Prerequisites
Single Server Hardware Requirements
Shown below are the mandatory prerequisites for installation.
Hardware Requirements
-
In the case of Single Server Deployment, We would be required 1 server with the following specs
-
In the case of Redundant deployment, 2 servers with the same specs are required.
|
Item |
Recommended |
Notes |
|---|---|---|
|
CPU |
4 vCPU |
|
|
Memory |
8 GB |
|
|
Disk Space |
100 GB |
The minimum disk space requirement is 50 GB. The recommendation is to account for transactional storage and logs. |
|
NICs |
1 |
Only one interface card is required per virtual machine |
Software Requirements
The following software must be installed on the server. These are required both for Single or Redundant deployment
|
Item |
Recommended |
Notes |
|---|---|---|
|
Operating System |
Windows Server 2019 Standard Edition (x64) |
Supported on these operating systems |
|
Database Server |
SQL Server 2014/2016/2019 Standard / Enterprise |
Database Engine is going to be MSSQLServer. Should be installed on a separate server if already installed should be accessible over the LAN |
|
Java |
1.8 |
|
|
Tomcat |
8.5 |
|
System Access Requirements
-
Administrative privileges (local system admin or domain administrator) are required to run the installation wizards.
-
For SQL Server-based setup, DB administrative privileges to create a new database are required to create an application database.
Compatible Browsers
|
Item |
Recommended |
Notes |
|---|---|---|
|
Firefox |
Quantum |
Tested with the mentioned version for compatibility but assumed to work with a recent version of Firefox. |
|
Chrome |
Latest |
Not tested, but assumed to work fine |
|
Internet Explorer |
IE 10.0 and above |
Tested |
Installation Prerequisite
Following are the essential prerequisites/components, which should be in place to make the gadget functional.
|
Component |
Detail |
|---|---|
|
Inbound VXML Script & DN |
First, the prerequisite is the inbound VXML where the first call of the customer should be landed, and a DN has to dial to reach the VXML server as per the architecture of the application. |
|
TRANSFER DN |
An ICM DN will be used to transfer the call to the Call Parking Application. The detail of ICM Scripts is mentioned here |
|
JDK (Java) Installation
|
We need to install the JDK 1.8 on all the backend deployment servers. Follow this link to install JDK 1.8. |
|
Tomcat Installation |
We need to install the tomcat 8.5 on all the backend deployment servers. Please follow this link to install the tomcat 8.5. |
Deployment Instructions
Database setup
The call parking application currently supports Microsoft SQL Server 2014/2016/2019. And while installing the SQL server for the Call Parking application database, keep the collation as “SQL_Latin1_General_CP1_CI_AS” to avoid explicit conversion for the reporting.
Microsoft SQL Server
If SQL Server isn’t available on the LAN, download Microsoft SQL Server and follow the installation instructions to install the database server. Once the database engine is installed perform the below steps
-
Create SQL database and user following the procedure mentioned in this doc.
-
Create the tables by following the doc.
-
Enable the SQL Server Browser window service
-
Enable the SQL Server Agent window service
-
Enable TCP/IP Connection
Goto SQL Server configuration manager-
Click on SQL Network configuration
-
Open Protocol for MSSQLSERVERSQLEXPRESS
-
Select the TCP/IP option
-
Right-click on it
-
Click on Enable option
-
Restart the SQL Server service from window services
-
Backend Deployment
Follow the steps mentioned below if the call parking application is being installed for the very first time on the particular server.
-
Download the backend war file from here.
-
Place the war file on the following path of the tomcat server
C:\Program Files (x86)\Apache Software Foundation\Tomcat 8.5\webapps -
Start the tomcat server, it will create a folder named "callparkgadget" on the same path as in point 2.
-
Make the following edits and restart the tomcat server:
-
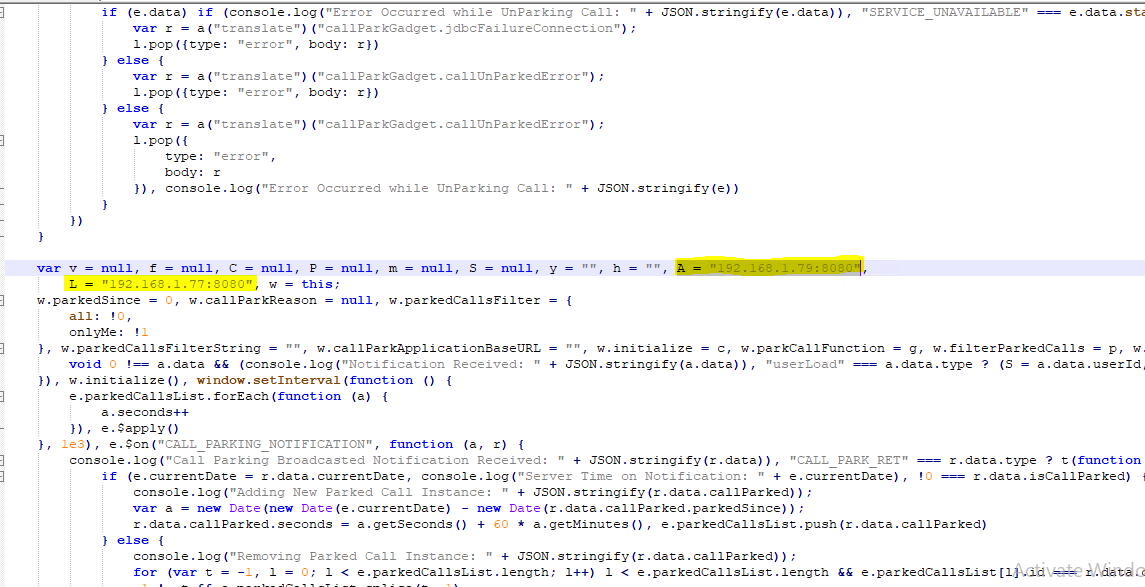
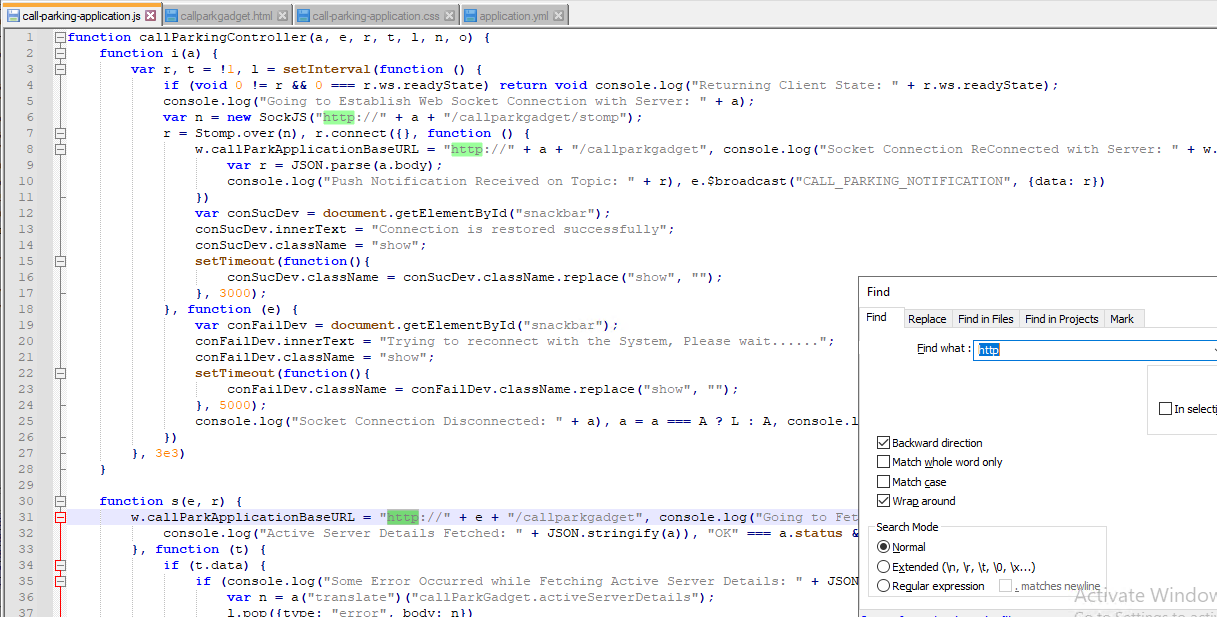
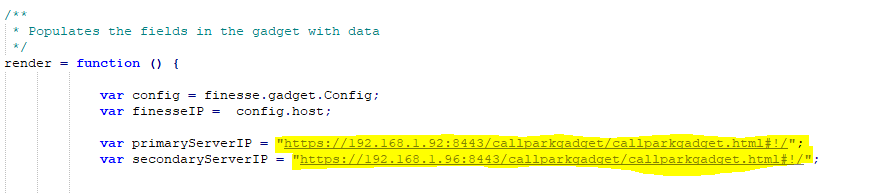
Open the "call-parking-application.js" on the following path and change the primary and secondary ip and port for the backend as shown in the figure:
Path: C:\Program Files (x86)\Apache Software Foundation\Tomcat 8.5\webapps\callparkgadget\scripts
-
If you are running an application over HTTPS protocol then make sure that “http://” should be replaced with “https://” throughout the file.
-
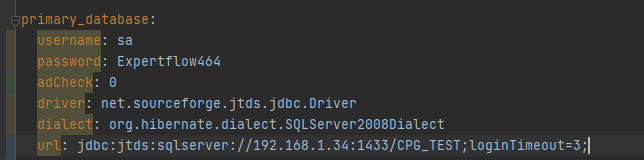
Open the "application.yml" on the following path and change the IP and port against variable serverDetails with the actual IP and port on which the backend is deployed on.
-
Change the DB credentials under primary_database (user, password), update the URL with the correct IP of the DB server and name of the database eg. CPG_TEST to CPG.
File Path: C:\Program Files (x86)\Apache Software Foundation\Tomcat 8.5\webapps\callparkgadget\WEB-INF\classes
-
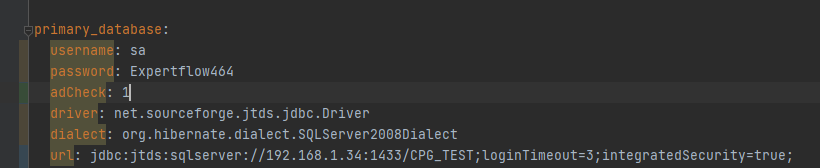
For AD authentication, set the configurations as follow:
-
If your gadget is running on HTTP protocol, you need to enable mixed content on your browser. Follow this to enable.
-
If your gadget is running on HTTPS, you need to accept the security exceptions on your browser. Follow this.
-
Note
If u are using an AD connection, kindly make sure to place the ntlmauth.dll file inside the bin folder of jdk!
Path: C:\Program Files\Java\jdk1.8.0_291\bin
Restart the Tomcat Service
After changing the database and frontend application configurations, restart the tomcat service.
Test the Backend
To test the successful deployment, hit the following URL in the browser. Make sure the IP and the port are correct!
http://ip:port/callparkgadget/callparkgadget.html#!/
In the case of HTTPS, the above link would be like this:
https://ip:port/callparkgadget/callparkgadget.html#!/
In case of success following page should be loaded:
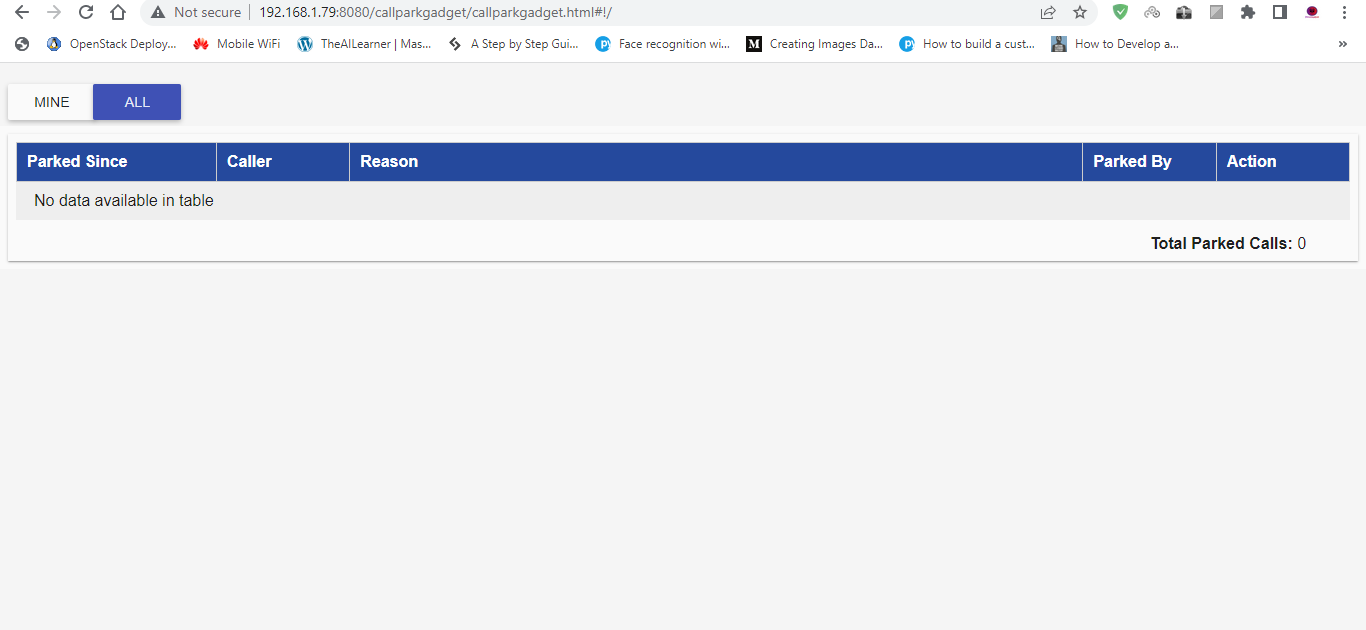
Deploy Finesse Gadget
To deploy the finesse gadget, follow these steps:
1. Download the files from here (CallParkingGadget)
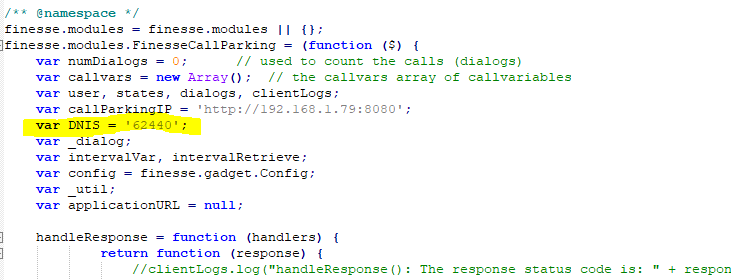
2. Open the CallParking.js file and change the call parking server IP highlighted in the screenshot
3. Find the DN in “CallParking.js” file and replace the DN number where you want to transfer the call while parking. (DN will be the same as mentioned in the above heading "OutBound VXML Script and DN").
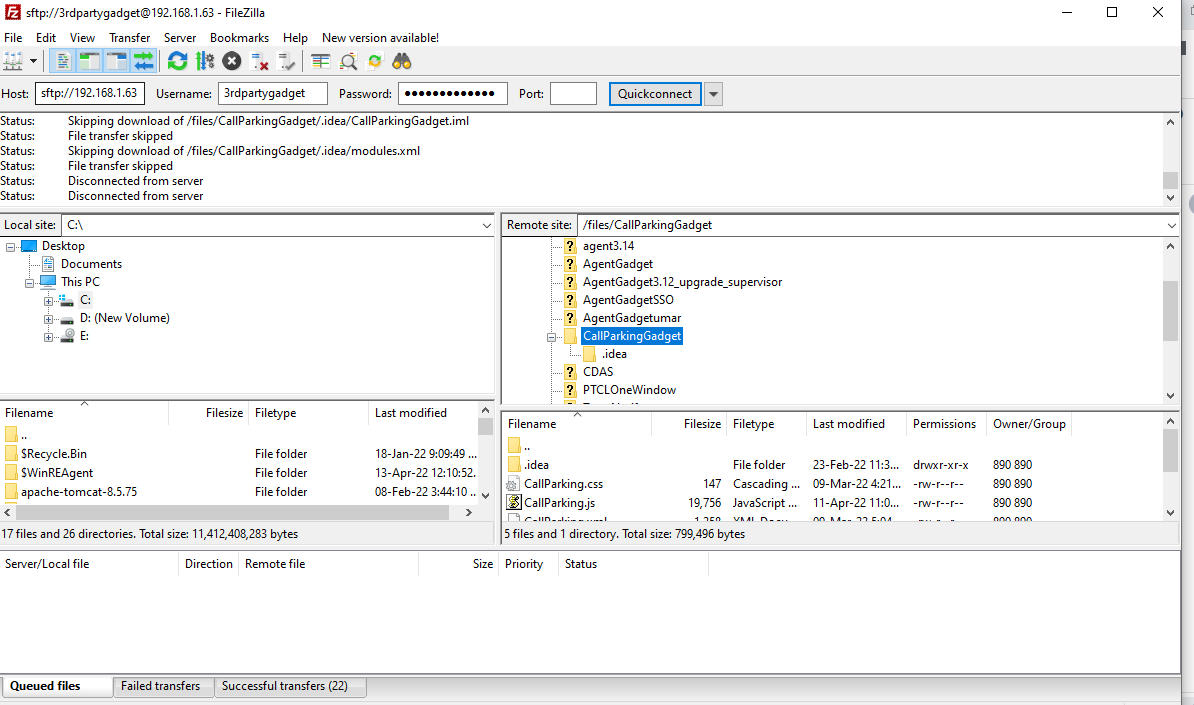
4. Upload all these files via Filezilla on the configured path for finesse.
Adding Gadget into the Finesse
In order to add gadgets to finesse we will update the Finesse layout to point to the new gadget. Do the following steps to do so!
-
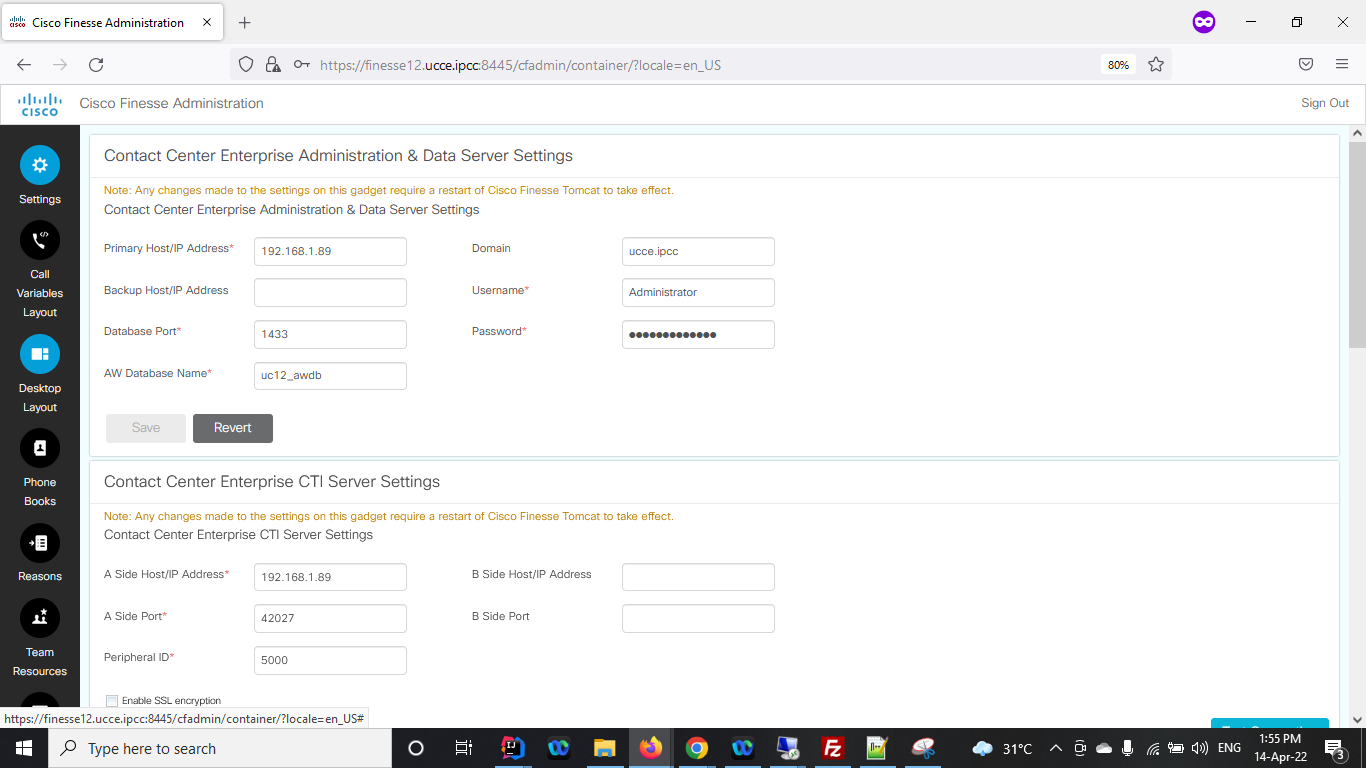
In our case, load the Finesse administration by going to: https://finesse12.ucce.ipcc:8445/cfadmin/
-
Provide the following user and password.
-
Username: administrator
-
Password: **************
-
-
After successful login, the following screen will be shown:
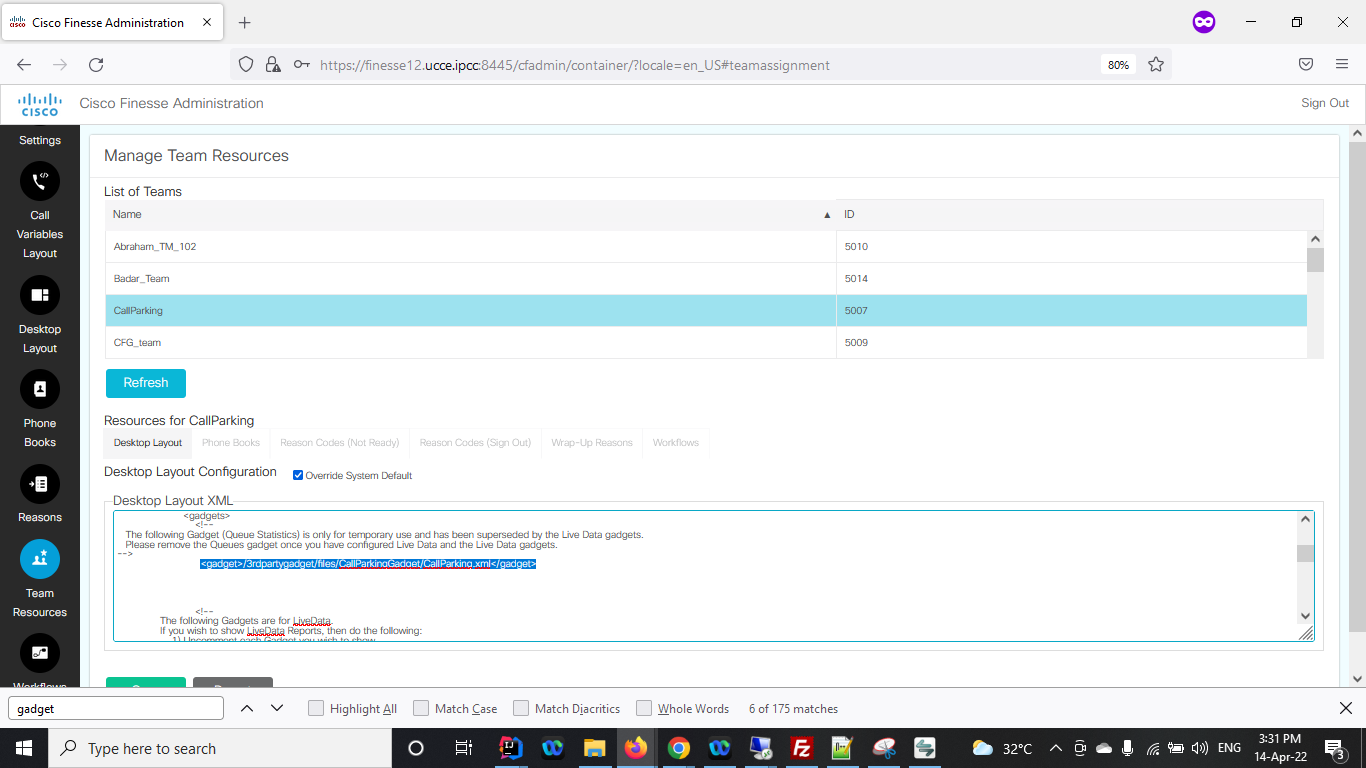
Go to the "Teams Resources" Tab and upload the gadget to the required Team. In our case, for example, "CallParking" and add the following line in the "<gadgets>" tag.
<gadget>/3rdpartygadget/files/CallParkingGadget/CallParking.xml</gadget>
-
You can add this gadget to any finesse tab, like Home, My History or you can create even a custom tab.
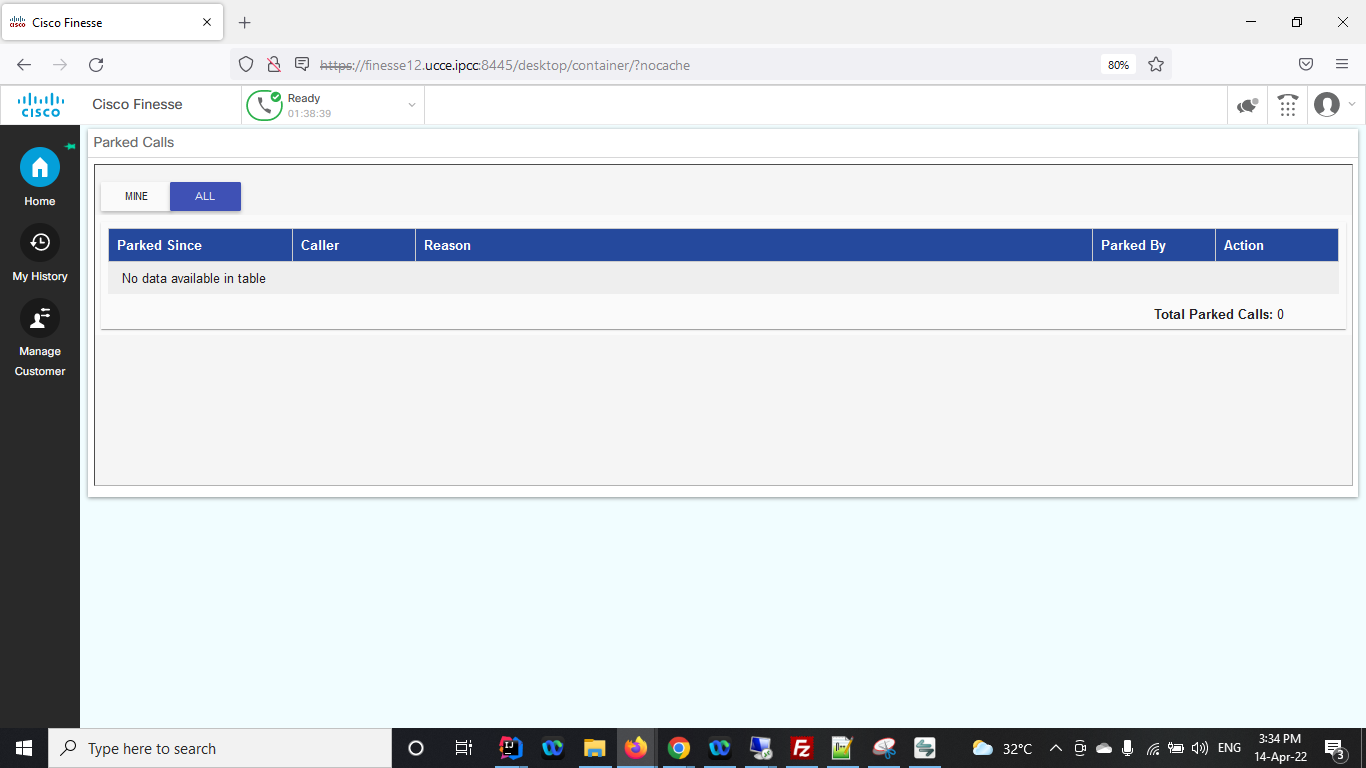
4. Click save and logged into the agent configured for the call parking via the link https://<ip>:8445/desktop/container/?nocache.
5. You must see the gadget in the finesse like below.
INFO
-
If you are running backend application over HTTP, then please enable Mix content Setting
-
If Application is running over HTTPs,with self-signed certificate please accept the certificate first and then refresh the finesse
Setup VXML Application
Following are the steps to deploy the VXML application:
-
Download the VXML application, classes, and libraries from here (VXMLApp.zip)
-
Extract the folder - you can see the folders in it.
-
Open the lib folder and place all the files inside it at vxml server (C:\Cisco\CVP\VXMLServer\Tomcat\lib)
-
Place the classes files at vxml server (C:\Cisco\CVP\VXMLServer\common\classes\com\ef)
-
Create the file “ActiveServer.txt” in C\EF and add primary server ip in it
-
Copy the folder “CallParking” and place it at C:\Cisco\CVP\VXMLServer\applications
-
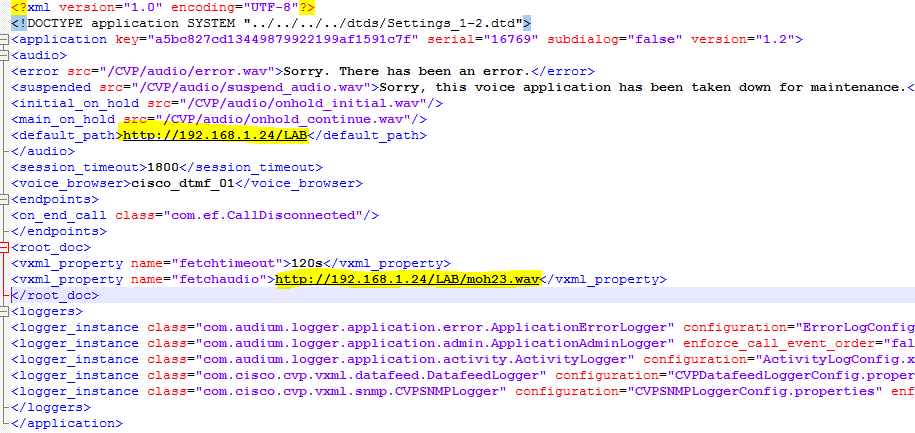
Open the folder (C:\Cisco\CVP\VXMLServer\applications\CallParkingNew\data\application\settings.xml) and add the media server name
-
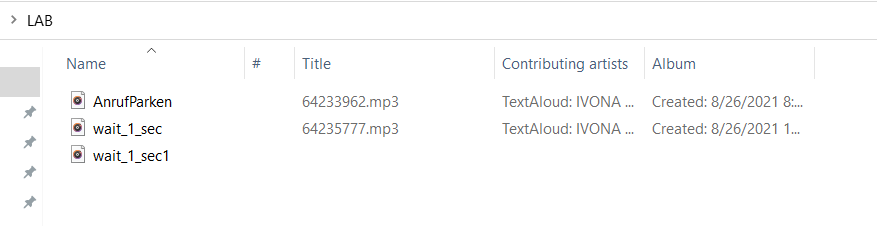
Download the media files from here.
-
Place the files at the media server location
-
Open the folder C:\Cisco\CVP\VXMLServer\applications\CallParkingNew\admin and double click on deployApp.bat write “y” and press enter.
-
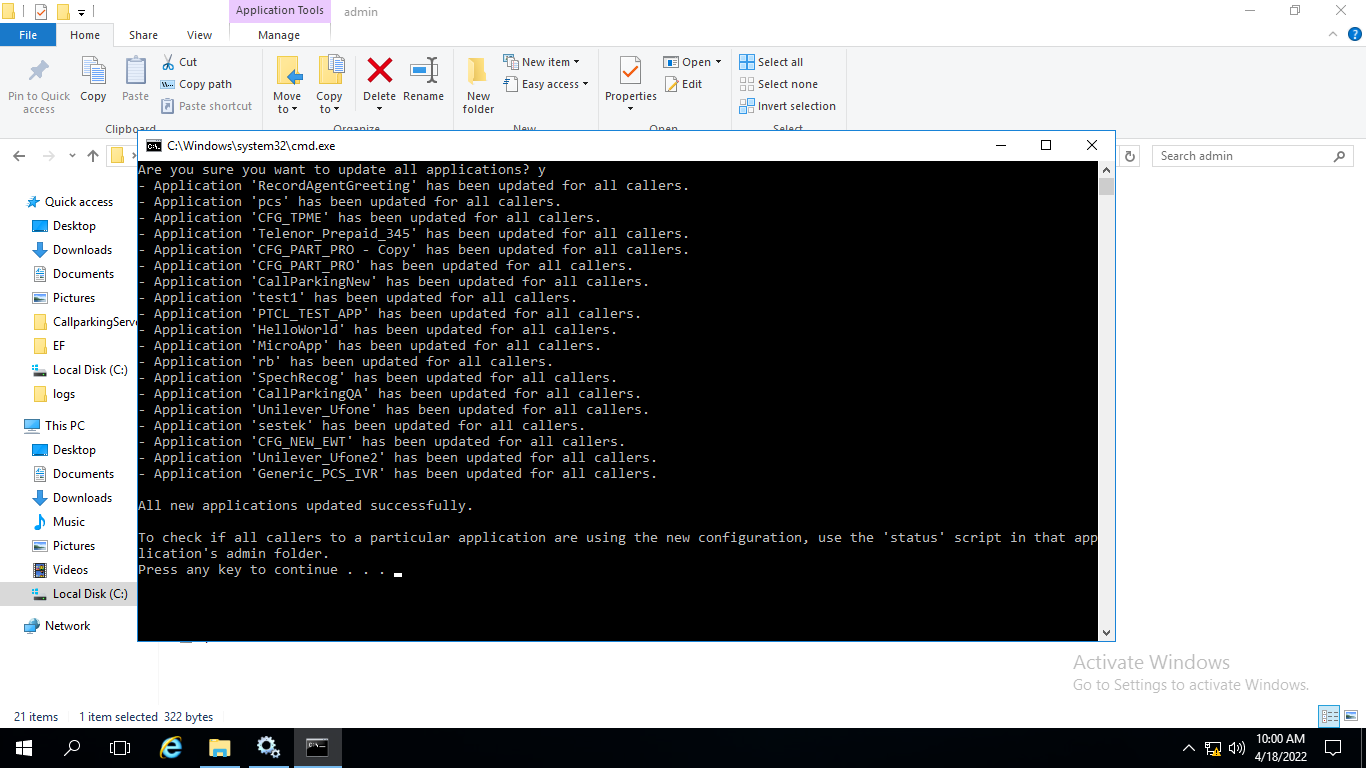
After all the above steps, you need to update all apps and the classes on the VXML. Follow the following screenshots in sequence to do so.
-
Go to the pat C:\Cisco\CVP\VXMLServer\admin and open the file updateAllApps.bat. And command line window will open. Press y and enter. It will update the apps.
-
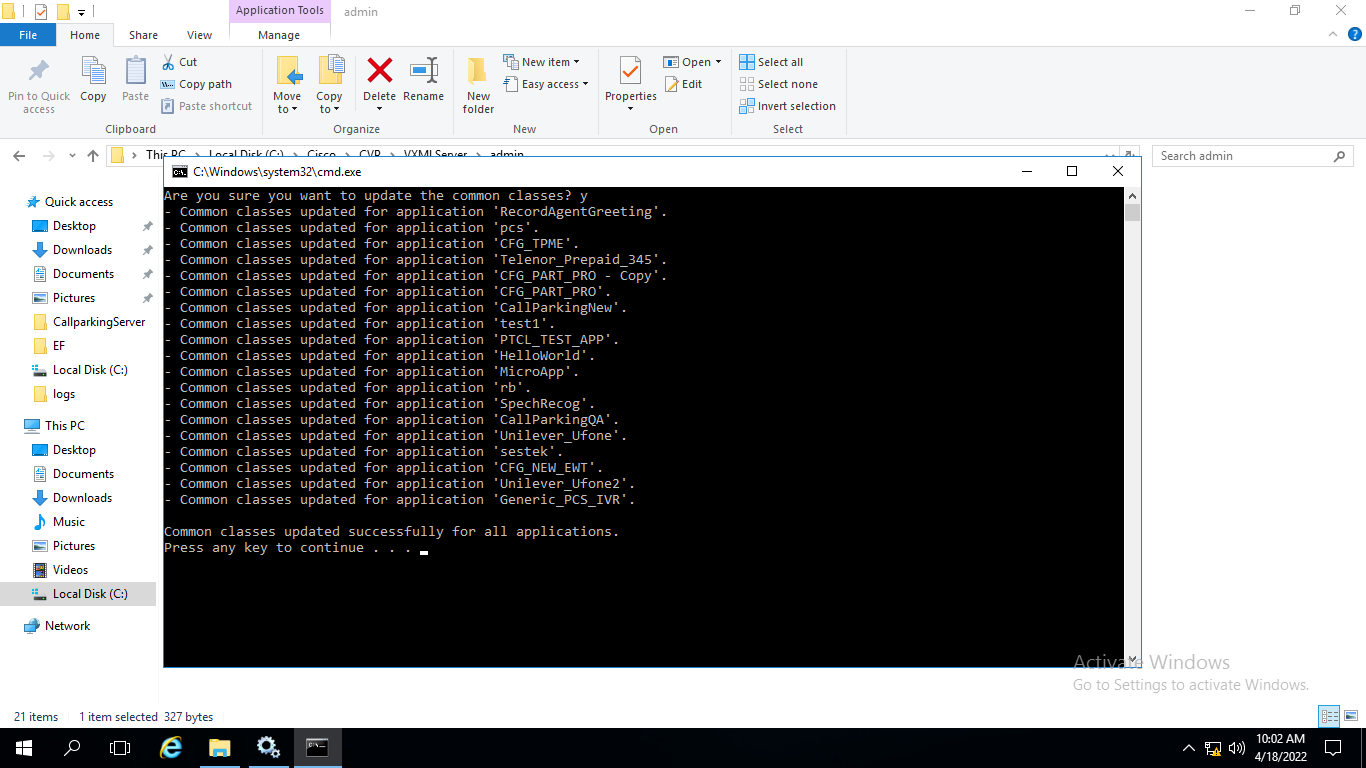
Now open the file updateCommonClasses.bat. Press y and enter. It will update all the classes and libs.
-
This step only needs to be done in case you have added/changed lib files!
-
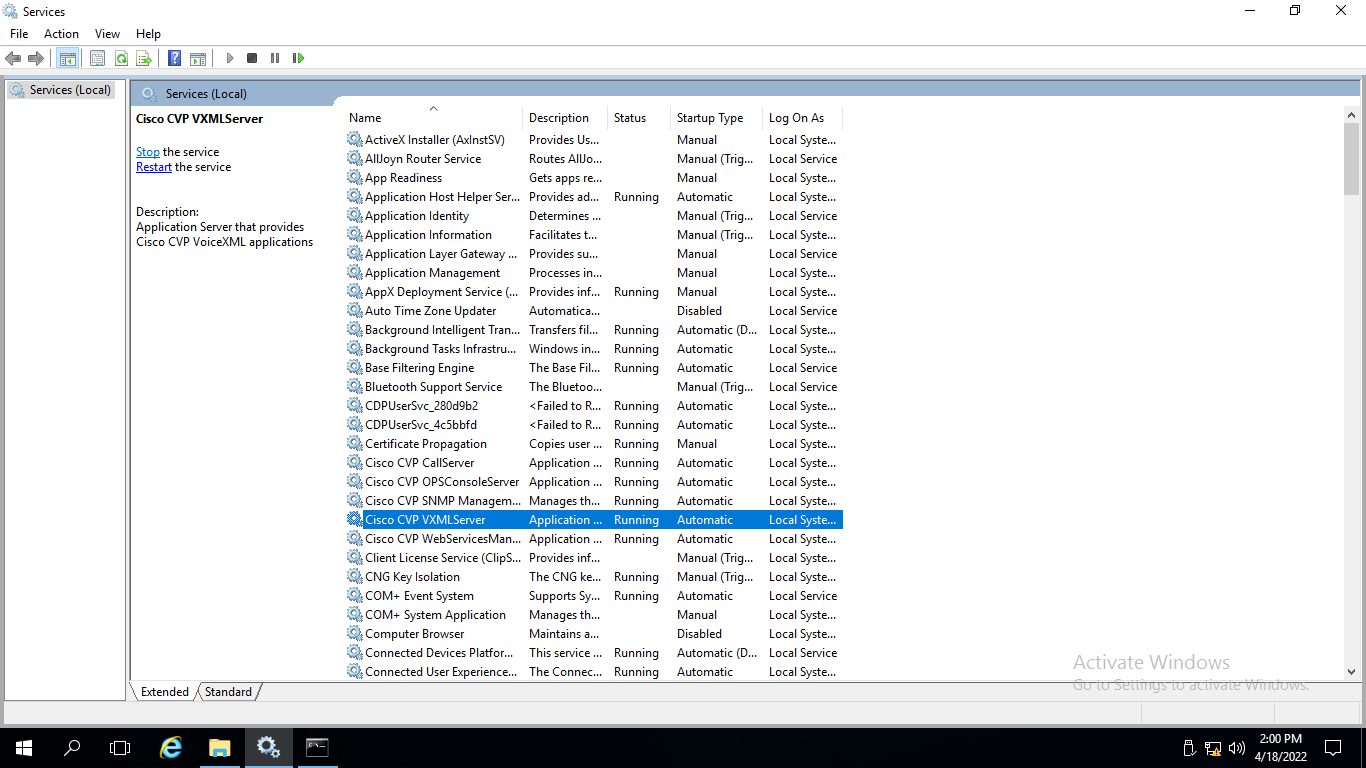
Open the services from the start menu!
-
Here restart the VXML server to make the changes effective wrt to libs
-
-
ICM Scripts
Call parking gadget is dependent on the ICM script to park and unpark a call.
Following is the ICM call flow
-
The call comes on ICM when the agent presses the call park button.
-
ICM is configured with DN which is associated with call type and script.
-
In ICM Script VXML application is being called to implement call parking logic.
-
VXML Application responds back with AgentID when the agent presses the unpark button from the finesse interface.
-
ICM script is configured with Queue to agent node to Queue the call for a particular agent.
Scripting considerations:
-
The queue to agent cross node should be configured to route the call back to the call parking application.
-
Cancel Queue nodes should be used if a call is required to park again once queued for an agent.
-
The agent should be part of the Enterprise Skill Group configured for Queue to Agent node.
Troubleshooting/Limitations
|
Issue |
Solution |
|---|---|
|
Call parking application is not starting, tables are not creating in db, database engine is not allowing db connection |
Check SQL Server Browser service is enabled and running. |
Please contact Expertflow support at helpdesk@expertflow.com for further assistance.