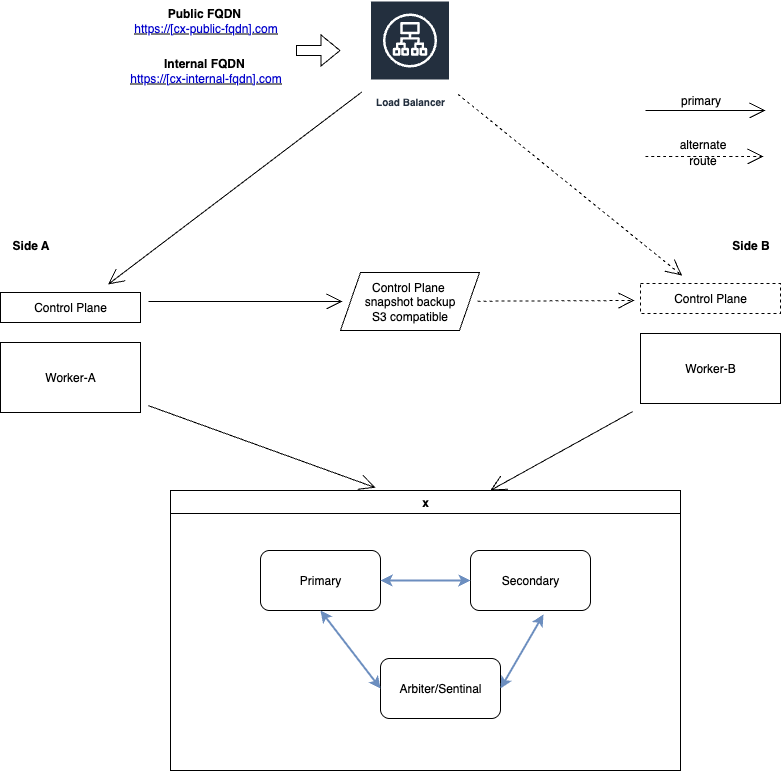
This Kubernetes deployment requires a single Control Plane node while workload is distributed across multiple Worker nodes across sites. The solution continues to work even if the Control Plane is down. However, Control Plane functions such as rescheduling of the workload cannot be performed during the outage of the Control Plane.
Suitable when
-
Only two physical sites are available in the infrastructure for the Kubernetes deployment.
-
High availability of workload is needed and a temporary failure of Control Plane is acceptable.
Limitations
-
In the case of the Control Plane failure, a manual intervention will be required to re-bootstrap the control-plane from last known good backup.
-
If a site hosting Control Plane and one or more Worker nodes are down then the solution may be partially or completely down. To overcome this limitation, use CX High Availability.
What-if Scenarios
See the What if scenarios below to learn more about the behaviour of this cluster.
|
What if |
Then |
|---|---|
|
A POD or the service running inside the POD is down |
The POD/service will be rescheduled on any of the available worker node(s). |
|
A worker-node is down |
The workload is rescheduled to other worker node(s). Depending upon the workload this may take 5-15 minutes. Otherwise, some features of the application may fail to work. |
|
The control-plane node is down |
Solution continues to operate normal, while no configurational management is possible. If a worker node is also down while the control plane is down, the workload cannot be rescheduled. |
Deployment Prerequisites
-
At least three nodes (typically virtual machines) - one for Control Plane and two or more for worker nodes.
-
One free additional IP for load-balancer.
-
Full network connectivity between all nodes
-
Provide a cloud-native storage such as NFS, VSAN, or any CNCF certified cloud-native storage accessible at both sites.
-
Provide an S3 compatible storage for backup of the Control Plane node.
-
Minimum resource requirement for each node is mentioned below:
|
Nodes / VMs |
|
vCPU |
vRAM |
vDisk (GiB) |
Comments |
|---|---|---|---|---|---|
|
CP |
Control Plane |
2 |
4 |
50 |
See RKE2 installation requirements for hardware sizing, the underlying operating system, and the networking requirements. |
|
CX-A |
CX workload |
2 |
4 |
250 |
The worker node to schedule workload of CX services that can handle the workload of up to 100 concurrent agents or 300 concurrent conversations. |
|
CX-B |
CX workload |
2 |
4 |
250 |
|
|
Report |
Report workload |
4 |
8 |
250 |
This for Apache Superset. This workload may also be shared with other worker nodes (CX-A or CX-B). |
|
ETL |
ETL services |
2 |
4 |
250 |
Expertflow ETL consisting of Apache AirFlow services. This workload may also be shared with other worker nodes (CX-A or CX-B). |
Installation Steps
This guide covers steps to install a single control-plane multi-worker deployment of an RKE2 cluster.
Step-1 Install RKE2 Control-plane
Install RKE2 control-plane RKE2 Control plane Deployment
Step-2 Install metallb
For the Installation of MetalLB you will need 1 free additional IP or an IP Pool to assign to this load balancer as mentioned in prerequisites
kubectl apply -f https://raw.githubusercontent.com/metallb/metallb/v0.14.3/config/manifests/metallb-native.yaml
Add additional IP pool for metallb
cat <<"EOF" | kubectl apply -f -
apiVersion: metallb.io/v1beta1
kind: IPAddressPool
metadata:
  name: first-pool
  namespace: metallb-system
spec:
  addresses:
  - <Additional IP>/32

EOF
Add Layer2 configuration for Metallb
cat <<"EOF"| kubectl apply -f -
apiVersion: metallb.io/v1beta1
kind: L2Advertisement
metadata:
  name: example
  namespace: metallb-system
spec:
  ipAddressPools:
  - first-pool
  nodeSelectors:
  - matchLabels:
      kubernetes.io/hostname: <Worker node hostname>
  - matchLabels:
      kubernetes.io/hostname:  <Second worker node hostname>
EOF
Step- 3 deploy nginx-ingress-controller
download the ingress-nginx-controller helm chart
helm pull --untar oci://registry-1.docker.io/bitnamicharts/nginx-ingress-controller
cd nginx-ingress-controller
create values file for the nginx-ingress-controller
cat <<EOF |tee -a nginx-values.yaml
initContainers:
  - name: ef-set-sysctl
    image: busybox
    securityContext:
      privileged: true
    command:
    - sh
    - -c
    - |
      sysctl -w net.core.somaxconn=65535
      sysctl -w net.ipv4.ip_local_port_range="1024 65535"
config:
  use-forwarded-headers: "true"
  keep-alive-requests: "10000"
  upstream-keepalive-requests: "1000"
  worker-processes: "auto"
  max-worker-connections: "65535"
  use-gzip: "true"
allowSnippetAnnotations: true
replicaCount: 3
EOF
deploy the nginx-ingress-controller using
helm upgrade --install --namespace ingress-nginx --create-namespace --values ./nginx-values.yaml nginx-ingress .
Step-4 Get Control-plane token
On the control-plane node, run the following command to get the control-plane token to join worker(s) with this control-plane.
cat /var/lib/rancher/rke2/server/node-token
# It will display the node-token as something like the following
K10e2bfc647bbf0839a7997cdcbee8754b3cd841e85e4250686161893f2b139c7d8::server:a342ef5189711287fb48f05c05346b89
Step-5 Add Worker(s)
Follow the Deployment Prerequisites from RKE2 Control plane Deployment for each worker node before deployment i.e disable firewall on all worker nodes.
On each worker node,
-
Run the following command to install RKE2 agent on the worker.
Bashcurl -sfL https://get.rke2.io | INSTALL_RKE2_TYPE="agent" sh - -
Enable the
rke2-agentservice by using the following command.Bashsystemctl enable rke2-agent.service -
Create a directory by running the following commands.
Bashmkdir -p /etc/rancher/rke2/ -
Add/edit
/etc/rancher/rke2/config.yamland update the following fields.-
<Control-Plane-IP>This is the IP for the control-plane node. -
<Control-Plane-TOKEN>This is the token which can be extracted from first control-plane by runningcat /var/lib/rancher/rke2/server/node-tokenBashserver: https://<Control-Plane-IP>:9345 token: <Control-Plane-TOKEN>
-
-
Start the service by using follow command.
Bashsystemctl start rke2-agent.service
Step 6: Verify
On the control-plane node run the following command to verify that the worker(s) have been added.
kubectl get nodes -o wide
Sample output:-

Step 7: Tainting control-plane
Taint control-plane Tainting a Control Plane Node
Step 8: Draining control-plane
On control-plane node, run the following command to evict pods from control-plane.
kubectl drain <control-plane hostname> --delete-emptydir-data --ignore-daemonsets
Limitation
-
After a node goes down if pod remain terminating state you need to force full delete all the terminating pods after 5 mins by using the following command.
for p in $(kubectl get pods -n ef-external | grep Terminating | awk '{print $1}'); do kubectl delete pod -n ef-external $p --grace-period=0 --force;done
for p in $(kubectl get pods -n expertflow | grep Terminating | awk '{print $1}'); do kubectl delete pod -n expertflow $p --grace-period=0 --force;done
for p in $(kubectl get pods -n monitoring | grep Terminating | awk '{print $1}'); do kubectl delete pod -n monitoring $p --grace-period=0 --force;done
for p in $(kubectl get pods -n kube-system | grep Terminating | awk '{print $1}'); do kubectl delete pod -n kube-system $p --grace-period=0 --force;done
Note: Do not delete terminating pods from “nfs-client“ and “ingress-nginx“ namespaces. It may lead to potential failure.
Next Steps
Choose Storage
Use a cloud native storage for a Worker HA setup. For available storage options, see Storage Solution - Getting Started
For multi-node (Worker HA) you can use local storage with node affinity. But, this will impose a restriction on worker nodes that a workload will have to be provisioned from the same node it was setup initially.
Setup CX on Kubernetes
To deploy Expertflow CX on this node, see CX Deployment on Kubernetes