Allows CX agents to consult, transfer an active conversation, or add agents to the conference, and send Whisper Message.
Consult a Conversation
Agents can consult an ongoing conversation with another agent if think the other agent can assist them in answering the customer's query in a better way.
Disclaimer
-
There can be only one ASSISTANT participant at any given time in a conversation
-
If only a chat session is active in a conversation, the consult will only be active for chat.
-
Direct transfer or direct conference features are disabled once there is already an active consult session.
-
The KeyCloak permissions must be updated with the provided config files, for the agent or anyone else in that role, to initiate consult requests.
-
Direct transfer or direct conference features are disabled once there is already an active consult session.
A consult can be initiated for a conversation in two ways:
-
Queue Consult
-
Agent Consult
Queue Consult
Agents can initiate a consult request in an active conversation on the same or another queue. The system looks for a suitable agent to join the conversation to assist the primary agent.
To Consult on the Queue
Follow these steps to consult
-
Click
.png?cb=2dc456b5bc112bc4e8f3c98e2a4bc5f6)
-
Queue Name (department name or any queue name)
-
Number of agents available (ready + active) in the queue. This helps the agent decide whether the consult request should be started on the selected queue or not (based on the available agents count).
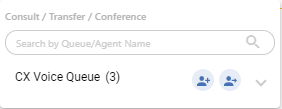
Queue Consult
-
-
Choose a queue from the list and click the Consult option

-
A queue consult request can be placed even if no active agent is available on the queue.
-
At this stage, the request is placed in the queue. If an agent becomes available, the request is routed to that available agent.
-
If no agent becomes available, the request is removed from the queue after the TTL timer expires, The primary agent gets a notification ‘No Agent Available’ in the interaction history.
-
If the agent initiates another request and a request is already in process, the user will be notified with an error from the system.

-
-
Upon successful request, the Queue Consult dialog box appears (for Chat only). The agent can optionally typea a message for the receiving/secondary agent who is going to join the conversation. Click the Consult Request button to initiate the request.

-
The agent will see a notification indicating that a "Queue Consult Request has been placed" in the interaction history.
-
The request will be parked on priority. The system will look for an available agent from the queue to route the request to an agent.
-
If the other agent does not accept the request, the system keeps on looking for another agent for some time.
-
If no agent is found,
-
The request is timed out.
-
The agent will see a notification, "No Agent Available".
-
Writing a note while initiating a consult request is an optional thing for agents to describe something about the conversation to the consulted agent.
In case, an agent receives a consult request from another agent,
-
A consult request notification will be received with the following information:
-
Channel icon via which the request is placed (WhatsApp, Web, Facebook, etc.)
-
A button to Accept the request.
-
Name of the Agent in case of a Chat session OR the agent extension in case of a Voice session.
-
The optional notes are entered by the agent while the consult request is ringing on the request agent (Only available for Chat).

-
-
Click the Accept button to accept the request.
-
The primary agent will also be notified that another agent has joined the conversation as an Assistant.
Agent Consult
Agents can consult directly with another agent
Follow these steps to transfer via named agent
-
Click the Agent Assistance button
-
Queue Name (department name or any queue name)
-
Number of agents available (ready + active) in the queue. This helps the agent decide whether the consult request should be started on the selected queue or not (based on the available agents count).
-
-
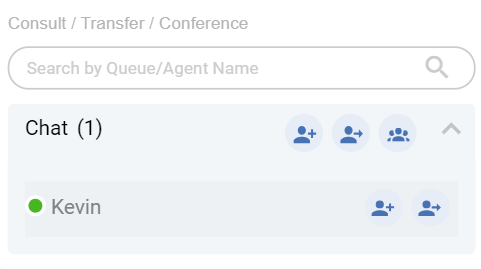
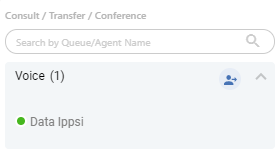
Expand a queue to view the list of agents available on that particular queue.
-
Choose an agent from the list and click the Consult button
-
The agent will see a notification indicating that "Agent Consult Request has been placed" in the interaction history.
-
The consult request will be routed to the selected agent based on their availability.
-
On a successful request, the requested agent will see an incoming request notification with the following information:
-
Channel icon via which the request is placed (CX Voice).
-
A button to Accept the request.
-
Name of the customer, the name of the agent in case of a Chat session OR the agent extension in case of a Voice session.
-
The optional notes are entered by the agent while the consult request is ringing on the requested agent (Only available for Chat).
-
-
Click the Accept button to accept the consult request.
Limitations
-
The optional note is only available for chat.
-
If a consult is already in progress on chat for a conversation, and the Voice session gets active afterward, the consult will only be limited to chat.
-
If any changes are done with permissions on Keycloak, the agent or anyone else in that role needs to re-login for the changes to be reflected.
To Consult Transfer a Conversation
Agents can transfer an ongoing conversation to the consulted agent to assist him answer the customer's query.
Disclaimer
-
Consult Transfer for a voice session should only be done if the consulted agent is also part of the voice call/session.
-
The primary agent can only initiate the transfer request.
Agents can initiate a consult transfer request in the following ways based on the active channels.
Consult Transfer For Chat
Follow these steps to consult transfer
-
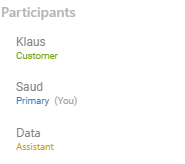
Click the participants list button

-
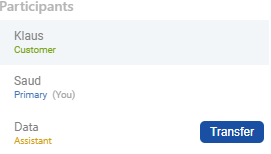
The agent will see a dropdown containing the participant's list in the ongoing conversation.
-
Check for the participant with the ASSISTANT role, and click the Transfer button to initiate the transfer request to the consulted agent.
-
A notification message with the text "Consult transfer request has been placed" is added in the interaction history.
-
On a successful transfer,
-
The Primary agent is unsubscribed from the conversation and a notification of the ‘agent left’ appears in the interaction history.
-
The ASSISTANT agent now becomes the PRIMARY agent, and can directly interact with the customer.
-
The customer also sees the notification that the other agent has joined (in case of Web).
-
Consult Transfer For CX Voice
Follow these steps to consult transfer
In case of an active consult call, the PRIMARY agent can view the consult transfer option on the CTI toolbar
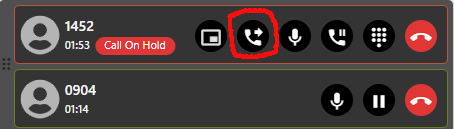
-
Click the consult transfer button

-
Upon a successful request,
-
A notification message "Consult transfer request has been placed" appears in the interaction history.
-
The Primary agent is now unsubscribed from the conversation and the ‘agent left’ notification appears in the interaction history.
-
The ASSISTANT agent has now become the PRIMARY agent, and can directly interact with the customer.
-
Limitations
-
Consult Transfer in not supported for outbound calls.
Transfer a Conversation
Agents can transfer an ongoing conversation to another agent if think that the other agent will better answer the customer's query. A conversation can be transferred in two ways:
-
Direct Queue Transfer
-
Direct Agent Transfer
Direct Queue Transfer
Agents can transfer a conversation to a queue. The system looks for a suitable agent to join the conversation.
To Transfer to the queue
Follow these steps to transfer
-
Click
-
Queue Name (department name or any queue name)
-
Number of agents available (ready + active) in the queue. This helps the agent to decide whether this conversation should be transferred to the selected queue or not (based on the available agents count).
-
-
Choose a queue from the list and select the Transfer option.
-
A queue transfer request can be placed even if no active agent is available on the queue.
-
Upon request, the request is placed in the queue. If an agent becomes available, the request is routed to that agent.
-
If no agent becomes available, the request is removed from the queue after the TTL timer expires, No Agent Available is published and a notification is shown in the interaction history.
-
If a user initiates another request and a request is already in process, the user will be notified with an error from the system.
-
-
In the Message box in the Transfer to Queue dialog box, the agent can optionally type a message for the receiving agent. This message is then received by the other agent who is going to join the conversation. Click the Transfer button to transfer the conversation.
-
The agent will see two notifications. One is a notification that "Conversation is closed due to CHAT TRANSFERRED" and another toaster notification "Transfer request placed successfully"
-
The chat will be parked in the transferred queue on priority. The system will look for an available agent from the queue to route the conversation to an agent.
-
The customer sees a notification, "Your request is being transferred to <queue-name>, please wait!", followed by another notification that, "Agent1 has left".
-
If the other agent does not accept the request, the system keeps on looking for another agent for some time.
-
If no agent is found,
-
The request is timed out.
-
The customer will see a notification, "No agents were available".
-
Writing a note while transferring a request is an option thing for agents to describe something about the conversation to the transferee.
In case, an agent receives a transferred request from another agent,
-
A transfer request notification will be received with the following information:
-
Channel icon via which the request is placed (WhatsApp, Web, Facebook, etc.)
-
A button to Accept the request
-
Name of the customer if identified
-
The optional notes are entered by the agent while transferring the conversation. (See point #3 above.)
-
-
Click the Accept button to accept the conversation
-
The customer will also be notified that 'You have joined the conversation'.
Transfer A Conversation To A Queue
Direct Agent Transfer
Agents can transfer a conversation to another agent
Follow these steps to transfer a conversation to an agent
-
Click the Agent Assistance button
-
Queue Name (department name or any queue name)
-
Number of agents available (ready + active) in the queue. This helps the agent decide whether this conversation should be transferred to the selected queue or not (based on the available agents count).
-
-
Expand a queue to view the list of agents available on that particular queue.
-
Choose an agent from the list and select the Transfer button

-
The agent will see two notifications. One is a notification that "Agent transfer request has been placed" and another toaster notification "Transfer request placed successfully".
-
The conversation will be transferred to the selected agent based on his availability.
-
On a successful transfer, the requested agent will see an incoming request notification with the following information:
-
Channel icon via which the request is placed (CX Voice).
-
A button to Accept the request.
-
Name of the customer.
-
Number of the customer.
-
-
Click the Accept button to accept the conversation
Add Agents to Conference
This allows agents to add one or more agents to the conference with the customer. The recent implementation allows the customer to place a request on the queue even if there is no agent available on the queue.
When an agent is added to the conference, the conversation becomes a conferenced conversation. All newly added agents in the conference have the same level of rights and permissions as the first primary agent in the conversation. This also implies that if the first agent leaves the conversation, the conference will continue with the agents in the conversation.
Follow the steps mention below
-
Click
-
Queue Name
-
Number of agents available (ready + active) in the queue
-
-
Choose a queue name from the list and hit the Queue Conference button.
-
A queue conference request can be placed even if no active agent is available on the queue.
-
Upon request, the request is placed in the queue. If an agent becomes available, the request is routed to that agent.
-
If no agent becomes available, the request is removed from the queue after the TTL timer expires, No Agent Available is published and a notification is shown in the interaction history.
-
If a user initiates another request and a request is already in process, the user will be notified with an error from the system
-
-
A Message box will appear in the Conference dialog box.
-
Type a message for the receiving agent. This is an optional message. This message is then received by the other agent who is going to join the conversation.
-
Then, click the Add to Conference button to make it a Conference Conversation
-
The system looks for an available agent to be added as a Primary Participant to the conversation The system will route the conversation to Agent2
-
The first agent can see a toaster notification that "a conference request has been placed successfully."
-
You will see a notification in the Activity Timeline that the "Conference request has been successfully placed" and on the other hand
-
An incoming conference request notification will be received to Agent2 (receiving agent) with the following information:
-
A special indication that this is a Conference Chat request from Agent1
-
Name of the identified/linked customer (if done by Agent)
-
Note entered by Agent1 (if available) before placing the Conference request
-
A button to Accept the request
-
-
By clicking the Accept button, Agent2 joins the conversation as the Primary Participant.
-
Agent1 sees the notification that A2 has joined
-
The Customer sees the same notifications in the Conversation history on the Customer side
-
Agent2 can send/receive Whisper messages with Agent1.
-
Agent2 can also see all the message exchanges in the current conversation.
-
Agent2 will see the Customer Profile and all the Media Channels, Active Sessions of the customer (based on the permissions) along with the Conversation Data and the past conversation history
-
Agent2 can perform other operations based on the Primary Participant permissions.
-
-
Agent 2 can leave the chat
-
-
-
All other conversation participants will see a notification, "<agent-names> left the conversation"
-
-
-
In case, Agent2 does not accept the request.
-
-
The system keeps on looking for another available agent from the selected queue until it finds one
-
-
-
No agents available
-
The request will be canceled.
-
Agent1 sees a notification in the Activity Timeline such as, "No agents were available to join the conference conversation"
-
Adding an Agent to Conference