Vault Deployment on Kubernetes
For a production-ready install, we suggest that the Vault Helm chart is installed in high availability (HA) mode.
This installs a StatefulSet of Vault server Pods with either Integrated Storage, or a Consul storage backend.
Vault Integrated Storage implements the Raft storage protocol and is commonly referred to as Raft in HashiCorp Vault Documentation. The Vault with Integrated Storage Reference Architecture requires 5 replicas.
Consul is a service mesh solution that launches with a key-value store. Vault requires a storage backend like Consul to manage its configuration and secrets when it is run in high-availability.
vault deployed with consul as backend storeage creates a default of 3 replicas in our StatefulSet for use with Consul Storage.
We will need a 3 node Kubernetes cluster at least.
The preferred storage backend is Hashicorp's Consul product which is the only backend that checks both the high availability and Hashicorp supported boxes. The reference architecture created by HashiCorp details how Vault can be implemented in a highly available manner using HashiCorp consul.
The fundamental difference between Vault's Integrated Storage and Consul is that the Integrated Storage stores everything on disk while Consul KV stores everything in its memory which impacts the host's RAM.
In this guide, we will demonstrate an HA mode installation with Integrated Storage.
cd cim-solution/kubernetes/vault/
kubectl apply -f tls/tls-ca.yaml
kubectl apply -f tls/tls-server-vault.yaml
kubectl apply -f tls/tls-server-client.yaml
There are two approaches for vault to be deployed. Both have different use case and different management of secret
Vault deployment with Injector alongside of VSO
Vault deployment with CSI
First approach is useful when you have to fully automate the secret injection by using vault secrets operator. VSO is a Kubernetes operator that syncs secrets between Vault and Kubernetes natively without requiring the users to learn details of Vault use. It has two kinds of implementation:
i. Vault Static Secret
ii. Vault dynamic Secrets
Second approach is by utilizing the Secrets Store CSI driver. https://secrets-store-csi-driver.sigs.k8s.io/ allows Kubernetes to mount multiple secrets, keys, and certs stored in enterprise-grade external secrets stores into their pods as a volume. Once the Volume is attached, the data in it is mounted into the container's file system.
1. Vault deployment with Injector
ci-integrated.yaml include all the modified configuration in order to install vault. We are going to render the vault chart with these values.
helm install vault vault/ -n vault --values vault/csi-integrated.yaml Warning: Vault should run in podAntiAffinity rules. Which means only one pod is allowed to be scheduled at on node. Integrated storage mode requires 5 replicas of vault pod spread across 5 nodes. In order to run these instance on smaller number of nods, we override the affinity in csi-integrated.yaml which is not recommended to do in production env. Vault should run on cluster with 5 nodes.
https://expertflow-docs.atlassian.net/wiki/x/eQCLDw
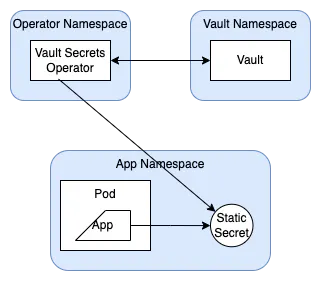
Vault Secrets Operator
The Vault Secrets Operator (VSO) allows Pods to consume Vault secrets and HCP Vault Secrets Apps natively from Kubernetes Secrets. The operator writes the source secret data directly to the destination Kubernetes Secret, ensuring that any changes made to the source are replicated to the destination over its lifetime. In this way, an application only needs to have access to the destination secret in order to make use of the secret data contained within.
Steps to deploy VSO
kubectl apply -f tls/ca-vso.yaml

helm upgrade --install vault-secrets-operator vault-secrets-operator/ -n vault --values vault-secrets-operator/vso-values.yaml
Enable dynamic secret injection for Postgresql
export POSTGRES_ADMIN_PASSWORD=$(kubectl get secret --namespace ef-external ef-postgresql -o jsonpath="{.data.postgres-password}" | base64 -d)kubectl run ef-postgresql-client --rm --tty -i --restart='Never' --namespace ef-external --image docker.io/bitnami/postgresql:14.5.0-debian-11-r21 --env="PGPASSWORD=$POSTGRES_ADMIN_PASSWORD" --command -- psql --host ef-postgresql -U postgres -d licenseManager -p 5432once inside postgres client, run below command to create vault user with superuser privileges.
create a role with user vault for the VSO
CREATE ROLE vault WITH SUPERUSER LOGIN ENCRYPTED PASSWORD 'vault';login inside the vault pod
kubectl -n vault exec -it vault-0 -- shvault loginNow enable the database secret engine
vault secrets enable databaseverify if the database secret engine is enabled
vault secrets listenable authentication with kubernetes
vault auth enable kubernetes


vault write auth/kubernetes/config \
token_reviewer_jwt="$(cat /var/run/secrets/kubernetes.io/serviceaccount/token)" \
kubernetes_host=https://${KUBERNETES_PORT_443_TCP_ADDR}:443 \
kubernetes_ca_cert=@/var/run/secrets/kubernetes.io/serviceaccount/ca.crt \
issuer="https://kubernetes.default.svc.cluster.local"
configure vault database secret engine to access postgres
vault write database/config/expertflow-apps \
plugin_name="postgresql-database-plugin" \
allowed_roles="expertflow-apps-role" \
connection_url="postgresql://{{username}}:{{password}}@ef-postgresql.ef-external.svc.cluster.local:5432/licenseManager" \
username="vault" \
password="vault"
create database role that would allow vault to create secrets
vault write database/roles/expertflow-apps-role \
    db_name="expertflow-apps" \
    creation_statements="CREATE ROLE \"{{name}}\" WITH LOGIN PASSWORD '{{password}}' VALID UNTIL '{{expiration}}'; \
        GRANT SELECT ON ALL TABLES IN SCHEMA public TO \"{{name}}\";" \
    default_ttl="1h" \
    max_ttl="24h"
after 24h, secrets will be rotated automatically. What it means the vault will request PostgreSQL to create new credentials and then will vault create the Kubernetes secrets from these credentials. Once Kubernetes secrets are created, the applications which are using these secrets will be restarted automatically.
test database credential
vault read database/creds/expertflow-apps-roleCreate a policy in vault to read database creds for the expertflow-apps-role
vault policy write expertflow-db-policy - <<EOF
path "database/creds/expertflow-apps-role" {
capabilities = ["read"]
}
EOF
Create a Kubernetes type role in vault to enable access to the secret
vault write auth/kubernetes/role/expertflow-role \
bound_service_account_names=default \
bound_service_account_namespaces=expertflow \
policies=default,expertflow-db-policy \
audience=vault \
ttl=24h
now apply the database-creds.yaml and vault-auth.yaml
kubectl apply -f vault-secrets-operator/database-creds.yaml
kubectl apply -f vault-secrets-operator/vault-auth.yaml
database-creds.yaml will create secret with the name of postgres in expertflow namespace. now we can use postgres secret in our deployment such as:
apiVersion: apps/v1
kind: Deployment
metadata:
  labels:
    app: ef-app
  name: ef-app
  namespace: expertflow
spec:
  selector:
    matchLabels:
      app: ef-app
  template:
    metadata:
      labels:
        app: ef-app
    spec:
      containers:
        - image: nginx
          name: nginx
          env:
#            - name: SECRET_USERNAME
#              valueFrom:
#                secretKeyRef:
#                  name: mysecret
#                  key: username
#            - name: SECRET_PASSWORD
#              valueFrom:
#                secretKeyRef:
#                  name: mysecret
#                  key: password
            - name: POSTGRES_USERNAME
              valueFrom:
                secretKeyRef:
                  name: postgres
                  key: username
            - name: POSTGRES_PASSWORD
              valueFrom:
                secretKeyRef:
                  name: postgres
                  key: password
          resources: {}
2. Vault deployment with Container Storage Interface (CSI)
Kubernetes application pods that rely on Vault to manage their secrets can retrieve them from a mounted file system through the attached as ephemeral volumes. This approach of employing ephemeral volumes to store secrets is a feature of the Secrets Store extension to the Kubernetes Container Storage Interface (CSI) driver.
Vault Installation
This approach requires a different values.yaml file modified to run vault with vault CSI provider and injector to be false.
helm install vault vault/ -n vault --values vault/csi-integrated.yaml A provider is launched as a Kubernetes DaemonSet alongside of Secrets Store CSI driver DaemonSet.
The Vault CSI provider was installed above alongside Vault by the Vault Helm chart.
This DaemonSet launches its own provider pod and runs a gRPC server which the Secrets Store CSI Driver connects to make volume mount requests.
Initializing and unsealing of vault
https://expertflow-docs.atlassian.net/wiki/x/eQCLDw
Set a secret in Vault
When we have to add/ update a secret value, first we have to put the secret in vault key value store and then retrieve it with vault CSI provider + Kubernetes CSI operator.
To put the secret in vault, follow below steps
kubectl -n vault exec -it vault-0 -- shvault logininput the token that was generated during the vault initialization.
vault auth enable kubernetes


vault write auth/kubernetes/config \
token_reviewer_jwt="$(cat /var/run/secrets/kubernetes.io/serviceaccount/token)" \
kubernetes_host=https://${KUBERNETES_PORT_443_TCP_ADDR}:443 \
kubernetes_ca_cert=@/var/run/secrets/kubernetes.io/serviceaccount/ca.crt \
issuer="https://kubernetes.default.svc.cluster.local"
enable the key value secret store in vault at path secret/
vault secrets enable -path=secret -version=2 kv-v2put the value of secrets
vault kv put secret/appname username=foo password=bar token=34234325324this will create a key value pairs of secrets at path secret/appname
to read the value of secrets stored at appname
vault kv get secret/appnameout will be like this:
=== Secret Path ===
secret/data/appname

======= Metadata =======
Key                Value
---                -----
created_time       2024-05-12T13:13:52.075938676Z
custom_metadata    <nil>
deletion_time      n/a
destroyed          false
version            2

====== Data ======
Key         Value
---         -----
password    bar
token       34234325324
username    foo
Create a policy named ef-policy. This will be used to give the default service account permission to read the kv secret created earlier at secret/appname
vault policy write ef-policy - <<EOF
path "secret/data/*" {
  capabilities = ["read"]
}
EOF
The data of kv-v2 requires that an additional path element of data is included after its mount path (in this case, secret/).
Here we are using regex *. It means if we put another secret of different app i.e. appname-2 at secret/appname-2 , we won't have to update the policy. We just have to put the secret with the following command:
vault kv put secret/appname-2 username=ef password=ef123 token=123
Finally, create a Kubernetes authentication role named database that binds this policy with a Kubernetes service account named default.
vault write auth/kubernetes/role/database \
bound_service_account_names=default \
bound_service_account_namespaces=expertflow \
policies=ef-policy \
    ttl=24h
Successful output:
Success! Data written to: auth/kubernetes/role/databaseInstall the secrets store CSI driver
The Secrets Store CSI driver secrets-store.csi.k8s.io allows Kubernetes to mount multiple secrets, keys, and certs stored in enterprise-grade external secrets stores into their pods as a volume. Once the Volume is attached, the data in it is mounted into the container's file system.
Inside the vault directory, there is a directory which container helm chart of secrets-store-csi.
Run the following command to install it.
helm install csi secrets-store-csi-driver/ --set syncSecret.enabled=true -n vaultDefine a SecretProviderClass resource
The Kubernetes Secrets Store CSI Driver Helm chart creates a definition for a SecretProviderClass resource. This resource describes the parameters that are given to the Vault CSI provider. To configure it requires the address of the Vault server, the name of the Vault Kubernetes authentication role, and the secrets.
Run the following command to create the resource with kind SecretProviderClass
cat > spc-vault-appname.yaml <<EOF

apiVersion: secrets-store.csi.x-k8s.io/v1
kind: SecretProviderClass
metadata:
  name: vault-appname
  namespace: expertflow
spec:
  provider: vault
  secretObjects:
  - data:
    - key: password
      objectName: appname-password
    - key: username
      objectName: appname-username
    - key: token
      objectName: appname-token
    secretName: appname-secret
    type: Opaque
  parameters:
    vaultAddress: "https://vault-internal.vault.svc.cluster.local:8200"
    vaultCACertPath: "/vault/userconfig/tls-ca/tls.crt"
    vaultSkipTLSVerify: "true"
    roleName: "database"
    objects: |
      - objectName: "appname-password"
        secretPath: "secret/data/appname"
        secretKey: "password"
      - objectName: "appname-username"
        secretPath: "secret/data/appname"
        secretKey: "username"
      - objectName: "appname-token"
        secretPath: "secret/data/appname"
        secretKey: "token"

EOF
Create the vault-appname SecretProviderClass.
kubectl apply --filename spc-vault-appname.yamlThe vault-appname SecretProviderClass describes one secret object:
objectNameis a symbolic name for that secret, and the file name to write to.secretPathis the path to the secret defined in Vault.secretKeyis a key name within that secret.
Verify that the SecretProviderClass, named vault-appname has been defined in the default namespace.
kubectl describe SecretProviderClass vault-appname -n expertflowCreate a deployment with secret mounted
With the secret stored in Vault, the authentication configured and role created, the provider-vault extension installed and the SecretProviderClass defined it is finally time to create a pod that mounts the desired secret.
Kubernetes secrets are populated with the contents of files from your CSI volume.
cat > webapp-deployment.yaml <<EOF

apiVersion: apps/v1
kind: Deployment
metadata:
  name: webapp-deployment
  namespace: expertflow
spec:
  replicas: 1 # You can adjust the number of replicas as needed
  selector:
    matchLabels:
      app: webapp
  template:
    metadata:
      labels:
        app: webapp
    spec:
      serviceAccountName: default
      containers:
      - image: jweissig/app:0.0.1
        name: webapp
        env:
        - name: DB_PASSWORD
          valueFrom:
            secretKeyRef:
              name: appname-secret
              key: password
        - name: DB_USERNAME
          valueFrom:
            secretKeyRef:
              name: appname-secret
              key: username
        - name: DB_TOKEN
          valueFrom:
            secretKeyRef:
              name: appname-secret
              key: token
        volumeMounts:
        - name: secrets-store-inline
          mountPath: "/mnt/secrets-store"
          readOnly: true
      volumes:
      - name: secrets-store-inline
        csi:
          driver: secrets-store.csi.k8s.io
          readOnly: true
          volumeAttributes:
            secretProviderClass: "vault-appname"
EOF
When a pod references this SecretProviderClass, the CSI driver will create a Kubernetes secret called "appname-secret" with fields "password", "username" and "token" set to the contents of the "appname-password", "appname-username", "appname-token", object from the parameters. The pod will wait for the secret to be created before starting, and the secret will be deleted when the pod stops.
Notice there is an env entry, referencing a secret. deploy the pod:
kubectl apply --filename webapp-deployment.yamlYou can now verify the Kubernetes secret has been created:
kubectl get secret appname-secret -n expertflowIf you do get secrets -o yaml, the secret will contain the following contents:
apiVersion: v1
data:
  password: YmFy
  token: MzQyMzQzMjUzMjQ=
  username: Zm9v
kind: Secret
metadata:
  creationTimestamp: "2024-05-12T13:53:42Z"
  labels:
    secrets-store.csi.k8s.io/managed: "true"
  name: appname-secret
  namespace: expertflow
  ownerReferences:
  - apiVersion: secrets-store.csi.x-k8s.io/v1
    kind: SecretProviderClassPodStatus
    name: webapp-expertflow-vault-appname
    uid: 6d1d5f2b-a833-41ea-ab40-41ab87180081
  resourceVersion: "3224006"
  uid: bd34a163-e5be-40d5-979b-79f4904478c6
type: Opaque
And you can also verify the secret is available in the pod's environment:
 kubectl -n expertflow exec webapp -- env | grep DB_PASSWORD
 kubectl -n expertflow exec webapp -- env | grep DB_USERNAME
 kubectl -n expertflow exec webapp -- env | grep DB_TOKEN
Similarly, if we have to add secrets for another application, we have to follow below steps:
Put secrets in vault database
Create SecretProviderClass object
Add the reference of secrets in the deployment
Steps in action:
Put secrets in Vault Database:
we are using secret name as appname-2, it can be the name of the application for which you have to add secrets.
vault kv put secret/appname-2 username=ef password=ef123 token=123Create SecretProviderClass object
we are creating SecretProviderClass that will create Kubernetes secret with name appname-2-secret in expertflow namespace. The name of SecretProviderClass should be according to the application for which we are creating the secrets.
cat > spc-vault-appname-2.yaml <<EOF

apiVersion: secrets-store.csi.x-k8s.io/v1
kind: SecretProviderClass
metadata:
  name: vault-appname-2
  namespace: expertflow
spec:
  provider: vault
  secretObjects:
  - data:
    - key: password
      objectName: appname-2-password
    - key: username
      objectName: appname-2-username
    - key: token
      objectName: appname-2-token
    secretName: appname-2-secret
    type: Opaque
  parameters:
    vaultAddress: "https://vault-internal.vault.svc.cluster.local:8200"
    vaultCACertPath: "/vault/userconfig/tls-ca/tls.crt"
    vaultSkipTLSVerify: "true"
    roleName: "database"
    objects: |
      - objectName: "appname-2-password"
        secretPath: "secret/data/appname-2"
        secretKey: "password"
      - objectName: "appname-2-username"
        secretPath: "secret/data/appname-2"
        secretKey: "username"
      - objectName: "appname-2-token"
        secretPath: "secret/data/appname-2"
        secretKey: "token"

EOF
Add the reference of secrets in the deployment
Now we have to add the reference of the secretKey in our application deployment/ pod.
cat > webapp-deployment-2.yaml <<EOF
apiVersion: apps/v1
kind: Deployment
metadata:
  name: webapp-2-deployment
  namespace: expertflow
spec:
  replicas: 1
  selector:
    matchLabels:
      app: webapp-2
  template:
    metadata:
      labels:
        app: webapp-2
    spec:
      serviceAccountName: default
      containers:
      - image: jweissig/app:0.0.1
        name: webapp
        env:
        - name: DB_PASSWORD
          valueFrom:
            secretKeyRef:
              name: appname-2-secret
              key: password
        - name: DB_USERNAME
          valueFrom:
            secretKeyRef:
              name: appname-2-secret
              key: username
        - name: DB_TOKEN
          valueFrom:
            secretKeyRef:
              name: appname-2-secret
              key: token
        volumeMounts:
        - name: secrets-store-inline
          mountPath: "/mnt/secrets-store"
          readOnly: true
      volumes:
      - name: secrets-store-inline
        csi:
          driver: secrets-store.csi.k8s.io
          readOnly: true
          volumeAttributes:
            secretProviderClass: "vault-appname-2"

EOF
After applying these three manifest, when the pod will start, the secrets will be created at runtime.