Setting Up a YouTube Project in the Google Developers Console
Create a New Project
-
Go to the Google Developers Console.
-
Create a new project by selecting "New Project" in the project drop-down.
Enable the YouTube Data API v3
-
In your project, navigate to APIs & Services > Library.
-
Search for YouTube Data API v3 and enable it.
Obtaining API Credentials
Step 1: Creating Credentials
-
Navigate to the Credentials section in your project.
-
Click on Create Credentials and select the appropriate type based on your application’s requirements:
-
OAuth 2.0 Client ID – This is necessary for accessing user-specific data or performing actions on behalf of a user, such as managing YouTube videos or playlists.
-
Step 2: Configuring the OAuth Consent Screen
-
Click on Configure Consent Screen, which will redirect you to the OAuth Consent Screen setup.
-
Select User Type as Internal.
-
After creation, you’ll be taken to the OAuth Consent Screen tab. Here, provide only the required (*) fields and skip the optional ones for now.
-
In the Scopes section, add the following:
-
youtube.readonly -
youtube.force-ssl
-
Step 3: Securing Your Credentials
-
Go to the Credentials tab and click Create Credentials again.
-
When prompted, enter the following details:
-
Application Type: Web Application
-
Name:
expertflow -
Redirect URI:
https://oauth.pstmn.io/v1/callback
-
-
Store your OAuth 2.0 credentials (Client ID and Client Secret) securely. Avoid exposing them in client-side code to prevent unauthorized access
o grant a developer access to the project, the owner of the project must assign the appropriate IAM role in Google Cloud Console. Follow these steps:
Grant Developer Access in Google Cloud IAM
-
Navigate to IAM Settings:
-
Go to Google Cloud Console.
-
Open your project.
-
In the left sidebar, select Solution.
-
redirect you a page , select IAM & Admin
-
-
Add a Principal (Developer):
-
Click on Grant Access.
-
In the New Principals field, enter the developer’s email address.
-
-
Assign a Role:
-
Under Assign Roles, click on Select a role.
-
Choose the role "Editor" (or "Developer", depending on project needs).
-
Editor: Allows full read-write access except for permissions management.
-
Developer Roles: Include roles like Cloud Functions Developer, App Engine Developer, Compute Instance Admin, etc.
-
-
-
Set IAM Conditions (Optional):
-
If needed, add conditions to limit access based on time, resources, or actions.
-
-
Save Changes:
-
Click SAVE to grant access.
-
Alternative Method: Adding Developer via Google Groups
If managing multiple developers, create a Google Group and assign roles to the group instead of individual accounts.
Obtain Authorization Code
Hit the following API in your browser. This will redirect you to Google's sign-in page, where you will authenticate and grant the requested permissions. After successful authentication, you will receive an authorization code.
Authorization URI:
https://accounts.google.com/o/oauth2/auth?
  client_id=YOUR_CLIENT_ID
  &redirect_uri=https://oauth.pstmn.io/v1/callback
  &response_type=code
  &scope=https://www.googleapis.com/auth/youtube.force-ssl
  &access_type=offline
  &prompt=consent
Explanation of Parameters:
-
client_id: Your application's client ID (replace with your actual client ID).
-
redirect_uri: The URL where the authorization server will send the user after authorization. This should match the URL configured in your Google Cloud console.
-
response_type: Set to
codeto receive an authorization code. -
scope: Permissions requested. For YouTube API, use
https://www.googleapis.com/auth/youtube.force-ssl. -
access_type: Set to
offlineto receive a refresh token. -
prompt: Set to
consentto force the user to re-consent every time.
Example Redirect After Successful Authentication:
Once you hit the above URL, you will be redirected to your redirect_uri with a code parameter. For example:
https://oauth.pstmn.io/v1/callback?code=4/0AeanS0YV.......&scope=https://www.googleapis.com//youtube.force-ssl
-
code: The authorization code you will use in the next step.
-
scope: Confirms the scope granted by the user.
Important Notes:
-
The authorization code expires within a few minutes, so proceed to the next step promptly.
Exchange Authorization Code for Tokens
Use Postman to send a POST request to exchange the authorization code for an access token and refresh token.
Token URI:
POST https://oauth2.googleapis.com/token
Headers:
Content-Type: application/x-www-form-urlencoded
Body (Form-Data or x-www-form-urlencoded):
code=4/0AX4XfWhG7EXAMPLECODE
client_id=YOUR_CLIENT_ID
client_secret=YOUR_CLIENT_SECRET
redirect_uri=https://oauth.pstmn.io/v1/callback
grant_type=authorization_code
Explanation of Parameters:
-
code: The authorization code received from the previous step.
-
client_id: Your application's client ID (replace with your actual client ID).
-
client_secret: Your application's client secret.
-
redirect_uri: Must match the redirect URI used in the authorization request.
-
grant_type: Must be set to
authorization_code.
Example Response:
If successful, you will receive a response containing the access token and refresh token:
{
  "access_token": "ya29.a0ARr...",
  "expires_in": 3600,
  "refresh_token": "1//0gA8A...",
  "scope": "https://www.googleapis.com/auth/youtube.force-ssl",
  "token_type": "Bearer"
}
Use Tokens to Access YouTube API
-
Use the
access_tokento make authenticated requests to YouTube's APIs. -
Save the
refresh_tokensecurely to generate new access tokens when the current one expires.
NOTE
For Switching between Youtube Channels:
-
Navigate to the OAuth Consent Screen > Audience and make sure Publishing Status is set to “in Production“, User Type to “External“.
-
Updating a Channel will require update of refresh token as well, even if it belongs to same account.
YouTube Channel Configuration in Expertflow Unified Admin
These below details outlines the configuration steps for setting up YouTube as a channel provider and connector in Expertflow's Unified Admin interface.
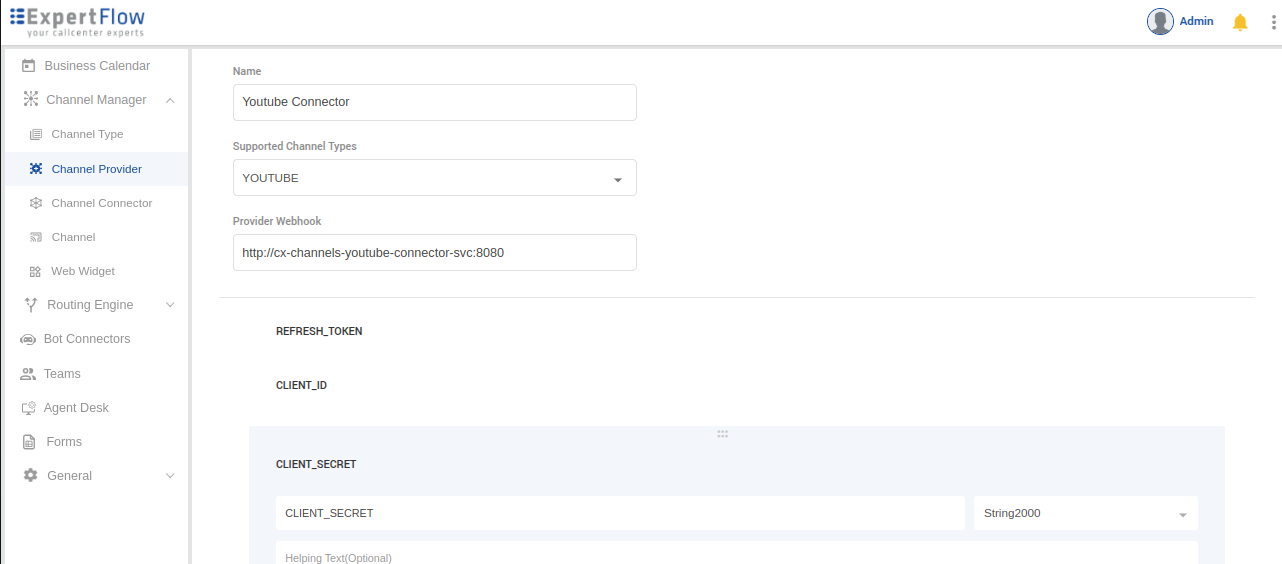
Channel Type & Provider
It is recommended to use the service name of the component in the "Channel Provider -> Provider's Webhook" field. However, FQDN can also be used with some additional custom configurations.
-
Create a new Channel Type (if it does not exist). Give it the name "YOUTUBE"
-
Provide the service name of Youtube Connector in the Provider Webhook field as http://{SERVICE-NAME}:{SERVICE-PORT}. Replace the {SERVICE-NAME} and {SERVICE-PORT} in the URL with the component's k3s-based service name and port (It can be fetched using k get svc -n expertflow).
-
Add the following attributes;
-
Click Add Custom Attribute button and on the form that opens, replace the dummy value "New attribute0.." in the attribute field with REFRESH_TOKEN and select data-type as "String2000" in the field to the right-most part of the form.
-
Click Add Custom Attribute button again, and replace the dummy value "New attribute1.." in the attribute field with CLIENT_ID and select data-type as "String2000".
-
Click Add Custom Attribute button again, and replace the dummy value "New attribute1.." in the attribute field with CLIENT_SECRET and select data-type as "String2000".
-
Click Save
-
Channel Connector Configuration
Navigate to Channel Manager > Channel Connector
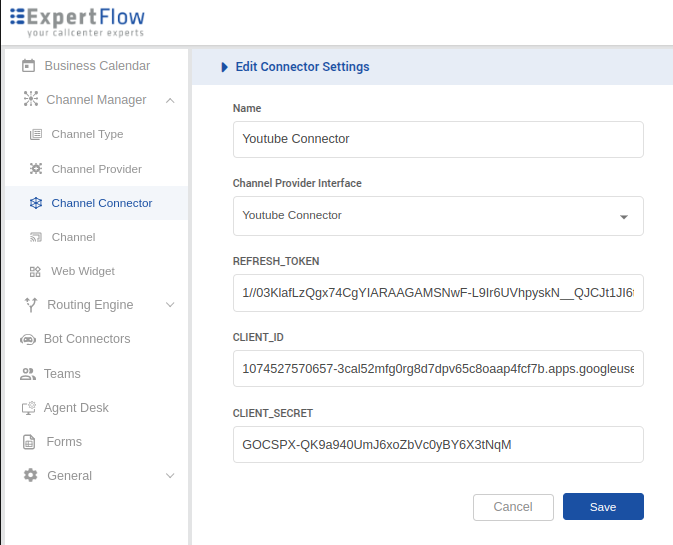
Fields and Values:
-
Name:
Youtube Connector -
Channel Provider Interface:
Youtube Provider -
REFRESH_TOKEN:
use the saved refresh token generated in Step 3 of Obtain Authorization Code. -
CLIENT_ID:
AAASPX-QK9a940UmJ6xoZb......6X3tAAAGenerated in above steps -
CLIENT_SECRET:
GOCSPX-QK9a940UmJ6xoZb......6X3tNqMGenerated in above steps
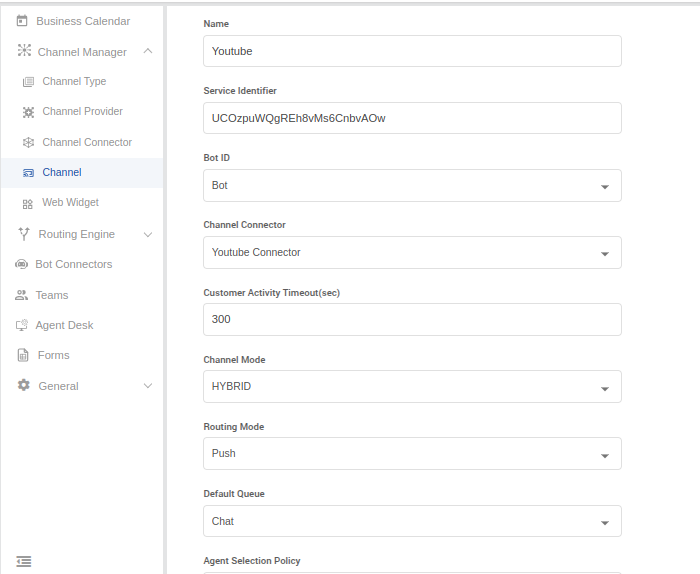
Channel
Configuring the Youtube Channel in Channel Configuration
-
Navigate to Channel Manager > Channel
-
Provide the channel name under the Name field
-
Provide the Youtube Channel Id under the Service Identifier field.
-
Fill the rest of the fields in the form accordingly and Click the Save button.
Notes:
-
Ensure that the client_id and client_secret are obtained from the Google Cloud Console.
-
The refresh_token is generated as part of the OAuth 2.0 flow and must be securely stored.
-
The Provider Webhook should point to a valid endpoint capable of handling incoming requests.
-
After saving the configurations, test the integration to ensure it works as expected.
Setup Webhook
Once the Youtube account is setup and Configurations on unified admin is already finished with working youtube-connector on some instance, then we need to setup the webhook using this postman request. Use your own FQDN to fetch the channel type and in POST call.
Snapshot is shown below:
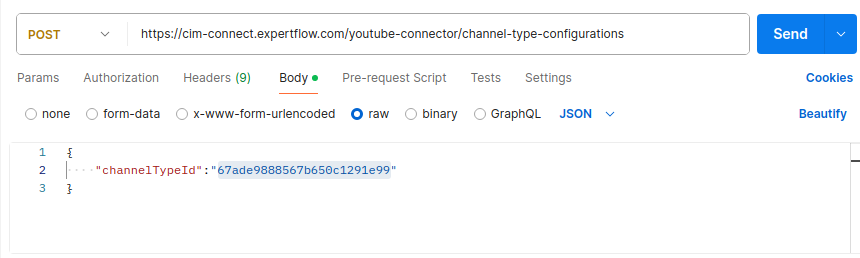
Post Url
https://<FQDN>/youtube-connector/channel-type-configurations
Post Body
{
“channelTypeId”: “id-of-channel-type”
}
Post Response
Note: You can fetch the ChannelTypeId from this channels list API, and search for the Youtube channel Type from the list and then use that ChannelTypeId.