Introduction
This document covers the steps to follow to install the EF Generic Connector patch. This guide has instructions to update Generic Connector from version 4.0 to version 4.4.
Intended Audience
Technical implementation team either from ExpertFlow or its Partner responsible for installing and configuring EF Generic Connector and its related components.
Installation Prerequisites
-
The
Generic connector 4.0
release must be installed before this patch can be applied.
-
WinRAR
for windows.
Access & Privileges Requirements
-
Administrative access (LocalSystem account or domain administrator) on the Connector Server is required to do the installation and configuration.
Upgrade Software
If you have already installed a previous version of Generic Connector and just want to upgrade, you need to obtain a patch from Google Drive and follow the following steps.
-
Download and extract GC patch.rar e.g. GC Patch 4.4.rar
-
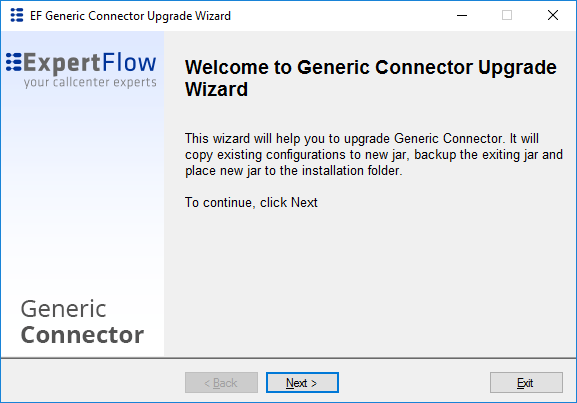
Double click on GCPatchService.exe. It opens a dialog to proceed.
-
Click Next. It will open a dialog for folder selection. Select Generic Connector installation path <EF Connector Home>.

-
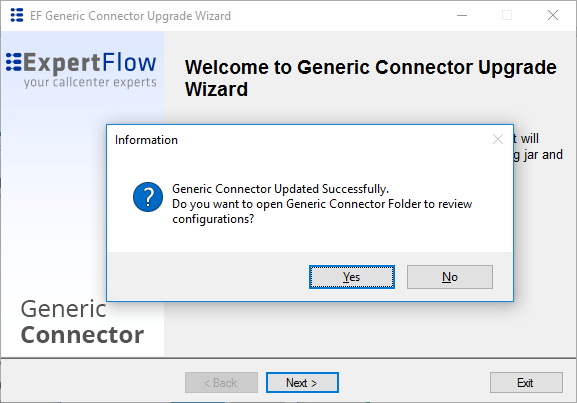
Click OK. It will upgrade the existing GC with old configurations. It will ask you to review the configuration file. You need to ensure that all the newly introduced parameters are available in GC Config. Click Yes to open the installation folder. See Generic Connector Configuration.
-
You have up-to-date GC. Old GC will be available as a backup in the same folder.
-
Open the generic-connector config folder from EF Service Manager
and open the generic-connector.jar using WinRar utility. Inside the generic-connector.jar go to the Config directory and open the config.properties file in any text editor.
-
Copy the following configuration parameter at the bottom of the config.properties file as shown in the screenshot.
For License key please contact with Team
# properties file containing properties used by the server daemon
#Number of concurrent agents, DO NOT TOUCH
NUMBER_OF_LICENSES=10
#Customer Name, DO NOT TOUCH
CUSTOMER_NAME=LabPerm
#LICENSE_KEY, DO NOT TOUCH-
KEY=ABCCDEFGHIJKLMNOPQRSTUVWXYZ
# Interval in seconds between XMPP server pings
XMPP_PING_INTERVAL=3
#-----------Administrator Credentials----------#
ADMIN_ID=Administrator
ADMIN_PASSWORD=Expertflow464#default reason code for not ready from supervisor 19
Supervisor_initiated_NotReadyReasonCode=19
#default reason code for logout from supervisor 20
Supervisor_initiated_LogOutReasonCode=20#ACCESS_TOKEN_URL for SSO user
ACCESS_TOKEN_URL=https://192.168.1.104:1123/getaccesstoken#---------UCCX DB Credentials-------------#
UCCX_SERVER_IP=192.168.1.29
UCCX_SERVER_USERNAME=Administrator
UCCX_SERVER_PASSWORD=Expertflow464
UCCX_DB_USERNAME=uccxhruser
UCCX_DB_PASSWORD=12345
UCCX_DB_RETRY_ATTEMPTS=2
UCCX_DB_TIMEOUT_CONNECTION=1800
#----------REST API Config----------------#
#Format for communication. Expected formats REST, JMS
COMMUNICATION_FORMAT=REST
FRONT_END_EVENT_SEND_REST_API=http://192.168.1.30:8113/event
BACK_END_COMMAND_SEND_REST_API=http://localhost:8112/gc/command
#Redis config
REDIS_URL=redis-master.ef-cti.svc
REDIS_PORT=6379
REDIS_PASSWORD=Expertflow123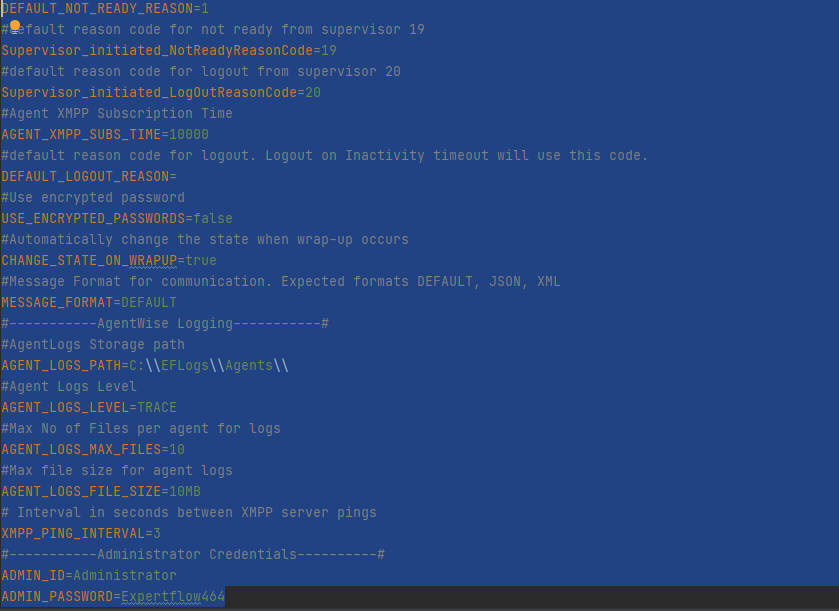
-
Close & save the file and click yes on the archive update dialog.
-
Start the generic connector from EF Service Manager.