User Guide
Allows managers to run customer satisfaction surveys following their interactions with the call center, including interactions through voice calls and web chats.
Surveys through the following channels are available as of today:
IVR surveys: An IVR-based questionnaire can be played to a customer over the same incoming call once the customer ends up talking to the contact center representative.
SMS Surveys: As a replacement for IVR surveys, an SMS message can also be sent to take quick customer feedback after an inbound call ends.
Web Survey: A Web-based survey can be pushed to the customer at the end of a webchat. Note that PCS exposes RESTful APIs for 3rd-party chat engines to trigger a web survey automatically at the end of a webchat.
A Contact center can run multiple surveys of different types simultaneously for different services and DNs (Dialed Numbers).
Logging in
An administrator is the primary user of the system, who has access to all system features.
Log in with the admin credentials as provided by ExpertFlow. You may later change the system passwords.
If you face any issues during login, please contact Expertflow Support.
Setting Language
After logging in the PCS, the Language can be selected from the Top right corner with a drop-down of Languages, a Flag with the language Name, click on that menu and select the Language.
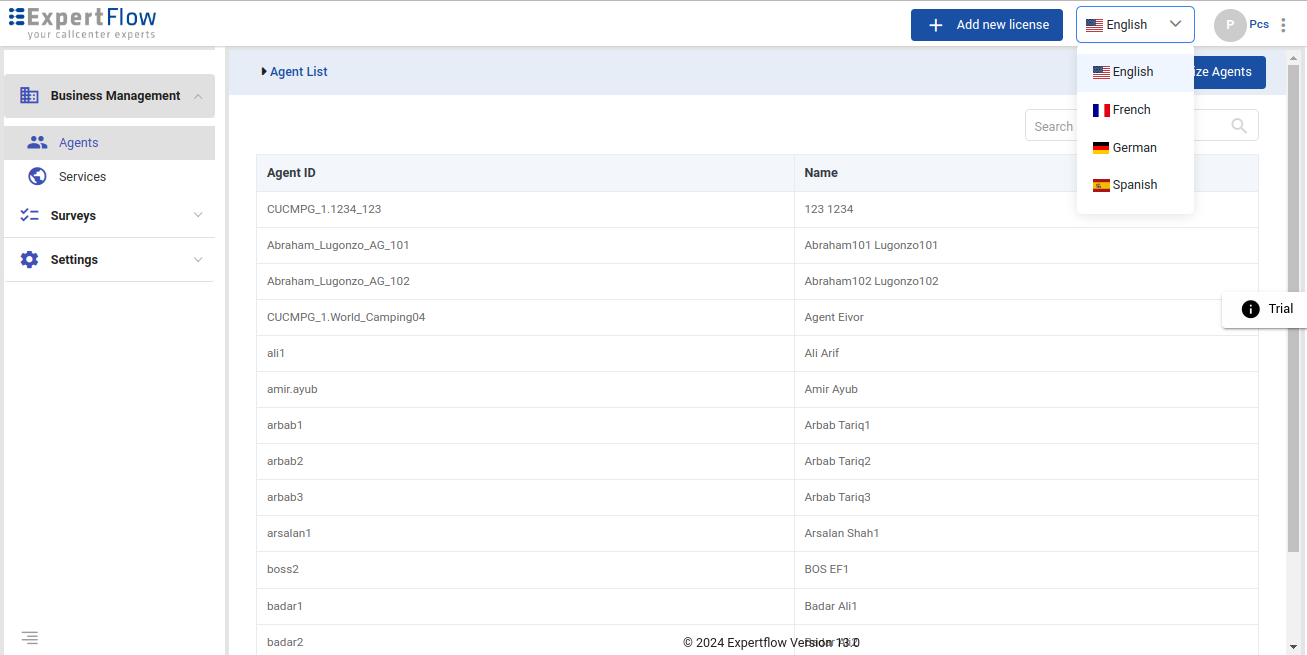
After selecting the language, the Application language well be set accordingly.
Setting Up PCS
License Information
After logging in to the PCS, go to the Setting -> License on the left side menu to see your license information.
The License page appears with the details about the installed license: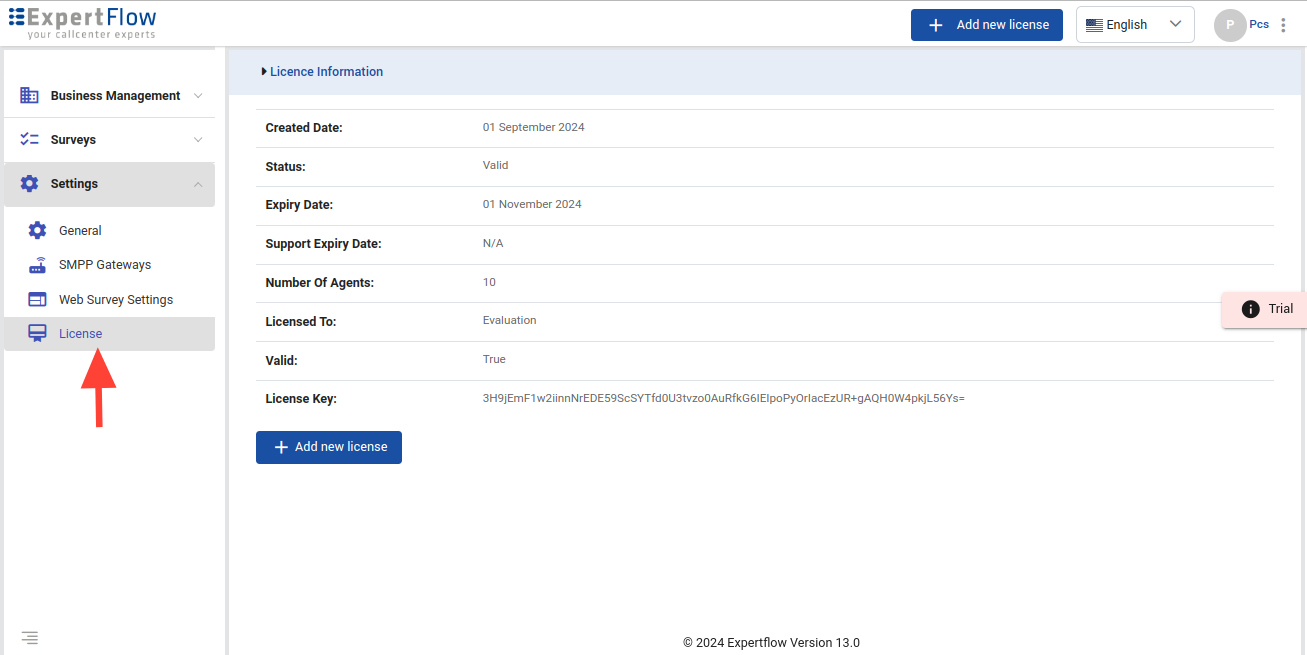
As can be seen in the screenshot above, the Created Date and Expiry Date fields show the date when the license was installed and the date when it will expire.
The application starts showing a reminder one month before the support contract expiry to renew the contract to continue to enjoy uninterrupted support from ExpertFlow.
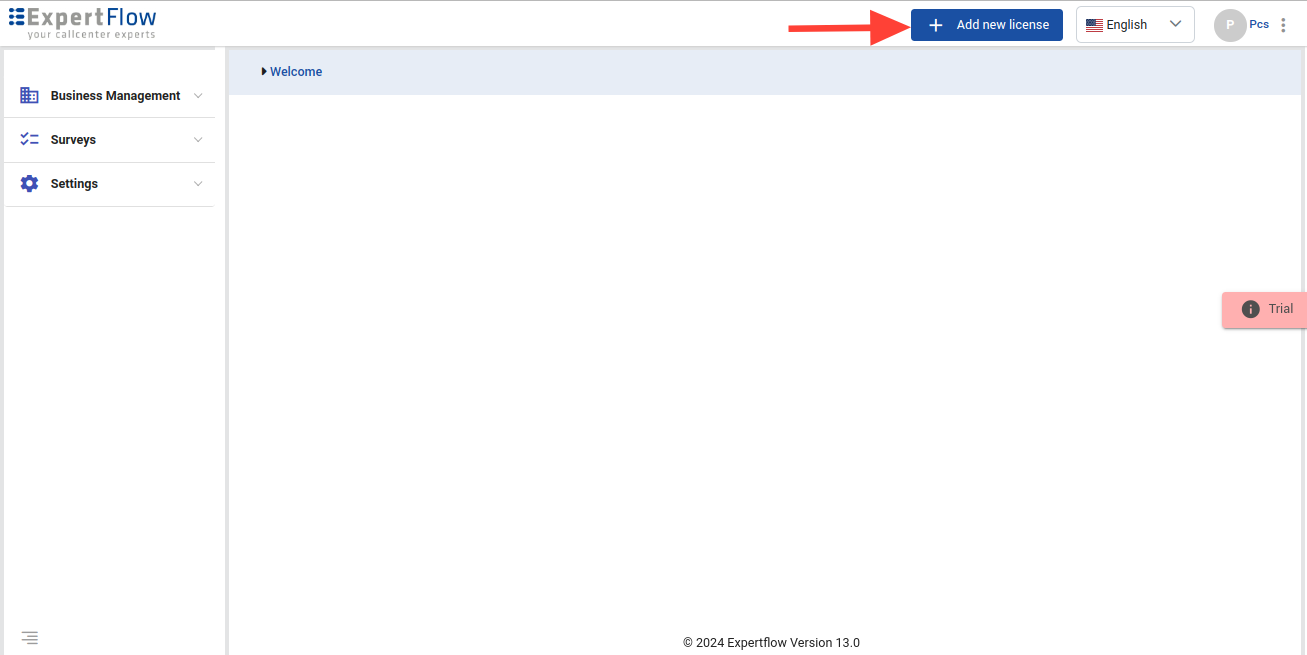
The License Key can be added from the same Setting - > License page. And also after logging in, the Add new licence appears, and from there you can just add the license Key.
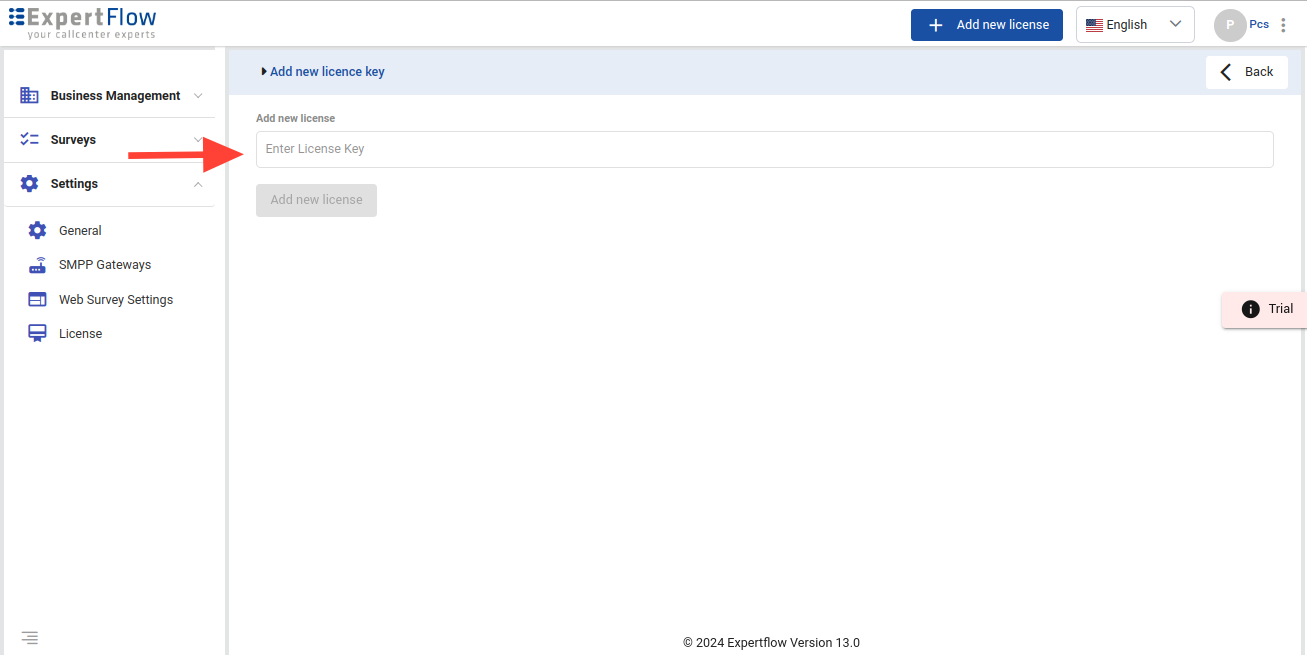
Copy and paste the Key in the above field, and then the key can be verified from the Setting - > License.
Settings (for CCE)
Settings are specified to define the location from where to synchronize the audio prompt files which are used in PCS IVR surveys. This setting should be configured only in the case of UCCE-based deployment.
In the case of CCX, the audio prompts are synchronized from the CCX server directly via APIs.
Skip this section if you have Cisco Unified Contact Center Express (UCCX) deployment.
Proceed to the General menu through Settings.
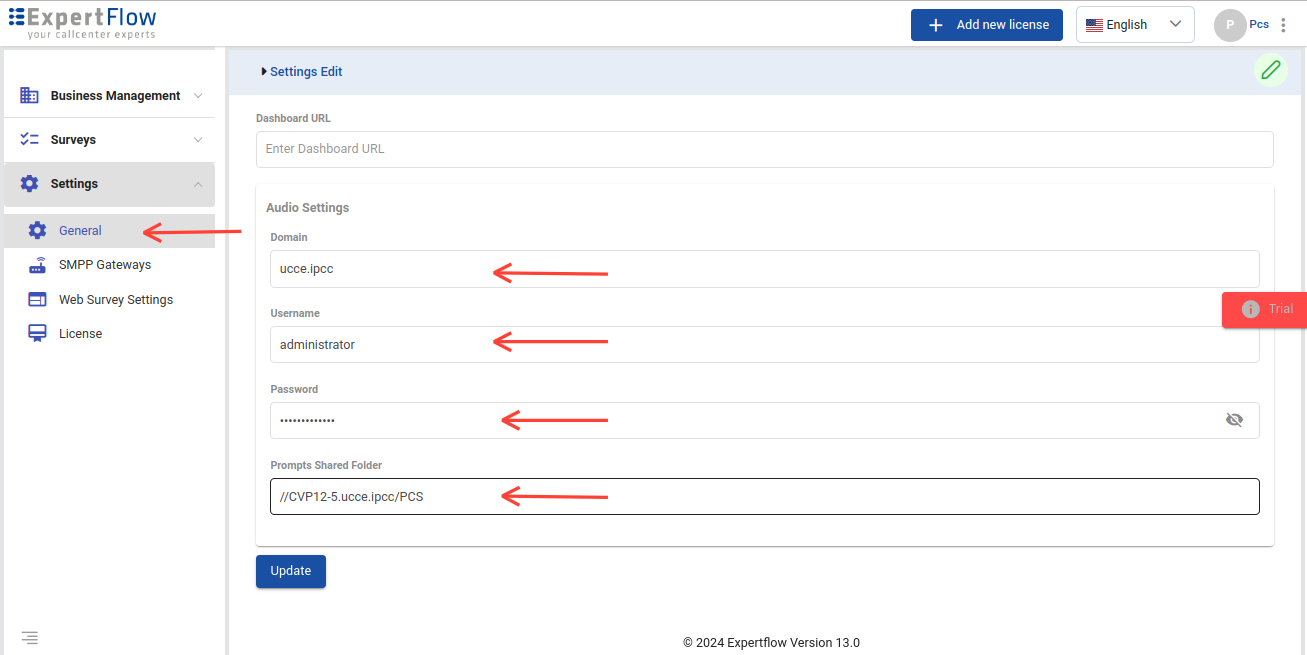
Under the Setting Details page, you will see the following parameters:
Dashboard Settings
Dashboard URL: The URL of the Dashboard or Dashboard group is located here. This should be a valid dashboard URL.
Audio Settings
Domain: This is the domain of the machine where prompts are located
Username: This is the username of the machine to be accessed for prompt retrieval
Password: This is the password of the machine to be accessed for prompt retrieval
Prompt Location: This is the complete path of the location where the audio prompts are located
File Path: When a survey is played to the caller, we can also enable/disable an option for the caller to record his feedback while providing the response to survey questions. This field stores the path where the recorded voice feedback of the customer should be stored.
Business Management
Under Business Management, you can synchronize contact center agents from UCCE/UCCX database. These agents are then used in reports to filter survey records against particular agents.
Agents
Go to Business Management→ Agents menu to view the agents list.
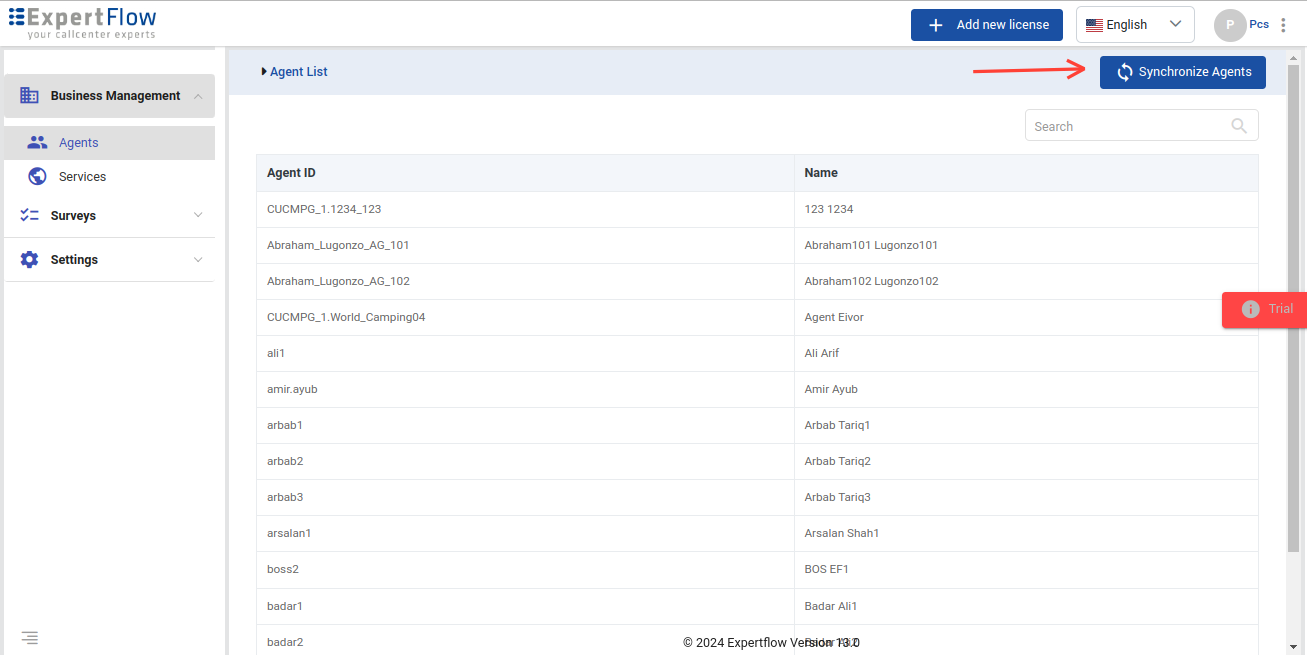
You will see Agents List as shown below with read-only rights:
Click the Synchronize Agents button to get the latest updated Agents List from CCE/X.
In the case of CCX, the agent synchronization sometimes takes a bit longer.
If agents are edited from CUCM in the case of CCX, the changes might not reflect properly in PCS.
The same agent's information is used while reporting on the survey statistics.
Services
Services in PCS act as triggers to hit the survey script at the end of the interaction. These services are associated with the surveys that run at the end of customer interaction.
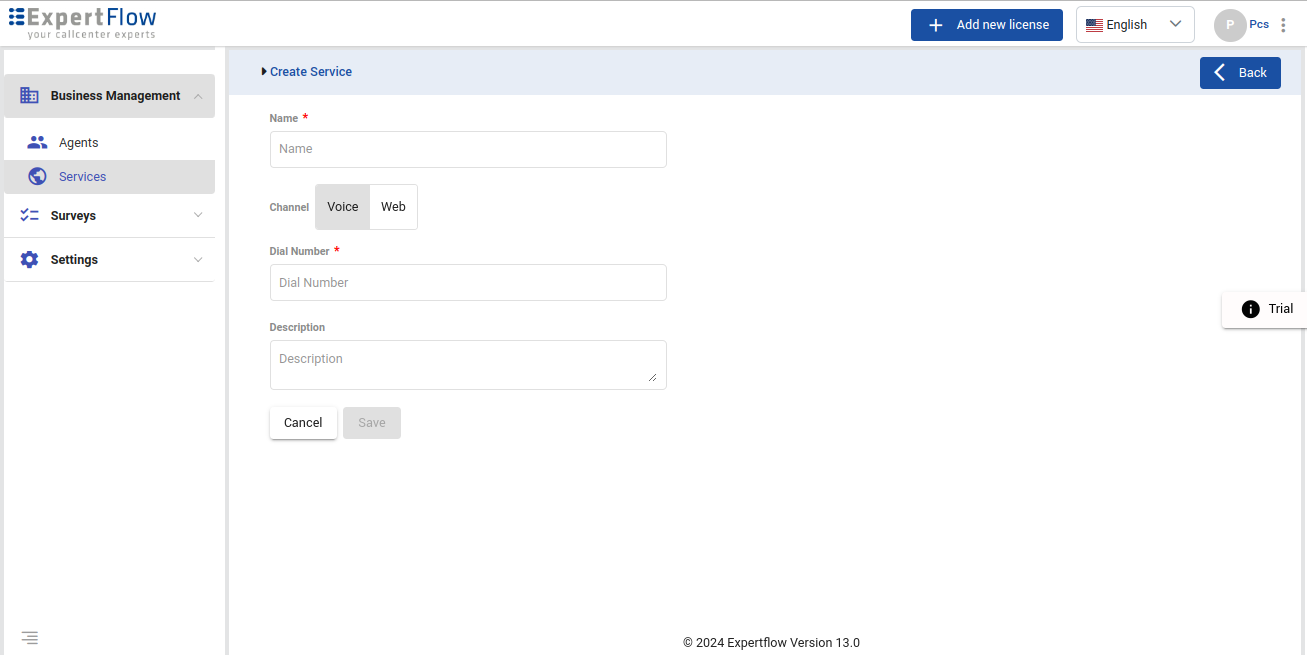
A new Channel field allows differentiation between Web and Voice services. For a voice survey, the user can provide the Dialed Number, the name of the service, and provide an optional description whereas for a web survey, the user can provide the service name and an optional description for which this survey is going to be executed.
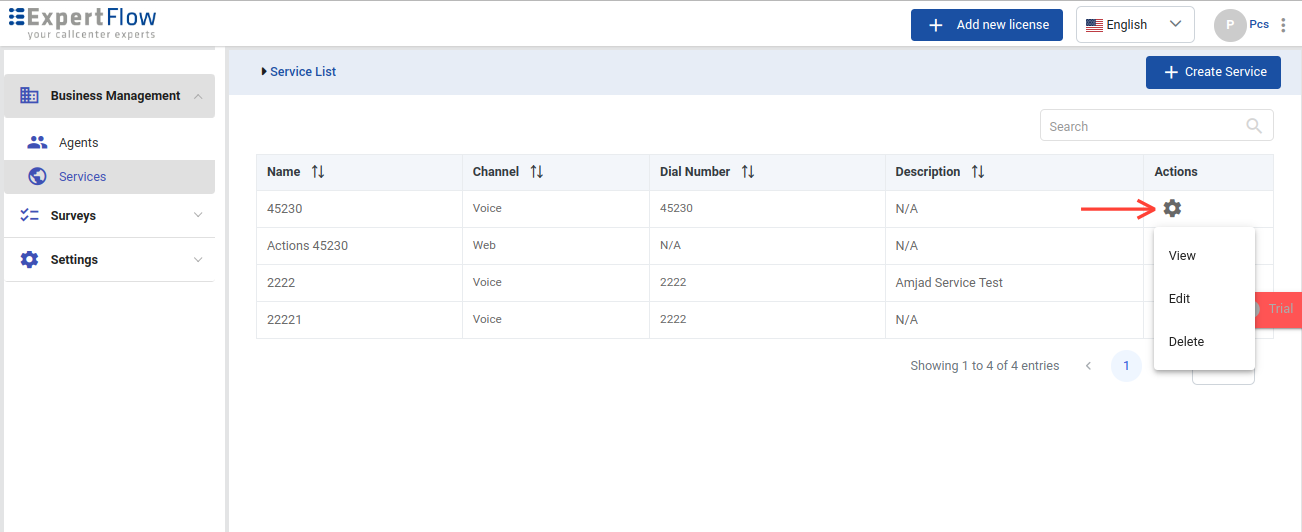
Go to the Business Management→ Services menu to view the Services list.

Click the New Service button to add a new contact center service. Add the Name, Channel, Dial Number, and Optional description, and then click save.
See the Actions drop-down to make changes to any service later on from the Services List.
Surveys
Questions management
The Questions management feature allows you to create and manage your survey questions. The questions are the audio files in case of IVR survey, SMS text in case of SMS surveys, and textual questions with several rating or two boolean options in the case of web surveys.
Go to Surveys → Questions to access the Questions list.
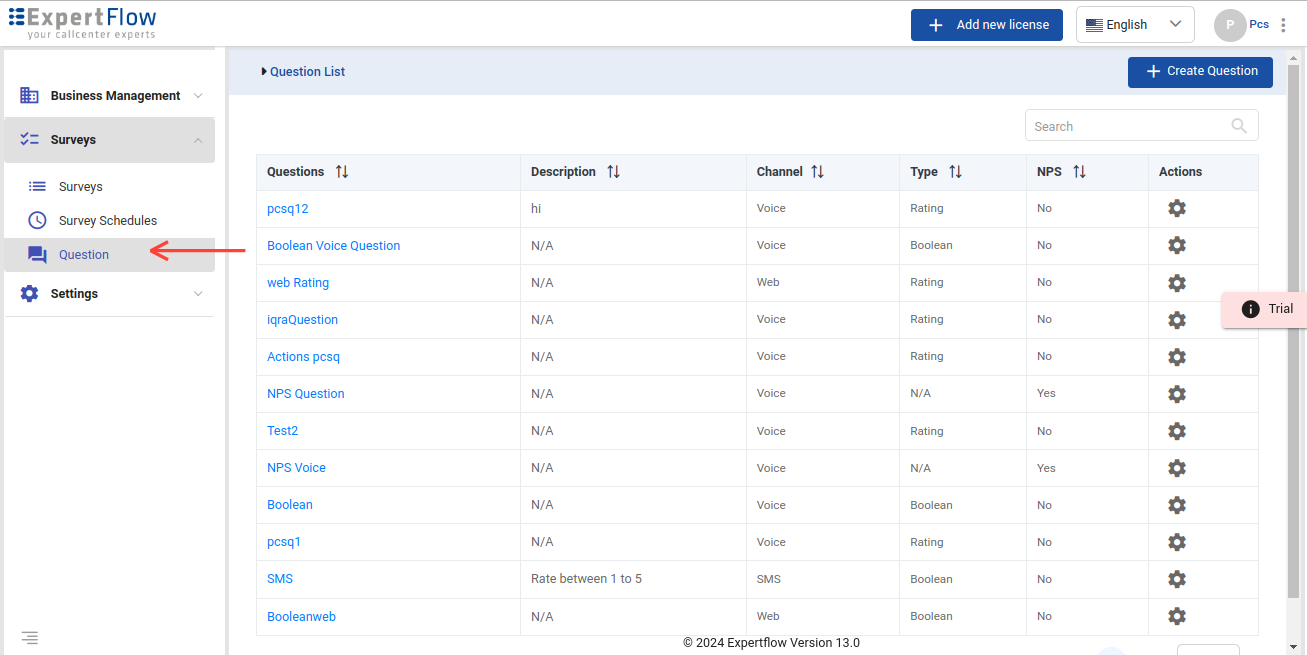
Click the Create Questions button to create a new question.
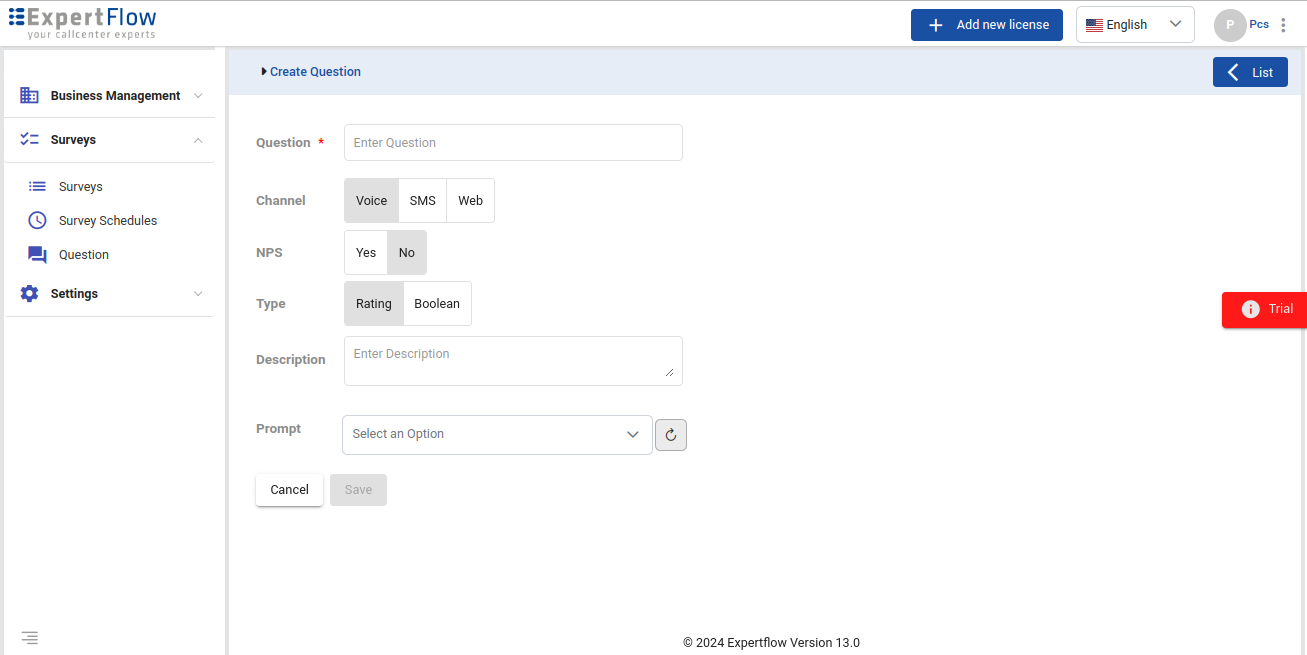
Fill the form using the following table:
Name | Description |
Question | Enter the question. This serves as the name of the question in case of IVR and SMS -based surveys while shown as a textual question to a web surfer in case of web-based surveys. |
Channel | Choose the channel type for the question. Based on the selection, the appropriate parameters are displayed. |
NPS | For a survey that has to generate an NPS report, it has to include a question of type NPS in the survey. While creating an NPS question, set this flag to “Yes”. An NPS question always has a rating scale of 1-10 no matter what rating scale has been configured on the backend. So the rating scale selected in the application configuration (i.e., 1-5 OR 0-9) is applicable to all non-NPS questions across all PCS surveys. Check with your system administrator to know what rating scale is being configured in the application. |
Type | Choose the type of question. Note that a question can be one of the following:
|
Description | Enter a brief description of the question. In the case of the SMS question, write here the SMS message that is to be sent to customers at the end of the call. |
Options | This field is only shown if the WEB channel is selected. These are the multiple different textual options that you would like to provide to the customer. Note that in the case of having Rating type questions, there is a predefined rating scale from 0-9 or 1-5 (as configured in the application backend). So, the options in this field, in case of Rating type questions, are only to define the minimum, maximum range, i.e., Bad or Good. In the case of rating-type questions, you always need to provide a negative option on the first index and a positive option on the second index. To learn more, see Submit feedback from web section. In the case of Boolean-type questions, you always need to provide a positive option on the first index and the negative option on the second index (i.e. the sequence must be, “Yes, No” OR “Agree”, “Disagree”). In the case of MCQ, note that the number of possible options depends on the rating scale enabled in PCS. So, if it is 1-5, you can provide a maximum of 5 possible options while in the case of 0-9 rating, you can provide a maximum of 10 possible options to choose from. |
File name | This is the audio prompt that should be played in the IVR and is only shown if the channel of the question is Voice. |
You cannot edit a question once created and linked to a survey.
Creating a survey
PCS allows users to create as many surveys as desired.
Go to Surveys → Surveys tab to access Surveys List page.
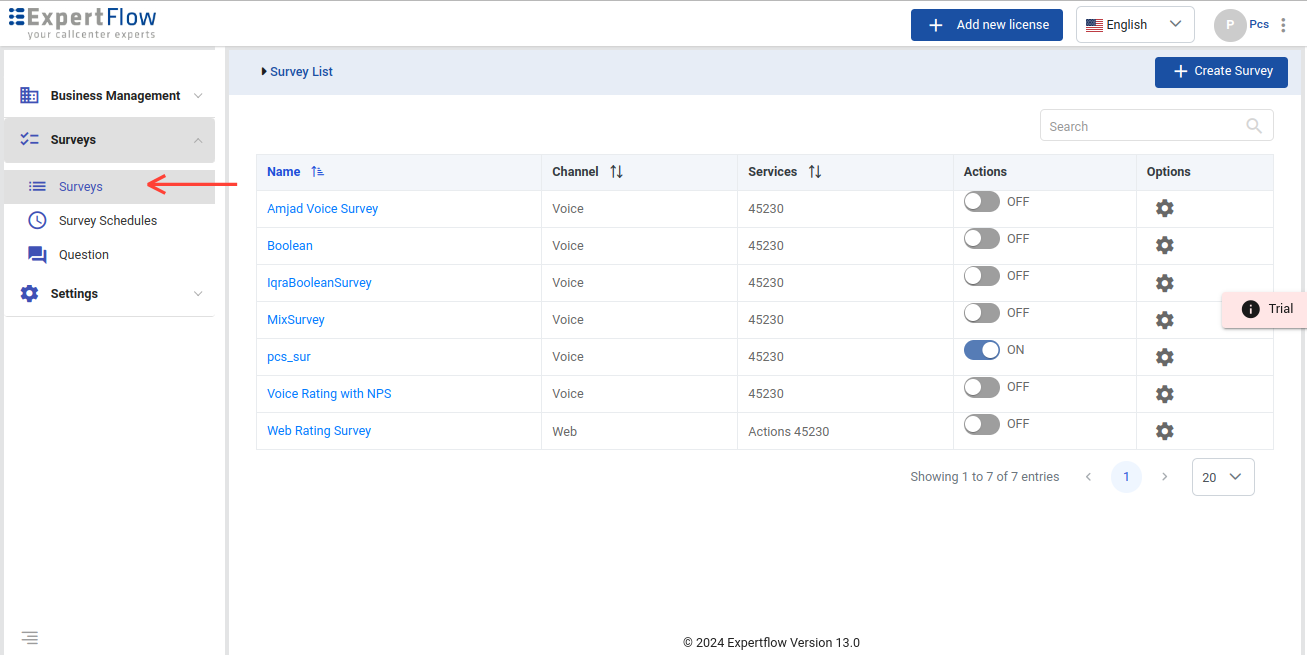
Click the Create Survey button to create a new survey.
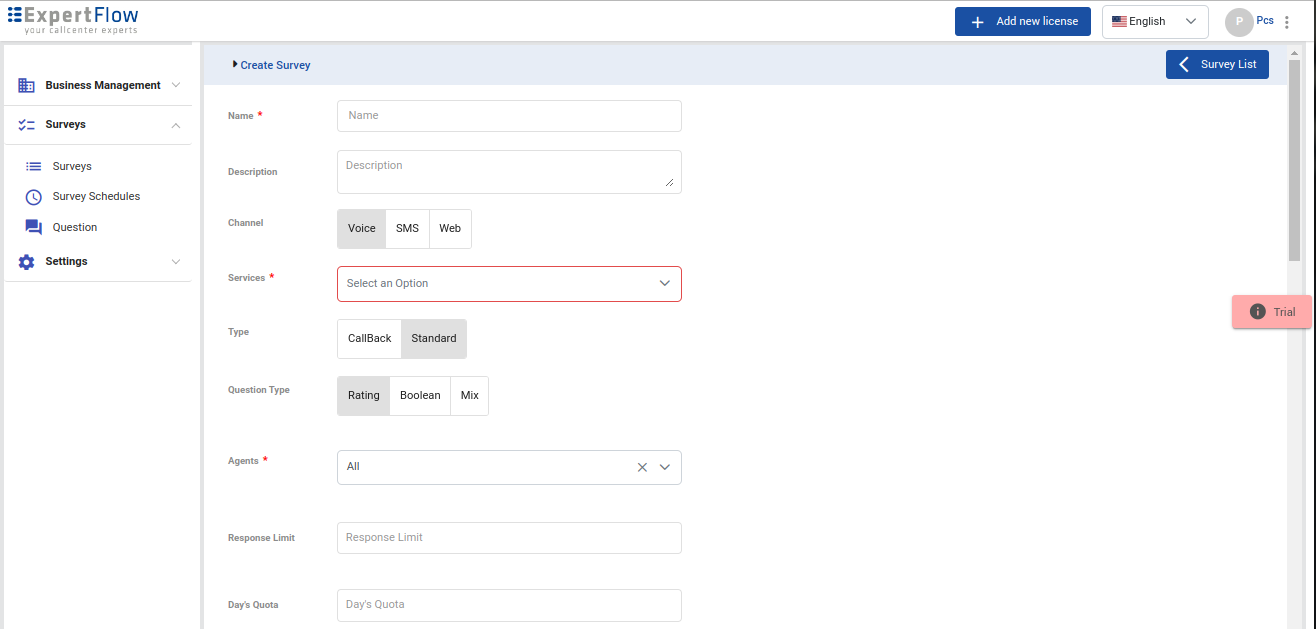
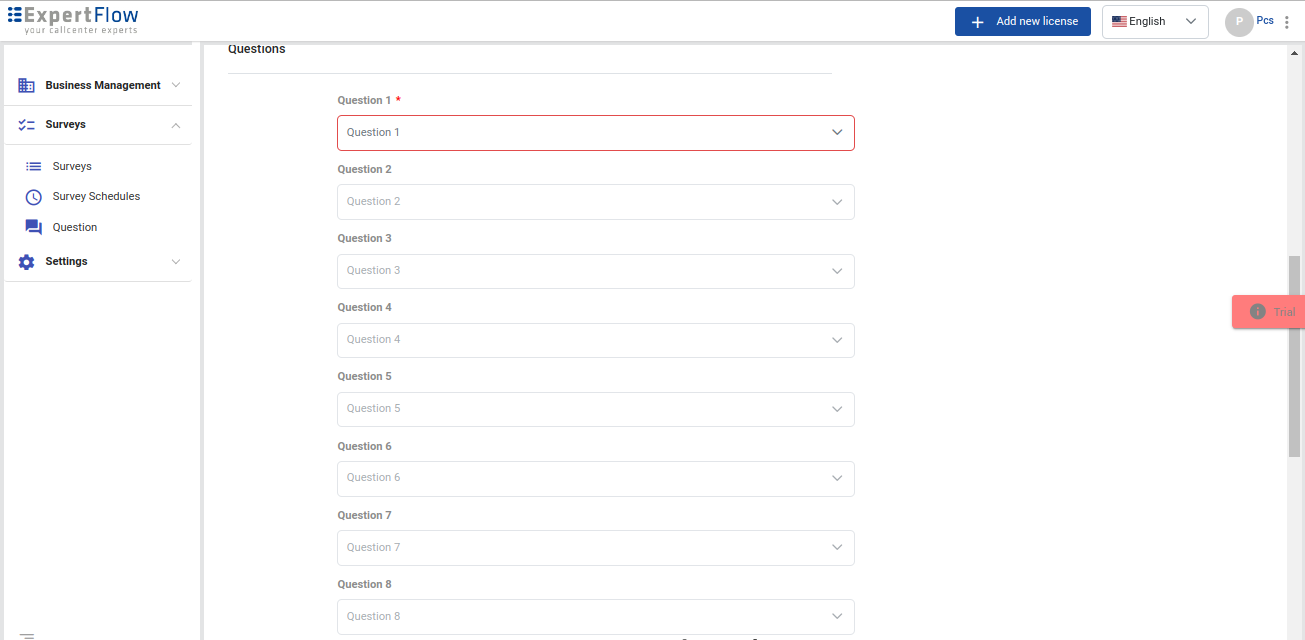
Under the Create Survey form, give the details of the survey as follows:
Name | Description |
Name | Enter the name of the survey. |
Description | Enter an optional description. |
Channel | Select the channel through which the survey is to be conducted. |
Service | Select one service DN, i.e., the trigger to hit this survey. Note that to run a web and SMS survey with all services, select “All-Web” in the case of web surveys and “All” in the case of SMS surveys. For Surveys, one service can be used in multiple surveys; however, one Survey is related to that service. For UCCE-based deployments, surveys can be created with All Services except for the surveys of type “Standard”. |
Question Type | The question type also determines the survey type. So if you select Rating, the survey is supposed to contain rating-type questions in it, hence called a Rating type survey. The questions in the Questions dropdowns appear based on the question type selected here. |
Response Limit | “Response Limit” text field determines the maximum number of responses to be collected in a survey. The maximum limit of Response Limit is 9999999. |
Days Quota | The admin also defines the number of days for the renewal of the survey quota in a "Days Quota" field. Maximum limit of Days Quota is 9999. |
Questions | Select survey questions one by one. At least one question is required to be present in a survey. 10 questions can be defined in a survey at max with the 10th question being the NPS question. |
Agent | Always select “ALL” agents for voice and web surveys. For SMS surveys, select the name of the agent against whom you want to conduct the survey. |
SMS Question | Choose the SMS question to be sent to the customer at the end of the call. This is the question that has been created through Questions interface. This field is shown if the selected survey channel is type SMS. Note that in the case of SMS surveys, we can only send one question in an SMS survey. |
Type | The type of the survey could be Standard, Callback. In Standard surveys, we do have the ability to play the survey on the same call after the agent hangs up the call, while in Callback Surveys, an outbound survey call is generated once the customer call ends. This field is only shown in case of UCCE-based deployments. In the case of CCX, there’s only one type of survey, which is “Standard” (happens right after the customer interaction) |
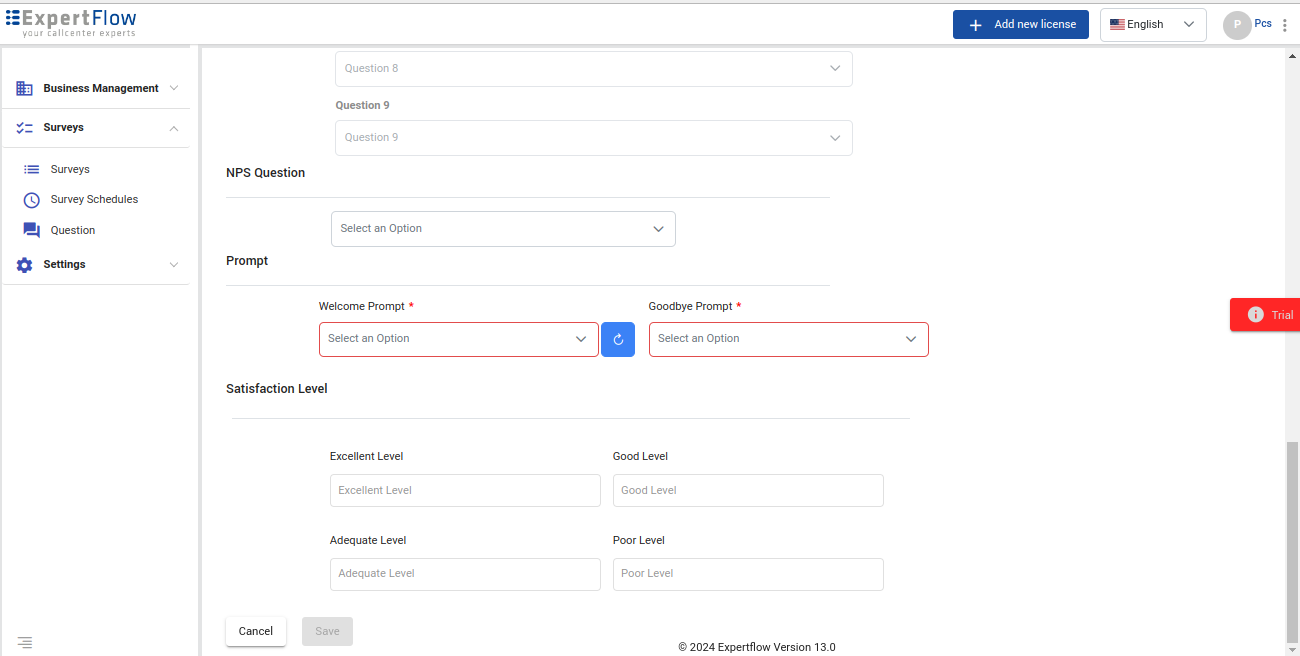
NPS Question | NPS stands for Net Promoter Score. It's a customer satisfaction benchmark that measures how likely customers are to recommend your product to a friend, family, or colleague. It is a typical answer to a question like "On a scale of 0 to 10, how likely are you to recommend us to a friend?" The responses to this question can be categorized into three groups:
|
Prompts | Select Welcome and Goodbye prompts for voice-based IVR surveys. If the selected survey channel is SMS or Web, these fields will not be shown. |
Greeting Message | In the case of Web Survey, the user can define the greeting message for a particular web survey. This message appears at the top of the web survey form |
Goodbye Message | In the case of Web Survey, the user can define the goodbye message for a particular web survey, which appears after the survey feedback is submitted by the customer |
Satisfaction Levels | Set customized satisfaction levels based on business requirements. By default, if the survey results are 100%, this would be marked as Excellent, if it is greater than or equal to 90%, the survey result would be marked as Good, and so on. |
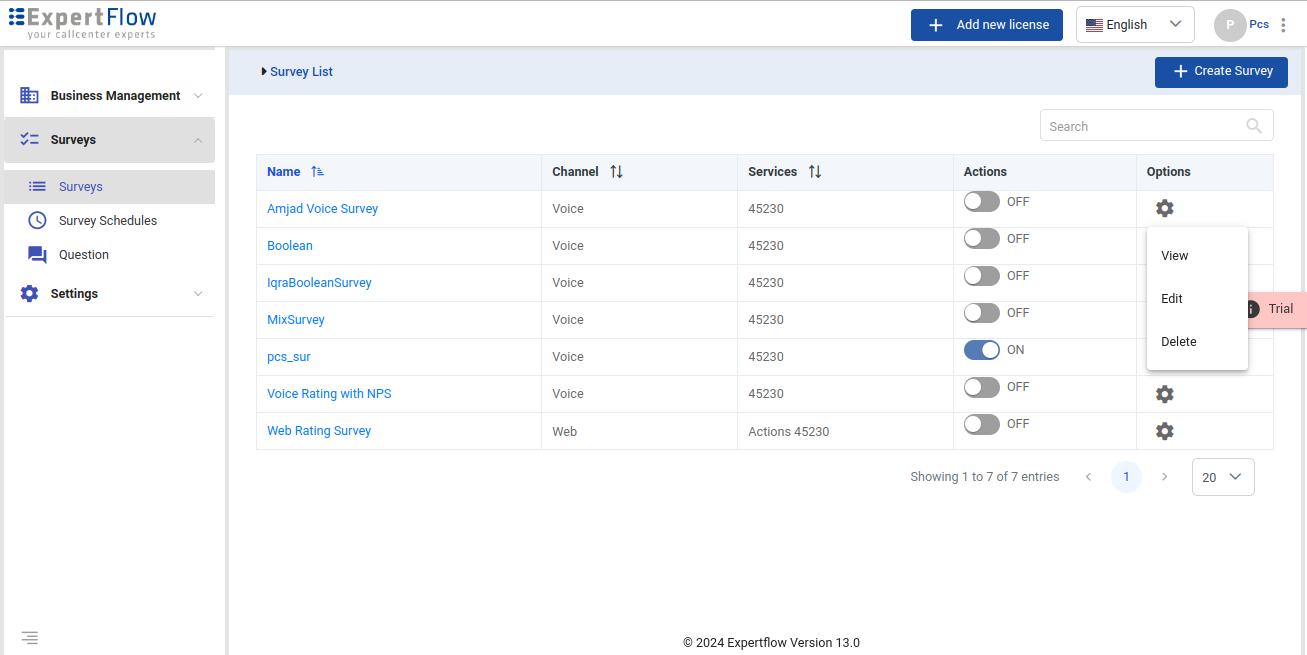
Once a survey is created, its default state is OFF. You can start/stop a survey at any point in time. Once a survey is turned ON, it can not be edited. The only operation that can be performed against an already running survey is to set up notification rules. See the Setting up Notification Rules section for more details.
Proactive IVR/SMS Surveys
Running a survey proactively allows you to instantly make fresh outbound calls or send the survey SMS in bulk to a list of customers at any time. You can add customers to a list whom you think are/could be the eligible participants of the survey and upload the list to an ExpertFlow Campaign Manager campaign. From the ECM campaign, select this campaign to run as a survey campaign. ECM calls PCS APIs to trigger the PCS IVR or send the SMS via PCS. The response to the survey is then collected and available for reporting from the PCS Database.
Note:
This feature is tested/available only for CCE deployments.
This feature requires integration with ECM.
Since only IVR-based surveys can run from PCS, Cisco OB IVR licenses are required to run Proactive IVR or Callback surveys from PCS.
To execute proactive surveys, the allowable file size of the contacts CSV is 128 KB
To run proactive surveys or targeted surveys on a customer list, upload the customer list to an ECM campaign.
The other options against an existing survey include Edit, Delete, and View the survey.
One survey can be ON against one or ALL services at a time.
A survey cannot be created against multiple services.
The rating range for rating type surveys (i.e., 1-5 or 0-9) is defined in the deployment time and set by the EF IT team.
Surveys should remain turned ON to continue to collect customer responses in the survey
A survey once created cannot be modified to add/remove questions from it. The user can, however, modify the survey Name, Description, and the Satisfaction Levels of an active survey.
Setting Up Survey Schedules
You can set survey schedules against a particular survey. Schedules can be set for both “Standard” and “Real-time” surveys.
Go to Survey → Survey Schedules tab from the header. You can also add a schedule to an existing survey (only if the survey is turned OFF).
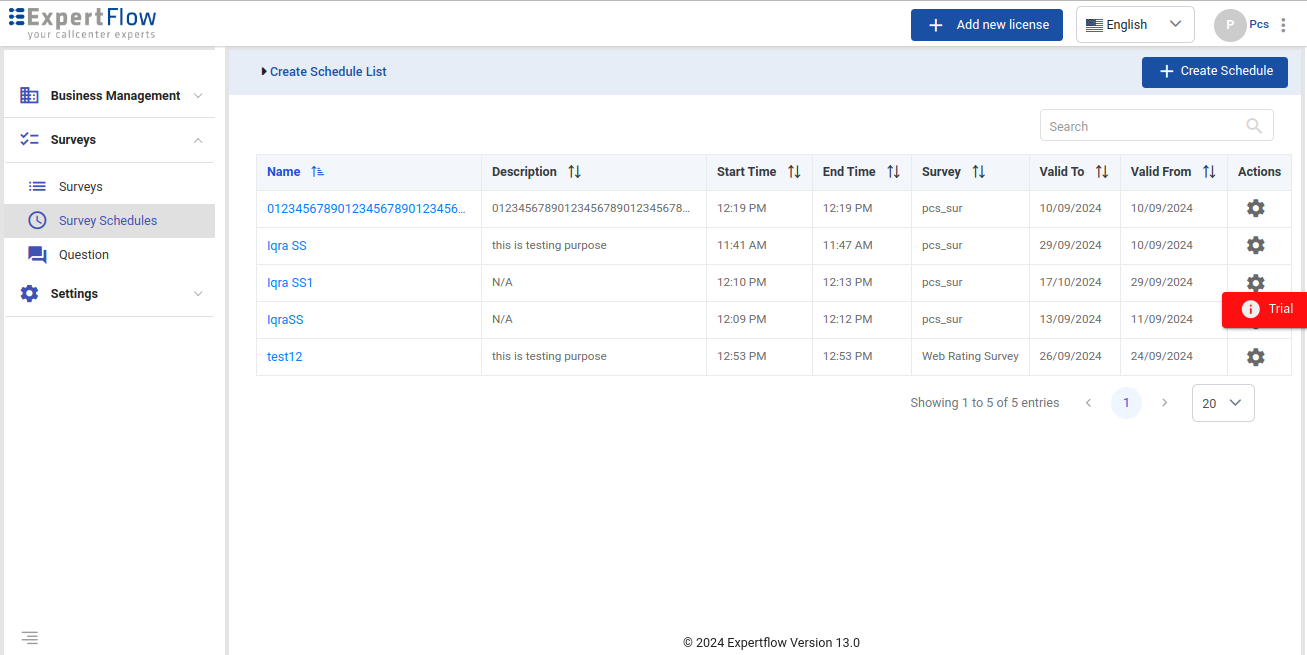
Click the Create Schedule button to create a new schedule.
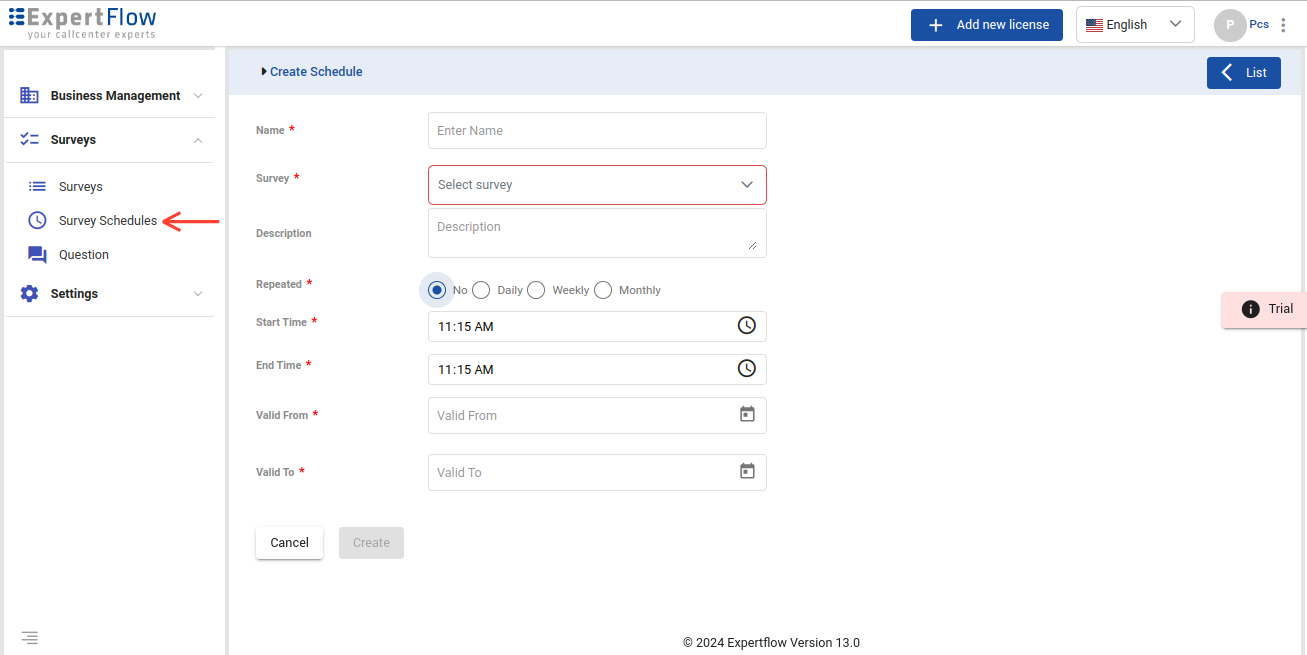
Under the Create Schedule page, provide the following information:
Name (mandatory): Give a name to the schedule.
Description: Give a short description of the survey schedule.
Survey (mandatory): Select a survey for which this schedule is to be created.
Repeat: Give a recurrence type for the schedule. The currently available types are Daily, Weekly, Monthly. Select No if recurrence is not required.
Start Time (mandatory): Give a start time for the schedule.
End Time (mandatory): Give an end time for the schedule.
Valid From (mandatory): Give a valid from date from which this schedule would become effective.
Valid To (mandatory): Give a date until when the schedule remains active.
Click the Create button to create a survey schedule.
To see possible actions against an already created Schedule, select the Schedule under the Schedule List and expand the Action menu under it.
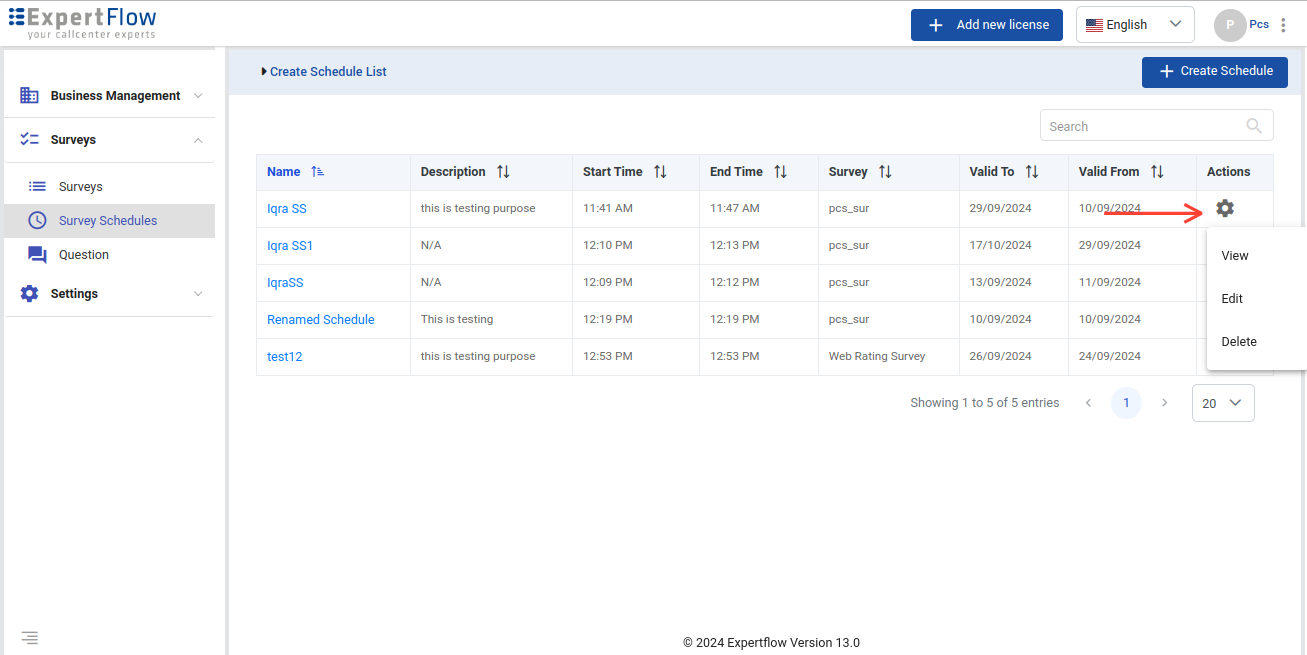
Once created, you cannot change the survey to which it is associated.
You cannot create survey schedules for web surveys.
Making configurable the order of the survey rating scale
The rating scale available within the app runs in a sequence with 1 being the highest negative and 5 being the highest positive (in 1-5 rating scale) or 0 being the highest negative and 9 being the highest positive (in 0-9 rating scale), in configurable rating scale1 being the highest positive and 5 being the highest negative. In the same order, you can apply to the other rating scale, i.e., 0-9 (0 being the highest positive and 9 being the highest negative).
In the configuration settings, the deployment engineer (or customer) will be able to map the worst and the best rating with the highest or the lowest number. This will apply to both 1-5 and 0-9 to rating scales for all surveys. For instance, you can map the worst rating score to the highest number on the rating scale (i.e., 5 in case of 1-5 rating scale) while mapping the best score to the lowest number (i.e., 1 in case of 1-5 rating scale). Similarly, it can also provide the opposite of it.
This will be a one-time configuration, as other settings in the configuration settings. If it is changed later in production, it might affect reports.
In the PCS configuration settings page, right below the Rating range options, there is an option for this proposed setting with label Best Rating with two options 1. The highest number 2. Lowest number
By default, the Highest number will be selected.
There will be changes in the Summary and average reports and Email notifications average calculations.
This does not apply to the rating scale of NPS, which is the standard rating scale with 1-6 being detractors, 7-8 passives, and 9-10 being the promoters scores.
