Solution Components
EF Oracle Service Cloud Connector has two major components:
-
EF Oracle Service Cloud CTI Add - to be installed on Oracle Service Cloud CRM as an Add-In Component.
-
EF Connector – is to be installed on a separate Windows machine. See EF-Connector-install-guide for more information about setting up EF Connector.
Before you Start the deployment of the CTI Add-In in Oracle, ensure that you have already installed the EF Connector mentioned in part #2 above and that CTI events are landing the the CTI Connector server.
Pre-Install Setup
Validate Prerequisites
-
Verify that all the installation prerequisites (hardware, software, network and any other) are all met
-
Verify that Internet Explorer version 11.0 or higher version is installed on agents machines.
-
Verify that agent/ staff machine has .NET Framework version 4.5.2 or higher version is installed
-
Verify that required Oracle Service Cloud administrative access is granted
-
Verify that required System level administrative access is granted
-
Verify that required ports are open on the Oracle Service cloud server
-
Verify that Finesse server is accessible and is in service
-
Verify that EF Connector is already installed and configured
EF Oracle Service Cloud CTI Add-In Installation
Download the ExtensionBarAddIn.zip from Google Drive here, open it with Winrar and edit the below fields under <userSettings> in the app.config file.
|
Name |
Description |
Default Value |
|
BROKER_URL |
Provide IP address to AQM Server & port as 61616 e.g. 10.100.4.242:61616 |
|
|
Username |
Provide the Username for the account which you’ve assigned the CTI. This account must have full admin rights |
|
|
Password |
Provide the Password for the account which you’ve assigned the CTI. |
|
|
County_CODE |
Provide the phone number /ANI prefix e.g. 254 for Kenya |
|
|
ScreenPopURL |
Provide the port that you’ve configured to be used for screenpop. If you have not configured this port- You can see how that is done from here. Oracle Uses localhost as default server address or 127.0.0.1 |
|
Login using Administrative user account to Oracle service cloud, then navigate to Configuration section and perform the following;
-
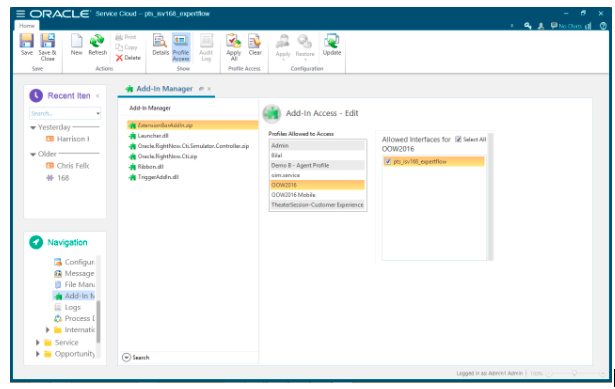
Upload the Add-In in step 2 above and click save. See
Uploading Toolbar Add-In
for details
-
Assign a user profile to this Add In(s) and click save.
-
Verify that Add-In(s) file is properly loaded. See
Uploading Toolbar Add-In
for details
-
Single Sign-On configuration for CTI agents. See
Agent Login Custom Fields Creation
Oracle Service Cloud CTI configuration
Uploading Toolbar Add-In
To upload an Add-In, click on new then choose the file you want to upload from your computer's file system and upload. Then choose the user profile you’ll want to associate this Add-In and save.
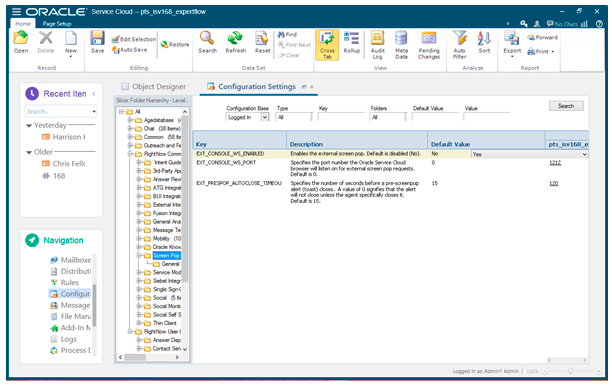
Screen Pop Configuration(s)
Select “YES” on EXT_CONSOLE_WS_ENABLED section to enable screen pop, then enter the port number and save the changes.
Agent Login Custom Fields Creation
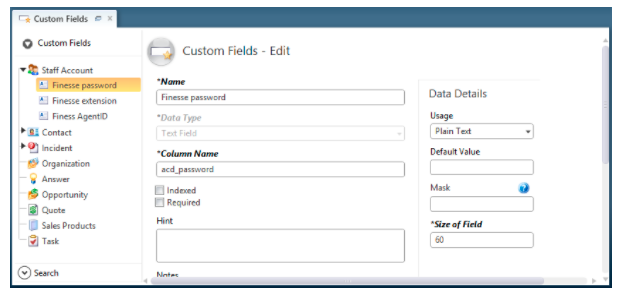
For agent to login to the CTI Connector, custom fields to capture Finesse Agent ID, Finesse Password and Finesse extension credentials must be created under Custom Field section, strictly with exact specifications as show in the screen shots attached.
-
Finesse AgentID field is to be created with its details as shown below

2. Finesse Password field is to be created with its details as shown below:
3. Finesse Extension field is to be created with its details as shown below:
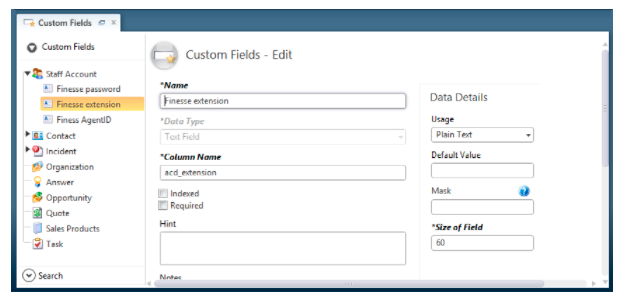
After creating each of the custom fields above click on save button to effect the changes to the CRM. For each agent, add Finesse credentials in the respective field and save against his/her profile.

Once above configuration is done
Login to the Oracle Service Cloud CRM using any agent configure in the CRM to login to Finesse, and you should be able to see the CTI toolbar. After successful login to the CTI toolbar, you should be able to receive events from the Connector. Upon accepting customer call, a screen pop up of customer information will happen in case the customer contact/ANI matches any record in the CRM as shown below.

EF Oracle Service cloud Add-in Logging Configuration
-
Errors thrown by the Add-In are stored on agents documents directory : here C:\Users\{account_name}\Documents\EFLogs\Connector.log
-
Default log folder will be created at in C:\Users\{account_name}\Documents\EFLogs.
-
A daily rolling file is created in the specified folder
|
Log Level |
Description |
|
ERROR |
Log all messages with level error, fatal |
|
INFO |
Log all messages with level info |
|
DEBUG |
Log all messages with level debug |
EF Connector Logging Configuration
-
Connector logging configurations are defined in config/Log4cxxConfig.xml.
-
Default log folder will be created at in C:\Program Files (x86)\EFConnector\log.
-
A daily rolling file is created in the specified folder
-
The default log level is set to debug. You can choose any of the following log levels for restricted logging.
|
Log Level |
Description |
|
OFF |
No logging |
|
FATAL |
Log only fatal issues |
|
ERROR |
Log all messages with level error, fatal |
|
WARN |
Log all messages with level warn, error, fatal |
|
INFO |
Log all messages with level info, warn, error, fatal |
|
DEBUG |
Log all messages with level debug, info, warn, error, fatal |
|
TRACE |
Log all messages with level trace, debug, info, warn, error, fatal |
|
ALL |
Log all messages |
Note: In log4cxx.xml, log level should be in lowercase.
Oracle Service Cloud CTI Install Verification
-
Make sure that ActiveMQ is up and running.
-
Login to Oracle Service Cloud Desktop using one of the configured agents (associated with this Add-In profile)
-
To verify that the CTI Add-In is loaded the toolbar should be shown on the Toolbar section on top of the agent desktop interface.
-
You should be able to login to the CTI by clicking on the login button.
-
Verify that the agent can login to the Oracle Service Cloud CTI Toolbar and if agent can receive events from the Connector.
-
Verify that the agent gets the desired controls on the toolbar after login.
-
Verify that agent can make and receive calls
-
Verify that the agent can receive the screen pop of customer information after accepting the incoming call on the agent desktop if there is a match of customer’s phone number in the CRM.
Troubleshooting Guide
-
If CTI Add-In is not loaded
a).Verify that the appropriate user profile is associated to this Add-In
b). Verify that the Add In is enabled for this user account. If not, ensure that the check box is checked.
-
If controls are not enabled even after login
a). Verify that you have internet access and you are logged in to the IP phone (softphone).
b). If AMQ/GC is running and you still face the issue with controls even after verifying step (a), please share the log of Connector for review.
-
If you can’t receive a response to any actions like Change Agent State
a). Make sure that Finesse is running and GC configurations match the current Finesse setup.