Purpose
This deployment guide provides detailed instructions for installing, configuring, and using the EFCX connector within Suite CRM. It is designed to ensure a smooth integration process, enabling users to effectively utilize the connector within their Suite CRM environment.
Intended Audience
This document is intended for customers who want to deploy EFCX connector within Suite CRM.
Prerequisites
-
You must have installed the EFCX on your server before integrating.
-
A Suite CRM account is required.
Install Expertflow EFCX Package
Follow these steps to install the EFCX Connector into Suite CRM:
-
Make sure Node.js is installed on the machine where Suite CRM is hosted.
-
Download the ZIP package from this URL.
-
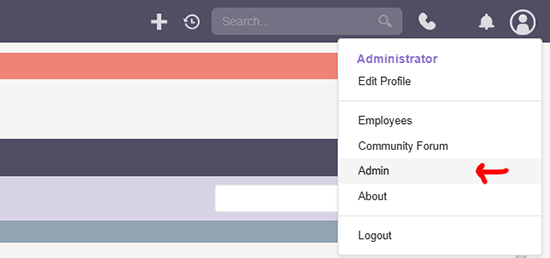
Log in to your Suite CRM account as an administrator.
-
From the user icon, select Admin, then choose Module Loader from the menu.
-
Select the ZIP file, then click Upload, followed by Install, then Commit, and wait for the process to complete.
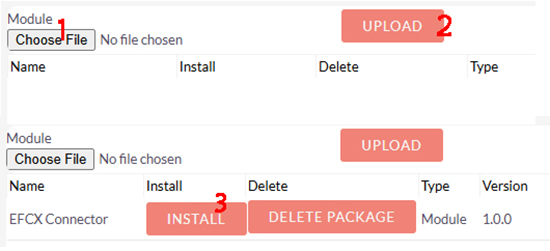
Keep the site open and wait for the popup confirming 100% completion. Then click Home and refresh the page.
After installation, make sure to set the EFCX URL and DN Number in the configuration.
-
To access the configurations, click the phone icon in the top right to open the EFCX widget, then click the settings icon.
-
Make any changes as per the below table, then press Enter to save.
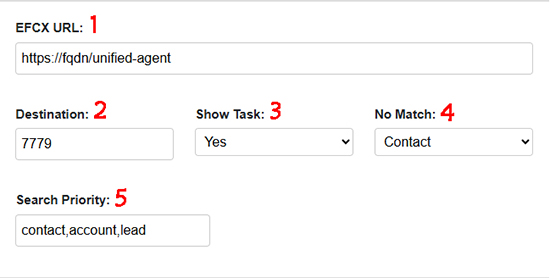
Configurations
|
No |
Property Name |
Value |
|---|---|---|
|
1 |
EFCX URL |
The base EFCX URL where the agent desk is deployed. |
|
2 |
Destination Number |
The DN number used for agent outbound or click-to-dial calls. |
|
3 |
Show Task |
Whether to open the task after it's created (it will be created automatically after the conversation ends). |
|
4 |
No Match |
The entity where new customers will be saved if they don't already exist in the CRM. |
|
5 |
Search Priority |
The entity to search first when looking up customer numbers. |
Uninstall Expertflow EFCX Package
Follow these steps to uninstall the EFCX Connector from Suite CRM:
-
Log in to your Suite CRM account as an administrator.
-
Hover over the user icon in the top right corner and select Admin.
-
In the Admin Tools section, select Module Loader.
-
Click Uninstall then Commit and wait for the process to complete (may take some time, depending on your machine).
Keep the site open and wait for the popup confirming 100% completion. Then click Home and refresh the page.