Screen Recording for Cisco Configuration and Deployment Guide
Pre-Requisite
Voice Recording Solution should be deployed on a Server.
An SFTP server is required which is same as where VRS is deployed.
This SFTP server must be configured for the root user.
Deployment and Configuration of Screen Recording Service
For screen recording service follow the below:
A) SFTP server configuration
Configure SFTP on VRS server on root user.
Note the SFTP root password.
Note the SFTP IP Address.
B) Finesse Server Gadget Deployment
Gadget file to be deployed is FinesseGadgetApi.zip download.
Unzip the finessesGadgetApi.zip
From you host Machine navigate to the Gadget Directory in terminal or sftp software.
Connect to the Finesse host using the following command: sftp 3rdpartygadget@<finesse.ip> (Replace finesse.ip with IP address)
If it prompts for a password, put in the password for the 3rdpartygadget user.
Once connected to the finesse machine, use cd files command to navigate into the files folder.
Once you are in the files folder, use the command put -r <foldername> to copy folders. Replace foldername with FinessesGadget.
Once files are copied, log in to https://<finesse.ip>:8445/cfadmin . Replace finesse.ip with you finesse ip or FQDN.
Click on Team Resources, click on a team, and edit the text that describes the Finesse desktop. Locate <role>agent</role>.
Locate the <id>home</id> in the agent role
Add the line in the <gadgets> tab as show in image.
<gadget>/3rdpartygadget/files/FinessesGadgetApi/ScreenRecordingGadget.xml</gadget>.
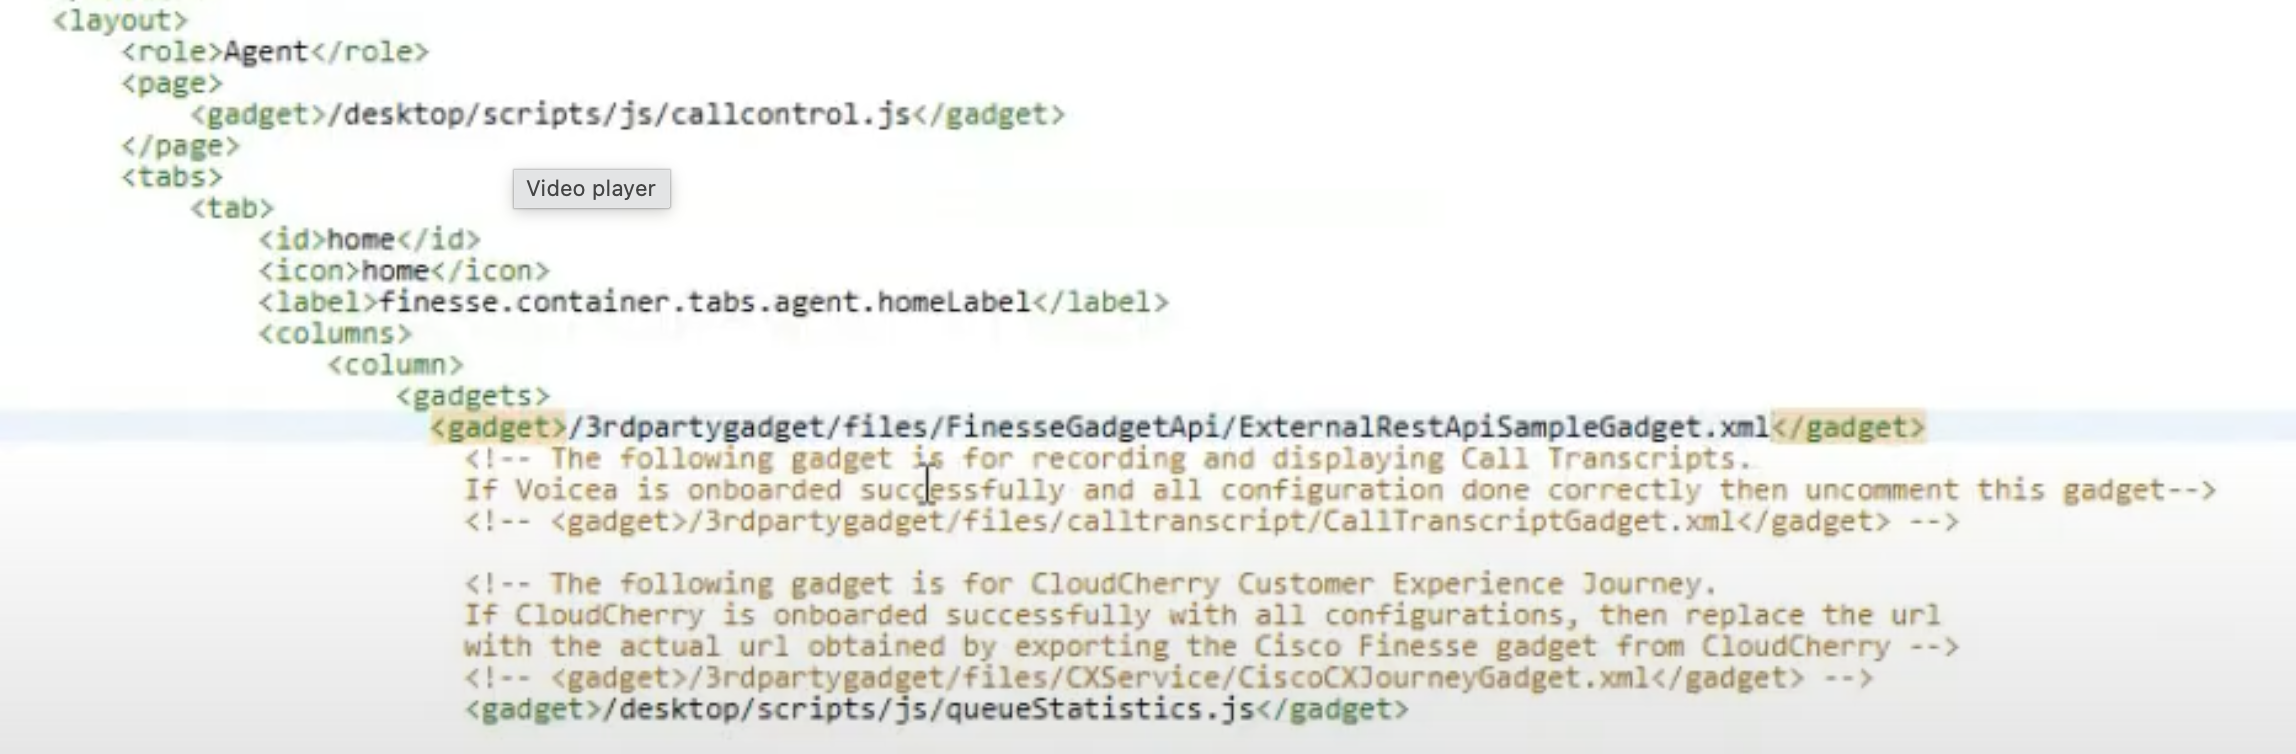
Example Adding Gadget for Agent
Repeat the above steps for the supervisor role (if the screen recording is required for the supervisor).
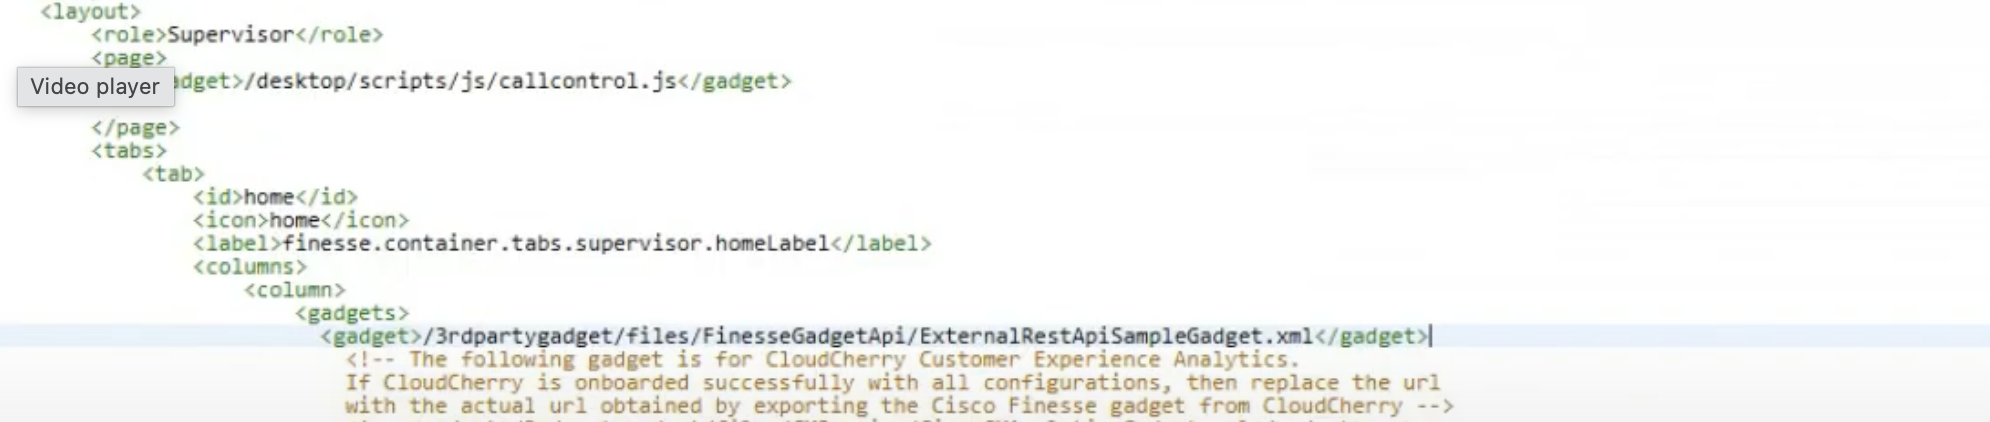
Example Adding Gadget for Supervisor
Login to the UCCX/UCCE Administration. Cisco U
From menu bar open Subsystems → Rmcm → Teams
Open your team and add the Agents (on which recording is to be enabled) in the Assigned Resources Section.
C) Agent Computer
The agent workstation includes two user accounts. One account is intended for administrative or supervisory use, while the second account is designated for the agent. The actual account names may differ from “admin” or “agent” depending on the deployment environment.
Log into Admin account (Remember: This is the primary workstation account managed by the administrator or supervisor, and its name may vary based on the deployment)
Download the Screen Recording executable file from here Controller.exe .
Download config-admin.ps1 file.
Download config-agent.ps1
Download ffmpeg.zip and
Unzip ffmepg.zip folder and copy the ffmpeg file from the folder.
Create a folder named "Service" in the C: drive and place the following files inside it:
Controller.exe
config-admin.ps1
config-agent.ps1
ffmpeg.exe
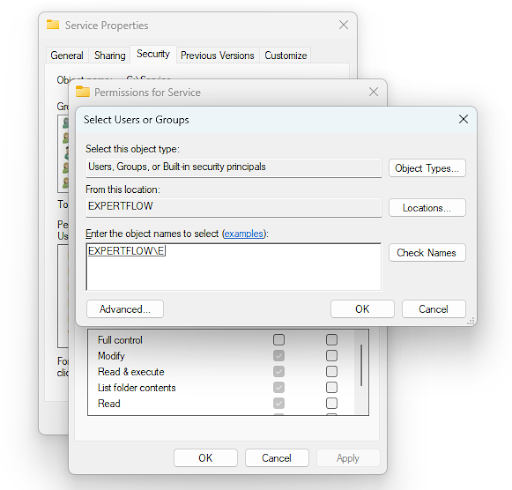
Right click on the Service folder and go to properties.
In properties go to Security section.
Click Edit button to change permissions.
Click Add to add Admin and Agent Account.
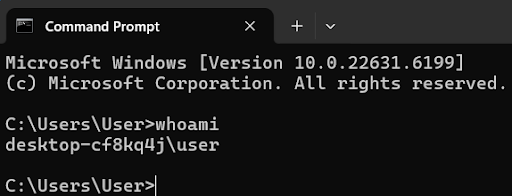
Name of account can be found in command prompt using the command
whoamias shown in the image
Type the name of the Admin user account and press check Names (Do not confuse it with Administrator Account which already exists in the list)
Upon press check names button, a name will appear e.g DESKTOP-FPCJMEG\EF.
Example
Press Ok
Now, Grant full permission (Full Control, Modify, Read, Read & execute, special permission) in the below section to the Admin account.
Repeat the same steps for the Agent Account as well.
Grant all permission except full control and special permission to the Agent account
Press Ok.
Go to Advanced option in the security tab.
Double click on the Agent account.
Press ' Show advance permissions' . Make sure Delete is unchecked.
Open the command prompt in administrator mode or run as administrator.
Add the required Environment Variables in the Command Prompt using the following syntax:
CODEsetx "<Environment Variable>" <Value> /MRefer to the table below for the necessary variables and their corresponding values.
Environment Variables | Value |
|---|---|
AGENT_HOST | localhost |
SFTP_IP | The IP address of the SFTP server, which is the same as the one where VRS is deployed |
SFTP_ROOT_PASSWORD | Password of the SFTP Server |
Once done, close the command prompt and reopen. Verify that environment variables are saved by running the following command:
echo %<Environment Variable>%Open PowerShell as Administrator and run the following commands on any path:
Set-ExecutionPolicy RemoteSigned -Scope CurrentUserSet-ExecutionPolicy Unrestricted -Scope CurrentUser
A message will appear. Write yes and press enter.
Run the power shell in administrator mode
In PowerShell navigate to C:\Service\ using this command
cd C:\Service\Run the config-admin.ps1 using command.
.\config-admin.ps1If powershell asks permission to run it then type 'R' and run this command
Run the config-agent.ps1 using command.
.\config-agent.ps1Press windows button and type Task Scheduler.
In the left most section click on Task Scheduler Library which is under Task Scheduler (local)
All Libraries will open in the middle section
At the bottom two task with name Service and Service-agent are now created.
Double Click the Service task.
A dialog box will appear.
In the security option section make sure you have your account set under 'When running the task, use the following user account'
Make sure 'Run only when user is logged on' option is checked
Make sure ‘Run with the highest privileges’ option is checked
Press Ok.
Double Click the Service-agent task
Under security option add the agent account.
Click on the 'Change User or Group'
Enter the name of the agent account. Press Check Names.
Name of the agent account will appear. eg DESKTOP-FPCJMEG\EF2
Press OK.
Single click the Service task and In the right most section press Run.
Do the same for Service-agent.
Close the task scheduler.
Go to the C Drive where the Service folder is located, and manually run
Controller.exeby double-clicking it.Open the Browser and access this URL http://localhost:8000 . A page would open indicating that service is running fine.
Now, make a test call. Upon transferring the file to the SFTP server, a folder named screen_recording will automatically be created in the root directory
Access the server via SSH and log in to the SFTP server.
Go to the
/screen_recordingDirectory on the SFTP server and Verify if your recording is being saved.Download and Play the video manually.
https://<SFTP_IP>/vrs/recording/screen/<filename.extension>
Login to the VRS Application and Play the video button of the Call Activity