This document describes how Cisco UCCX/UCCE supervisors and system administrators can use ECM (Campaigns) administration to manage routine contact center Campaign Management.
Login
Use the super admin credentials (provided by Expertflow) when logging on to ECM for the first time) to have super admin access to ECM.
Managing Campaigns
Cisco campaigns are supposed to be created via Cisco Outbound Administration interfaces. While creating a campaign in ECM, you will see a drop-down list of available Cisco outbound campaigns. Select one Cisco campaign from the dropdown and link it with the new ECM campaign. With this implementation, you can link a single Cisco campaign with multiple campaigns of ECM.
While creating a campaign, you need to set the campaign type as ‘IVR’ or ‘Agent’ based. For all IVR based campaigns, ECM allows to dynamically set the IVR prompts as key-value pairs where “key” is a name selected from an application-wide defined list of keys and the “value” is one of the available prompts. You can add as many prompts as needed for the campaign to use them in the IVR application. However, note that this facility is only available when ECM is running with CCX.
Using this feature, the same IVR application (underlying CCX Campaign) may be reused with multiple ECM Campaigns. This is particularly useful when it’s necessary to run different campaigns simultaneously and all campaigns are expected to use the same IVR application with different prompts to be played for each campaign.
While creating some agent-based campaign there is an option to select a ‘form’ from the dropdown list.
To create new campaigns, navigate to Campaigns link in the left sidebar.
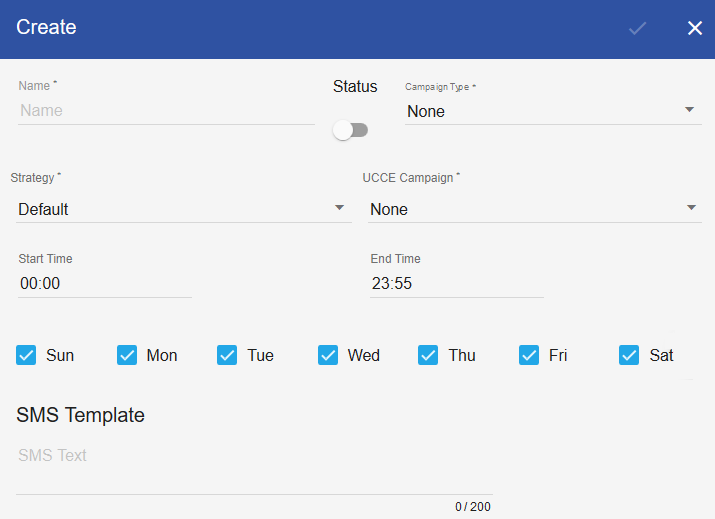
Fill in the form with the help of the following table:
|
Field Name |
Description |
|
Name |
Enter the name of the campaign. The name of the campaign should not contain special characters and spaces. This is a mandatory field. Each campaign name should be unique and must be longer than 3 characters. |
|
Status |
Switch ‘On’ or ‘Off’ to enable or disable the campaign respectively. If an enabled campaign is to be stopped, just switch its status to ‘Off’. Every newly created campaign has switched off status. |
|
Campaign Type |
This determines the type of campaign. Each voice campaign can either be ‘Agent-based’ or ‘IVR-based’. The default value for the new campaign is always set to None. The type of campaign once defined, cannot be changed later. |
|
Cisco Campaign |
Select one Cisco campaign to be linked with the new ECM campaign. This dropdown populates depending upon the value of “Campaign Type”. So if it is “IVR”, all IVR campaigns will be populated in the list and if the “Campaign Type” selected above is None, this field will also show None as the default value. |
|
Strategy |
This is the name of the call strategy to be used for the campaign. Each campaign must have a call strategy associated with it. The system has a Default strategy which includes a single SMS attempt only for SMS campaigns. The call strategy of a campaign can only be changed when a campaign is paused. See Call Strategy Management for details. |
|
Start/End time |
This determines the valid timings of the campaign execution. So the dialer starts dialing the calls based on the defined time of the campaign. |
|
Days of week |
Select the days of the week when the campaign should start dialing the calls. By default, all weekdays are selected. |
|
SMS Template |
Create/Save the SMS template to send the SMS on campaign contacts |
Click the ‘Tick’ icon to save changes.
To update an existing campaign, click on the name of the campaign from the “Campaigns list”.
To delete a campaign, click on the campaign name and click the “delete” icon displayed on the top right of the campaign detail window.
-
If you observe that the changes are not taking effect, try navigating to some other page and then get back to see the changes.
-
For web callback requests, create a campaign for callbacks and keep it running based on the call center opening/closing hours. All callback requests collected from the web would be dialed automatically based on this campaign timing. Note that for callbacks, only one campaign for web should be running at one time.
Upload campaign contacts
Campaign contacts can be uploaded from the campaign interface in the form of a CSV/text file.
We recommend that you import a maximum of 5,000 contacts in the campaign at a time.
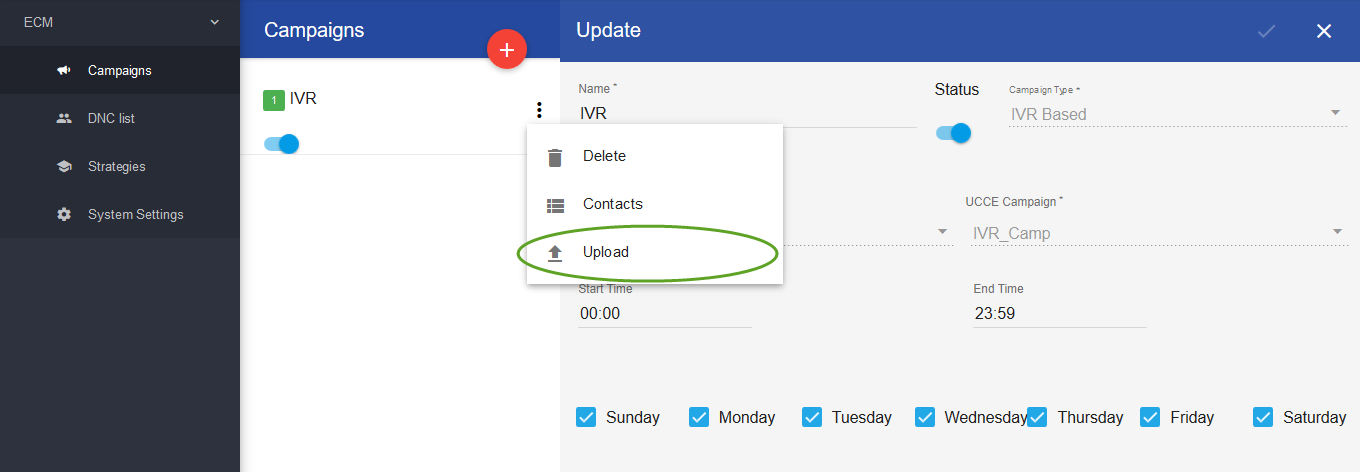
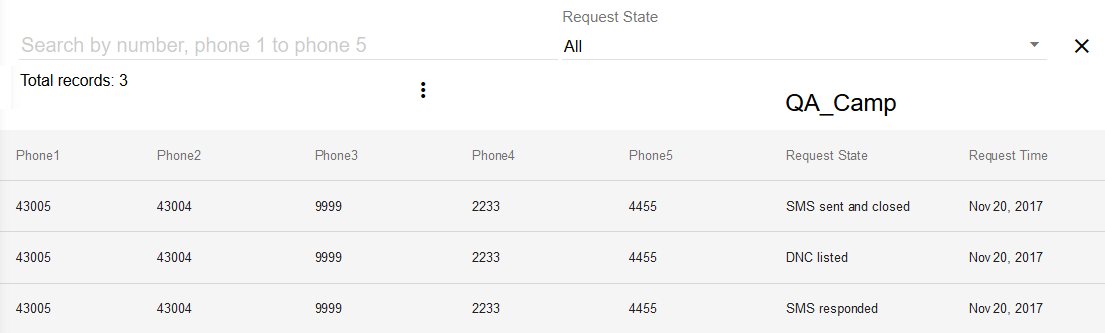
User can also monitor the status of uploaded contacts from the “Contacts” menu
Campaign contacts can also be imported from a shared location in the form of a CSV/text file for ECM to read. See Setting Up Campaigns to see how to specify the machine access.
A sample CSV file for uploading data can be seen in the picture below:

Note the following:
-
Phone 1-5: The phone numbers for the contact. Each number can be 15 characters long and must be a valid phone number. Phone1 is mandatory and must be specified.
-
Business parameters 1-12: The length of data in these parameters can be defined as per the integration specifications. Normally, the length of these parameters cannot exceed 255 characters.
ECM APIs can also be used to upload campaign data from CRM or some other external application. Refer to API doc => Insert Caller APIs to see how to Upload contacts via APIs.
Call Strategy Management
Call strategy defines the calling pattern and redials attempts based on call results. Attempts can be defined in strategy, each attempt has its unique name. Call strategies state what to do with contact if not reached on the first attempt. This includes configuration of retry attempts and the selection of the channel to retry the contact (i.e. Voice or SMS).
Multiple campaigns can also share one, common call strategy.
Maximum attempts upon the number of attempts define in strategy.
Navigate to Strategies link in the left sidebar.
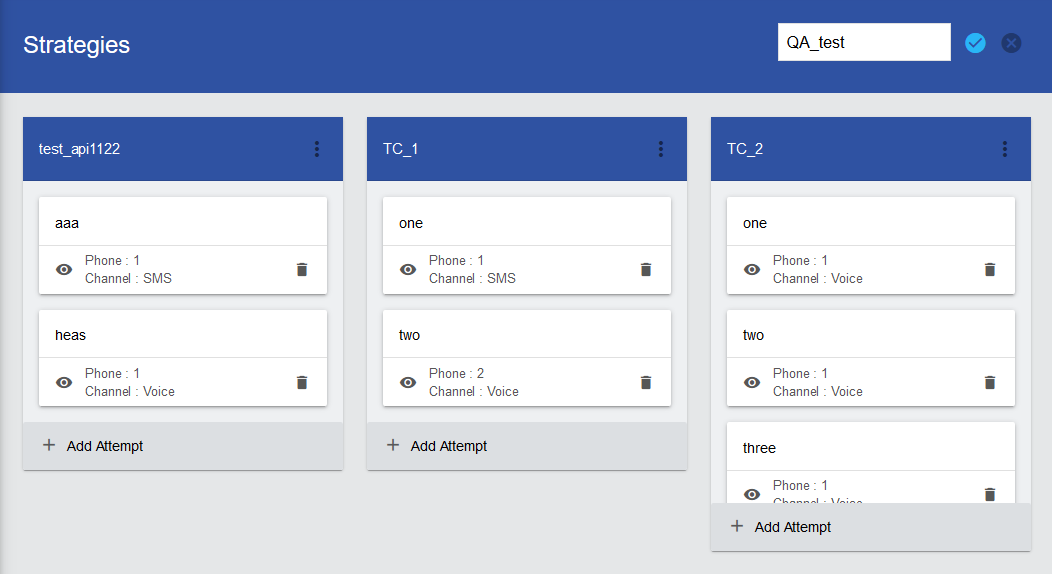
Create a strategy and define attempts in it
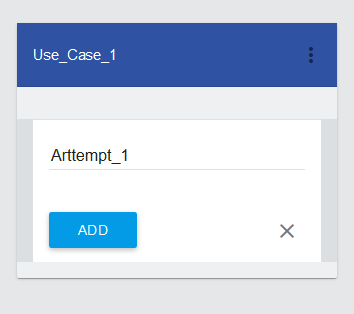
Attempt form:
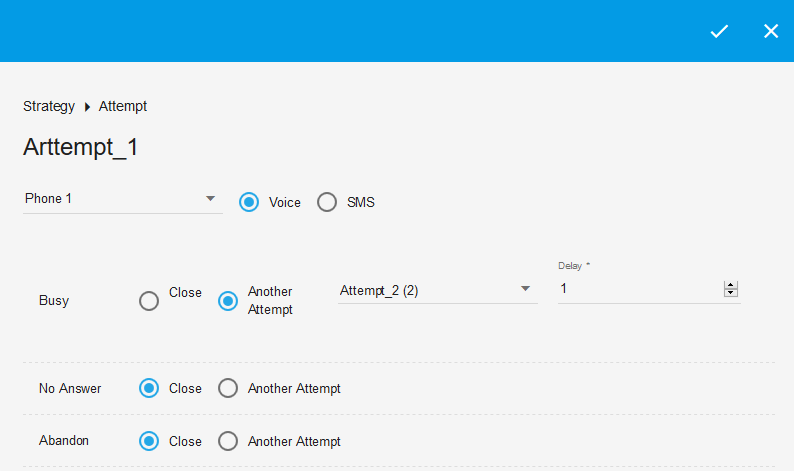
Fill the form using the details below:
|
Field Name |
Description |
|
Name |
Enter the name of the call strategy. This is a mandatory field. |
|
Attempts Name |
Each strategy has multiple attempts, depend upon the use case. |
|
Contact Selection Option |
ECM Strategy provides a drop-down option to select the contacts from phone 1 to phone 5 for the attempt. |
|
Channel Selection Option |
ECM provides multiple channels to run the campaign
|
|
Dialer Outcome/Call Result |
This defines the dialer outcomes or the call results against which the strategy must be applied. ECM currently supports the following dialer outcomes:
You can turn the switch ‘On’ or ‘Off’ to enable/disable the strategy for a particular dialer outcome. |
|
Delay (minutes) |
This is the delay time or interval to be provided between the attempts. Please note that the actual dialing interval between the retry attempts will be more than the configured value. It varies and depends upon the following factors:
|
|
Expiry (minutes) |
This is the expiry time for SMS |
To update an existing strategy, Change the attempt order by drag and drop. An attempt can be added/delete from strategy.
To add a new strategy while viewing the strategy list, click the ‘+’ icon.
To delete a strategy, click the Dots against the strategy name and click the delete option.
-
There is a system-defined Default strategy, which includes an SMS attempt for SMS campaigns.
-
At least one strategy must be defined in the application to be used with campaigns.
-
A strategy associated with a campaign cannot be deleted.
-
The “Callback” strategy might not work properly. If you want agents to schedule a callback from Finesse, you should not set the call strategy for “Callbacks”.
-
The scheduled callbacks are handled directly through the Cisco OB dialer. ECM will not be able to fetch the scheduled callback time details.
Do-Not-Call List (DNC)
The DNC list contains the phone numbers which should not be dialed for outbound campaigns. Usually, the customers who do not wish to be contacted by the organizations are added in the system as DNC contacts.
ECM scrubs the uploaded list of campaign contacts against the list of DNC before dialing the phone number. So if a contact exists in the DNC, that contact will not be dialed while dialing calls in the campaign.
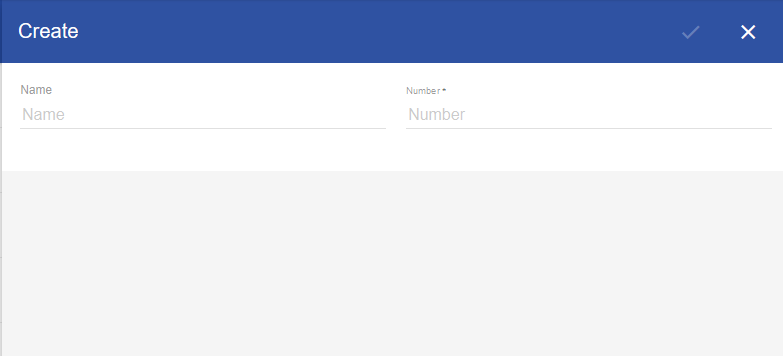
To add a new contact, hover your mouse on the ‘+’ icon. Click the ‘contact’ icon to add a single contact or ‘excel’ icon to add numbers in bulk through a CSV.
Fill in the form using the following details:
|
Field Name |
Description |
|---|---|
|
Name |
Enter a name for the contact. This field is optional. |
|
Number |
DNC list in ECM allows uploading numbers for a DNC contact. If any of the uploaded numbers in the campaign data, no call will be generated on that contact. A valid number should not exceed more than 15 digits. |
Click the ‘Tick’ icon to save changes. To update a contact, click on the contact from the DNC list.
To upload a CSV file of DNC contacts, the file must not exceed 2MB in size. See the following sample to learn about the pattern in which the numbers should be uploaded.
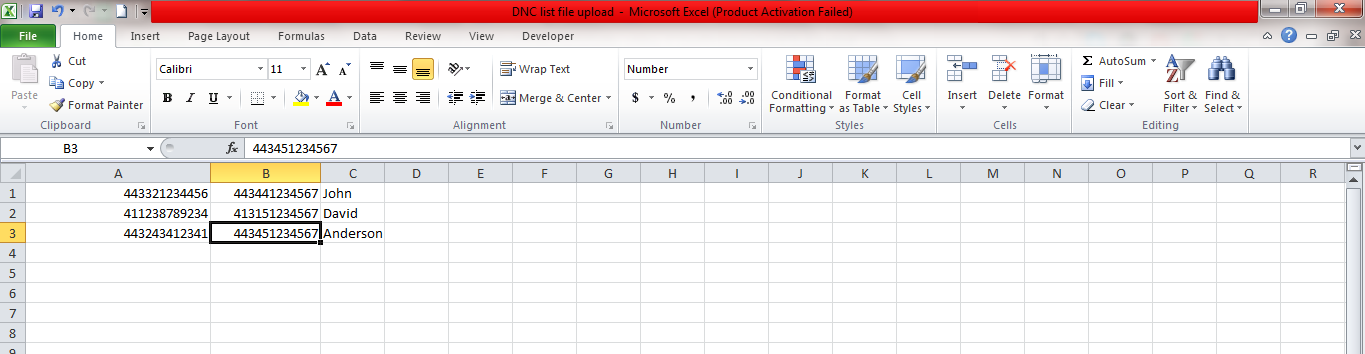
The first field in the file corresponds to the primary phone number, the second field corresponds to the secondary number while the third fields identify the contact name.
If a contact has any of its numbers invalid in the CSV, the record will be skipped altogether and will not be uploaded to the DNC list.