Logs retention sometimes called logs aggregation as well, performs collection of logs from all kubernetes engine sources e-g pods, system services, or nodes and correlate them based on the filtering algorithm that they can be digested appropriately and easily at the target service. Below are some of the examples we can implement on the kubernetes cluster to route logs from the Kubernetes to different targets.
EFK to Elasticsearch/Kibana
Requirements
For logs retention on a kubernetes cluster, below given Hardware specs are required for the solution. Please consult official documentation for the cluster size.
|
Component |
CPU |
RAM(GB) |
Disk( GB) |
|---|---|---|---|
|
elasticsearch |
4 |
16 |
250 |
|
Kibana |
2 |
4 |
N/A |
|
fluent-bit |
0.5 |
.5 |
|
A dedicated worker node will be required with above given specs.
Introduction
This document proposes a solution to retain logs for the solution deployed on any Kubernetes engine. These logs are then served in a web administration pane of ElasticSearch and are stored in its own backend storage supported by the respective storage class configured on the cluster. Ideally, when configuring the logs retention using this document, kindly consider reserving enough storage for the volume to hold as much logs as required or mandated in the customer environment.
For details on how Kubernetes maintains logs on the node level, please consult this Kubernetes Logging Mechanism
We are using Fluentbit for preprocessing the logs before sending them to Elasticsearch. Fluentbit collects data and logs from different sources, unifies them, and sends them to multiple destinations. It has a minimal footprint ~450KB as compared to its predeceases Fluentd which has 40 MB of footprint which makes Fluentbit a super fast, lightweight, and highly scalable logging and metrics processor and forwarder.
.jpg?cb=c9342ebe3cfa2b06ccc2d5675b25737f)
First, need to clone the repository.
git clone -b <branch> https://gitlab.expertflow.com/cim/cim-solution.git
you should insert the name of the release branch name here <branch> i.e. CIM-1.0-Beta-SR9
After cloning the repository ,run the following command:
cd kubernetes/logging/EFK
kubectl create ns logging
Generate self-signed certificates. You can skip the following step if you already have valid certificates.
openssl req -x509 \
-newkey rsa:4096 \
-sha256 \
-days 3650 \
-nodes \
-keyout devops238.ef.com.key \
-out devops238.ef.com.crt \
-subj "/CN=devops238.ef.com" \
-addext "subjectAltName=DNS:devops238.ef.com,DNS:devops238.ef.com"
Replace the --key and --cert field with the name of your own key and cert files.
 kubectl create secret tls elastic-certificates -n logging \
 --key devops238.ef.com.key \
 --cert devops238.ef.com.crt \
 --dry-run=client -o yaml > elastic-certificates-secret.yml
Apply login credentials and certificates secrets.
kubectl apply -f elastic-certificates-secret.yml
kubectl apply -f elastic-credentials-secret.yml
Install Elastic search
Before Installing ElasticSearch, please confirm the storage class in values.yaml file matches your storage class.
helm upgrade --install=true elasticsearch \
--namespace logging \
--values elasticsearch/values-small.yaml elasticsearch/
for the validation of the Elasticsearch deployment, type:
curl -sk -u "elastic:vXVWD81ms2s6B56KVGQO" https://devops238.ef.com:9200/ | jq
Install Kibana
helm upgrade --install=true kibana \
  kibana/ \
  --namespace logging \
  --values kibana/values-large.yaml
Install Fluentbit
cd fluent-bit

kubectl apply  -f fb-role.yaml \
-f fb-rolebind.yaml \
-f fb-service.yaml \
-f fb-configmap.yaml \
-f fb-ds.yaml
You can access Kibana on the following link:
https://devops238.ef.com:5601/
username: elastic
password: vXVWD81ms2s6B56KVGQO
ELK to Syslog
Introduction
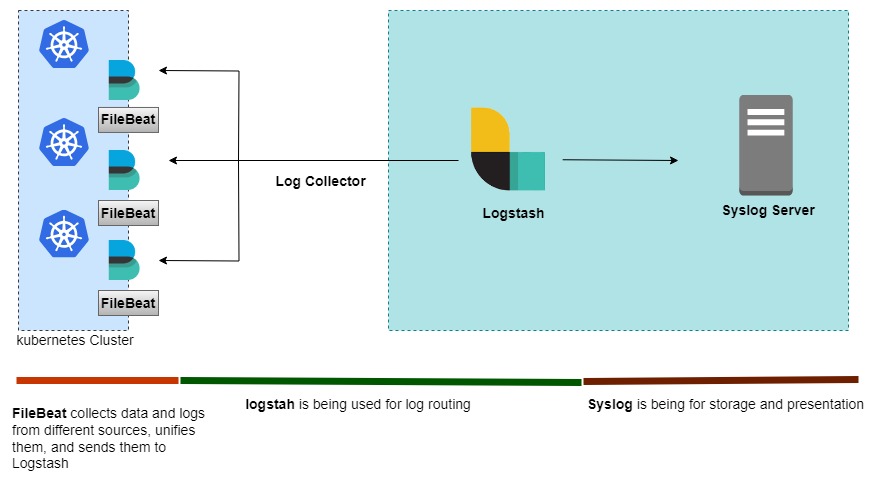
This document proposes a solution to retain logs for the solution deployed on any Kubernetes engine. We use filebeat to preprocess logs before delivering them to logstash.Filebeat collects and combines data and logs from many sources before sending them to logstash.For log routing, logstash is utilised.Syslog is used for both storage and presentation.
First, need to clone the repository.
git clone -b CIM-1.0-Beta-SR15 https://gitlab.expertflow.com/cim/cim-solution.git
you should insert the name of the release branch name here <release_branch> i.e. CIM-1.0-Beta-SR13
After cloning the repository, run the following command:
cd kubernetes/logging/syslog-ELK
Create the logging namespace
kubectl create ns logging
Apply the Kubernetes Manifests:
kubectl apply -f filebeat.yaml
Edit the logstash-values.yaml file to reflect your environment and run the helm command to deploy the logstash
helm upgrade --install --namespace=logging --values=logstash-values.yaml logstash logstash
wait for sometime to let both filebeat and logstash synchronize and know each other's presence.
You can explore the flow of logs by tailing logs of logstash pod.
kubectl -n logging logs -f logstash-pod-name
helm upgrade --install=true kibana \
  kibana/ \
  --namespace logging \
  --values kibana/values-small.yaml