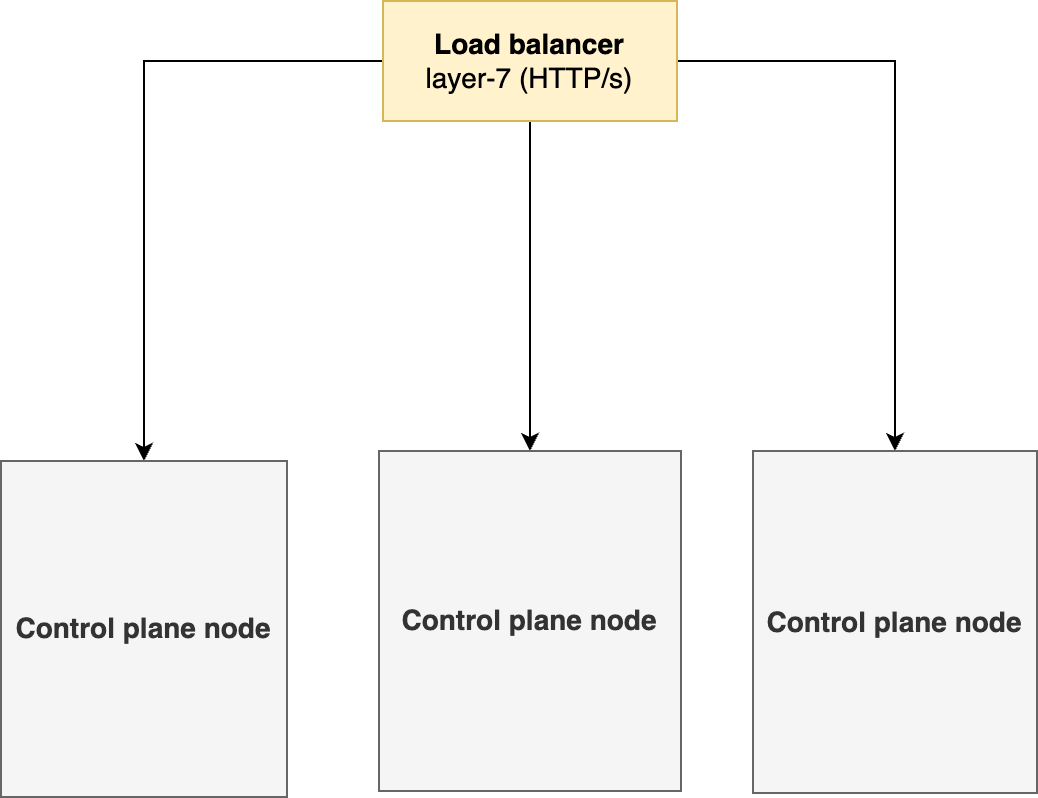
You may use any external load balancer for high availability of your Kubernetes cluster. This document covers the configuration of an NGINX as an external load balancer for an RKE2 Kubernetes cluster.
Deployment Prerequisites
|
|
Node Required |
vCPU |
vRAM |
vDisk (GiB) |
Comments |
|---|---|---|---|---|---|
|
RKE2 |
3 Control Plane nodes |
2 |
4 |
50 |
See RKE2 installation requirements for hardware sizing, the underlying operating system, and the networking requirements. |
|
CX-Core |
2 Worker nodes |
2 |
4 |
250 |
If cloud-native storage is not available, then 2 additional worker nodes are required 1 on site-A and 1 on site-B. |
|
Superset |
1 Worker node |
2 |
8 |
250 |
For reporting |
Load Balancer Hardware Requirements
|
Type |
RAM (GiB) |
vCPU |
DISK (GiB) |
Scalability |
Network Ports |
Minimum Nodes |
|---|---|---|---|---|---|---|
|
Load-Balancer |
2 |
1 |
100 |
Single-Node |
6443, 9345,80,443 to all CP/Worker Nodes nodes |
1 |
Load Balancer without HA is the single point of failure in the cluster setup and customers are required to set up either of the above in a failover cluster.
Configuration Steps
1. DNS configurations
In your DNS, map your FQDN to a record or a CNAME pointing to the load balancer IP or hostname. Given below is a sample configuration for NGINX as an ELB.
2. Deploy an ELB
3. Deploy the cluster in HA using LoadBalancer
3.1. Deploy RKE2 on the first control plane
-
Create a deployment manifest called
config.yamlfor the RKE2 cluster and replace the IP address.
Assuming that the Load balancer is running on 1.1.1.1 with the FQDN cx.customer-x.com.
cat<<EOF|tee /etc/rancher/rke2/config.yaml
tls-san:
  - cx.customer-x.com
  - 1.1.1.1
write-kubeconfig-mode: "0600"
etcd-expose-metrics: true
cni:
  - canal

EOF
-
For the first control plane setup, install RKE2 RKE2 Control plane Deployment
-
Retrieve the joining token from the control plane you need to use to install the remaining control plane nodes.
Bashcat /var/lib/rancher/rke2/server/node-token
3.2. Deploy RKE2 on remaining control plane nodes
-
Create a deployment manifest called
config.yaml
Assuming that the Load balancer is running on 1.1.1.1 with the FQDN cx.customer-x.com.
cat<<EOF|tee /etc/rancher/rke2/config.yaml
server: https://1.1.1.1:9345
# speicfy the token as retrieved in the first control plane deployment
token: [token-string]
tls-san:
  - cx.customer-x.com
write-kubeconfig-mode: "0644"
etcd-expose-metrics: true
cni:
  - canal

EOF
-
Install RKE2 RKE2 Control plane Deployment on all the remaining control plane nodes.
4. Deploy Worker Nodes
Follow the Deployment Prerequisites from (4.5) RKE2 Control plane Deployment for each worker node before deployment i.e disable firewall on all worker nodes.
On each worker node, make sure a unique hostname is set beforehand.
To set a hostname, run the following command:-
hostnamectl set-hostname <hostname>
To check the hostname, run the following command:-
hostname
Once hostnames are set, follow these commands on each node to deploy worker nodes.
-
Run the following command to install the RKE2 agent on the worker.
curl -sfL https://get.rke2.io | INSTALL_RKE2_TYPE="agent" sh - -
Enable the
rke2-agentservice by using the following command.systemctl enable rke2-agent.service -
Create a directory by running the following commands.
mkdir -p /etc/rancher/rke2/ -
Add/edit
/etc/rancher/rke2/config.yamland update the following fields.-
<Control-Plane-IP>This is the IP for the first control-plane node. -
<Control-Plane-TOKEN>This is the token from Step 2.server: https://<Control-Plane-IP>:9345 token: <Control-Plane-TOKEN>
-
-
Start the service by using the following command.
systemctl start rke2-agent.service
At this point, you have the RKE2 Kubernetes cluster ready using a load balancer.
5. Verify the cluster setup
On the control-plane node run the following command to verify that the worker(s) have been added.
kubectl get nodes -o wide
Next Steps
-
Choose and install a cloud-native storage. See Storage Solution - Getting Started for choosing the right storage solution for your deployment.
-
Deploy Expertflow CX following Expertflow CX Deployment on Kubernetes