Description
High Availability (HA) is essential for ensuring uninterrupted service and resilience in real-time communication systems. HA ensures that in case of hardware failures, network issues, or planned maintenance, the service remains available without interruption. In an HA setup, EF SIP Proxy is deployed in a redundant manner, with failover mechanisms in place to automatically switch traffic to a backup instance in case of a failure.
Keepalived.service
The keepalived.service plays a crucial role in achieving High Availability (HA) through the use of a Virtual IP (VIP). Keepalived is a Linux-based utility that implements the Virtual Router Redundancy Protocol (VRRP), allowing multiple servers to share a common VIP. By configuring keepalived on multiple servers within a cluster, one server is elected as the master while the other acts as a backup. The master server assumes ownership of the VIP and handles incoming traffic. In the event of a failure on the master server, such as a hardware or software issue, keepalived automatically transfers the VIP to a backup server, ensuring seamless failover without service interruption. This allows the EF SIP proxy to continue processing the SIP requests. Keepalived monitors the health of servers and network connectivity to determine when failover is necessary, providing a reliable mechanism for achieving High Availability through Virtual IP.
Keepalived module
The keepalived module helps to see and control the status of a keepalived cluster through EF SIP proxy control panel. This tool connects to each machine or node in the cluster using SSH to check its status, which is then shown on the main page. In the display, green nodes are Primary nodes, meaning they currently have the Virtual IP active. Gray nodes are Backup nodes. If a node appears red, it means there's a problem, like bad communication through SSH. With this tool, we can also change a node's status to Primary by clicking on it. When we do this, a command is sent to each node in the cluster. The command makes the clicked node Primary and switches all other nodes to Backup mode.
Requirements
To set up HA for EF SIP Proxy we need at least two EF SIP Proxy servers and one virtual IP. Also, ensure that the machine is using PHP 7.4. The control panel may not function smoothly with other PHP versions. Keepalived module depends on the ssh2 php extension to run, thus it has to be manually installed and set up before using the module. For example, on Debian 12, run apt-get install php7.4-ssh2. Run these commands to ensure the installation of dependencies.
sudo apt-get install -y lsb-release apt-transport-https ca-certificates
sudo wget -O /etc/apt/trusted.gpg.d/php.gpg https://packages.sury.org/php/apt.gpg
sudo sh -c 'echo "deb https://packages.sury.org/php/ $(lsb_release -sc) main" > /etc/apt/sources.list.d/php.list'
sudo apt-get update
apt-get install -y php7.4 php7.4-curl php7.4-gd php-pear php7.4-cli php7.4-mysql php7.4-apcu;
apt-get install libapache2-mod-php7.4
Overview of process to follow
The following steps provide an overview to achieve HA for EF SIP proxy.
-
Setting up the cluster
-
Adding nodes
-
Keepalived utility configuration for assigning Virtual IP
-
Making changes in keepalived module functions
-
Making the Virtual IP operational
-
Keepalived module configuration
Step 1: Setting up the cluster
Setting up clustering in EF SIP Proxy involves configuring multiple EF SIP Proxy instances to work together as a cluster, typically for high availability.
-
Open
opensips.cfgfile in server 1 to change the user location module configuration, add binary transport protocol, and add the clusterer module in the modules section.nano /etc/opensips/opensips.cfg -
Change the user location module configuration in the modules section
#### USeR LOCation module loadmodule "usrloc.so" modparam("usrloc", "location_cluster", CLUSTER_ID) modparam("usrloc", "working_mode_preset", "full-sharing-cluster") modparam("usrloc", "db_url", "mysql://opensips:opensipsrw@localhost/opensips") -
Replace
CLUSTER_IDwith any integer that is not yet assigned as cluster_id for any other cluster. -
Add these lines in the modules section to add the clustering module
#### Clustering modules loadmodule "clusterer.so" modparam("clusterer", "my_node_id", MY_NODE_ID) modparam("clusterer", "db_mode", 1) modparam("clusterer", "db_url", "mysql://opensips:opensipsrw@localhost/opensips") -
Replace
MY_NODE_IDwith the node id of this SIP Proxy server. We can use any random integer that is not assigned to any other node. -
Add
proto_binmodule for the intercommunication of nodes of the cluster. -
Insert these lines in the modules section
#### BINary protocol loadmodule "proto_bin.so" socket = bin:IP:5555 -
Replace the “IP” with the IP of the server.
-
Save this file and restart opensips.
sudo systemctl restart opensips.service
Repeat the same process for the other node server as well and make sure to allow 5060 and 5555 ports.
Step2: Adding nodes
To add nodes we’ll use EF SIP Proxy control panel.
-
To access the EF SIP Proxy Control Panel, navigate to the following URL: http://server-ip/cp, where 'server-ip' represents the IP address of the server hosting the EF SIP proxy. The login credentials are as follows: Username: admin & Password: opensips.

-
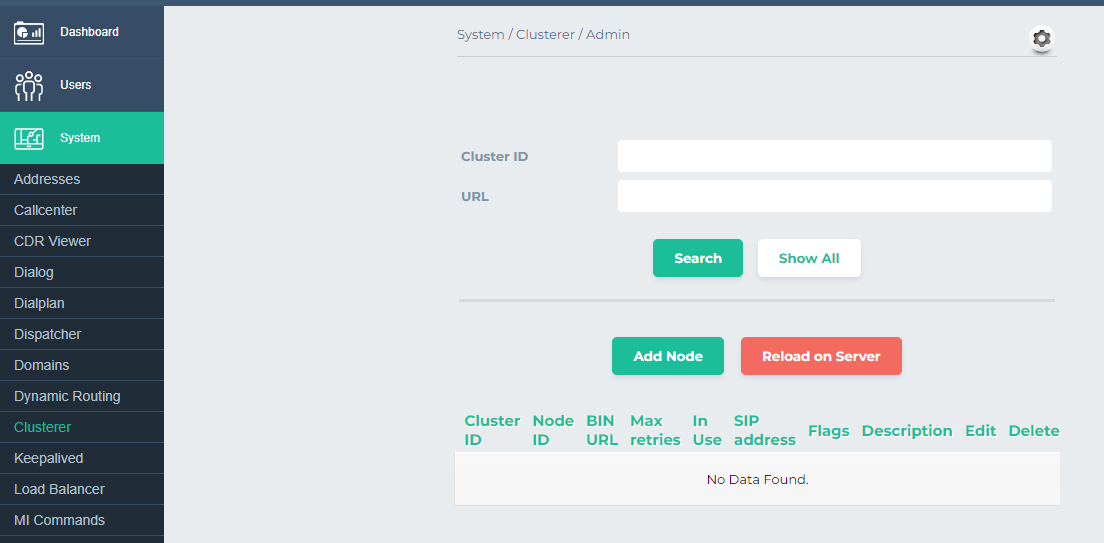
Once logged in, proceed to the 'System' section, followed by 'CLusterer'.
-
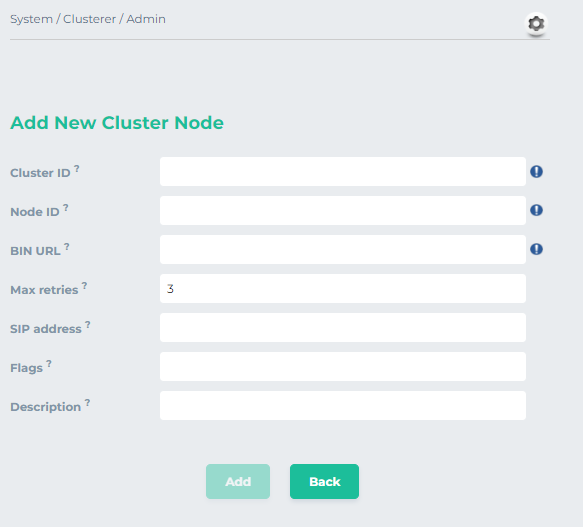
Click on Add Node
-
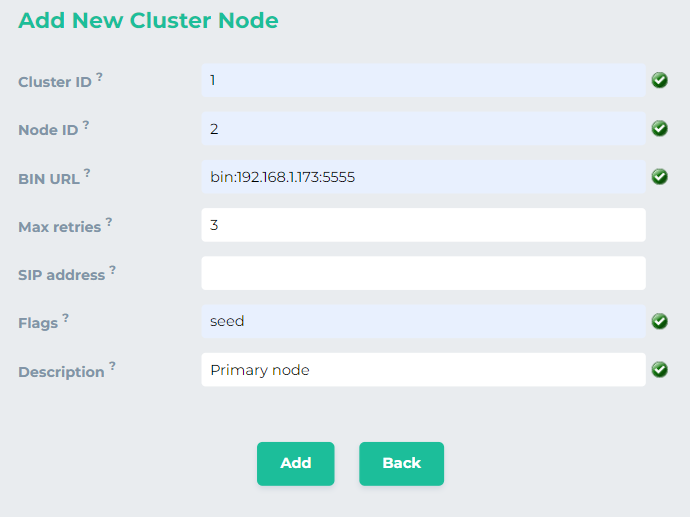
Cluster IDis the same ID that we put inopensips.cfgfile. -
Node IDfor the node is the same one that we set for each node. -
BIN URLis the address we set forproto_binmodule inopensips.cfgfile. The syntax is "bin:192.168.1.173:5555" -
Leave
SIP addressempty -
Enter “seed” in
Flags. Keep in mind that this flag will just be set for primary node. For backup node it will be empty. -
Enter
Description.
This will look like
-
Click on
Addand thenReload on Server. -
Add the second node as a backup node by following the same steps.
-
In the end, it would look like

-
Add this information to the other node by repeating this process for the other server.
Cluster id for all the nodes in same cluster will be same while each node will have unique node id. Also in the cluster the Flag will be set to seed just for the primary node.
Step 3: Keepalived configuration for assigning virtual IP
Keepalived provides high availability by managing a floating virtual IP (VIP) shared among servers. It monitors server health, triggers failover upon detection of failure, and migrates the VIP to a standby server.
-
To install keepalived in server open the terminal and run this command.
sudo apt-get install keepalived -
Once installed open
/etc/keepalived/keepalived.confand add these linesvrrp_instance VI_1 { state MASTER interface ens192 virtual_router_id 51 priority 100 advert_int 1 unicast_src_ip 192.168.1.173 unicast_peer { 192.168.1.90 } authentication { auth_type PASS auth_pass 12345678 } virtual_ipaddress { 192.168.1.202/24 } } -
state-> It would be MASTER for the primary node and BACKUP for backup node -
interface-> replace it with the network interface of your server. Confirm interface by runningip addr. -
virtual_router_id-> it should be any random value -
priority-> this value should be greater for the master node -
unicast_src_ip-> IP of the current machine -
unicast_peer-> contains IP of the other nodes -
virtual_ipaddress-> The floating virtual IP, Ensure that this IP is available in the local network.
-
Start keepalived
sudo systemctl start keepalived.service
Don’t enable the keepalived.service. Keep it disable. The issue is that if the machine restarts after crashing or any other reason the keepalived.service will start if it is enabled. This will switch the primary node automatically. In order to keep the switching controlled keep this service disabled.
-
Install and configure keepalived in the other server by repeating these steps.
-
Check the status of keepalived
sudo systemctl status keepalived.service -
Ensure that the server designated to be primary should show that it is in master state and the other server should be in backup state


The virtual IP would be mapped to the primary node until it is active. When the primary node goes down the virtual IP would be mapped to the backup node.
Step 4: Making changes in keepalived module functions
To load the keepalived module smoothly and run it without any errors we need to make some changes in the PHP files of the module. The module tries to authenticate the remote connection with the node/machine using the ssh2_auth_pubkey_file() function. Various attempts were made to add nodes and authenticate through the original code, but couldn’t make it. Some similar issues regarding ssh2_auth_pubkey_file() have already been reported. Issue#1, Issue#2, Issue#3.
The issue regarding the keepalived module was raised and its solution was also uploaded and the possible solution was also updated. Keepalived opensips issue.
The first issue was that no nodes appeared after adding these to the module. Since OpenSIPS is more suitable with PHP 7.4, install php7.4-ssh2 instead of just php-ssh2. Use the command 'sudo apt install php7.4-ssh2'. This will resolve the problem of loading the nodes in the control panel. The second issue was related to authentication while making the SSH2 connection. So I used an alternative authentication method. OpenSIPS uses the ssh2_auth_pubkey_file() function for authentication of remote machines. To bypass this, I used the ssh2_auth_password() function.
To replace the authentication function open function.inc.php file.
nano /var/www/html/opensips-cp/web/tools/system/keepalived/lib/functions.inc.php
Comment out the line or remove it
// $auth=ssh2_auth_pubkey_file($connection, $user, $pub_key, $prv_key, $pass);
Add this line in the place of removed/commented line
$auth = ssh2_auth_password($connection, $user, 'Expertflow123');
Save this file and exit.
Restart apache2 service. sudo systemctl restart apache2.service
Step 5: Making the Virtual IP operational
The configuration is almost done. Now we just need to update opensips.cfg for both servers to assign them virtual IP.
-
Open
opensips.cfgfile in the backup node server first to add the virtual IP as SIP listener. -
Add virtual IP as UDP and TCP listener
# SIP listerner socket=udp:192.168.1.202:5060 #Customize me --> Virtual IP socket=tcp:192.168.1.202:5060 #Customize me --> Virtual IP socket=udp:192.168.1.90:5060 #Customize me --> Server IP socket=tcp:192.168.1.90:5060 #Customize me --> Server IP -
Save these changes
If the keepalived.service is active and running in both servers then the virtual IP will be assigned just to primary server. In this case when we restart opensips there will be error as opensips could not assign the virtual IP.
-
Stop the keepalived.service in the primary server
sudo systemctl stop keepalived.service -
Ensure using
ip addreither virtual IP is assigned to this server or not -
Now restart opensips
sudo systemctl restart opensips.server -
Add virtual IP for the primary server by following the same steps
-
Before restarting opensips, start the keepalived service
sudo systemctl start keepalived.service -
Now the EF SIP proxy is running on both servers
-
Run the following commands in both servers to,
-
List the other nodes of the cluster
opensips-cli -x mi clusterer_list -
List the info of all nodes of the cluster
opensips-cli -x mi clusterer_list_topology -
List the capabilities of the cluster
opensips-cli -x mi clusterer_list_cap -
List the sharing tags of the current node
opensips-cli -x mi clusterer_list_shtags
At this point, the EF SIP proxy is running in the cluster(active-backup) setting. When the active server goes down the keepalived service will map the virtual IP to the backup node and it will start processing the proxy processes.
Step 6: Keepalived module configuration
To see the nodes in the control panel and switch the primary node we need to configure the keepalived module.
-
To access the EF SIP Proxy Control Panel, navigate to the following URL: http://server-ip/cp, where 'server-ip' represents the IP address of the server hosting the EF SIP proxy. The login credentials are as follows: Username: admin & Password: opensips.

-
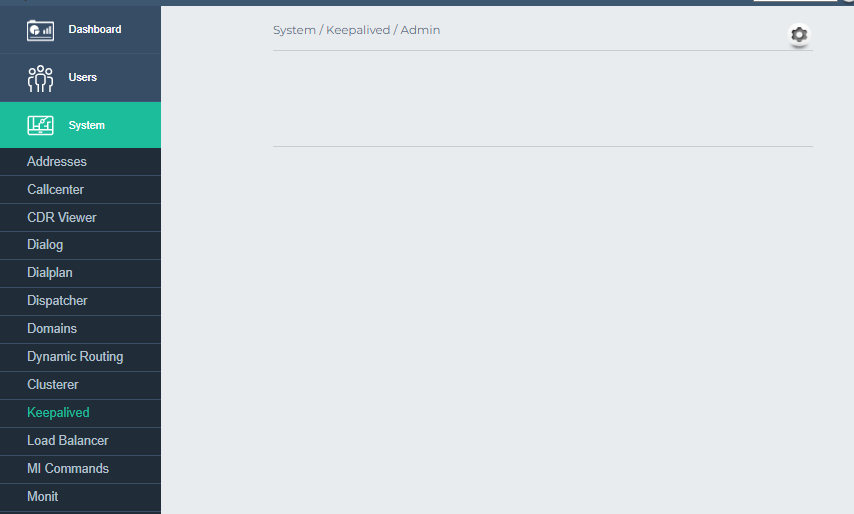
Once logged in, proceed to the 'System' section, followed by 'Keepalived'.
-
Click on the gear icon to add configuration
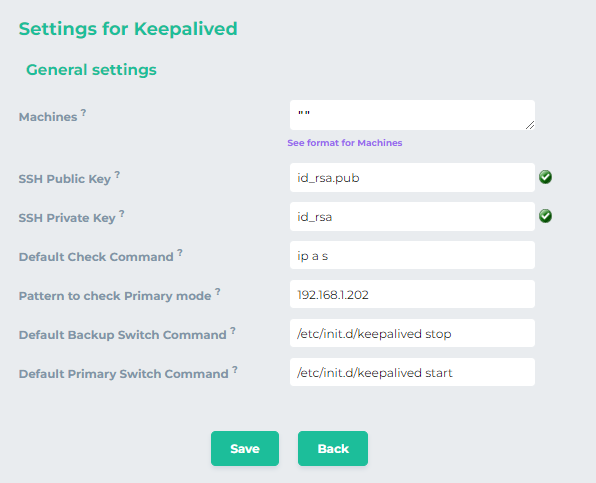
-
The format of the machine node is a JSON list, where each element consists of two nodes: → name: the title of the keepalived instance. → boxes: a list of boxes that are part of the keepalived instance
-
Each box consists of the following nodes: → box: the name of the Box or keepalived node → ssh_ip: the IP of the machine; if missing and a known box is used, the MI conn_ip is considered → ssh_port: the SSH port to connect to; default is 22 → ssh_user: the SSH user to authenticate with; default is root → ssh_pubkey: the SSH public key to authenticate with; → ssh_key: the SSH private key to authenticate with; → check_exec: script that is executed to check if the mode of the node; the output is compared against the 'check_pattern' value; → check_pattern: a pattern that is applied on 'check_exec' output to check if the node is Primary; → backup_exec: command to run when the machine is put in backup mode; → primary_exec: command to run when the machine is put in primary mode;
-
The default JSON object for two nodes is
[ { "name": "Virtual IP", "boxes": [ { "box": "Primary", "ssh_ip": "192.168.1.90", "ssh_pubkey": "\/.ssh\/id_rsa.pub", "ssh_key": "\/.ssh\/id_rsa", "check_exec": "ip a s", "check_pattern": "192.168.1.202", "backup_exec": "\/etc\/init.d\/keepalived stop", "primary_exec": "\/etc\/init.d\/keepalived stop" }, { "box": "Secondary", "ssh_ip": "192.168.1.173", "ssh_pubkey": "\/.ssh\/id_rsa.pub", "ssh_key": "\/.ssh\/id_rsa", "check_exec": "ip a s", "check_pattern": "192.168.1.202", "backup_exec": "\/etc\/init.d\/keepalived stop", "primary_exec": "\/etc\/init.d\/keepalived stop" } ] } ] -
As we are not going to use public key authentication we’ll use the following object for two nodes. The remaining values will be inserted in the boxes. Copy and paste the following lines into machines box
[ { "name": "Cluster 1", "boxes": [ { "box": "Primary(1.90)", "ssh_ip": "192.168.1.90" }, { "box": "Secondary(1.173)", "ssh_ip": "192.168.1.173" } ] } ] -
Customize the “box” and the “ssh-ip” accordingly
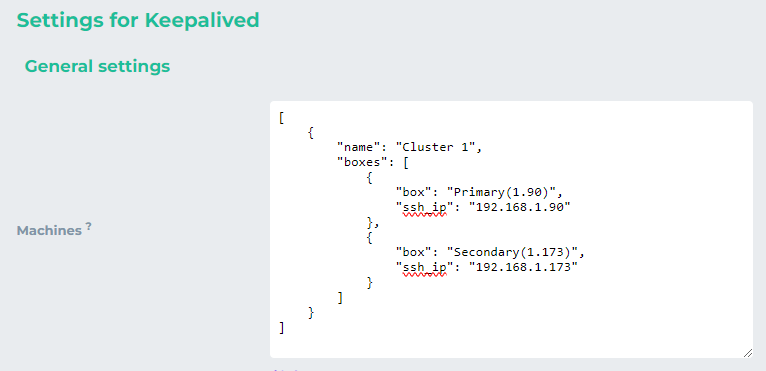
-
Now add the other values as shown below
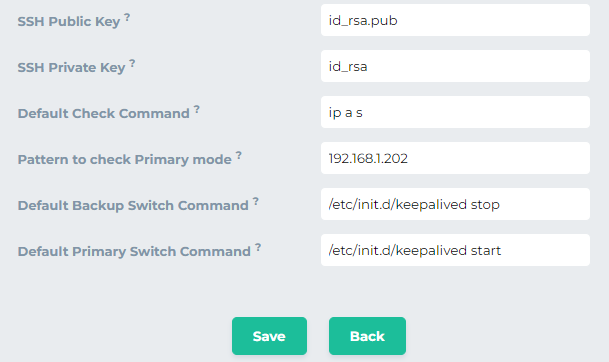
-
ip a s → This command will show the IP addresses of a node when the node state is checked. If the the virtual IP (192.168.1.202 in this case) is present in the IP addresses the node will be considered primary otherwise secondary. Change the Pattern to check the Primary mode with your virtual IP.
-
/etc/init.d/keepalived stop→ this command will stop the keepalived service to make some other node primary. -
/etc/init.d/keepalived start→ this command will start the keepalived service to make the node primary. -
When switching a node to primary by clicking on it, a command is executed on each node within the cluster: a command to turn the node as Primary is executed on the primary node, and a command to turn the nodes as backups is executed on all the others.
-
Click on save and it will be displayed as
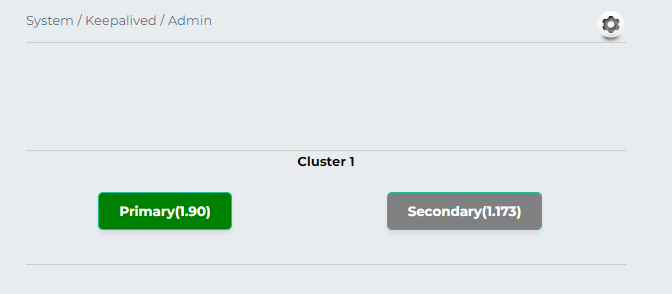
-
Click once on the node box to make it active and receive the SIP requests.
If the node box color doesn’t change refresh the page
Limitation with keepalived.service
This is for the case if we want to switch the active node automatically when the master node/machine restarts after some issue. It works fine when the active node goes down (the backup node becomes live). The issue arises when the active node server comes back online and attempts to restart OpenSIPS. At that time, the Keepalived service (if this service is enabled) does not assign the virtual IP immediately to the active node, preventing OpenSIPS from starting with the virtual IP at startup. Consequently, when the virtual IP is reassigned to the active node after a few moments, it cannot process SIP requests as OpenSIPS is not running.
The limited solution is to add a cronjob to wait for some time before starting OpenSIPS, allowing Keepalived to assign the virtual IP during that period.
-
Run the following command in the active node server
crontab -e -
Add this line at the end
@reboot sleep 5 && sudo systemctl restart opensips.service