Requirements
|
MultiNode Cluster |
RAM |
CPU |
Disk |
Network |
|---|---|---|---|---|
|
2 Worker Nodes |
4 GiB |
4 |
250 GiB SSD |
1Gbps Single |
|
3+ Worker Nodes |
8 GiB |
4 |
500 GiB SSD |
1Gbps Dual (Preferred) |
Architecture
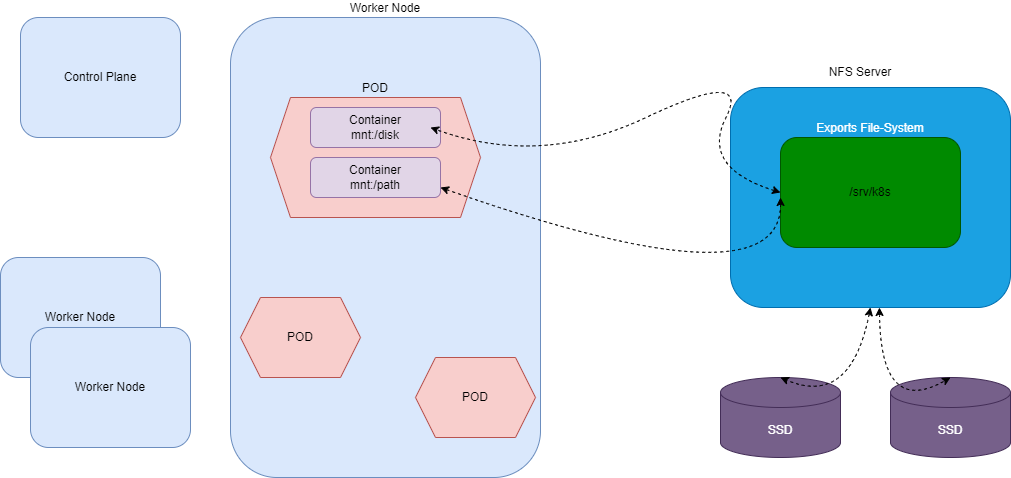
Install NFS server
Nfs Server is a dedicated Node outside the Kubernetes Cluster with dedicated storage and other specs as mentioned in the Requirements section.
to install the NFS server on Ubuntu based Node, please follow these steps.
For Ubuntu:-
Update the repository
apt-get update
Install the required packages
sudo apt-get install nfs-kernel-server
For RHEL:-
Install the required packages
sudo yum install -y nfs-utils
Create the export directory
mkdir /srv/k8s
add the exported file-system to the NFS Server’s export list
vi /etc/exports
and add the line given below
/srv/k8s WORKER_NODE1_IP(rw,async,no_subtree_check,no_root_squash,no_all_squash,insecure) WORKER_NODE2_IP(rw,async,no_subtree_check,no_root_squash,no_all_squash,insecure) WORKER_NODE-N-IP(rw,async,no_subtree_check,no_root_squash,no_all_squash,insecure)
Please substitute the IP addresses for all the WORKER_NODE_IPs accordingly.
NOTE:
-
Be aware of the following points:
-
there is no space between the IP address and the options
-
you can list more IP addresses and options; they are space separated as in:
-
/export/users 192.168.1.1(rw,no_subtree_check) 192.168.1.2(rw,no_root_squash)
-
-
using the insecure option allows clients such as Mac OS X to connect on ports above 1024. This option is not otherwise "insecure".
-
Note that when locking down which clients can map an export by setting the IP address, you can either specify an address range using a subnet mask, or you can list a single IP address followed by the options. Using a subnet mask for single client's full IP address is **not** required. Just use something like 192.168.1.123(rw). There are a couple options for specifying the subnet mask. One style is 255.255.255.0. Both styles should work. The subnet mask marks which part of IP address must be evaluated.
-
Enable and start the NFS Server
For Ubuntu:-
systemctl enable --now nfs-kernel-server.service
For RHEL:-
Start and enable NFS Server:-
sudo systemctl enable rpcbind
sudo systemctl start rpcbind
sudo systemctl enable nfs-server
sudo systemctl start nfs-server
verify the exported file-system
exportfs -rav
showmount -e localhost
Kubernetes Worker Nodes
These steps should be performed on all the Worker nodes in the cluster
install the required package for nfs client
For Ubuntu:-
apt install -y nfs-common
For RHEL:-
sudo yum install -y nfs-utils
once the package it installed , you can verify the NFS mount point by running
mkdir /mnt/NFS
mount -t nfs NFS-SERVER_IP:/srv/k8s /mnt/NFS
If the above command runs succesfully, you will be able to write/create in /mnt/NFS directory
mkdir /mnt/NFS/${HOSTNAME}
verify the directory is created successfully on the NFS-SERVER by listing the contents of /srv/k8s/.
unmount the NFS mount point as we dont need it to be mounted consistently. the NFS driver will automatically mount relevant paths from within Worker Node in Kubernetes cluster.
umount /mnt/NFS
Prepare the kubernetes cluster for NFS Storage
For NFS Storage, we will be installing nfs-subdir-external-provisioner as volume provisioner for our Kubernetes cluster.
On Control-Plane
add the require helm repository
helm repo add nfs-subdir-external-provisioner https://kubernetes-sigs.github.io/nfs-subdir-external-provisioner/
refresh the help repo
helm repo update
install the helm chart
helm upgrade --install=true \
--namespace=nfs-client \
--create-namespace   \
--set replicaCount=5 \
--set storageClass.defaultClass=true \
--set storageClass.reclaimPolicy=Retain \
--set nfs.server=<NFS-SERVER-IP> \
--set nfs.path=/srv/k8s  \
nfs-subdir-external-provisioner \
nfs-subdir-external-provisioner/nfs-subdir-external-provisioner
Substitute the NFS-SERVER-IP and EXPORT_PATH with actual values
verify the deployment is ready by running
kubectl -n nfs-client get pods
Once all the pods are in running state, verify the current storage class assignment
kubectl get storageclass
expected output is something like
NAME                   PROVISIONER                                     RECLAIMPOLICY   VOLUMEBINDINGMODE   ALLOWVOLUMEEXPANSION   AGE
nfs-client (default)   cluster.local/nfs-subdir-external-provisioner   Retain          Immediate           true                   2d20h
Verify the NFS Storage Class
Deploy a test pod
deploy a test workload to verify the NFS storage class.
kubectl create -f https://raw.githubusercontent.com/kubernetes-sigs/nfs-subdir-external-provisioner/master/deploy/test-claim.yaml -f https://raw.githubusercontent.com/kubernetes-sigs/nfs-subdir-external-provisioner/master/deploy/test-pod.yaml
there should a PVC in Bound state to PV in nfs-client storage class
example output
kubectl  get pvc
NAME         STATUS   VOLUME                                     CAPACITY   ACCESS MODES   STORAGECLASS   AGE
test-claim   Bound    pvc-4c922e69-bd8c-4835-bb6a-3b7d959e8e50   1Mi        RWX            nfs-client     2d18h
Teardown the test deployment
kubectl delete -f https://raw.githubusercontent.com/kubernetes-sigs/nfs-subdir-external-provisioner/master/deploy/test-claim.yaml -f https://raw.githubusercontent.com/kubernetes-sigs/nfs-subdir-external-provisioner/master/deploy/test-pod.yaml