Solution Prerequisites
Hardware Sizing
The following lists the machine specifications for up to 100 concurrent agents deployment, with no other EF components installed on the VM.
|
vCPU |
vRAM |
vDisk |
Notes |
|
2 cores (2.60GHz, 2 processors) |
4 GB |
1x100 GB mounted on / |
In case MSSQL server is installed on a separate machine |
|
4 cores (2.60 GHz, 4 processors |
8 GB |
1x100 GB mounted on / |
If MSSQL server is installed on the same machine as the wallboard stack |
For HA, the same specifications would be doubled for two machines.
To get machine specifications for a larger agent volume and/or with other ExpertFlow products in a co-resident deployment, please get a quote from ExpertFlow or contact your ExpertFlow Account Manager.
Software Requirements
OS Compatibility
The following OS software is required on the server:
|
Item |
Version |
Notes |
|
CentOS
|
7.x updated to the latest packages (use Yum update) |
Administrative privileges (root) are required to follow the deployment steps. |
Database Requirements
|
Item |
Notes |
|
MS SQL Database Server 2016/2017 Express/Standard/Enterprise |
For clustered SQL Server installation, the customer will be responsible to provide the cluster. For stand-alone DB deployment, DB (2017 express) will be included within docker containers. |
|
Microsoft SQL Server 2017 |
Microsoft SQL Server 2017, Microsoft Corporation Express Edition (64-bit) on Linux (Ubuntu 16.04.5 LTS).
|
Docker Engine Requirements
|
Item |
Notes |
|
Docker CE 18.06.0+
|
Browser Compatibility
|
Item |
Version |
Notes |
|
Firefox |
73.0.1 (64-bit) |
|
|
Chrome |
Not tested
|
Some UI elements might not render properly. A full-blown testing cycle can be carried out on demand. |
|
IE |
Not tested |
Not supported |
Cisco Unified CCX Compatibility
Tested with the CCX version 11.5 and 11.6 Assumed to work on higher versions as well. An on-demand testing cycle can also be executed on older versions of CCX.
Cisco Unified CCE Compatibility
Tested with the CCE version 11.5. Assumed to work on higher versions as well. An on-demand testing cycle can also be executed on older versions of CCE.
Wallboard Reporting/ Display Device
The provisioning of reporting devices is partner/customer's responsibility. For reporting device, one of the following hardware solutions must be provided to display wallboard views in the production environment.
-
An existing PC with a pre-installed OS, Monitor or LCD for wallboard display OR
-
A Smart LCD with an embedded browser to open the wallboard view OR
-
A raspberry pi device with OS installed with an LCD to display.
For raspberry pi device's details, see https://www.raspberrypi.org/products/raspberry-pi-3-model-b/
Port Utilization
The following ports should remain open on the Firewall. The local security policy and any antivirus should also allow open communication on the following ports.
|
Type |
Source Host |
Source Port |
Destination Host |
Destination Port |
|
HTTP |
Enterprise web user |
any |
Dashboard & Wallboards |
80 |
|
HTTPS |
Dashboards & Wallboards server |
any |
Dashboard & Wallboards |
443 |
|
UDP/TCP |
Dashboards & Wallboards server |
any |
MS SQL Server (CCE DB) |
1433 |
System Access Requirements
Deployment Privileges
Administrative privileges (root) on the machine are required to follow the deployment steps. The Internet should be available on the machine where the application is being installed and connections on port 9242 should be allowed in the network firewall to carry out the installation steps.
Provision Database and a user on SQL Server Cluster
The following database and the privileged SQL user is required to connect to the application database. The application will create its tables and other schema objects itself after connection.
-
Create a wallboard application database with the name EFWallboard.
-
Create an SQL Server User EFUser with a database role db_owner on the EFWallboard database.
Integration with UCCX
To read CSQs and agents list from CCX, we need admin user credentials to access UCCX Configuration APIs to fetch the list of CSQs, agents, and teams.
To access the Cisco CCX database remotely via the wallboard application, CCX reporting user (uccxhruser) password is required.
Integration with UCCE
Since we need access on the Cisco AW database remotely, create an SQL server user, EFUser, with db_datareader role on the Cisco AW database.
Time Synchronization Requirements
If the system dates and times are not synchronized, the system can produce unpredictable results. Therefore, the EF applications and Cisco Contact Center should have their time zone and date/time properly configured, according to the geographic region and must be synchronized.
To configure the time zone, please see the instructions from the hardware or software manufacturer of the NTP server. The application servers should be synchronized. This synchronization should be maintained continuously and validated on a regular basis. For security reasons, the Network Time Protocol (NTP) V 4.1+ is recommended.
Installation Steps
The Internet should be available on the machine where the application is being installed and connections on port 9242 should be allowed in the network firewall to carry out the installation steps. All the commands start with a # indicating that root user privileges are required to execute these commands. Trailing # is not a part of the command.
Configure Log Rotation
Add the following lines in /etc/docker/daemon.json file (create the file if not there already) and restart the docker daemon using systemctl restart docker. Perform this step on all the machines in the cluster in case of HA deployment.
|
|
Installing Application
-
Download the deployment script deploy-wallboard.sh and place it in the
/rootdirectory. This script will:-
delete the wallboard directory in the present working directory if it exists.
-
clone the wallboard repository from gitlab in the present working directory.
-
-
To execute the script, give it the execute permissions and execute it.
# chmod +x deploy-wallboard.sh
# ./deploy-wallboard.sh
-
Create two databases in your DB server corresponding to the wallboard and umm. This step is only required if you're using your own DB server/cluster. If you're using the built-in MSSQL database server, you don't need to do anything.
-
Update environment variables in the following files inside
/root/wallboard/docker/environment_variablesfolder.-
common-variables.envName
Description
Do not change the default values for non-HA deployment OR if you want to use the built-in database. For HA, use SQL server cluster settings instead of the defaults. If you want to use your own MSSQL instance anyway, update the following variables accordingly.
DB_URLWallboard database connection url
For example:
-
jdbc:jtds:sqlserver://<MACHINE-IP or FQDN>:PORT/db_name
-
jdbc:jtds:sqlserver://<MACHINE-IP or FQDN>:PORT/db_name;instanceName=SomeInstance
DB_USERdatabase user
DB_PASSWORDdatabase password
DB_DRIVERJDBC driver e.g., net.sourceforge.jtds.jdbc.Driver
DB_DIALECTDatabase dialect e.g., org.hibernate.dialect.SQLServer2008Dialect
CISCO_TYPE
The cisco type of solution .It is either "uccx" or "ucce"
SSO_ENABLEDSingle sign on facility, its value is either "true" or "false"
-
-
umm-variables.envName
Description
Do not change the default values for non-HA deployment OR if you want to use the built-in database. For HA, use SQL server cluster settings instead of the defaults. If you want to use your own MSSQL instance anyway, update the following variables accordingly.
DB_URLUMM database connection URL
For example:
-
jdbc:jtds:sqlserver://<MACHINE-IP or FQDN>:PORT/db_name
-
jdbc:jtds:sqlserver://<MACHINE-IP or FQDN>:PORT/db_name;instanceName=SomeInstance
DB_USERdatabase user
DB_PASSdatabase password
DB_DRIVERJDBC driver e.g., net.sourceforge.jtds.jdbc.Driver
DB_DIALECTDatabase dialect e.g., org.hibernate.dialect.SQLServer2008Dialect
REDIRECT_BASE_URLCallback URL for Wallboard.. The format would be: https://wallboard-ip/callback
IDS1_URLProvide the base URI of UCCE/UCCX node. The format would be: https://<fully qualified hostname of UCCX publisher node>:8553
IDS2_URLIf UCCE/UCCX is deployed in High Availability mode, provide the base URI of the second node. The format would be: https://<fully qualified hostname of UCCX Subscriber node>:8553
IDS_CLIENT_IDRegister supervisor tools application in IDS to get client ID by following the steps
here
. Example:
973a8f41be45426510c971ce41b6feae8d71bc22UMM_BASE_URLUMM base URL. It should be: https://IP:umm-port
Change the following variables as per your environment
PRIM_FINESSE_IPPrimary Finesse URL including port (if not 80 or 443)
For example:
SEC_FINESSE_IPSecondary Finesse URL including port (if not 80 or 443)
For example:
FINESSE_USERFinesse administrator user
FINESSE_PASSFinesse administrator password
SSO_ENABLEDThe single sign-on facility, its value is either "true" or "false"
-
-
synchronizer-variables.envName
Description
CC_TYPEDecides whether Cisco contact center is UCCX or UCCE
Holds string "UCCX" for UCCX and "UCCE" for UCCE. Default is UCCX
REDUNDANT_DEPLOYMENTDecides if synchronizer deployment is redundant. Set it to "true". Holds strings "true" or "false". Default is false
INSTANCE_NAMEUsed for differentiation of instances when deployed redundant, could be any string. It should be different on both machines.
SYNC_AGENTSTo enable Agent sync set it to "true", default is true
SYNC_AGENTS_STATSEnables/disables agents stats sync, default is true
SYNC_AGENTS_EMAIL_STATSEnables/disables agent email stats, default is false
SYNC_QUEUES_STATSEnables/disables queue stats, default is true
SYNC_QUEUESEnables/disables queues/skillgroups in case of UCCE, default is true
Following variables are used when CC_TYPE = "UCCX"
UCCX_PUB_IPPrimary UCCX IP
UCCX_PUB_USERNAMEPrimary UCCX admin username
UCCX_PUB_PASSWORDPrimary UCCX admin password
UCCX_SUB_USERNAMESecondary UCCX admin username
UCCX_SUB_PASSWORDSecondary UCCX admin password
UCCX_PUB_DB_PASSWORDPrimary UCCX database reporting user (hruser) password
UCCX_SUB_DB_PASSWORDSecondary UCCX database reporting user (hruser) password
UCCX_REAL_TIME_PORTUCCX real-time APIs port, default is 9080
Following variables are used when CC_TYPE = "UCCE"
CCE_DB_URLUCCE awdb database URL
jdbc:jtds:sqlserver://192.168.1.87:1433/ucce_awdb
CCE_DB_USERCCE database user
CCE_DB_PASSWORDCCE database password
TZ
The timezone of UCCE e.g. Asia/Karachi
-
-
The following configuration must be done at UCCX. This will allow the UCCX System to write real-time data to tables that Synchronizer uses to fetch for gadgets. This step is not needed for UCCE deployments.
-
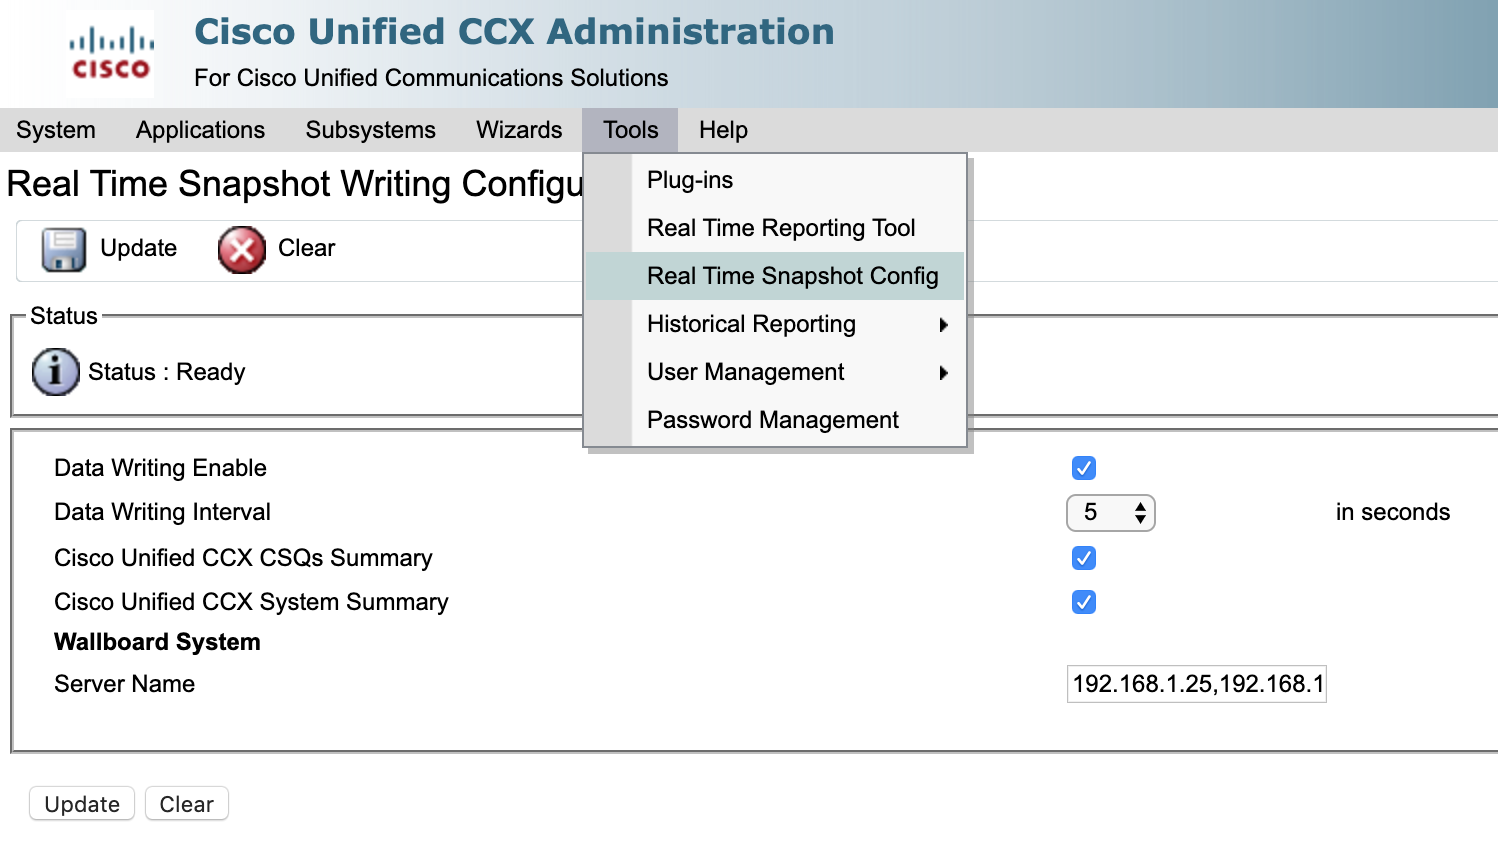
Go to Tools > “Real-Time Snapshot Config” on UCCX Administration UI.
-
Enable all three checkboxes
-
Select “5” from dropdown against “Data Writing Interval”
-
Provide the IP addresses of the machine where Synchronizer will run (comma separated IPs in case of HA, otherwise only one IP) separated by commas in the field against “Server Name” under the "Wallboard System".
-
Click on the update button.
-
-
Get domain/CA signed SSL certificates for wallboard FQDN/CN and place the files in
/root/wallboard/docker/certificatesfolder. The file names should beserver.crtandserver.key. -
Update the translation files inside
/root/wallboard/docker/translationsfolder for multilingual UI. The file names in the translation folder should remain unchanged. -
Having environment configurations done, copy the wallboard directory on the second machine in
/rootdirectory using the following command. (Only for HA deployment)# scp -r /root/wallboard root@<machine-ip>:/root/
-
Having copied the wallboard directory to the second machine, got to /root/wallboard/docker/environment-variables and update the INSTANCE_NAME variable in synchronizer-variables.env. Set it to any value other than the value that is set in the first machine. It will differentiate the two VMs as only one synchronizer service will be active. If one goes down, the other starts synchronizing data from UCCE/UCCX. (Only for HA deployment)
-
Execute the following commands inside /root/wallboard directory on both machines (if in HA, otherwise on the only machine in the cluster).
# chmod 755 install.sh
# ./install.sh
-
Run the following command to ensure that all the components are up and running. The screenshot below shows a sample response for a standalone non-HA deployment.
# docker ps
Virtual IP configuration (Only for HA deployment)
Repeat the following steps for all the machines in the HA cluster.
-
Download keepalived.sh script and place it in
/rootdirectory. -
Give execute permission and execute the script:
# chmod +x keepalived.sh
# ./keepalived.sh
-
Configure keep.env file inside
/root/keep-alivedfolderName
Description
KEEPALIVED_UNICAST_PEERSIPs of the machines in the cluster. On each machine, this variable should have a list of IPs of all the other machines in the cluster. The format of the list is as below:
"#PYTHON2BASH:['192.168.1.76','192.168.1.80']"KEEPALIVED_VIRTUAL_IPSVirtual IP of the cluster. It should be available in the LAN. For example: 192.168.1.245
KEEPALIVED_PRIORITYThe priority of the node. Instances with lower numbers will have a higher priority. It can take any value from 1-255.
KEEPALIVED_INTERFACEName of the network interface with which your machine is connected to the network. On CentOS,
ifconfigorip addr shwill show all the network interfaces and assigned addresses.CLEARANCE_TIMEOUTCorresponds to the initial startup time of the application in seconds which is being monitored by keepalived. A nominal value of 60-120 is good enough
KEEPALIVED_ROUTER_IDDo not change this value.
SCRIPT_VARThis script is continuously polled after 2 seconds. Keepalived relinquishes control if this shell script returns a non-zero response. For wallboard, it should be:
pidof dockerd && wget -O index.htmlhttp://localhost/umm/base/index.html
-
Give the execute permission and execute the script:
# chmod +x keep-command.sh
# ./keep-command.sh
Adding License
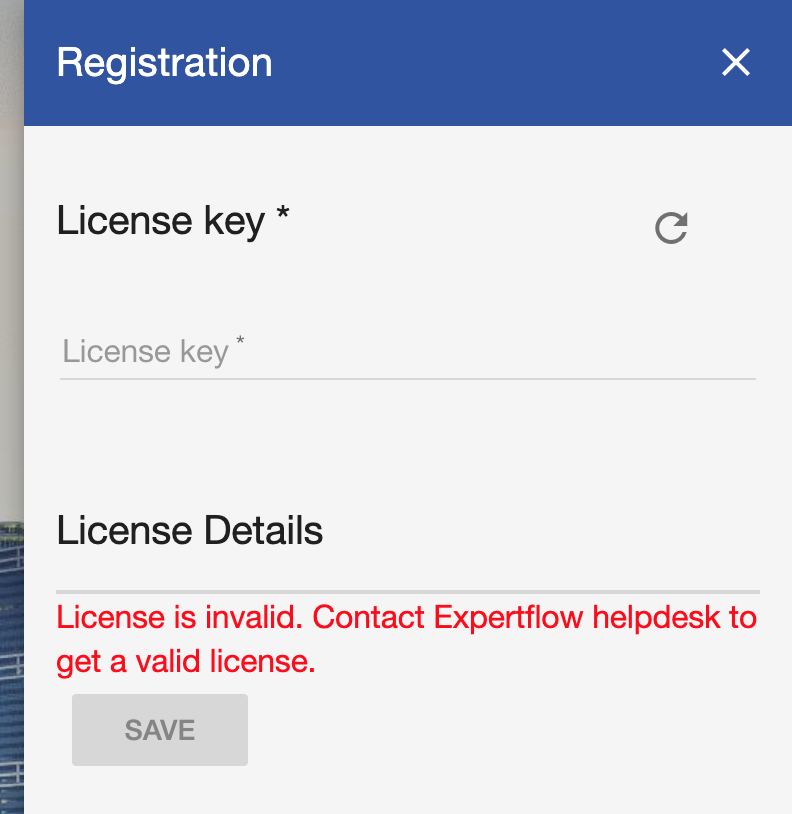
-
Browse to https://FQDN/umm in your browser (FQDN will be the domain name assigned to the IP/VIP).
-
Click on the red warning icon on right, paste the license in the field and click save.
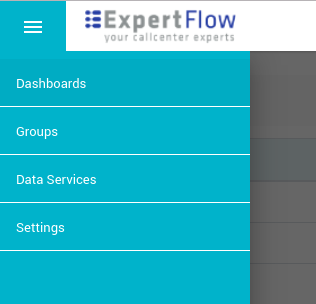
-
Go to https://FQDN to access wallboard front-end. (FQDN will be the domain name assigned to the VIP).
-
Go to Data Service on the left side menu to define data services. There will be two data services named Agent Service and Queue Service with the following URLs.
https://FQDN/agent-service and https://FQDN/queue-service
Uninstalling
To uninstall the application completely, execute the following commands.
|
|
Troubleshooting
-
To update any changes in the environment variables and/or compose file, simply execute the install script again:
/root/wallboard/install.sh
-
To restart the whole stack completely, execute the following commands:
# docker-compose -f /root/wallboard/docker/docker-compose.yml down
# /root/wallboard/install.sh