Preface
This document provides deployment details of the product as a standalone or when deploying for CRM like (Microsoft, ServiceNow, and SAPC4C)
Prerequisites
Following are the prerequisites for the deployment of the Javascript CTI Toolbar.
-
The user must have administrative rights
Installation of Javascript CTI Toolbar
This javascript_cti_toolbar can be deployed on any window server in any application server of the user's choice (IIS, Tomcat, etc). The following section lists the steps to deploy the application on an IIS server.
-
Download the javascript-cti-toolbar and extract. In the extracted folder, Copy all the files and place them in the (c:\inetpub\wwwroot\JavaScript-CTI) or any desired directory.
-
Open IIS. It can be opened by pressing window+R, writing inetmgr, and clicking OK. It will run IIS Manager.
-
Right-click on Sites to Add a new Site.
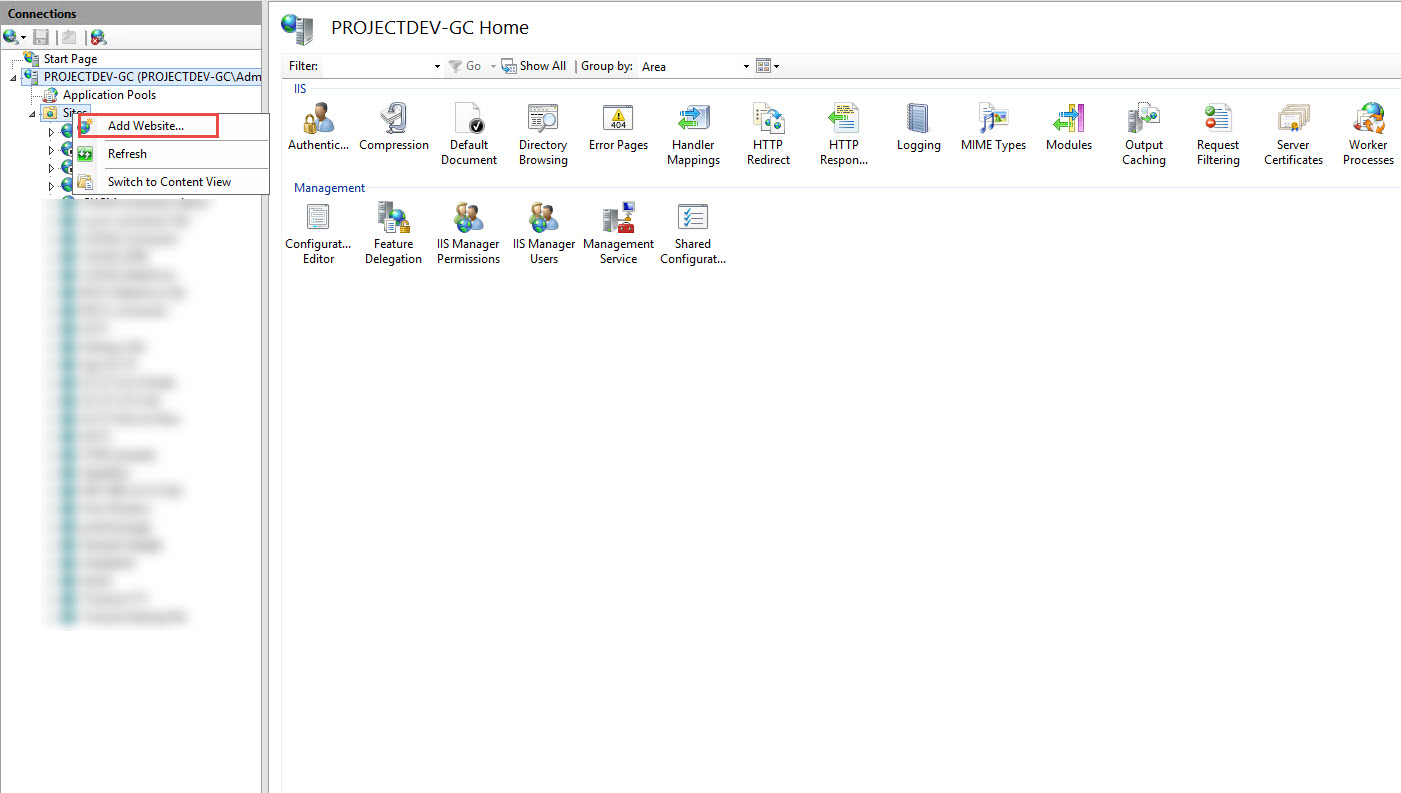
-
Add new Site, Site name (javascript_cti).
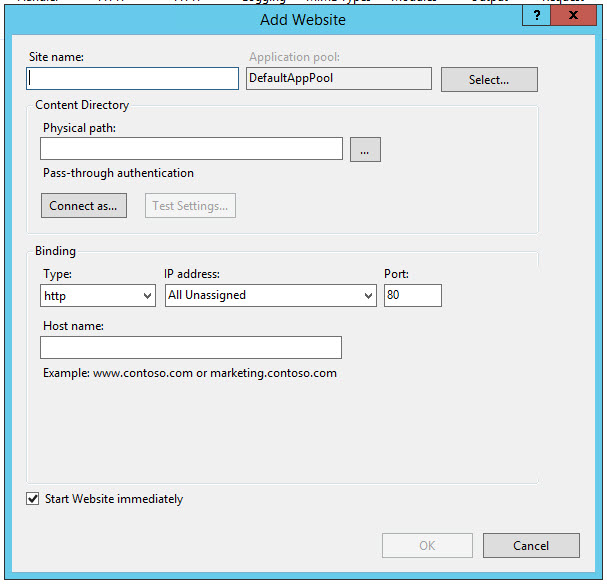
-
Physical path (cc:\inetpub\wwwroot\JavaScript-CTI).
-
Port, default value is 80 but any other value can be assigned.
-
Please follow
this
guide to install and configure the SSL certificates on IIS in order to run the cti_toolbar on HTTPS.
-
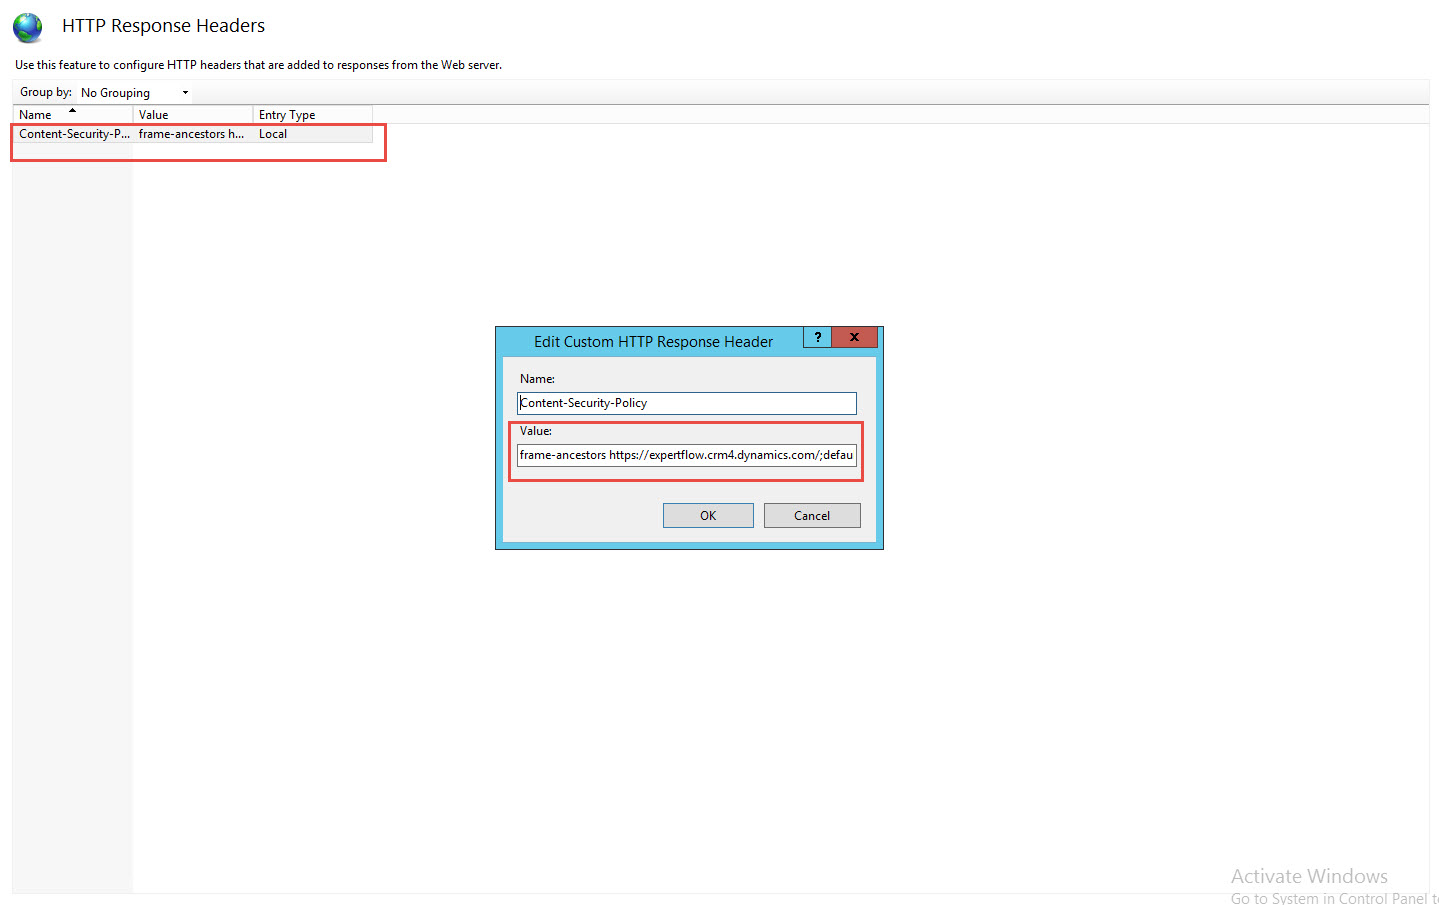
Setting the HTTP headers
Once you have deployed the JS CTI connector on your server the you need to set up http response headers for security.
-
Click on the Site which you have deployed on Server and there you will see an option of HTTP Response Headers.
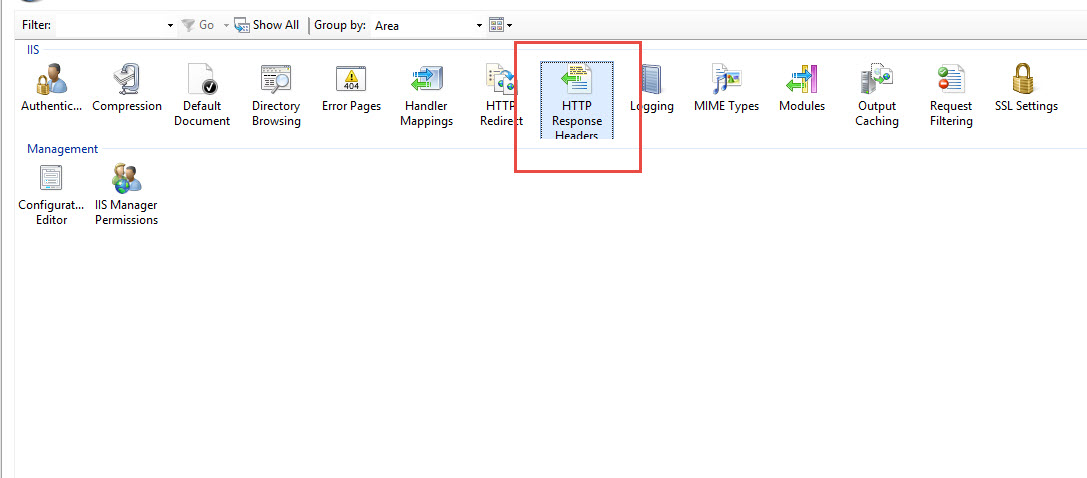
-
Click on HTTP Response Header and click on Add... on the right most corner.
-
In Name field, enter "Content-Security-Policy".
-
In the Values field there are multiple values to set. These values depend on your CRM and Finesse.
-
While adding the values, there should be no space between semi-colon and next value.
-
frame-ancestors https://<CRM Domain>.com/;
-
default-src 'self';
-
style-src 'self' https://fonts.googleapis.com/ https://cdnjs.cloudflare.com;
-
connect-src 'self' https://<Finesse FQDN>:8445 https://<Finesse FQDN>:7443/http-bind/;
-
script-src 'self';
-
font-src 'self' https://fonts.gstatic.com;
-
form-action 'self' https://<Finesse FQDN>8445 https://<Finesse FQDN>:7443/http-bind/;img-src 'self';
-
frame-src 'self';
-
media-src 'self';
-
object-src 'self';
-
manifest-src 'none';
-
worker-src 'none';
-
-
You have to change the value for frame-ancestors. The value will be a link to your CRM Domain.
-
You have to set the Finesse URL in connect-src, form-action.
-
When you run the JS CTI Connector on any CRM and you set the value of crm = 1 in config.js file then you have to write script-src as below
-
script-src 'self' https://<organizationCRMDomain> https://<CRM login URL>.com;
-
You have to set the URL for script-src when you want to run the JS CTI connector on any CRM with your CRM URL. if it is MS Dynamics then you have to also mention the Microsoft login URL too.
-
Expertflow SSO Server Deployment Guide
-
-
The Deployment Guide is available here. This is only required if Cisco Finesse is Configured with SSO. If Finesse is running without SSO, then please ignore this.
-
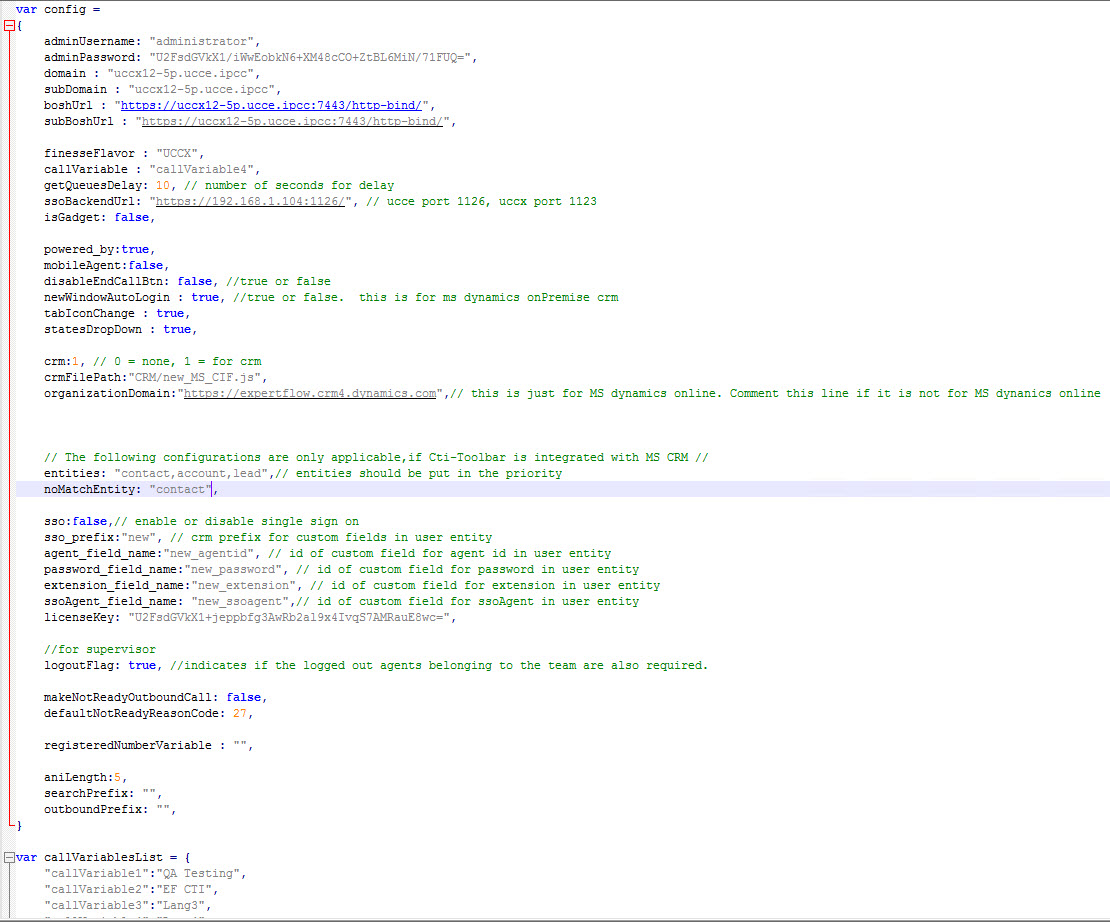
Configuration for Javascript CTI Toolbar
-
Open the new_config.js file located on `c:\inetpub\wwwroot\JavaScript-CTI\config.js` path. Set the properties as per the below table.
Please use these properties for stand-alone and mobile agent deployment. If CTI is being used inside the CRM, please follow the respective CRM Configurations
S.No
Property Name
Value
Description
1
adminUserName
admin
The Finesse Admin Username, This username is used to call the different Finesse APIs
2
adminPassword
*******
The Finesse Admin Password. The password needs to be encrypted first.
3
domain
https://<finesseFQDN>:8445/finesse/api/
The domain name for finesse with which we are integrating along with port and api endpoint
4
subDomain
https://<subscriberfinesseFQDN>:8445/finesse/api/
The domain name for subscriber finesse with which we are integrating along with port and api endpoint
5
boshURL
https://<finesseFQDN>:7443/http-bind /
The boshbaURL variable basically append the same Finesse Domain with a predefined URL
6
subBoshUrl
https://<subscriberfinesseFQDN>:7443/http-bind/
The sub bosh URL variable basically appends the same subscriber Finesse Domain with a predefined URL
7
finesseFqdn
<finesseFQDN>
The domain name for finesse
8
subFinesseFqdn
<subscriberfinesseFQDN>
The domain name for subscriber finesse
9
finesseFlavor
UCCE/UCCX
This property can have 2 values
-
UCCE
-
UCCX
Note: In the case of PCCE, we need to provide value UCCE.
10
callVariable
callVariable1
Our Connector required an empty one variable which it needs to use for some internal mechanism. That variable can be any callVariable like callVariable1,callVariable2, callVariable3....callVariable10, or any ECC variable as well.
In the case of the ECC variable, we need to provide names like ECC.variableName
11
powered_by
True
System variable should always remain True
12
disableEndCallBtn
false
This should always remain false
13
getQueuesDelay
6000
This is only applicable for UCCE/PCCE deployment. This is the time by which CTI Toolbar queries the UCCE Database to display the Queue Stats
14
logoutFlag
True
Used in Team Performance gadget, to get the logout agents' detail as well.
15
ssoBackendURL
https://192.168.*.*:8084
Javascript CTI Toolbar supports Finesse SSO login as well, and for that EF has developed its own Utility which needs to be deployed First. The Deployment Guide for SSO is available
here
. Once you deploy that Utility, you can then provide the link here. If Finesse is not SSO enabled, please ignore this property
16
isGadget
False
A System property should remain false always.
17
makeNotReadyOutboundCall
false
This property is used for making outbound calls in a Ready state, for CCE 12.5+ we can make calls in Ready state without any issues, but for below versions we need to set this property to true in order to make calls in ready state.
Note: The agent will be in Not Ready state after the call ends if the property is set to true.
18
defaultNotReadyReasonCode
27
This property is used for changing the agent state to Not ready for the outbound calls if made in Ready state and the makeNotReadyOutboundCall property is set to true.
19
callVariablesList
{"callVariable1": "Language"}
The call variables list is the config where you can decide which variables you want to display on the UI and with what name they should appear on the UI. In the list, you mention the call variable name followed by the value that will appear on the UI. So for example, if you want only call variable 1 to be displayed with the key 'language' then your config should be {"callVariable1": "Language"}.
-
Update the configurations and save the file.
-
-
Browse the configured FQDN and the application should be accessible as shown below.