User Guide for Quality Manager
As a Quality Manager, you can design evaluation workflows, assign reviews, and monitor evaluation progress across your team. This guide covers how to:
Design and manage evaluation forms with customizable sections, questions, and scoring.
Schedule evaluations for agents/teams and assign them to evaluators (human or AI).
Track reviews in progress, filter tasks, and evaluate interactions.
Manage conversation lists, apply filters, and assign/conduct reviews.
Login
The Login Screen is the entry point for accessing the Quality Management solution.
Login Screen
Users provisioned in IAM with the required permissions can authenticate using their credentials. The 'Remember Me' feature enables persistent login cookies for returning users
.png?inst-v=461a6021-2184-4c4d-acd5-8a6836f3d66f)
Login Screen
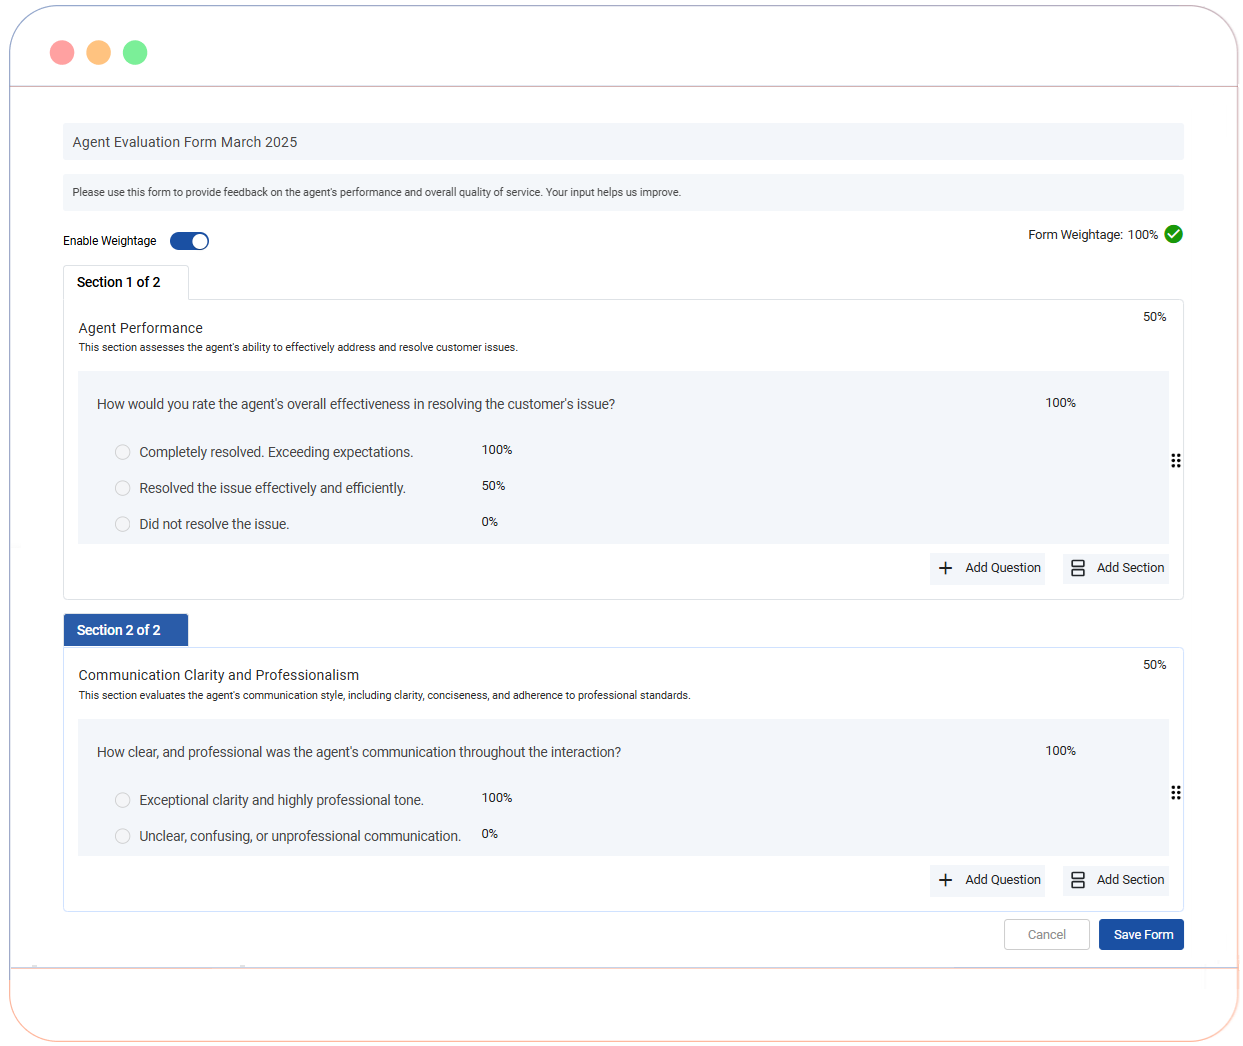
Design an Evaluation Form
The Forms tab enables Quality Managers to design and maintain evaluation forms to assess agent-customer interactions.
Forms List View:
Displays existing forms with,
Name
Created on date and time.
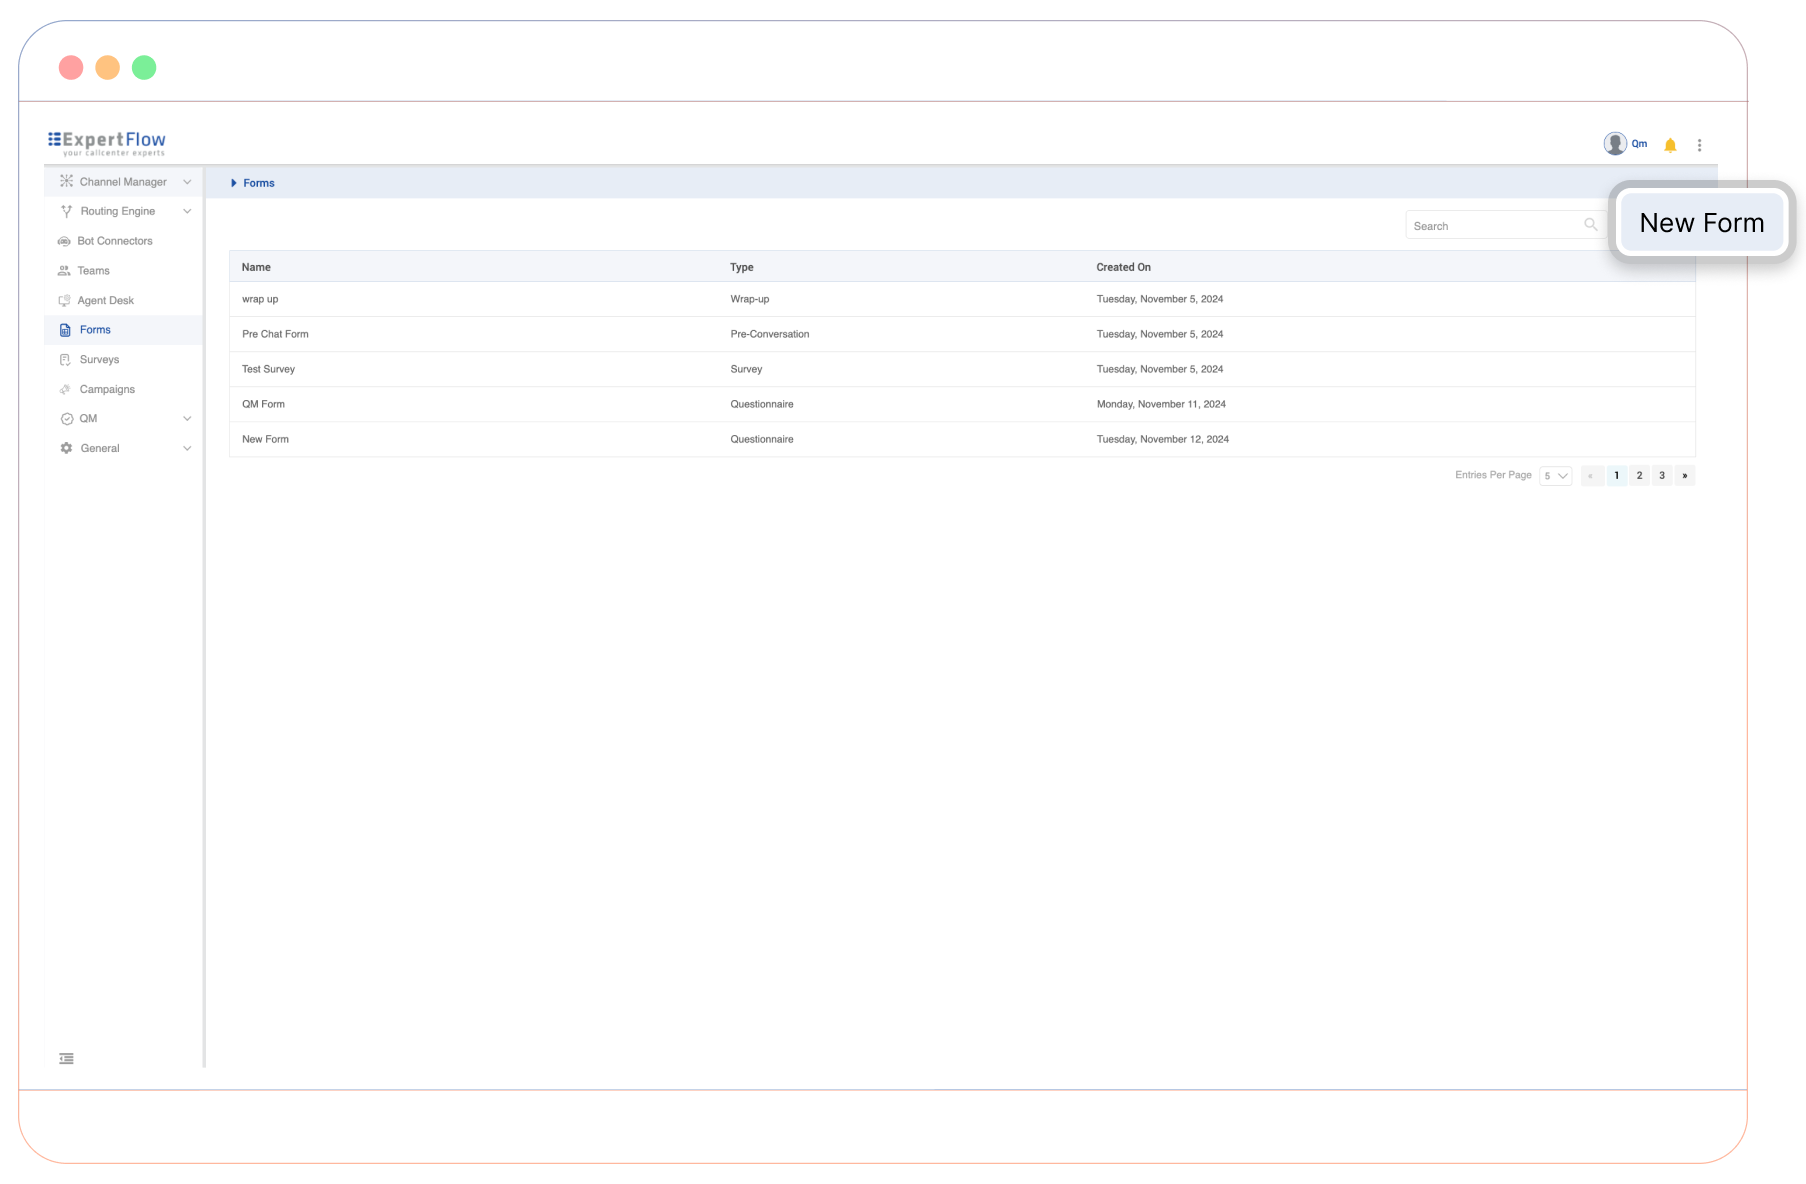
Creating a New Form
Steps to create a new form:
Click + New Form.
Provide a form title and description.
Enable Weightage (recommended for Quality Management Evaluation form).
Add sections and questions:
Add Section: Break down forms into logical categories.
Add Question: Insert multiple-choice, single-choice, or text-based questions.
Save the form
Reviews
Viewing and Filtering Reviews
Accessing Reviews
Select the Reviews option under the QM menu.
The Review Screen will open, and it lists all tasks assigned to the Quality Manager and all Evaluatord.
Filter Options
Use the dropdown menu to filter by:
All
Pending
In Progress
Completed
Evaluation Score
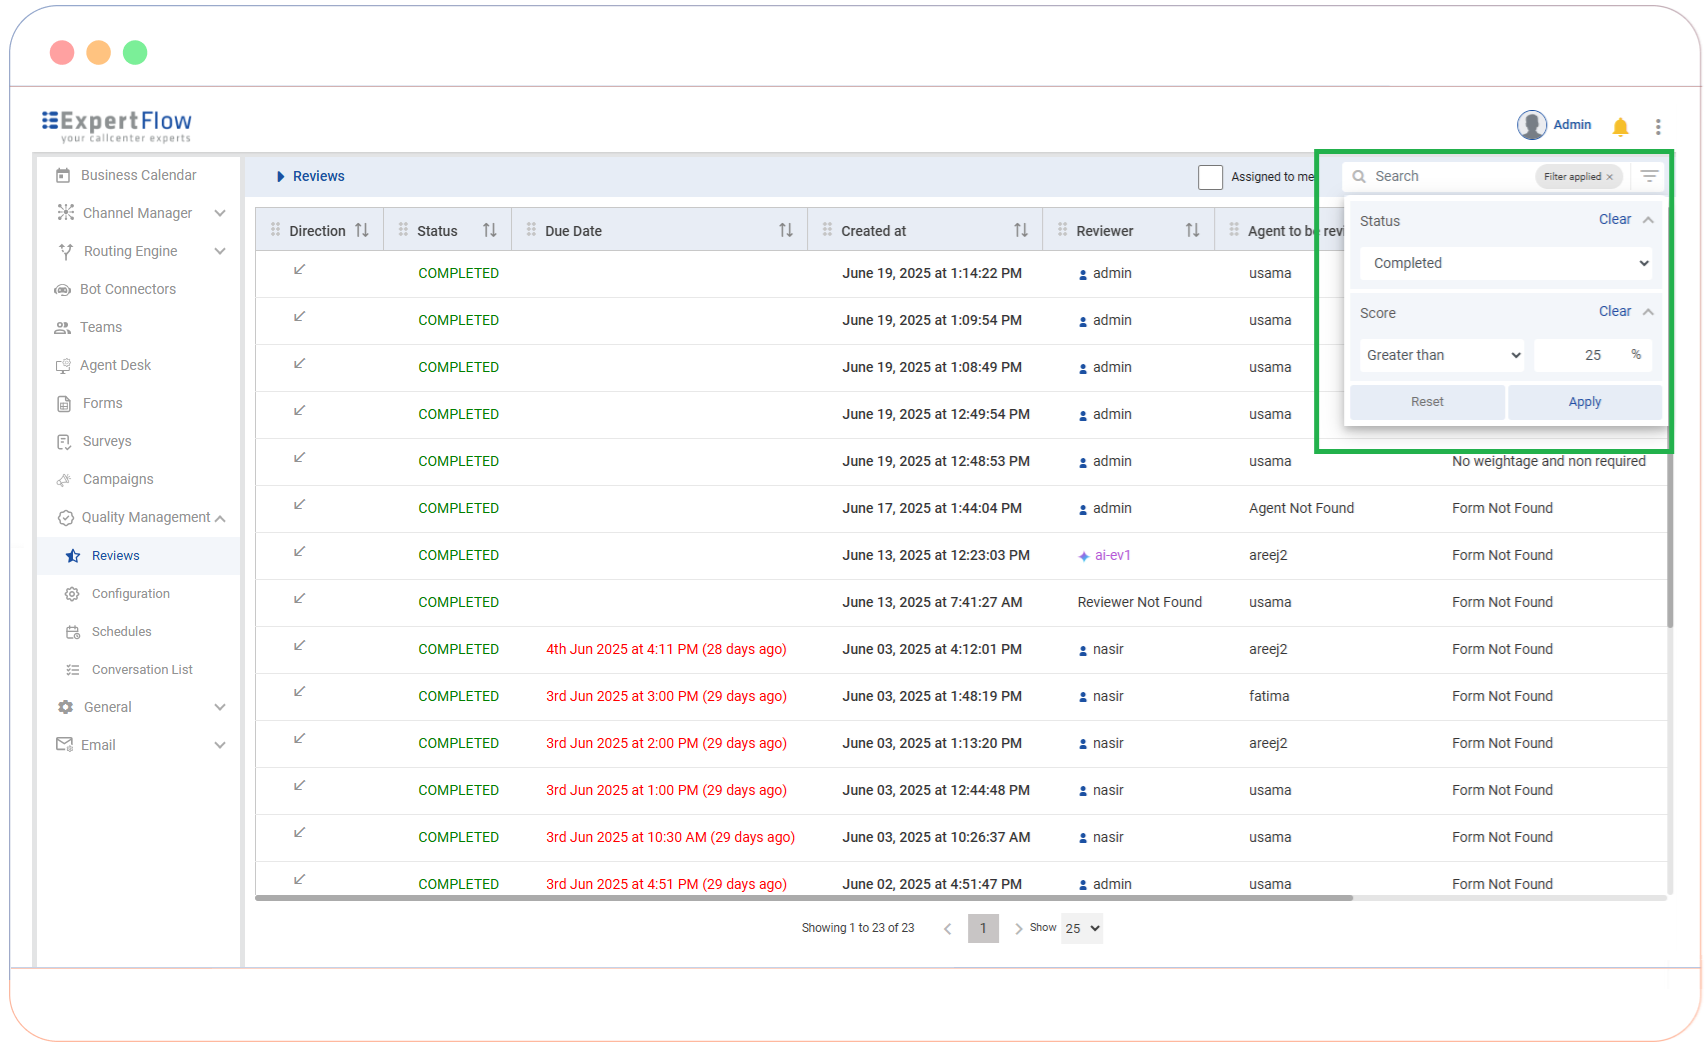
Toggle "Assigned to me" to view tasks specifically assigned to you (as Quality Manager).
.png?inst-v=461a6021-2184-4c4d-acd5-8a6836f3d66f)
Starting a Review
Select a review from the list available on the review screen and click "Start Review". It will open Conversation View.
Use the form on the right-hand panel to evaluate agent interactions.
Assign scores or feedback to specific questions or sections.
.png?inst-v=461a6021-2184-4c4d-acd5-8a6836f3d66f)
Schedules
The Schedules tab (Review Schedular) allows Quality Managers to assign reviews to evaluators systematically.
Manage Schedules:
Open the Schedules section in the left menu.
Select Manage Schedule
The list displays active schedules with details such as:
Name: Schedule title.
Status: Current state (e.g., Active, Inactive).
Date: Scheduled end date.
Managing Schedules
Click the edit icon to modify a schedule.
Use the toggle switch to activate or deactivate schedules.
If toggled to deactivate, reviews created by the schedule will not be removed. Only the future assignment of tasks by the scheduler is halted.
Delete schedules using the trash icon if no longer needed.
This will remove all pending/in-progress reviews.
.png?inst-v=461a6021-2184-4c4d-acd5-8a6836f3d66f)
Manage Schedules
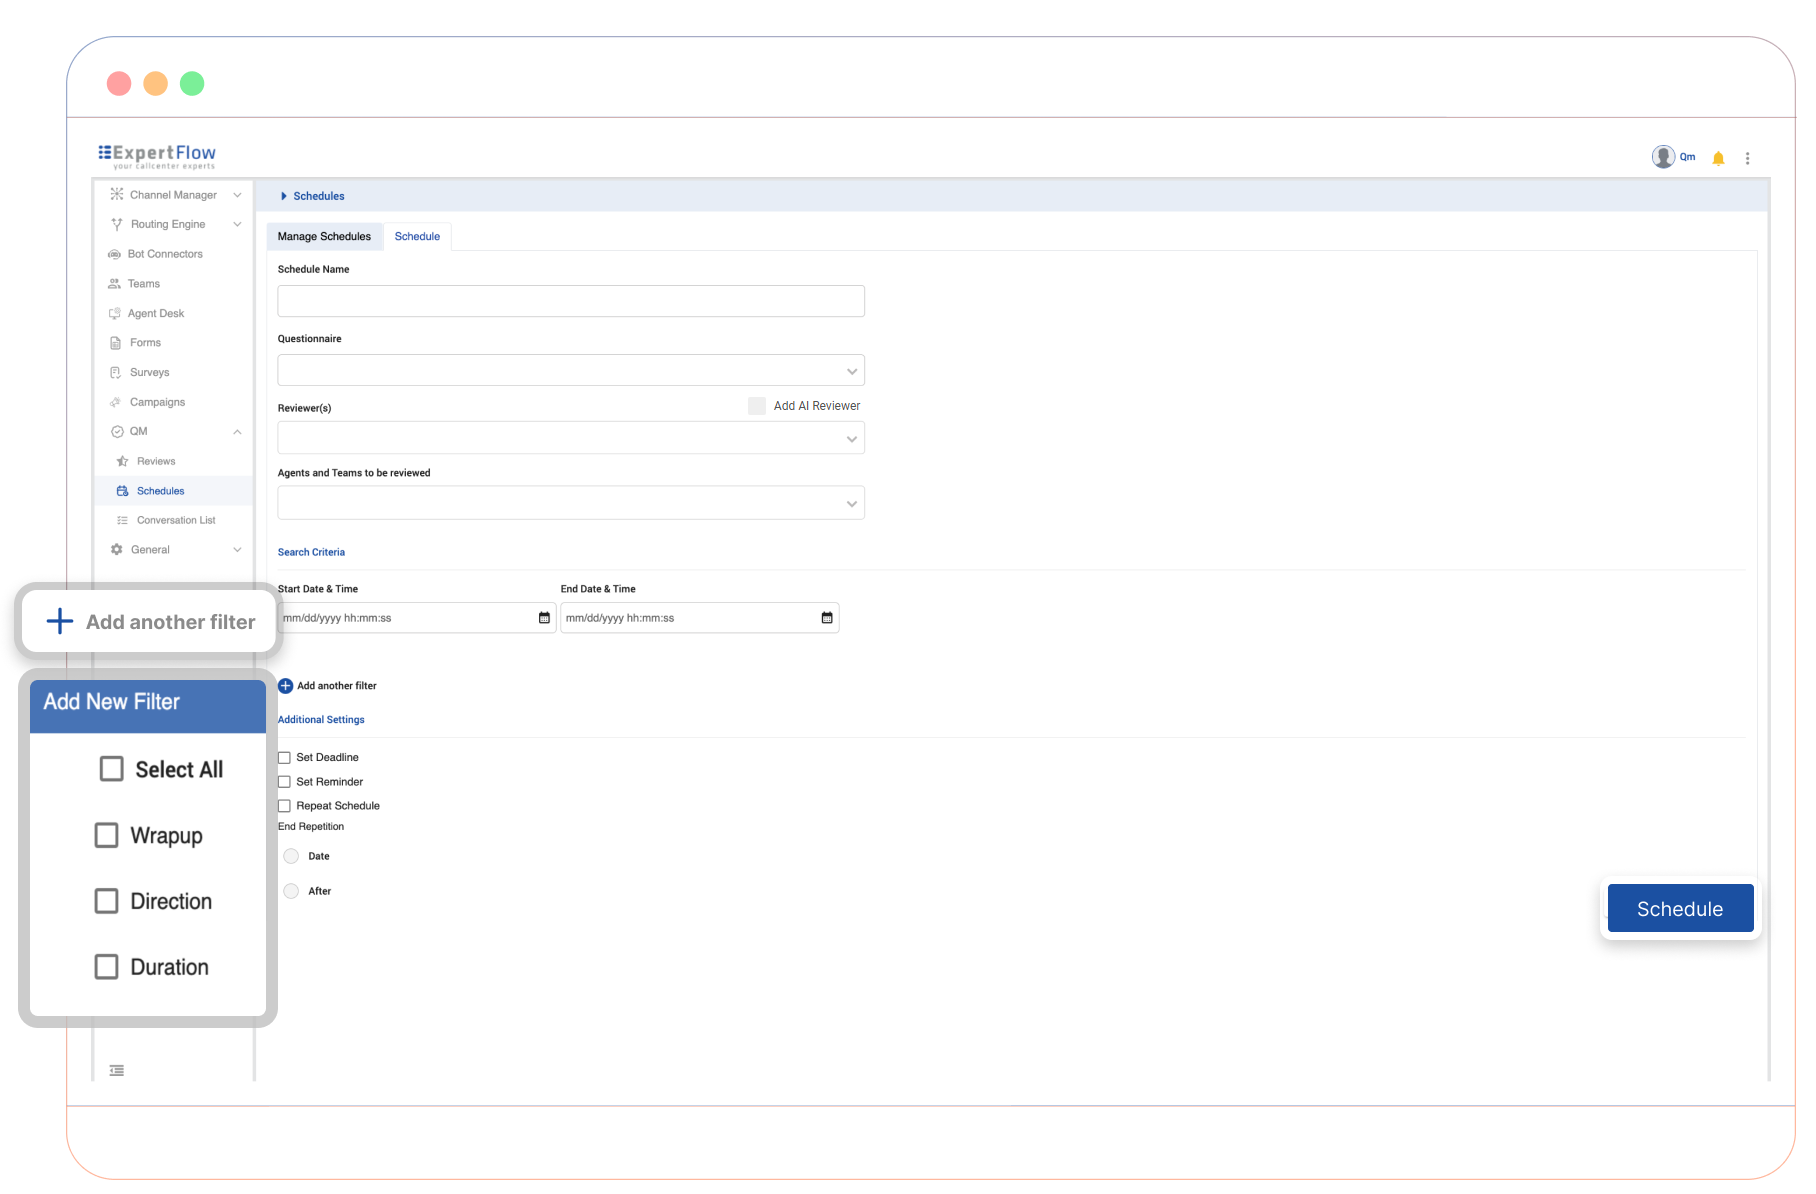
Create a New Schedule
New evaluation schedules are configured in the 'Schedule' tab, where the quality managers define all timing and frequency parameters.
When AI is not enabled
If the AI feature is not enabled, Quality Managers can't assign evaluations to AI, and they only have the option to assign evaluations to human evaluators.
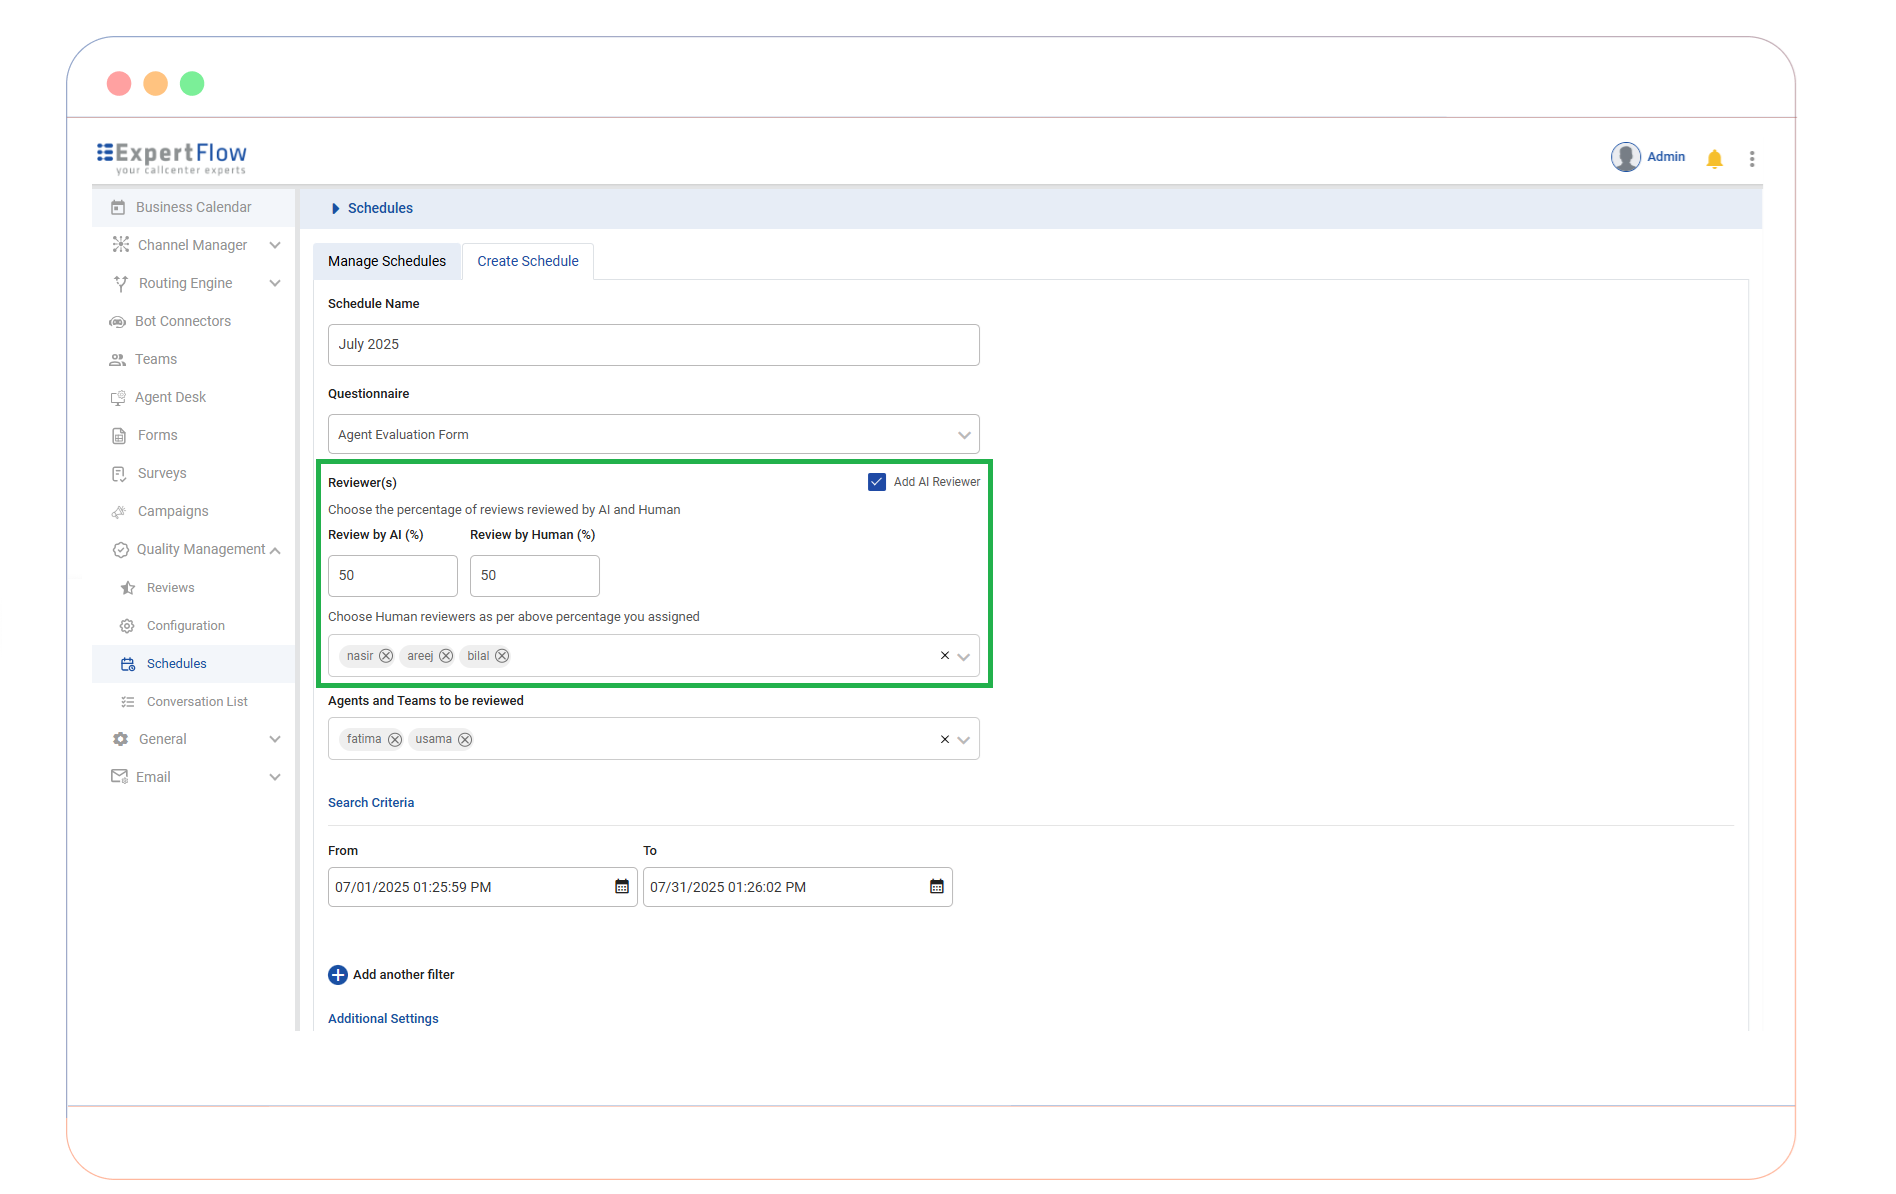
Scheduling Screen
After selecting the "Schedule" tab from the top of the “Schedules” screen, the following screen allows Quality Managers to configure a new schedule for quality management tasks.
Basic Information
Schedule Name:
Enter a name for the schedule to easily identify it (e.g., "Weekly Agent Review").
Questionnaire:
Select a pre-configured form from the dropdown (e.g., "QM Form", "Score", "Quality Manager Form"). This form will be used during the evaluation process.
Reviewer(s):
Assign one or more reviewers from the dropdown. Use the search feature to quickly find specific reviewers.
Agents and Teams to be Reviewed:
Select agents or teams that are to be reviewed under this schedule. Quality Manager can select individuals or entire teams from the dropdown.
Search Criteria
Start Date & Time / End Date & Time:
Set the date and time range for when the review schedule will be active. Use the calendar picker to select the desired dates and times.
Add Another Filter:
Use this feature to refine the criteria by additional parameters (e.g., "Wrapup", "Direction", "Duration").
Wild Card entry is allowed to add custom Wrap-up codes—Max 50 characters per entry.
Select filters to narrow down specific interactions or criteria for the schedule.
Additional Settings
Set Deadline:
Specify the number of days within which the schedule must be completed. Use the dropdown to select a value.
Set Reminder:
Enable reminders for assigned reviewers. Quality Manager can choose the reminder interval (e.g., 1, 2, or 3 days). Reminders can only be scheduled up to one day before the deadline.
Repeat Schedule:
Enable repetition for recurring schedules. Options include:
Daily
Weekly
Fortnightly
Monthly
For a Repeat Schedule, only new conversations that meet the search criteria will be assigned. The "Start Date & Time / End Date & Time" must be configured to ensure repetitions occur within the specified date range.
End Repetition Options
Date:
Specify the exact date when the recurring schedule will end.
After Occurrences:
Specify the number of occurrences after which the schedule will end.
When AI is enabled
During schedule creation, Quality Managers may configure the distribution ratio between AI and human evaluations. For example, if the schedule specifies 70% AI and 30% human evaluation, the system will adhere to this ratio when distributing conversations. The rest of the settings work just like they do on the Scheduling Screen.
Conversation List
The Conversation List shows all agent interactions for evaluation and quality management. This screen is crucial for accessing, filtering, and managing conversations. Below are the key components and functionalities:
Conversation Overview
Columns:
Direction: Indicates whether the conversation is inbound or outbound.
Date: The date the conversation took place.
Time: The starting time of the conversation.
Duration: Total time of the interaction.
From: The origin of the conversation (e.g., a phone number or a client).
To: The recipient of the conversation.
Agent(s): The agent(s) involved in the conversation.
Reviews: Shows progress in percentages or whether the review is assigned.
Wrap-up: Notes or summaries added by agents.
Filtering Options
Click the Filter Icon to open the filter panel.
Available filters:
Start Date & Time / End Date & Time: Specify a date and time range for filtering conversations.
Agents and Teams: Filter by specific agents or teams.
Direction: Select Inbound or Outbound Conversations.
Wrap-ups: Filter by wrap-up codes or notes.
Wild Card entry is allowed—Max 50 characters per entry.
Duration: Set a time range in minutes, seconds, or hours.
The default operator between different filters is AND, while the operator within the “Agents and Teams” and “Wrap-ups” filters is OR.
Actions:
Apply: Filter the list using the selected criteria.
Reset: Clear all applied filters.
.png?inst-v=461a6021-2184-4c4d-acd5-8a6836f3d66f)
Reviewing Conversations
Click on a conversation to open its detailed view.
The conversation view displays:
A chronological history of messages or call records.
Interaction details, such as client responses, agent replies, and system actions.
Actions:
Assign: Opens the Assign Panel where the quality manager can:
Select an evaluator.
Assign an agent for review.
Choose a questionnaire.
Set a due date and reminders.
Confirm by clicking Assign.
Review: Opens the Review Panel where the quality manager can:
Select an agent to review.
Choose a questionnaire for the evaluation.
Click Start Review to begin the process.
Viewing Conversation Types
Use the dropdown at the top-right to filter by:
All: Displays both chat and voice conversations.
Chat: Shows only chat-based interactions.
Voice: Displays voice calls.
.png?inst-v=461a6021-2184-4c4d-acd5-8a6836f3d66f)