Solution Prerequisites
Supervisor Tools is compatible with the following.
Hardware Requirements
For HA deployment, each machine in the cluster should have the following hardware specifications.
|
Components |
Minimum requirement |
|---|---|
|
CPU |
2 cores vCPU |
|
RAM |
4 GB |
|
Disk |
100 GB mounted on / |
|
NICs |
1 NIC |
Software Requirements
OS Compatibility
Supervisor Tools is tested with the following Linux-based operating systems.
|
Item |
Version |
Notes |
|---|---|---|
|
Red Hat Enterprise Linux recommended |
release 8.4 or higher |
Administrative privileges (root) are required to follow the deployment steps. |
|
CentOS Linux |
7.7.1908 (Core) |
Not recommended as it has many vulnerabilities and no longer maintained Administrative privileges (root) are required to follow the deployment steps. |
Database Requirements
|
Item |
Notes |
|---|---|
|
SQL Server 2019 Express/ Standard/ Enterprise |
The customer or partner to install and make it accessible on the local system or LAN. To support High Availability, the partner/customer must set up MS SQL Server in a failover cluster mode. |
Docker Engine Requirements
|
Item |
Notes |
|---|---|
|
Docker CE 18+ |
|
|
Version 1.23.1 |
Browser Compatibility
|
Item |
Version |
Notes |
|---|---|---|
|
Chrome |
120.x |
Compatible
|
|
Firefox |
Not Tested |
The UI of some pages might not render properly in Firefox. |
Cisco Unified CC Compatibility
|
Item |
Version |
|---|---|
|
UCCX |
12.5, 12.0 (SS0) |
|
UCCE |
12.6 |
|
CUCM |
12.5.1 |
Installation Steps
The Internet should be available on the machine where the application is being installed and connections on port 9242 should be allowed in the network firewall to carry out the installation steps. All the commands start with a # indicating that root user privileges are required to execute these commands. Trailing # is not a part of the command.
Allow ports in the firewall
For internal communication of the docker swarm, you'll need to allow communication (both inbound and outbound) on the ports: 8083/tcp,8084/tcp , 8085/tcp, 8086/tcp, 8087/tcp, 8844/tcp, 8834/tcp, 8443/tcp and 443/tcp.
To start the firewall on CentOS (if it isn't started already), execute the following commands. You'll have to execute these commands on all the cluster machines.:
systemctl enable firewalld
systemctl start firewalld
To allow the ports on CentOS firewall, you can execute the following commands. You'll have to execute these commands on all the cluster machines.
firewall-cmd --add-port=8083/tcp --permanent
firewall-cmd --add-port=8084/tcp --permanent
firewall-cmd --add-port=8085/tcp --permanent
firewall-cmd --add-port=8086/tcp --permanent
firewall-cmd --add-port=8087/tcp --permanent
firewall-cmd --add-port=8844/tcp --permanent
firewall-cmd --add-port=8834/tcp --permanent
firewall-cmd --add-port=8443/tcp --permanent
firewall-cmd --add-port=443/tcp --permanent
firewall-cmd --reload
Configure Log Rotation
Add the following lines in /etc/docker/daemon.json file (create the file if not there already) and restart the docker daemon using systemctl restart docker. Perform this step on all the machines in the cluster in case of HA deployment.
{
  "log-driver": "json-file",
  "log-opts": {
    "max-size": "50m",
    "max-file": "3"
  }
}
Creating Databases
Create a database for UMM and Supervisor Tools services in the MSSQL server with suitable names and follow the application installation steps.
Installing Application
-
Download the deployment script supervisor-tools-deployment.sh. This script will:
-
delete the supervisor-tools-deployment directory in the present working directory if it exists.
-
clone the supervisor-tools-deployment repository from GitLab in the present working directory.
-
-
To execute the script, give it the execute permissions and execute it.
chmod +x supervisor-tools-deployment.sh ./supervisor-tools-deployment.sh -
For UCCE customers only, execute the following command
rm /root/supervisor-tools-deployment/docker/config/umm/permissions/tam.json -
For UCCX customers only, uncomment the lines 71 - 81 from file
/root/supervisor-tools-deployment/docker/docker-compose.ymlIt should looks like
JSONtam: image: gitlab.expertflow.com:9242/supervisor-tools/team-administration:13.2.1 ports: - "8082:8080" env_file: - ${PWD}/docker/environment-variables/environment-variables.env restart: always volumes: - ${PWD}/docker/trustStore:/usr/local/trustStore networks: - st -
Update environment variables in the following files inside
/supervisor-tools-deployment/docker/environment_variablesfolder.-
Update UMM environment variables in the
umm-environment-variables.envfile. -
Update Supervisor Tools Environment variables in the
environment-variables.env. See also, Caller Lists Environment Variables to specify variables of the Caller Lists microservice.
-
-
Get domain/CA signed SSL certificates for SupervisorTools FQDN/CN and place the files in
/root/supervisor-tools-deployment/docker/certificatesfolder. The file names should beserver.crtandserver.key. -
Copy the supervisor-tools-deployment directory to the second machine for HA. Execute below command
scp -r supervisor-tools-deployment root@machine-ip:~/ -
Go to the second machine and update the environment variables where necessary.
-
Execute the following commands inside /root/supervisor-tools-deployment directory on both machines.
chmod 755 install.sh ./install.sh -
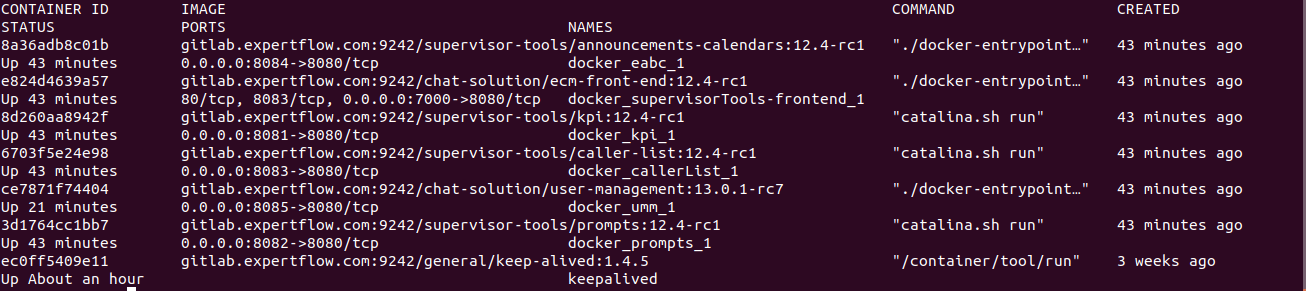
Run the following command to ensure that all the components are up and running. The screenshot below shows a sample response for a standalone non-HA deployment.
docker ps
Note: All machines and virtual IP should be on the same subnet for HA testing.
Virtual IP configuration
Repeat the following steps for all the machines in the HA cluster.
-
Download keepalived.sh script and place it in
/rootthe directory. -
Give execute permission and execute the script:
chmod +x keepalived.sh ./keepalived.sh -
Configure keep.env file inside
/root/keep-alivedfolderName
Description
KEEPALIVED_UNICAST_PEERSPear machine IP.
192.168.1.80KEEPALIVED_VIRTUAL_IPSVirtual IP of the cluster. It should be available in the LAN. For example: 192.168.1.245
KEEPALIVED_PRIORITYPriority of the node. Instance with lower number will have a higher priority. It can take any value from 1-255.
KEEPALIVED_INTERFACEName of the network interface with which your machine is connected to the network. On CentOS,
ifconfigorip addr shwill show all the network interfaces and assigned addresses.CLEARANCE_TIMEOUTCorresponds to the initial startup time of the application in seconds which is being monitored by keepalived. A nominal value of 60-120 is good enough
KEEPALIVED_ROUTER_IDDo not change this value.
SCRIPT_VARThis script is continuously polled after 2 seconds. Keepalived relinquishes control if this shell script returns a non-zero response. It could be either umm or any backend microservice API.
pidof dockerd && wget -O index.htmlhttp://localhost:7575/ -
Update the SERVER_URL in
/supervisor-tools-deployment/docker/environment_variablesto hold Virtual IP for front-end. -
Give the execute permission and execute the script on both machine.
chmod +x keep-command.sh
./keep-command.sh
Finesse Gadget Deployment
Follow the below steps to deploy the Finesse gadget:
-
Finesse gadget files are in supervisor-tools-deployment/gadget
-
Update the Backend IP in the EFGadget.js file on line 59
-
From the host machine, navigate to the Gadget Directory and connect to the Finesse host using the following command:
sftp 3rdpartygadget@finesseIP , it prompts for a password, put in the password for the 3rdpartygadget user. -
Once connected to the finesse machine, use cd files command to navigate into the files folder. Then use the command mkdir EFGadget to create the EFGadget Directory.
-
Once the directory has been created, navigate into the folder using cd EFGadget.
-
Once you are in the folder, use the command put filename to copy normal files and put -r foldername to copy folders that are in gadget Directory
-
Once files are copied, log in to https://finesseIP:8445/cfadmin
-
Click on Team Resources, click on a team, and edit the text that describes the Finesse desktop. Locate <role>supervisor</role> and add below lines after <tabs>
<tab>
 <id>ST</id>
 <label>Supervisor Tools</label>
 <columns>
  <column>
   <gadgets>
    <gadget>/3rdpartygadget/files/EFGadget/EFGadget.xml</gadget>
   </gadgets>
  </column>
 </columns>
</tab>
Login a supervisor with nocache, the supervisor will auto login to the supervisor tools gadget. The supervisor will be able to use supervisors tools in finesse.
SMBv2 Commands:
Following are the commands to enable and disable SMBv1 and SMBv2 on the SMB server component.
-
Detect if SMB1 enabled
Get-SmbServerConfiguration | Select EnableSMB1Protocol -
Enable SMB1
Set-SmbServerConfiguration -EnableSMB1Protocol $true -
Disable SMB1
Set-SmbServerConfiguration -EnableSMB1Protocol $false -
Detect if SMB2 enabled
Get-SmbServerConfiguration | Select EnableSMB2Protocol -
Enable SMB2
Set-SmbServerConfiguration -EnableSMB2Protocol $true -
Disable SMB2
Set-SmbServerConfiguration -EnableSMB2Protocol $false
For more info you can check:https://learn.microsoft.com/en-us/windows-server/storage/file-server/troubleshoot/detect-enable-and-disable-smbv1-v2-v3?tabs=server
Adding License
-
Browse to http://<MACHINE_IP or FQDN>/umm in your browser (FQDN will be the domain name assigned to the IP/VIP).
-
Click on the red warning icon on right, paste the license in the field and click save.