Get access to Twitter Developer Account (with Standard API Access)
To develop or deploy any Twitter integrations, you must have a Twitter Developer account, where you will set up a Twitter App upon which you will integrate your backend system - the application that is to interact with the Twitter Platform. Follow Twitter Getting Started to apply for a developer account to integrate HC with Twitter API.
The review feedback will be sent to the email you provided during the application process. Once the API access application has been approved, you can proceed to the below step for App Creation In Twitter Developer Account.
App Creation on Twitter Developer Account
-
Log in to Twitter Developer Account https://developer.twitter.com/en/portal/dashboard
-
Create a Project and then create an app. i.e. provide a name for the app, like for example “EF-Twitter-App”.
-
Generate the Keys and Access Tokens from the “Key and Tokens” Tab as shown in the screenshot below:
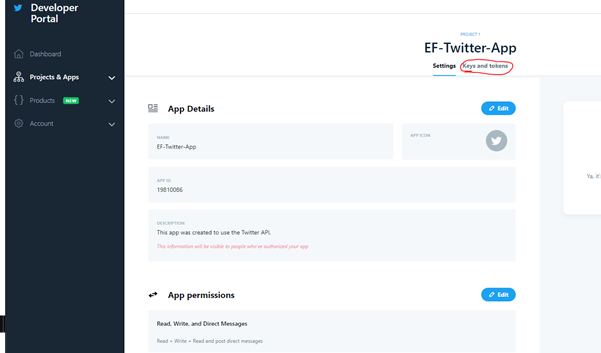
4. Generate Consumer Key, Consumer Secret, and access tokens. Make sure to save these keys somewhere save as you will need to configure them in the CCM (Channel-Manager variable.env file)
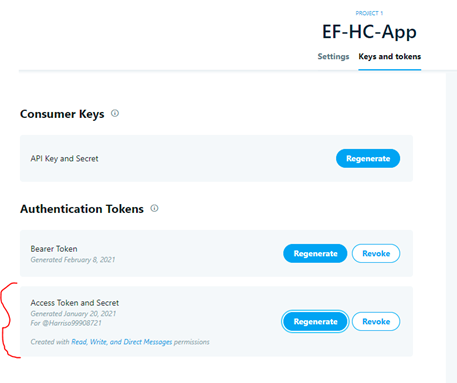
5. After you've created the APP and Generated the Keys & Tokens. Navigate to the following tab “Settings” and change the App permissions to Read+Write+Direct Messages. To do this, click on “Edit”.
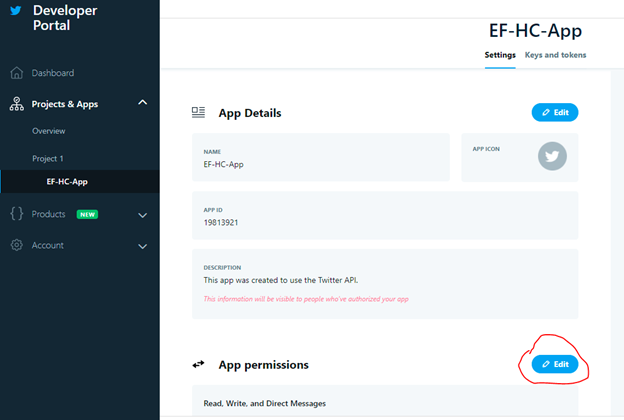
6. Copy The Keys & Access Tokens you generated in Step 3 into a secure location for future reference.
7. Create a Lab Environment where you will access your app, Navigate as follows
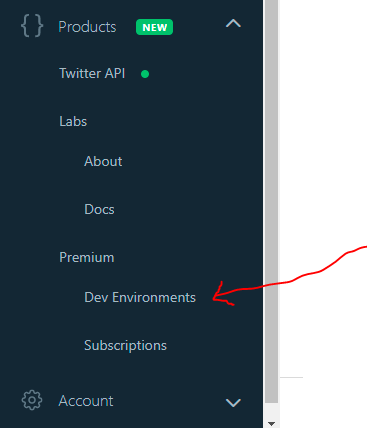
Then Create the environment as follow:

Keep Note of this environment name, as you will need it when registering CCM’s Twitter webhook with Twitter.
Integrating the Twitter App with EF Channel Manager Application
Since Twitter is cloud-based, to integrate it with CCM, the Twitter endpoint inside the CCM MUST be accessible publicly and MUST also be hosted in a secure host with a valid SSL certificate.
The Twitter endpoint in CCM will be as follows: https://FQDN/ccm/webhook/twitter
Before integrating this endpoint to Twitter for us to receive Live Twitter Direct Messaging Events, we need to configure the Keys and Access Tokens we generated above in the App creation Section. Copy and Paste Keys/Access token in ccm environment_variable.env file as following;
1. Twitter Configuration in CCM .env file
#Section for Twitter Settings
#Twitter Consumer secret that you generate from your twitter developer account: https://developer.twitter.com/en/portal/dashboard
TWITTER_CONSUMER_SECRET= {ENTER_CONSUMER_SECRET}
#Twitter Consumer key that you generate from your twitter developer account: https://developer.twitter.com/en/portal/dashboard
TWITTER_CONSUMER_KEY= {ENTER_CONSUMER_KEY}
#Twitter Access Token that you generate from your twitter developer account: https://developer.twitter.com/en/portal/dashboard
TWITTER_ACCESS_TOKEN={ENTER_ACCESS_TOKEN}
#Twitter Access Secret that you generate from your twitter developer account: https://developer.twitter.com/en/portal/dashboard
TWITTER_ACCESS_SECRET={ENTER_ACCESS_SECRET}
TWITTER_ACCOUNT_ID={ENTER_TWITTER_USERID} See here how to generate THE TWITTER_ACCOUNT_ID to map to this variable.
Generate your TWITTER_ACCOUNT_ID from Twitter API

2. CCM’s Twitter Endpoint Integration with Twitter
The CCM’s Twitter endpoint https://FQDN/ccm/webhook/twitter is the webhook that will receive the twitter events. So twitter should be conjured to send all messaging events related to our Twitter Account to these endpoints.
However, Twitter doesn’t accept the absolute URL as it is, so we need to Encode the URL. You can use any encoding tool available or you can use Postman to encode this URL.
To encode the URL using the Postman Tool. Paste the URL on the address bar in Postman, and then select the “encode” option by clicking the 3 dots shown in the screenshot below.

The encoded URL will look similar to this : https%3A%2F%2FFQDN%2Fccm%2Fwebhook%2Ftwitter
A. Registering the CCM’s Twitter endpoint (as a webhook) in Twitter
To register a webhook, you can use Insomnia too, you can find it here. Once you install then you may proceed as follows;
-
Create a POST request
-
Paste URL: https://api.twitter.com/1.1/account_activity/all/research/webhooks.json?url=https%3A%2F%2F2f9ac4d60faa.ngrok.io%2Fwebhook%2Ftwitterchat ..
Replace “research” with the Development Environment Label that you created on the Twitter developer platform.
Replace the second highlighted part of the URL with the Encoded webhook URL
3. Choose Body as “JSON”
4. Authentication as “OAuth 1.0”
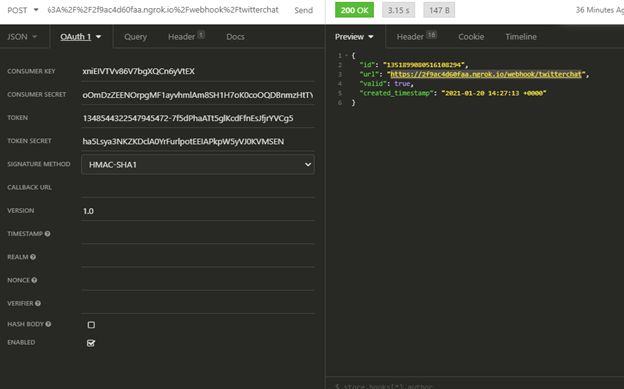
Replace:
-
Consumer key: with the “API key” (you generated for the app)
-
Consumer secret: with the “API secret”
-
Token: with the “access token”
-
Token Secret: with the “Access secret”
-
Choose SIGNATURE METHOD as “HMAC-SHA1”
Leave the rest of the field in default values.
Then click send.
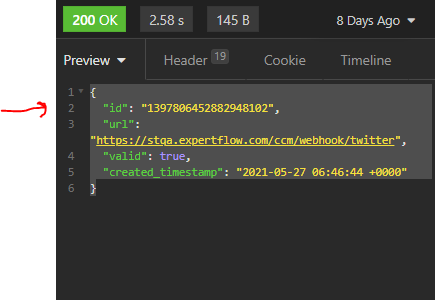
Note: Make sure to copy and save the id returned in the response body, as you may need it for troubleshooting in the future troubleshooting steps.
B. Subscribing the webhook events
This part will activate the webhook to receive the messaging events from Twitter.
-
Create a POST request
-
Paste URL: https://api.twitter.com/1.1/account_activity/all/research/subscriptions.json
Replace “research” with the Development Environment Label that you created on the Twitter developer platform.
3. Choose Body as “JSON”
4. Authentication as “OAuth 1.0”
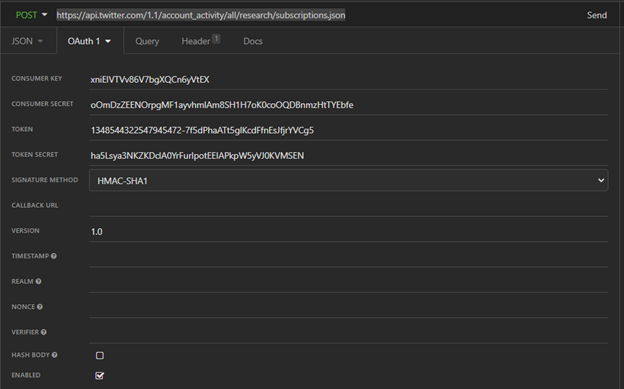
Replace:
-
Consumer key: with the “API key” (you generated for the app)
-
Consumer secret: with the “API secret”
-
Token: with the “access token”
-
Token Secret: with the “Access secret”
-
Choose SIGNATURE METHOD as “HMAC-SHA1”
Leave the rest of the field in the default value
For Success Result: Status code: 201 - Created.