Solutions Pre-requisite
Hardware Sizing
For a simplex (single server) deployment, minimum and recommended hardware requirements are as follows:
|
|
Minimum |
Recommended |
|---|---|---|
|
vCPU |
4 Cores |
8 Cores |
|
vRAM |
8 GB |
16 GB |
|
vDisk |
40 GB |
160 GB |
For a redundant deployment, two servers of the same specifications (as mentioned above) are needed.
Software Requirement
Following are the prerequisites for setting up a Hybrid Chat solution under different deployment profiles.
|
Hardware Sizing |
Hybrid Chat Core |
|---|---|
|
For up to 250 concurrent agents |
8 vCPU, 16 GB RAM, 150 GB HDD |
|
Software Requirements |
|
|
|
|
Certificates for HTTPS |
|
|
Certificates from a valid signing authority or Domain signed certificate are required for HTTPS protocol support
|
|
|
System Access Requirements |
|
|
Administrative privileges (root) on the host machine are required to proceed with the installation. |
|
System Access Requirements
The following ports should remain open on the Firewall. The local security policy and any antivirus should also allow open communication on the following ports:
|
Type |
Source Host |
Source Port |
Destination Host |
Destination Port |
|---|---|---|---|---|
|
TCP |
<Client Application> |
any |
EF Connector |
61616/61614 |
|
TCP |
EF Connector (B) |
any |
EF Connector |
61616/61614 |
|
HTTP |
For status monitoring from any machine |
EF Connector |
8162 |
|
|
NTP |
EF Connector |
any |
NTP Server |
123 |
|
DNS |
EF Connector |
any |
DNS Server |
53 |
-
<Client Application> is a machine running the client application of EF Connector. For server-based applications like Siebel, it’s Siebel Communication Server. For desktop-based applications, it’s the machine address of the agent desktop running the desktop application.
-
In a redundant deployment, both EF Connector instances communicate with each other on the same TCP OpenWIre port 61616. In the table above, it’s mentioned as EF Connector (B) ⇒ EF Connector.
-
These are defaults set in EF Connector, but you can always change the default configuration.
Time Synchronization Requirements
An important consideration is time synchronization between related components. Communication between EF Connector, client applications, and Connector Server. If the system dates and times are not synchronized the system can produce unpredictable results. Therefore, please make every effort to adhere to the following time synchronization guidelines:
EF Connector Server and client applications should have their Time Zone and time configured properly according to the geographic region and synchronized.
In the case of docker deployment, every container should have valid time zones!
Deployment Modes
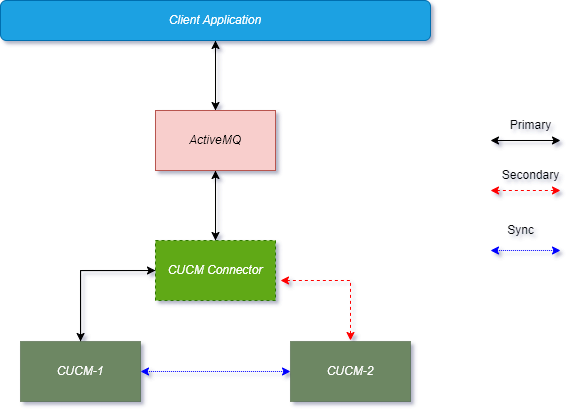
Non-Redundant / Simplex Mode Deployment
In simplex deployment, the application is installed on a single server with no failover support of EF Connector. However, the same EF Connector can still communicate with primary and secondary CUCM servers.
Simplex mode is useful for lab tests and commercial deployments at a smaller scale. The figure below explains the simplex mode of the Generic Connector.
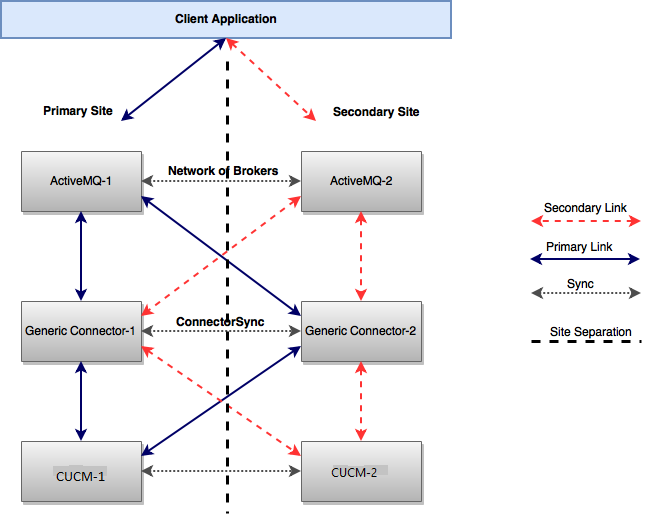
High Availability (HA) / Duplex Deployment
Active-Passive (Primary / Secondary) Setup
To configure the Connector in Active-Passive mode, set the value of attribute “GRC_CONSUMER_PRIORITY” in the Connector configuration. For the Primary Connector, set the value of this attribute to “127” (without quotes). For the Secondary Connector, set the value of this attribute to “100” (without quotes).
The active-Passive mode has the following configurations.
Configurations for Site-1
Primary-AMQ: broker-1, Secondary-AMQ: broker-2
Generic Connector Configuration should look like this, For a detailed description of the GC please consult properties
|
Property |
Value |
|
ActiveMq_Timeout |
10000 |
|
GRC_CONSUMER_PRIORITY |
127 |
|
RANDOMIZE |
false |
|
PRIORITY_BACKUP |
true |
|
ActiveMq_URL_1 |
primary-url-of-amq:port |
|
ActiveMq_URL_2 |
secondary-url-of-amq:port |
Configurations for Site-2
Primary-AMQ: broker-1, Secondary-AMQ: broker-2, For a detailed description of the GC please consult properties.
|
Property |
Value |
|
ActiveMq_Timeout |
10000 |
|
GRC_CONSUMER_PRIORITY |
100 |
|
RANDOMIZE |
false |
|
PRIORITY_BACKUP |
true |
|
ActiveMq_URL_1 |
primary-url-of-amq:port |
|
ActiveMq_URL_2 |
secondary-url-of-amq:port |
Failover Scenarios
The following table shows different failover scenarios and their impact on the Connector Clients.
|
Scenario |
Behavior |
|
|---|---|---|
|
1 |
AMQ-1 is down while GC-1 is active |
AMQ-2 will take over. GC-1 will automatically connect to AMQ-2 and all client requests will be processed by the same GC-1 instance because of its higher consumer priority. Request Flow: Client-App → AMQ-2 → GC-1 Response Flow: GC-1 → AMQ-2 → Client-App |
|
2 |
AMQ-2 and GC-1 are down while AMQ-1 and GC-2 are up |
AMQ-1 will take over and all client requests will be processed by GC-2 because it has the second-highest priority after GC-1. Request Flow: Client-App → AMQ-1 → GC-2 Response Flow: GC-2 → AMQ-1 → Client-App |
|
3 |
Both AMQ-1 and GC-1 are down |
AMQ-2 and GC-2 will start receiving requests. GC-2 will acquire all agents subscription rights and will start processing requests. Request Flow: Client-App → AMQ-2 → GC-2 Response Flow: GC-2 → AMQ-2 → Client-App |
|
4 |
GC-1 restores |
GC-1 will start receiving requests and will grab the agents rights because of its higher consumer priority but events will be sent from connector-2 for the existing agents. For the new agent subscriptions, connector-2 will be on standby |
|
5 |
The link between Connector-1 and Connector-2 is down |
In this case, the AMQ network of brokers will not be functional and GCs won’t be able to communicate to sync agents either. So, both GCs will be functioning independently |
|
6 |
AMQ-1 restores while GC-1 is still down |
If AMQ-2 is active and the client application is connected to AMQ-2 then all requests will be processed by GC-2 even though GC-1 is active and connected to AMQ-1. Request Flow: Client-App → AMQ-2 → GC-2 Response Flow: GC-2 → AMQ-2 → Client-App |
|
7 |
GC-1 is down while both AMQs are active |
Requests will be processed by GC-2 going through the network of brokers. Request Flow: Client-App → AMQ-1 → AMQ-2 → GC-2 Response Flow: GC-2 → AMQ-2 → AMQ-1 → Client-App |
|
8 |
GC-2 is down while both AMQs are active |
In active-passive mode, it will have no effect on request and response flow. Because AMQ-2 doesn’t get any request from Client-App until AMQ-1 goes down. |
Failover is handled in a way that if any component goes down, passive components take over in a seamless way. Also if both connectors went down at the same time, all the agents data will be lost!
Active-Active Setup
In this setup for both connectors, the primary amq URL for connector 1 will become the secondary amq URL for connector 2 and vice versa. All the remaining things will remain the same.
Configurations for Site-1
AMQ-1: broker-1, AMQ-2: broker-2
Generic Connector Configuration should look like this, For a detailed description of the GC please consult properties
|
Property |
Value |
|
ActiveMq_Timeout |
10000 |
|
GRC_CONSUMER_PRIORITY |
127 |
|
RANDOMIZE |
false |
|
PRIORITY_BACKUP |
true |
|
ActiveMq_URL_1 |
url-of-AMQ-1:port |
|
ActiveMq_URL_2 |
url-of-AMQ-2:port |
Configurations for Site-2
Primary-AMQ: broker-1, Secondary-AMQ: broker-2, For a detailed description of the GC please consult properties.
|
Property |
Value |
|
ActiveMq_Timeout |
10000 |
|
GRC_CONSUMER_PRIORITY |
100 |
|
RANDOMIZE |
false |
|
PRIORITY_BACKUP |
true |
|
ActiveMq_URL_1 |
url-of-AMQ-2:port |
|
ActiveMq_URL_2 |
url-of-AMQ-1:port |
Generic Connector Configuration
Connector Configuration Parameters
Following are the CUCM configurations that can be set in the env file!
|
Parameter |
Default Value |
Description |
|
KEY |
ASDFGHJKLZXCVBNM234RFGHUIOKJMNBFEWSDFGHNJMNBV |
License key. Must be obtained from EF Team |
|
CUCM_IP1 |
CUCM_Server_IP1 |
Primary CUCM |
|
CUCM_IP2 |
CUCM_Server_IP2 |
Secondary CUCM |
|
HEARTBEAT_SLEEP |
5 |
Delay in ping to check ping service (seconds) |
|
ACTIVEMQ1 |
localhost:61616 |
ActiveMQ Primary URL |
|
ACTIVEMQ2 |
localhost:61616 |
ActiveMQ Secondary URL |
|
CUCM_USER |
Jtapi_USer |
Jtapi users are required to login into CUCM |
|
CUCM_PASSWORD |
Jtapi_Password |
Password for the jtapi user to login |
|
ACTIVEMQ_TIMEOUT |
30000 |
ActiveMQ connection timeout (in milliseconds) |
|
PREFECT_SIZE |
20000 |
Prefect Size of the messages |
|
GRC_CONSUMER_PRIORITY |
127 |
0-127 priority to read the message first in case of multiple consumers. Details are mentioned in HA section. |
|
PRIORITY_BACKUP |
true |
Property to enable amq failover support. Details are mentioned in HA section. |
|
|
false |
Property to randomize traffic on amqs! This will be required for HA. Details are mentioned in HA section. |
|
AGENT_STATES_PUBLISHER_DURATION |
5000 |
Time after which states of all agents will be published on the topic |
|
MESSAGE_FORMAT |
JSON |
Type of Events returned to the client (Only JSON supported currently) |
|
LOG LEVEL |
TRACE |
Log Level |
|
AGENT_LOGS_PATH |
/app/logs/agents/ |
Agent Logs Storage path |
|
AGENT_LOGS_LEVEL |
TRACE |
Agent Logs Level |
|
AGENT_LOGS_MAX_FILES |
10 |
Max No of Files per agent for logs |
|
AGENT_LOGS_FILE_SIZE |
10MB |
Max file size for agent logs |
|
|
|
Expiry time for a message to read in a queue |
Deployment Steps
-
Download the deploy.sh file from here.
-
Place deploy.sh file inside some folder eg. Jtapi_Connector.
-
Run the following commands to start the procedure.
Commands to execute deploy.sh file
cd /root/Jtapi_Connector
bash deploy.sh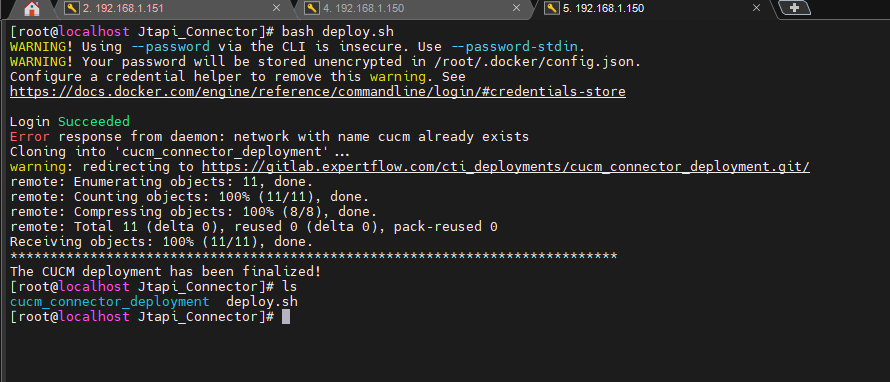
-
A cloned folder 'cucm_connector_deployment' can be seen on the command ls.
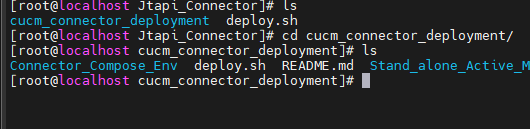
-
Go into the cloned folder, where two folders can be seen.
-
Run the following set of commands to install ActiveMQ.
Install ActiveMQ
cd Stand_alone_Active_MQ docker-compose up -d -
After above command user can access admin console on a browser to confirm its availability.
http://machine_ip:8161/admin/queues.jsp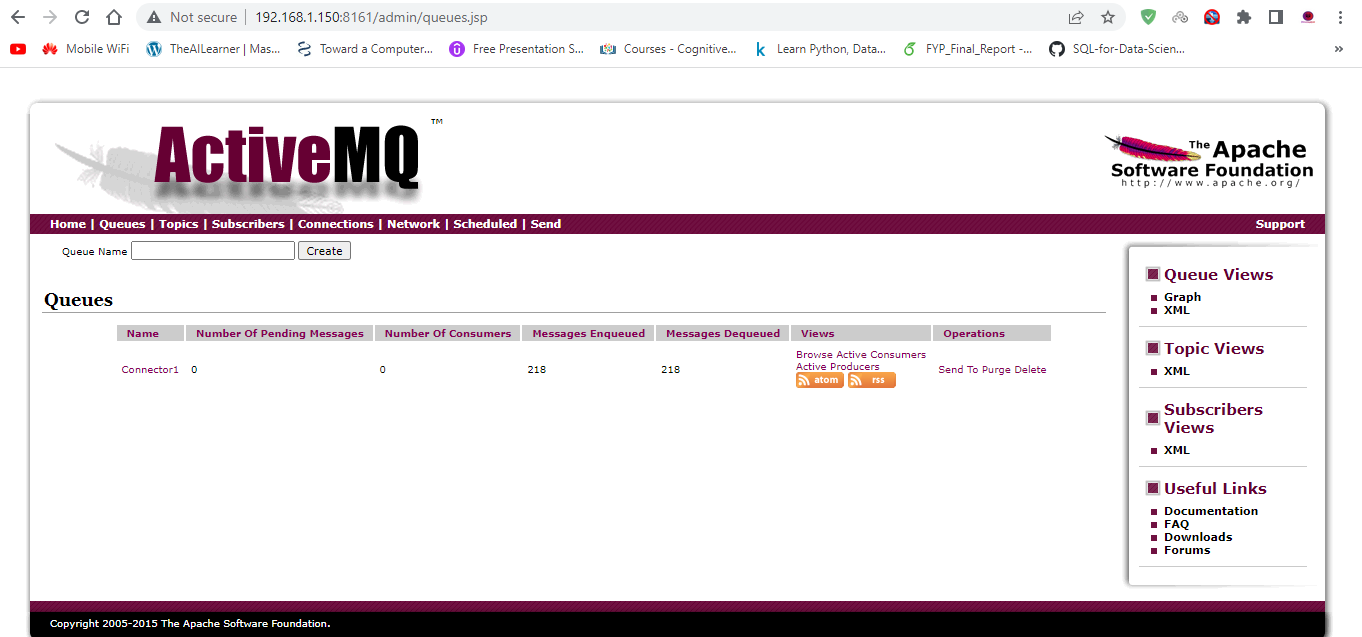
-
After that run the following commands to edit the activemq configuration!
-
Get the activemq imageid by following command
docker container ps -a
-
Enter the following set of commands to reach to the activemq configuration file (activemq.xml), and set the urls as in the following image
docker exec -it c139b3018245 bash
cd conf
vim activemq.xml
-
-
If u are going for redundent deployment also follow steps mentioned here!
Note: If you wanted to know about vim command, Here is the detail.
-
After amq installation, go back to the main repo directory 'cucm_connector_deployment'. And go into the connector folder 'Connector_Compose_Env'.

-
You can see the files like this.

-
Edit the env file and add the required configurations as explained here!
-
After adding configurations, run the following commands to install connector application:
Test
docker-compose up -d -
After successful execution of step 13, run the following command to check if the container is up and running!
docker container ps -a

ActiveMQ Configuration (Redundant Deployment Only)
ActiveMQ “Config” button opens the ActiveMQ configuration file %ACTIVEMQ%/conf/activemq.xml in your default text editor (e.g. notepad).
Configuring Network of Brokers
Settings for a network of brokers are mandatory for redundant deployment only. These configurations should however be done on one side only.
ActiveMQ brokers should be configured to run as a network of brokers to communicate with each other both for Active-Active and Active-Passive deployment models.
-
Enter the following set of commands to reach the ActiveMQ configuration file (activemq.xml), and set the ActiveMQ Network brokers
docker exec -it <ContainerID> bash
cd conf
vim activemq.xml
Note
If you are using the command prompt, follow this link to copy the ActiveMQ configuration in the file
In activemq.xml, the “Network of Broker” configuration please add the following configuration mentioned in the screenshot below. There are 2 instances of <networkConnector> (i) for Queues, (ii) for topics, where you need to set the value of the URI parameter specifying other broker’s (site-B) address.
Note: Make sure that the configurations are active on only one side. On the other side, it should remain commented out.
This commented tag looks like the following in the activemq.xml file:

If the above-commented configurations are not available in activemq.xml file then copy following and add it inside <broker> tag!
Note: Here the URI IP should be IP of the remote amq!
Configurations
<networkConnectors>
	<networkConnector
    	name="T:broker1->broker2"
        uri="static:(tcp://192.168.2.162:61616)"
        duplex="true"
        decreaseNetworkConsumerPriority="true"
        networkTTL="2"
        dynamicOnly="true">
        <excludedDestinations>
        	<queue physicalName=">" />
        </excludedDestinations>

    </networkConnector>

    <networkConnector
    	name="Q:broker1->broker2"
        uri="static:(tcp://192.168.2.162:61616)"
        duplex="true"
        decreaseNetworkConsumerPriority="true"
        networkTTL="2"
        dynamicOnly="true">
        <excludedDestinations>
        	<topic physicalName=">" />
        </excludedDestinations>
    </networkConnector>
</networkConnectors>
After adding the above configuration, the user needs to restart the same service.
Run docker container ps -a and grab the id of amq service.
Run the following commands.
Command to restart the Service
docker stop c139b3018245
docker start c139b3018245
The URI on site-A should point to site-B URI “static:(tcp://SITE-B:PORT)” to configure it in network bridge mode.
For more information about configuring a network of brokers, see this article.
Frontend Deployment Guide
Preface
This document provides deployment details of the product as a standalone.
Prerequisites
Following are the prerequisites for the deployment of the CUCM Connector.
-
The user must have administrative rights.
Installation of CUCM Connector
This cucm connector can be deployed on any window server in any application server of the user's choice (IIS, Tomcat, etc). The following section lists the steps to deploy the application on an IIS server.
-
Download the cucm_connectorand extract. In the extracted folder, Copy all the files and place them in the (c:\inetpub\wwwroot\JavaScript-CTI) or any desired directory.
-
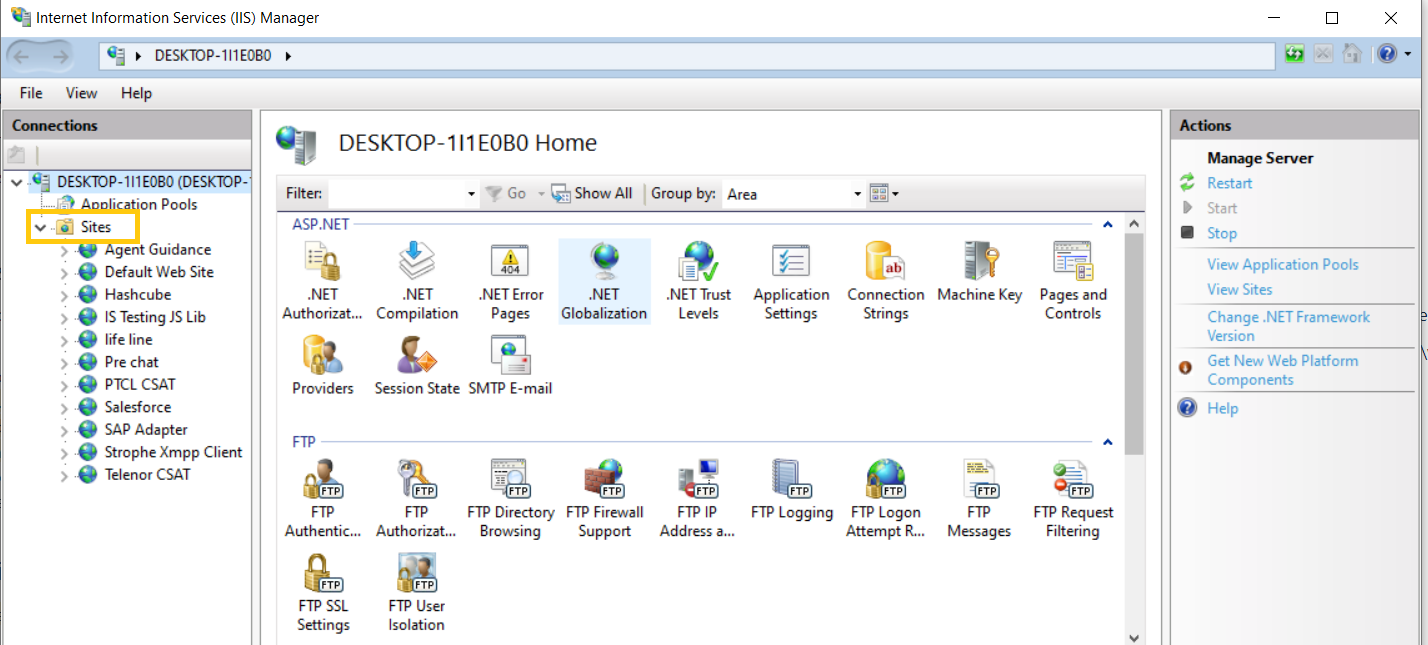
Open IIS. It can be opened by pressing window+R, writing inetmgr, and clicking OK. It will run IIS Manager.
-
Right-click on Sites to Add a new Site.
-
Add new Site, Site name (cucm_connector).

-
Physical path (cc:\inetpub\wwwroot\cucm_connector).
-
Port, default value is 80 but any other value can be assigned.
-
Please follow this guide to install and configure the SSL certificates on IIS in order to run the cucm_connectoron HTTPS.
-
Configuration for CUCM Connector
-
Open the new_config.js file located on `c:\inetpub\wwwroot\JavaScript-CTI\config.js` path. Set the properties as per the below table.
|
Property Name |
Value |
Description |
|
|---|---|---|---|
|
1 |
amqUrl1 |
ws://<activemq-server-ip>:61614/stomp or wss://<activemq-server-ip>:61614/stomp |
For communicating with JTAPI backend. For Http use ws and for Https use wss. |
|
2 |
amqUrl2 |
ws://<activemq-server-ip>:61614/stomp or wss://<activemq-server-ip>:61614/stomp |
For communicating with JTAPI backend. For Http use ws and for Https use wss. |
|
3 |
powered_by |
true/false |
System variable should always remain True |
-
Update the configurations and save the file.
-
Browse the configured FQDN and the application should be accessible as shown below.