The purpose of this document is to provide deployment steps for Cisco Outbound connector of Expertflow CX solution.
Pre-requisites
Before you begin, verify
- EF CX is deployed.
- Redis is installed, see https://redis.io/docs/install/install-redis/ (new link: https://redis.io/docs/latest/operate/oss_and_stack/install/install-stack/apt/ )
- Cisco UCCE or UCCX is set up with API-created campaigns
Redis Setup
-
After installing Redis, enable and start it:
systemctl enable redis systemctl enable redis-server systemctl start redis systemctl start redis-server -
Run the following command, but replace PASSWORD with your desired Redis password:
sed -i '/# requirepass/c\requirepass PASSWORD' /etc/redis/redis.conf -
Run the following commands:
sed -i '/protected-mode/c\protected-mode no' /etc/redis/redis.conf sed -i '/bind 127.0.0.1 -::1/c\# bind 127.0.0.1 -::1' /etc/redis/redis.conf sed -i '/bind 127.0.0.1 ::1/c\# bind 127.0.0.1 ::1' /etc/redis/redis.conf -
Restart Redis:
systemctl restart redis
systemctl restart redis-server
Deploy Kubernetes artifacts
-
SSH onto the EF CX server and navigate to the root folder.
-
Run the following commands:
git clone -b deploy_artifacts_4.9.1 https://efcx:RecRpsuH34yqp56YRFUb@gitlab.expertflow.com/rtc/cisco-outbound-connector.git
cd cisco-outbound-connector
kubectl create namespace cisco-voice
# import activemq certificates to cisco-voice namespace, from ef-external namespace
kubectl get secret activemq-tls -n ef-external  -o yaml | sed 's/namespace: ef-external/namespace: cisco-voice/' | kubectl create -f -
CONTAINERD_ADDRESS=/run/k3s/containerd/containerd.sock /var/lib/rancher/rke2/bin/ctr  -n k8s.io i pull -u efcx:RecRpsuH34yqp56YRFUb gitimages.expertflow.com/rtc/cisco-outbound-connector:4.9.1
-
Decide the FQDN to be used in your solution and change the <FQDN> in the below-given command to your actual FQDN:
sed -i 's/devops[0-9]*.ef.com/<FQDN>/g' ./*
Open the Cisco Outbound Connector ConfigMap with:
vi ef-cisco-outbound-connector-cm.yml
-
Change the values as follows:
-
CISCO_FQDN: The address of the Cisco deployment.
-
CISCO_USERNAME: The admin username of the Cisco deployment.
-
CISCO_PASS: The admin password of the Cisco deployment.
-
CISCO_TYPE: CCX or CCE, depending on the Cisco deployment.
-
CX_FQDN: The address of EF CX. https://FQDN
-
DB_NAME: The name of the Cisco database.
-
CCX: default db_cra
-
CCE: The database where the Dialer_Detail(CCE) table is located.
-
-
DB_IP: The server IP address of the Cisco database.
-
DB_PASS: The password of the Cisco database.
-
DB_PORT: The port of the Cisco database.
-
CCX: default 1504
-
CCE: default 1433
-
-
DB_USERNAME: The username of the Cisco database.
-
CCX: default uccxhruser
-
CCE: default sa
-
-
LOG_LEVEL: The amount of detail in the logs. Default is INFO, and for more detailed logs the value should be DEBUG.
-
REDIS_DB: The index of the Redis cache where call IDs will be stored. Can be a number from 0 through 16.
-
REDIS_HOST: The server IP address of the Redis cache.
-
REDIS_PASS: The password of the Redis cache.
-
REDIS_PORT: The port of the Redis cache. The default is 6379.
-
REDIS_DELAY: The time in minutes the connector will wait between checking call results for the call IDs stored in the Redis cache.
-
SERVICE_ID: Service Identifier for the connector set in the EF CX Unified Admin channel settings.
-
AUTH_ENABLED: true or false depending on whether APISIX authentication is enabled in EFCX. The four settings below are set if this value is true.
-
API_USERNAME: The username created in Keycloak for API authentication.
-
On Keycloak create a user in the Expertflow realm.
-
Assign the admin and default roles, and have Email-Verified option enabled.
-
Assign a non-temporary password to this user as well.
-
-
API_PASS: The password for the above user created in Keycloak for API authentication
-
CLIENT_ID: Should always be cim.
-
CLIENT_SECRET: Found on Keycloak in the cim client.
-
-
Run the following commands:
kubectl apply -f ef-cisco-outbound-connector-cm.yml
kubectl apply -f ef-cisco-outbound-connector-service.yml
kubectl apply -f ef-cisco-outbound-connector-deployment.yml
kubectl apply -f ef-cisco-outbound-connector-ingress.yml
Configure Unified Admin
-
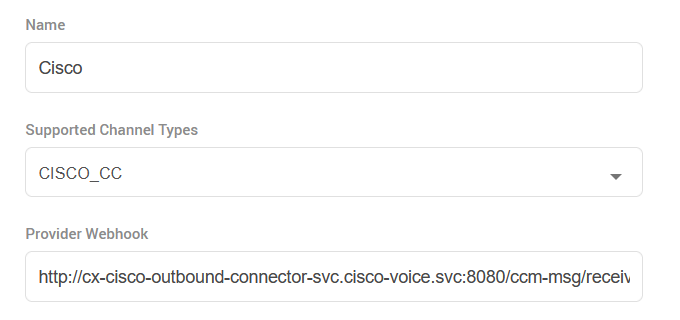
Open Unified Admin and navigate to Channel Provider.
-
Add a new provider with CISCO_CC as the Supported Channel Type, and http://cx-cisco-outbound-connector-svc.cisco-voice.svc:8080/ccm-msg/receive as the Provider Webhook
-
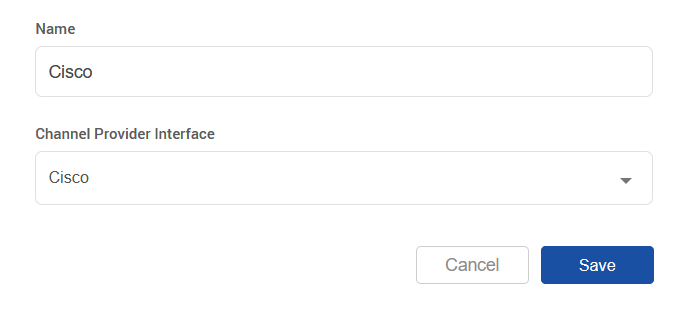
Add a new Channel Connector with this Provider
-
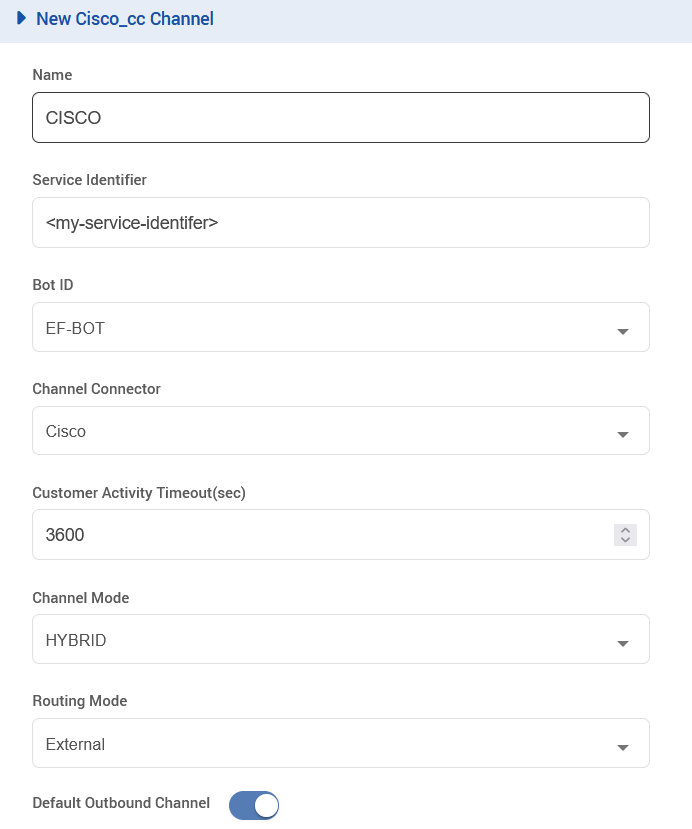
Create a new Channel of type CISCO_CC, using the following configurations(replace the Service Identifier field with the identifier set in the connector):