Introduction
Integration of any 3rd party software with Meta Products like Instagram is made possible through the Meta Graph API (and Instagram Messenger APIs) that are exposed by the Meta Platform. Since the software will be interacting with contents generated by the page connected with Instagram account and user of the page connected with instagram account, the 3rd party software require to authenticate itself to Meta APIs through the means of Page Access Token which is essentially "an opaque string that identify a user, app or page and can be used by the App to make Graph API calls". The Page Access Token in itself will bears the permission scope (list of allowed permissions) that our Meta/Facebook App has been granted on the Facebook Page. To bring the point home, 3rd party software integrates with Instagram Platform via Facebook Apps which is created and configured by the developer on the Facebook Developer Platform.
Creating a Facebook App on Facebook Developer Platform
As explained above, Facebook App is what enables us to integrate our connector with Facebook Platform for either comments or instagram messenger direct messages. The process for setting up a Facebook entails the following steps:
-
Creation of your developer account. Note: you MUST have a Facebook account for you to create a developer account.
-
Creation of Facebook App.
-
Adding a Webhook and/or Instagram Messenger Product
-
App permissions and Approval process.
1. Creation of Developer Account
Creation of your developer account. Note: you MUST have a Facebook account for you to create a developer account.
2. Creation of Facebook App
You can now create the Facebook App after acquiring a Facebook Developer account.
The app creation flow gathers the minimum amount of information needed to generate a unique ID for your app. Once you complete the flow you will end up in the App Dashboard where you can provide additional information about your app.
-
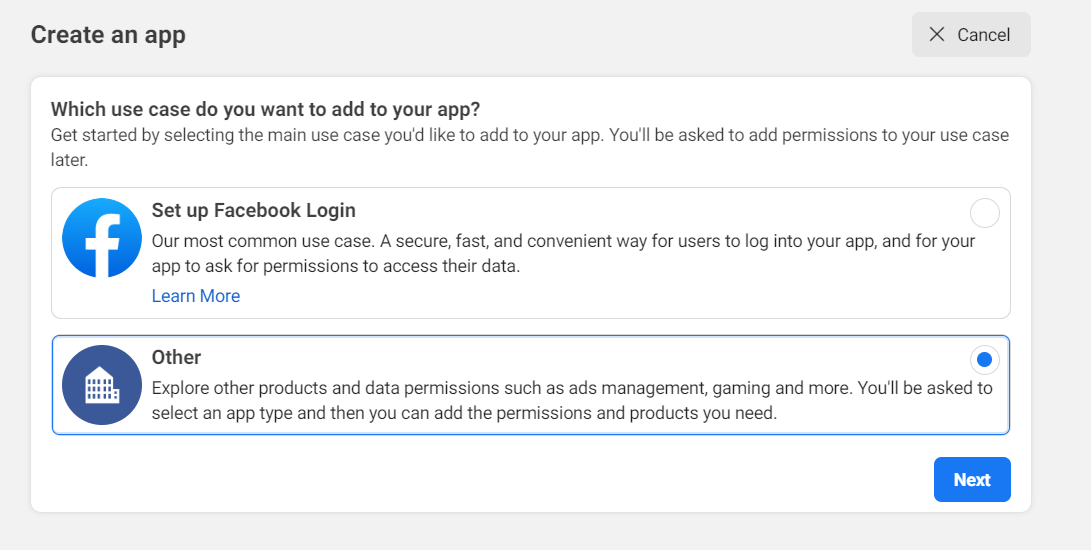
Go to the Apps panel and click Create App.
-
Select Other and click Next
-
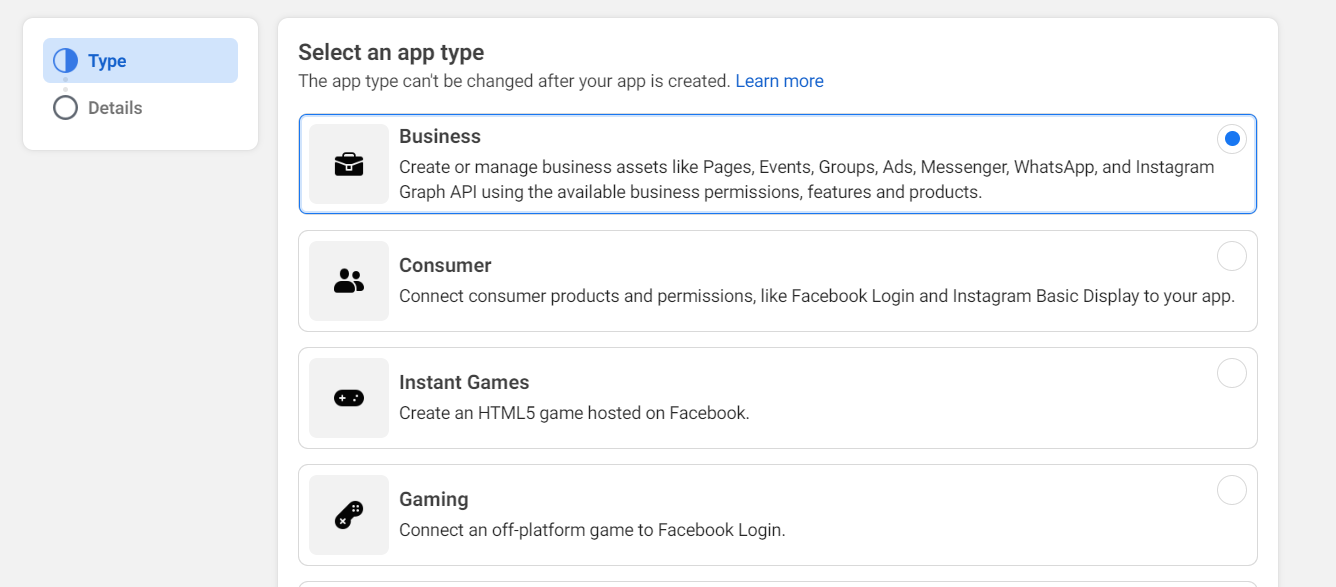
Select a App Type as Business and click Next
-
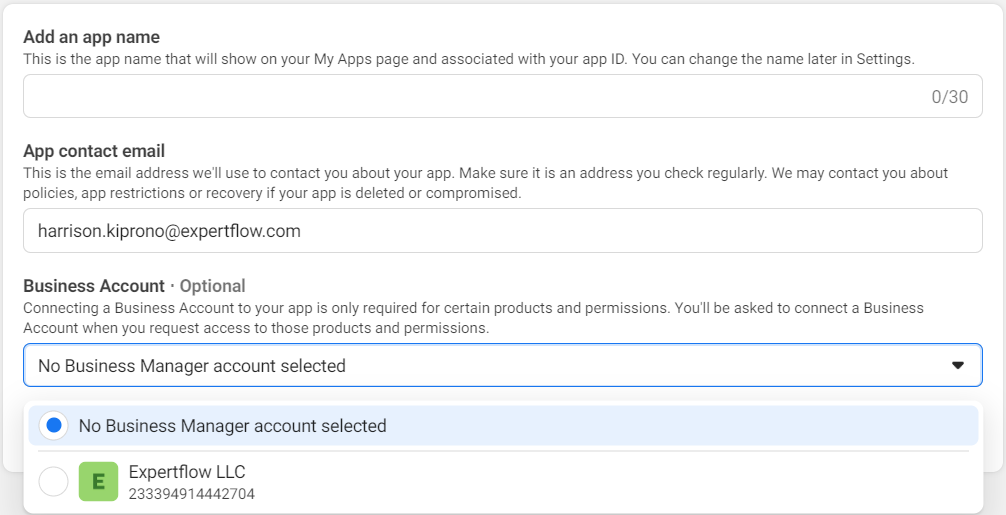
Enter the App Name and an email address where we can send you any important developer notifications. You can also add a Facebook Business Manager account if you have one, then click Create App.
-
Once you have completed the app creation flow, your app will be loaded in your app dashboard. The app dashboard allows you to view, add, and update details, such as app settings, roles, and additional use cases.
3. Adding a Webhook and/or Instagram Messenger Product.
Note: This step is to be done after Instagram connector has been deployed in your environment.
Adding a product to your app enables relevant functionality and access to your app. Webhook products enables your app to receive updates and changes at Realtime from the page without calling the API.
A. Webhook
-
Go to Add Product page
-
Select Webhooks
-
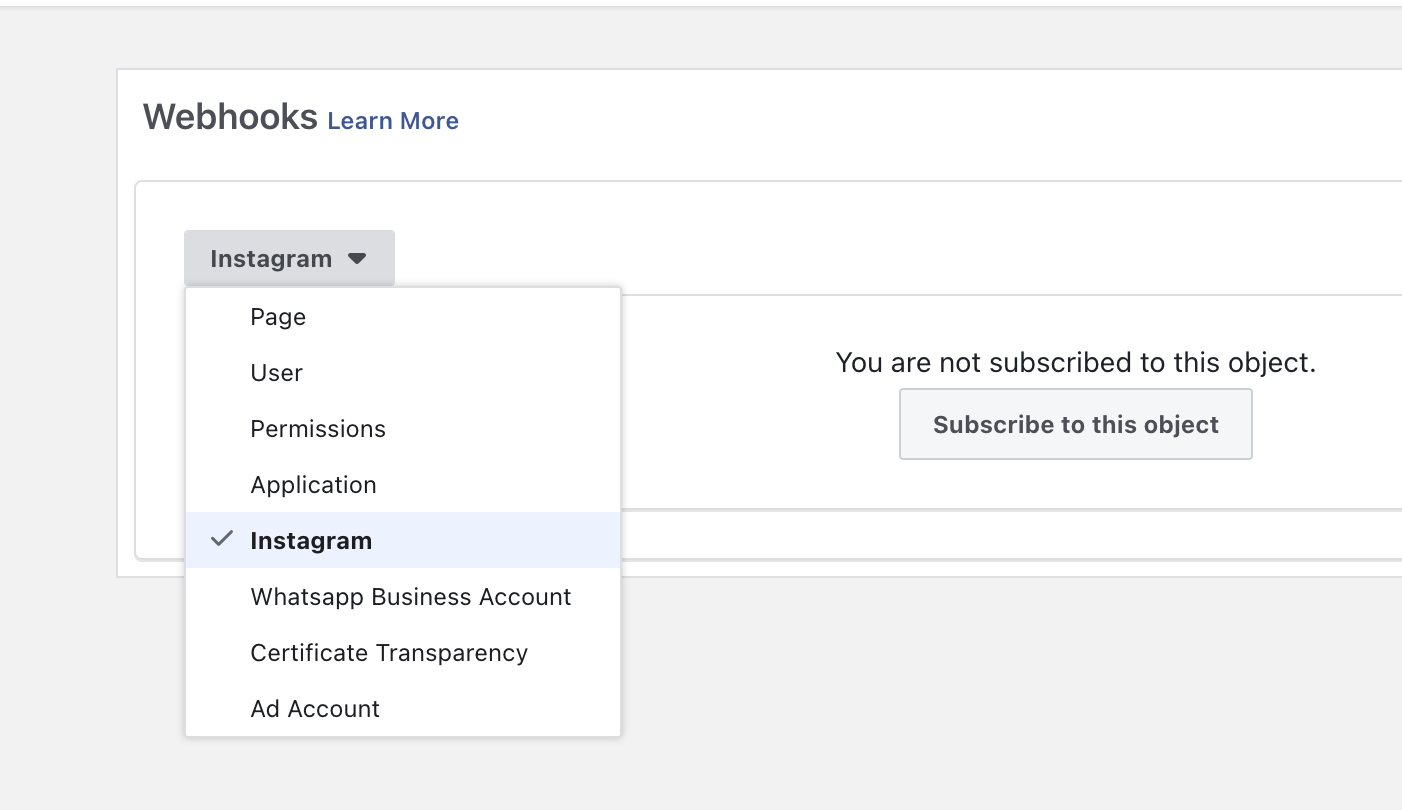
Then Select Webhooks from the left Navigation Menu.
-
Select Instagram as the object you want to subscribe to and click "Subscribe to this object" button
-
Provide the INSTAGRAM connector specific configuration for the webhook endpoint exposed on the Instagram connector. Enter the webhook URL as follows;
-
Webhook URL: https://{{SERVER-FQDN}}/instagram-connector/webhook/{{INSTAGRAM-USER-ID}}
(If you don't know the instagram user id then you can fetch the page-id from the section "Creation of a Long-Lived(without-expiry) Page Access Token - 1g" below and use that page id to get the instagram account id from the "Getting a Page's IG User" section of this page link) -
Verify Token: Now, this verify token must be same as the INSTAGRAM-PAGE-ACCESS-TOKEN variable in unified-admin configuration (Channel Connector).
-
-
Click Verify & Save. This will be saved only if the webhook URL and the token are valid.
-
On the App dashboard, subscribe to "messages", "comments" etc fields as required.
B. Instagram Messenger
-
Go to Add Product page
-
Select Instagram Messenger
-
Then Select Instagram Messenger from the left Navigation Menu.
-
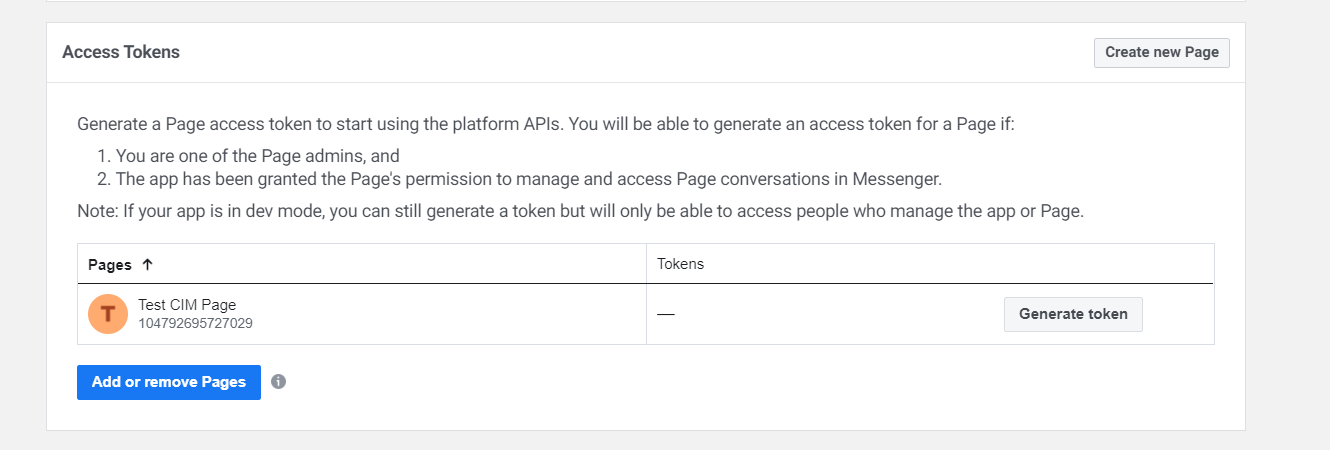
One the page that opens, Look for section "Access Token" and then Select Add or remove Page. Note that you MUST have a new Page created already on facebook and you must have admin access to the page to do this step and that page must be linked with your instagram professional account. (Note: To link facebook page with instagram professional account go to facebook page → settings → Linked Account and link your instagram professional account here)
-
On the pop up dialog, select Opt in to current Pages only
-
Select the Page that you intend to integrate and click Continue.
If you already have a page created then we can use the same page or else create a new page. Once created then create a new instagram account and make it as business account. Once done, then link this new instagram account with your newly created or already existing facebook page.
-
Then click Save.
-
Find and click the button Add subscriptions.
-
On the pop up dialog, select "messages" field as shown in the screenshot
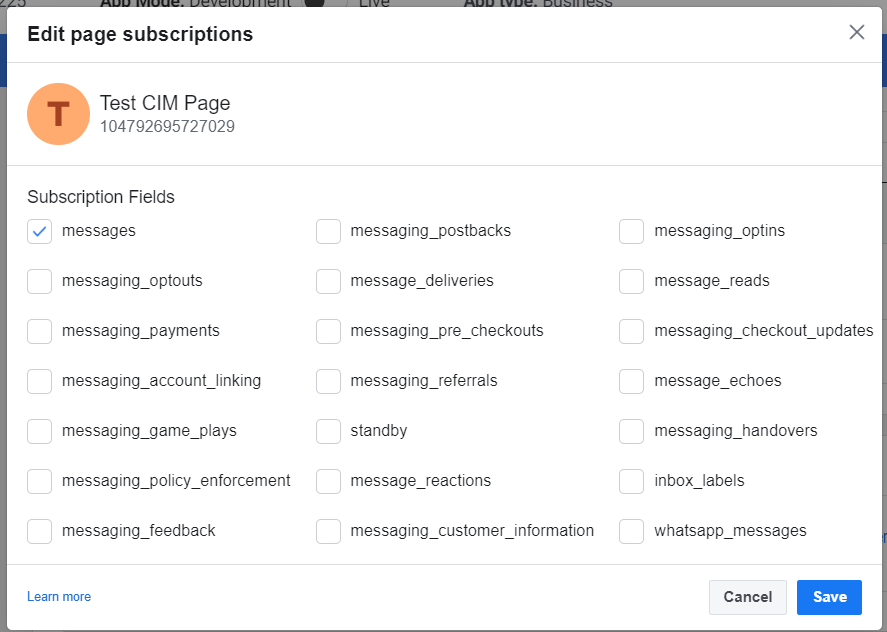
At this point, your Facebook App is setup and can send feed or DM messages generated by the page (connected with instagram professional account) admins/developers/testers to the webhook.
As we have already settled up Facebook DM(Direct Messaging) and SM(Social Media) related pages and webhooks and we do already have advanced access on webhooks related permissions on DEV as well as QA account so for instagram we only need to setup webhook and assign page. Rest everything will be used as same as before already settled up.
App permissions and Approval Process
To access contents generated by other public users, your Facebook App has to undergo scrutiny by Facebook and the respective permissions used in the App have to reviewed and approved by Facebook Review Team.
Following are the permissions that you need to access instagram post's comments and instagram messenger messages posted by public users:
Basic Permissions Required in all cases
-
instagram_basic - (The instagram_basic allows your app to read an Instagram account profile's info and media. Link)
-
pages_manage_metadata - (The pages_manage_metadata permission allows your app to subscribe and receive webhooks about activity on the Page, and to update settings on the Page. Link)
A. Instagram Messenger
-
instagram_manage_messages - (The instagram_manage_messages permission allows business users to read and respond to Instagram Direct messages. Link)
B. Post's Comments
-
instagram_manage_comments - (The instagram_manage_comments permission allows your app to create, delete and hide comments on behalf of the Instagram account linked to a Page. Link)
Steps for submitting a permission for approval
-
Go to permissions and feature section and click Permissions and Features
-
Identify the permission and click Get advanced access . Agree to the term and conditions and click Confirm
-
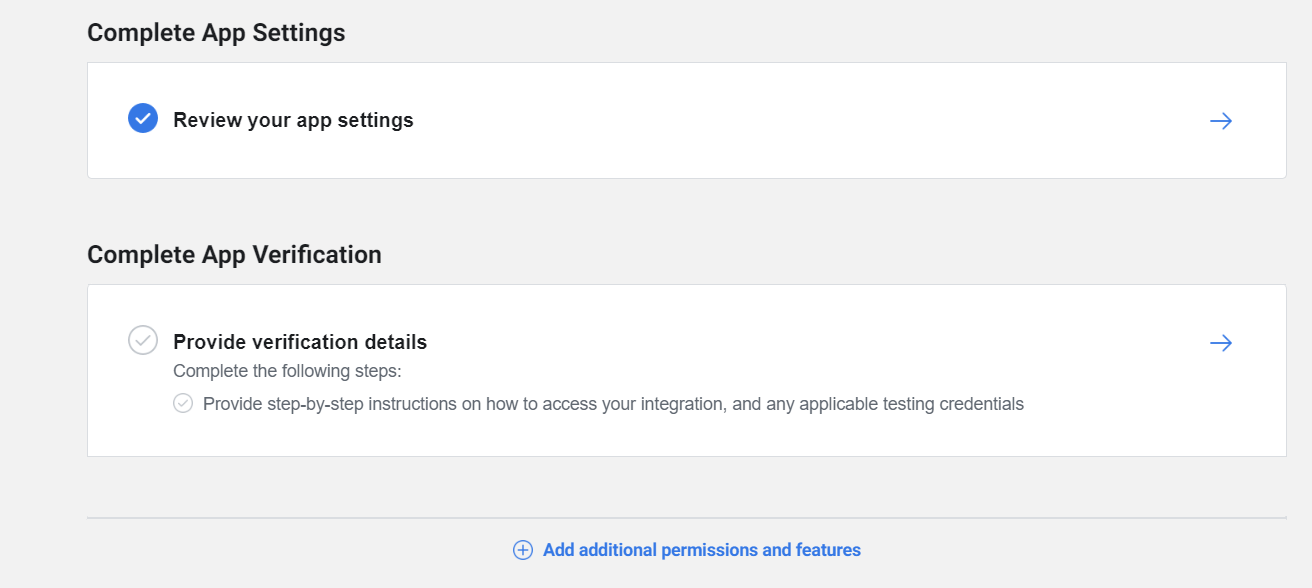
On the page the opens, Scroll down to Review your app settings and click the arrow, to open the form.
-
Fill in the form. Ensure to specify the privacy policy URL (the policy MUST be hosted on the company's website and should always be accessible). Look at the the privacy policy for Expertflow.. you can use this for internal deployments.
-
Select App Category as Messaging and Save.
-
Then Scroll down to Complete App verification and click the arrow to open the form.
-
On the pop up form, Select "No" for the question "Does your app use a Facebook authentication solution, like Facebook Login, that the review team can use to login and verify your app?"
-
For the question "Provide detailed step-by-step instructions on how a reviewer can test your integration and how you are using the requested permissions or features. Include any testing credentials required to access your integration". Here you need to document a clear end-to-end step by step procedure that the Facebook Review Team need to follow when Testing the permission that you have requested for. The step Must include describing;
-
Instagram Account they need to use to test you App.
-
The URL for the Facebook Page or Instagram Account (based on permission)
-
Credentials for login into the Agent Desk or CIM or any other backend for that matter.
-
Instruction of how/what content/text to send from Page/Instagram Messenger and how to accept/reply etc to that message within Agent Desk etc.
-
Clarity on how the permission will be used in your App and why it's necessary for your App to function.
-
A screencast demonstrating all the steps above.
-
-
Once you have submitted the review forms. Facebook Team will review the App and send feedback to the email that you specified in the App.
Repeat the process for the rest of the permissions. Ensure to switch your App to Live Mode once all the required permissions have been approved - this will enable you App to access public contents posted on the page. Here is a link to a document which explains in detail the App Permissions related stuff that would be helpful.

Granting a User Access to Facebook App on Facebook Developer Platform
Access to an existing Facebook App on the FB Developer platform is granted by the app owner or anyone else who has the admin role to the app. (Assuming) you have access the app and you want to grant another FB user access the same app, follow the steps below;
-
Login to Facebook using the Facebook account which is associated with the app you want to grant the user access. (Note: Step 2, below will use the active session that you established in this step to authenticate and authorize you to the apps which you have access to)
-
Navigate to Facebook Developer platform. The landing page will somehow look as depicted in this screenshot

-
Select the app you want to grant the user access
-
On app's detail page(i.e. the page that opens up), expand the tab "Roles" and click Roles
-
Depending on the type of Role that you want to assign the user, you will choose either to add the user as an Admin, Developer or Tester to the app.
-
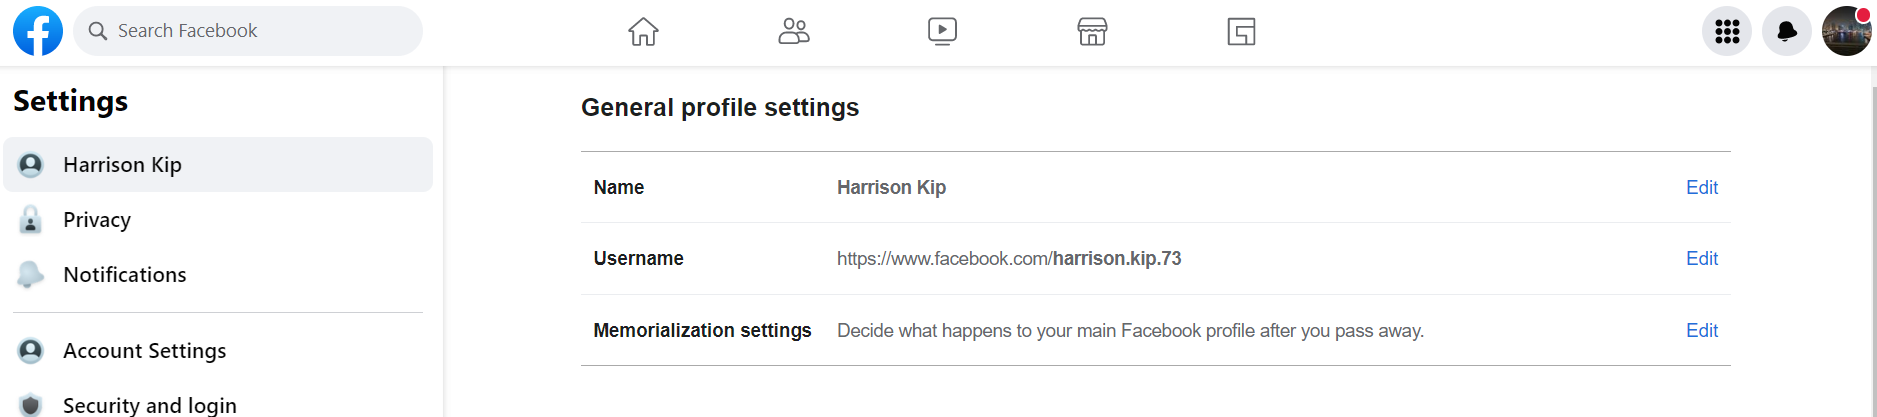
Click on the Add .. button, and search the user by Full Names as per his/her FB account or for more precise search, you can use the FB user username that you will find when you open your profile via the URL: User Facebook Profile (example)
-
Copy your username that after the https://www.facebook.com/ and paste in the filter field and click submit.
-
Verify that the user that you added appears
-
Ask the user to login into his/her Facebook account and subsequently to his
https://developers.facebook.com/apps
account to accept the invitation to manage the app (Note: Without accepting the invite the user won't see the app in which they are associated with on Facebook developer account)
-
After clicking the above link for FB developer account, go the top-right corner of your FB Developer account, and expand the notification tray (it will appear as shown in following screenshot)
-
Click on Pending App Request link that appears, and click accept.
-
-
Creation of a Long-Lived (without expiry) Page Access Token
Every API call to the Facebook graph API requires authentication, and this is achieved through combination of User Access Token and the Page Access Token. The former is used during the process of generation of the Page Access Token, therefore the resultant token (which is the Page Access Token) will be of main focus in this topic.
The question would be that how do we generate this token(Page Access Token)? Note: Prior to this step, ensure that the Facebook Account you intent to use has been added onto the Facebook Page as an admin and also granted access to the Facebook App on Facebook Developer Account.
Follow the steps below to generate a Long-Lived Page Access Token:
As mentioned above, the ultimate page access token is generated using the user access token, therefore, we will start with generation of a user access token and then using the user access token, we will generate a long-lived page access token.
-
Navigate to
https://developers.facebook.com/tools/explorer/
to launch the Graph API Explorer Tool which is used to generate a short-lived user access token (valid for 1hr).
-
On the Graph API Explorer window that opens on your browser, edit the from me?fields=id,name to me/accounts
-
On the form to the right of your screen, select the App on the Meta App dropdown menu
-
On the User or Page select dropdown, select Get User Access Token
-
On the permissions field. Select all the permissions required like instagram_basic, instagram_manage_messages, Instagram_manage_comments etc.
-
Click Generate Access Token button and then Submit
-
Copy the access token on the Access Token field and store it somewhere as you will need it in the next step.
-
Copy the Page Id(designated as id) in the API response body and store it somewhere as you will need it as well in the next step.
-
-
Navigate to
Expertflow Postman documentation platform - Long-Lived User Access Token
where Graph API for generating long-lived user access token is documented
-
On the page that opens, replace value on the client_id field with the actual App Id. You can find the App Id to replace in this field on your Facebook App's Settings > Basic page.
-
Replace the value on the client_secret field with the actual value on your App secret field (Note: you have to click the show button to unlock the full secret)
-
Replace the value on the fb_exchange_token field with the Short-Lived User Access Token which you generated in the step above.
-
Click Send
-
From the API response payload, copy the access token value that you receive after making the API request. This is a Long-Lived User Access Token which expires after a period of 60 days. Ensure that you store this token as we will use it in the next step.
-
-
Navigate to
Expertflow Postman documentation platform - Long-Lived Page Access Token
where Graph API for generating long-lived page access token is documented
-
On the page that opens, replace the {PAGE-ID} on the address bar with the actual page id which you generated in step 1, above.
-
Replace the value on the access_token field with the Long-Lived User Access Token which you generated in step 2(e), above.
-
Click Send
-
From the API response payload, copy the access token value that you receive after making the API request. This is a now the Long-Lived Page Access Token(never expires) which you will need to configure in the Facebook Connector in CIM. (Note: Ensure that you store this token in a safe place where it's not exposed to compromise).
-
Unified Admin Configurations
A). Instagram connector configurations
This section outlines the procedure for setting up the Instagram connector in CIM.
Channel Type & Provider
-
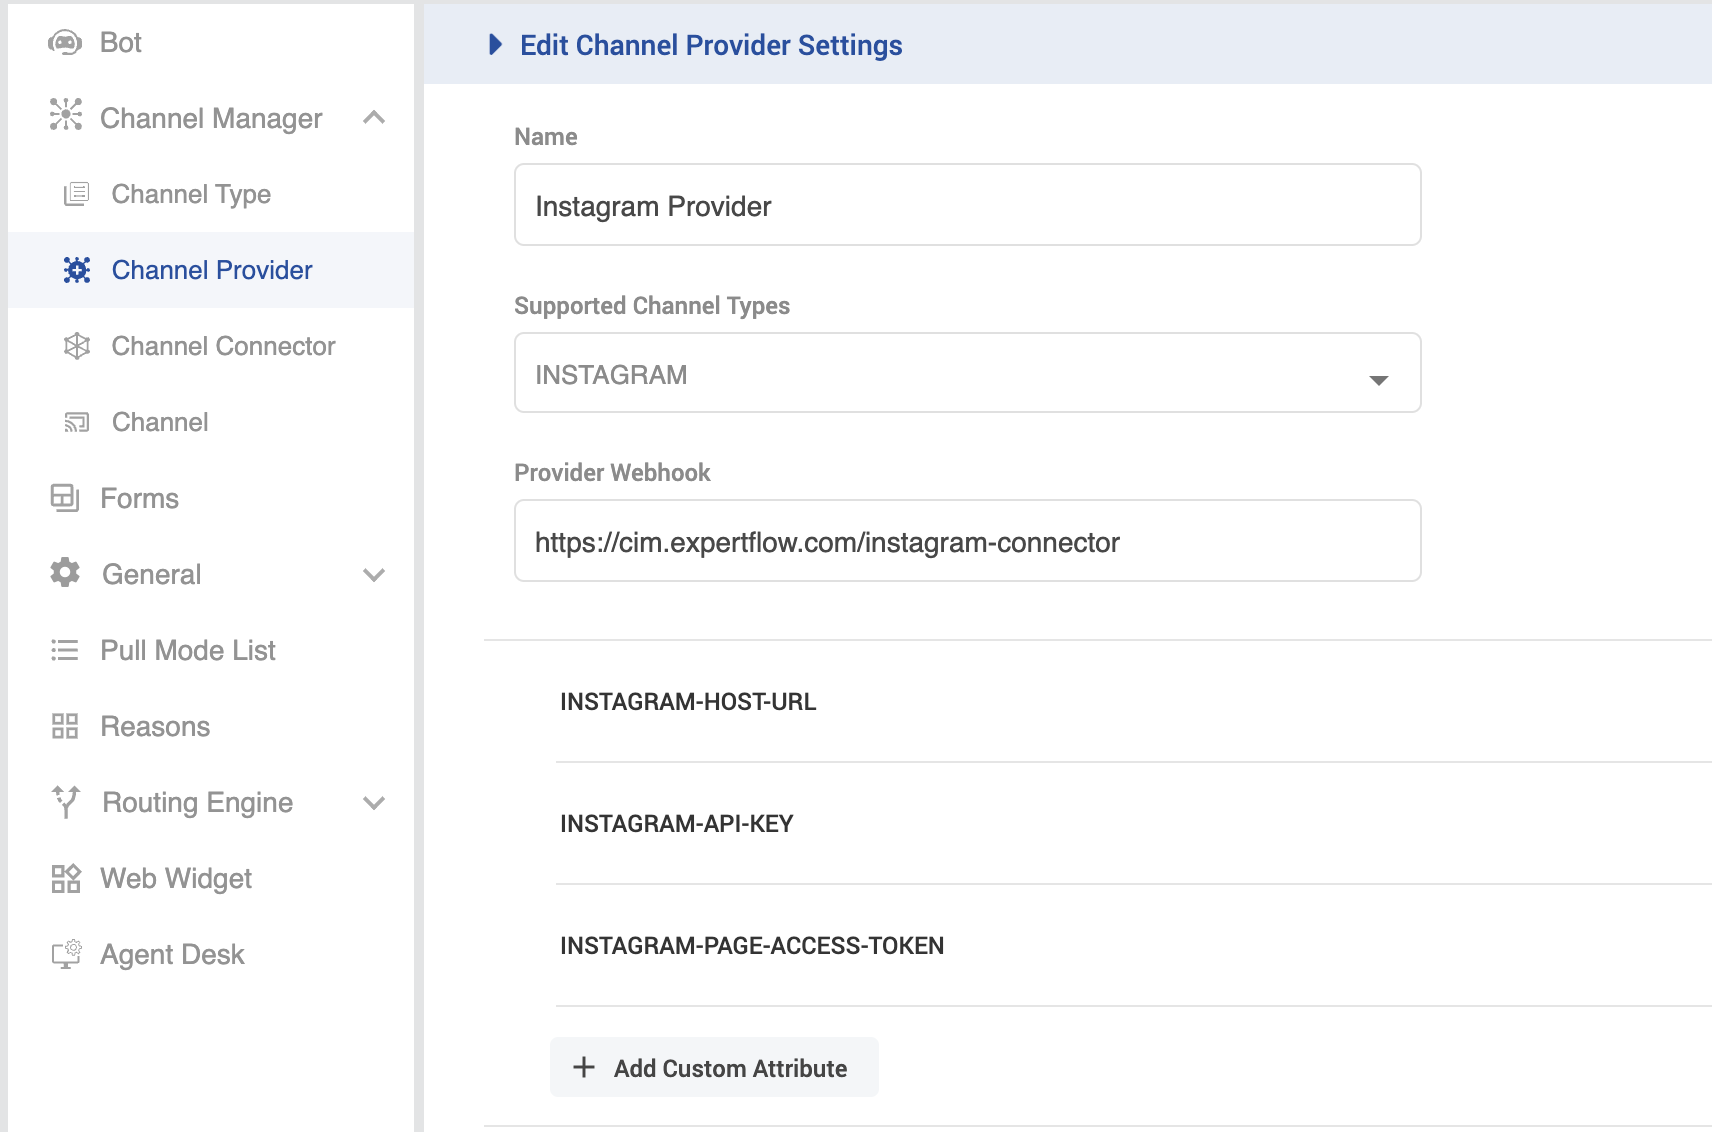
Create a new Channel Type (if doesn't exist). Give it the name "Instagram".
-
Provide the webhook URL for the Instagram Connector in the Provider Webhook field as https://{SERVER-FQDN}/instagram-connector. Replace the {SERVER-FQDN} in the URL with CIM FQDN
-
Add the following attributes;
-
Click Add Custom Attribute button and on the form that opens, replace the dummy value "New attribute0.." in the attribute field with INSTAGRAM-HOST-URL and select data-type as "URL" in the field to the right-most part of the form.
-
Click Add Custom Attribute button again, and replace the dummy value "New attribute1.." in the attribute field with INSTAGRAM-API-KEY and select data-type as "String 2000".
-
Click Add Custom Attribute button again, and replace the dummy value "New attribute2.." in the attribute field with INSTAGRAM-PAGE-ACCESS-TOKEN and select data-type as "String 100".
-
Click Save
-
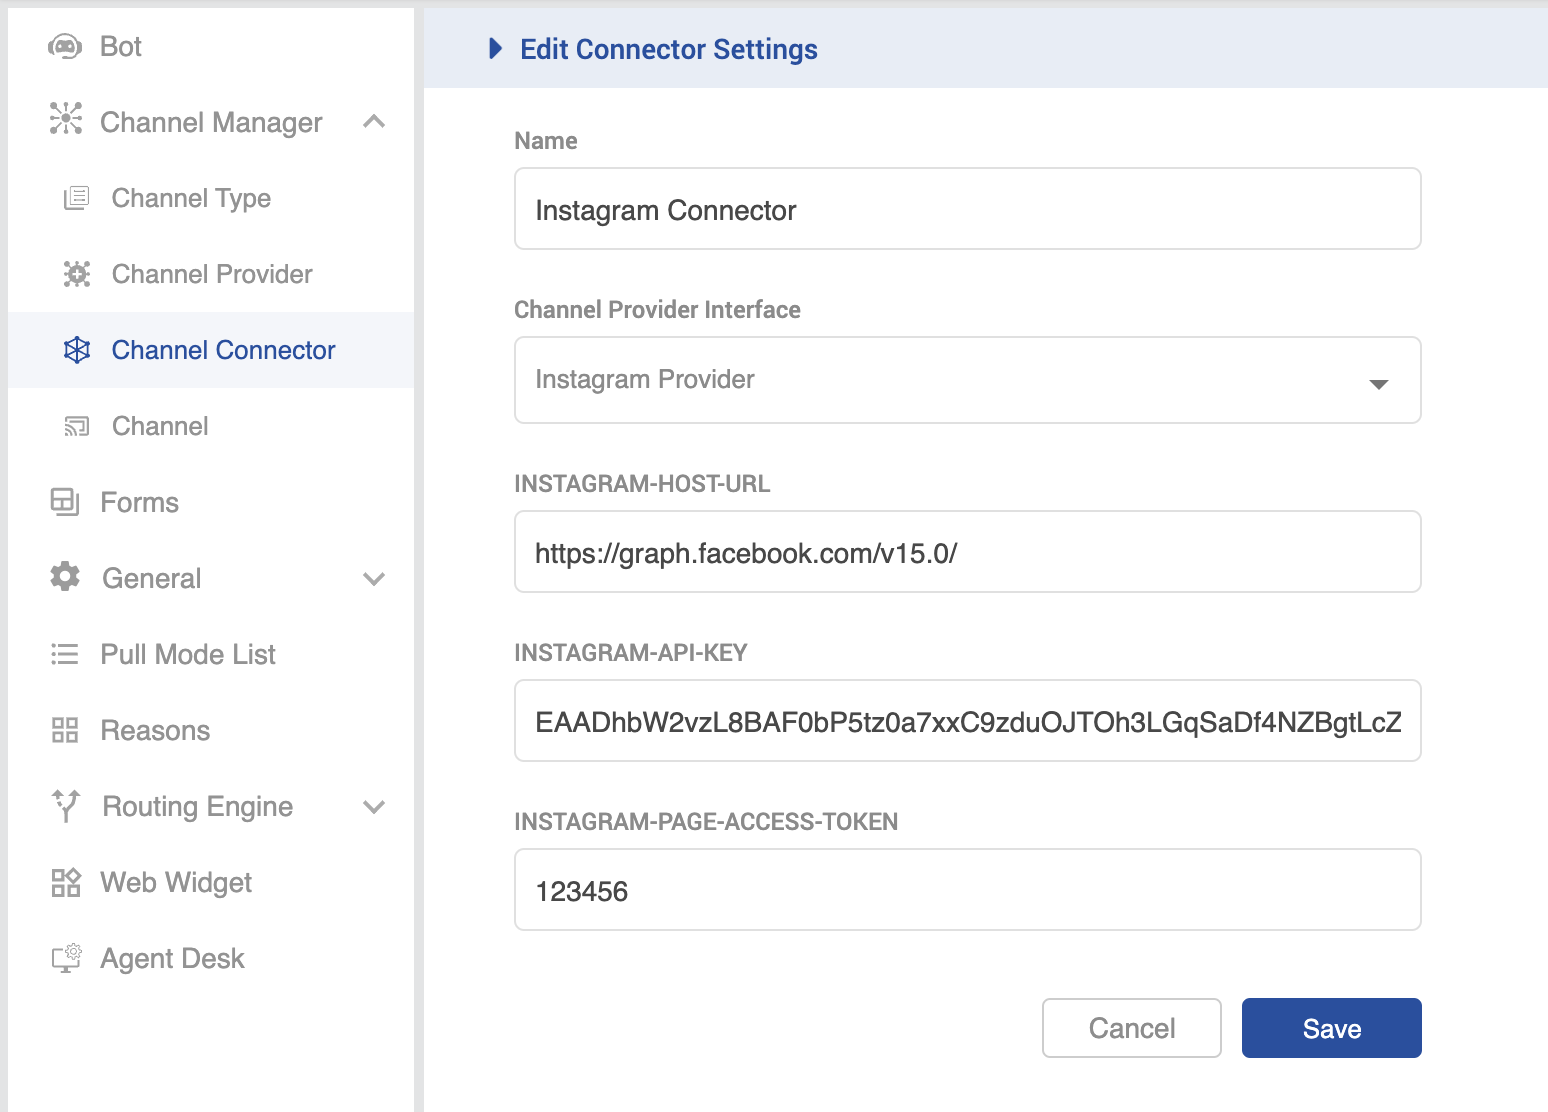
Channel Connector
Adding the Instagram URL and Page Access Token in Channel Connector
-
Navigate to Channel Manager > Channel Connector
-
Provide the name for the connector under the Name field
-
Select the Channel Provider Interface.
-
Enter the Instagram URL in the INSTAGRAM-HOST-URL field. For example, https://graph.facebook.com/v15.0/ (Note: ensure you add the "/" after the API version)
-
Enter the Long-Lived Page Access Token in the INSTAGRAM-API-KEY field.
-
Enter the "Verify Token" value which was used while registering Webhook (Step 3A) in the INSTAGRAM-PAGE-ACCESS-TOKEN field.
-
Click Save
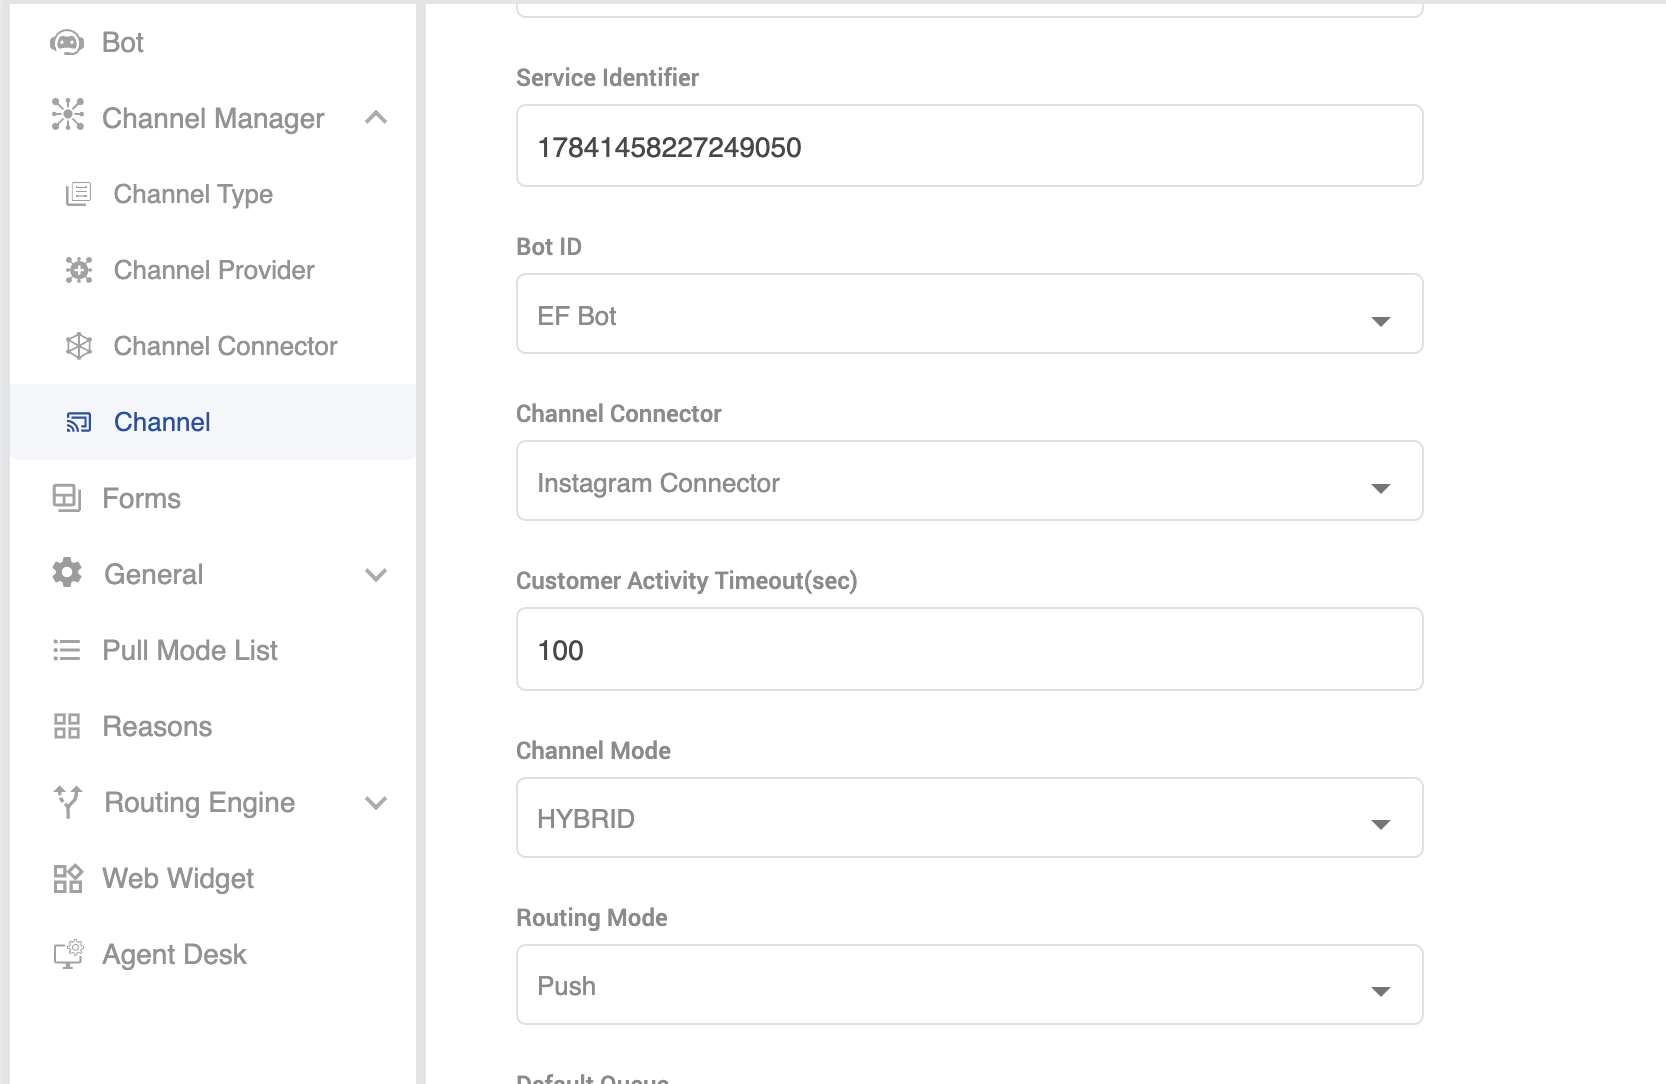
Channel
Configuring the Instagram Channel in Channel Configuration
-
Navigate to Channel Manager > Channel
-
Provide the channel name under the Name field
-
Provide the Instagram User Id which is linked with facebook page under the Service Identifier field. Note: This is the same IG User-ID which you received from the API request that you placed to /me/accounts API on Graph API Explorer above and used that in IG UserID page API call.
-
Fill the rest of the fields in the form accordingly and Click Save button.