Define a ChannelConnector in Expertflow CX Unified Admin to send and receive customer messages to and from HybridChat.
Step 1: Add Channel Type
Expertflow CX supports a few channel types out of the box. If you are planning to develop a connector for a different channel type, create a new ChannelType.
Click New Channel Type button on the top right hand side. Following table lists the attributes of the New Channel Type form. A sample of the filled form is provided on the right-hand side.
|
Attribute |
Value |
|---|---|
|
Name |
Name of the channel |
|
Media Routing Domain |
Select the media routing domain e.g. voice, chat etc. the channel type. |
|
Channel Type Logo |
Upload logo of the channel |
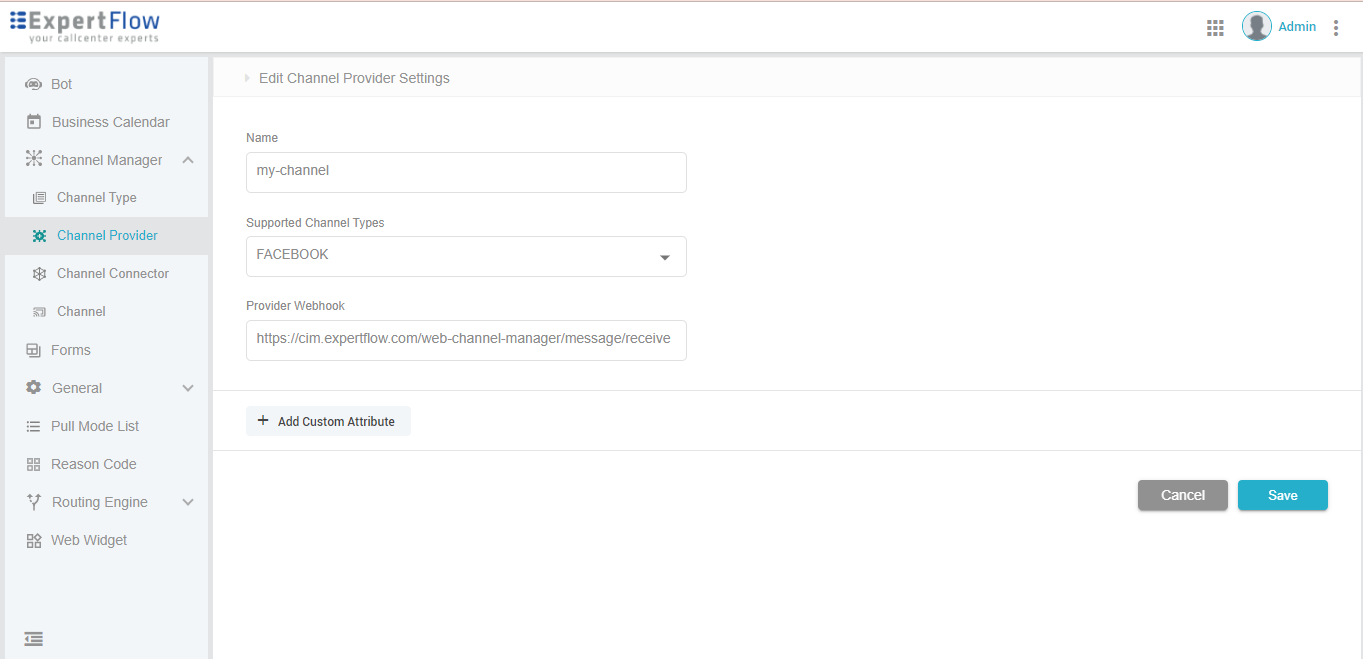
Step 2: Add Channel Provider
Click Unified Admin → Channel Manager → Channel Provider → New Channel Provider. Following table lists the attributes of the New Channel Provider form. A sample of the filled form is provided on the right-hand side.
|
Attribute |
Value |
|---|---|
|
Name |
Name of the channel provider |
|
Supported Channel Types |
Select the channel type(s) from the list of given channels. More than one can be selected. If you have created a new channel, it will also be shown in this list. |
|
Provider Webhook |
Specify the Webhook for the channel to listen to events from CCM. It should be noted that currently all out-of-box connectors are deployed as a service within same instance of Expertflow CX. The address of the webhook can be taken from service nameThe address The format of specifying webhook is |
|
Add Custom Attributes |
User defined custom field. Can be channel-specific. For example, for Facebook API Key is required in order to integrate connector with channel. Define the custom field in this UI. Value of the field is specified in the Create Connector which is the Step 3 in this guide. The API for updating these custom attributes between channel-CCM is provided here on Channel Connector Configuration page. |
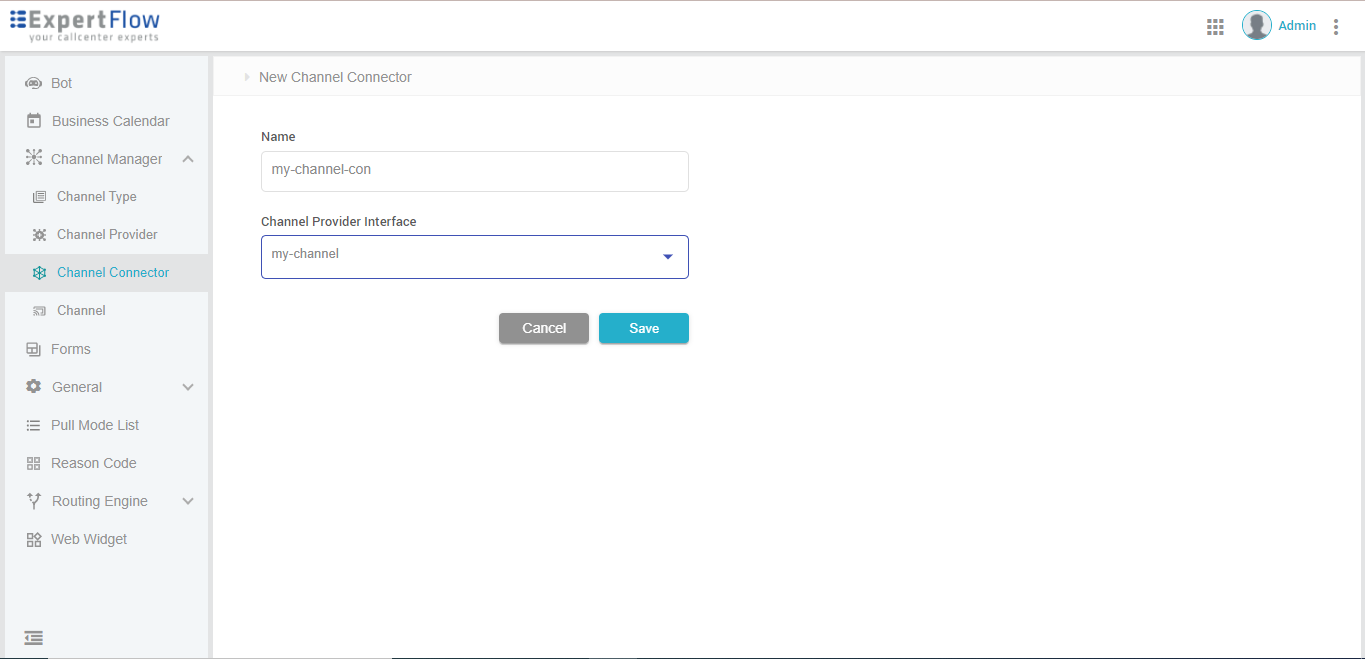
Step 3: Create Connector
Click Unified Admin → Channel Manager → Channel Connector → Create Connector. Following table lists the attributes of the Channel Connector. A sample of the filled form is provided on the right-hand side.
|
Attribute |
Value |
|---|---|
|
Name |
Name of the channel provider |
|
Channel Provider Interface |
Select the channel provider you created in Step 1 in Channel Provider |
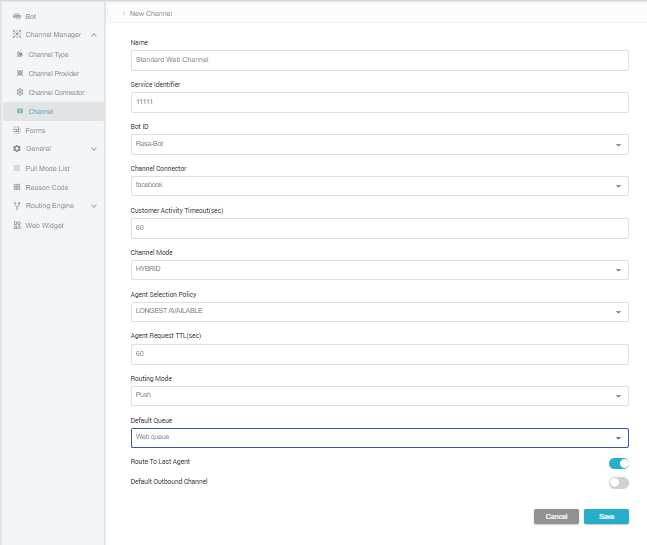
Step 4: Create New Channel
The next step of the registration process is to connect channel to connector. Click Unified Admin → Channel Manager → Channel → New Channel. Following table lists the attributes of the Channel Connector. A sample of the filled form is provided on the right-hand side.
|
Attribute |
Value |
|---|---|
|
Name |
Name of the channel provider |
|
Service Identifier |
Select the channel provider you created in Step 1 in Channel Provider |
|
Bot ID |
The name/ID of the bot integrated with this channel |
|
Response SLA |
Time in seconds to respond before the request is re-routed |
|
Channel Connector |
Select the connector created in Step 4 |
|
Customer Activity Timeout |
Set time in seconds |
|
Channel Mode |
Select options for setting up the mode i.e. Hybrid |
|
Agent Selection Policy |
Currently there is one policy i.e. the longest available |
|
Agent Request TTL (sec) |
Set time in seconds |
|
Routing Mode |
Select one of the two modes:
|
|
Default Queue |
Select the available queues in the list |
|
Route To Last Agent |
Toggle Button for routing the previous agent |
|
Default Outbound Channel |
Toggle Button for making this the default outbound channel |
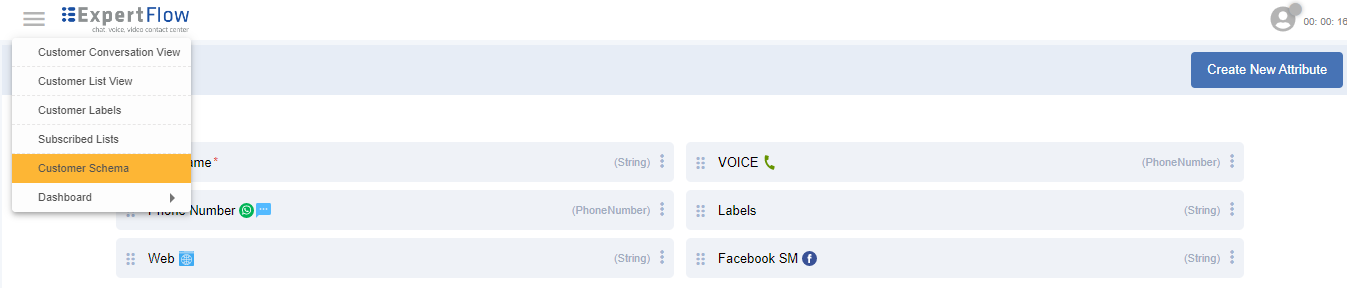
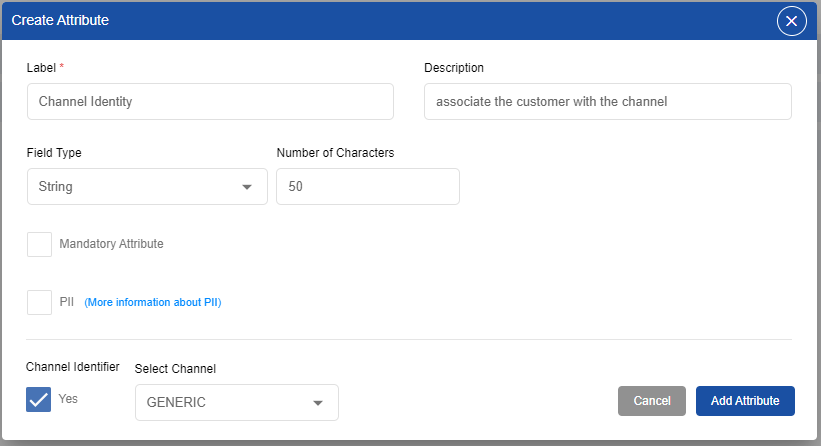
Step 5: Create Channel Identifier for Customer Identification
The final step of the registration process is to associate customers with the channel that we created in Step 4. This customer-channel association will help us identify which customers use this channel to connect with Agents/Hybrid Chat.
To do this, login to Unified Agent Console with Admin access. Click Unified Agent → Customer Schema → Create New Attribute. Following table lists the fields. A sample of the filled form is provided on the right-hand side.
|
Attribute |
Value |
|---|---|
|
Label |
Name of the attribute e.g. channel identifier |
|
Description |
Describe the attribute |
|
Field type |
In this case, String should be selected |
|
Number of Characters |
attribute value length - valid only for strings |
|
Mandatory Attribute |
When checked, the field value cannot be left blank |
|
PII |
Personal information identifiable. It is used to encrypt information of the customer. When checked, the information for the customer will be encrypted. |
|
Channel Identifier |
When checked, the attribute contain the channel type used by the customer. Should be selected from Select Channel drop down. Select the channel that we created in Step 4. |
For the Connector-CCM message exchange, please click through to the Messages page.