Introduction
Creating a Twitter developer account allows you to access Twitter's API and build applications that interact with the platform. Here's a step-by-step guide to getting started with a Twitter developer account
Twitter Developer Account Guide
Twitter had introduced a new version of its API, v2, which provides improved features and functionalities compared to the previous versions. To set up a Twitter Developer Account for v2 API access, follow these steps:
Sign in or Create a Twitter Account
If you haven't already, sign in to your Twitter account. If you don't have one, create a Twitter account here.
Apply for a Developer Account
-
Go to the Twitter Developer Portal.
-
Sign in with your Twitter account credentials.
-
Click on the "Apply" button to apply for a developer account.
Access the Developer Portal
-
Once your application is approved, you'll receive an email notification. This process might take some time as Twitter manually reviews applications.
-
Log in to the Twitter Developer Portal using your Twitter credentials.
Create a New Project
-
In the Developer Portal dashboard, click on "Projects & Apps" on the left sidebar.
-
Click on the "Set up Project" button or create a new project.
-
Provide the necessary details for your project, such as the project name and the purpose of your use of the Twitter API.
Create a New App and Access v2 API Keys
-
After setting up the project, click on your project to access its dashboard.
-
Click on the "Create App" button within the project.
-
Fill out the application form with details about your app, including its name, description, and use case.
Enable v2 API Access and Generate Keys
-
Once the app is created, you'll be redirected to its dashboard within the project.
-
Navigate to the "Keys and Tokens" tab.
-
Under the "Authentication Tokens" section, you'll find your Bearer Token for v2 API access.
-
Use this Bearer Token , Api Key, Api Secret Key, Access Token and Access Token Secret for authentication when making requests to Twitter's v2 API endpoints.
Start Developing with Twitter API v2
-
Utilize the Bearer Token in your application's code to authenticate API requests to Twitter's v2 endpoints.
-
Refer to the Twitter API v2 Documentation for detailed information on endpoints, query parameters, response formats, and sample code for various functionalities.
-
Ensure you understand and comply with Twitter's API usage policies, including rate limits and guidelines specific to Twitter API v2.
-
Regularly check the Developer Portal for updates, announcements, or changes in policies related to the v2 API.
Twitter's Developer Portal and API documentation provide detailed information about utilizing the v2 API endpoints and functionalities. Be sure to refer to these resources for the most accurate and updated information.

Twitter Channel Configuration in CIM - Unified Admin
This section will help setup Twitter Connector in CIM unified admin.
-
First of all, go to Unified Admin (https://fqdn/unified-admin) and create an MRD, Routing Attribute, Queue specifically for Twitter Channel so that we can assign these dedicated items for Twitter Channel. Then assign the MRD to selected agent and setup the agent attributes. All these steps will be performed in the same way as we normally setup for any other channel or even for basic unified-admin setup. If you have any confusion in setting up things mentioned in this step, you can review the Unified Admin Setup Guide.
-
Once done, then proceed to Channel Manager menu and perform the steps in each of the sub-menu under Channel Manager as follows:
-
Channel Type:
Channel Type should be automatically created as part of Channel Connector bootstrapping. You should see a channel named "TWITTER" here. -
Channel Provider:
-
Create a new Channel Provider (i.e. name can be "Twitter Channel Provider").
-
Select Channel Type as "TWITTER" from the drop down menu.
-
Enter provider webhook as: https://fqdn/twitter-connector
-
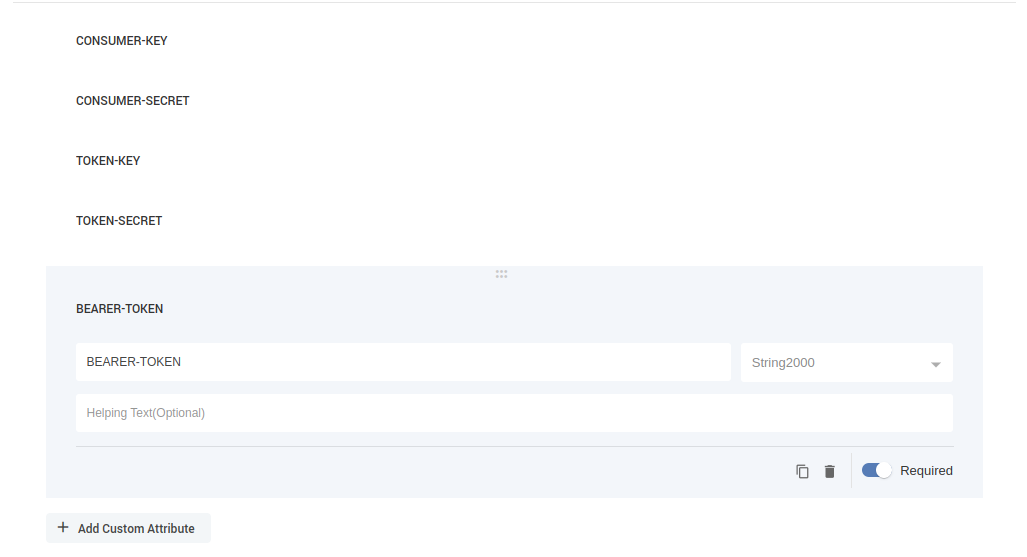
Add Five (5) custom attributes, each with type = "String2000". All of them will be "Required" attributes. Their name will be:
-
CONSUMER-KEY
-
CONSUMER-SECRET
-
TOKEN-KEY
-
TOKEN-SECRET
-
BEARER-TOKEN
-
-
-
-
Channel Connector:
Add a new Channel Connector.-
Name can be "Twitter Channel Connector"
-
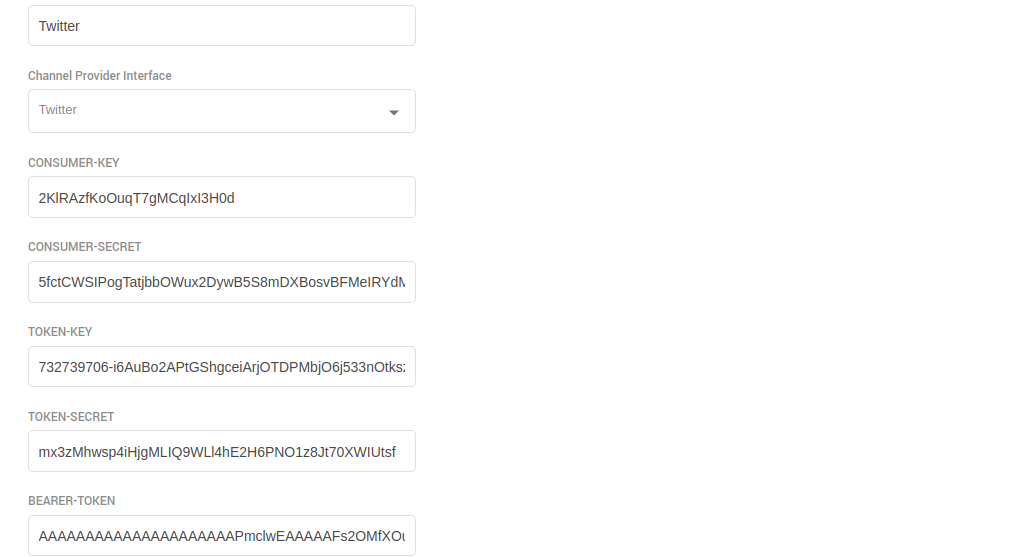
Select Channel Provider Interface as the one we created in previous step. (I.e. Twitter Channel Provider)
-
Once you select the channel provider interface value, then the respective custom attribute fields will appear. These fields will be those 5 fields, which we added in previous step as part of custom attributes. Enter the API Keys and Token values in it from the one that we extracted while setting up Twitter Developer Account.
-
-
Channel:
Now in the Channel menu, you should see a channel named "TWITTER". Expand the collapsible menu and click on "Add new channel".-
Name can be "Twitter "
-
In Service Identifier field, add the Account ID.
-
Select the default bot from the Bot ID drop down values. It could be named as "EF-Bot".
-
Select "Twitter Channel Connector" that we created in previous step in Channel Connector field.
-
Customer Activity Timeout can be set as 180 seconds.
-
Channel Mode can be used as default value. i.e. HYBRID.
-
Agent Selection Policy field value can be used as default value. i.e. LONGEST AVAILABLE.
-
Agent Request TTL can be set as 100 seconds.
-
Routing Mode can be selected as PUSH or PULL. Based on this selection, you can select the Queue or List in the next field value.
-
Size restrictions for uploading via Twitter API
-
Image 5 MB
-
GIF 15 MB
-
Video 512 MB (But in our application its limited to 25MB maximum)
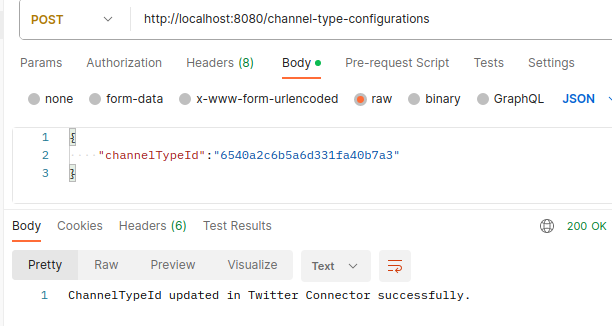
After running Twitter Connector Application, first thing we need to do is to register a channel-type TWITTER with this connector. In order to do so please use this link to fetch the channel-type-id for twitter. After that, use this channel-type-id in the body of this link to register it.
Once done, twitter will run in PULL MODE mechanism to fetch messages from twitter in a specific interval of time (based on its usage limits)
Twitter Supports sending multiple media at a time as a comment , but we only take up first media upload.This is because our CIMMessage can only support 1 attachment for now
After all these configurations, you should be able to use Twitter Channel Connector with CIM as its component. For any further details you can visit Twitter Documentation.
Limitations
Currently as part of 4.5 release, we have some limitations which will be covered in up comings releases.
-
Twitter only supports social media for now. And the bot responses will not be handled in it. On agent desk, you might see the bot messages as a DM message but it will not forward as a comment/social media message.
-
As DM is not supported so if you send a message without a “comment reply action button” then it will show on agent desk but not deliver on twitter.
-
In View Full Post, post which contains media will not show post media but show a link of twitter post page instead. However the media in comments will work and display fine.
-
In comments or view full post, only 1 media will be shown as part of message. However twitter do support multiple media attachment inside a single comment.