Description
The EF SIP proxy dialplan tool maps over the dialplan module of opensips . The tool is used to perform modifications in OpenSIPS's dialplan rules during runtime. Dialplan implementation is tested for OpenSIPS version 3.4 and Control Panel version 9.3.4.
Significance of the Dialplan module
Through a control panel interface, the Dialplan module in EF SIP proxy simplifies the configuration process for creating calling routes depending upon the Request URI. Administrators can input specific dialing patterns and corresponding media proxies/routes via a user-friendly interface within the control panel. Backend processes triggered by the control panel dynamically generate and update database records defining translation rules expected by the Dialplan module. EF SIP proxy then automatically reloads its configuration to incorporate these adjustments, seamlessly mapping dialed numbers to the desired destination based on configured patterns. This streamlined approach eliminates the need for manual configuration within the configuration files. This way also eliminates the need to restart the openSIPS after adding rules of destination numbers. Overall, using the Dialplan module in the control panel enhances the accessibility and flexibility of OpenSIPS, empowering administrators to make configuration changes with ease.
Prerequisite
Ensure that the machine is using PHP 7.4. The control panel may not function smoothly with other PHP versions.
Step 1: Adding dialplan module and dialplan route in the configuration file
-
Open
opensips.cfgfile to add the Dialplan module in the modules section.nano /etc/opensips/opensips.cfg -
Add the following lines in the modules section.
#### Dialplan module loadmodule "dialplan.so" modparam("dialplan", "db_url","mysql://opensips:opensipsrw@localhost/opensips") -
Add following lines/route in the logical routing section.
# Route for dialplan processing route[to_dialplan] { # Initialize dialplan ID AVP if not set if($avp(dpid)==NULL ) { $avp(dpid)=0; } xlog("Dialplan: Subscriber.s dpid: $(avp(dpid))\n"); # Translate destination using dialplan if(!dp_translate($avp(dpid),$rU,$rU,$avp(dest))) { send_reply(404, "Destination Not Found"); exit; } xlog("Dialplan: Destination: $avp(dest)\n"); # Route request based on destination if ($avp(dest)=="1") { xlog("----------- Reguest For VBB -----------"); route(to_media_vbb); } if ($avp(dest)=="2"){ xlog("----------- Reguest For CVP---------"); # request with no Username in RURI route(to_media_cvp); } send_reply(404, "Unknown Destination"); exit; } -
Save this file and restart opensips.
Step 2: Adding media routes
The logic in the dialplan route shows that when the destination condition matches the SIP request is forwarded to the next route.
-
Open
opensips.cfgfile and the following route in the routing logic sectionroute[to_media_vbb] { xlog("Routing to media VBB servers via load balancer\n"); if (!lb_start(1, "channel")) { send_reply(500,"No route to Media"); exit; } xlog("Using VBB server $du (RURI=$ru) \n"); t_on_failure("media_failover"); t_relay(); exit; } -
Change the set ID in lb_start() according to set ID of the desired destination.
-
Add routes of other media servers as well and save it.
Step 3: Get the destination number for each route
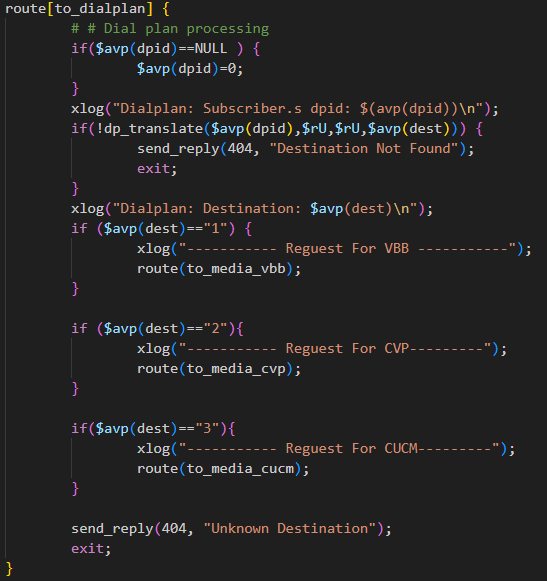
Open the opensips.cfg file located at /etc/opensips/opensips.cfg and navigate to the [to_dialplan] section. The value of $avp(dest) determines the next route to take. In the scenario provided below, when the value of $avp(dest) is set to "1", the request will be directed to the media vbb. Record all the values of $avp(dest) and their corresponding routes. For instance, in this case 1 corresponds to the vbb route, 2 to the cvp route, and 3 to the cucm route.
Step 3: Adding attributes in the Dialplan tool via EF SIP proxy control panel
To access the EF SIP Proxy Control Panel, navigate to the following URL: http://server-ip/cp, where 'server-ip' represents the IP address of the server hosting the EF SIP proxy. The login credentials are as follows: Username: admin & Password: opensips.
Once logged in, proceed to the 'System' section, followed by 'Dialplan'.
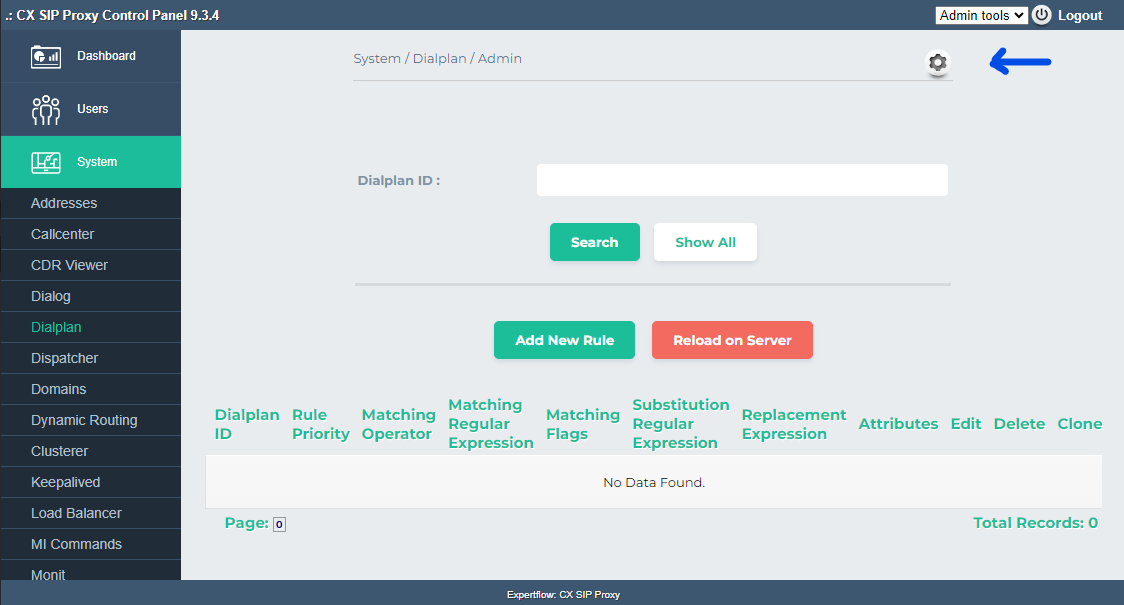
To add tool-specific settings via the setting panel, click the gear icon in the tool header. In the dialplan settings, modify the standard attributes for the dialplan by adding the following object to the “Attributes List” field:
{
"1":”VBB",
"2":"CVP",
"3":”CUCM"
}
Ensure that the object contains the correct pairs of values for all the routes as noted from the opensips.cfg file. Additionally, change the line dialplan_attribute_mode to checkboxes.
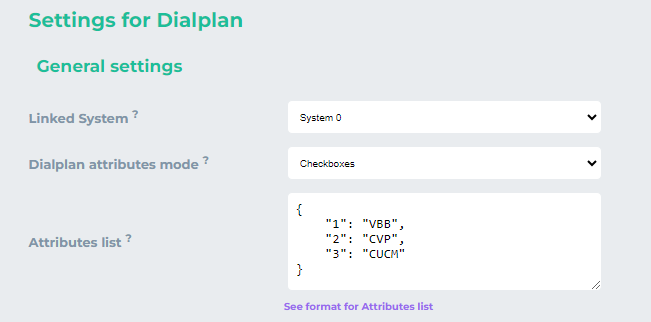
Leave the rest of the setting as it is and save it.
Step 3: Assigning DN to the routes
To access the EF SIP Proxy Control Panel and navigate to the dialplan tool, follow the instructions provided in step 2. Once in the dialplan tool, proceed to add a new rule. Input the dialplan ID and rule priority. If you do not wish to prioritize this rule, maintain the rule priority at zero. Otherwise, assign lower values to rules for higher priority.
In the Matching Regular Expression field, add the DN as a regular expression. Optionally, add Substitution Regular Expressions if needed. Then, select the attribute to which you want to assign this DN.
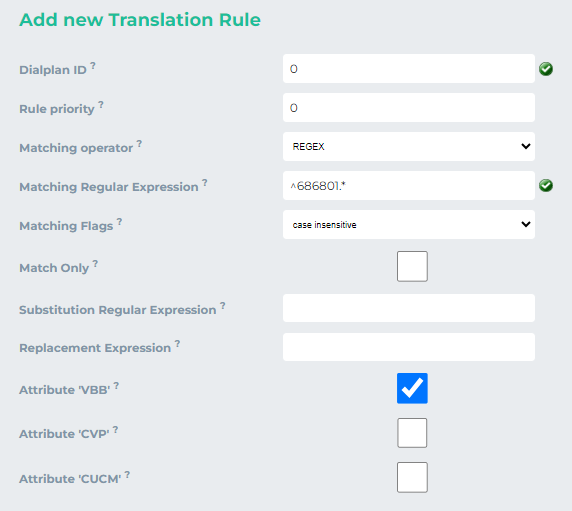
Make sure to save these settings. Add the DNs for other attributes in a similar manner. Pay attention to the Matching Flags, especially if the Matching Regular Expression contains any alphabetic characters. Once all the rules have been added, click on Reload on Server to apply the changes.

This indicates that when the DN 686801 is matched, the value of $avp(dest) is set to 1. Consequently, when this DN is dialed, the request will be routed to VBB.
