Overview
Twilio is providing a market leading product named "Twilio Messaging-X" which provides support for transactional SMS, MMS, and WhatsApp messaging under one/single API. In our connector, we will be consuming these 3 features of Twilio.
Whatsapp messaging works free of cost using its sandbox, but for SMS their are some geographical and domestic level restrictions which bounds us to use the PAID accounts and paid phone numbers in order to test the use cases. Lets discuss in details about the setup required related to setting up Whatsapp Sandbox (Free), Whatsapp Sender (Paid - for production use) and SMS/MMS capabilities (with Paid numbers).
Limitations / Things to notice
-
For SMS & MMS, details about which number is supported for which capabilities is mentioned against the numbers when you buy it. Normally as US or Canada based numbers are rich in feature which normally supports to send messages around the globe. However, Twilio guarantees receiving of message domestically (with in same region) but it do not guarantees receiving of message from around the globe due to limitation/restrictions on each countries end. Not giving guarantees, doesn't mean that it totally don't support all the countries. It means that message from some countries might receive and from countries might not due to any restrictions. Details regarding this are mentioned here.
-
For this above mentioned reason, Twilio suggested to use different sub accounts to manage each client in each region to ensure delivery. Otherwise, its suggested to use WhatsApp for messaging purpose as its more interactive.
-
For WhatsApp, we are currently using sandboxes for all the development/testing/Qa. However, a proper WhatsApp sender for business can be used but it would cost money. So, when we will make the solution live then we can apply for Sender and get it approved based on business to use it live.
Setting up Twilio Account
-
First of all we need to create an account on Twilio console which is totally free of cost. This will give us 15.50$ credit to use during trial period and to avail limited functionality of Twilio with this credit amount.
-
Once account is created then we will land on Twilio console with our 1st project.
Please note that we can create multiple projects in Twilio console within same account. Each will be billed and managed separately. Along with that we can also create sub accounts as well, where billing will be same but items within project will be linked with each other. Sub accounts are normally preferred to manage different clients separately under one Twilio project/main-account.
-
Now, we will be needing Whatsapp sandbox for the Whatsapp level configuration. and for SMS/MMS we will be needing an "Active Phone Number" from Twilio with SMS/MMS support. Lets see the details of each of these in next sections.
Setting up Whatsapp
-
In order to test the functionality of Whatsapp and all its features we can use "Whatsapp Sandbox" which provides free access to a specific Twilio Whatsapp number. We can send and receive messages from our own private number to that Twilio Sandbox Whatsapp number.
-
For that, go to the left menu of the page under Develop tab. Go to Messaging → Try it out → Send a Whatsapp message
-
When you will be accessing it for the first time then you need to accept some agreement of use, which you can accept. Then you will see the screen as mentioned below.
-

As mentioned on the screen, you can add this Whatsapp number shown in the screen to your contact in your own mobile. (Like in my case its +14155238886)
-
Once added, then you can send a message with the code as mentioned after the whatsapp number as mentioned in the attached screenshot. This will enable the messaging from your own mobile number to this Whatsapp sandbox number.
-
Now go to the second tab named "Sandbox settings" and add the exposed Webhook of your Twilio connector deployment as mentioned in the screenshot below.

-
The details of this webhook is mentioned in the upcoming section (Twilio Sandbox Configurations) at the end of this page.
Thats it! The settings required to setup Twilio Whatsapp messaging is done on Twilio Sandbox.
As already mentioned, this sandbox usage is free of cost. In the production environment, we will be needing a PAID Twilio account and we need to create a Whatsapp Sender with the details mentioned in "Left Menu → Develop Tab → Messaging → Senders → Whatsapp senders". But those messages using Whatsapp Senders are PAID messages (Sending & Receiving).
Setting up SMS/MMS
-
For SMS/MMS feature, we first need to acquire an active Twilio phone number from "Left Menu → Develop Tab → Phone Numbers → Manage → Active numbers".
-
If there are any numbers already purchased then it will be shown in the listing section of this menu. Otherwise, you can buy a number from this screen.
The most important thing to ensure while buying a number is that it should be SMS & MMS capable. This can be ensured by making sure that whichever number you are purchasing it must has SMS & MMS icon against it.
Also, its good to purchase number from "United State" or "Canada" region because these two regions local numbers are highly featured and supports all functionalities and are capable of sending messages from around the globe. However, in case of receiving messages, Twilio guarantees domestic (same region) numbers messages delivery but doesn't guarantee delivery of international incoming messages.
-
Once you have purchased the number for this project now we need to setup another phone number because as mentioned in the above note as well, we need domestic sender and receiver in order to ensure delivery. As Twilio doesn't have any PK active phone numbers available thats why we need to purchase two different phone numbers from a same region in order to make sending and receiving from them.
-
For that, its better to create a "sub-account" by clicking on the "Accounts" from the top right menu bar and select "Subaccounts". Click on create an account and then your new subaccount will be listed on this screen, once you provide the details.
-
Now click on this newly created subaccount name and it will open the Twilio console for this sub-account. (As already mentioned, main account and all their sub accounts have separate quota for all the features and functionalities except billing) Thats why, we can now create/buy a new active phone number specifically for this sub-account. This new phone number should be from the same region from which we have purchase the previous phone number and this one also should be SMS and MMS capable.
-
Till this step we have 2 Twilio Projects/Account. 1st is main and 2nd is sub-account of main account. Both have their own active phone numbers from same region and SMS/MMS enabled support. All these steps we have done so far are free of cost (with trial balance).
-
Now, in order to send message from 1 Trial project active phone number to other Trial project active phone number we need a PAID account because it cannot be done on trial. So, for this we need to top-up our account with the minimum amount of $20 to make it work. Details are mentioned here.
-
As we are now working with PAID project which has 1 main account and 1 sub account working under this PAID project. Now we need to bind one of the active Twilio phone number for Cim and from second we can use to send and receive messages as customer. For that, lets assume that our main account name is "Expertflow Cim" and sub-account name is "Expertflow Customer".
-
We can now go to the "Expertflow Cim" account by selecting it from the top left menu of Twilio console. Go to "Left Menu → Develop Tab → Phone numbers → Manage → Active numbers".
-
Click on the hyperlinked Active phone number from the listing. A screen will open to configure this number as seen in the screenshot below.
-
Under "Configure Tab", go the bottom under "Messaging" section and choose "Webhook, TwiML Bin, Function, Studio Flow, Proxy Service" from the Configure with Other Handlers drop down.
-
Enter the webhook URL in the text box below after selecting "Webhook" from the A MESSAGE COMES IN drop down. Same for "PRIMARY HANDLER FAILS" drop down but its optional.
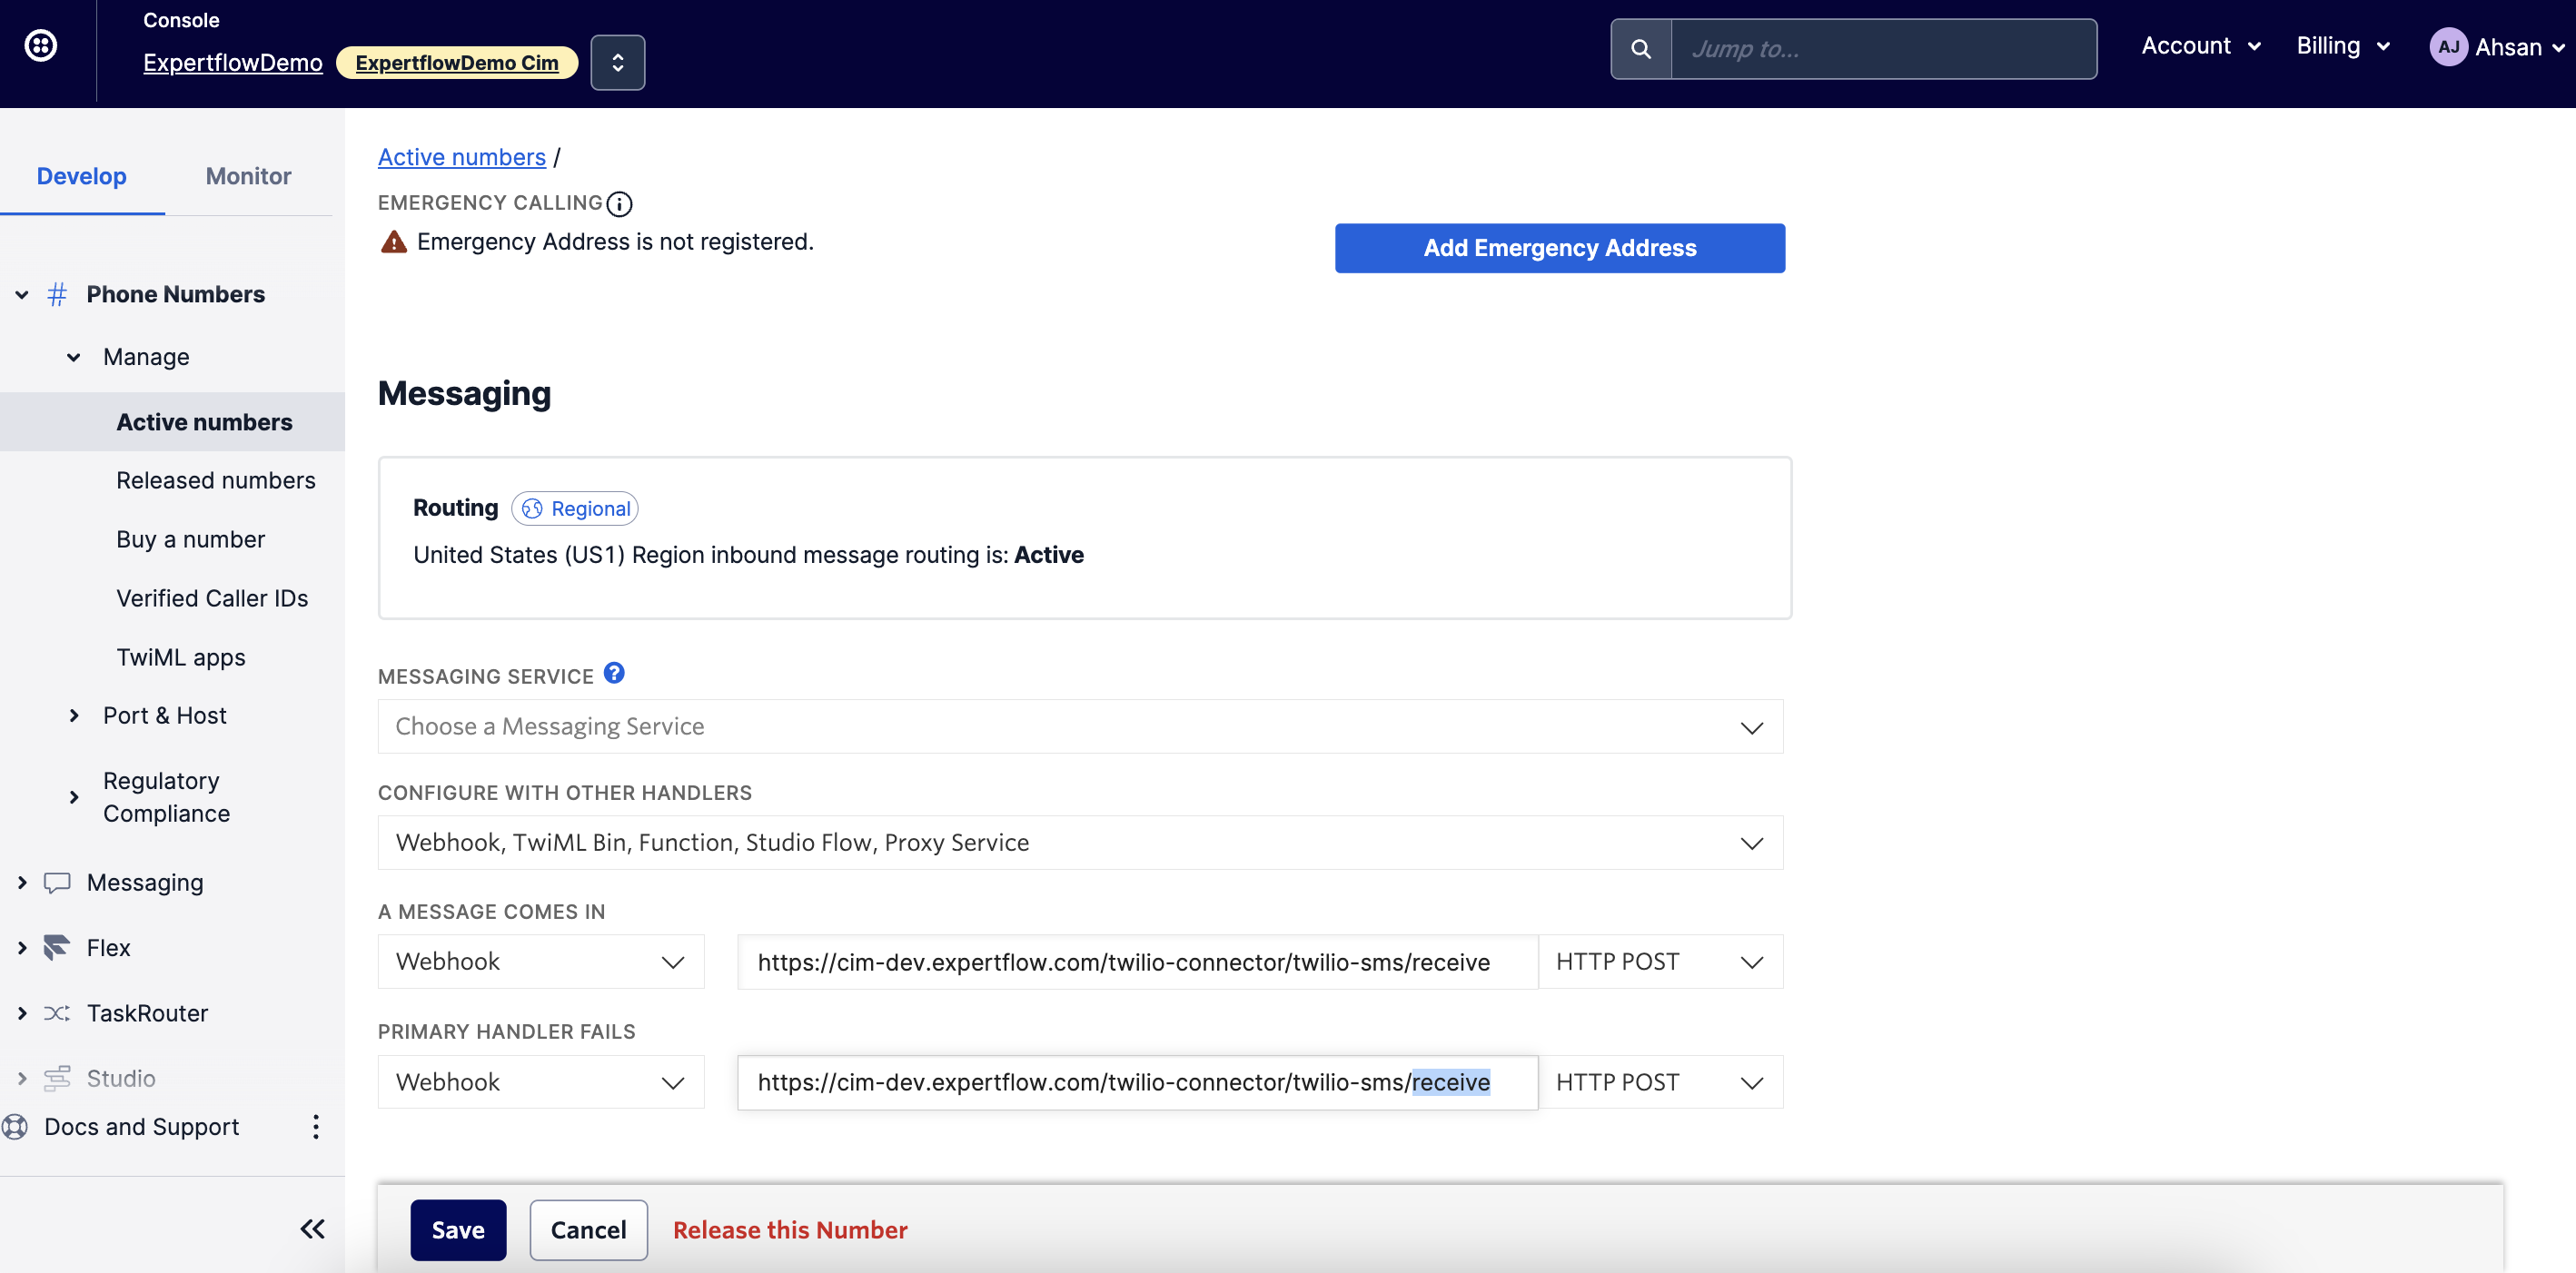
-
Click on Save. Now your Expertflow Cim number is bind with Cim and whenever you will receive any message on this number, it will be forwarded to this webhook.
-
As we don't have any real phone which can support our 1st phone number which we will be using as a customer, so one way to perform our testing is to use Twilio dev-phone 3rd party asset to configure that number in Twilio dev-phone. Details to setup Twilio dev-phone is mentioned here.
-
Now we are able to send and receive SMS from dev-phone to Cim agent and vice versa. SMS can be tested with this dev-phone but for MMS we need to use any other 3rd party tool or application or website to test if the media is coming fine because dev-phone do not support MMS. For testing MMS:
-
you can either use postman to see if the MMS media URLs are coming and going fine.
-
you can also use API Explorer to send a message from customer phone number to cim phone number with media content to test if media is reaching back fine.
-
you can also use API Explorer to view the message send back from cim phone number to customer phone number with their Sid/MessageId using View a Message API.
-
API Explorer is accessible from the left menu of Twilio console
Unified Admin Configurations
Channel Manager Configs
As Twilio is a single provider which supports the functionality of both Whatsapp as well as SMS/MMS messaging. But due to limitations in our Cim solution, we cannot use same Channel for both. Thats why for now, we will use 2 different Channel Types (SMS, WHATSAPP), 1 Same Channel Provider (TWILIO) and 1 Same Channel Connector (TWILIO) for setting up both Whatsapp and SMS/MMS features of connector. Lets see these in details in next steps!
Channel Type
-
Whatsapp channel type must be already created as part of bootstrapping of Channels Connector.
-
SMS channel type must also be already created as part of bootstrapping of Channels Connector.
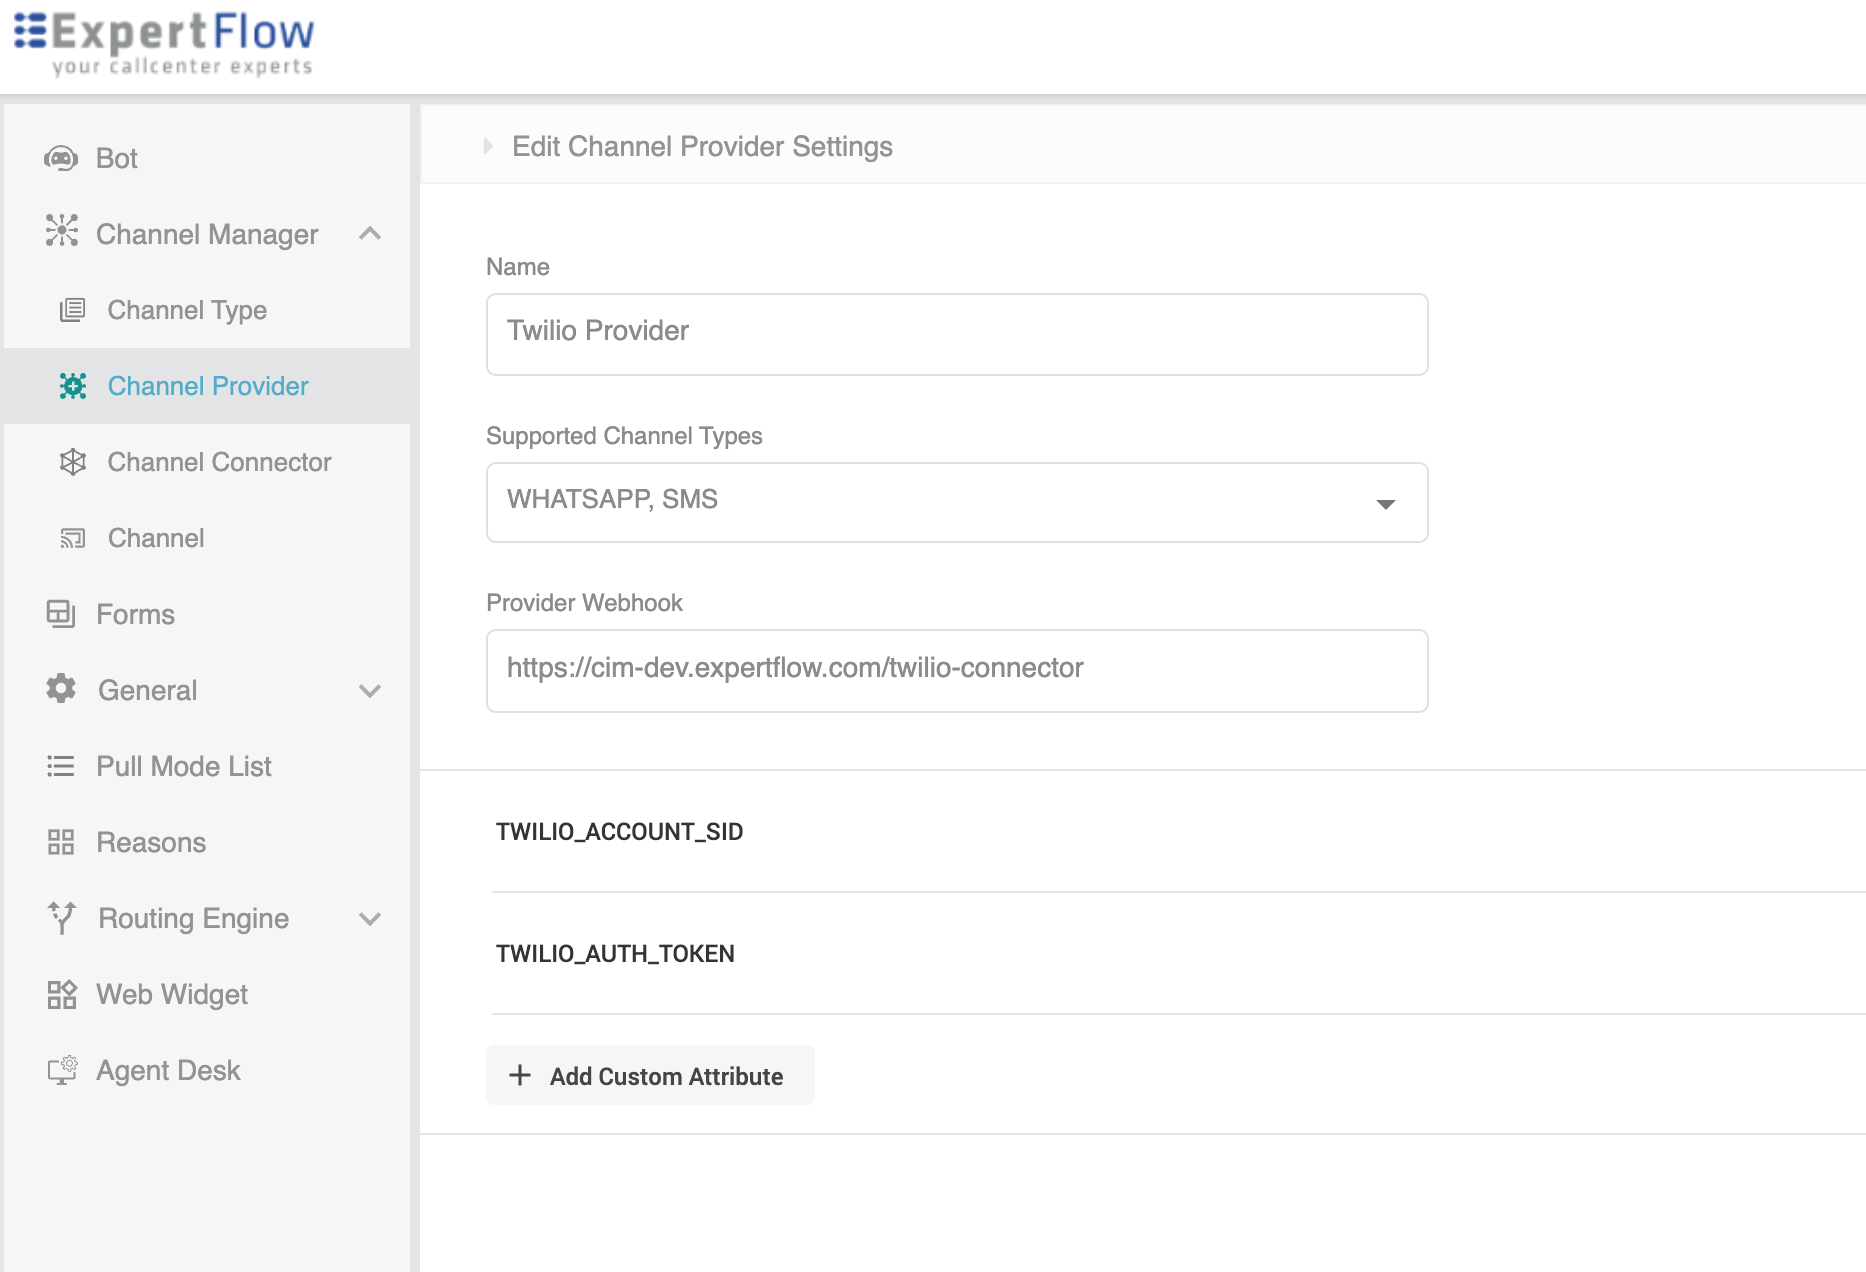
Channel Provider
-
Name can be any. E.g. Twilio Provider.
-
Supported Channel Types will be selected as "Whatsapp" and "SMS" (If you want to setup any one only, then select any one).
-
Provider Webhook will be FQDN/twilio-connector. E.g: https://cim.expertflow.com/twilio-connector.
-
Add two customer attributes as mentioned below and in attached snapshot.
-
TWILIO_ACCOUNT_SID
-
TWILIO_AUTH_TOKEN
-
|
Variable Name |
Description |
Size |
Required |
Example |
|---|---|---|---|---|
|
TWILIO_ACCOUNT_SID |
It's a unique key that is used to identify specific resources on Twilio. |
String100 |
YES |
3066b0c7226cbc56ae1cea5631e45351 |
|
TWILIO_AUTH_TOKEN |
Twilio auth token for authentication. |
String100 |
YES |
ACffc18ee1a1bff1e297134033a5d07721 |
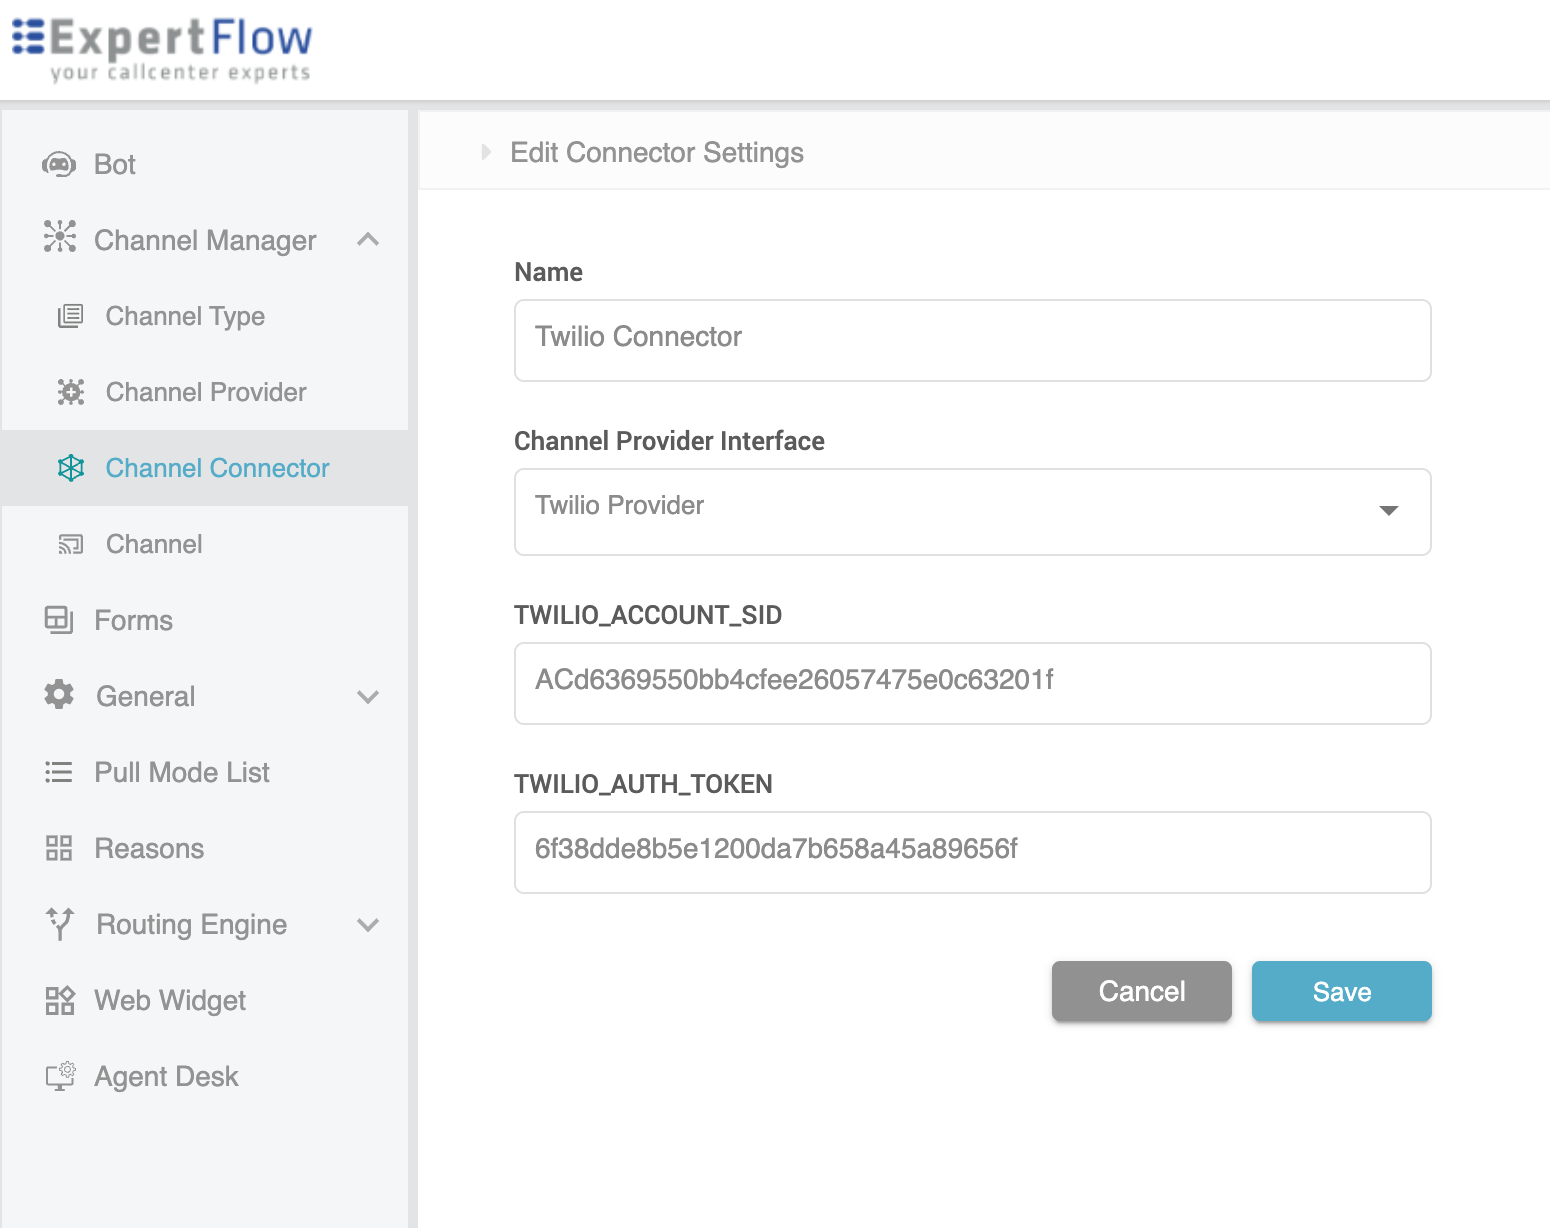
Channel Connector
-
Name can be any. E.g: Twilio Connector
-
Channel Provider Interface must be same as created in previous step.
-
Provide the values for TWILIO_AUTH_TOKEN and TWILIO_ACCOUNT_SID from the Twilio Console. Please note here that we need to use the TWILIO_AUTH_TOKEN and TWILIO_ACCOUNT_SID of that account or sub account which we have tied with cim phone number, as each account or sub account have different token and sid's.
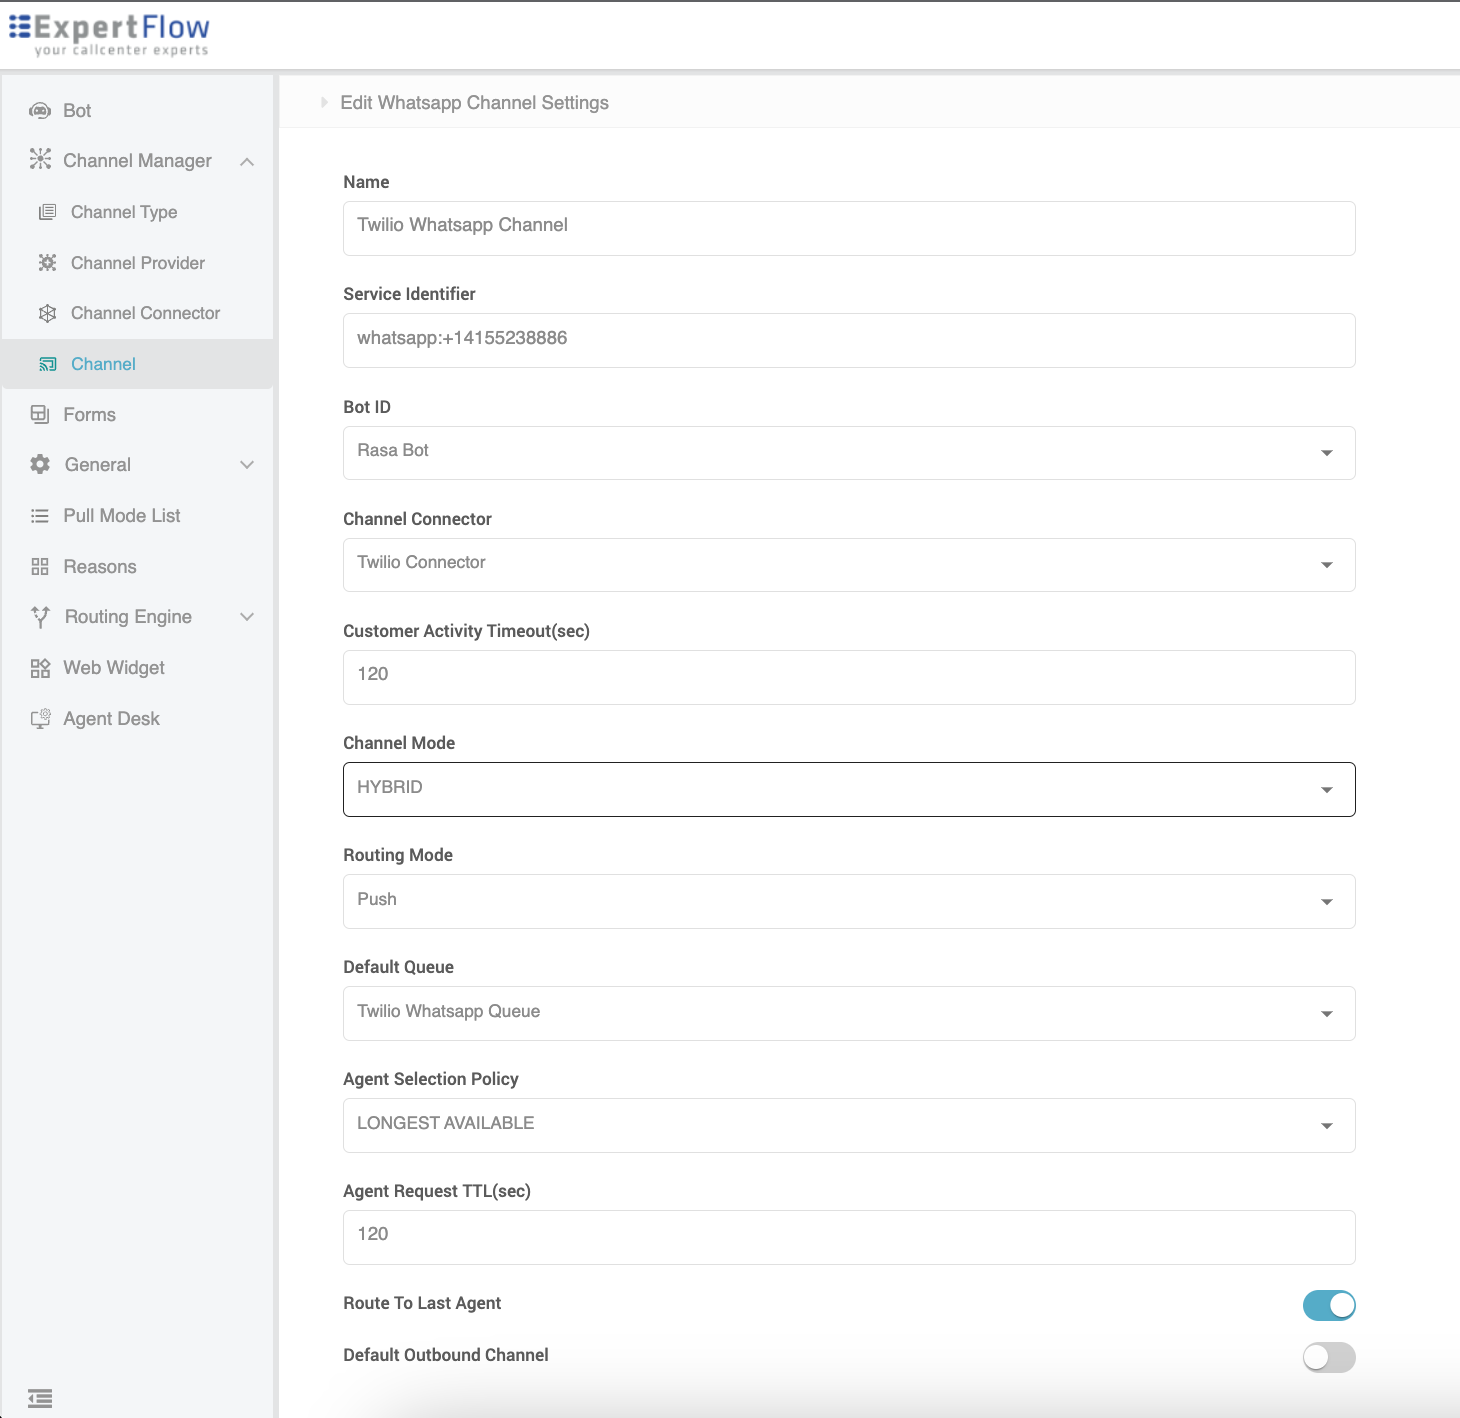
Channel
-
Here we will be creating two different channels. If we want to setup Whatsapp, then we will create channel under "Whatsapp" channel type. If we want to setup SMS/MMS, then we will create channel under "SMS" channel type.
-
Name of channel can be any. E.g: Twilio Whatsapp Channel or Twilio SMS Channel
-
Service identifier:
-
For Whatsapp: it will be the number assigned for whatsapp messaging (paid) or sandbox number (free). Sandbox number can be found at "Twilio Console" → Left Navigation menu → Develop tab → "Messaging" → "Try it Out" → "Send a Whatsapp message" → "Sandbox settings" (snapshot attached in next section in "Twilio Sandbox Configurations"). We need to use it with whatsapp prefix like "whatsapp:+123456677"
-
For Sms: it will be the active phone number we have bind for cim.
-
-
Rest of the fields are same like all other connectors. Sample is shown in image below.
Environment Variables
|
Variable Name |
Description |
Example |
|---|---|---|
|
CCM_URL |
FQDN of the machine where Customer-Channel-Manager is deployed. |
https://cim-dev.expertflow.com/ccm |
|
FILE_ENGINE_URL |
FQDN of the machine where File-Engine is deployed. |
https://cim-dev.expertflow.com/file-engine |
Twilio Whatsapp Sandbox Configurations
-
In order to make Twilio console send us the incoming data to our application, we need to specify the webhook on Twilio Console Whatsapp sandbox (as shown in image below)
|
Webhook |
Description |
HTTP Method |
Example |
|---|---|---|---|
|
{FQDN}/twilio-connector/twilio-msg/receive |
When a message comes in from WhatsApp , then the Twilio will send the message to our this webhook of twilio-connector, |
POST |
https://cim-dev.expertflow.com/twilio-connector/twilio-msg/receive |
|
{FQDN}/twilio-connector/twilio-msg/status |
When the *status of the message is updated. then the Twilio will send the updated message status to our this webhook of twilio-connector.
*Status like queued → sent → delivered → read. |
POST |
https://cim-dev.expertflow.com/twilio-connector/twilio-msg/status |