Overview
Viber provides support to send send private messages to users. Viber Direct Messages enable businesses to take an interaction with a user as a private conversation via Viber Bot. Viber allow businesses to create Viber Bot (Admin account) and subscribe to it in order to receive events whenever a new message is received on your Viber Bot (Admin account).
Get Started - Setup Viber
In order to setup Viber, we first need to create a Viber account using our phone number (on mobile app). Download the Viber Mobile App and sign up using your mobile number.
Once done, now you need to visit Viber Admin Portal and Sign in using your mobile number (with which you have just registered on mobile App).
Once logged in, visit the menu item in left stating “Create Bot Account”. Fill out the form with the information. Please note here that “URI” is unique across Viber because it would be the unique name of your account across Viber. Sample Account Information form is given in the snapshot below.
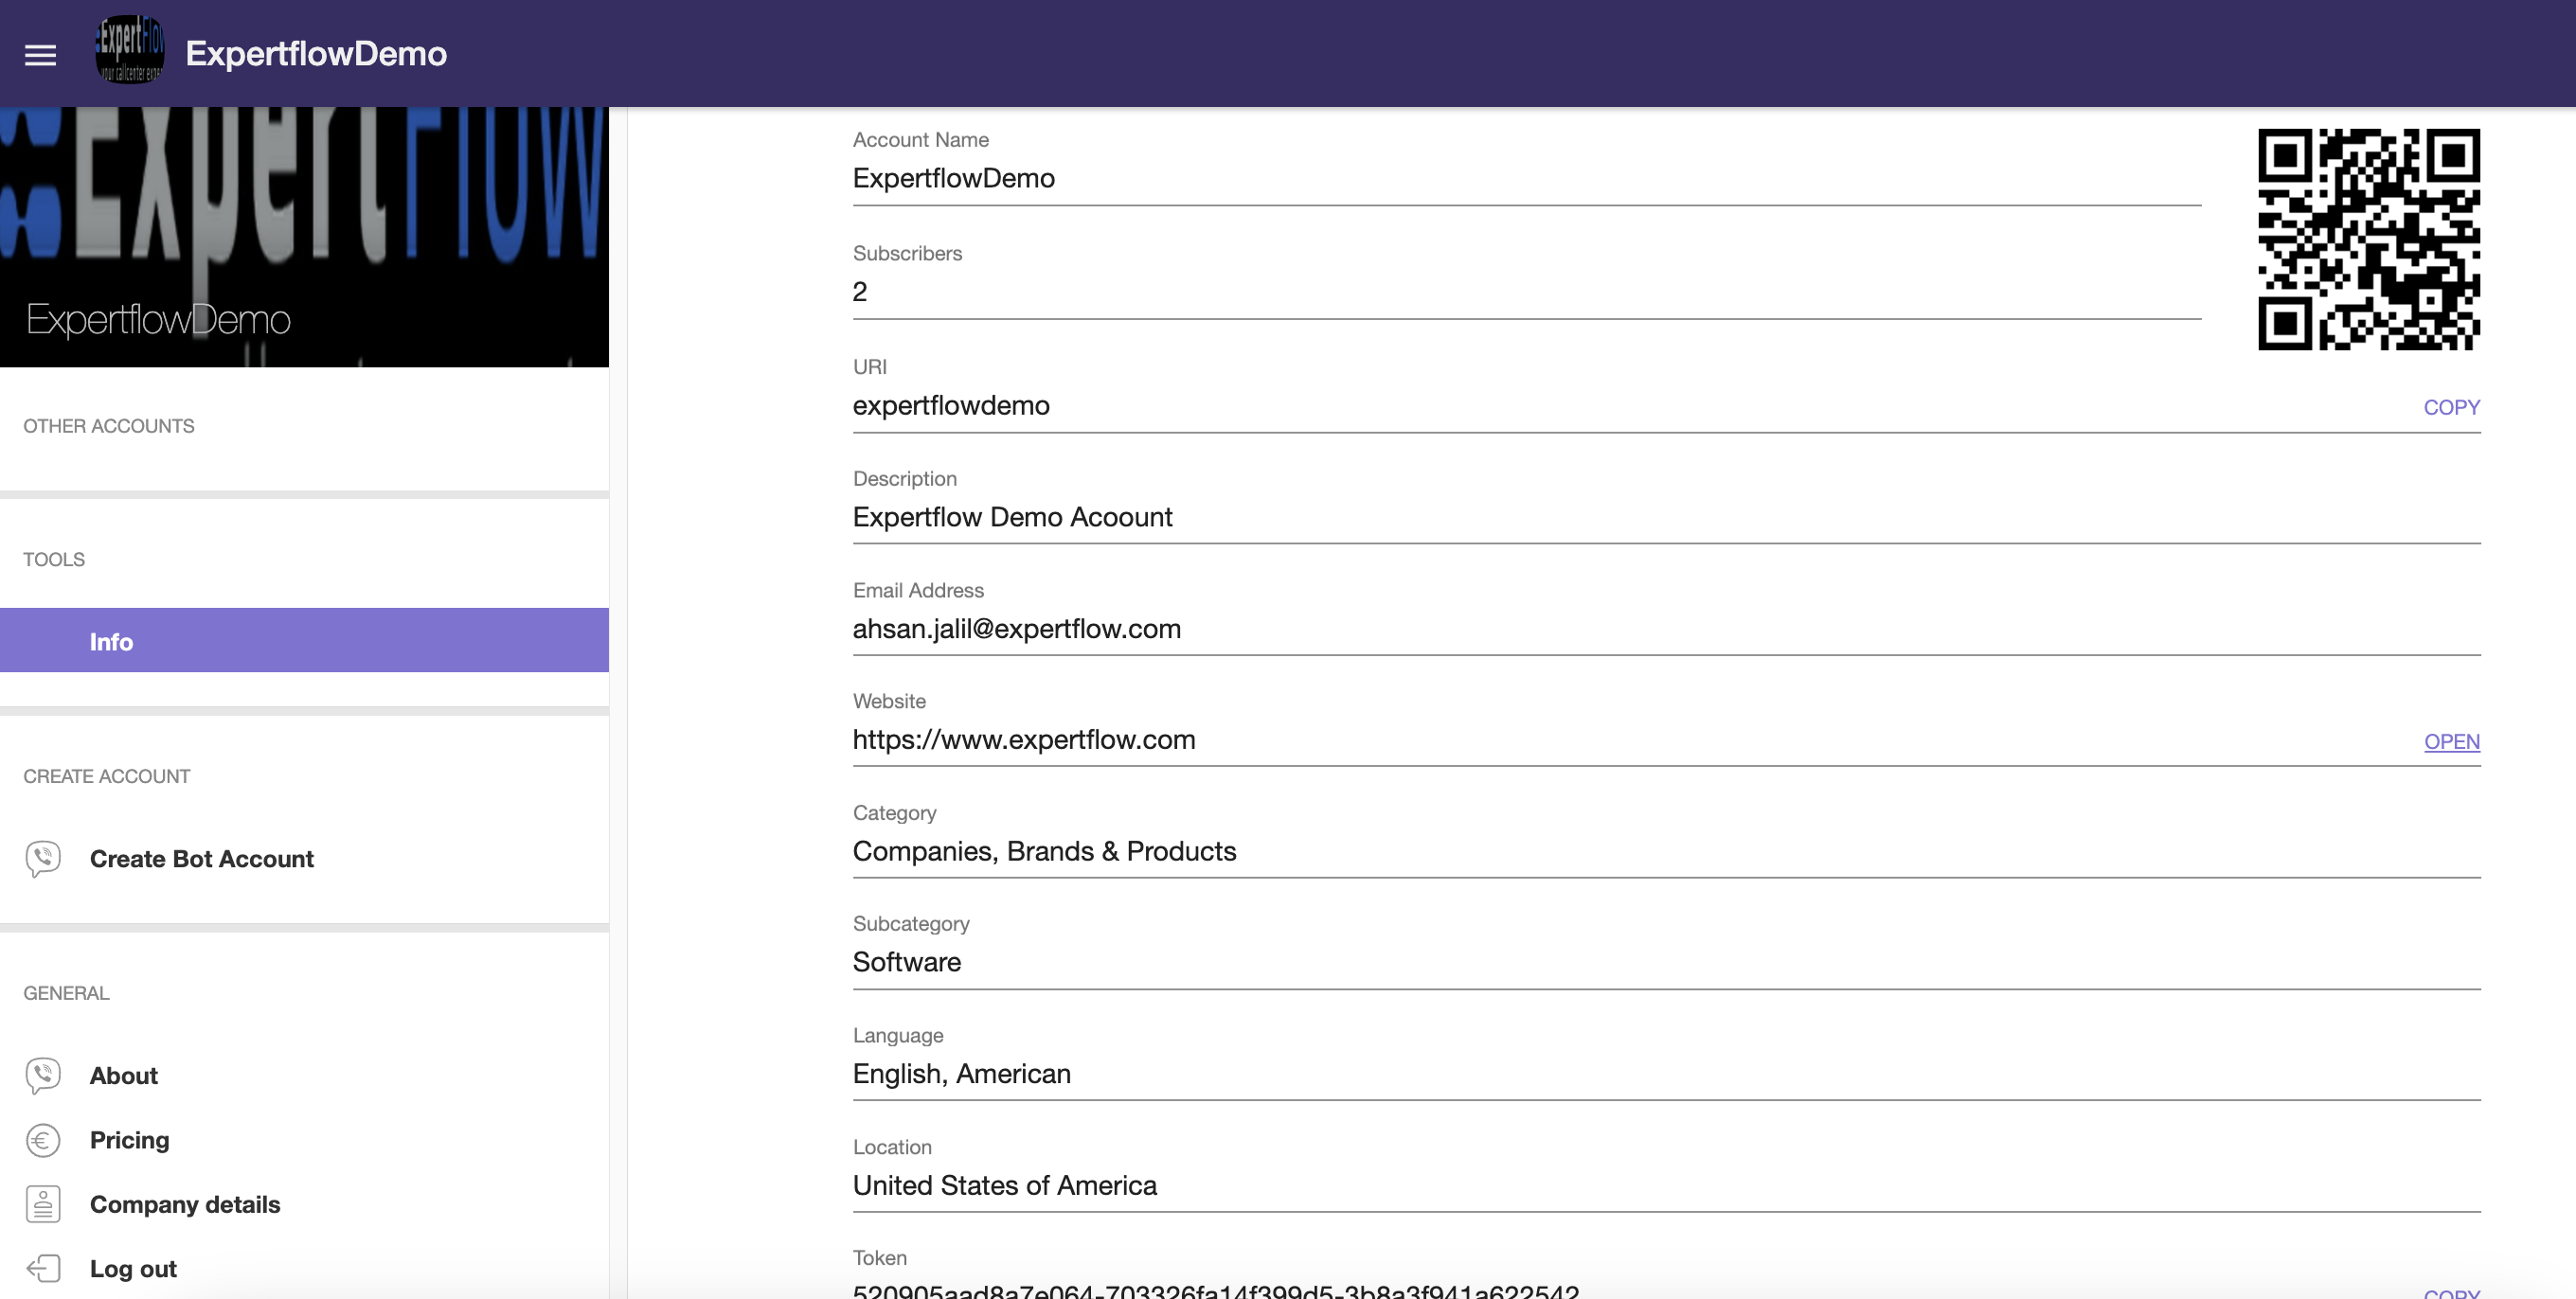
Once created, it will assign you a unique “Token” that you can save for later use. However, it can still be accessed again from “Info” menu on the left or by selecting your account from top left menu.
Once bot is created, you can now open you Viber Mobile App, Select “More” from the bottom menu bar, Select “QR Code Icon” from the top right of the screen which opens. Scan the code of your bot account from your admin panel (as shown in the image above). Once scanned, you will be able to see your bot named account and you can chat with it from here.
For the first time, when you access it, it will show you an icon of “publish” on your bot. Select this icon to publish your bot as well. Please note here that by default, our bot will not show up in the search results because it’s a PAID feature. However, we can still able to access our account via QR code as we have mentioned above.
Unified Admin Configuration
In our CX Hybrid Chat application, we need to setup viber same like we setup any other connector. The detailed setups are mentioned below.
Channel Type
-
VIBER channel type should be already shown in the list here. If not please add one.
-
Select the MRD as CHAT for general chat feature or any other specifically created for VIBER.
-
Upload the icon (if not already uploaded)
-
Save
Channel Provider
-
Set any name i.e. Viber Provider.
-
Select Channel Type as “VIBER”.
-
Set “Provider Webhook” field as “<FQDN>/viber-connector”. E.g. https://cim.expertflow.com/viber-connector.
-
Add 2 Attributes as Custom Attributes
-
VIBER-TOKEN (String2000)
-
VIBER-ACCOUNT-NAME (String2000)
-
-
Save
Channel Connector
-
Set any name i.e. Viber Connector.
-
Select Channel Provider as “Viber Provider”.
-
In VIBER-TOKEN field, paste the Viber Token from the Viber Admin Panel → Bot Account → Info.
-
In VIBER-ACCOUNT-NAME field, paste the Viber Account Name from the Viber Admin Panel → Bot Account → Info.
-
Save.
Channel
-
Click on Viber to expand the panel and click on “Add new Channel”.
-
Set any name i.e. Viber.
-
Set ServiceIdentifier as “Account URI” from the Viber Admin Panel → Bot Account → Info. (Case sensitive)
-
Select the Bot from the drop down list.
-
Select “Viber Connector” from Channel Connector drop down list.
-
Set 180 as Customer Inactivity Timeout (sec). (You can change it as per your need)
-
Set ChannelMode as HYBRID.
-
Set Routing Mode as PUSH or PULL (As required).
-
Set Queue or List (As required).
-
Set Agent Selection Policy as LONGEST AVAILABLE.
-
Set 180 as Agent Request TTL (sec). (You can change it as per your need)
-
Save.
Setup Webhook
Once the Viber account is setup and Configurations on unified admin is already finished with working viber-connector on some instance, then we need to setup the webhook.
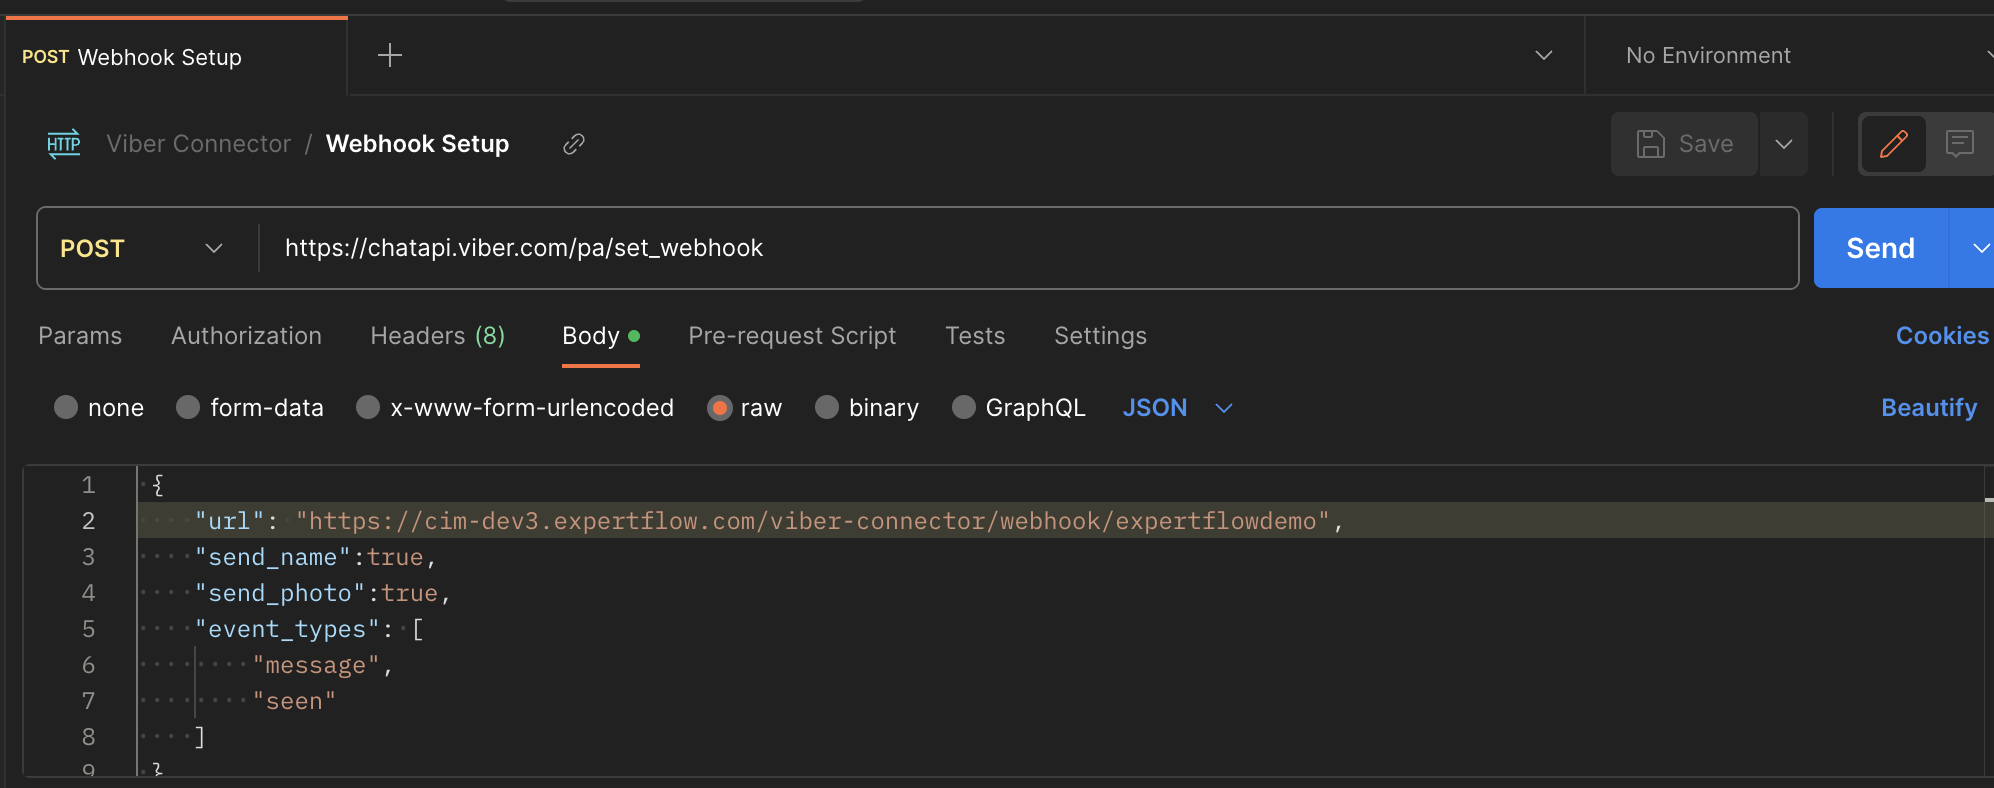
Snapshot is shown below:
Post Header
Add the below mentioned key value in the header of this post request. The token would be same as it is shown in the homepage of viber admin account (Viber Admin Panel → Bot Account → Info.)
Key: X-Viber-Auth-Token
Value: <viber-token>
Post Url
https://chatapi.viber.com/pa/set_webhook
Post Body
-
url will contain 2 parts.
-
https://cim-dev3.expertflow.com/viber-connector/webhook (This is the FQDN and the ENDPOINT of the API we have created to receive webhook in our connector)
-
/expertflowdemo (This is the Account URI of your Viber Bot Account through which it can be identified uniquely)
-
Post Response
If you receive a response with status equals 0 it means webhook is configured successfully on all the events. If status not equals to 0 then it means there is some issue. You can consult these error codes to identify the issue in this case.
After successfull webhook registration, you should be able to receive the chats on your viber connector and it should flow further to Hybrid Chat Agent accordingly.
For any other feature or details, please visit Viber documentation.