Solution Prerequisites
Installation Steps
The Internet should be available on the machine where the application is being installed and connections on port 9242 should be allowed in the network firewall to carry out the installation steps. All the commands start with a # indicating that root user privileges are required to execute these commands. Trailing # is not a part of the command.
Configure Log Rotation
Add the following lines in /etc/docker/daemon.json file (create the file if not there already) and restart the docker daemon using systemctl restart docker. Perform this step on all the machines in the cluster in case of HA deployment.
|
|
Installing Application
-
Download the deployment script deploy-wallboard.sh and place it in the
/rootdirectory. This script will:-
delete the wallboard directory in the present working directory if it exists.
-
clone the wallboard repository from GitLab in the present working directory.
-
-
To execute the script, give it the execute permissions and execute it.
# chmod +x deploy-wallboard.sh
# ./deploy-wallboard.sh
-
Create two databases in your DB server corresponding to the wallboard and umm. This step is only required if you're using your own DB server/cluster. If you're using the built-in MSSQL database server, you don't need to do anything.
-
Update environment variables in the following files inside
/root/wallboard/docker/environment_variablesfolder.-
common-variables.envName
Description
Do not change the default values for non-HA deployment OR if you want to use the built-in database. For HA, use SQL server cluster settings instead of the defaults. If you want to use your own MSSQL instance anyway, update the following variables accordingly.
DB_URLWallboard database connection url
For example:
-
jdbc:jtds:sqlserver://<MACHINE-IP or FQDN>:PORT/db_name
-
jdbc:jtds:sqlserver://<MACHINE-IP or FQDN>:PORT/db_name;instanceName=SomeInstance
DB_USERdatabase user
DB_PASSWORDdatabase password
DB_DRIVERJDBC driver e.g., net.sourceforge.jtds.jdbc.Driver
DB_DIALECTDatabase dialect e.g., org.hibernate.dialect.SQLServer2008Dialect
CISCO_TYPE
The cisco type of solution .It is either "uccx" or "ucce"
SSO_ENABLEDSingle sign on facility, its value is either "true" or "false"
-
-
umm-variables.envRefer to this document for configuration details
-
synchronizer-variables.envName
Description
CC_TYPEDecides whether Cisco contact center is UCCX or UCCE
Holds string "UCCX" for UCCX and "UCCE" for UCCE. Default is UCCX
REDUNDANT_DEPLOYMENTDecides if synchronizer deployment is redundant. Set it to "true". Holds strings "true" or "false". Default is false
INSTANCE_NAMEUsed for differentiation of instances when deployed redundant, could be any string. It should be different on both machines.
SYNC_AGENTSTo enable Agent sync set it to "true", default is true
SYNC_AGENTS_STATSEnables/disables agents stats sync, default is true
SYNC_AGENTS_EMAIL_STATSEnables/disables agent email stats, default is false
SYNC_QUEUES_STATSEnables/disables queue stats, default is true
SYNC_QUEUESEnables/disables queues/skillgroups in case of UCCE, default is true
DB_RETRY_ATTEMPTS
Defines how many times will try to acquire a new Connection from the database before giving up. By default is it set to 1.
DB_TIMEOUT_CONNECTION
Sets the database connection timeout period after which an idle connection is removed from the pool. default is 1800 ie.(30 min)
Following variables are used when CC_TYPE = "UCCX"
UCCX_PUB_IPPrimary UCCX IP
UCCX_PUB_USERNAMEPrimary UCCX admin username
UCCX_PUB_PASSWORDPrimary UCCX admin password
UCCX_SUB_USERNAMESecondary UCCX admin username
UCCX_SUB_PASSWORDSecondary UCCX admin password
UCCX_DB_USERNAME
hruser user name
UCCX_PUB_DB_PASSWORDPrimary UCCX database reporting user (hruser) password
UCCX_SUB_DB_PASSWORDSecondary UCCX database reporting user (hruser) password
UCCX_REAL_TIME_PORTUCCX real-time APIs port, default is 9080
SLA_FORMULA#1 = (Calls Answered/ Calls presented)*100 (updated after every 5 sec)
#2 = (Calls Answered met SL/ Calls presented)*100 (updated after every 5 mins)SLA_Decimal#true = (The SLA value will be displayed for up to 2 decimal points).
#false = (The SLA value will be rounded off.)CCX_API_TIMEOUT
Defines the timeout for CCX APIs in milliseconds, default is 3000 milliseconds. A value of 5000 milliseconds is recommended.
Following variables are used when CC_TYPE = "UCCE"
CCE_DB_URLUCCE awdb database URL
jdbc:jtds:sqlserver://192.168.1.87:1433/ucce_awdb
CCE_DB_USERCCE database user
CCE_DB_PASSWORDCCE database password
TZ
The timezone of UCCE e.g. Asia/Karachi
CCX_AGENT_STATE_REST_OPERATION
post= For running real-time API via POST method
get= For running real-time API via GET method
if this variable is not available in the environment file, it will be running via GET method
-
-
The following configuration must be done at UCCX. This will allow the UCCX System to write real-time data to tables that Synchronizer uses to fetch for gadgets. This step is not needed for UCCE deployments.
-
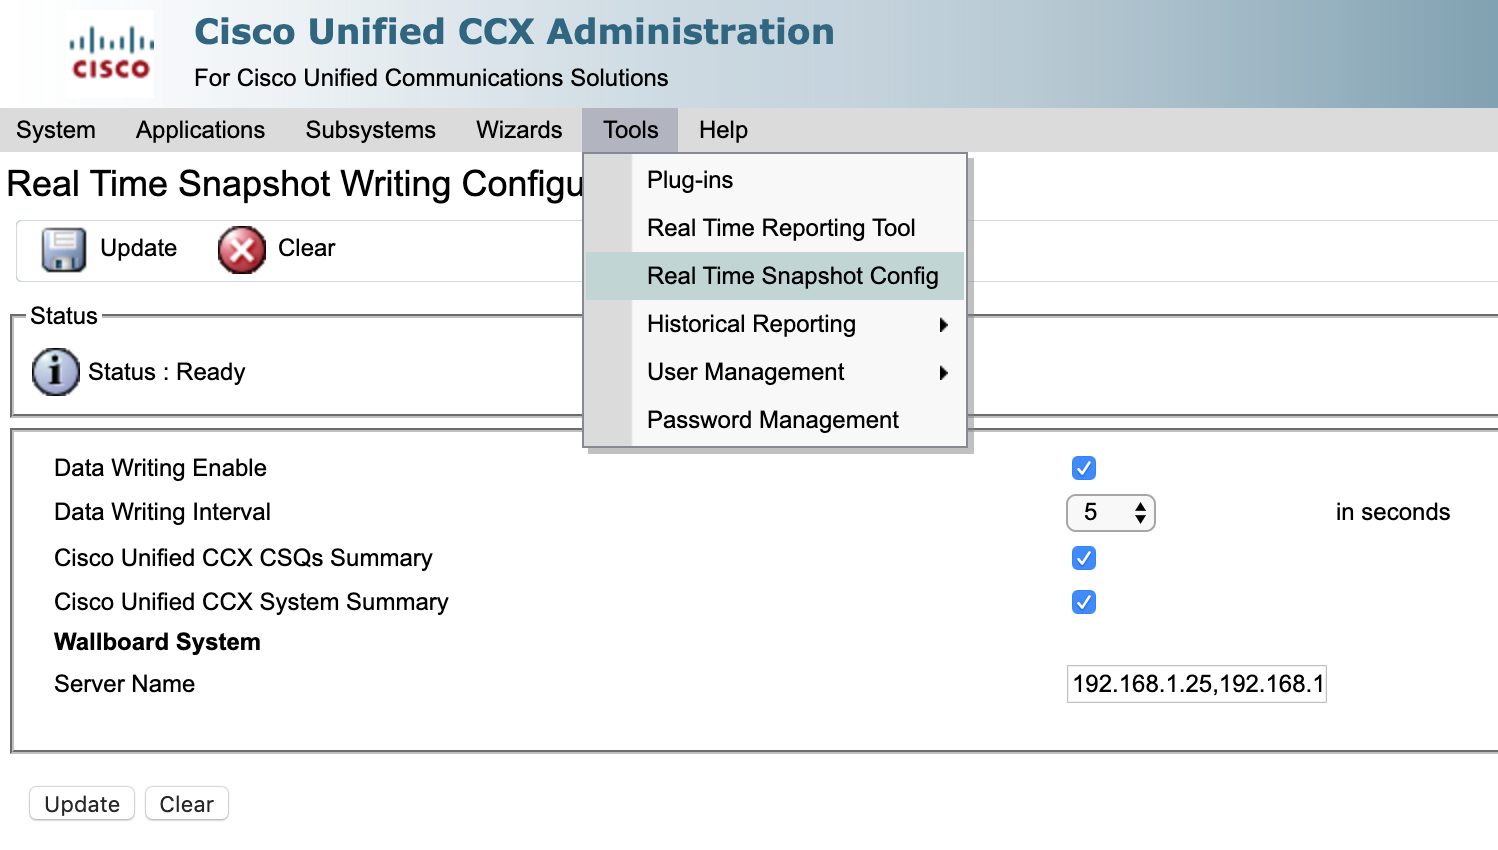
Go to Tools > “Real-Time Snapshot Config” on UCCX Administration UI.
-
Enable all three checkboxes
-
Select “5” from the dropdown against “Data Writing Interval”
-
Provide the IP addresses of the machine where Synchronizer will run (comma separated IPs in case of HA, otherwise only one IP) separated by commas in the field against “Server Name” under the "Wallboard System".
-
Click on the update button.
-
-
Get domain/CA signed SSL certificates for wallboard FQDN/CN and place the files in
/root/wallboard/docker/certificatesfolder. The file names should beserver.crtandserver.key. -
Update the translation files inside
/root/wallboard/docker/translationsfolder for multilingual UI. The file names in the translation folder should remain unchanged. -
Having environment configurations done, copy the wallboard directory on the second machine in
/root thedirectory using the following command. (Only for HA deployment)# scp -r /root/wallboard root@<machine-ip>:/root/
-
Having copied the wallboard directory to the second machine, got to /root/wallboard/docker/environment-variables and update the INSTANCE_NAME variable in synchronizer-variables.env. Set it to any value other than the value that is set in the first machine. It will differentiate the two VMs as only one synchronizer service will be active. If one goes down, the other starts synchronizing data from UCCE/UCCX. (Only for HA deployment)
-
Execute the following commands inside /root/wallboard directory on both machines (if in HA, otherwise on the only machine in the cluster).
# chmod 755 install.sh
# ./install.sh
-
Run the following command to ensure that all the components are up and running. The screenshot below shows a sample response for a standalone non-HA deployment.
# docker ps
Virtual IP configuration (Only for HA deployment)
Repeat the following steps for all the machines in the HA cluster.
-
Download keepalived.sh.sh script and place it in
/rootdirectory. -
Give execute permission and execute the script:
# chmod +x keepalived.sh
# ./keepalived.sh
-
Configure keep.env file inside
/root/keep-alivedfolderName
Description
KEEPALIVED_UNICAST_PEERSIPs of the machines in the cluster. On each machine, this variable should have a list of IPs of all the other machines in the cluster. The format of the list is as below:
"#PYTHON2BASH:['192.168.1.76','192.168.1.80']"KEEPALIVED_VIRTUAL_IPSVirtual IP of the cluster. It should be available in the LAN. For example: 192.168.1.245
KEEPALIVED_PRIORITYThe priority of the node. Instances with lower numbers will have a higher priority. It can take any value from 1-255.
KEEPALIVED_INTERFACEName of the network interface with which your machine is connected to the network. On CentOS,
ifconfigorip addr shwill show all the network interfaces and assigned addresses.CLEARANCE_TIMEOUTCorresponds to the initial startup time of the application in seconds which is being monitored by keepalived. A nominal value of 60-120 is good enough
KEEPALIVED_ROUTER_IDDo not change this value.
SCRIPT_VARThis script is continuously polled after 2 seconds. Keepalived relinquishes control if this shell script returns a non-zero response. For wallboard, it should be:
pidof dockerd && wget -O index.htmlhttps://localhost/umm/base/index.html
-
Give the execute permission and execute the script:
# chmod +x keep-command.sh
# ./keep-command.sh
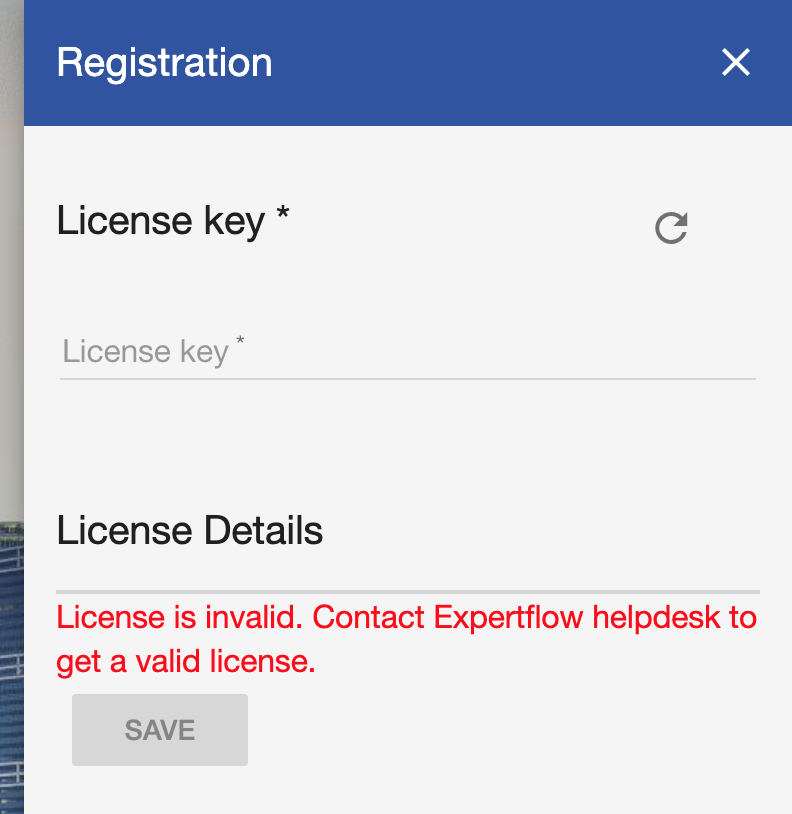
Adding License
-
Browse to https://FQDN/umm in your browser (FQDN will be the domain name assigned to the IP/VIP).
-
Click on the red warning icon on right, paste the license in the field and click save.
-
Go to https://FQDN to access the wallboard front-end. (FQDN will be the domain name assigned to the VIP).
-
Go to Data Service on the left side menu to define data services. There will be three data services named Agent Service, Queue Service & Call Type with the following URLs.
https://FQDN/agent-service and https://FQDN/queue-service.

Uninstalling
To uninstall the application completely, execute the following commands.
|
|
Troubleshooting
-
To update any changes in the environment variables and/or compose file, simply execute the install script again:
/root/wallboard/install.sh
-
To restart the whole stack completely, execute the following commands:
# docker-compose -f /root/wallboard/docker/docker-compose.yml down
# /root/wallboard/install.sh
Synchronizer Patch 13.7.4: Synchronizer Improvements
This patch applies performance improvements and handling connection timeouts gracefully.
Apply the following steps to set database timeout and retry attempts configuration configurations.
-
Stop the current release services by executing the following command inside the
current-release-deployment-dir/wallboard/directory.# docker-compose down
-
Open synchronizer-variables.env in path
/root/wallboard/docker/environment_variablesfolder and add the following variables.Name
Description
CCX_SSL
#Boolean (true or false)
#if set to true it will append https:// to all ccx apis
#if set to false it will append http:// to all ccx apis
#Default is set to false
-
Open docker-compose.yml file in current-release-deployment-dir/wallboard/docker directory and update the following tags:
#Synchronizer
gitlab.expertflow.com:9242/wallboards-dashboards/synchronizer:13.7.4
# agent-service
gitlab.expertflow.com:9242/wallboards-dashboards/wallboard-microservices/agent-backend:13.4.1
# queue-servicegitlab.expertflow.com:9242/wallboards-dashboards/wallboard-microservices/queue-backend:13.4.3
-
Execute the following commands inside the
current-release-deployment-dir/wallboard/directory../install.sh
-
Run the following command to ensure that all the components are up and running.
dockerps