Solution Prerequisites
Hardware Sizing
For a simplex (single server) deployment, minimum and recommended hardware requirements are as following:
|
|
Minimum |
Recommended |
|---|---|---|
|
vCPU |
2 Cores |
4 Cores |
|
vRAM |
4 GB |
8 GB |
|
vDisk |
20 GB |
500 GB |
For a redundant deployment, two servers of the same specifications (as mentioned above) are needed.
Software Requirement
|
Microsoft Windows Server 2012 standard Edition x64 R2 |
A Windows Server 2012 R2 64-bit or above is recommended |
|---|---|
|
Locale Settings |
English (recommended) |
|
Java Runtime (64 bit) |
Java Runtime (JRE) 8 is required |
|
Antivirus |
Any of the antivirus as mentioned in Software License Requirements |
|
WinRAR |
A package extractor to modify embedded configuration properties |
|
.Net Framework |
.Net Framework 4.5.2 for Service Manager |
Browser Requirement
Port Utilization
Following ports should remain open on the Firewall. The local security policy and any antivirus should also allow open communication on the following ports:
|
Type |
Source Host |
Source Port |
Destination Host |
Destination Port |
|---|---|---|---|---|
|
TCP |
<Client Application> |
any |
EF Connector |
61616/61614 |
|
TCP |
EF Connector (B) |
any |
EF Connector |
61616/61614 |
|
HTTP |
For status monitoring from any machine |
EF Connector |
8162 |
|
|
XMPP |
EF Connector |
any |
Cisco Finesse |
5222, 5223, 7071, 7443 |
|
HTTP/S |
EF Connector |
any |
Cisco Finesse |
80, 8080, 443, 8443 |
|
NTP |
EF Connector |
any |
NTP Server |
123 |
|
DNS |
EF Connector |
any |
DNS Server |
53 |
-
<Client Application> is a machine running client application of EF Connector. For server based applications like Siebel, it’s Siebel Communication Server. For desktop based applications, it’s the machine address of the agent desktop running the desktop application.
-
In a redundant deployment, both EF Connector instances communicate with each other on the same TCP OpenWIre port 61616. In the table above, it’s mentioned as EF Connector (B) ⇒ EF Connector.
-
These are defaults set in EF Connector, but you can always change the default configuration.
If you need to file sharing and remote installation / configuration using RDP, you might need to open the following additional ports:
|
Type |
Source Host |
Source Port |
Destination Host |
Destination Port |
|
RDP |
For remote desktop connection |
EF Connector |
3389 |
|
|
TCP |
For file-sharing |
EF Connector |
139,445 |
|
|
UDP |
For file-sharing |
EF Connector |
137,138 |
|
System Access Requirements
-
Administrative access (LocalSystem account or domain administrator) on the Connector Server is required to do the installation and configuration.
Time Synchronization Requirements
An important consideration is time synchronization between related components. Communication between EF Connector, client applications and Cisco Finesse carry timestamps. If the system dates and time are not synchronized the system can produce unpredictable results. Therefore, please make every effort to adhere to the following time synchronization guidelines:
EF Connector, client applications and Cisco Finesse should have their Time Zone and time configured properly according to the geographic region and synchronized. To configure the time zone, please see the instructions from the hardware or software manufacturer of NTP server. Client applications and EF Connector should be synchronized to the second. This synchronization should be maintained continuously and validated on a regular basis. For security reasons, Network Time Protocol (NTP) V 4.1+ is recommended.
Deployment Modes
For Generic Connector we support 2 modes of deployment, Non - Redundant / Simplex Mode and High Availability Duplex Mode
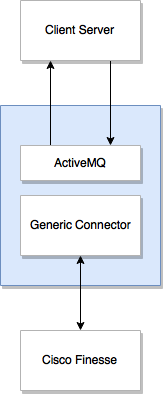
Non-Redundant / Simplex Mode Deployment
In simplex deployment, the application is installed on a single server with no failover support of EF Connector. However, the same EF Connector can still communicate with primary and secondary Finesse servers.
Simplex mode is useful for lab tests and commercial deployments at a smaller scale. Figure below explains the simplex mode of Generic Connector.
High Availability (HA) / Duplex Deployment
In Duplex mode, there are two types of supported configurations.
|
Active-Passive |
A primary/secondary configuration setup where one Connector works as a primary server while the other (secondary) is available as a stand-by server (from a Disaster Recovery site) |
|
Active-Active |
In this mode, both Connector instances are active and serving clients and one instance serves as the backup / secondary for the other. |
Active-Passive (Primary / Secondary) Setup
To configure the Connector in Active-Passive mode, set the value of attribute “GRC_CONSUMER_PRIORITY” in Connector configuration. For the Primary Connector, set the value of this attribute to “127” (without quotes). For the Secondary Connector, set the value of this attribute to “100” (without quotes).
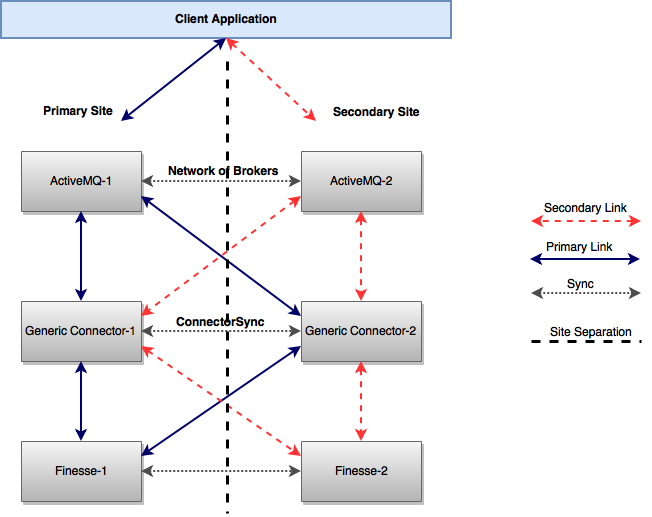
The active-Passive mode has the following configurations.
Configurations for Site-1
Primary-AMQ: broker-1, Secondary-AMQ: broker-2
Generic Connector Configuration should look like this, For a detailed description of the GC please consult properties
|
Property |
Value |
|
ActiveMq_Timeout |
10000 |
|
GRC_CONSUMER_PRIORITY |
127 |
|
RANDOMIZE |
false |
|
PRIORITY_BACKUP |
true |
|
ActiveMq_URL_1 |
primary-url-of-amq:port |
|
ActiveMq_URL_2 |
secondary-url-of-amq:port |
Configurations for Site-2
Primary-AMQ: broker-1, Secondary-AMQ: broker-2, For a detailed description of the GC please consult properties.
|
Property |
Value |
|
ActiveMq_Timeout |
10000 |
|
GRC_CONSUMER_PRIORITY |
100 |
|
RANDOMIZE |
false |
|
PRIORITY_BACKUP |
true |
|
ActiveMq_URL_1 |
primary-url-of-amq:port |
|
ActiveMq_URL_2 |
secondary-url-of-amq:port |
Failover Scenarios
The following table shows different failover scenarios and their impact on the Connector Clients.
|
No. |
Scenario |
Behavior |
|
1 |
AMQ-1 is down while GC-1 is active |
AMQ-2 will take over. GC-1 will automatically connect to AMQ-2 and all client requests will be processed by the same GC-1 instance because of its higher consumer priority. Request Flow: Client-App → AMQ-2 → GC-1 Response Flow: GC-1 → AMQ-2 → Client-App |
|
2 |
AMQ-2 and GC-1 are down while AMQ-1 and GC-2 are up |
AMQ-1 will take over and all client requests will be processed by GC-2 because it has the second-highest priority after GC-1. Request Flow: Client-App → AMQ-1 → GC-2 Response Flow: GC-2 → AMQ-1 → Client-App |
|
3 |
Both AMQ-1 and GC-1 are down |
AMQ-2 and GC-2 will start receiving requests. GC-2 will acquire all agent’s XMPP subscriptions and will start processing requests. Request Flow: Client-App → AMQ-2 → GC-2 Response Flow: GC-2 → AMQ-2 → Client-App |
|
4 |
GC-1 restores |
GC-1 will start receiving requests and will grab the XMPP connection of all the active agents because of its higher consumer priority. GC-2 will again be in stand-by mode. |
|
5 |
The link between Connector-1 and Connector-2 is down |
In this case, the AMQ network of brokers will not be functional and GCs won’t be able to communicate to sync agents either. So, both GCs will be functioning independently |
|
6 |
AMQ-1 restores while GC-1 is still down |
If AMQ-2 is active and the client application is connected to AMQ-2 then all requests will be processed by GC-2 even though GC-1 is active and connected to AMQ-1. Request Flow: Client-App → AMQ-2 → GC-2 Response Flow: GC-2 → AMQ-2 → Client-App |
|
7 |
GC-1 is down while both AMQs are active |
Requests will be processed by GC-2 going through the network of brokers. Request Flow: Client-App → AMQ-1 → AMQ-2 → GC-2 Response Flow: GC-2 → AMQ-2 → AMQ-1 → Client-App |
|
8 |
GC-2 is down while both AMQ are active |
In active-passive mode, it will have no effect on request and response flow. Because AMQ-2 doesn’t get any request from Client-App until AMQ-1 goes down. |
Failover is handled in a way if any component goes down, passive components take over in a seamless way.
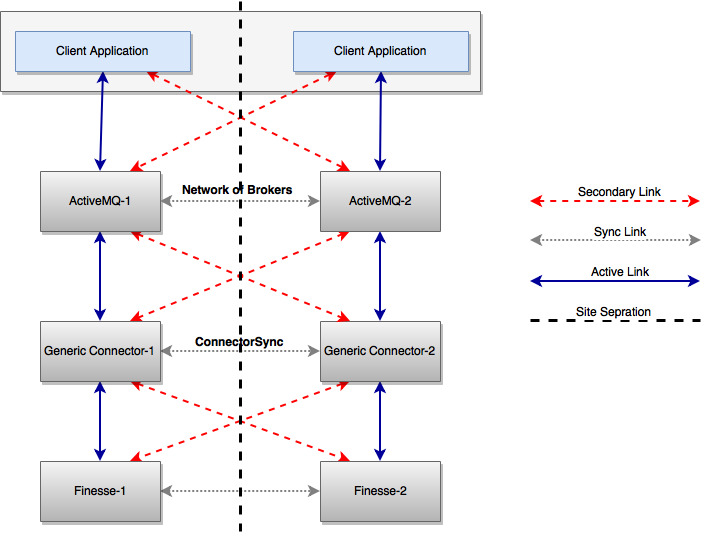
Active-Active Setup
For an Active-Active deployment, the Failover URL is set to use the local AMQ as primary and remote AMQ as secondary.
For GC-1, the configuration would look like this, For a detailed description of the GC please consult properties
|
Property |
Value |
|
ActiveMq_URL_1 |
[AMQ-1]:61616 |
|
ActiveMq_URL_2 |
[AMQ-2]:61616 |
|
GRC_CONSUMER_PRIORITY |
127 |
|
PRIORITY_BACKUP |
true |
|
Finesse_1 |
http://Finesse-1/finesse/api/ |
|
SERVER_ADDRESS_1 |
Finesse-1 |
|
Finesse_2 |
http://Finesse-2/finesse/api/ |
|
SERVER_ADDRESS_2 |
Finesse-2 |
For GC-2, the configuration would look like this, For a detailed description of the GC please consult properties
|
Property |
Value |
|
ActiveMq_URL_1 |
[AMQ-2]:61616 |
|
ActiveMq_URL_2 |
[AMQ-1]:61616 |
|
GRC_CONSUMER_PRIORITY |
100 |
|
PRIORITY_BACKUP |
true |
|
Finesse_1 |
|
|
SERVER_ADDRESS_1 |
Finesse-2 |
|
Finesse_2 |
|
|
SERVER_ADDRESS_2 |
Finesse-1 |
Where [AMQ-1] should be replaced with the IP / machine-name of ActiveMQ-1 and [AMQ-2] should be replaced with the IP / machine-name of ActiveMQ-2. Finesse-1 is the IP/name of the Finesse-1 server and Finesse-2 is the IP/name of the Finesse-2 server.
Both Connectors will have its local AMQ as primary brokers and both Connector instances will be serving agents' requests in parallel. All client requests received by Connector-1 are handled by Connector-1 and all requests received by Connector-2 will be handled by Connector-2. In case of failure of any component at any Connector instance, the other Connector instance will take over and handle the request.
We have achieved it using ActiveMQ configurable properties specifically Consumer priority, Priority Backup, and building a Connector Sync mechanism in Generic Connector.
Failover Scenarios
|
No. |
Scenario |
Behavior |
|
1 |
AMQ-1 is down while GC-1 is active |
AMQ-2 will take over and all client requests will be processed by the same GC-1 instance because of its higher consumer priority. |
|
2 |
Both AMQ-1 and GC-1 is down |
AMQ-2 and GC-2 will start receiving requests. GC-2 will acquire all agent’s XMPP subscriptions and will start processing requests. |
|
3 |
GC-1 restores |
Connector-2 will continue to process requests until connectivity between the Client application and Connector-2 is lost or Connector-2 is down. |
|
4 |
The link between Connector-1 and Connector-2 is down |
Both connector instances serve requests independently. |
|
5 |
AMQ-1 restores while GC-1 is still down and AMQ-2 is also down |
The client will send a request to AMQ-1. AMQ-1 will send the request to GC-2 because GC-1 is down. Request Flow: Client-App-1 → AMQ-1 → GC-2 Response Flow: CGC-2 → AMQ-1 → Client-App-1 |
|
6 |
GC-1 is down while both AMQ are active |
The request flow will be the same as no. 5 |
|
7 |
GC-2 is down while both AMQ are active |
AMQ-2 requests will be redirected to AMQ-1 and GC-1 will handle all requests. Request Flow: Client-App-2 → AMQ-2 → AMQ-1 → GC-1 Response Flow: GC-1 → AMQ-1 → AMQ-2 → Client-App-2 |
Installation
Note that the screenshots in this guide may not be up-to-date and may show older version. Please make sure that the file you download is of the desired version, i.e. 4.0.
-
Download EF Connector Installer
-
Run the setup wizard GenericConnector 4.0.exe to start the installation process. The .exe file when runs may show an older version on the installer. You may ignore that but make sure that you use the latest version, i.e. 4.0.

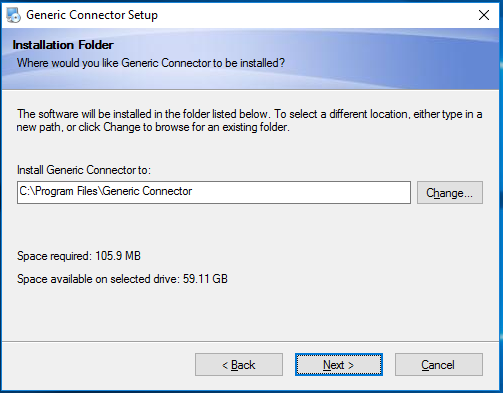
-
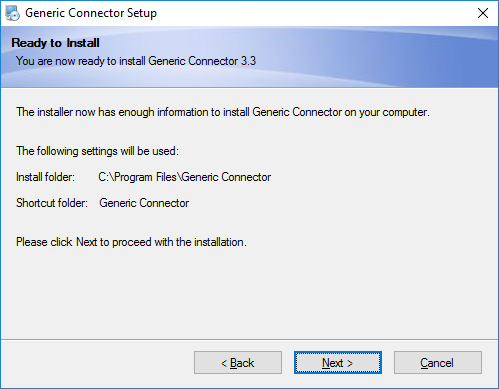
Now, select a location to install the software. The default path is C:\Program Files\Generic Connector. The specified path is mentioned as <EF Connector Home> in the rest of the document.
-
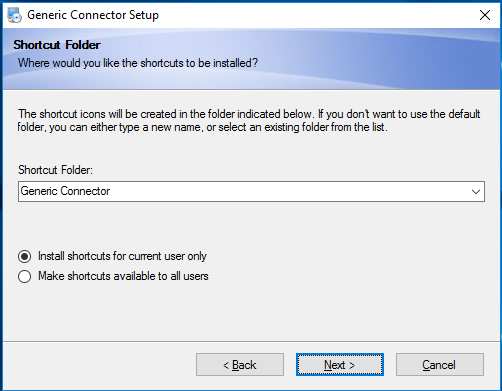
Select the folder for shortcut in Start Menu
-
Review your selection and if all is okay, proceed with installation.
-
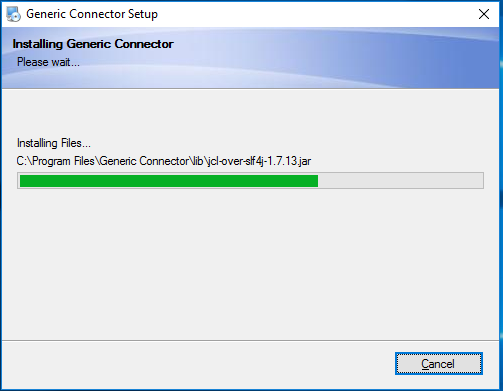
The installation wizard will copy all the files to the selected folder.
-
-
Press finish to close this setup wizard.
-
Upon successful completion, EF Service Manager app is installed with a shortcut created on the Desktop.

Note
Note that after installing Generic-Connector4.0.exe successfully, you must need to upgrade the Software to version 4.4
Upgrade Software
Click here to upgrade the software
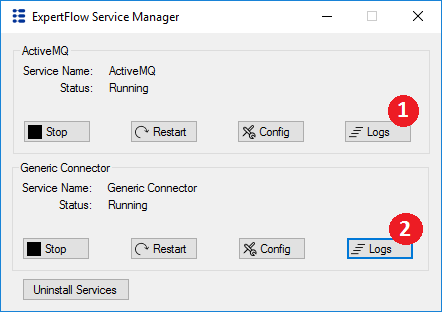
EF Service Manager
EF Service Manager is a mini management console to:
-
Install / Uninstall Services
-
Start / Stop ActiveMQ
-
Start / Stop Generic Connector
-
Open ActiveMQ configuration file
-
Open Generic Connector configuration
-
Open ActiveMQ logs folder
-
Open Generic Connector logs folder
Proceed with installing the application as a service and do any necessary configuration using EF Service Manager.
Install Windows Services
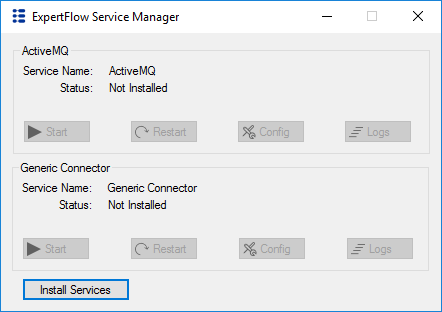
Run EF Service Manager from the Desktop shortcut. The Service Manager shows the status of all of the Connector services. Click on “Install Service” to install both ActiveMQ and Generic Connector services. Once the services are installed, you will be able to configure and use these services.
After clicking on Install Service, if the services installed correctly, it will prompt a success message or display an error message in case of any issue.
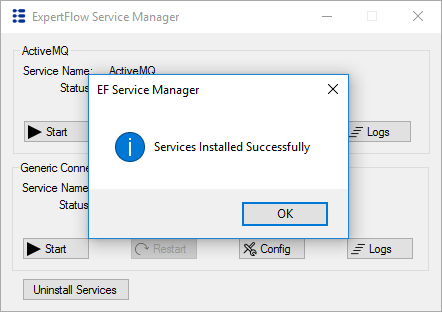
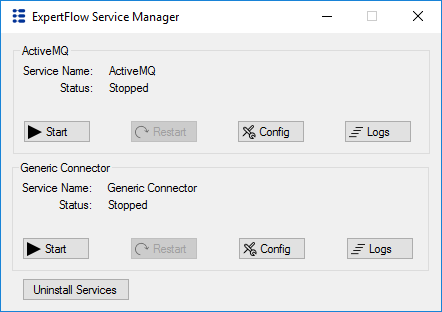
The panel will look like the following after successful service creation.
Manage Services
-
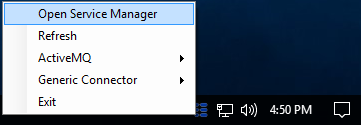
Run Service Manager from the desktop (if it is not running). You can locate Service Manager from system tray
-
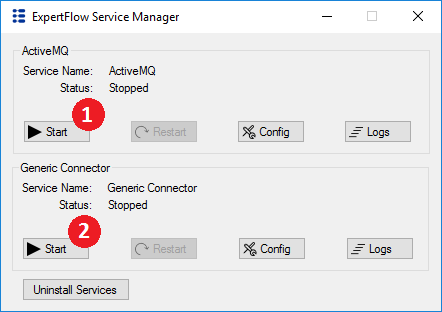
Run both Services, one after the other.
-
To validate if ActiveMQ is running, login to the web-console via http://broker-[x]-ip:[web-console-port] with the default credentials [admin/admin] or as per your configured credentials. Reference ActiveMQ Web Console Configuration
-
In the Queue section, you should find a Queue name Connector1 created.
-
You can also verify ActiveMQ and GenericConnector from their log files by clicking on the Logs button in both Sections.
ActiveMQ Configuration (Redundant Deployment Only)
ActiveMQ “Config” button opens the ActiveMQ configuration file %ACTIVEMQ%/conf/activemq.xml in your default text editor (e.g. notepad).
Configuring Network of Brokers
Settings for a network of brokers are mandatory for redundant deployment only. These configurations should however be done on one-side only.
ActiveMQ brokers should be configured to run as a network of brokers to communicate with each other both for Active-Active and Active-Passive deployment models.
In activemq.xml, the “Network of Broker” configuration (<networkConnectors>...</networkConnectors>) is commented. Uncomment this tag and specify URI of the other broker to connect to. There are 2 instances of <networkConnector> (i) for Queues, (ii) for topics, where you need to set the value of uri parameter specifying other broker’s (site-B) address.
Note: Make sure that the configurations are active only one one side. On the other side, it should remain commented out.
This commented tag looks like following in activemq.xml file:

The URI on site-A should point to site-B URI “static:(tcp://SITE-B:PORT)” to configure it in network bridge mode.
For more information about configuring a network of brokers, see this article.
ActiveMQ Web Console Setup
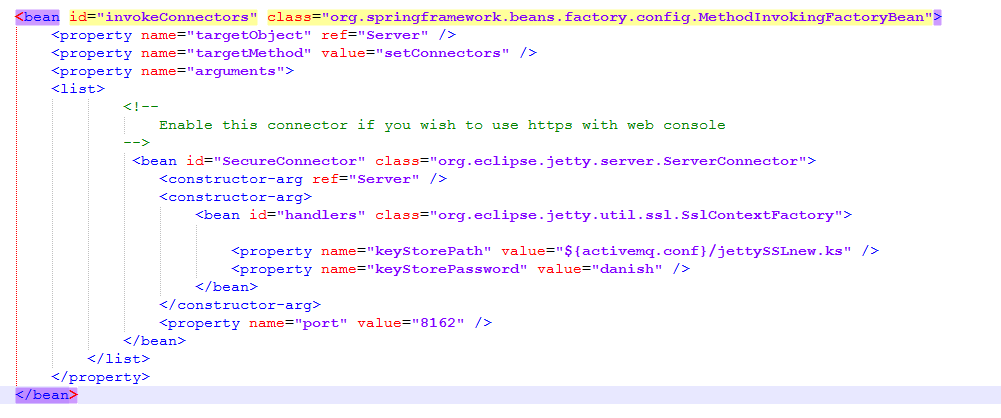
ActiveMQ web console runs on HTTPS port 8162 and is enabled by default. You can modify web console configurations in <EF Connector Home>\conf\jetty.xml.
See this article for more information about web console configurations. As shown here we can create our own keystore and certificates for SSL configuration of ActiveMQ console.
Web Console Passwords Configuration
To ensure the security , default passwords for ActiveMQ web console are encrypted. For user “admin” default password is changed to “@ctiveMQSecured1!”.
To generate your own secure password.
-
Open command prompt
-
Navigate to <EF Connector Home> through command prompt
-
Execute the following command
java -cp jetty-util-9.3.12.v20160915.jar org.eclipse.jetty.util.security.Password [<user>] <password>
-
It will generate the encrypted passwords with three different algorithms i.e. OBF, MD5,CRYPT
-
Copy the encrypted password along with its algorithm name e.g. CRYPT:adi0HK/rgc8DA and paste it to the <EF Connector Home>\conf\jetty-realm.properties in the sequence: username: password [,rolename]
-
Save jetty-realm.properties
See this article for more information about generating a secure password for a web console.
Setting up ActiveMQ with Jetty and Active Directory
ActiveMQ administration console can be integrated with Windows Active Directory. The sample Active Directory configurations are outlined in the ldap.config file which is placed here <EF Connector Home>\conf\>
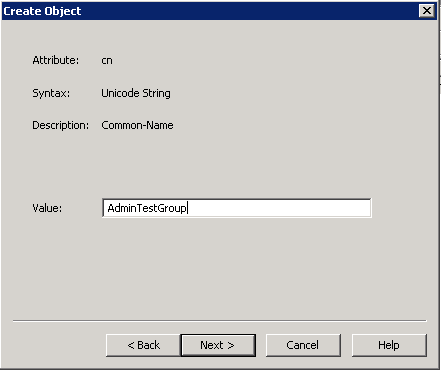
Create Object of Type GroupOfUniqueNames
In Active Directory,
-
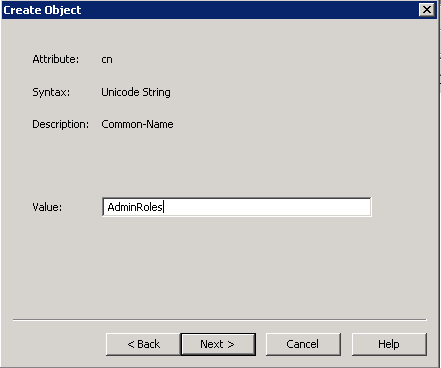
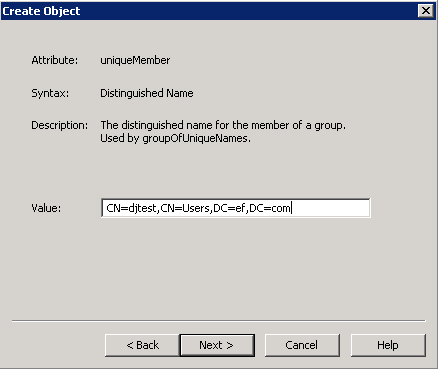
Create a new Object in Active Directory with a class of type ‘GroupOfUniqueNames’ in any group and give it any name. This name should match with the roles attribute of SecurityConstraint in the <EF Connector Home>\conf\jetty.xml, which is explained here. For illustration purposes, we have created an empty group with type ‘Container’ called AdminTestGroup. In this container we have created an object of type ‘GroupOfUniqueNames’ called AdminRoles.
-
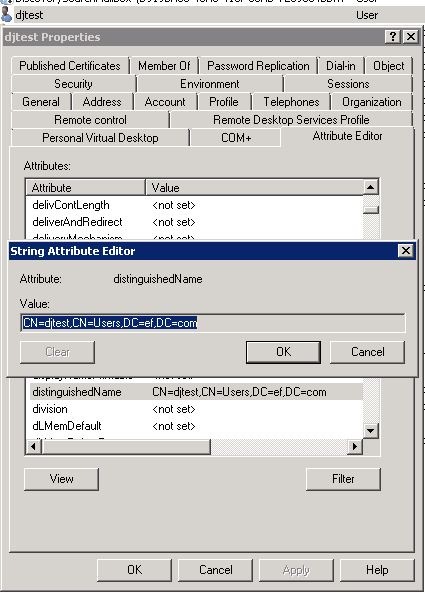
In the next step, add the user you want to give access to as a unique member of AdminRoles. Here we have added the distinguished name of the user called djtest.
You can find a user’s distinguished name from User’s Properties > Attribute Editor > distinguishedName.
-
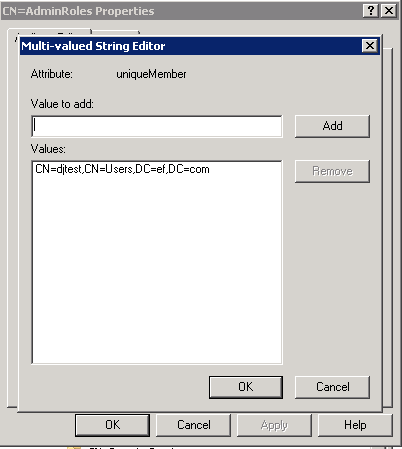
After adding the members to the group you should be able to see them in the group
Jetty/ActiveMQ Configuration
-
In <EF Connector Home>\conf\jetty.xml,
Modify the securityConstraint bean in the jetty.xml file and change the value of the roles to the name that you provided to the group you created above with the type ‘GroupOfUniqueNames’ in our case this is AdminRoles.

Modify the securityHandler bean in jetty.xml and change the ref of property name ‘loginService’ to ‘ldapLoginService’ as shown below

Also uncomment the following property ‘identityService’ in securityHandler bean

You will find the ldap.config file on this path <EF Connector Home>\conf\ldap.config.
You will have to update this file according to your Active Directory settings.
Note: Please do not change this string “amqLdapLoginModule“
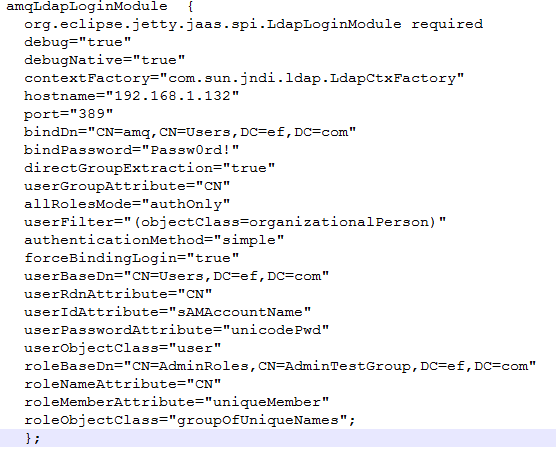
Description of configuration attributes for Active Directory
Hostname : The IP address of the Active Directory server. In the illustration above, we used 192.168.1.132
Port : The port on which the Active Directory server is running
bindDn : The distinguishedName of a User which is used for initial binding with the Active Directory
bindPassword : The password of the User whose distinguishedName we gave in the bindDn
userIdAttribute : The value of this attribute is the username with which we will login to the ActiveMQ web console.
userPasswordAttribute : The format in which the password is saved in the Active Directory.
userObjectClass : The class of the object which can login to the ActiveMQ console. For instance we have have created a user of class ‘User’
roleBaseDn : This gives the distinguishedName of the group where all the users who can access the ActiveMQ console are added to.
roleObjectClass : The class of the group which contains all the users that we want to give access to.
roleMemberAttribute : This is the type of the members that are added into the group, for instance we have created a group which has the class groupOfUniqueNames and contains members of type ‘uniqueMember’.
roleNameAttribute : Specifies the attribute type of the role entry that contains the name of the role
Setting up SSL to access ActiveMQ console
Caution : Run all of the commands in administrator mode on the command line.
Replace the <KEY_STORE_NAME> with the name of your choice. Also replace the <ALIAS> with the alias of your choice. Make sure that the same names are used when running the commands.
1) Using the keytool provided in the java jdk to run this command
keytool -keystore <KEY_STORE_NAME>.ks -alias <ALIAS>-keyalg RSA -keysize 2048 -sigalg SHA256withRSA -genkey
This will generate the keystore.
2) Now to generate the certificate request file run this command
keytool -certreq -alias< ALIAS> -keystore <KEY_STORE_NAME>.ks -file <CSR_FILE_NAME>.csr
This will generate the certificate request file
3) Now use this certificate request file to get the issuing authority to issue you the certificate
4) You should get two certificates which look like this

5) Now import these certificates using these commands
keytool -import -alias ALIAS -file CERTIFICATE.cer -keystore KEY_STORE_NAME.ks
keytool -import -alias ALIAS -file CERTIFICATE.p7b -keystore KEY_STORE_NAME.ks -trustcacerts
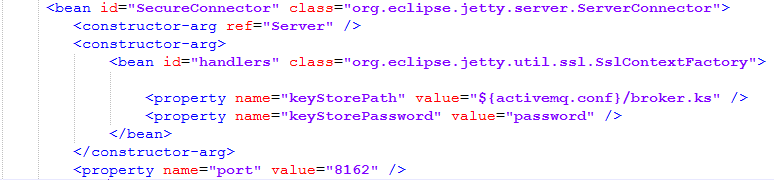
6) Place the certificate files and the keystore in the <EF Connector Home>\conf\

7) Open <EF Connector Home>\conf\jetty.xml . In the property name keystorePath change the value to be the name of your keystore file. Also change the property name keystorePassword’s value to be the password of the keystore. As shown here we can encrypt the password.
Note: Only the OBF algorithm passwords will work here. So the value of keyStorePassword property will look like this OBF:1v2j1uum1xtv1zej1zer1xtn1uvk1v1v
ActiveMQ SSL Certificates Configuration
Default ActiveMQ installation includes key and trust stores that reference the dummy self signed certificates. To configure the client provided certificates, copy the follow the instructions below:
In the conf/activemq.xml, edit the attributes in the sslContext element.
Generic Connector Configuration
Generic Connector “Config” button in EF Service Manager will open the folder where Generic Connector is installed.
-
Open generic-connector.jar file using WinRAR or similar to modify the embedded configuration properties file Config/config.properties.

-
Open Config\config.properties with text editor
-
Make the desired changes and update the file in the same jar file
Connector Configuration Parameters
|
Parameter |
Default Value |
Description |
|
NUMBER_OF_LICENSES |
1000 |
Number of concurrent agents, DO NOT TOUCH |
|
CUSTOMER_NAME |
Haseeb |
Customer Name, DO NOT TOUCH |
|
KEY |
ASDFGHJKLZXCVBNM234RFGHUIOKJMNBFEWSDFGHNJMNBV |
License key. Must be obtained from EF Team |
|
Finesse_1 |
https://Finesse-X-DN/finesse/api/ |
Primary Finesse URL for Site A |
|
Finesse_2 |
https://Finesse-X-DN/finesse/api/ |
Primary Finesse URL for Site B |
|
ACCESS_TOKEN_URL |
https://192.168.1.104:1126/getaccesstoken |
SSO get access token URL |
|
FINESSE_REQUEST_TIMEOUT |
3000 |
Finesse requested a timeout (in mili-seconds) |
|
FINESSE_HEARTBEAT_SLEEP |
5 |
Delay in ping to finesse servers (seconds) |
|
ByPass_SSL |
ture |
Bypass SSL Certificate if finesse url is https and self signed certificate is used, in case of false Import SSL certificate to JVM if needed |
|
ACTIVEMQ1 |
localhost:61616 |
ActiveMQ Primary URL |
|
ACTIVEMQ1 |
localhost:61616 |
ActiveMQ Secondary URL |
|
ACTIVEMQ_TIMEOUT |
30000 |
ActiveMQ connection timeout (in milliseconds) |
|
GRC_CONSUMER_PRIORITY |
127 |
Connector1 Queue consumer priority (Used for primary, secondary deployment of GC)(0-127) |
|
PRIORITY_BACKUP |
true |
To connect with its primary GC |
|
RANDOMIZE |
false |
for failover url |
|
PREFETCH_SIZE |
20000 |
Prefect Size of the messages |
|
AGENT_STATES_PUBLISHER_DURATION |
5000 |
Time after which, states of all agents would be published on topic (In Milliseconds) |
|
GC_HEARTBEAT_TIMEOUT |
10000 |
GC heartbeat timeout |
|
AGENT_INACTIVITY_DURATION |
30 |
Agent inactivity time (in seconds) |
|
GC_HEARTBEAT_SLEEP |
10000 |
gc heartbeat thread sleep time |
|
AGENT_INACTIVITY_TIME_SWITCH |
false |
Agent inactivity switch |
|
DEFAULT_NOT_READY_REASON |
19 |
default reason code for not ready (Must be defined in finesse) |
|
DEFAULT_LOGOUT_REASON |
70 |
Default reason code for force logout |
|
AGENT_XMPP_SUBS_TIME |
10000 |
Agent XMPP Subscription Time |
|
USE_ENCRYPTED_PASSWORDS |
false |
Use encrypted password |
|
CHANGE_STATE_ON_WRAPUP |
true |
Automatically change the state when wrap-up occurs |
|
LOGLEVEL |
TRACE |
Log Level |
|
GC_HEARTBEAT_TIMEOUT |
10000 |
GC heartbeat timeout |
|
USE_ENCRYPTED_PASSWORDS |
true |
Use password encryption (3Des). (Must be same as in client.) |
|
CHANGE_STATE_ON_WRAPUP |
true |
Caller’s state change automatically on wrap-up |
|
MESSAGE_FORMAT |
JSON |
Message Format for communication. Expected formats DEFAULT, JSON, XML |
|
AGENT_LOGS_PATH |
C:\\EFLogs\\Agents\\ |
Agent Logs Storage path |
|
AGENT_LOGS_LEVEL |
TRACE |
Agent Logs Level |
|
AGENT_LOGS_MAX_FILES |
10 |
Max No of Files per agent for logs |
|
AGENT_LOGS_FILE_SIZE |
10MB |
Max file size for agent logs |
|
XMPP_PING_INTERVAL |
3 |
Interval in seconds between XMPP server pings |
|
ADMIN_ID |
Administrator |
The username of the administrator account the would be used for phonebook and contact APIs |
|
ADMIN_PASSWORD |
Expertflow464 |
The password of the administrator account would be used for phonebook and contact APIs |
|
Supervisor_initiated_NotReadyReasonCode |
19 |
Reason code for supervisor state change to Not_Ready |
|
Supervisor_initiated_LogOutReasonCode |
20 |
Reason code for supervisor state change to Log_Out |
|
UCCX_SERVER_IP |
192.168.1.29 |
For queue stats in case of UCCX |
|
UCCX_SERVER_USERNAME |
Administrator |
UCCX DB server UserName |
|
UCCX_SERVER_PASSWORD |
Expertflow464 |
UCCX DB server password |
|
UCCX_DB_USERNAME |
uccxhruser |
UCCX DB userName |
|
UCCX_DB_PASSWORD |
12345 |
UCCX DB password |
|
UCCX_DB_RETRY_ATTEMPTS |
2 |
UCCX DB retry attemps |
|
UCCX_DB_TIMEOUT_CONNECTION |
1800 |
UCCX DB connection timeout |
|
COMMUNICATION_FORMAT |
REST | JMS |
Communication format |
|
REDIS_URL |
redis-master.ef-cti.svc |
Redis URL |
|
REDIS_PORT |
6379 |
Redis port |
|
REDIS_PASSWORD |
Expertflow123 |
Redis password |
|
SQL_SERVER |
192.168.1.89 |
SQL server IP (For Skill groups and supervisor list) |
|
DATABASE |
uc12_awdb |
SQL server database |
|
DATABASE_TABLE |
Skill_Group |
SQL server database table |
|
DATABASE_USER_NAME |
sa |
SQL server database userName |
|
DATABASE_USER_PASSWORD |
Expertflow464 |
SQL server database user password |
|
KEY_STORE_TYPE |
PKCS12 |
|
|
KEY_STORE |
D:\\EF_Project\\GC4.4\\Generic Connector\\certs\\store\\clientkeystore.p12 |
|
|
TRUST_STORE |
D:\\EF_Project\\GC4.4\\Generic Connector\\certs\\store\\client.truststore |
|
|
KEY_STORE_PASSWORD |
changeit |
|
|
TRUST_STORE_PASSWORD |
changeit |
|
|
PRIVATE_KEY_STRING |
key_value |
|
|
ISSUER |
ef-chat |
|
|
EXPIRY |
300 |
|
|
PEP_BASE_PATH |
http://192.168.50.31:8113 |
|
|
AOP_CALLBACK |
/ef-voice/fnb-cme/submit-gc-event/v1 |
|
|
AXL_URL |
https://192.168.1.26:8443/axl/ |
|
|
AXL_USER |
administrator |
|
|
AXL_PASSWORD |
Expertflow464 |
|
Setup Default Reason Code(s)
Create at least one reason code for not-ready and one reason code for logout in Cisco Finesse and specify the default reason code in the Generic Connector configuration file.
For default not-ready reason,
|
DEFAULT_NOT_READY_REASON |
1 |
Default reason code to be passed by Generic Connector to Cisco Finesse |
|
DEFAULT_LOGOUT_REASON |
2 |
Default reason code to be passed by Generic Connector to Cisco Finesse |
JMX Monitoring
GC now supports JMX monitoring. You can monitor the performance of GC via any of the monitoring tools such as JConsole and VisualVM. GC supports JMX Monitoring on port 9010.