Windows Setup Prerequisites
In addition to Solution Prerequisites, following are the setup requirements for the solution to run on Windows.
|
|
Requirement |
|---|---|
|
OS |
Windows Server 2019 (Version 1809) |
|
Docker Desktop |
2.3 or higher |
Docker Desktop requires bare metal server. However if you are using virtual machine make sure that VMware Hypervisor with Nested Virtualization is enabled. See this guide to enable Nested Virtualization in VMware Hypervisor.
Installation Methods
There are two methods by which you can deploy HC on Docker Desktop.
-
Manual Installation without Script
-
Installation via Python Script.
Installation Steps for Manual Deployment
-
Install
Docker Desktop
on the host operating system.
-
Download the
Git
and install it on the host operating system.
-
Navigate to
C:\and create a directory with nameHybrid-Chat. Navigate inside the directory and run the following command to clone theChat-Solutiondirectory on to your Server Machine. -
git clone https://connect:wCuQQzDRP-N7gcFk-7Ak@gitlab.expertflow.com/chat-solution/chat-solution.git --branch=3.12Now we have chat-solution downloaded in our Windows Server 2019.
-
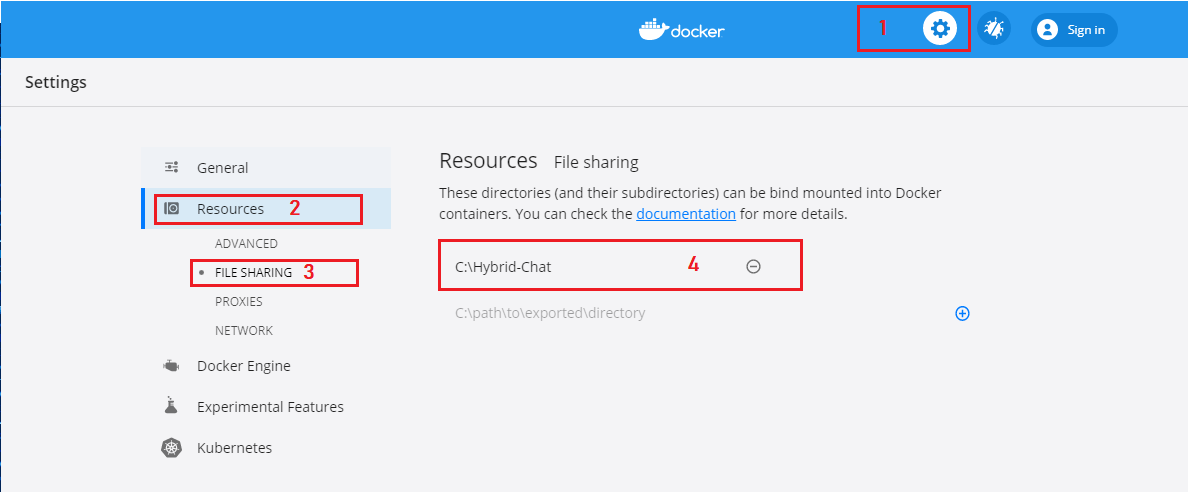
Open the Docker Desktop and navigate to Settings.
-
Click on Resources and then select File Sharing, Enter the path of the Hybrid-Chat.
Core Chat Solution Configuration
-
Navigate to the downloaded directory of
chat-solutionand navigate todocker/environment-variables -
Made the following changes in the following files.
agent-gadget-variables.env
|
Variable Names |
Variable Value |
|---|---|
|
|
|
|
|
|
|
|
|
|
|
|
|
|
|
customer-gadget-variables.env
|
Variable Names |
Variable Value |
|---|---|
|
|
|
|
|
|
|
|
|
|
|
|
|
|
|
|
|
|
|
|
|
mre-ui-variables.env
|
Variable Names |
Variable Value |
|---|---|
|
|
|
|
|
|
ecm-frontend-variables.env
|
Variable Names |
Variable Value |
|---|---|
|
|
|
umm-variables.env
|
Variable Names |
Variable Value |
|---|---|
|
|
|
mre-variables.env
|
Variable Names |
Variable Value |
|---|---|
|
|
|
|
|
|
|
|
|
|
|
|
Chat Solution Configuration with Standalone Agents
If you want to configure Chat Solution with Standalone agents, we need to make further changes to the following variables.
agent-gadget-variables.env
|
Variable Names |
Variable Value |
|---|---|
|
|
|
comm-server-variables.env
|
Variable Names |
Variable Value |
|---|---|
|
|
|
mre-variables.env
|
Variable Names |
Variable Value |
|---|---|
|
|
|
mre-microservice-variables.env
|
Variable Names |
Variable Value |
|---|---|
|
|
|
Nginx Configuration
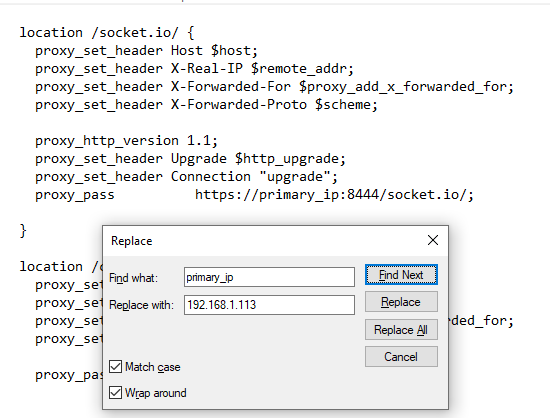
Navigate to chat-solution\docker\nginx and open the https-singleton.conf file in text editor and make the following changes.
Press CTRL + F and look for chatsolution.expertflow.com
It is going to be in following variables.
|
Line Number |
Variable Name |
Value |
|---|---|---|
|
14 |
|
FQDN of the machine on which the solution is deployed and/ or I.P address. |
|
179 |
|
FQDN of the machine on which the solution is deployed and/ or I.P address. |
|
283 |
|
FQDN of the machine on which the solution is deployed. |
|
289 |
|
FQDN of the machine on which the solution is deployed. |
Next thing we want to change is the variable name proxy_pass. For that, press CTRL + H and look for primary_ip and replace it with the IP of the Windows Server 2019.
Installation of Chat Solution
First of all, we need to create a network named, chat-solution by running the following command.
docker network create chat-solution
After that, we need to docker login into gitlab registry by running the following command.
docker login gitlab.expertflow.com:9242 --username deployment --password xWb8WafM8ZvdwBHNxLm3
Its time to install the Chat Solution, Navigate to chat-solution directory and run the following command.
docker-compose --env-file .\coreversion.env -f .\sds\docker-compose-agent-gadget.yml up -d
docker-compose --env-file .\coreversion.env -f .\sds\docker-compose-amq.yml up -d
docker-compose --env-file .\coreversion.env -f .\sds\docker-compose-campaigns.yml up -d
docker-compose --env-file .\coreversion.env -f .\sds\docker-compose-ccm.yml up -d
docker-compose --env-file .\coreversion.env -f .\sds\docker-compose-customer-gadget.yml up -d
docker-compose --env-file .\coreversion.env -f .\sds\docker-compose-db-connector.yml up -d
docker-compose --env-file .\coreversion.env -f .\sds\docker-compose-eabc.yml up -d
docker-compose --env-file .\coreversion.env -f .\sds\docker-compose-hc-server.yml up -d
docker-compose --env-file .\coreversion.env -f .\sds\docker-compose-mongo.yml up -d
docker-compose --env-file .\coreversion.env -f .\sds\docker-compose-mysql.yml up -d
docker-compose --env-file .\coreversion.env -f .\sds\docker-compose-routing.yml up -d
docker-compose --env-file .\coreversion.env -f .\sds\docker-compose-service-gateway.yml up -d
docker-compose --env-file .\coreversion.env -f .\sds\docker-compose-umm.yml up -d
That is all. You have working Chat Solution deployed in Docker Desktop. Now you can access UMM at https://fqdn/umm and after applying license, you can create agents and then restart MRE. You can access the Customer Gadget at https://fqdn/customer-gadget/ and use this link in Pre Chat Form to initiate a chat.
Installation via Python Script
You need Python 3 for Windows installed for this script to run. To download: Python Releases for Windows | Python.org This script has some limitations.
1. It only Install the solution. You cannot stop the solution using this script.
2. It deploys only Core version of HC with Contact Center or without Contact Center.
Simply need to download the Python Script from Installation-3.12.1.py and run it. Just answer the questions asked in the script and in the end you will have Hybrid Chat installed in your Docker Desktop.