Requirements
Software Requirements
|
Item |
Recommended |
Installation guide |
|
EFSwitch |
Latest version |
|
|
EF CX |
CX 4.3 |
Configure IVR scripts and recordings
Deployment
-
SSH into the Debian server onto which EFSwitch is installed.
-
Use command ssh username@server-ip
-
Enter user password and press ENTER.
-
Use command su.
-
Enter root password and press ENTER.
-
-
Clone the repository : https://gitlab.expertflow.com/rtc/freeswitch-scripts/
-
Confirm git is installed, and install it if is not.
-
Run the command git clone -b CX_4.5 https://gitlab.expertflow.com/rtc/freeswitch-scripts.git
-
Enter your Gitlab username and password when they are requested
-
-
Alter the file name of each file ending in .lua such that the dialing number of the IVR (Set in the CxIvr Dialplan section below) appears before the .lua suffix.
-
e.g. for an IVR with a dialing number of 1555 the scripts would be named cxIvr1555.lua vcApi1555.lua cx_env1555.lua cx_hangup1555.lua
-
-
These files will now be referred throughout this document as cxIvr{DN}.lua etc where {DN} is the dialing number described in the previous point.
-
Move the files ending in .lua to the EFSwitch scripts folder:
-
mv file-name /usr/share/freeswitch/scripts
-
where file-name is each of cxIvr{DN}.lua vcApi{DN}.lua cx_env{DN}.lua cx_hangup{DN}.lua
-
-
Move the ivr_recordings folder to /usr/share/freeswitch/sounds/:
-
Run the command mv ivr_recordings /usr/share/freeswitch/sounds/
-
-
Assign read-write permissions to the ivr_recordings folder:
-
Run the command chmod 777 -R /usr/share/freeswitch/sounds/ivr_recordings
-
Configuration
-
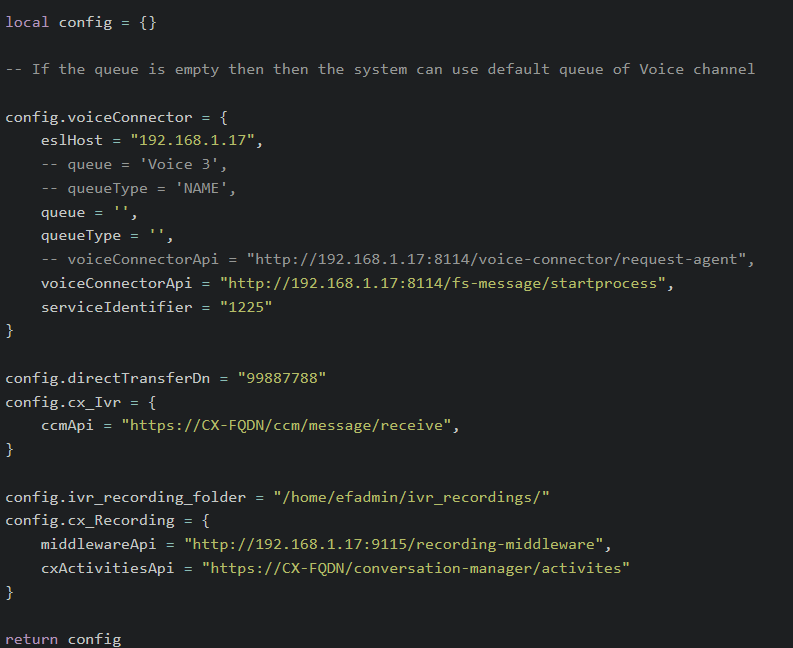
Open cx_env{DN}.lua :
-
Run vi cx_env{DN}.lua
-
-
Press the "I" key to enter editing mode.
-
Set the value of the eslHost field to the IP of the EFSwitch server.
-
In the queueType field set either NAME or ID.
-
In the queue field enter either the name or ID of the agent queue used(based on queueType field).
-
Alternatively, the queue and queueType fields can be left empty to specify use of the CX Voice channel default queue by setting them to empty quotes i.e. ''.
-
The voiceConnectorApi field will contain a URL in the following format:
-
For CX 4.3-4.4: http://IP:PORT/fs-message/startprocess
-
For CX 4.5: http://IP:PORT/voice-connector/request-agent (Subject to change in CX 4.5 release)
-
Replace IP and PORT with the voice connector server IP address, and the voice connector port.
-
-
The directTransferDn field contains the dialing number of the Direct Queue Transfer dialplan. This values should be consistent among two other places:
-
The NUMBER in the destination_number field of the Direct Queue Transfer dialplan in the Dialplan section below.
-
The STATIC_QUEUE_TRANSFER_DN field in the Agent Desk config-map:
-
SSH into the EFCX server by using the command ssh username@IP-addr
-
Where username is the EFCX SSH username and IP-addr is the EFCX server IP address
-
Run the command vi cim-solution/kubernetes/cim/ConfigMaps/ef-unified-agent-configmap.yaml
-
Scroll down to find the STATIC_QUEUE_TRANSFER_DN field and note down its value.
-
-
-
The ccmApi field contains the CCM API of the EFCX:
-
Replace CX FQDN with the EF CX domain name e.g. my-efcx.expertflow.com.
-
The ivr_recording_folder field contains path to the ivr_recordings folder. Set to /usr/share/freeswitch/sounds/ivr_recordings/ as set above.
-
The middlewareApi field holds the API of the recording middleware: (Subject to change in CX 4.5 release)
-
Replace IP and PORT with the middleware server IP address, and the middleware port.
-
The cxActivitiesApi field contains the Third Party Activities API of the EFCX conversation manager: (Subject to change in CX 4.5 release)
-
Replace CX FQDN with the EF CX domain name e.g. my-efcx.expertflow.com.
-
Save and exit the file by pressing the Esc key, entering :wq and pressing ENTER.
-
-
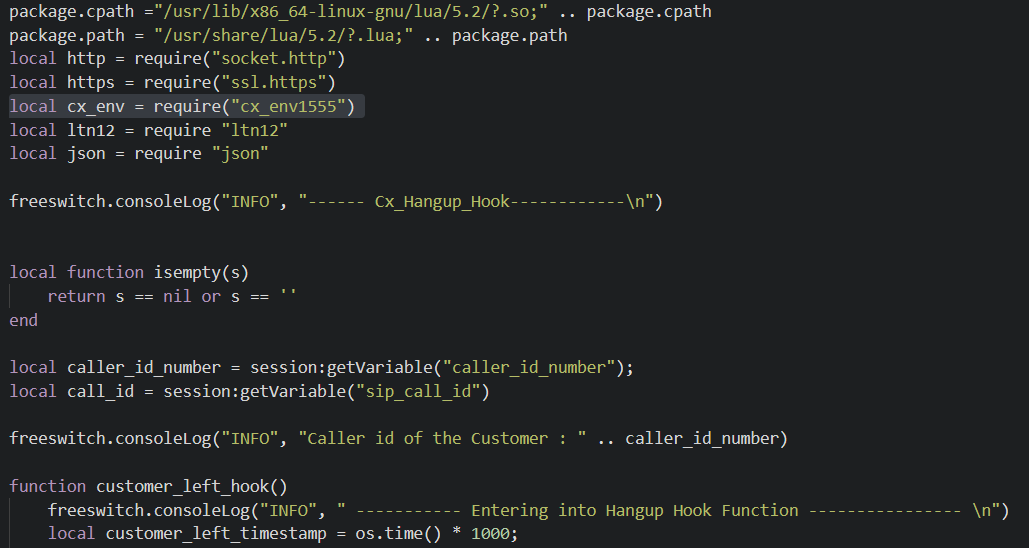
Open cx_hangup{DN}.lua.
-
Run vi cx_hangup{DN}.lua
-
-
Press the "I" key to enter editing mode.
-
As shown in the image above, near the top of the file, edit the line:
-
local cx_env = require("cx_env")to -
local cx_env = require("cx_env{DN}") -
Where {DN} is the IVR dialing number.
-
-
Save and exit the file by pressing the Esc key, entering :wq and pressing ENTER.
-
-
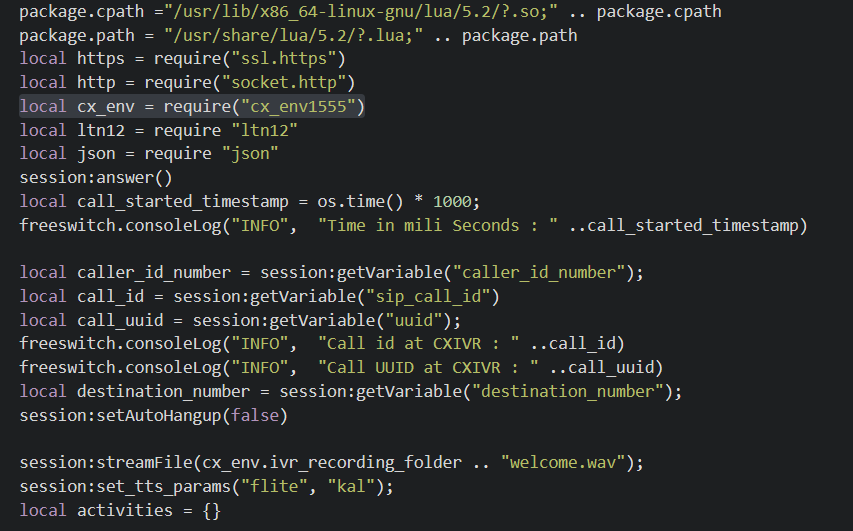
Open cxIvr{DN}.lua.
-
Run vi cxIvr{DN}.lua
-
-
Press the "I" key to enter editing mode.
-
As shown in the image above, near the top of the file, edit the line:
-
local cx_env = require("cx_env")to -
local cx_env = require("cx_env{DN}") -
Where {DN} is the IVR dialing number.
-
-
Save and exit the file by pressing the Esc key, entering :wq and pressing ENTER.
-
-
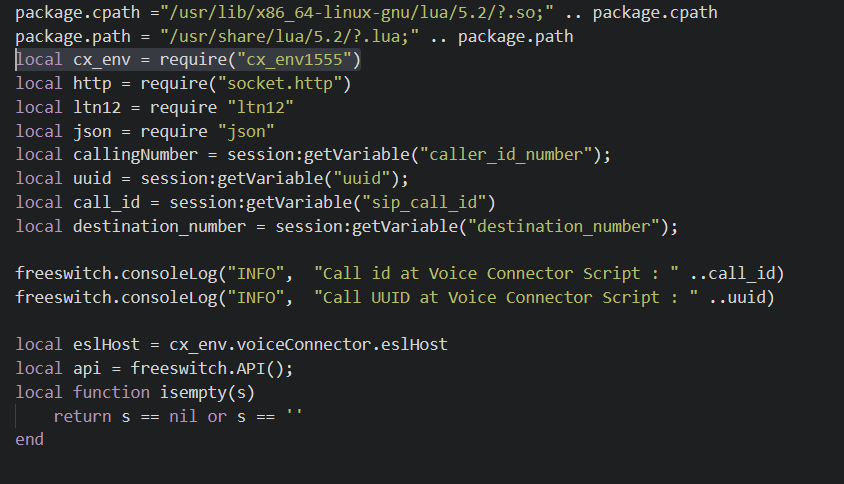
Open vcApi{DN}.lua.
-
Run vi vcApi{DN}.lua
-
-
Press the "I" key to enter editing mode.
-
As shown in the image above, near the top of the file, edit the line:
-
local cx_env = require("cx_env")to -
local cx_env = require("cx_env{DN}") -
Where {DN} is the IVR dialing number.
-
-
Save and exit the file by pressing the Esc key, entering :wq and pressing ENTER.
-
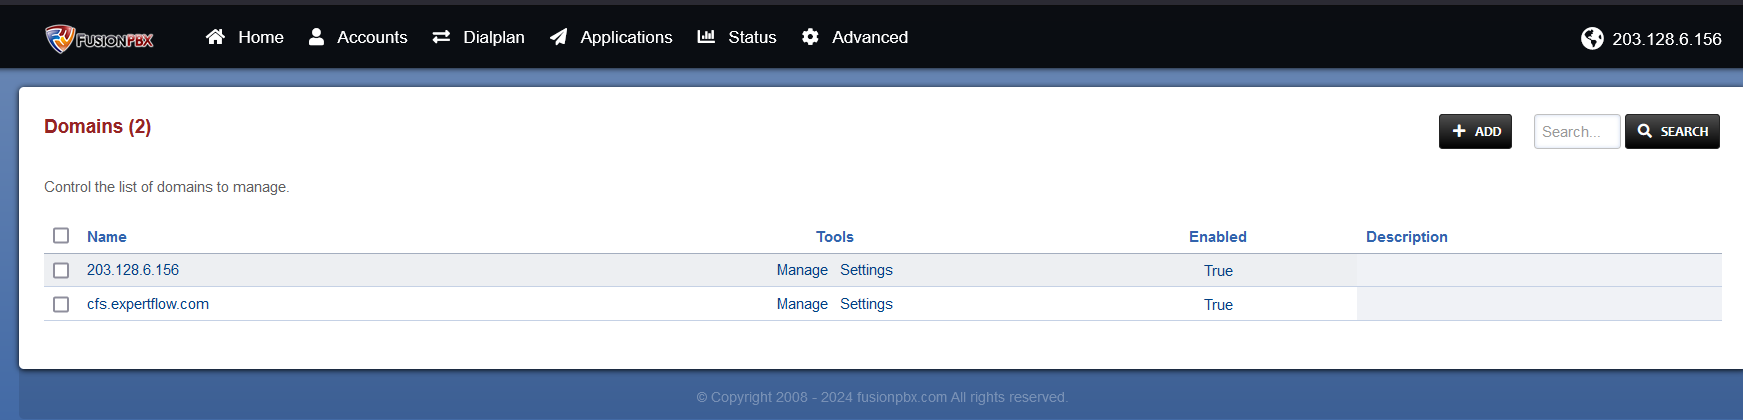
Domain Creation
-
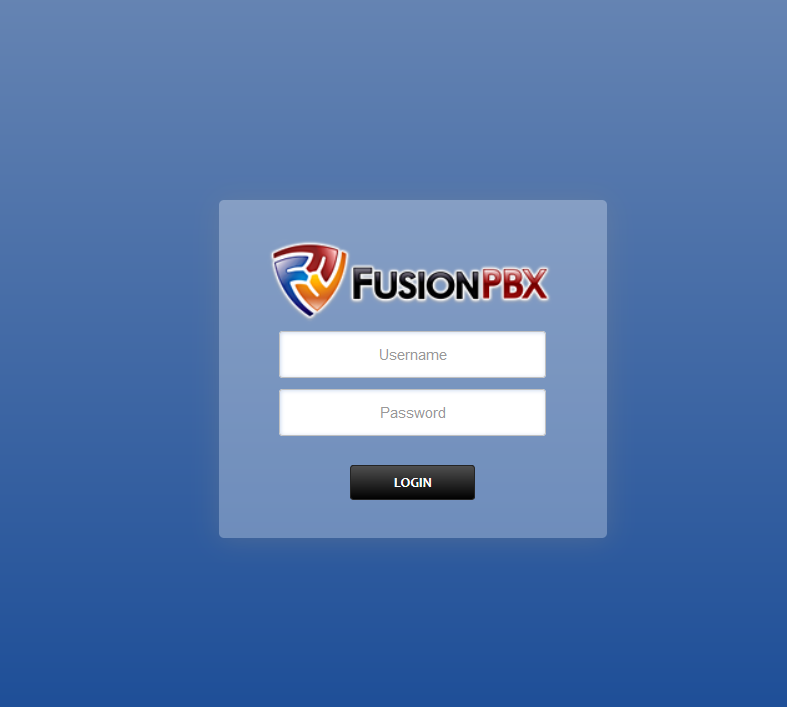
Login to EFSwitch web interface.
-
Open in browser: https://IP-addr, where IP-addr is the IP address of the server that EFSwitch is deployed on.
-
-
Add the username and password that was shown upon installation of EFSwitch and press LOGIN.
-
-
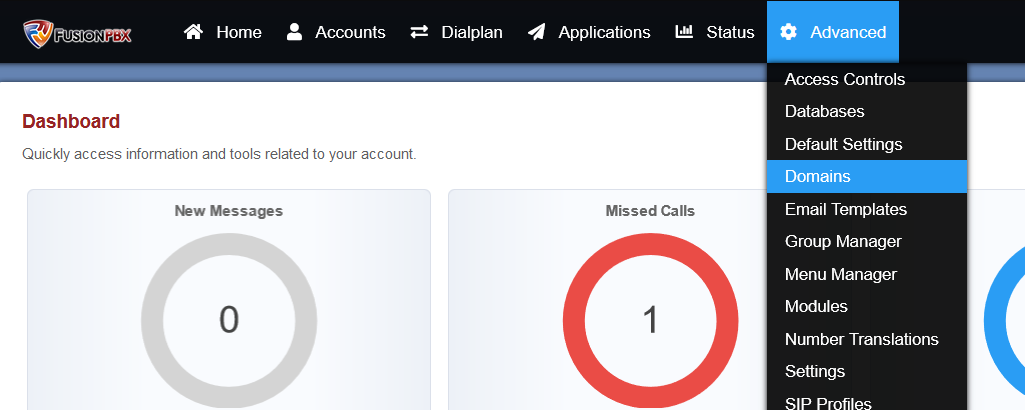
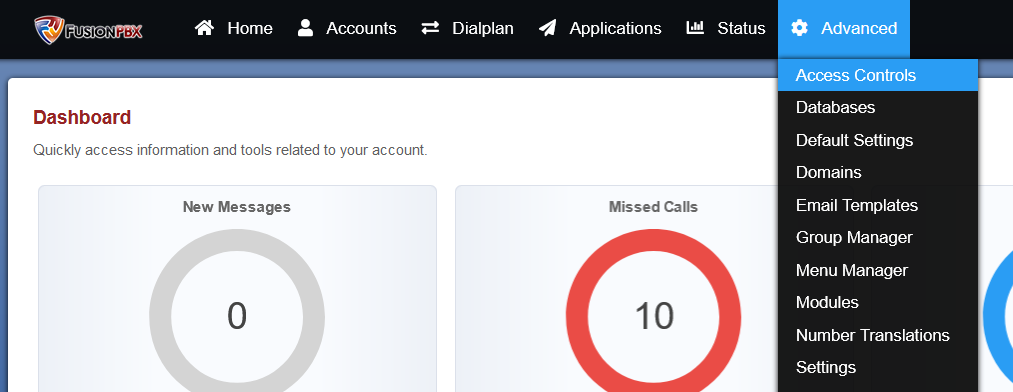
Select the Domains option from the Advanced tab.
-
-
Select the ADD button on the top right.
-
-
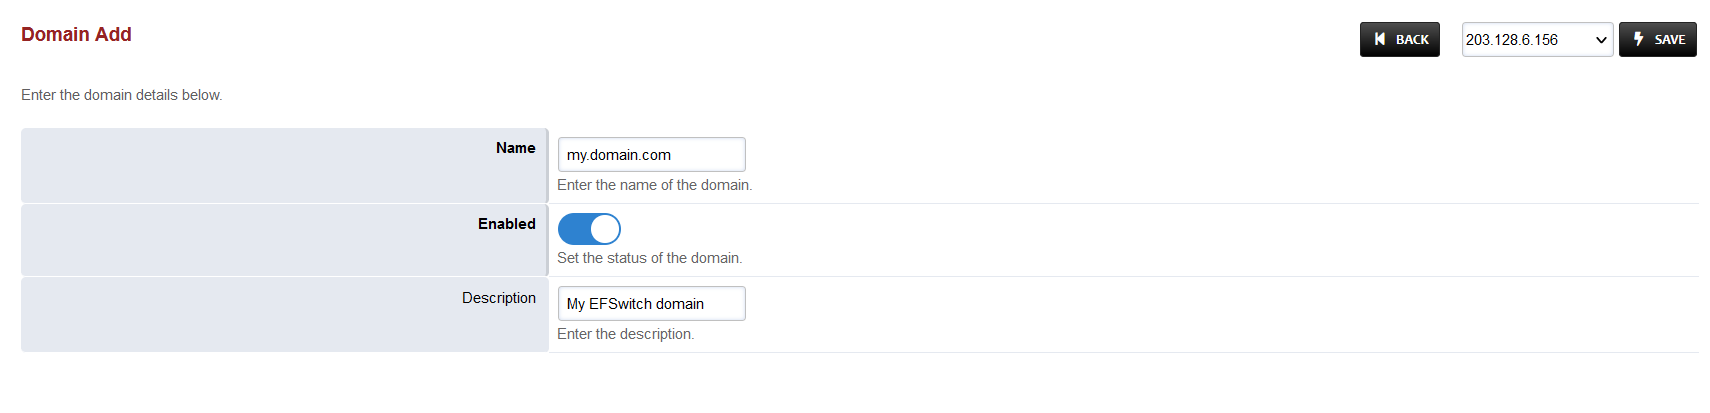
Add a name of your choice, preferably in Fully Qualified Domain Name form, as shown in the image below:
-
-
Save the changes by pressing SAVE button in top right corner.
Configure Dialplans
CxIVR Dialplan
-
Login to EFSwitch web interface.
-
Open in browser: https://IP-addr, where IP-addr is the IP address of the server that EFSwitch is deployed on.
-
-
Add the username and password that was shown upon installation of EFSwitch and press LOGIN.
-
-
Press the IP address in the top right and select the Domain created in the Domain creation section above:
-
-
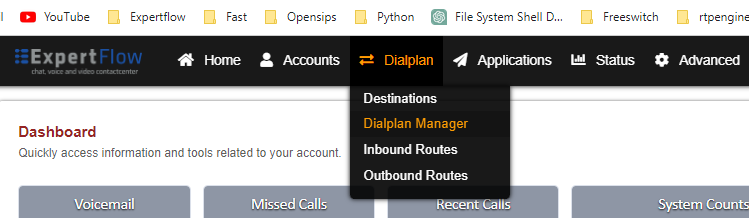
Open the Dialplan Manager section under the Dialplan tab.
-
-
Add a new Dialplan by pressing the Add Button on the top.
-
-
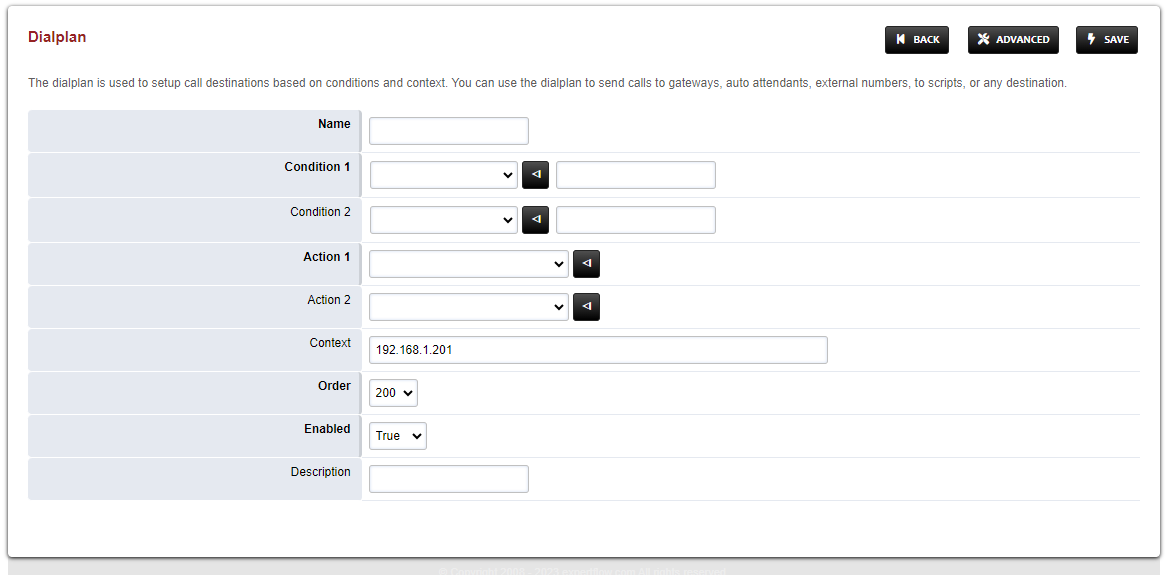
Fill the form with following details :
-
Name = CxIvr
-
Condition 1 = Select destination_number from list and add a dialing number, matching the {DN} value in the .lua scripts filenames set in the IVR scripts section above.
-
Action 1 = Select first item from the list
-
-
Save the form by pressing save button on top right Corner.
-
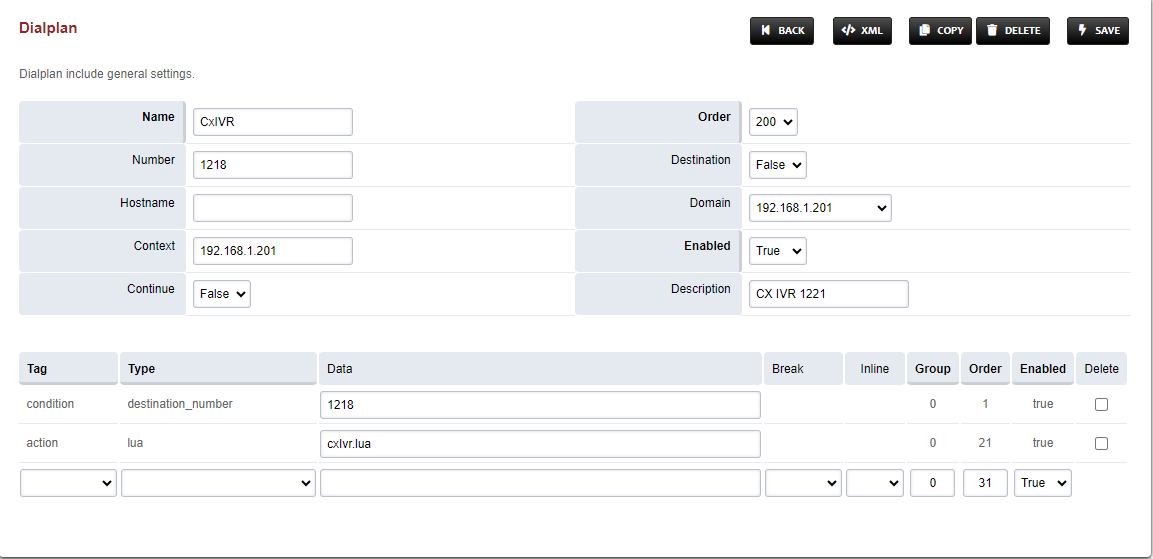
Re-open CxIvr dialplan.
-
-
Change action from transfer to lua and add cxIvr{DN}.lua into data column. it looks like this.
-
-
Set the Context field to the value of the Domain set in the Domain creation section.
-
Set the Domain field to the value of the Domain set in the Domain creation section.
-
Save the changes by pressing SAVE button in top right corner.

Direct-Transfer Dialplan
-
Login to EFSwitch web interface.
-
Open in browser: https://IP-addr, where IP-addr is the IP address of the server that EFSwitch is deployed on.
-
-
Add the username and password that was shown upon installation of EFSwitch and press LOGIN.
-
-
Press the IP address in the top right and select the Domain created in the Domain creation section above:
-
-
Open the Dialplan Manager section under the Dialplan tab.
-
-
Add a new Dialplan by pressing the Add Button on the top.
-
-
Fill the form with following details :
-
Name = CxQueue
-
Condition 1 = Select destination_number from list and add a random number
-
Action 1 = Select first item from the list
-
-
Save the form by pressing save button on top right Corner.
-
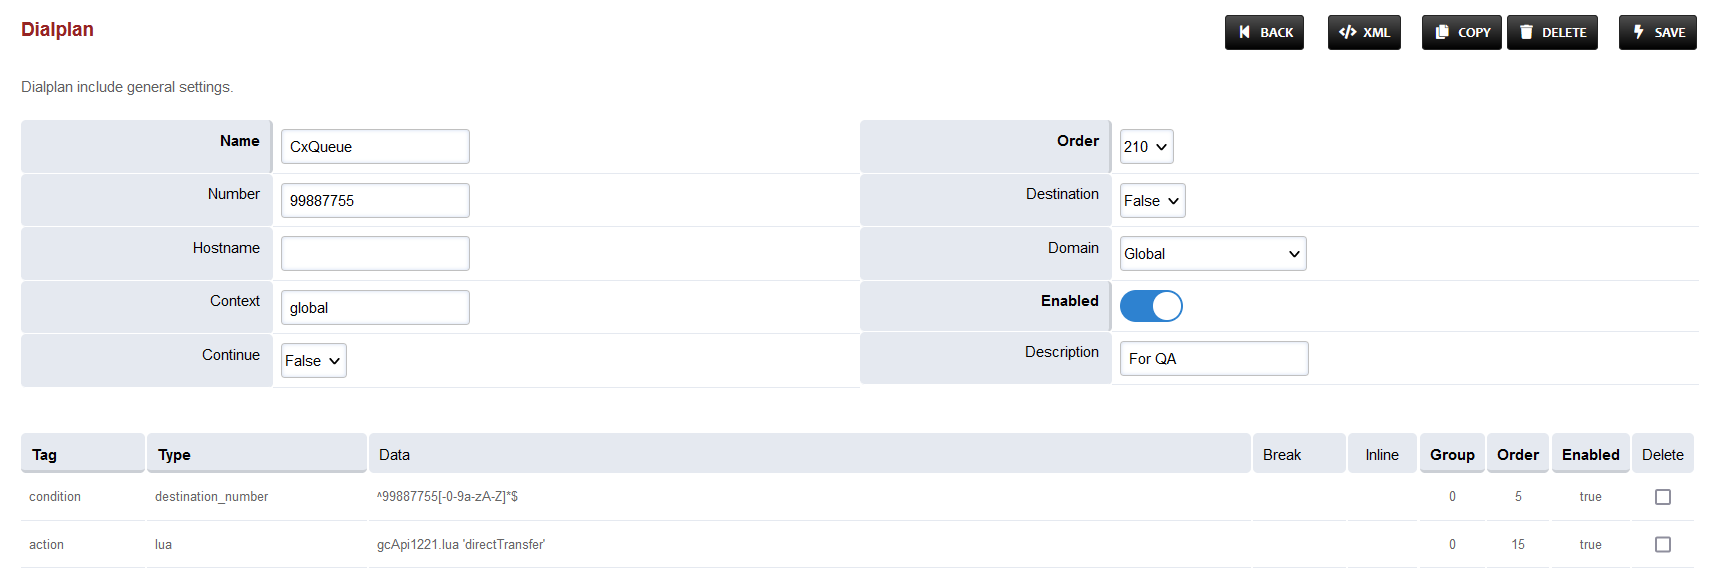
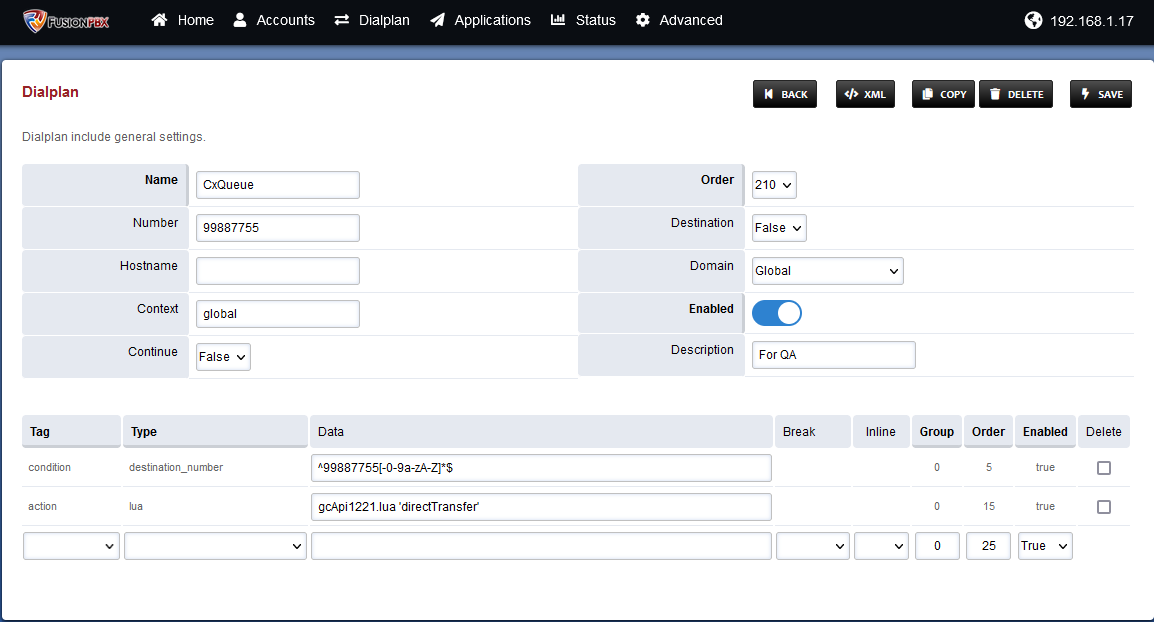
Re-open CxQueue dialplan.
-
-
Change the value of the Data column in the destination_number row to ^NUMBER[-0-9a-zA-Z]*$
-
Where NUMBER is the Direct Queue Transfer dialing number set in the cx_env{DN}.lua file in the IVR Scripts Configuration section above.
-
-
Change the value of the Type column in the Action row to lua and the Data field to gcApi{DN}.lua 'directTransfer'
-
-
Set the Context field to the value of the Domain set in the Domain creation section.
-
Set the Domain field to the value of the Domain set in the Domain creation section.
-
Save the changes by pressing SAVE button in top right corner.
WebRTC Dialplan
-
Login to EFSwitch web interface.
-
Open in browser: https://IP-addr, where IP-addr is the IP address of the server that EFSwitch is deployed on.
-
-
Add the username and password that was shown upon installation of EFSwitch and press LOGIN.
-
-
Press the IP address in the top right and select the Domain created in the Domain creation section above:
-
-
Open the Dialplan Manager section under the Dialplan tab.
-
-
Add a new Dialplan by pressing the Add Button on the top.
-
-
Fill the form with following details :
-
Name = webrtc
-
Condition 1 = Select destination_number from list and add the webRTC dialing number
-
Action 1 = Select first item from the list
-
-
Save the form by pressing save button on top right Corner.
-
Re-open webRTC dialplan.
-
Set the Context field to the value of the Domain set in the Domain creation section.
-
Set the Domain field to the value of the Domain set in the Domain creation section.
Changes in Local extension Dialplan
-
Login to EFSwitch web interface.
-
Open in browser: https://IP-addr, where IP-addr is the IP address of the server that EFSwitch is deployed on.
-
-
Add the username and password that was shown upon installation of EFSwitch and press LOGIN.
-
-
Press the IP address in the top right and select the Domain created in the Domain creation section above:
-
-
Open the Dialplan Manager section under the Dialplan tab.
-
-
Find and open the local_extension dialplan.
-
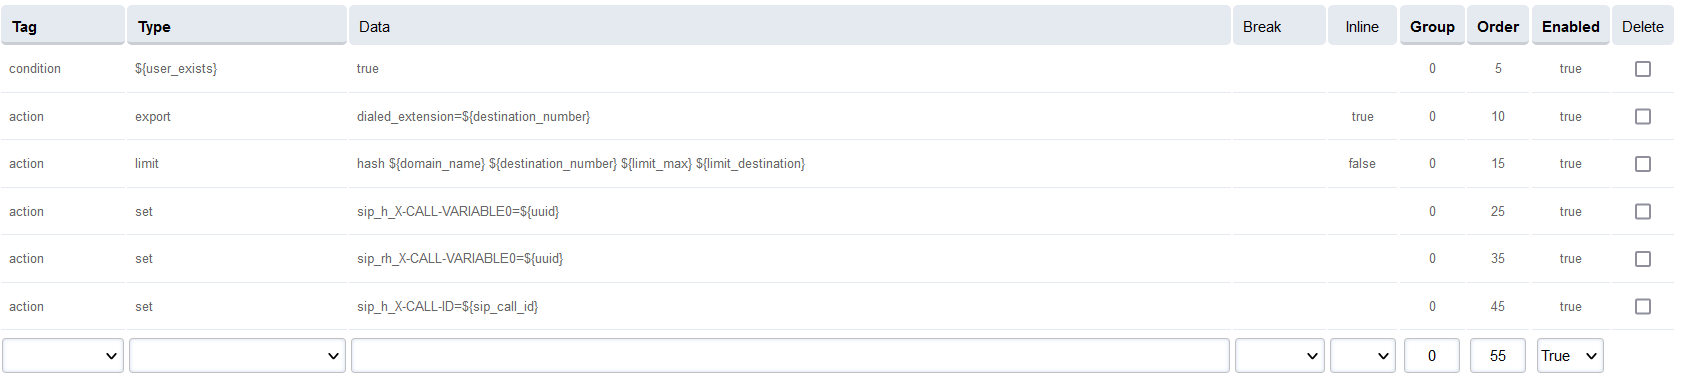
Add the following information to the end of the first group:
|
action |
set |
sip_h_X-CALL-VARIABLE0=${uuid} |
0 |
25 |
true |
|
action |
set |
sip_rh_X-CALL-VARIABLE0=${uuid} |
0 |
35 |
true |
|
action |
set |
sip_h_X-CALL-ID=${sip_call_id} |
0 |
45 |
true |
-
The result will look like this:
-
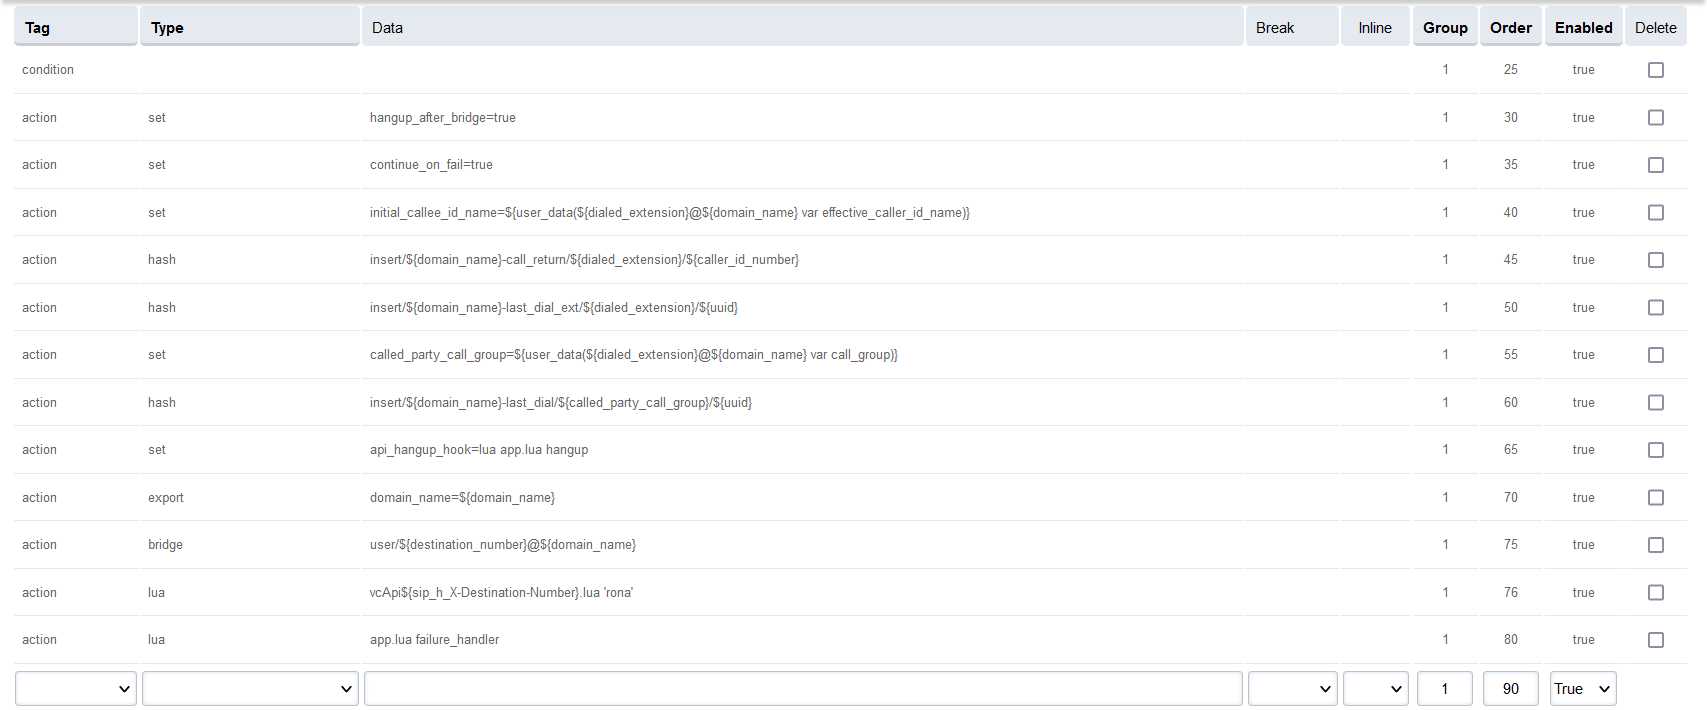
Add the following information to the last group:
|
action |
lua |
vcApi${sip_h_X-Destination-Number}.lua 'rona' |
1 |
76 |
true |
|---|
-
The result will look like this:
-
Note that the new line must be AFTER the bridge user/${destination_number}@${domain_name} line so if the Order of that line is 75 then the new line must have order 76 (as shown in the image above)
-
Save the changes by pressing SAVE button in top right corner.
Configure Access Control List (ACL)
For the Voice Connector to be able to access the EFSwitch ESL for communicating with EFSwitch, their IP address must be added to the ACL.
-
Login to EFSwitch web interface.
-
Open in browser: https://IP-addr, where IP-addr is the IP address of the server that EFSwitch is deployed on.
-
Add the username and password that was shown upon installation of EFSwitch and press LOGIN.
-
-
Press the IP address in the top right and select the Domain created in the Domain creation section above:
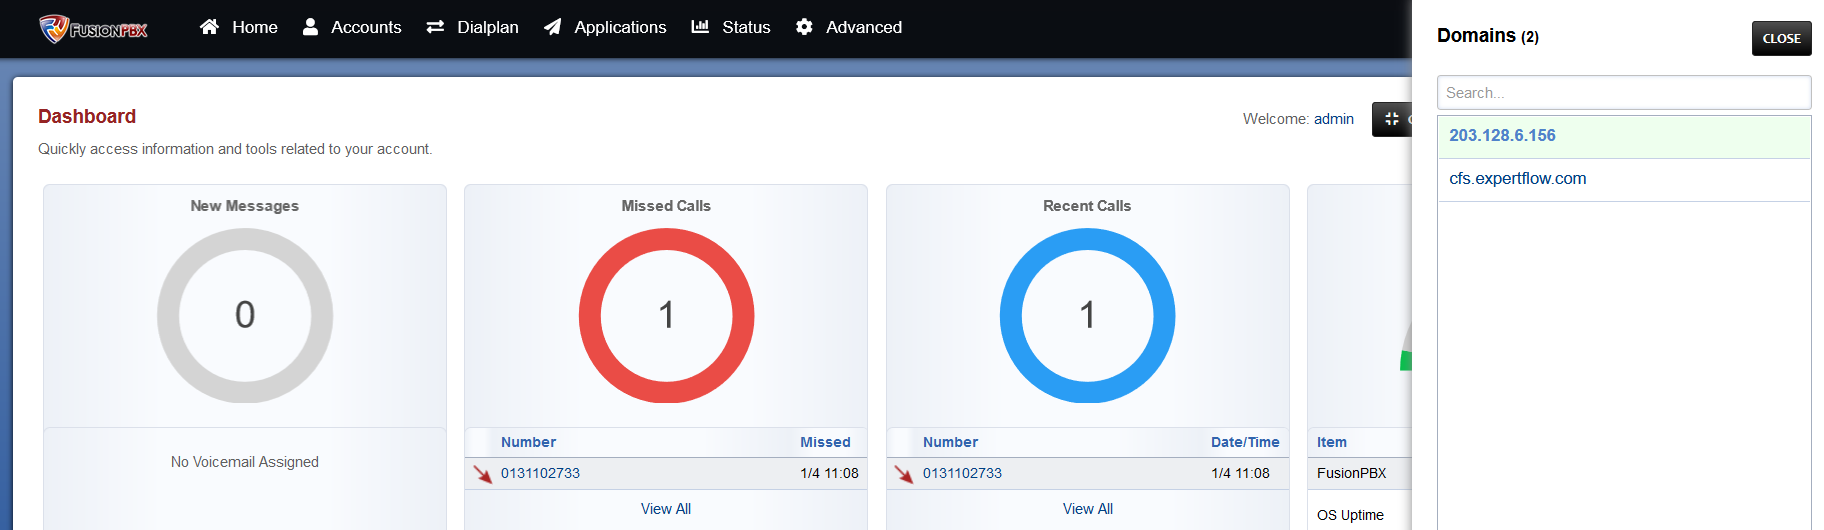
-
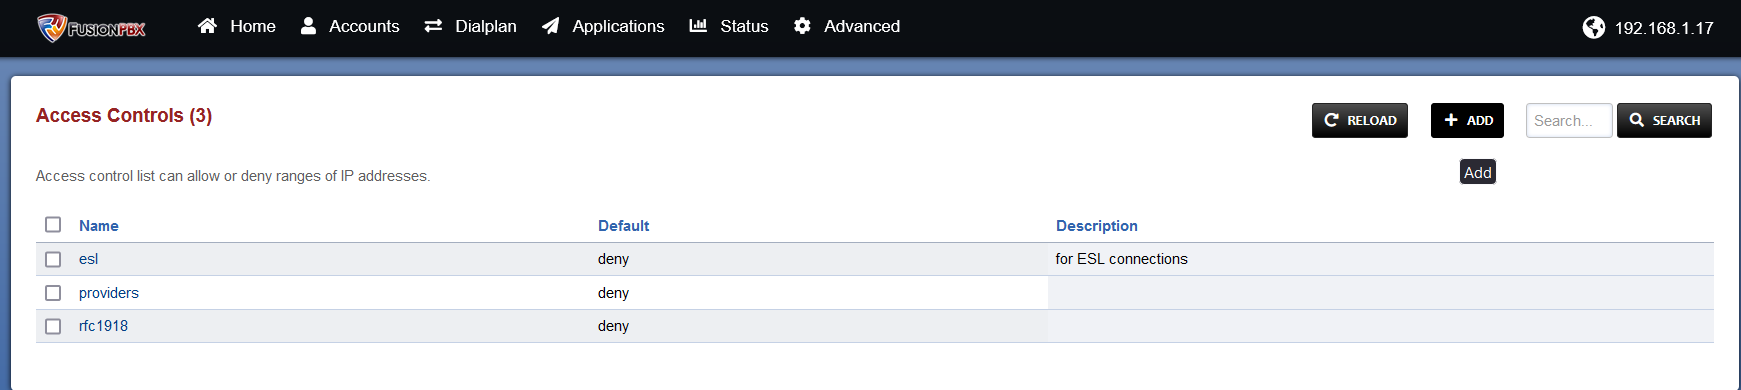
Open the Access Control List from the Advanced tab.
-
Create a new ACL with the Add button.
-
Set the name to esl, the Default to allow and add the following IP addresses:
-
127.0.0.1
-
The IP address of the server the EFSwitch is running on e.g. 192.168.1.17.
-
The IP address of the server the Voice connector is running on e.g. 192.168.1.201.
-
Lastly, add the IP addresses of the docker container for the Voice connector.
-
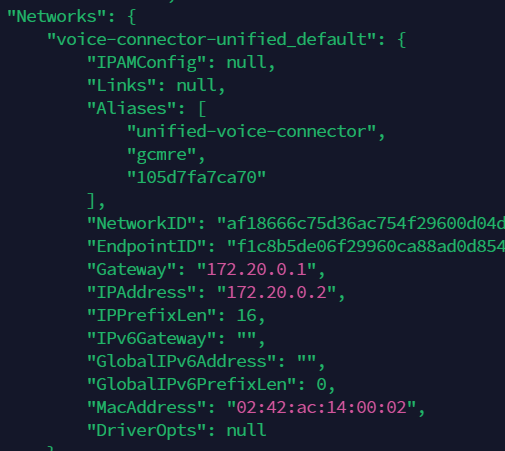
On the Voice connector server, use the command docker ps to list the containers.
-
-
Run the command docker inspect containerID (where containerID is the container ID for the Voice connector) and scroll down to the Networks object and find the Gateway and IPAddress fields.
-
-
Copy these two addresses to the esl ACL.
-
-
-
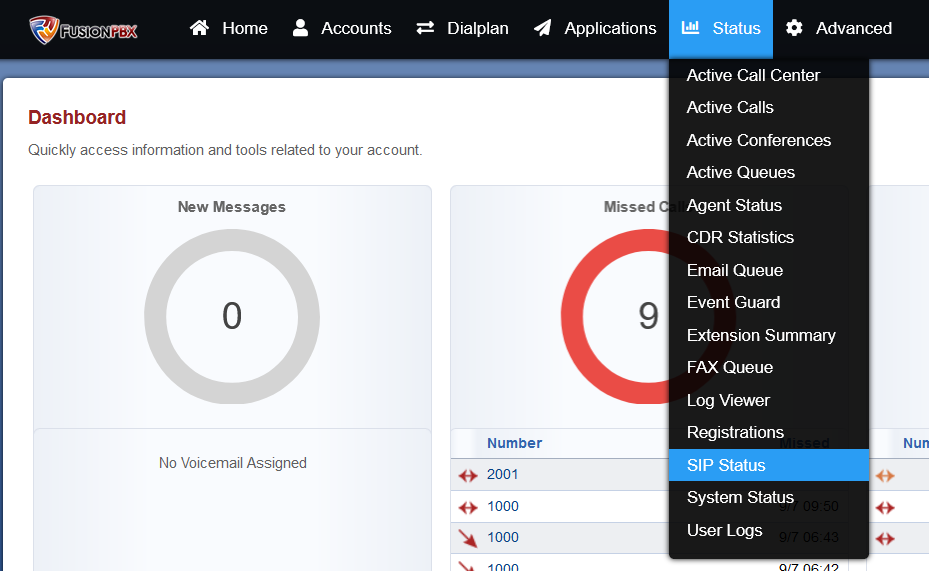
Click the Save button and go to the SIP Status with from the Status tab.
-
Click the Reload ACL button on the top right.


Configure Event Socket Library (ESL)
-
Login to EFSwitch web interface.
-
Open in browser: https://IP-addr, where IP-addr is the IP address of the server that EFSwitch is deployed on.
-
Add the username and password that was shown upon installation of EFSwitch and press LOGIN.
-
-
Press the IP address in the top right and select the Domain created in the Domain creation section above:
-
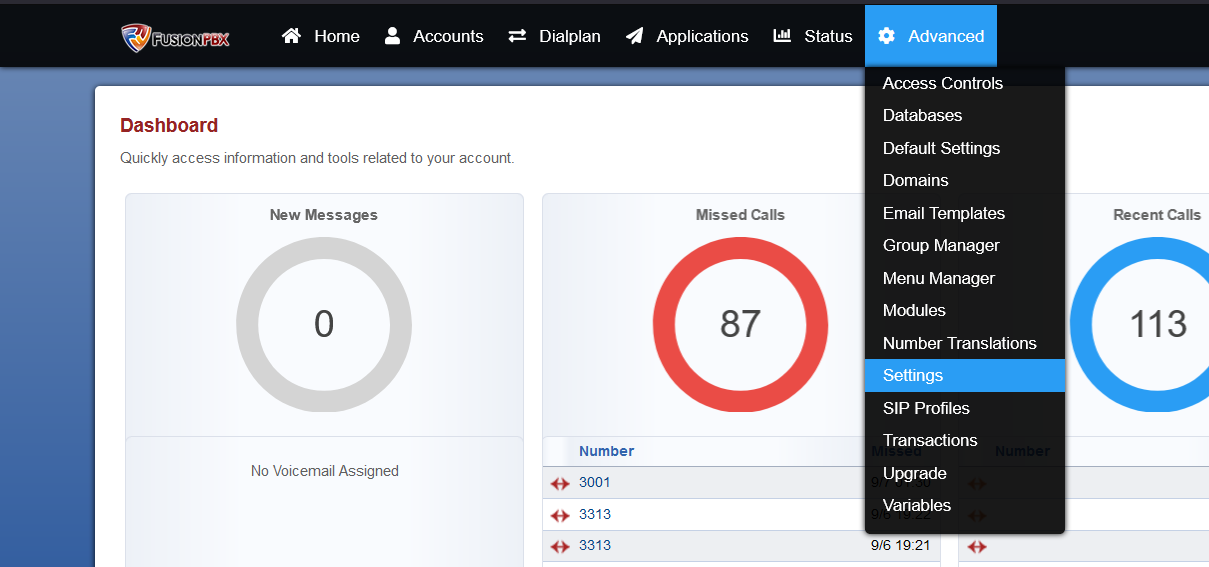
Open Settings from the Advanced tab.
-
Change the Event Socket IP Address to 0.0.0.0, and the Event Socket ACL to esl.

-
Optionally, change the Event Socket Password to the a different value, or leave as default ClueCon.
-
If the password is changed, then the same must be set in the environment file for the voice connector.
-
-
If the password is changed, update it in the environment variables file of the Voice connector docker container.
-
SSH into the Debian server onto which EFSwitch is installed.
-
Use command ssh username@server-ip
-
Enter user password and press ENTER.
-
Use command su.
-
Enter root password and press ENTER.
-
-
Run the command systemctl restart freeswitch to restart EFSwitch with the new ESL settings.
-
Log out of EFSwitch in the browser and log back in.
-