Overview
Expertflow CX's AgentDesk is a browser-based application that serves as a unified agent workspace for handling customer queries across all contact center touch points (voice, chat, video). This gives agents the power to stick to one single interface for handling multiple different nature of customer requests while viewing the combined interaction history across channels, of the incoming customer.
The AgentDesk can also be embedded within Cisco Finesse Desktop as a Finesse gadget or, in a 3rd-party CRM solution.
Intended audience
This document serves as a user guide for contact center agents to help them use the AgentDesk interface more effectively to handle their routine tasks.
Getting Started
Login
There are two options for agents to get logged in to AgentDesk;
-
One with Cisco Finesse while the application is running as a Finesse gadget
-
The other, with a local Keycloak user account, especially in a case when the application is running in a standalone mode (as a WWW-based contact center)
Expertflow CX uses the third-party IAM solution, named, Keycloak for managing agent privileges. Agent profiles and their role mappings (agents and supervisors) for AgentDesk are defined and managed within Keycloak.
|
Login Options |
Description |
|---|---|
|
Login with Finesse |
This is available when AgentDesk is embedded in Cisco Finesse. Once logged in to Cisco Finesse, agents automatically get logged in to the AgentDesk. This automatic login to the application is supported in case of both SSO and non-SSO environments. When agents log in, their login details are synchronized with Keycloak so that the agent profiles also get created in Keycloak with the same credentials as of Cisco. Upon login, agents are allowed to get logged into AgentDesk with the restricted access to the application resources. |
|
Login with Keycloak |
If Cisco integration is not enabled, agents provide their Keycloak username and password while logging into AgentDesk. The user authentication request is redirected to Keycloak for request verification. Upon confirmation, agents get logged in to the AgentDesk with access to the permitted resources. |
See Security and User Permissions for more details on user authorization with AgentDesk.
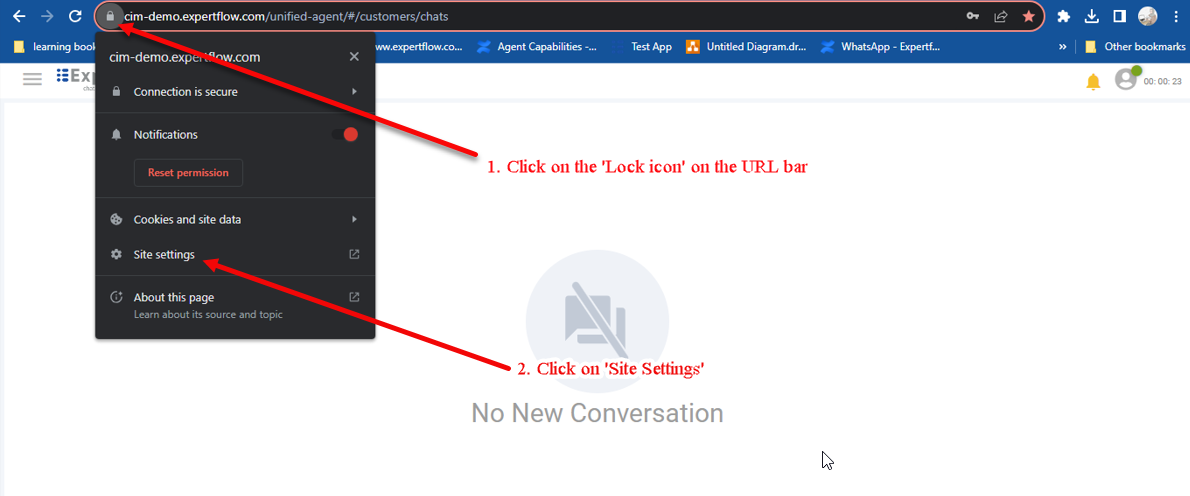
Browser and Sound Notifications
Agents will receive browser notifications along with a beep on receiving new conversations, and whenever a new message is received from the customer in an existing conversation. Make sure that your browser settings are enabled to receive these notifications.
To enable browser notifications on the AgentDesk, click on the lock button in the URL of the AgentDesk browser
Accept a Conversation
Agents receive new customer requests either from queues (based on the routing logic) or from Lists if they are subscribed to the List (from Subscribed Lists). The former is called Push Routing or Precision Routing where new requests are pushed or assigned to agents, while the latter is called Pull mode where agents can pull a request from the List and join whenever they are convenient. In this section, we'll see how agents can join a Push-based request.
For more details, see Pull-mode vs Precision Routing.
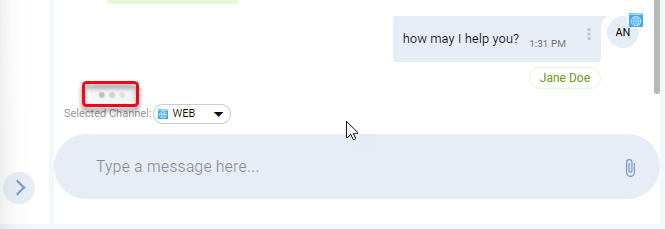
Once a new request is assigned to an agent and the agent is reserved, an incoming chat notification appears on the AgentDesk, with a button to Accept the request.
The notification contains the name of the customer (if identified), or "Jane Doe" (if an exact match was not found), with a channel type icon to determine the channel through which the request was received (such as Web, WhatsApp channel icons).
See Customer Lookup Section in the following sections to learn more on how a customer is identified.
In the case of an anonymous customer (or Jane Doe), the incoming notification's background color is set to RED while in the case of an identified customer, the background color of the notification changes to GREEN.
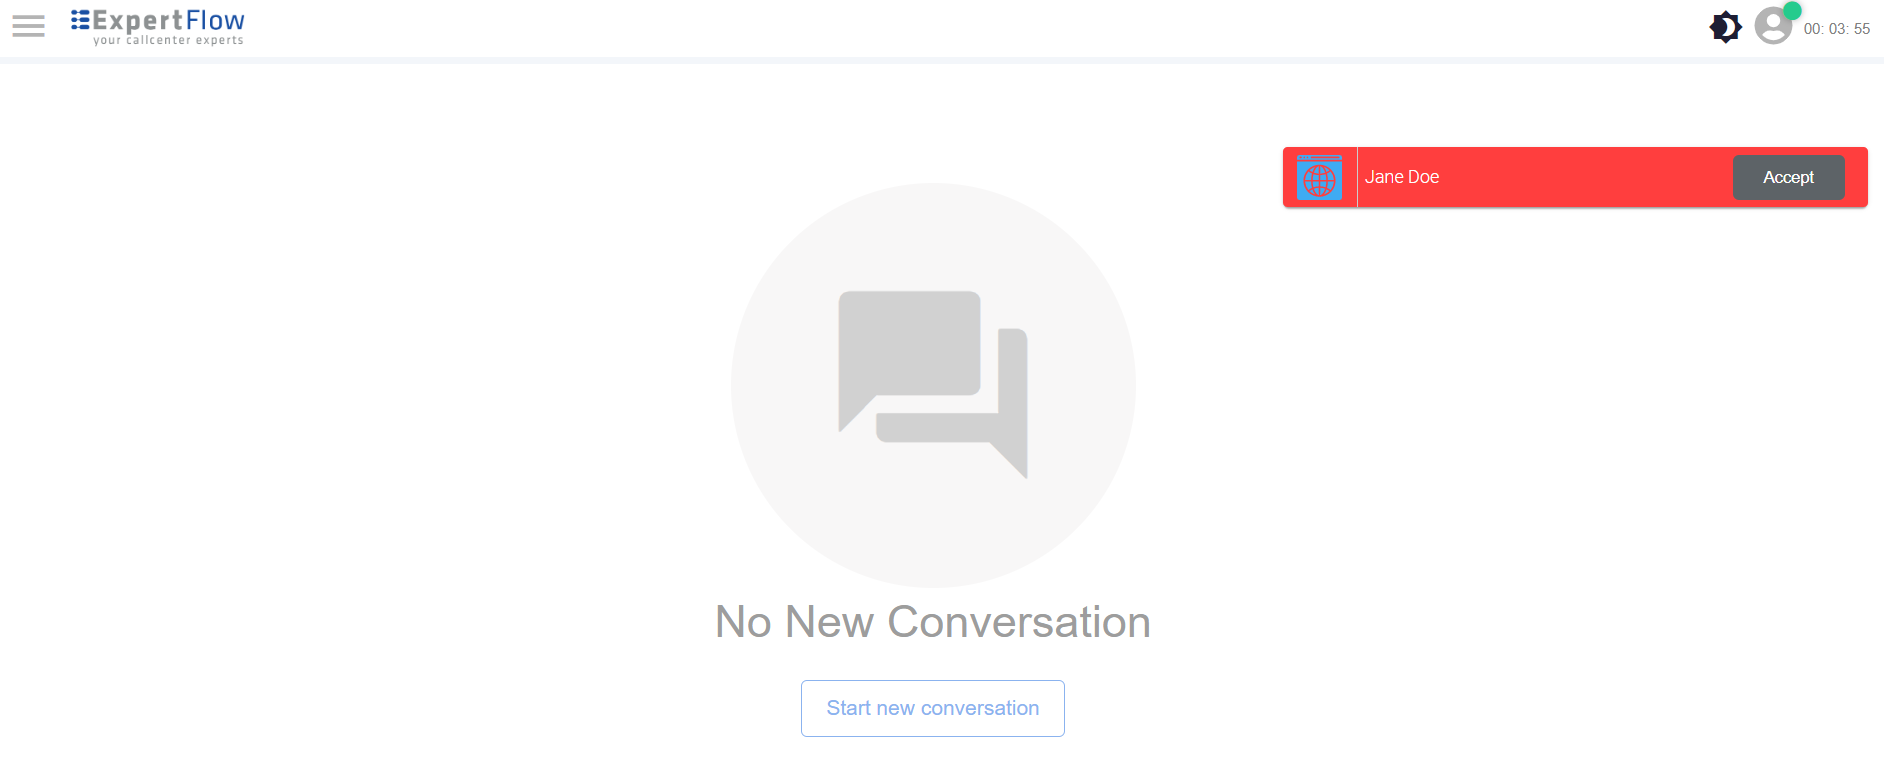
Accept a conversation
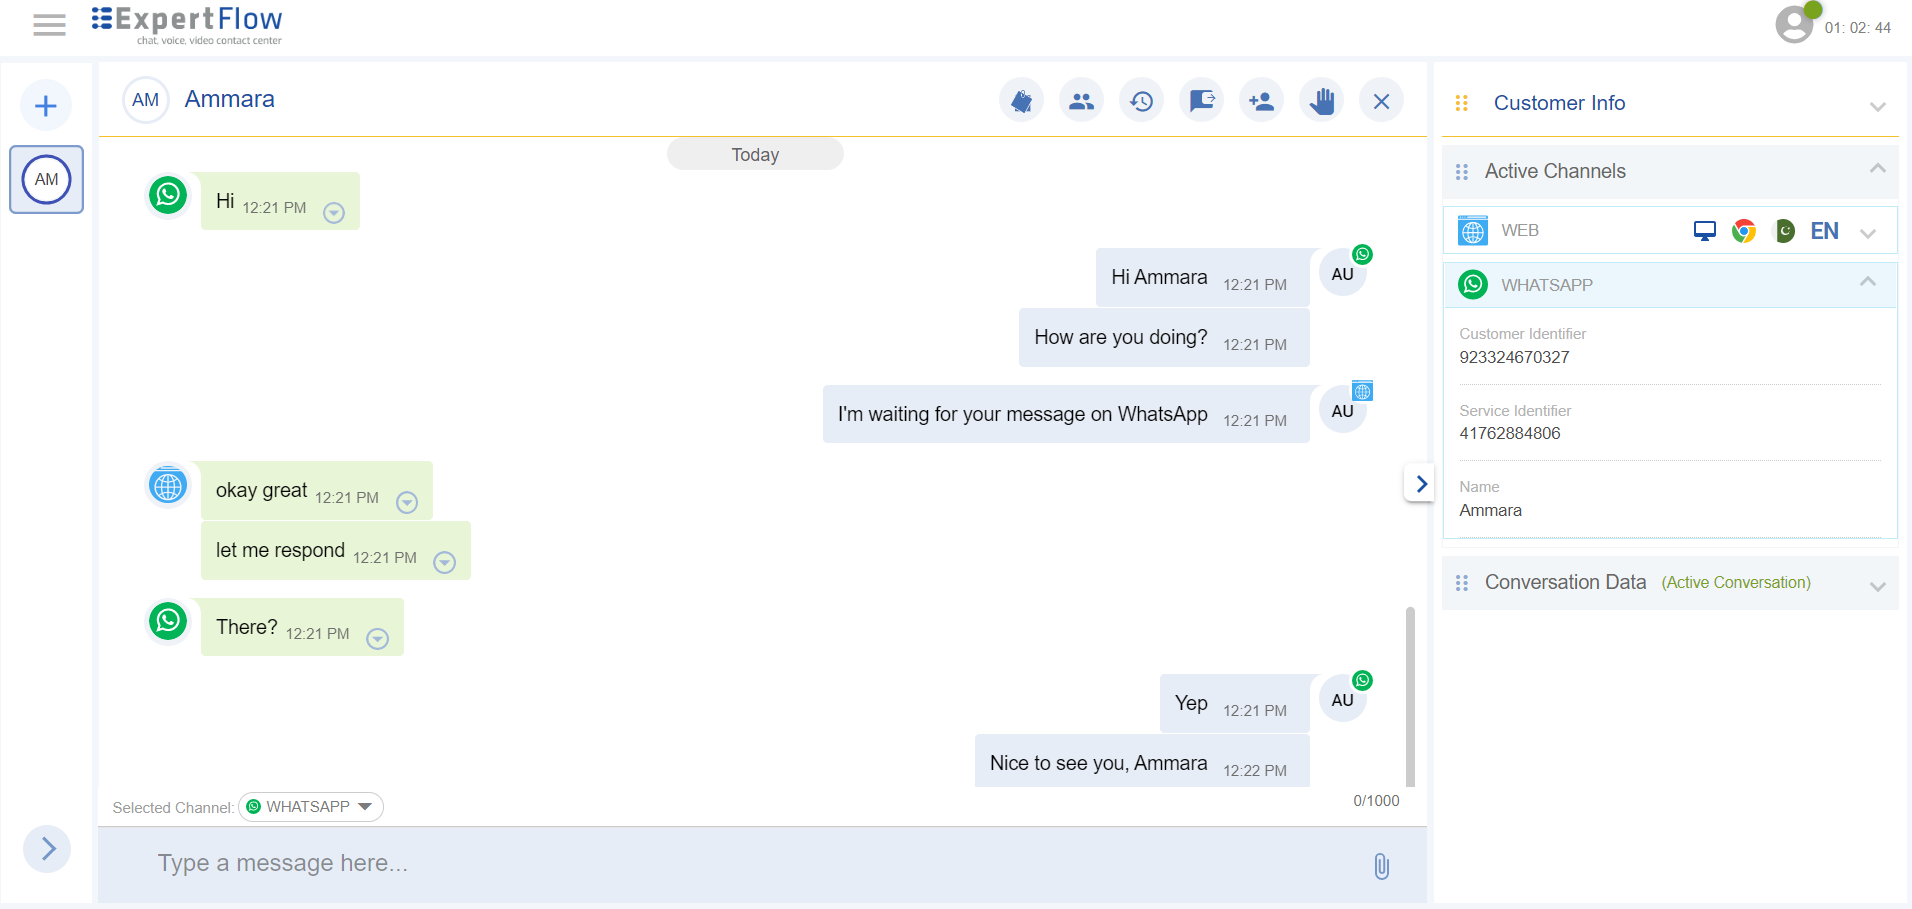
Upon accepting the request, agents can see the Customer Profile data and Media Channel details of the customer by expanding the right-hand panel under the relevant panes.
The central Conversation History View shows all activities exchanged with the underlined customer including voice calls, chats, wrap-ups/ notes given on a conversation. The Channel Session data for the active channel is also available under the Active Channels pane.
See below mentioned details about each of these panes.
Customer Lookup
Upon the arrival of a new customer request, the application shows the best-matched customer profile in the Customer Profile pane, based on the channel identity of the customer (such as WhatsApp number, Facebook name, Twitter name, and email ID). During customer lookup, the following scenarios may appear:
|
Scenario |
Description |
|---|---|
|
Single/Exact match found |
This is the case when an exact match is found. However, if you realize that this is a different customer (based on your conversation with the customer), there is a possibility that you can change the customer and link the conversation to a different customer. To do this, click on the Link Profile button under the Customer Profile pane. From the Customer List, you can choose the right customer and click the mouse hover action Link against the customer record to link it with the active conversation. See the Link Profile section. |
|
Multiple matches found |
When multiple matches are found, you will see a list of matches on the right side under the Conversation View, in the Link Profile tab. Choose the quick link option from here to link the active conversation with the appropriate match. In case if you need more details on all found matches, click the View all matches button to get to the Customer List view where you can see more details of the customers before you actually link the conversation with one. Click the link icon against one customer record in the Customer List view to link the customer with the conversation. |
|
No match found |
When the customer does not exist, the system will create an anonymous profile with the default name, |
See more details on linking a conversation with a different profile, in the following section.
View Customer Profile
Expand the arrow on the Conversation view to see the Customer Profile pane on the right-hand side.
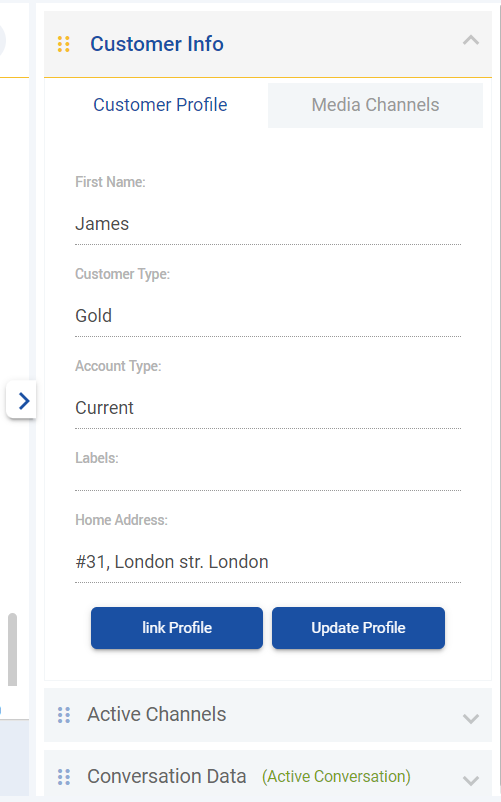
Customer Profile
In this view, the customer profile data is segregated and divided into two tabs:
Customer Profile
All customer data is stored in Expertflow CX except the media channel identities (phone number, WhatsApp number, etc.).
If no data is available in any of the customer fields, those fields will not appear under this tab by default.
Media Channel Identities
This lists down all of the media channel identities of the customer in a unified space, giving agents the flexibility to choose one channel identity to initiate a conversation with the customer.
See Initiate a Conversation section for more details.
This, in the future, will help agents in also viewing the presence status (online, offline) of customers on each channel (depending upon the channel that supports presence).
Manage Customer Profile
Click the Update Profile button to update the customer information. Click the Link Profile button to link this conversation with a different customer profile.
To learn more, see the Update Customer and Link Profile sections respectively.
Link Profile
The auto-matched customer profile is linked automatically with the conversation as soon as the conversation starts. When it comes to manual linking, there are multiple scenarios which are detailed below:
-
When a customer is not identified but exists
-
When multiple matches are found
-
When the actual customer is different than the identified
When a customer is not identified but exists
This is the case where a customer is supposed to contact the contact center with an identity that is not stored under the customer profile. In this case, the system creates an anonymous profile and returns an anonymous customer to the agent to do the essential updates. The agent can decide if a new profile needs to be created or link the active conversation with an existing customer profile (based on the conversation with the customer).
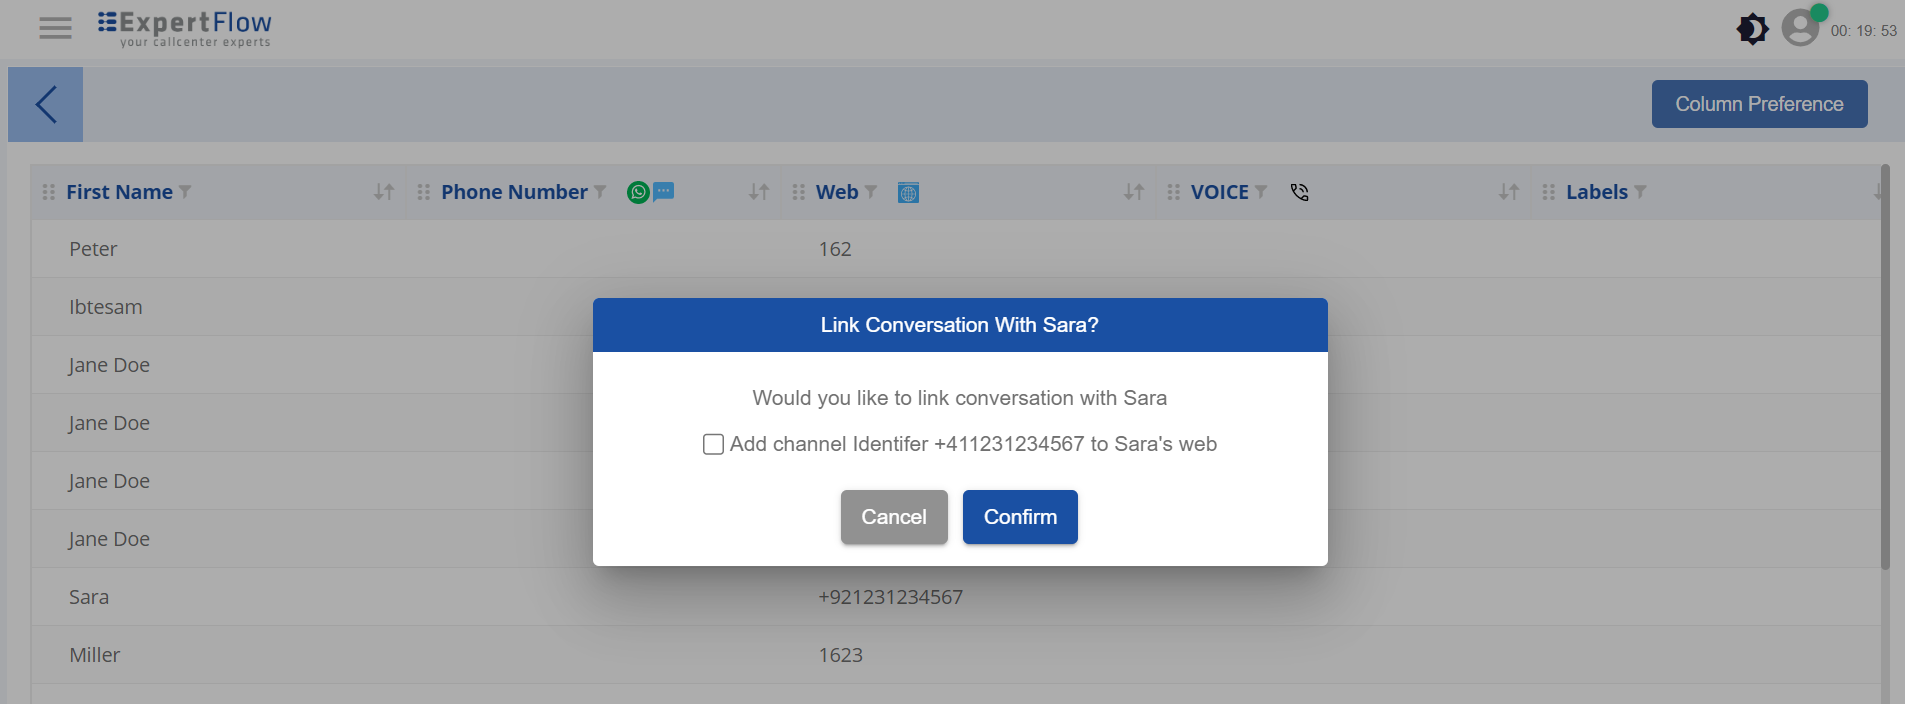
If the agent comes to know that the profile already exists, he/she can click the Link Profile button under the Customer Profile pane on the right and click the "Link" icon against a desired customer record on the Customer List view. See the screenshot below.
See Customer List to learn more.

Upon clicking the Link option, the agent is asked to confirm if it also wants to update the channel identity of the customer in the linked profile. Upon confirmation (check the checkbox in the confirmation dialogue), the channel identity is added to the linked profile so that the next time when the customer reaches with the same channel identity, the system will return this customer profile as an identified customer (if no other profile exists with the same identity).
In case, the customer says that the channel identity does not belong to his/her profile or the agent decides not to add the identity to the linked customer profile, the conversation still gets linked with the profile so that it can be tracked under the linked customer's conversation history.
When multiple matches are found
This is the case when multiple matches were found against the customer's channel identity. This happens when the same channel identity exists in multiple customer profiles. In this case, the system creates an anonymous profile and returns all matched customers as suggestions to the agent. The agent will see all matches under another pane, Link Profile pane. The agent can select the right customer from the pane and choose the Link option against the desired customer.
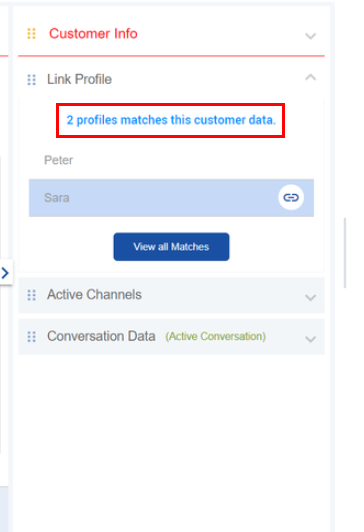
To see more details of those matched profiles, click the View all matches button to go to the Customer List. Looking at the other attributes from the Customer List, make sure that you click the "Link" icon against the right customer record on the Customer List.
When the actual customer is different than the identified
This happens when a customer has called from an identity that is linked with a different customer profile. For instance, a customer John calls from another customer David's cell number while the number is owned by David.
In this case, the agent may decide if it wants to link the active conversation with a different customer (in this example, John) instead of the identified customer (i.e. David). Also, the agent can decide if it needs to update the channel identity to the linked profile (based on its conversation with the customer).
View Conversations History
The Conversation History lists all conversations exchanged with the active customer. Each conversation carries activities exchanged over the conversation. These activities include, voice calls received/ initiated to the customer, ii) chat messages sent over the conversation (customer/ whisper messages), iii) conversation notifications logged under all conversations with this customer, iv) wrap-up and note activities.
So when a request is routed to an agent, the agent can only see the current conversation and the activities/messages exchanged for the active conversation before it was routed to the agent.
By default, the past conversations are hidden behind a Load More button. If you have permission to load the history, click this button to load the past conversations of the customer.
See more about permissions and scopes in Security and User Permissions.
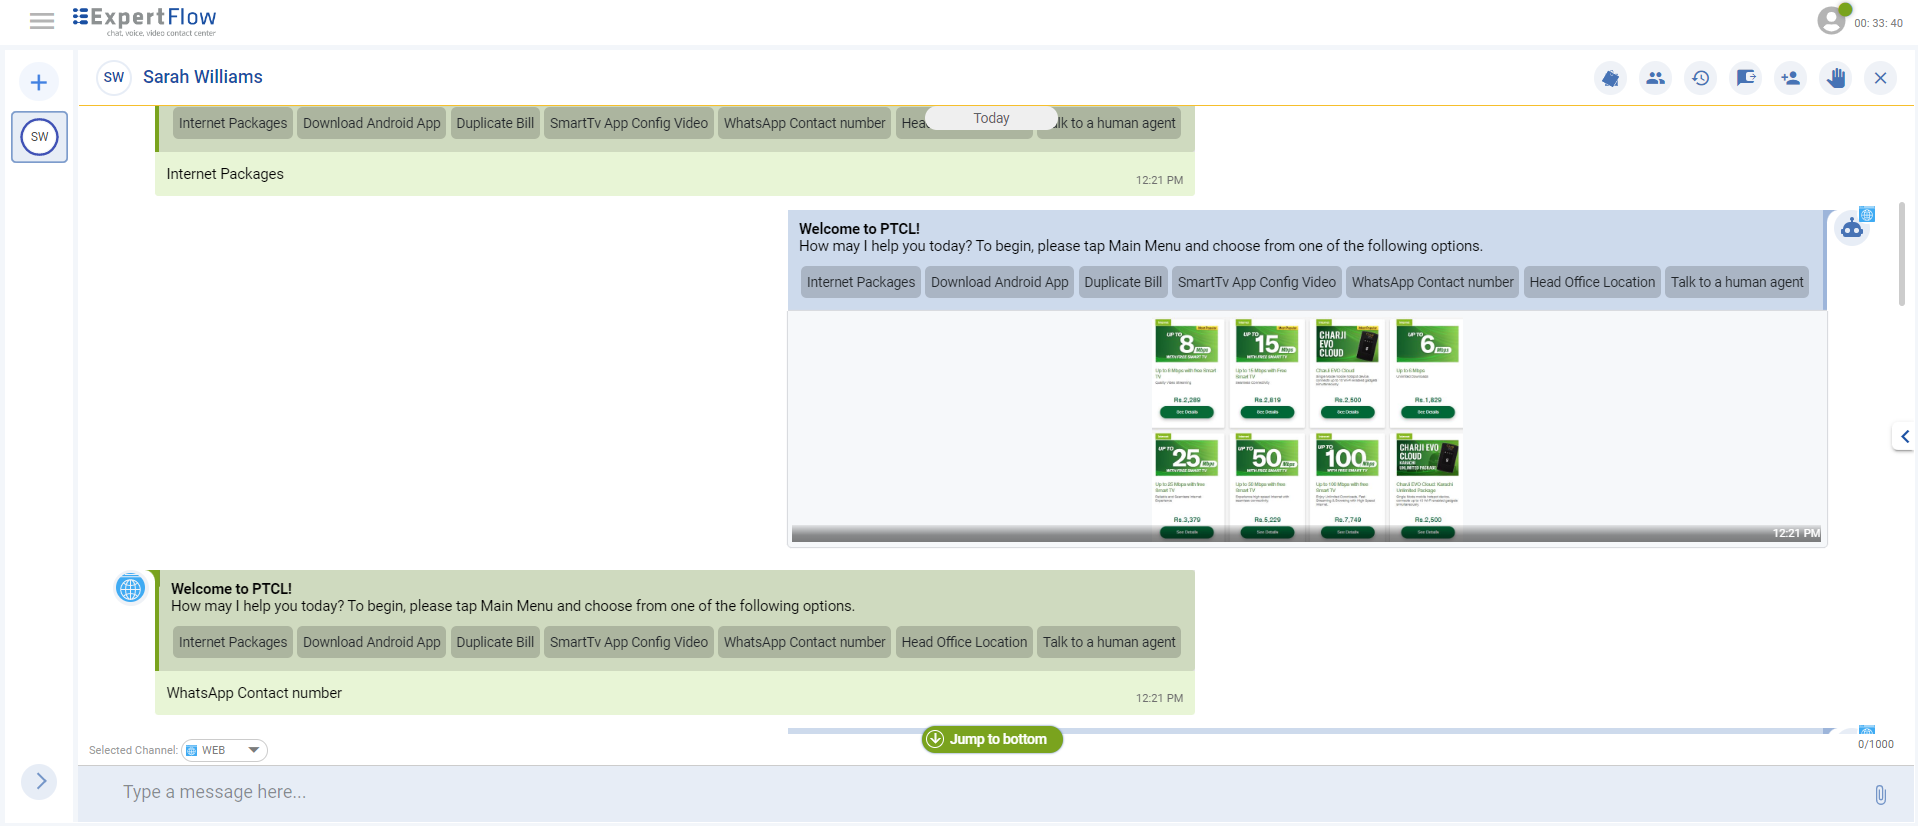
To go to the bottom of the conversation, click Jump to bottom.
If you receive a new message while reading the previous history on the top, you'll see the New message button being popped up. Click on that to read the newly received message.
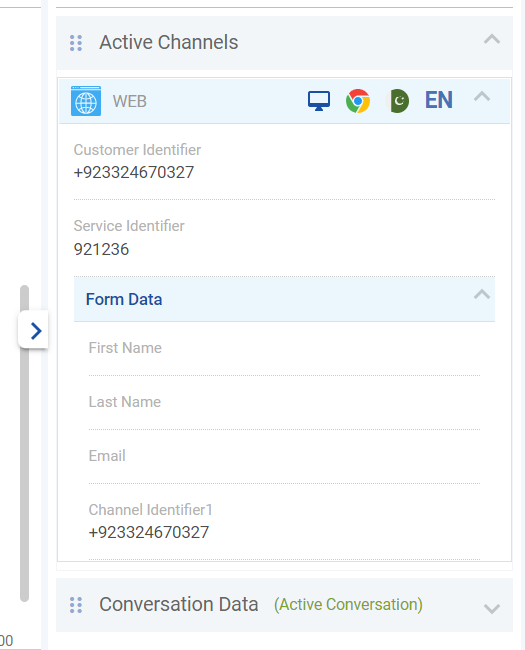
View Active Channels
This is where all of the active channel sessions of the customer are listed. These are the channels on which the customer is currently active on the system. Since a customer can open multiple channel sessions in a conversation, all those channel sessions are listed here with or without the channel session data (this is the data that is passed by the channel connector to the channel).
In the case of a web channel, the channel session data carries:
-
Customer's browser info - device type (mobile, desktop), browser type, time zone, language
-
Customer Identifier
-
Service Identifier
-
Form data as filled in by the customer while initiating the web chat
In the case of WhatsApp channel, the channel session data carries:
-
Service Identifier
-
Customer Channel Identifier
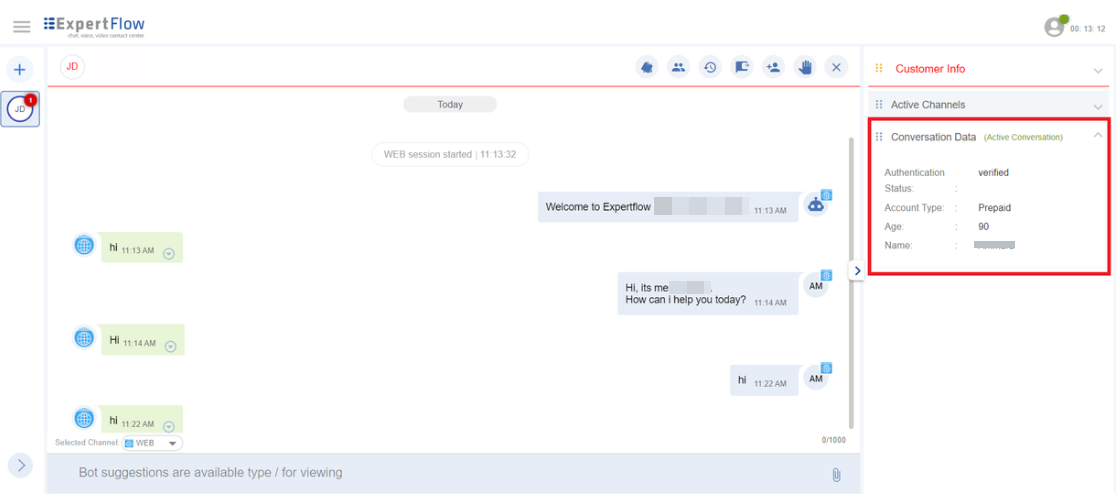
View Conversation Data
To learn more, see Conversation Data.
To see the conversation data of an active conversation, see the Conversation Data pane on the right side. The data is available in the form of key-value pairs. If any changes are made to this data, they'll be updated here on run time, without requiring a manual refresh.
To see the conversation data of past conversations, see the data in the conversation history by clicking on the Conversation Data chip shown alongside each conversation.
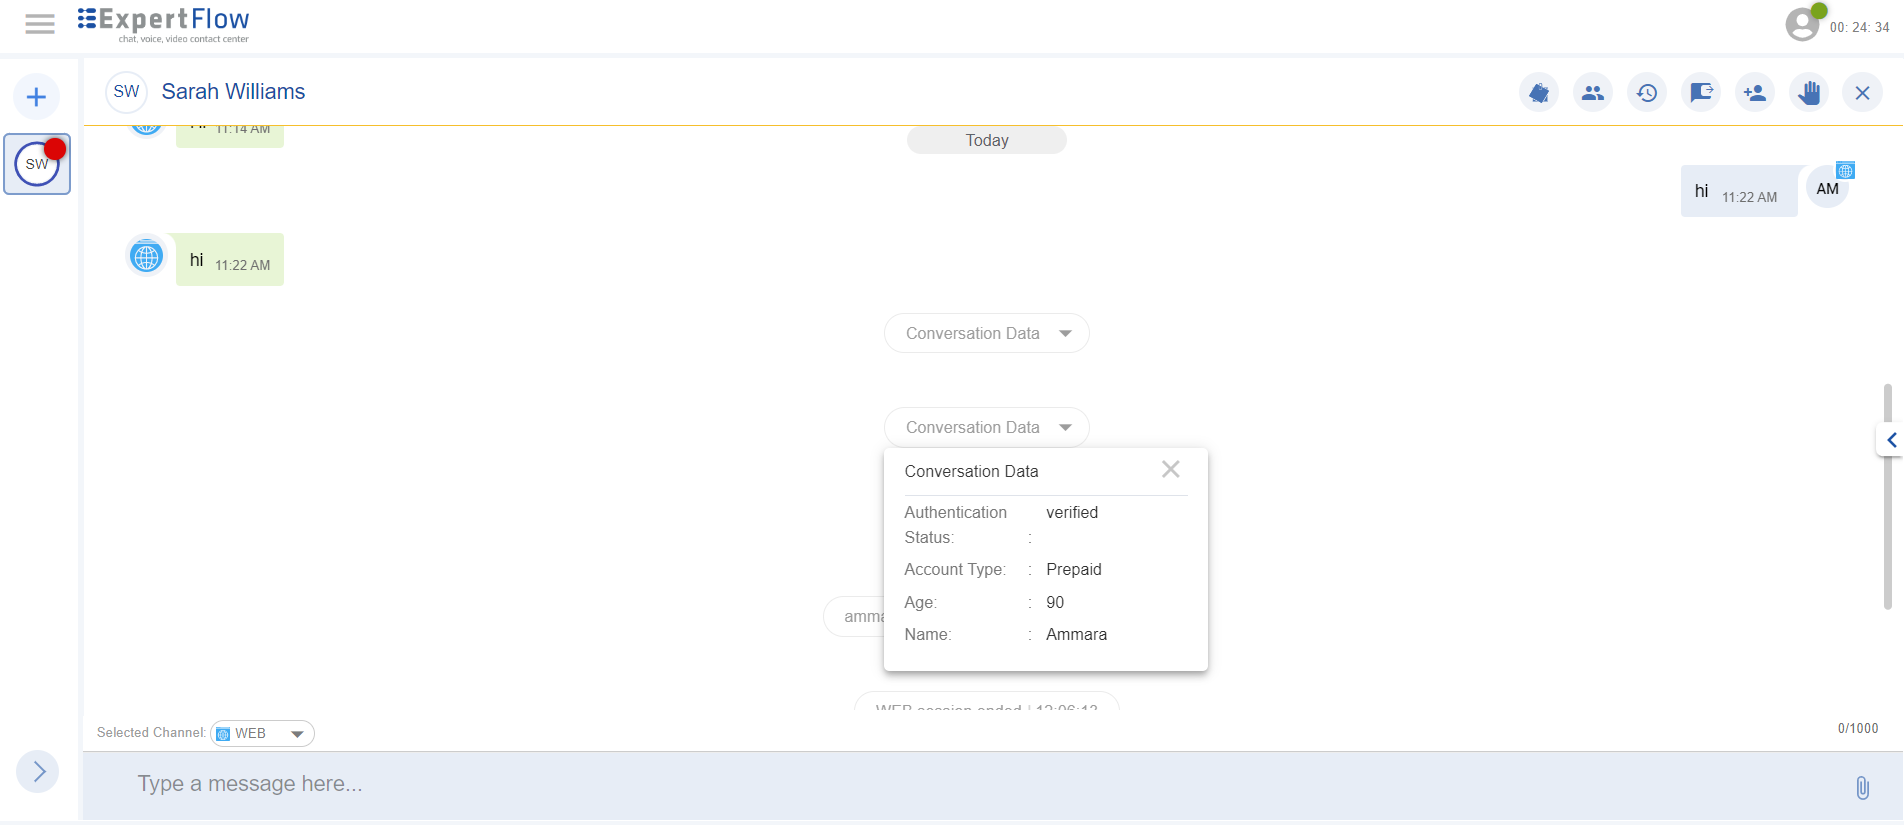
For now, each update done to the Conversation Data is logged in the conversation history. In future updates, the past conversations will only carry one Conversation Data per conversation, with the latest modified key-value pairs.
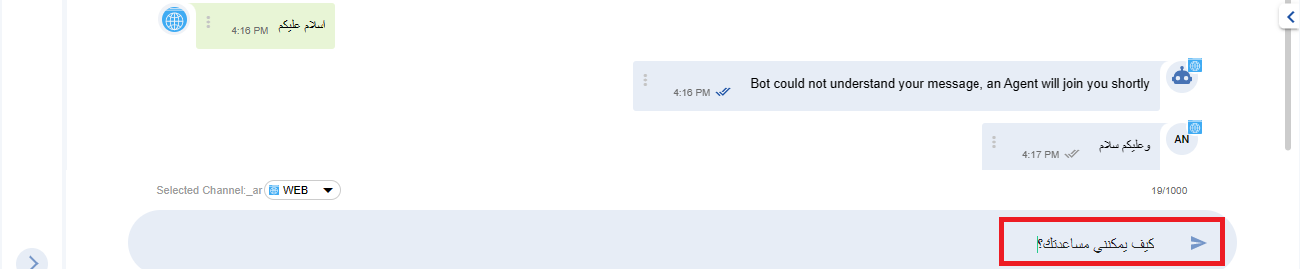
View Messages on Right-to-left and Left-to-Right
Based on the browser language settings of the agent, the agent can see the message alignment and the message composer text of all messages started from the right and proceed to the left, or started from the left and proceed to the right If it is an RTL (Right to left) language such as Arabic, Hebrew, Sorani, Azeri, Aramaic, Persian, Urdu, Kashmiri, Pashto, Sindhi, Punjabi the message composer and alignment will be Right-to-Left as shown in the screenshot below,
In the case of LTR (Left to right) language English for example, the message composer and alignment will be Left-to-Right.
Change AgentDesk Language
Agents can change the language preferences on the AgentDesk which enables them to switch the UI language to the specific preferred language.
To choose the preferred language of the AgentDesk application, the agent can see a list of languages in the Language dropdown as defined by the Administrator in the Unified Admin under Locale -> Supported Languages
This will translate all the static elements of UI on the AgentDesk Application.
Send a Message
At the extreme bottom of the Customer Conversation View, the Message Composer bar is shown. Type a message in the composer to send it over to the customer. On the top of the message composer, there's a dropdown showing the list of active channels of the customer in the conversation. By default, each message from the agent is sent to the customer on the channel from where the last message of the customer was received.
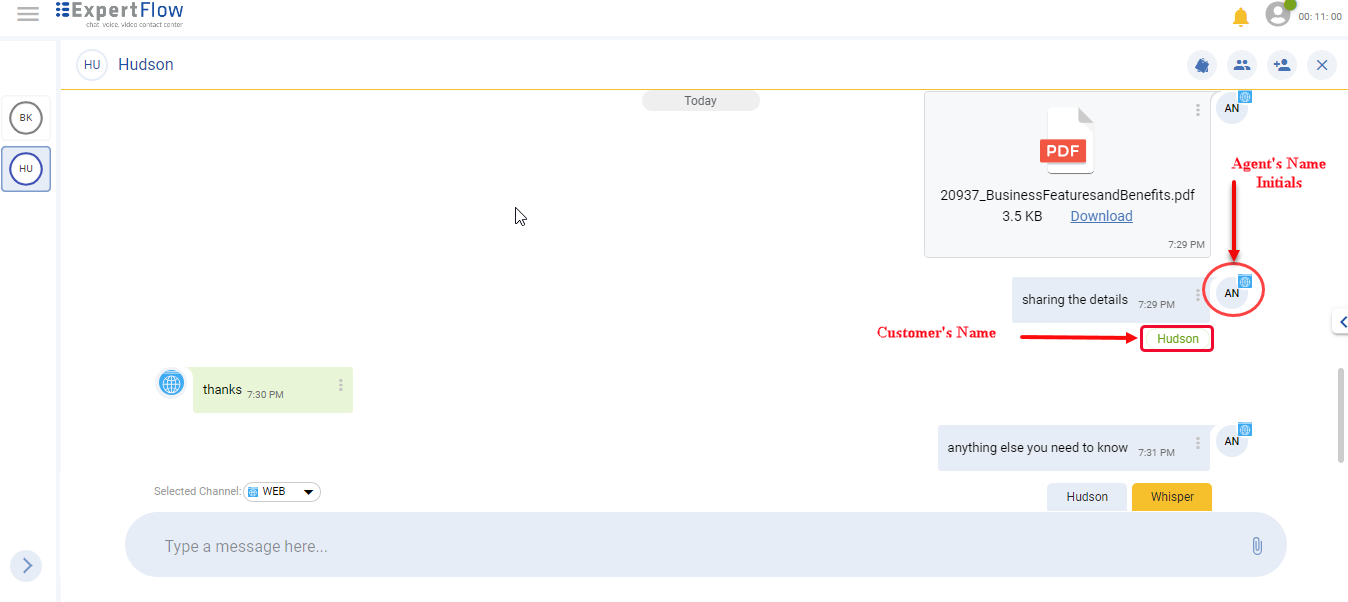
Delivery Notifications
The agent receives the Delivery Notification in the form of the customer's name display right under the message. The message will not consider to be delivered/read if there is no customer's name under the agent's message.
In case, the agent's message is not delivered due to any reason, instability of internet or power outage for example, the message will be blurred. This shows that message is not delivered.
Typing Indicator
Typing indicator is an indication for the agent to show that someone is still alive in the conversation. When the customer will respond and type a message, the typing bubbles will pop up. This allows the agent to stop and is more likely to wait for typing bubbles to stop and then can respond.
In the same way, if the agent will start typing, the typing bubbles will pop up with the customer. The customer will wait for typing bubbles to stop and then can respond.
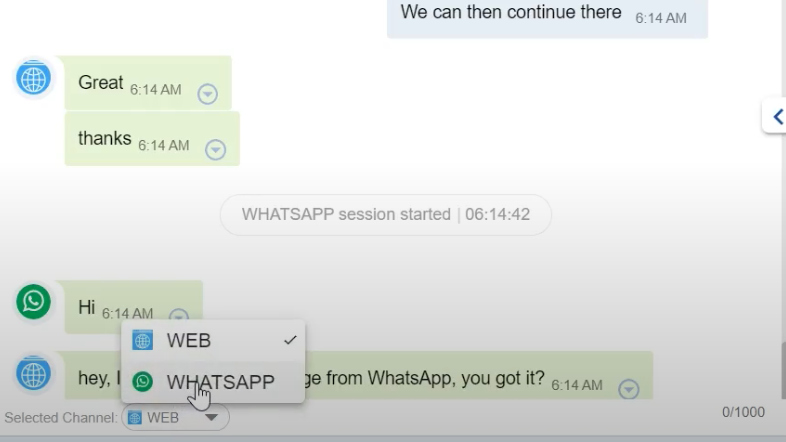
Switch to a different Channel
During the conversation with the customer, you may choose to switch to a different channel to send your message.
After typing your message in the Message Composer, choose the desired channel from the dropdown to send your message.
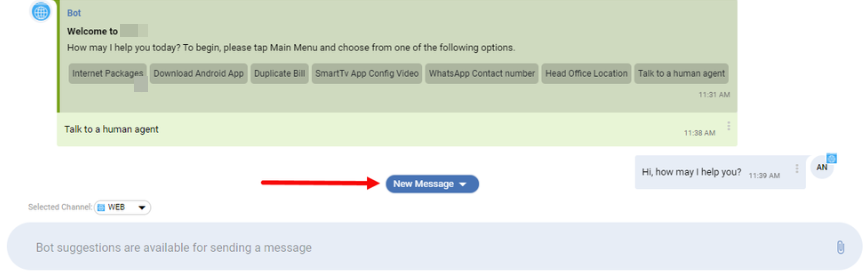
Send a Bot Suggestion
By default, the bot generates suggestions based on the latest messages sent by the customer. When there are some suggestions, you will see the text, Bot Suggestions are available type '/' to view in the composer.
Typing / will open up the Bot Suggestions panel. You can choose a suggestion from the panel and either, edit and send, or directly send it to the customer.

Please note that, bot suggestions are only available when a customer message is received. The option to choose a bot suggestion disappears as soon as the agent responds to the customer.
Send Attachments
Agents can send file attachments by using the attachment icon inside the Message composer, both images and docs. The following types of files are supported:
-
.txt,
-
.png
-
.jpg
-
.pdf
-
.ppt
-
.xlsx
-
.xls
-
.doc
-
.docx
While sending an attachment, you cannot enter a text message in the composer for now.
Send Formatted Text
An agent can send a formatted text message in bold, italic, strikethrough, highlight a text, and hyperlinks.
-
To bold text, add asterisks * before and after the text you want bolded.
-
To italicize text, add underscores _ before and after the text, you want to italicize'
-
To strike through text, add tildes ~ before and after the text you want to strike through.
-
To highlight a text, add an exclamation mark! before and after the text you want to highlight.
-
Hyperlinks are automatically detected by the message composer
-
Use single quotes ( ` ) to quote a single line text message (not valid for multiline texts)
-
Use multi quotes ( ``` ) to send texts with spaces before and after the text message you want to quote
View Structured Messages
Agents can receive the following types of structured messages, exchanged between the customer and the bot via WhatsApp channel:
-
Buttons and replies to a button message - (also supported for web channel)
-
Contact messages
-
Location messages
-
URL messages
-
Images
-
Video messages
-
Audio messages
Sending structured messages from the agent side is not yet supported.
Send A Quoted Reply
You can also send a reply to a specific message on the conversation. You can reply to a message sent either by the customer, by yourself, or by another agent added to the conversation.
To do this,
-
Choose the message you want to reply,
-
Click on the three dots button on the right side of the message. A pop-up of 'reply' will appear.
-
By clicking on the Reply button, you will see the message as a quoted message in the composer.
-
This is how you can reply to the specific message.
Quoted replies can be seen in the conversation view with a special indication that it was a quoted reply. For visibility, agent names in the 'Quoted Reply' are visible in blue color and the customer's name is seen in grey color.
Switch between Active Conversations
A list of active conversations are displayed on the left-hand side of the pane. You can switch to any chat you want to respond to.
On each active conversation, you will also see the count of new or unread messages. The counter disappears once you switch to the conversation and click in the Message Composer area.
There's also a + button displayed on the top on the left side bar. This is for agents to start a new conversation with a customer on their own.

Conversation Controls
At the top most of the Conversation View, there is a control bar displaying actions including leave conversation, wrap-up, Transfer, Conference controls. See details below.
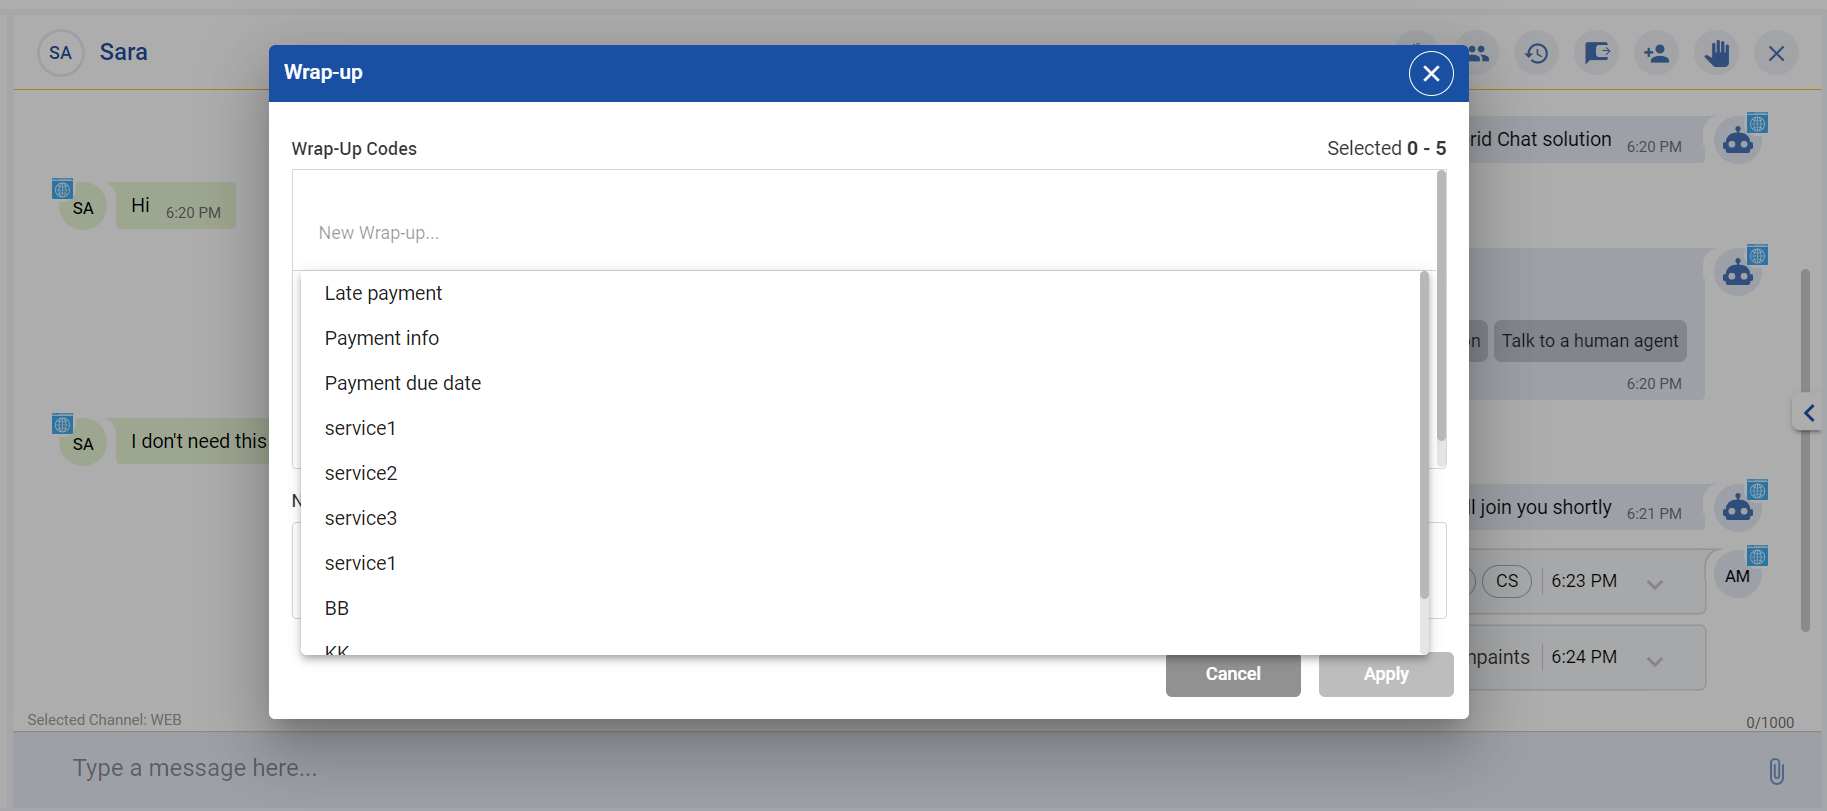
Add Wrap-up/Notes
Wrap-up is a concluding note added to the conversation which helps the business to know what the conversation was about. See more on Agent Capabilities
Add wrap-ups to a conversation by clicking the notes icon 
You can see Wrap-up categories and reasons as defined by the system administrator in the Wrap-up form in Unified Admin. Choose a category and a reason that best matches to the conversation you are having or had with the customer.
You can add a maximum of five wrap-ups in a single Wrap-up activity. However, more wrap-ups can also be added with additional wrap-up activities.
After applying wrap-ups, you can also add notes to summarise what the conversation was all about. The wrap-up and notes pushed in the conversation are available as independent activities in the Conversation view.
Notes can also independently be added at any time.
Leave Conversation
Click the x icon to leave the conversation. Upon clicking this icon, the Bot either closes the conversation (e.g. if the customer has already left) or, continues with the customer if the customer is still there and wants to know more.
Transfer a Conversation
You can transfer an active conversation to another agent if you think that the other agent will better answer the customer's query.
A conversation can be transferred in two ways:
-
Queue Transfer
-
Direct Transfer (Agent-to-Agent transfer)
For now, you can transfer a conversation to another queue from where the Routing Engine looks for a suitable agent to join the conversation. Direct or agent-to-agent transfer feature will be available with future releases.
Transfer the conversation: Workflow
button on the control toolbar will show you a dropdown containing the list of all queues with the following information:
-
Queue Name (department name or any queue name)
-
Number of agents available (ready + active) in the queue. This helps in deciding whether you should transfer this conversation to the selected queue or not (based on the available agents count).
-
Choose a queue from the list and select the Transfer option.
-
In the Message box in the Transfer to Queue dialog box, you can optionally type a message for the receiving agent. This message is then received by the other agent who is going to join the conversation. Click the Transfer button to transfer the conversation.
-
You will see a notification that "Conversation is closed due to CHAT TRANSFERRED" and another toaster notification "Transfer request placed successfully"
-
The chat will be parked in the transferred queue on priority. The system will look for an available agent from the queue to route the conversation to an agent.
-
The customer sees a notification, "Your request is being transferred to <queue-name>, please wait!", followed by another notification that, "Agent1 has left".
-
If the other agent does not accept the request, the Routing Engine keeps on looking for another agent for sometime
-
If no agent is found,
-
The request is timed out.
-
The customer will see a notification, "No agents were available".
-
Writing a note while transferring a request is an option thing for agents to describe something about the conversation to the transferee.
When you receive a transfer request from another agent,
-
You'll receive a transferred request notification with the following information:
-
Channel icon via which the request is placed (WhatsApp, Web, Facebook, etc.)
-
A button to Accept the request
-
Name of the customer if identified
-
The optional notes are entered by the agent while transferring the conversation. See point #3 above..
-
-
Click the Accept button to accept the conversation
-
The customer will also be notified that you have joined the conversation.
Add Agents to Conference
This feature allows you to add one or more agents to the conference with the customer.
When an agent is added to the conference, the conversation becomes a conferenced conversation. All newly added agents in the conference have the same level of rights and permissions as of the first primary agent in the conversation.
This also implies that if the first agent leaves the conversation, the conference will continue with the agents in the conversation.
To add agents to the conference
button on the control toolbar will show you a dropdown with a list of all available queues with:
-
Queue Name
-
Number of agents available (ready + active) in the queue
-
Choose a queue name from the list and hit the Queue Conference button.
-
In the Message box in the Conference dialog box, you can optionally type a message for the receiving agent. This message is then received by the other agent who is going to join the conversation.
-
Then, click the Add to Conference button to make it a Conference Conversation
-
The system looks for an available agent to be added as a Primary Participant to the conversation The system will route the conversation to Agent2
-
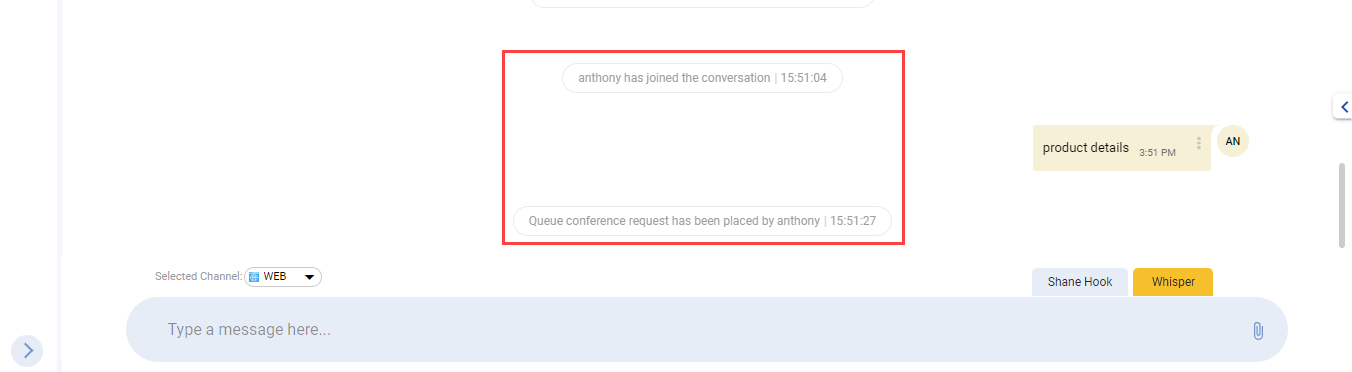
The first agent can see a toaster notification that a conference request has been placed successfully
-
You will see a notification in the Activity Timeline that the "Conference request has been successfully placed" on the other hand
-
Agent2 (receiving agent) receives an incoming conference request notification with the following information:
-
A special indication that this is a Conference Chat request from Agent1
-
Name of the identified/linked customer (if done by Agent)
-
Note entered by Agent1 (if available) before placing the Conference request
-
A button to Accept the request
-
-
By clicking the Accept button, Agent2 joins the conversation as the Primary Participant.
-
Agent1 sees the notification that A2 has joined
-
The Customer sees the same notifications in the Conversation history on the Customer side
-
Agent2 can send/receive Whisper messages with Agent1.
-
Agent2 can also see all the message exchanges in the current conversation.
-
Agent2 will see the Customer Profile and all the Media Channels, Active Sessions of the customer (based on the permissions) along with the Conversation Data and the past conversation history
-
Agent2 can perform other operations based on the Primary Participant permissions.
-
-
Agent 2 can leave the chat
-
-
All other conversation participants will see a notification, "<agent-names> left the conversation"
-
-
Agent2 does not accept the request.
-
The system keeps on looking for another available agent from the selected queue until it finds one
-
-
No agents available
-
The request will be canceled.
-
Agent1 sees a notification in the Activity Timeline such as, "No agents were available to join the conference conversation"
-
Send a Whisper Message
When there is more than one agent in the conversation, they can exchange whisper messages with each other.
Whisper messaging allows agents to chat internally with another agent or supervisor, during a customer conversation, without letting the customer know.
All agents who are a part of the conversation can view all whisper messaging exchanged. However, customers cannot see the whispered communication.
For now, whisper message capability is provided only for conferenced chats and Pull-based conversations (where there can be one or multiple agents in the conversation)
To send a whisper message,
-
Click the Whisper tab in the Message Composer as shown above in (Add agents to Conference)
-
Type your message
You'll notice that the Message Composer will be turned yellow as soon as you click the Whisper tab. This is to give agents the visual aid so that they can clearly distinguish between normal, customer messaging and whisper messaging.
All whisper messages are stored as part of the conversation and they are visible in the conversation history in yellow color.
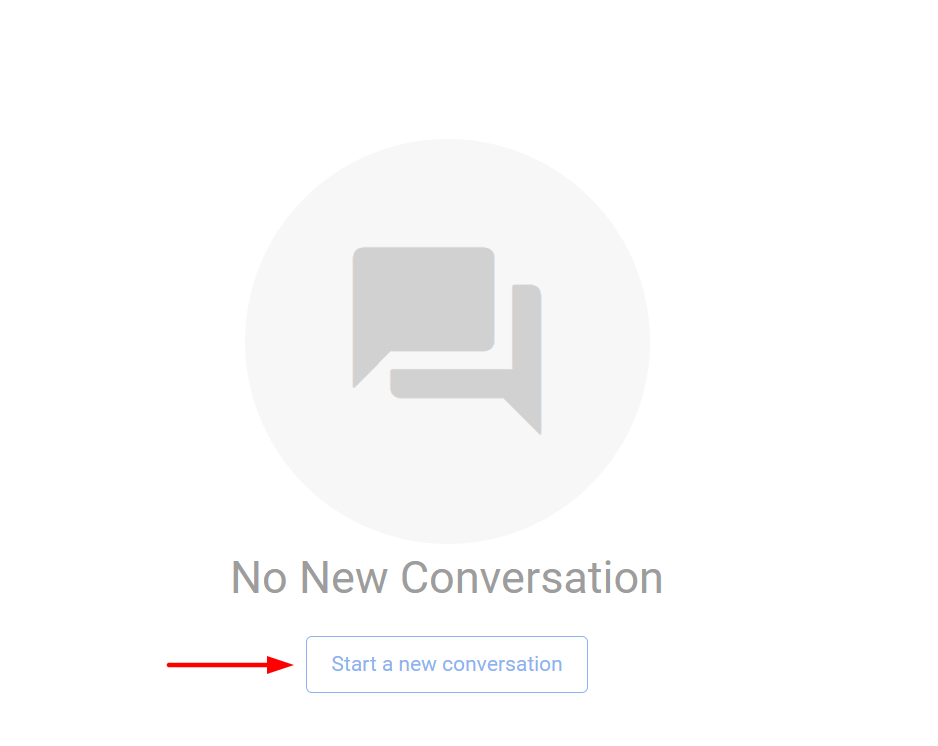
Initiate a Conversation
Using this version, you can also initiate new conversations with a customer for the WhatsApp channel. To do so, click the + icon on the left sidebar if you already have some active conversations, or, click the Start New Conversation button on the Conversation View in case of no conversations.
On the Customer List that opens up, look for the desired customer record and click the contact icon against the record. This will open up the customer profile on the Conversation View with Message Composer disabled. This is because no conversation is currently active with this customer. Also, by default, the customer history is hidden. You'll be able to load the history of the customer by clicking the link if you have permission to do so.
Expand the right side and click the Media Channels pane. Choose the channel identity (for now, only the phone number) for WhatsApp channel, click the dropdown and click the chat icon against the WhatsApp channel.
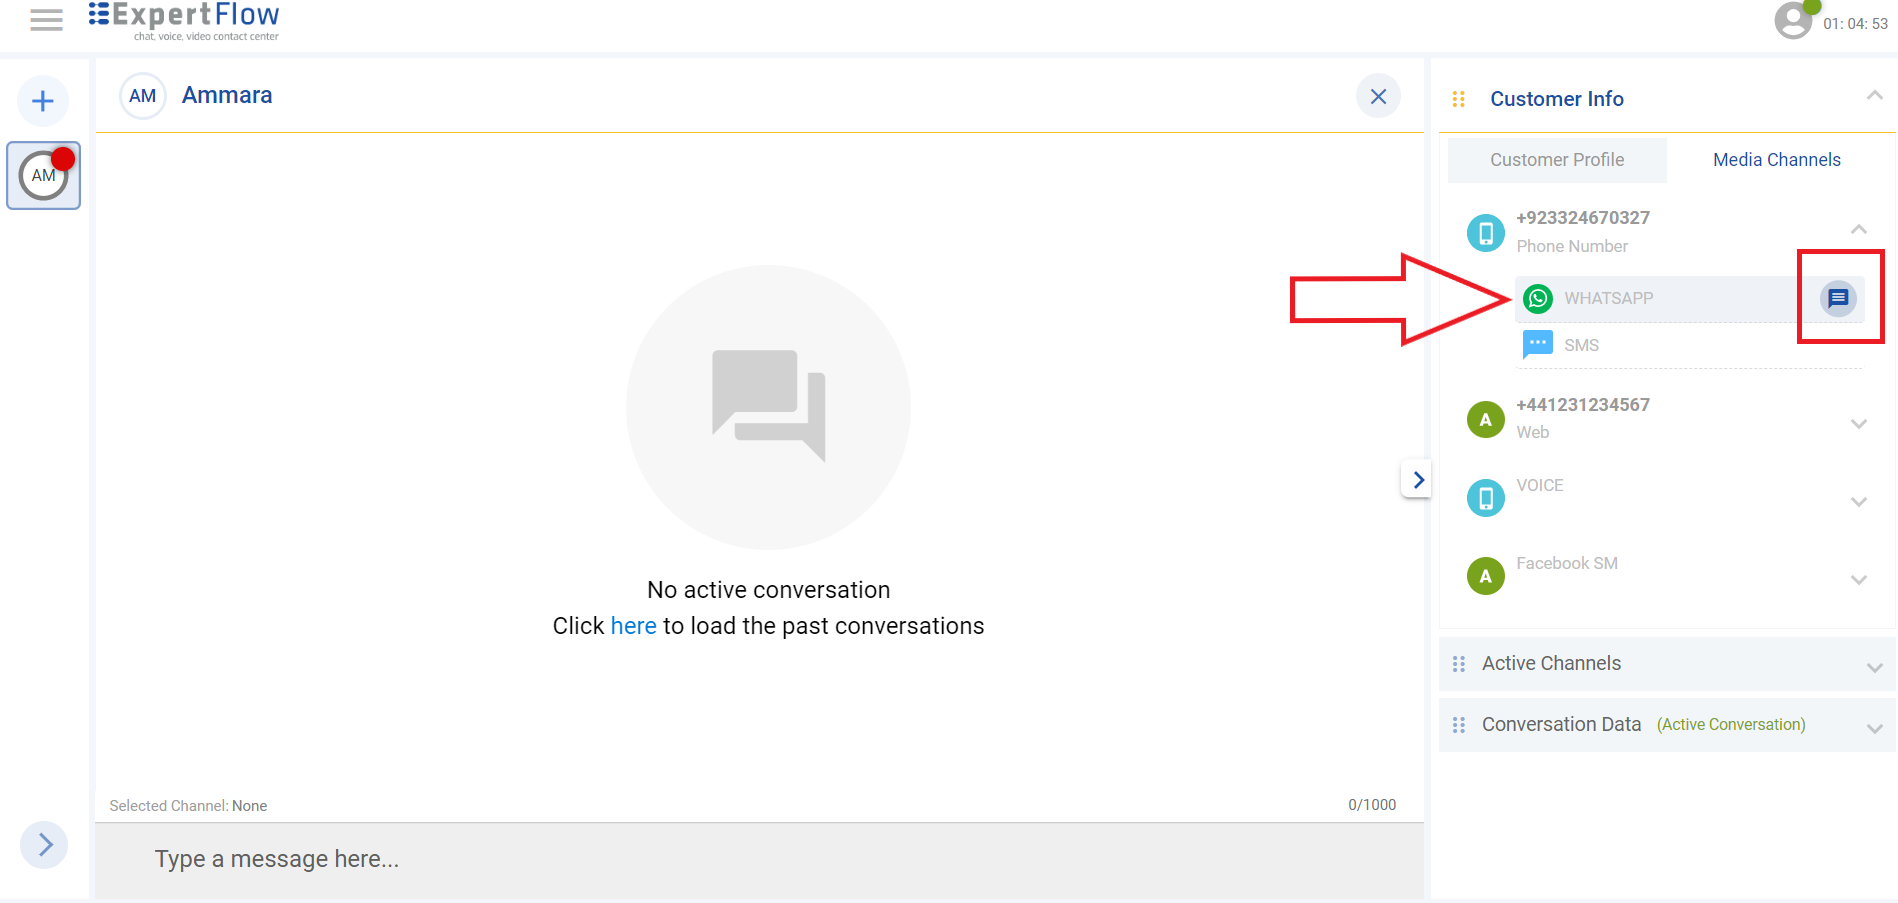
Clicking the chat icon will initiate a new conversation with the selected customer on WhatsApp.
-
Agent-initiated conversations are only supported on WhatsApp channel for now.
-
Agents can initiate conversations with customers at any time. In future updates, this will be restricted for agents not to initiate a conversation with a customer after 24 hours to align with WhatsApp 24-hour session limit policy.
-
To initiate after 24 hours, the businesses would need to buy template messages from WhatsApp. Outbound via WhatsApp template message support will be added in future releases.
-
If the customer does not join the conversation within the set activity timeout of the channel (as defined by the system administrator in Unified Admin), the conversation will automatically be closed.
View Conversation Notifications
On the active conversation, you'll receive notifications in real-time whenever a new channel session is started and ended; i.e. the time when the customer initiated the conversation.
Also, in cases of a conferenced/ pull-based chat, the agent can view the notifications whenever a new conversation participant joins/leaves the conversation.
Customer Inactivity Timeout
This is the time the system waits for a reply from the customer once a message is sent to the customer (from the agent or the bot). This timeout threshold is defined by the system administrator using the Unified Admin application.
When this happens,
-
Agents won't be able to exchange messages with the customer
-
Agents will see a notification that the channel session has ended
-
The Message Composer will be greyed out on the AgentDesk
-
The conversation still stays on the agent screen unless the agent clears and closes itself.
-
No wrap-ups can be pushed on the conversation
Subscribed Lists
All pull-based requests are parked to a List defined by the system administrator. If you want to receive notifications for new incoming pull-based requests, make sure that you are subscribed to the desired Pull-based Lists.
To subscribe to a List, open the burger menu and click on the Subscribed Lists option.
Click on the Manage Subscriptions button and choose the lists to subscribe to from the dialogue box. The lists that you subscribe to will start appearing on the list view.
To unsubscribe, choose the lists to unsubscribe from the same Manage Subscriptions dialogue and uncheck the Lists.
Join Pull-based Request
When a customer's request is received from the List that you have subscribed to, the new request notification will appear as an alert with a cross icon to dismiss the notification.
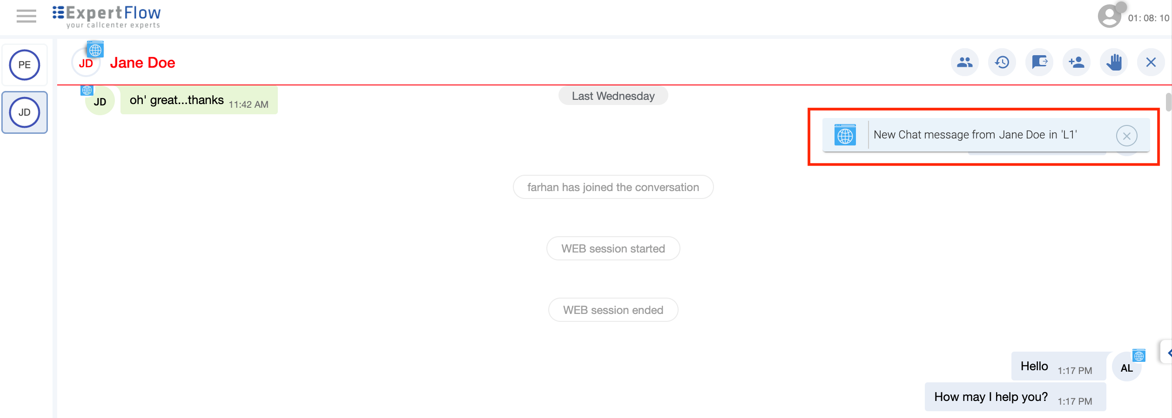
In the notification, the identified customer name (or Jane Doe if anonymous) will be shown along with the name of the List on which the request was received. Click the cross icon to dismiss the notification. It won't disappear automatically unless you close it.
To join the conversation, go to the Subscribed Lists and open the List mentioned in the notification. On the Inbox view, hover the mouse over the request that needs to be joined. Click on Join.
Inbox View
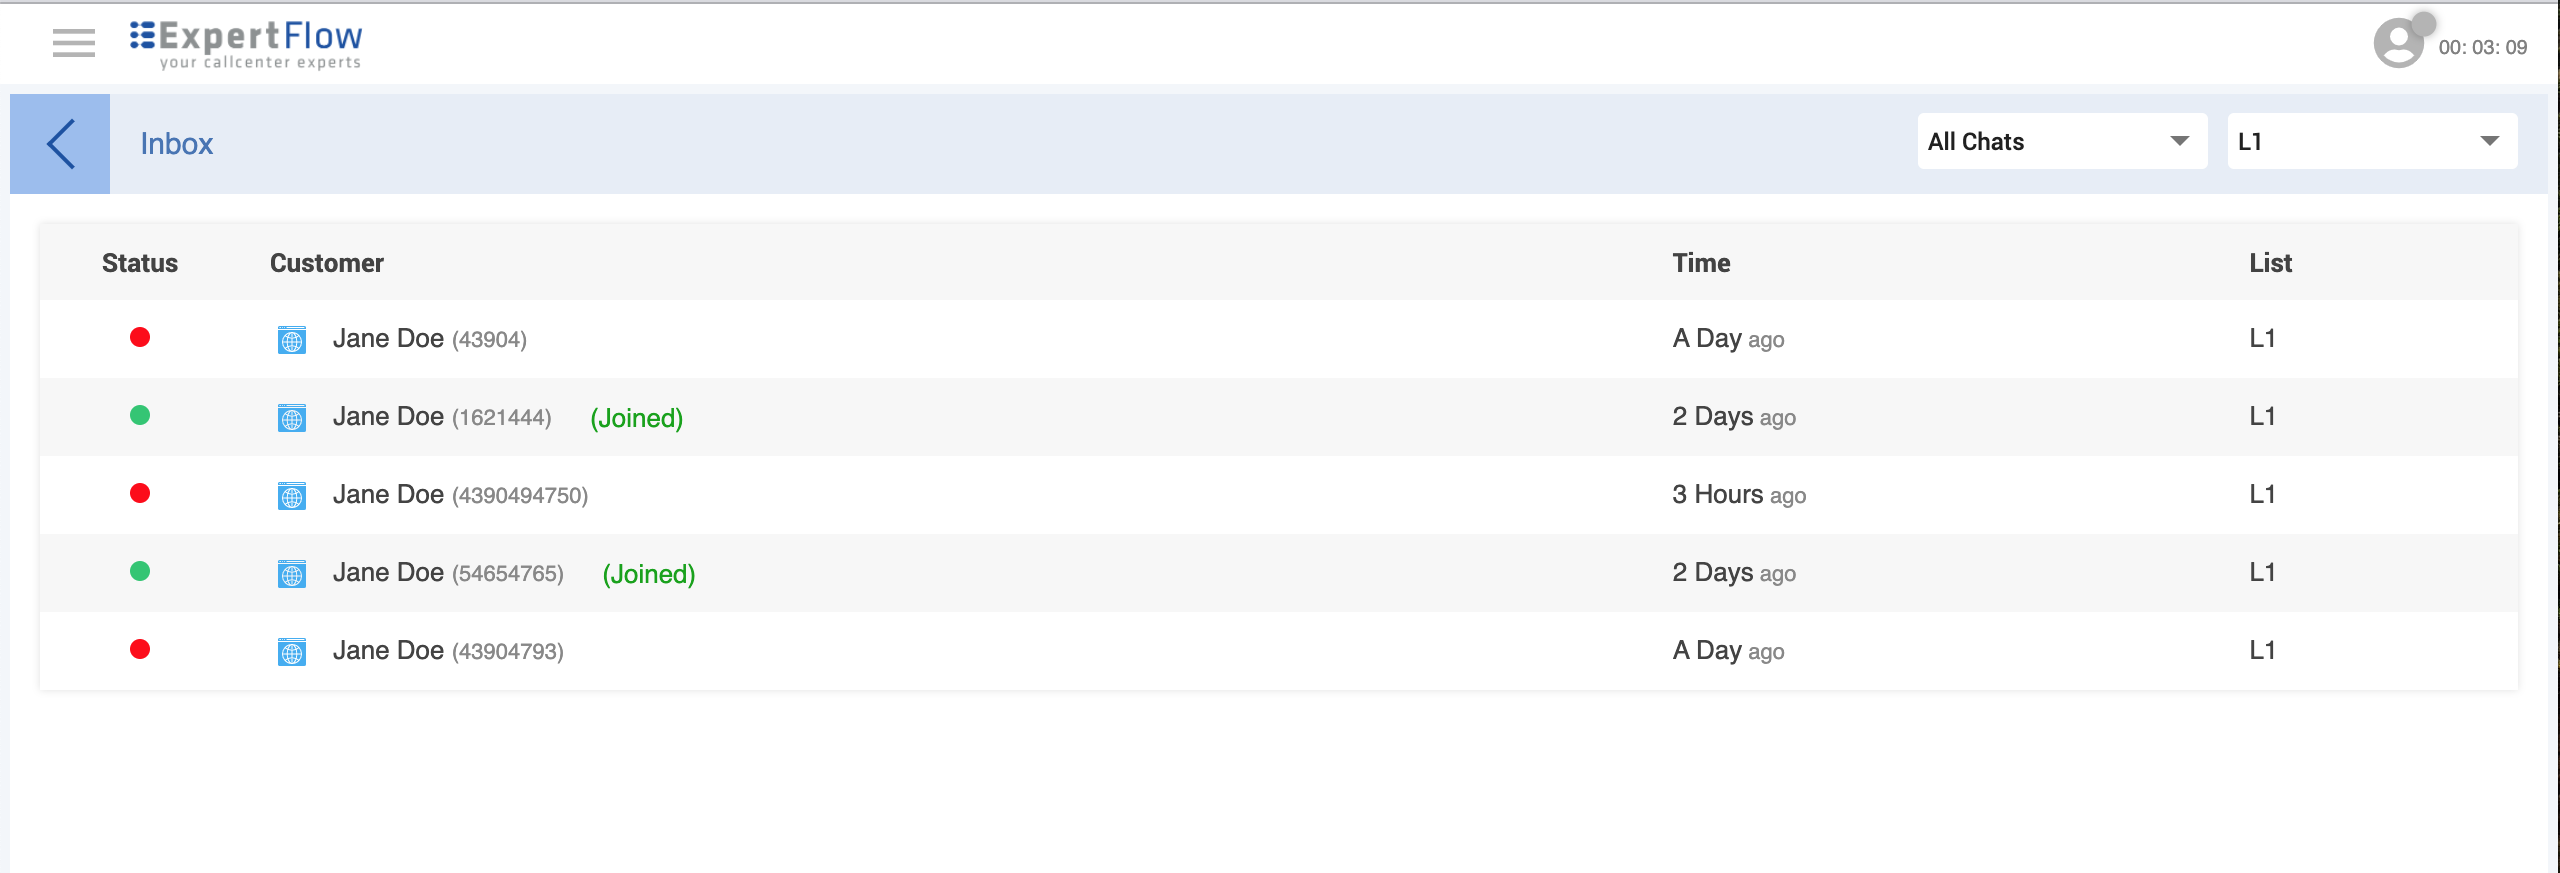
See the following table to understand the different columns on the Inbox view.
|
Field |
Description |
|---|---|
|
Status |
This shows the current state of a request state. A Pull-based request can be in one of the following states; i.e.
|
|
Customer |
In this column, the following information is displayed to help understand agents about the customer:
A Joined text in green is displayed next to the customer info to show that this conversation is already joined by you. |
|
Time |
This column shows when the request was received - (how much time ago) |
|
List |
This is the name of the List on which the chat landed. |
|
Filter |
Requests can be filtered in two ways:
|
On the Inbox, the latest chat will appear at the bottom of the list by default.
Customer List
The Customer List displays all customer profiles stored within the system.
To go to the Customer List, click on the Customer List View option from the main menu.
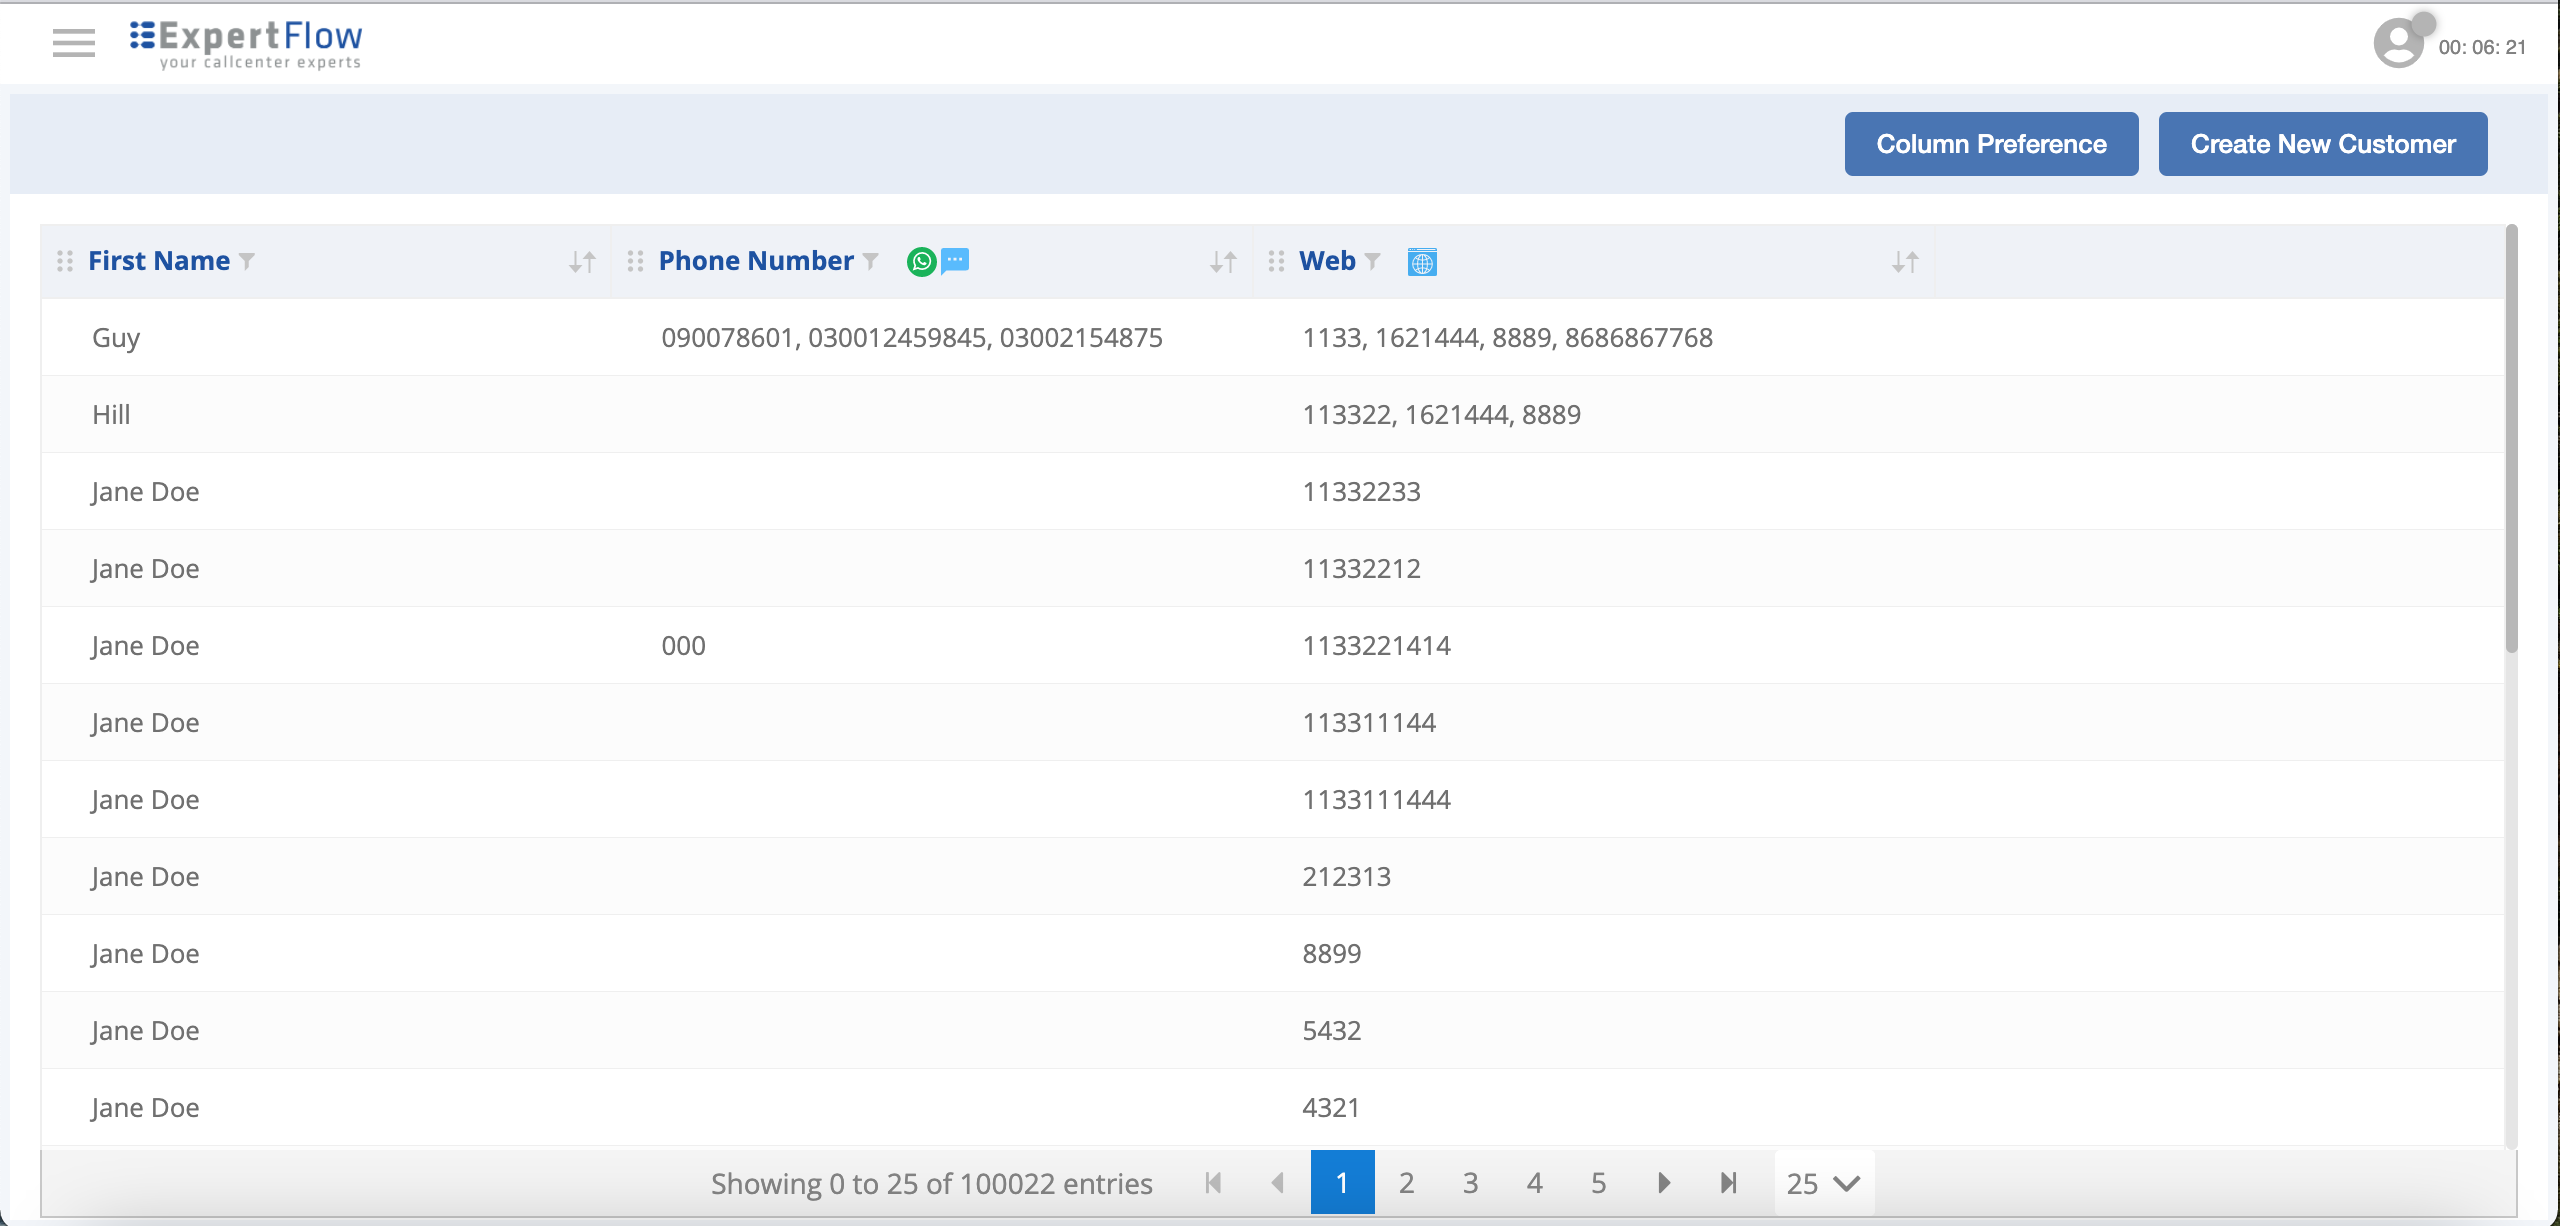
You can adjust which columns you want to see in the Customer List by clicking the Column Preference button at the top of the Customer List.
Create Customer
In the Customer List View, click the Create New Customer button to create the new customer. Fill in the fields in Create Customer dialogue to provide the customer details and click Save. Note that for the fields that are marked as Channel Identifiers, you can add multiple values for a channel identifier attribute. Click the + icon to add more values against one channel identifier attribute.
Update Customer
To edit the customer's profile, in the Customer List View, hover the mouse over the customer that you want to edit. Click on the pencil icon to edit a customer profile.
-
Edit whatever you want to edit
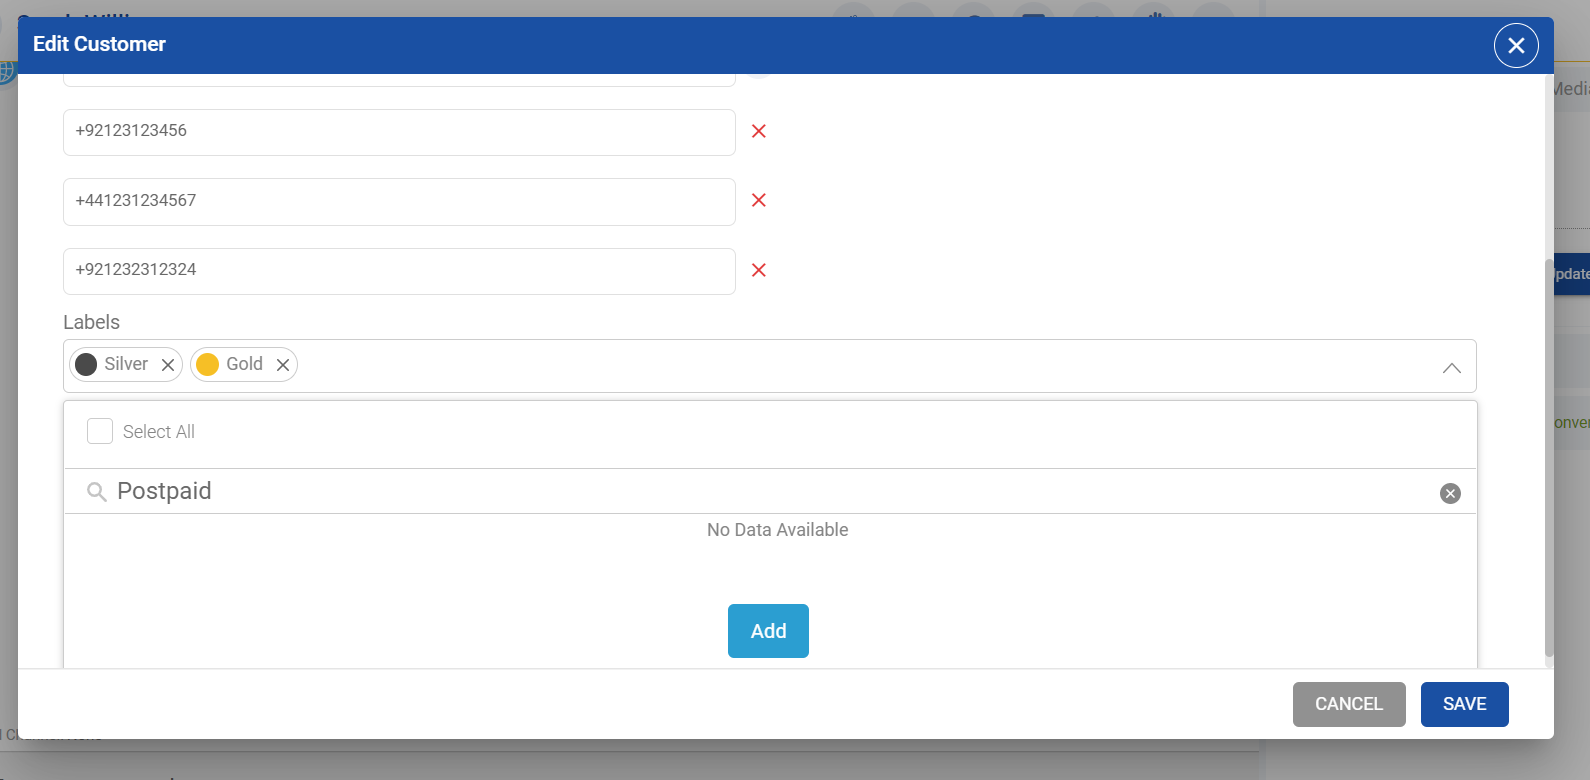
Assign Labels to Customers
To assign a label to a customer, click the Update Profile button under the Customer Profile pane on the Conversation View or click Edit Customer on the Customer List.
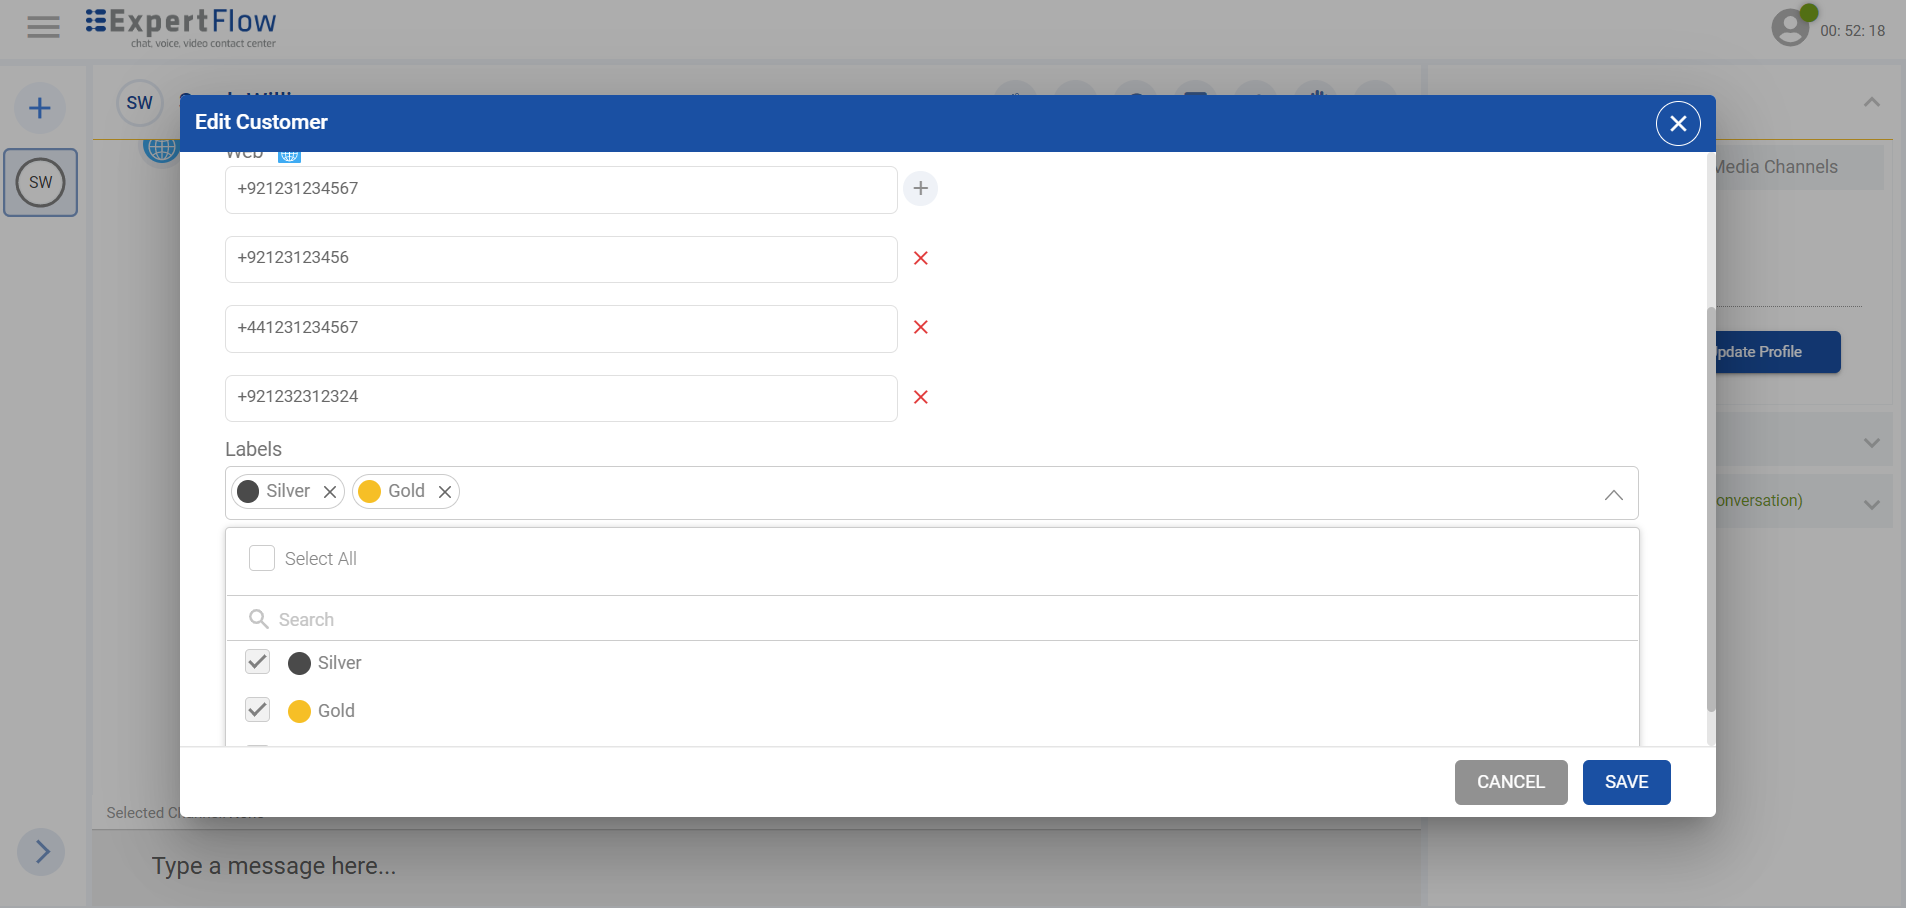
In the Labels dropdown, type the name of the label that you are looking for or choose the ones from the list. If the label that you are looking for does not exist, click the Add button in the result set to add a new label with the specified string with a default label color (that is, grey).
Understanding List View
-
All customer fields correspond to the columns here
-
Channel Identifier fields are differentiated with channel icons
-
Drag and move columns to adjust the column's position
-
A filter icon in each column is given to filter the data column-wise
-
Upward and downward arrows in each column are there to sort the data in ascending or descending order
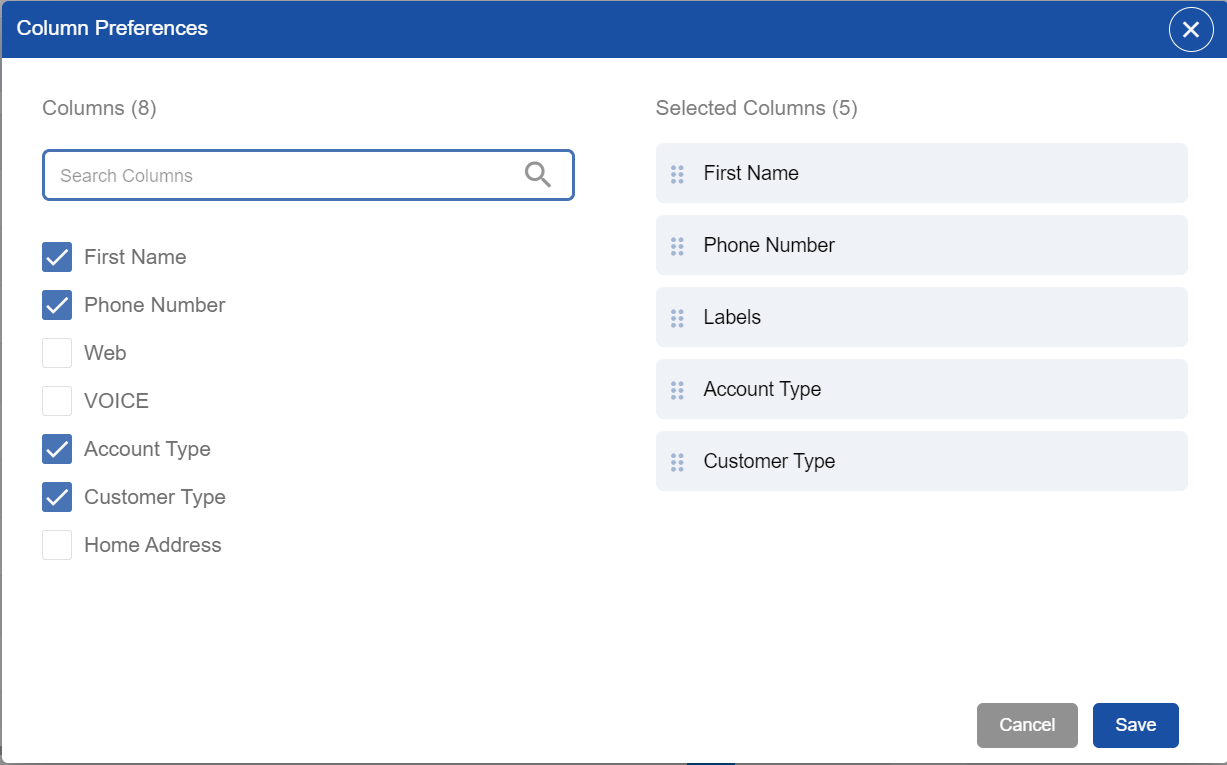
Column Preference
It allows you to set the preferences of your own choice. To set preferences, follow these steps:
-
From the menu bar, click the tab of Column Preference
-
The detail view will show the column titles. From here, choose which column want to select.
-
Select the desired column by checking the box.
-
Selected columns will be shown on the right-hand side.
-
Uncheck the boxes which don't want.
The search bar is given at the top under the column heading. From here, you can search whichever column you want to search.
Logout
To log out, click the profile menu at the top right on the AgentDesk and click the Logout button. Select one reason while getting logged out. Note that these reasons are defined by the system administrator and selecting a logout reason is optional.