Unified Admin is an Admin console that configures ExpertflowCX services and solution components.
Table of Contents:
- Getting Started
- Provisioning the system
- Step 1: Add Bot Connector
- Step 2: Add Media Routing Domain (MRD)
- Step 3: Map MRD to Channel Type
- Step 4: Create Routing Attributes
- Step 5: Assign Attributes to Agents
- Step 6: Create a Queue
- Step 7: Add Steps to the Queue
- Step 8: Change Max Tasks Limit for Agents MRD
- Step 9: Add Channel Provider
- Step 10: Add Channel Connector
- Step 11: Set up a new Channel
- Other Configurations
- Teams Configuration
- Form Builder
- Campaign Configuration
- Quality Management
Getting Started
Users are created and managed within Keycloak.
At least one admin user must be created within Keycloak, with admin role, to use the Unified Admin application.
See Keycloak Configuration to see how to create users and assign roles to users.
See Security and User Permissions -> User Authorization with Unified Admin to understand the scopes and permissions assigned to the default admin role.
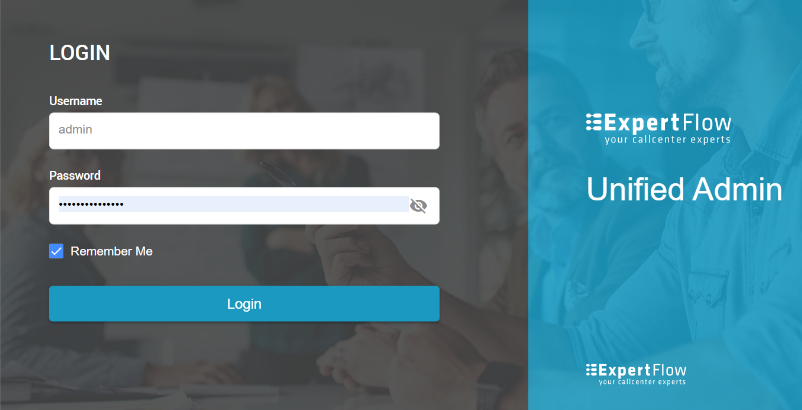
Login
Users can login to Unified Admin using the Keycloak username/password. Once entered, the user authentication request is redirected to Keycloak. Upon verification, the user is allowed to log in.
Upload License
The application for contact center agents and supervisors works with the Concurrent-user-based licensing model that provides simultaneous access to the system to a certain number of users.
To let agents start using and logging in to , the admin user must upload the license information to Unified Admin by going to General -> License Info page.
Two flavors of license verification are available.
See License Manager -> Concurrent user licensing to understand more on how this type of licensing works.
See License Manager to learn more about the flavors of license verification and key validation workflow.
1) Online verification by uploading License Key
With online verification, you need to upload the license key to Unified Admin to get it verified online.
On General → License Info, enter the license key, also known as, the Master API key received from the Expertflow shop in the Master API Key field under the Activate Online tab, and click Save.
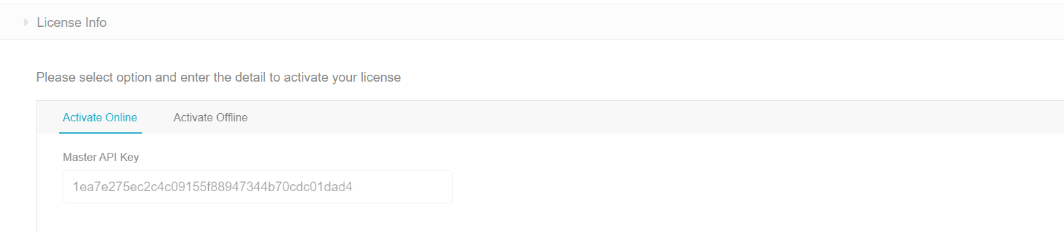
This request is then redirected to the License Manager to be verified. Upon verification, the license key is successfully uploaded.
Once saved, the uploaded key is visible from the front-end. You won't be able to change the license key.
2) Offline verification with a License File
In case of offline key verification, Expertflow allows you to upload a license file with pre-activated licenses where all license activations are pre-generated.
In this case, click the tab, Activate Offline to upload the license file that was downloaded locally, and click the Upload button.
The request is redirected to the License Server to verify the license file. Upon verification, the licenses are stored successfully.
To know more see Get the offline success file
Locale Settings
The locale settings allow admins to get provision of the time zone, and language settings system-wide so that each solution component shares the same locale settings wherever required.
|
Field |
Description |
|---|---|
|
Timezone |
Select a time zone that best suits your servers' location. |
|
Supported Languages |
Choose the languages that the system should support, for instance, for rendering the UI. For now, the only supported languages include:
This setting is currently only used in Web Widget → Language settings to show a list of supported languages for the Customer Widget UI. For the other components such as AgentDesk, the UI translation will be available in future updates. |
|
Default Languages |
Based on the supported languages chosen from the dropdown above, choose here the language which should act as a default language. For now, this is set to 'English' by default. |
Provisioning the system
Step 1: Add Bot Connector
Make sure that your bot is trained with the essential training data (or is up with the default bot training).
Tip
You must have a bot configured in the system to start creating new channels.
To learn more about Bot-controlled conversations, see Conversation Studio - Studio Nodes. To learn more about Bot training, see Custom Connector-Bot Communication
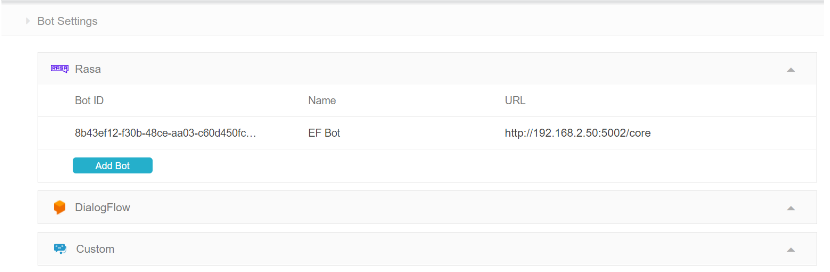
Expand the Rasa type and click, Add Bot to add the default controller bot.
|
Field |
Description |
|---|---|
|
Bot Name |
Specify a name to be given to the bot. |
|
API URL |
Enabled only if the Bot Type is Rasa or Custom. Provide the URL where the default bot connector is running. Example: |
|
Bot Config JSON |
Enabled only if the Bot Type is DialogFlow. |
By default, Rasa Bot is supported as the controller bot with default bot training. <give a link to the bot training>
If a Bot Connector is being used with a Channel or anywhere else, the system does not allow to delete of such a Bot until this association is removed.
Step 2: Add Media Routing Domain (MRD)
You can create, edit, and delete MRDs from the Unified Admin.
Tip
See Precision Routing to learn more about MRDs.
The MRD for VOICE and CHAT are available by default.
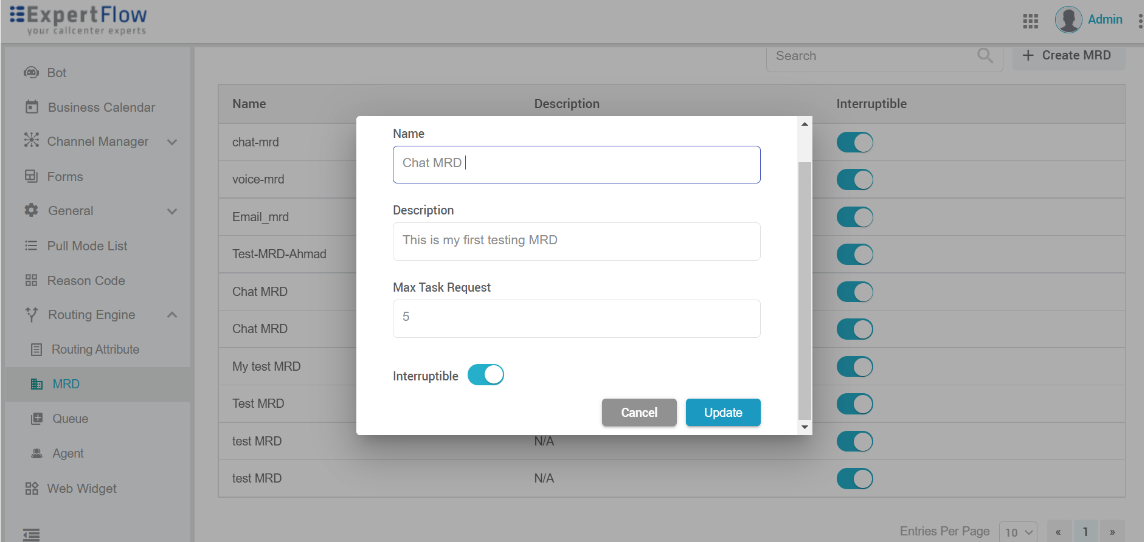
To create an MRD, go to the Routing Engine menu on the left and click MRDs.
While creating an MRD, provide the following info:
|
Field |
Description |
|---|---|
|
Name |
Give a name to the MRD. |
|
Description |
Provide an optional description of the MRD. |
|
Max Tasks Request |
Specify the maximum number of task requests that any agent can handle on this MRD. When this count reaches, the agent's MRD state will turn to This works in combination with the Agent-MRD tasks limit. See more in Step 8. Note that this limit should be greater than or equal to the task limit defined for one agent on this MRD. Therefore, if the maximum tasks count is later modified to make it lesser than an agent's individual tasks limit (during Agent-MRD mapping), an error would be thrown. |
|
Interruptible |
Reserved for future. When available, this will allow us to turn the flag to ON if the requests on this MRD are considered to be interruptible. This means that the system may interrupt the agent on this MRD (during an active conversation) to route him to a conversation from a different MRD if required. |
Add MRD
-
If an MRD is associated with a precision queue or with a Channel Type, it cannot be deleted until the association is removed.
-
If some conversations are already active on an MRD, it cannot be deleted.
-
MRD names are case-sensitive.
Step 3: Map MRD to Channel Type
The next step is to map one Channel Type to the MRD created in the above step.
Tip
Learn more about Channel Types in Channel related terms
The following channel types are available by default.
-
WhatsApp
-
Web
-
Facebook
-
Voice
To map a channel type to an MRD, expand Channel Manager from the left and go to Channel Types.
Choose a channel type to associate the MRD with. You can map one MRD to multiple channel types.
To know how to add more channel types, jump to Add Channel Type section.
Step 4: Create Routing Attributes
Agent attributes are created and assigned to agents so that customers can always get the right agent.
Tip
See Precision Routing to learn more about Agent Attributes.
Go to Routing Engine -> Routing Attributes and create a new attribute by clicking on the Create Attribute button, using the following table:
|
Field |
Description |
|---|---|
|
Name |
Give a name to the Routing Attribute. |
|
Description |
Provide an optional description here. |
|
Type |
Choose from one of the following types:
|
|
Default Value |
Specify a default value based on the type of attribute. This default value is automatically assigned to an agent when a Routing Attribute is assigned to the agent. You can overwrite the default value at the time of attribute assignment. |

Step 5: Assign Attributes to Agents
On Routing Engine -> Agents Attributes page, all Keycloak users having specified Keycloak role(s) are shown. By default, it contains the list of agents and supervisors with Keycloak roles agent, supervisor.
Tip
See Precision Routing to learn more about how agents or users are synced.
To assign a routing attribute to an agent, hover your mouse to an agent record and click the + icon to assign or remove an attribute to/from the selected agent.

Click the contact picture against an agent record on the Agents List to view the agent's profile in a read-only mode; this information is fetched from Keycloak User Profile since users are created and managed from within Keycloak.
A Routing Attribute assigned to an agent cannot be deleted.
Step 6: Create a Queue
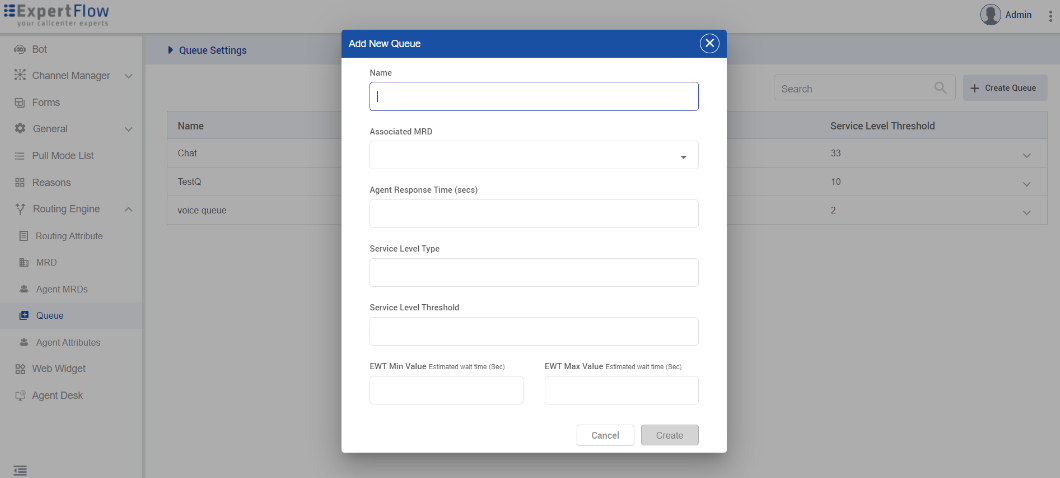
Expand the Routing Engine menu on the left and click Queues.
Tip
Learn more about Queues on Precision Routing
On the Queues List, add a new queue with the basic queue details using the following table:
|
Field |
Description |
Required |
|---|---|---|
|
Queue Name |
Specify a queue name. |
|
|
Associated MRD
|
Choose an MRD you created in step 2. |
|
|
Agent Response Time (in seconds) |
This is when the agent has to respond to a customer message. |
|
|
Service Level Type |
Type one of the following numbers in the field:
See more details about these in Key Reporting Concepts |
|
|
Service Level Threshold |
This is the service level threshold in seconds. This determines the time until when all requests being enqueued should ideally be picked up from the queue and routed to agents to be answered. This is set by the business as per their business policies and SLA reporting requirements. If a request gets answered within this time, it is considered to be answered within SL. See more on Key Reporting Concepts |
|
|
EWT (Estimate Wait Time) Min Value |
This is the minimum estimated wait time in seconds that will be displayed to the customer if the estimated wait time is below this number. The minimum value should be lesser than the maximum value.
|
|
|
EWT Max Value (Estimated Wait Time ) |
This is the maximum estimated wait time in seconds that will be displayed to the customer if the estimated wait time is more than this number. The maximum value should be greater than the minimum value.
|
|
|
Keys |
Fields |
|---|---|
|
|
Mandatory |
|
|
Optional |
This is an option to add Minimum or Maximum Value. However, adding value in any field can calculate the value of EWT.
The EWT is currently not visible to customers, neither in web chat widget nor for any other channel. The customer-side implementation for EWT is still pending.
Step 7: Add Steps to the Queue
Once a queue is added with the above settings, the next step is to add Queue Steps in the queue.
Tip
Learn more about Steps, Expressions, and Terms on Precision Routing
On the Queues list, click Add Step option against the desired queue to start adding steps in the queue using the following table:
|
Field |
Description |
|---|---|
|
Step Timeout |
This is the timeout for this step. It determines the time the system waits before jumping to the next step when no agent is found. |
|
Expression |
Add a logical expression for the Routing Engine to evaluate and identify an agent matching the criteria. Add the small + icon to add another term in the expression. Click Add Expression to add another expression to the same step. For instance, the expressions added in the illustration below states: Any agent having |
To continue adding more queue steps, go back to the Queues List, expand the desired queue, and click Add Step.
If the Routing Engine finds an agent matching to the criteria as a result of the first queue step, it won't jump to evaluate the next steps. Therefore, at the point where it gets an agent available matching the criteria, it stops jumping to the next steps.
-
If there're some conversations enqueued to or active against a queue, such a queue cannot be deleted. The reason is, even if the chat request is routed to an agent, there are scenarios where it can be re-routed such as in the case of RONA. So unless all requests are closed, the queue cannot be deleted.
-
A queue cannot be deleted if it is associated with a channel.
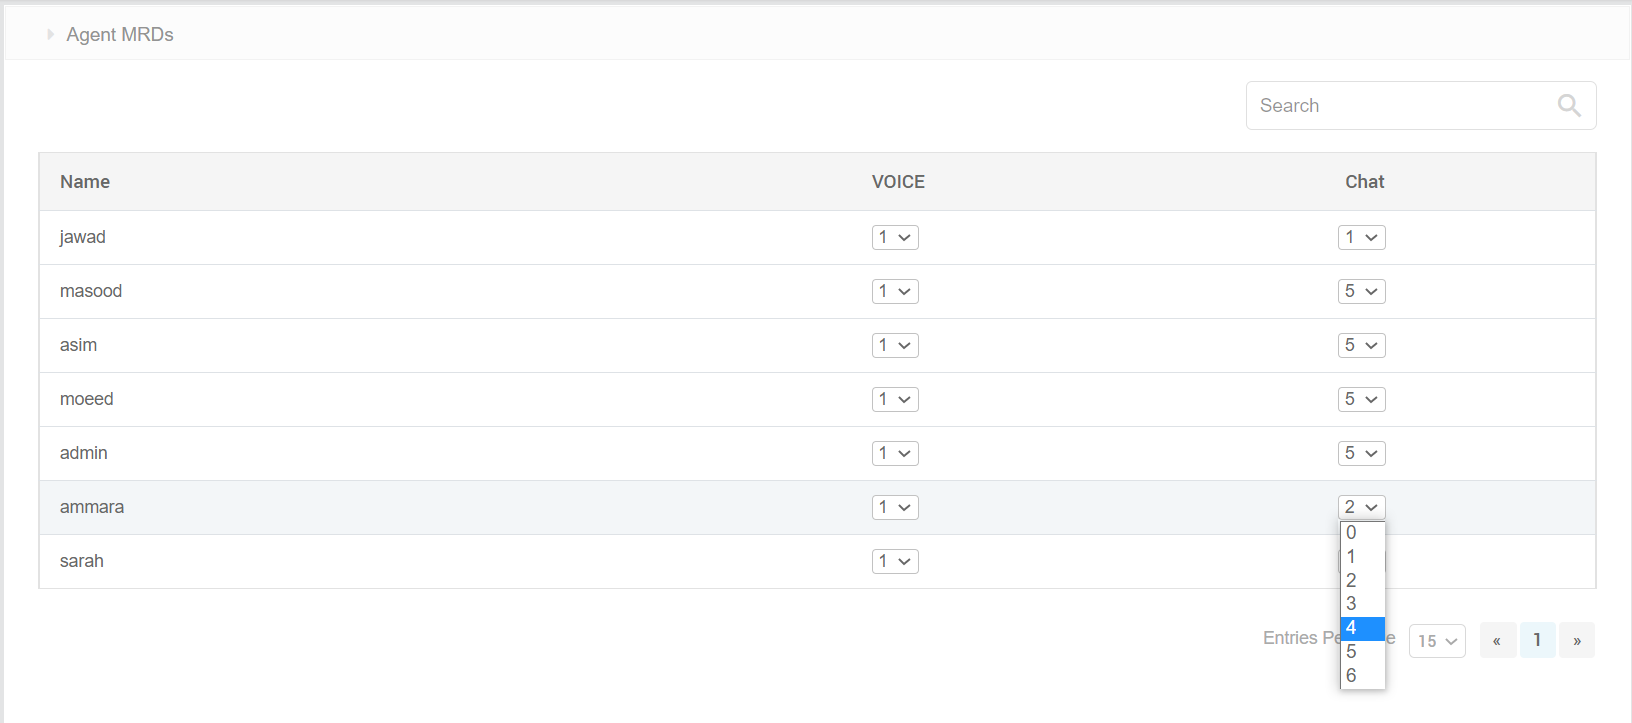
Step 8: Change Max Tasks Limit for Agents MRD
By default, each agent added to the system becomes a part of all MRDs with the default max tasks limit set as per the Maximum Tasks Requests per MRD. See Step 2 for more details.
To change an agent's tasks limit on each MRD, go to Routing Engine → Agent MRDs page.
All MRDs that are created are listed on Agent MRDs along with the list of all users created in the system. By default, all agents who are added become a part of all MRDs.
Select one user to change the maximum number of tasks that the agent can handle on an MRD. The dropdown contains the max limit as per the limit defined in the MRD definition (created in Step 2). Set the limit to 0 to make an agent unavailable for an MRD.
Step 9: Add Channel Provider
Channel providers are supported only for Web, WhatsApp via 360, and Facebook channels.
Channel providers are used to configure the third-party vendors who will be used to send/receive messages to/from a channel. For instance, Dialog 360 and Twilio could be the two-channel providers for WhatsApp channel.
Tip
Learn more about channel providers in Channel related terms
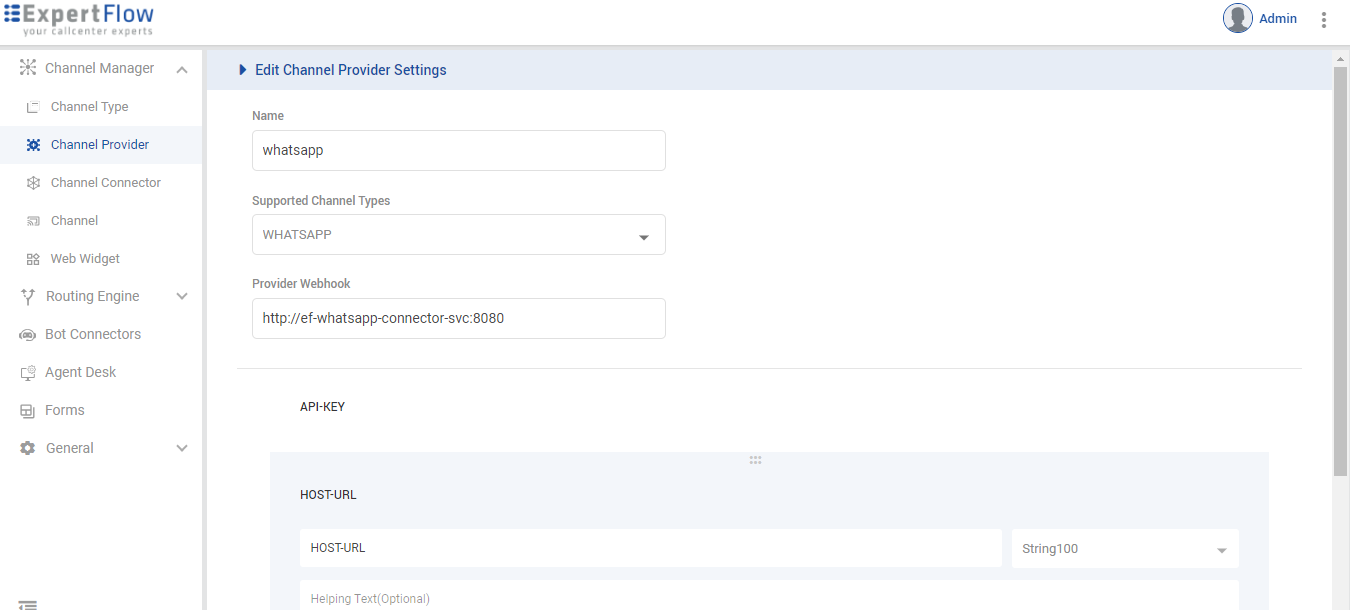
To add a new channel provider, go to Channel Manager → Channel Providers.
While adding a new channel provider, provide the following information.
|
Field |
Description |
|---|---|
|
Name |
Provide a name for the channel provider such as Dialog 360 for WhatsApp. |
|
Supported Channel Types |
This setting is used to determine which channel types this channel provider will support. For instance, you could configure one channel provider to support both WhatsApp and Facebook messages. So one channel provider can be used to serve both types of channels. Based on the supported channel types, you can add corresponding channel connectors and use them while configuring new channels. |
|
Provider Webhook |
Give a webhook URL for the Channel Provider where this channel provider will listen to the events:
The provider webhook URL is given in the following format: For Web provider Kubernetes based: HELM based: For WhatsApp Kubernetes based: HELM based: For Facebook Kubernetes based: HELM based: |
Follow the 360-Connector Configuration Guide to configure WhatsApp via Dialog 360.
See Facebook Comment/DM Connector - Configuration Guide for configuring Facebook Social Media.
Step 10: Add Channel Connector
You may create a channel connector for each new Channel Provider added to the system.
Tip
See Channel related terms to learn more on Channel Connectors.
On the Channel Connector list, click the Add New Connector button to add a new channel connector with the help of the following table:
|
Field |
Description |
|---|---|
|
Name |
This is the name of the channel connector. |
|
Channel Provider |
Select the desired Channel Provider (created in the above step) to configure this channel connector for the channel provider. Based on the selected channel provider, you'll see the corresponding configuration attributes to be specified for this channel connector. See the illustration below. |
|
Custom Attributes |
This shows the list of other custom attributes created while defining the Channel Provider you selected above. Available only if some custom attributes were added while defining the Channel Provider in the above step. For example, for the default Dialog 360,
For details on Dialog 360 connector configurations, see 360-Connector Configuration Guide for WhatsApp |
-
If a Channel Connector for a particular Channel Provider exists, the system does not allow to delete such a Channel Provider until the association is removed.
Follow the 360-Connector Configuration Guide to configure WhatsApp via Dialog 360.
See Facebook Comment/DM Connector - Configuration Guide for configuring Facebook Social Media.
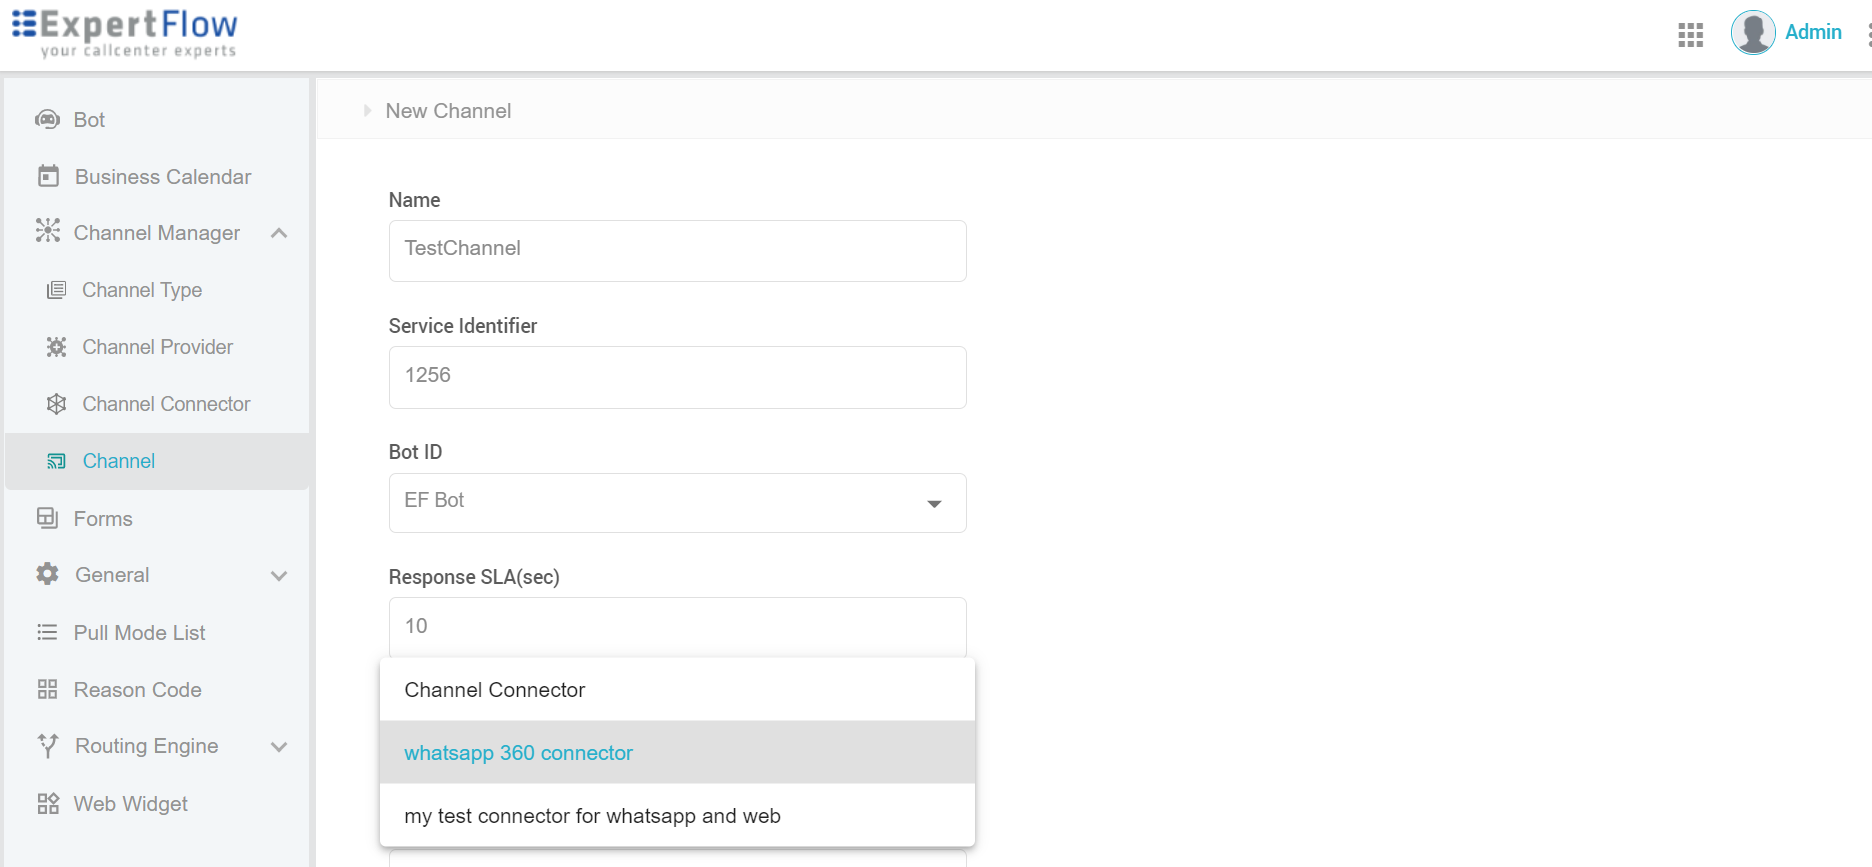
Step 11: Set up a new Channel
Add customer channels in the system to receive customer requests from relevant channels.
Tip
Learn more about channels in Channel related terms
|
Field |
Description |
|---|---|
|
Channel Name |
Specify a channel name. |
|
Service Identifier |
This is the service identifier of the service that the customer dialed or reached. It could be a DN (Dialed Number) such as a WhatsApp number, any website URL, Facebook ID, Viber ID. |
|
Bot ID |
This is the Bot Connector that was added under Bot Settings. You need to choose a bot connector here regardless of the Channel Mode. This is because a bot is an integral part of a conversation who acts as an authoring party, monitors the conversation events, identifies intents, and takes appropriate actions (for instance, closes a chat if the customer activity timeout reaches). |
|
Channel Connector |
This is the Channel Connector that should be used to send/receive messages to/from the channel. Choose the desired channel connector created in the above step to be associated with this channel. This list is rendered based on the Channel Type. |
|
Customer Activity Timeout |
This is the time in seconds that the system waits for the customer's response against a message sent by the agent or bot. When this time reaches, the system considers the chat as inactive. The bot closes the channel session of the customer and the agent receives |
|
Channel Mode |
Choose a channel mode. Possible values are:
|
|
Routing Mode |
This determines if the channel needs to push incoming requests to a queue to be routed to agents, or, broadcast to a Pull-based List to be taken up by any agents subscribed to the List. Possible values are:
|
|
Agent Selection Policy |
This determines how to select an agent when multiple agents match the criteria. Possible values are:
This is applicable only if the channel mode selected above is other than Bot and the selected Routing Mode is Push. |
|
Agent Request TTL (time-to-leave) |
This is the time in seconds that the system waits for an agent to be assigned to a queued request. Once this TTL is elapsed, the Disclaimer:
When the |
|
Default Queue |
This is the default queue where requests coming on the channel will be enqueued. This is enabled only if you have selected the Routing Mode as Push. |
|
Default List |
This is the default list where requests coming on the channel will be published. This is enabled only if you have selected the Routing Mode as Pull. |
|
Route to the last agent |
Reserved for future. This setting is used to route the request to the last agent who previously handled a request from the same customer. |
On the Channels list, you can see a dropdown for each channel type defined in the system. Expand a channel type to add a new channel of this channel type.
Other Configurations
Add Web Widget
Web widget is Expertflow's customer chat widget that loads on the company's website when a web visitor initiates a chat.
This Web widget is loaded based upon the settings defined in Web Widget configurations on Unified Admin.
Business administrators can add multiple web widget instances in Unified Admin, having their own set of configurations that work independently of the other widget instances.
For instance, if have different configuration requirements for a customer portal and a partner portal, you may define two web widget instances here.
Using the Web Widget REST APIs, the relevant widget configurations can then be loaded by the chat widget based on the widget identifier.
To add a new web widget, go to Web Widget on the left, and click Create Web Widget.
On the Web Widget Settings, fill in the form using the following table:
|
Field |
Description |
|---|---|
|
Widget Identifier |
A short string defining this web-widget instance, such as, web, customer-widget, partner-widget (Alphanumeric code). Following validations are applied to the widget identifier.
|
|
Widget Title |
This is the title text shown on the customer widget. Could be a company name or any short string. |
|
Widget Subtitle |
This is the subtitle text shown beneath the title text. Could be any short string, for instance, the opening hours of the contact center. |
|
Pre-Chat Form |
Select a form of the web widget. This dropdown shows the list of pre-conversation type forms specified in Form Builder. |
|
Customer Reconnect Time (in seconds) |
Not applicable for now. The reconnect time in case the customer chat widget is disconnected in defined in the configuration files for now. |
|
Language |
This determines the language of the web widget. This dropdown shows the list of supported languages specified in General Settings → Locale settings. |
|
Color Pallet |
Choose a color of the web widget from this color pallet. |
|
Download Transcript |
If enabled, customers can download the full chat transcript at the end of the webchat. |
|
Dynamic Link |
If enabled, this auto-converts a URL to a hyperlink, whether sent by the customer or by the system (agent/bot). |
|
Emoji |
If enabled, customers can send emojis during the web chat. |
|
File Transfer |
If enabled, customers can send and receive file attachments |
|
Font size |
If the value is |
Add Reason Codes
Reason codes are configured for agents to select a reason while going not ready and/or logging out.
To add a reason, go to the Reason Codes list and create a new reason using the following table:
|
Field |
Description |
|---|---|
|
Label |
Specify a reason label. This label will be displayed in the reasons list to agents in AgentDesk. |
|
Type |
Select a type from one of the following:
|
|
Description |
An optional description for the reason |
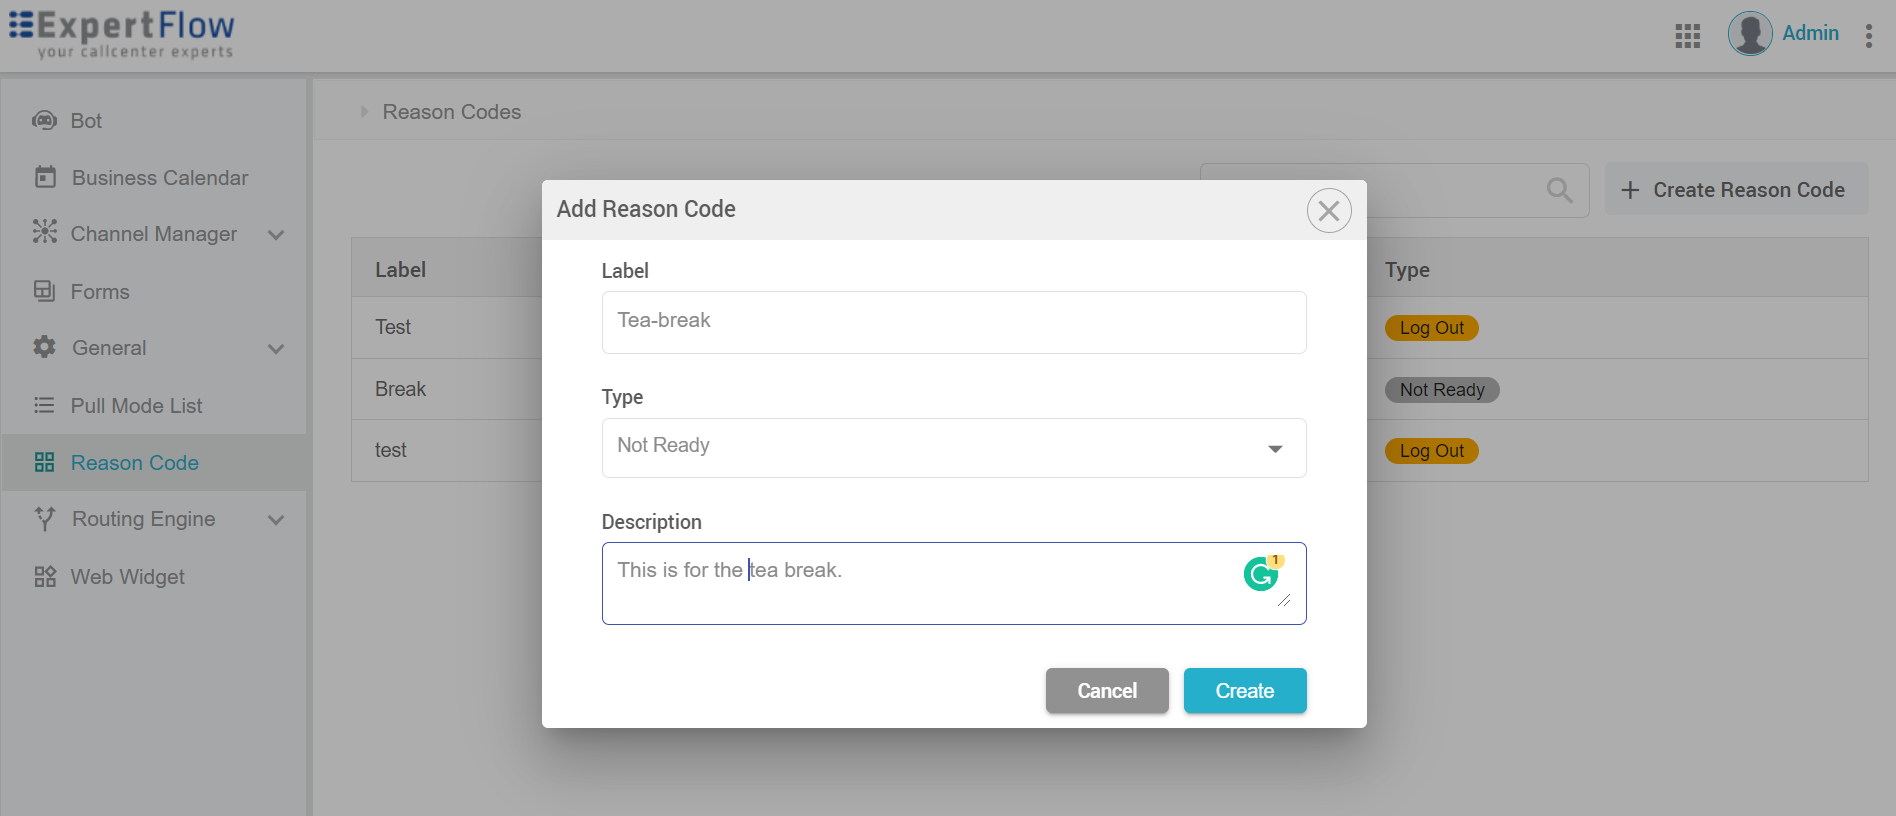
Some reasons are available by default. You can add more for agents to choose from.
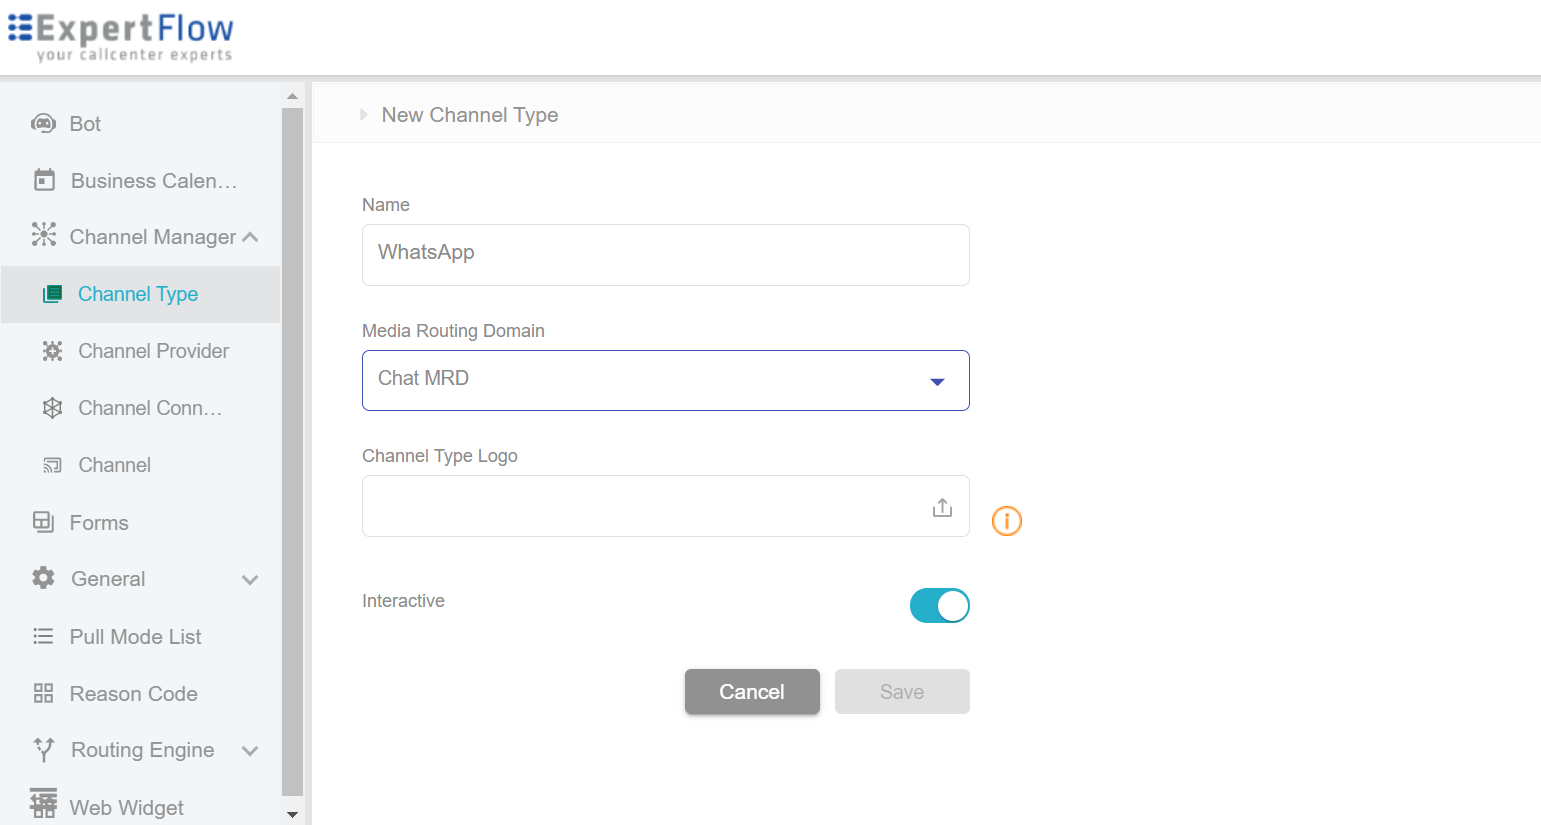
Add New Channel Type
You may also create additional channel types to provision new channels of the desired channel type.
Tip
Learn more about Channel Types in Channel related terms
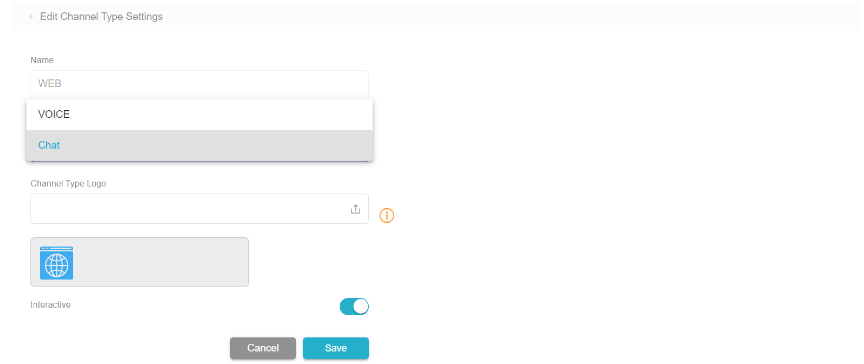
To add a new channel type, go to the Channel Manager menu on the left and click Channel Type.
While adding a new channel type, provide the following info:
|
Field |
Description |
|---|---|
|
Name |
Provide a name for the channel type. |
|
Media Routing Domain |
Choose the MRD created above for this channel type. |
|
Channel Type Logo |
Upload a logo for this channel type. This logo or icon is then used in Unified Agent to show media channel data. |
|
Interactive |
Reserved for future use. |
Pull Mode - No Routing
Pull mode allows incoming customer requests to be parked on a List instead of being queued to a queue and is available to all List Agents (who are subscribed to the List) to pick and join a conversation.
Tip
-
See Subscribed Lists to see how agents get subscribed to and join Pull-based requests
The Lists created from here are mapped to Channels while setting up a channel, with the Routing Mode → Pull.
Add Lists
Go to Pull Mode List and click the Create List button to add a new List using the following table.
|
Field |
Description |
|---|---|
|
Name |
Specify the List Name here. List names are not unique. So you can have two Lists having the same names. |
|
Description |
Specify an optional description of this List. For instance, what type of requests this List is expected to take in. |
Lists can only be deleted if they are not being used by any channel.
Teams Configuration
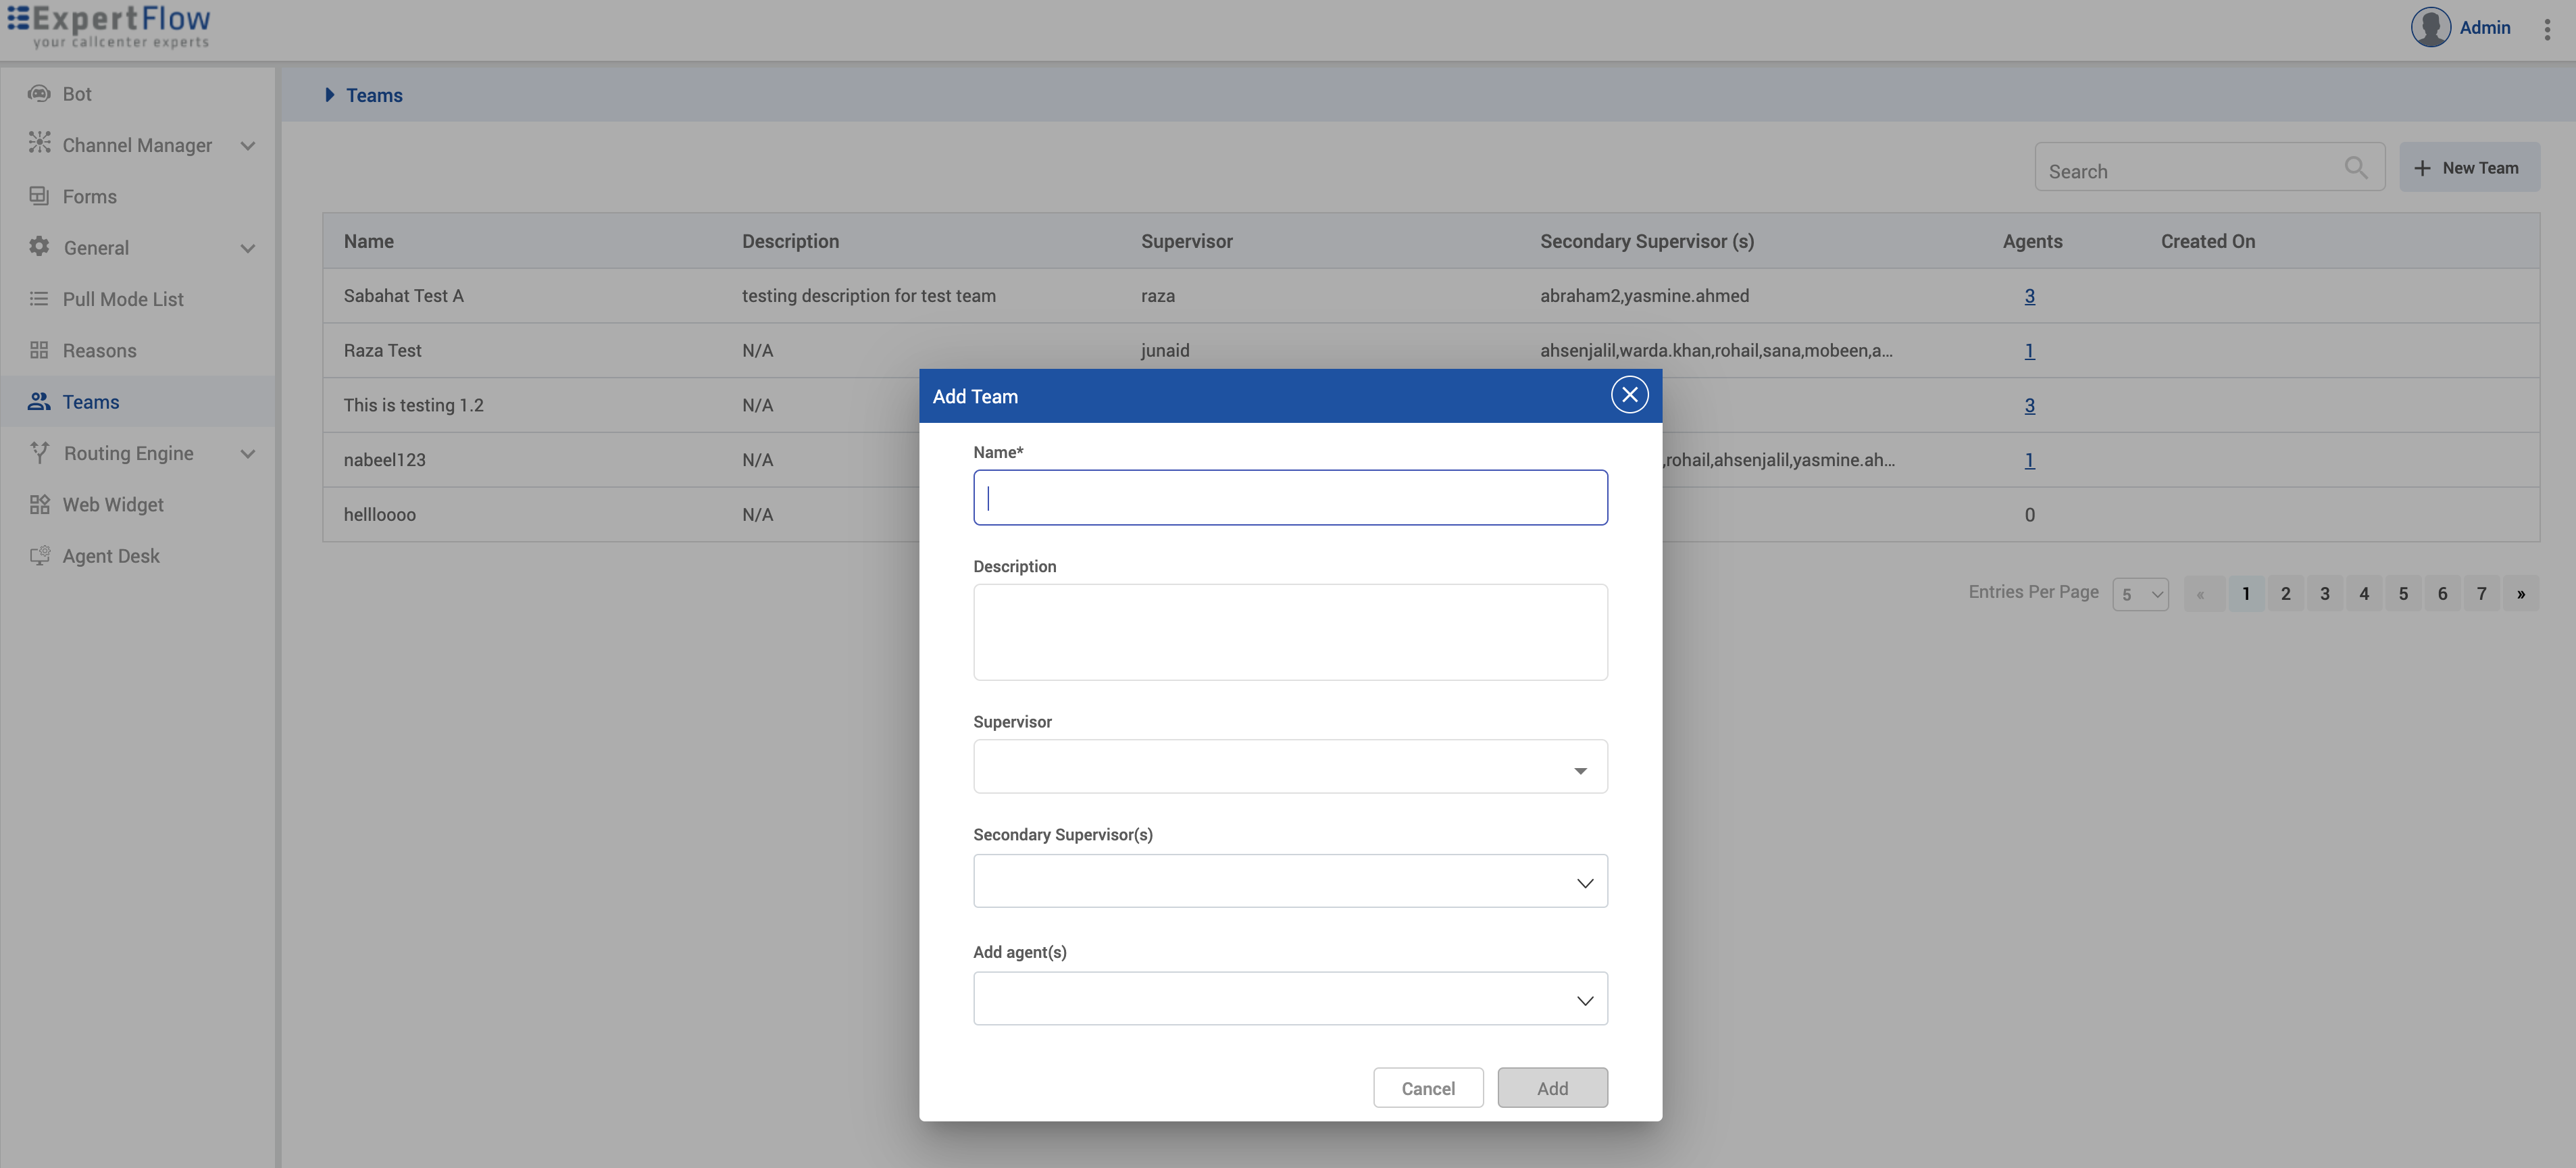
Create a new team
-
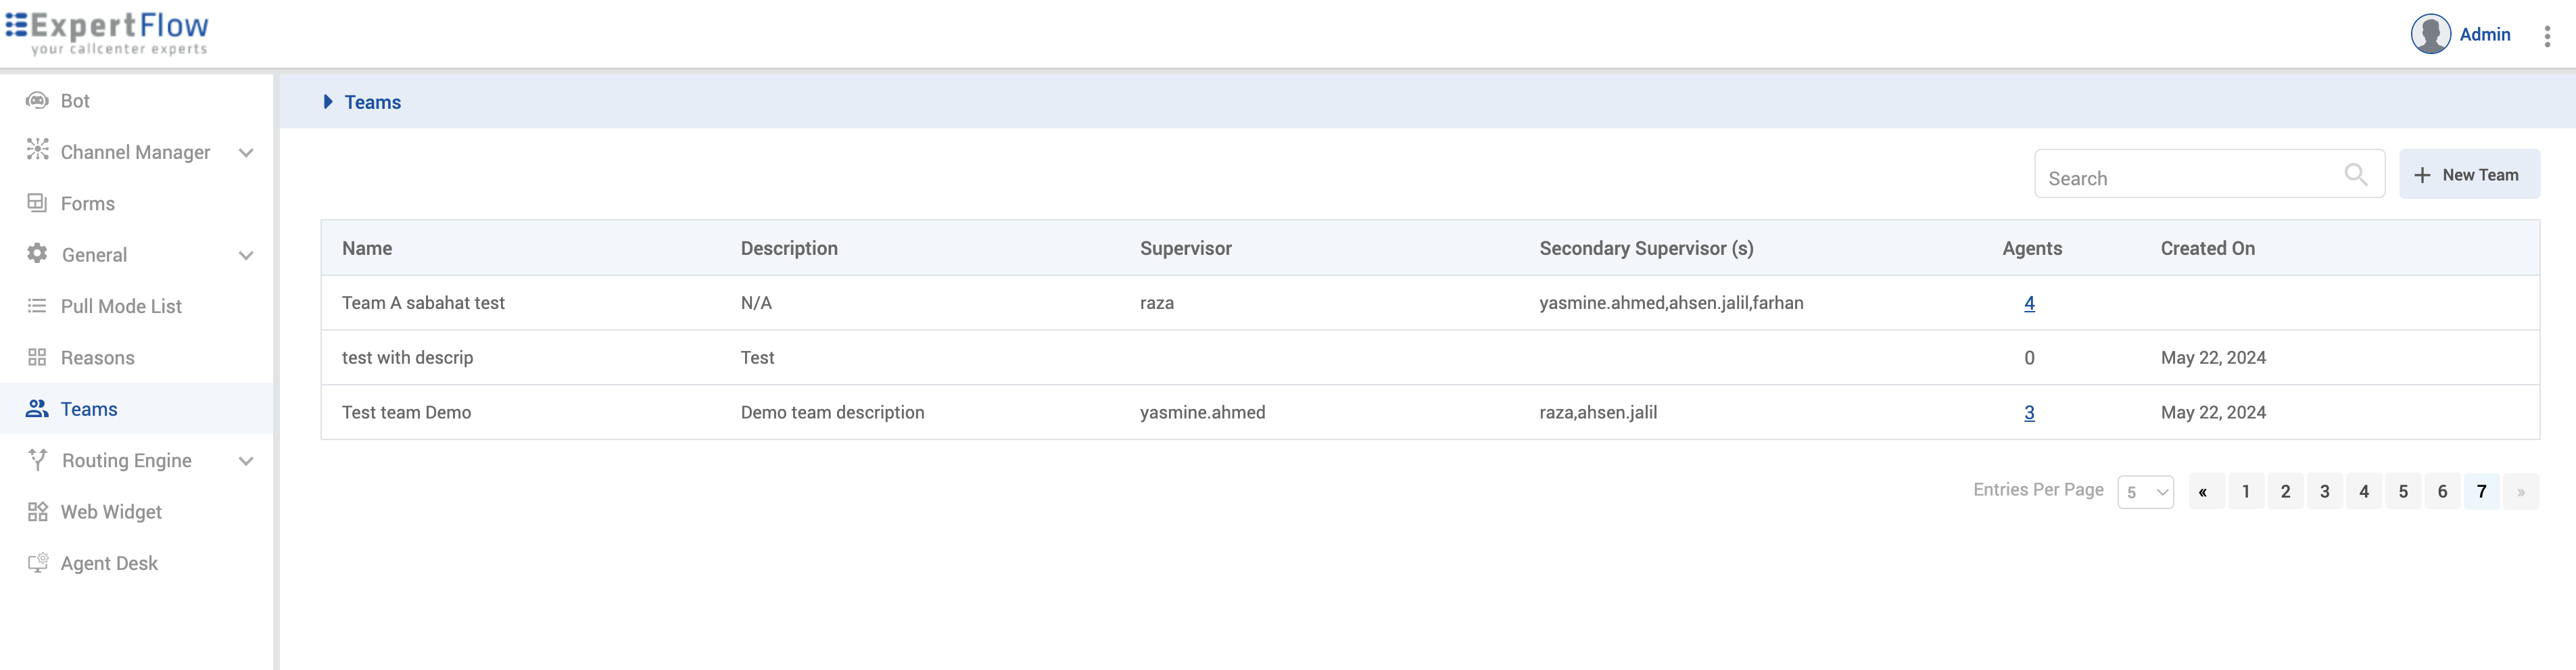
To create a team, click on the Teams tab. We will now see a section with heading Teams containing all the teams and their members (primary supervisor, secondary supervisor and agents).
-
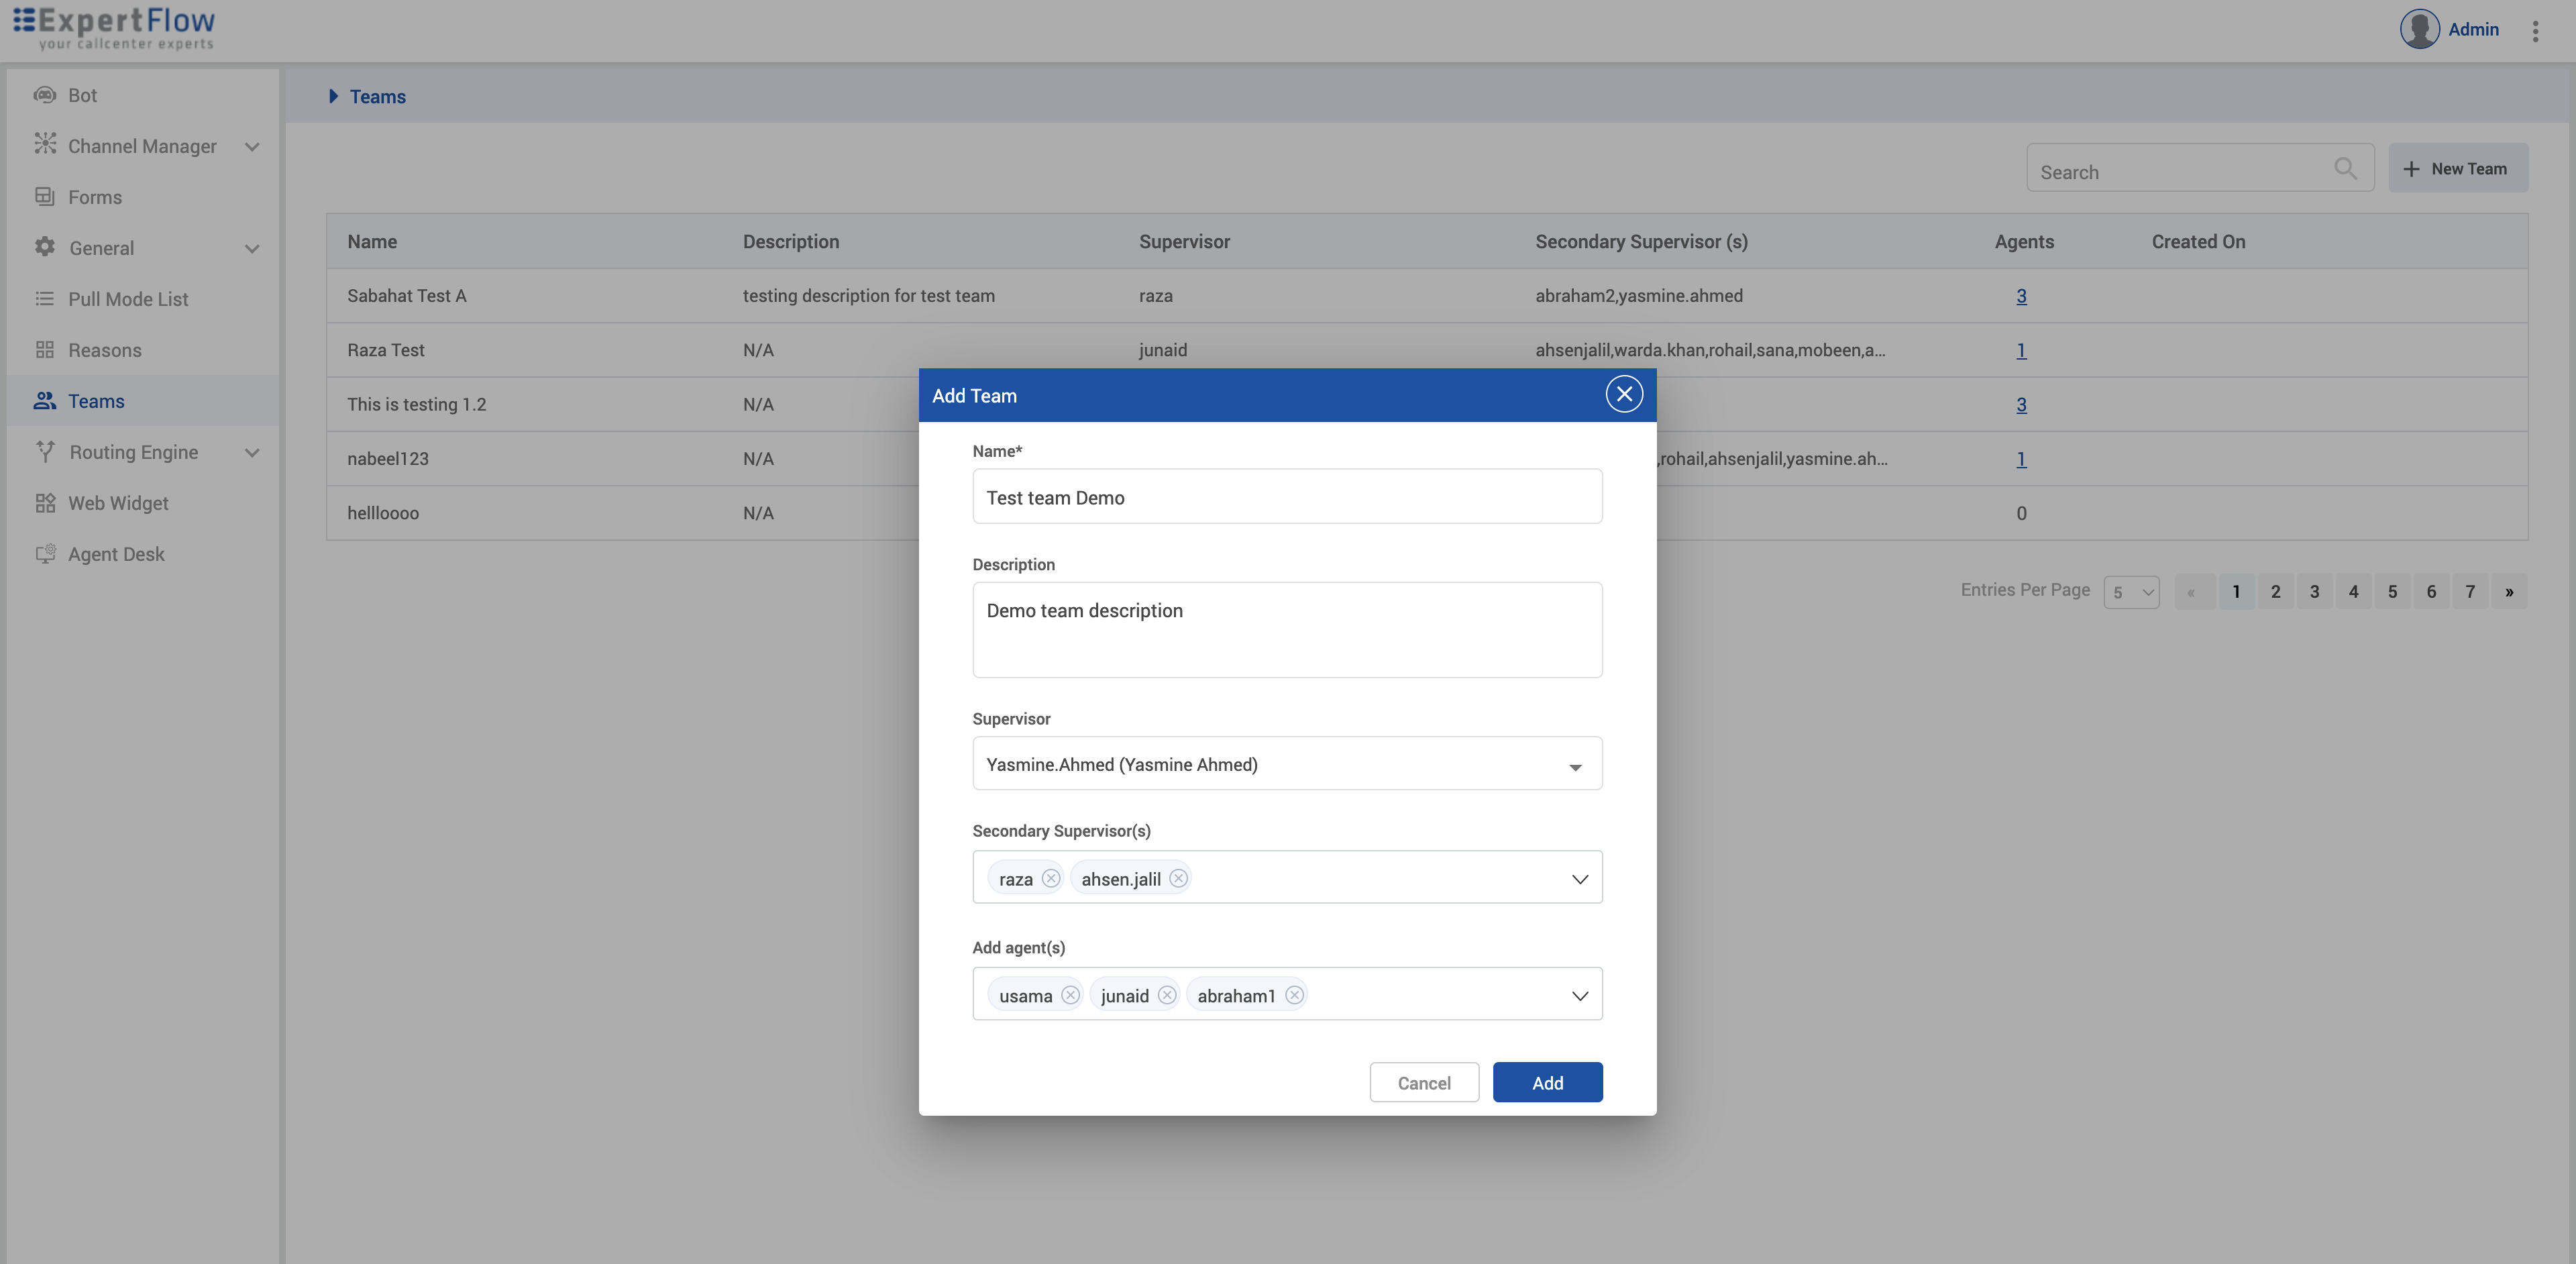
Click on New Team button to create the team. Dialog Box will appear.
-
Enter the team name and Click on Create button. Team should be created.
-
Description, supervisor(primary), secondary supervisors and agents are optional.
-
You can select multiple secondary supervisors and multiple agents.
-
-
Once the team is created, you should be able to see your team in the teams list.
-
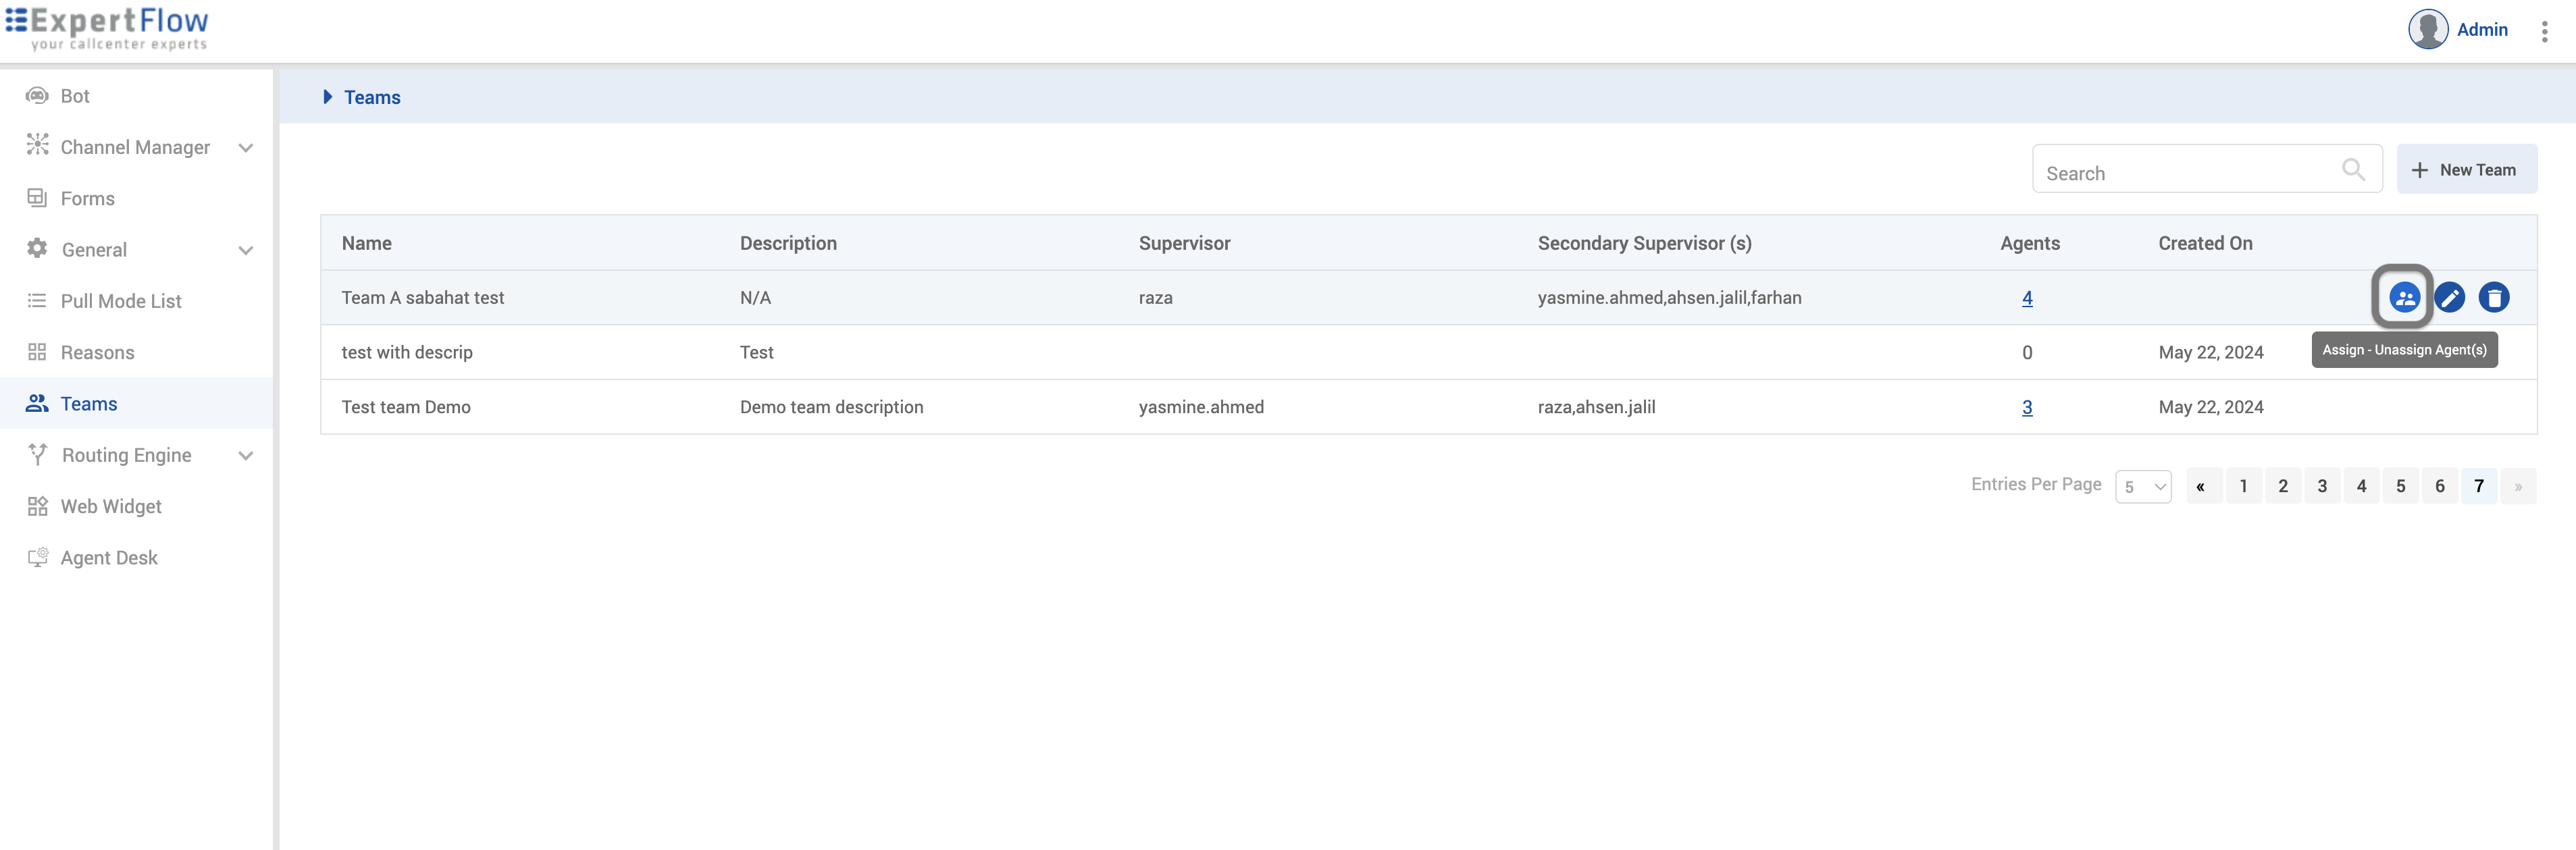
Once the team is created, you should be able to optionally assign some of the team agents directly to one of the secondary supervisors (aka Team Lead) of the team. You'll see option to assign; click on the icon.
-
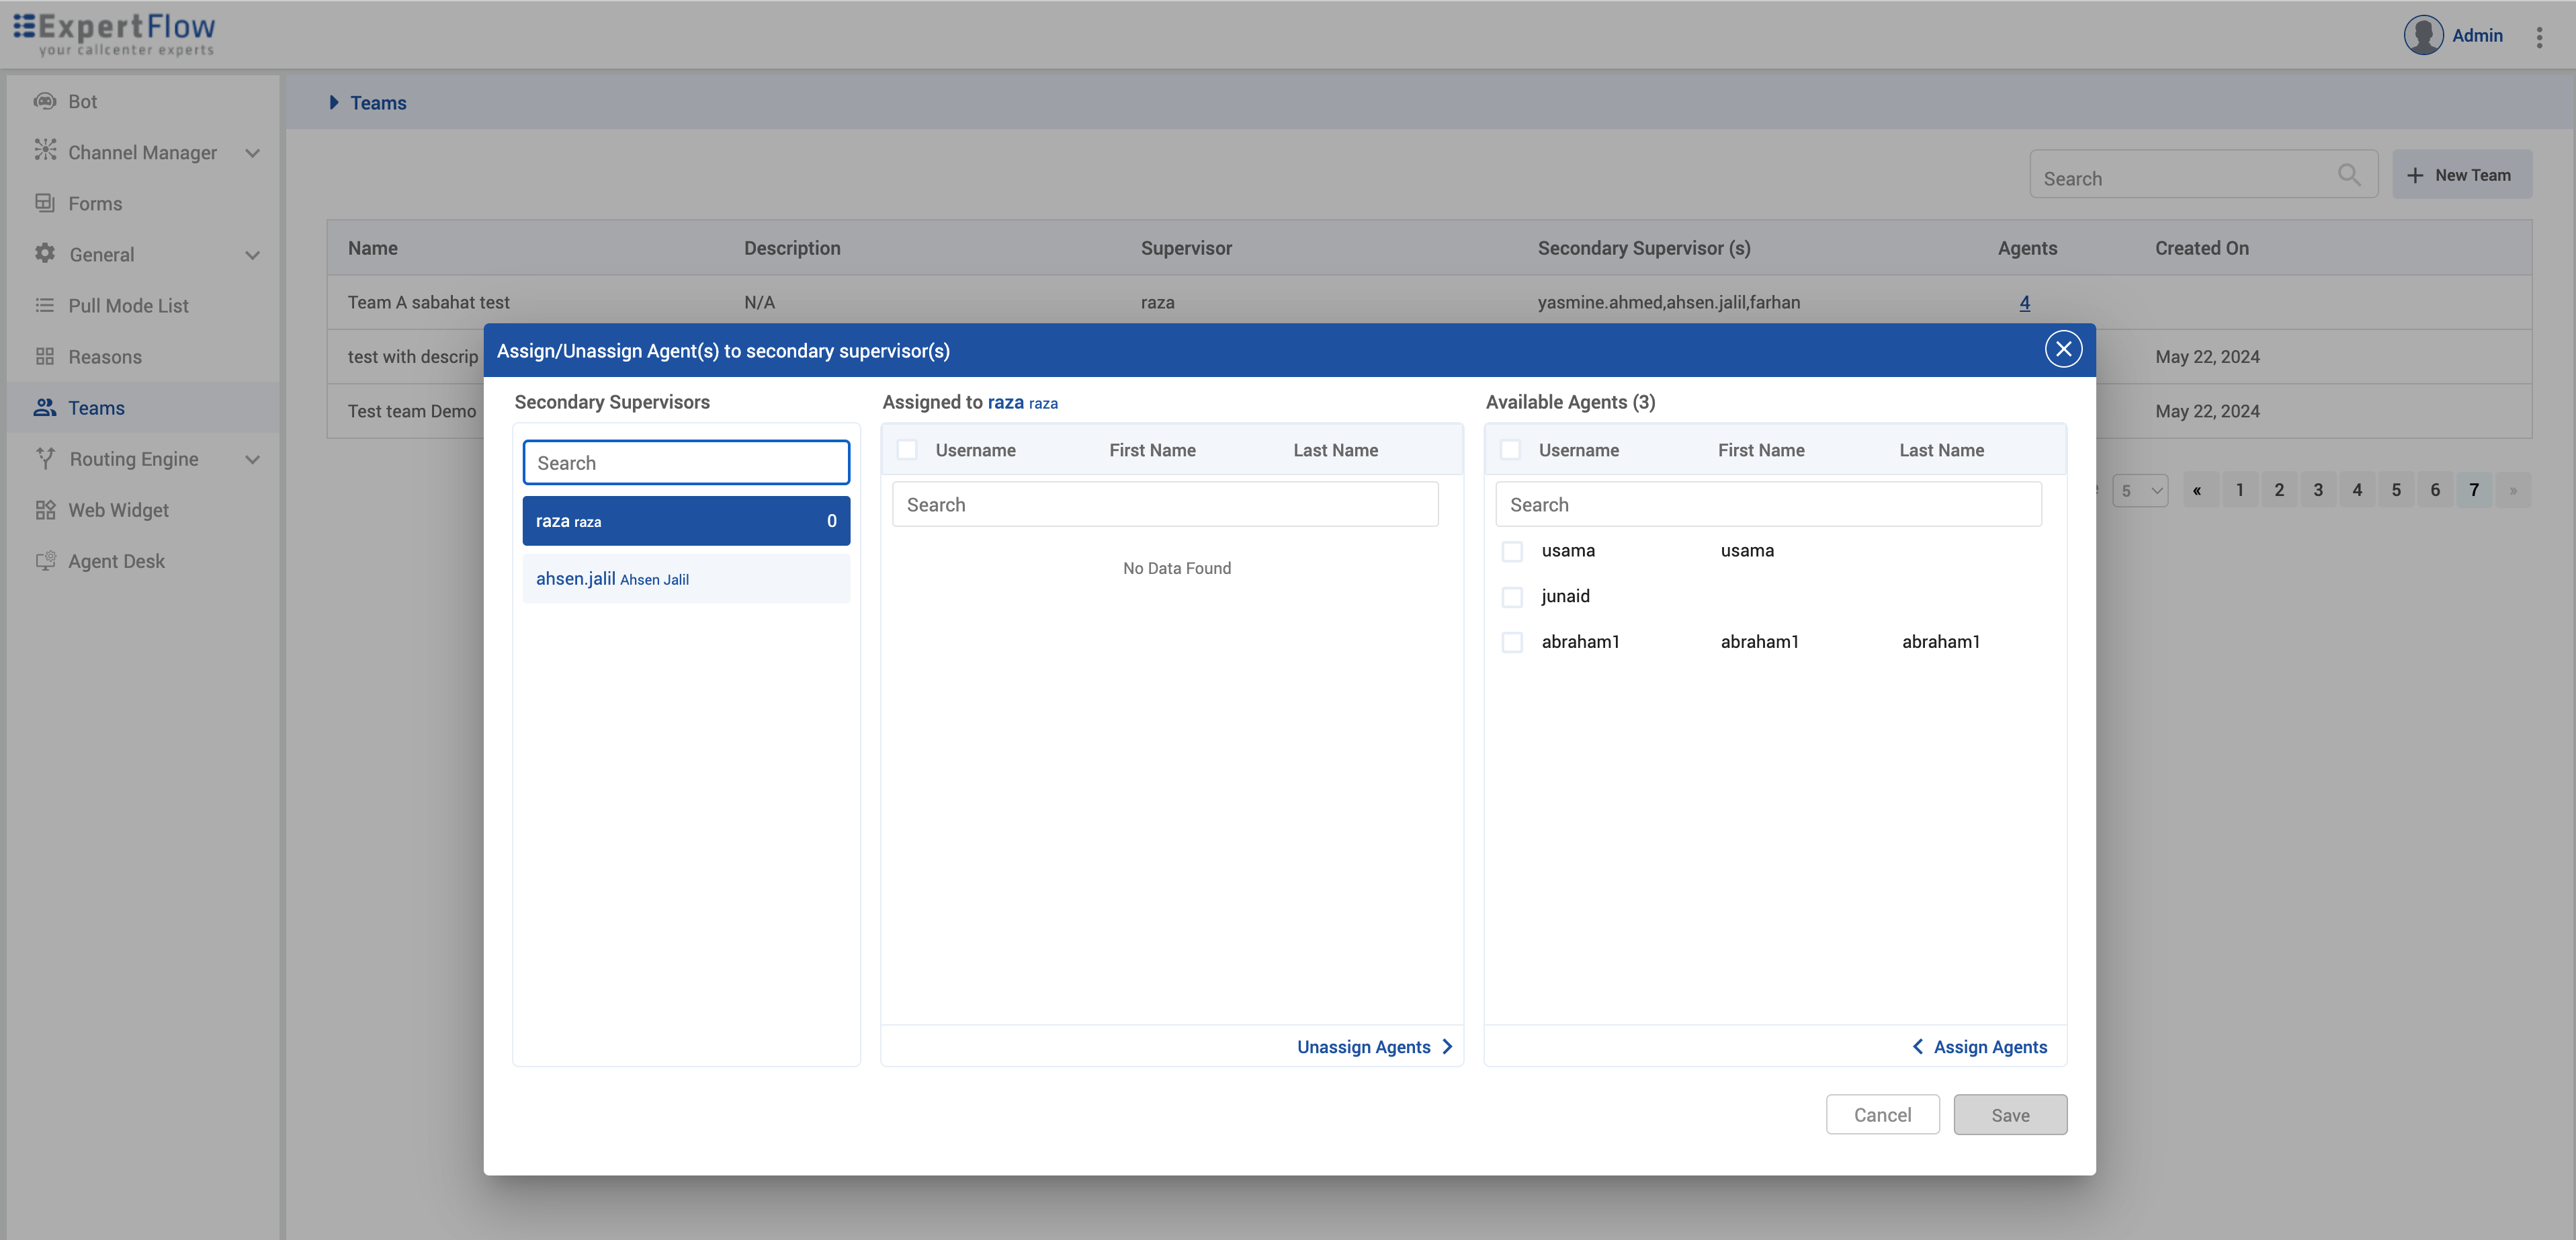
A dialogue box will appear with three sections
-
Secondary supervisors - This section will list all the secondary supervisors.
-
Assigned agents - Agents assigned to the specific secondary supervisor listed here.
-
Available agents - Agents that are part of the team but not assigned to any secondary supervisor in that team will be listed here.
-
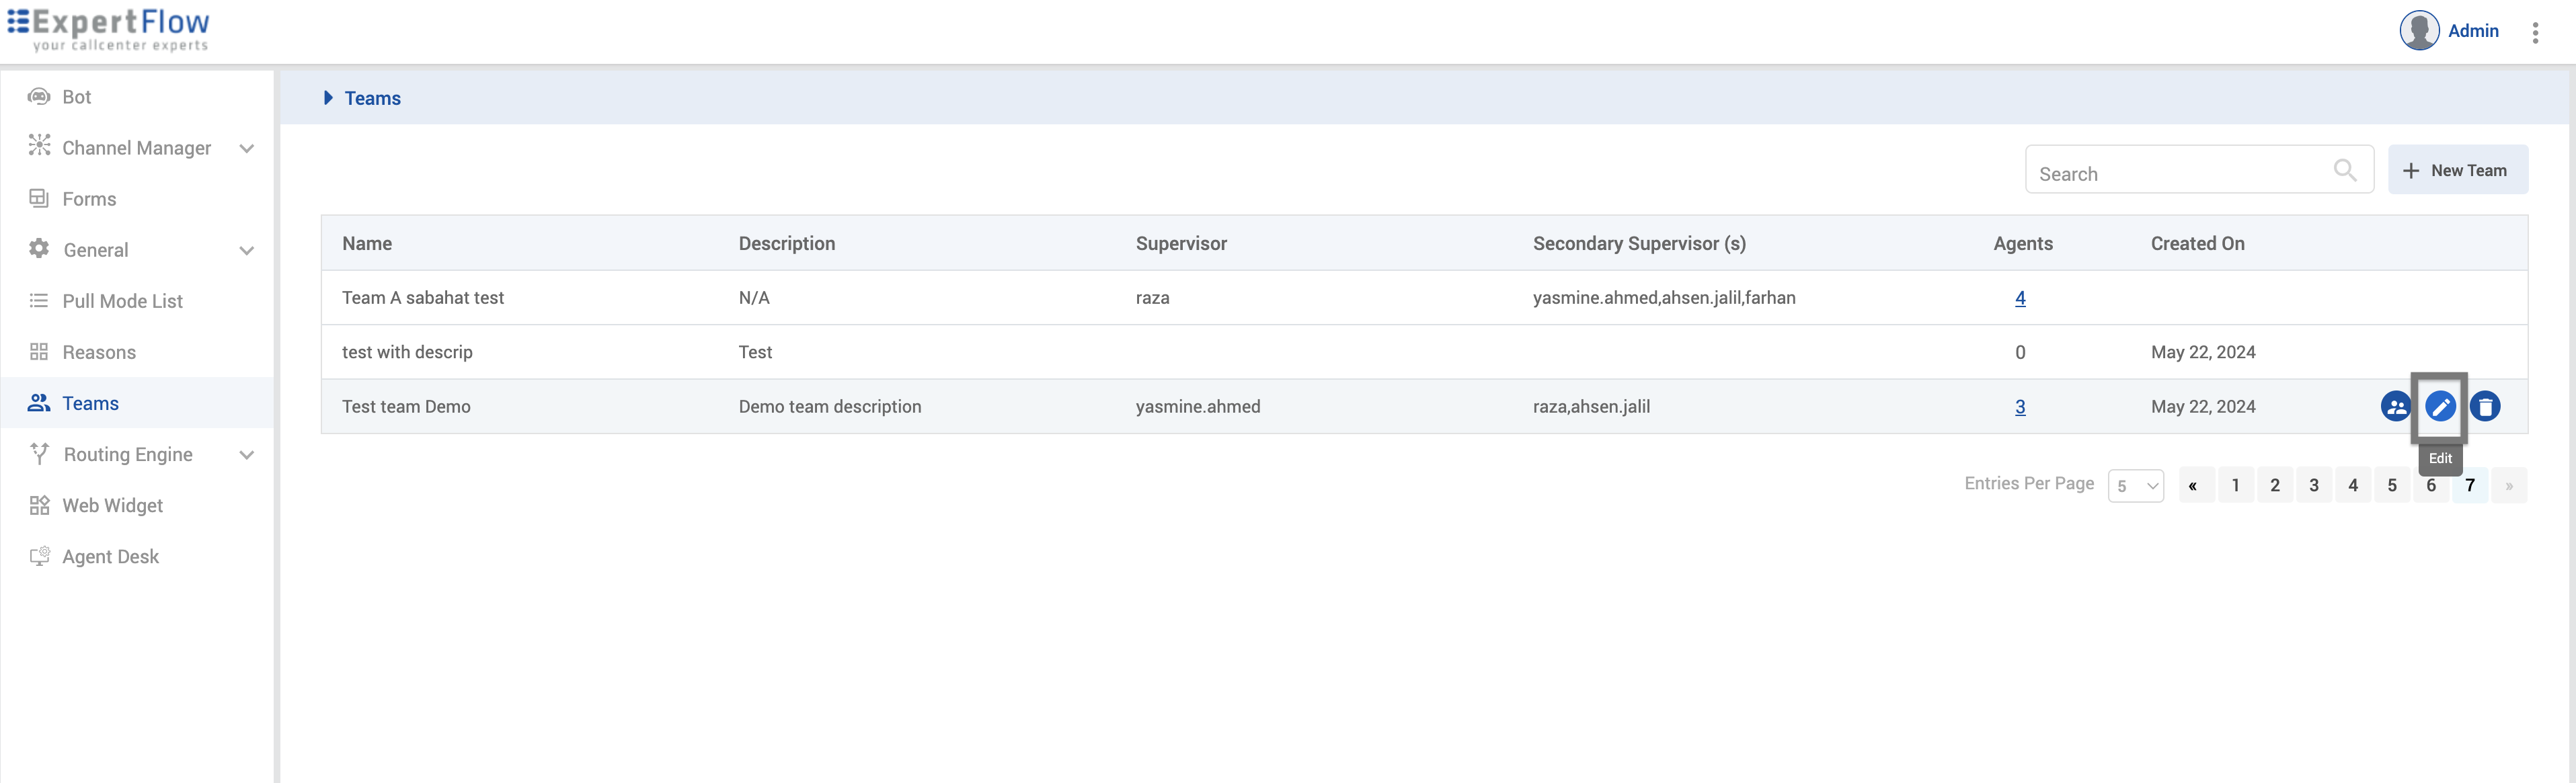
Update a team
To update or edit the team, hover over the specific team. There is an option to edit; click on the edit team icon.
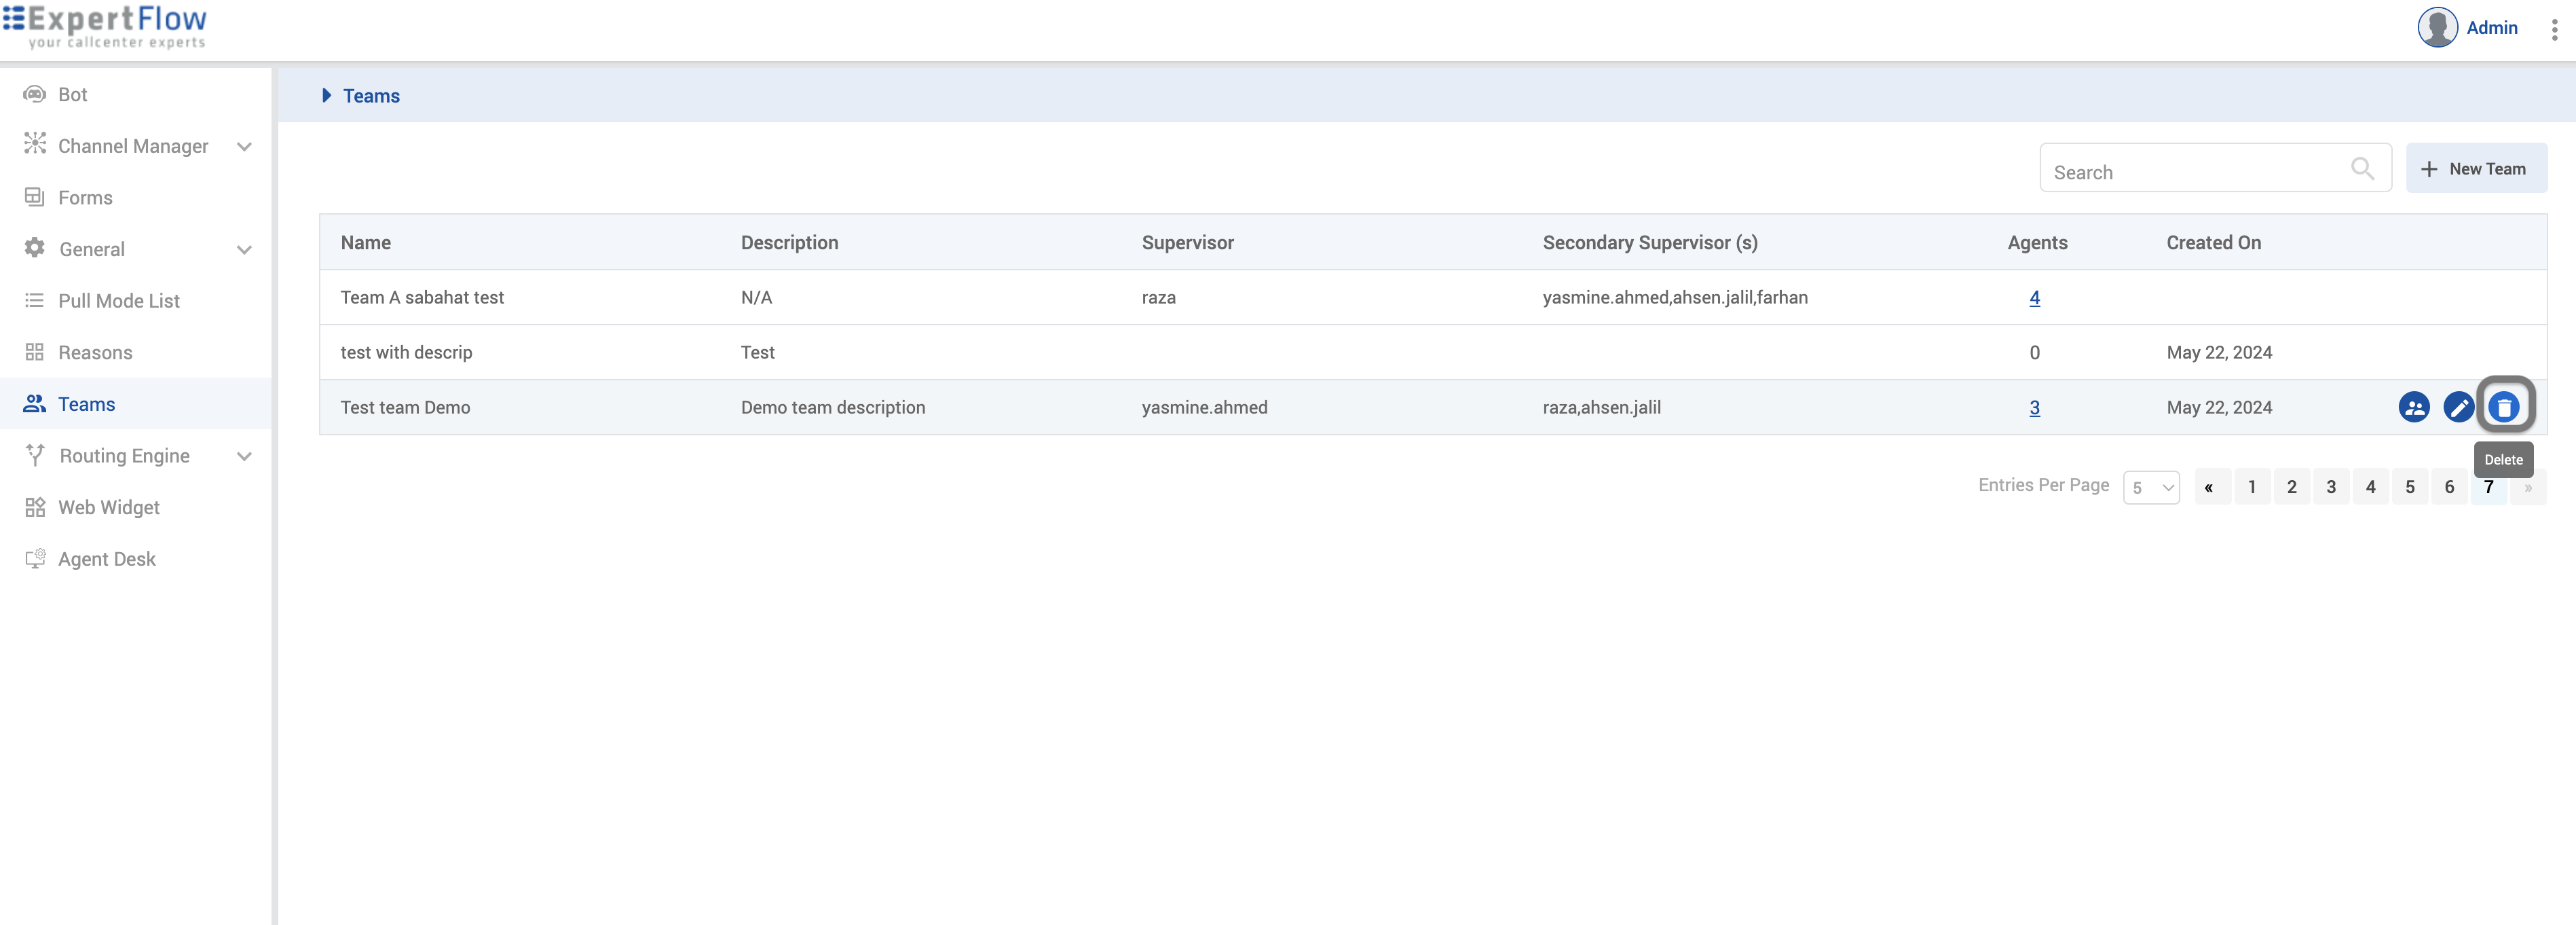
Delete a team
-
To delete a team, hover over the specific team. You’ll see the option to delete; click on the delete team icon.
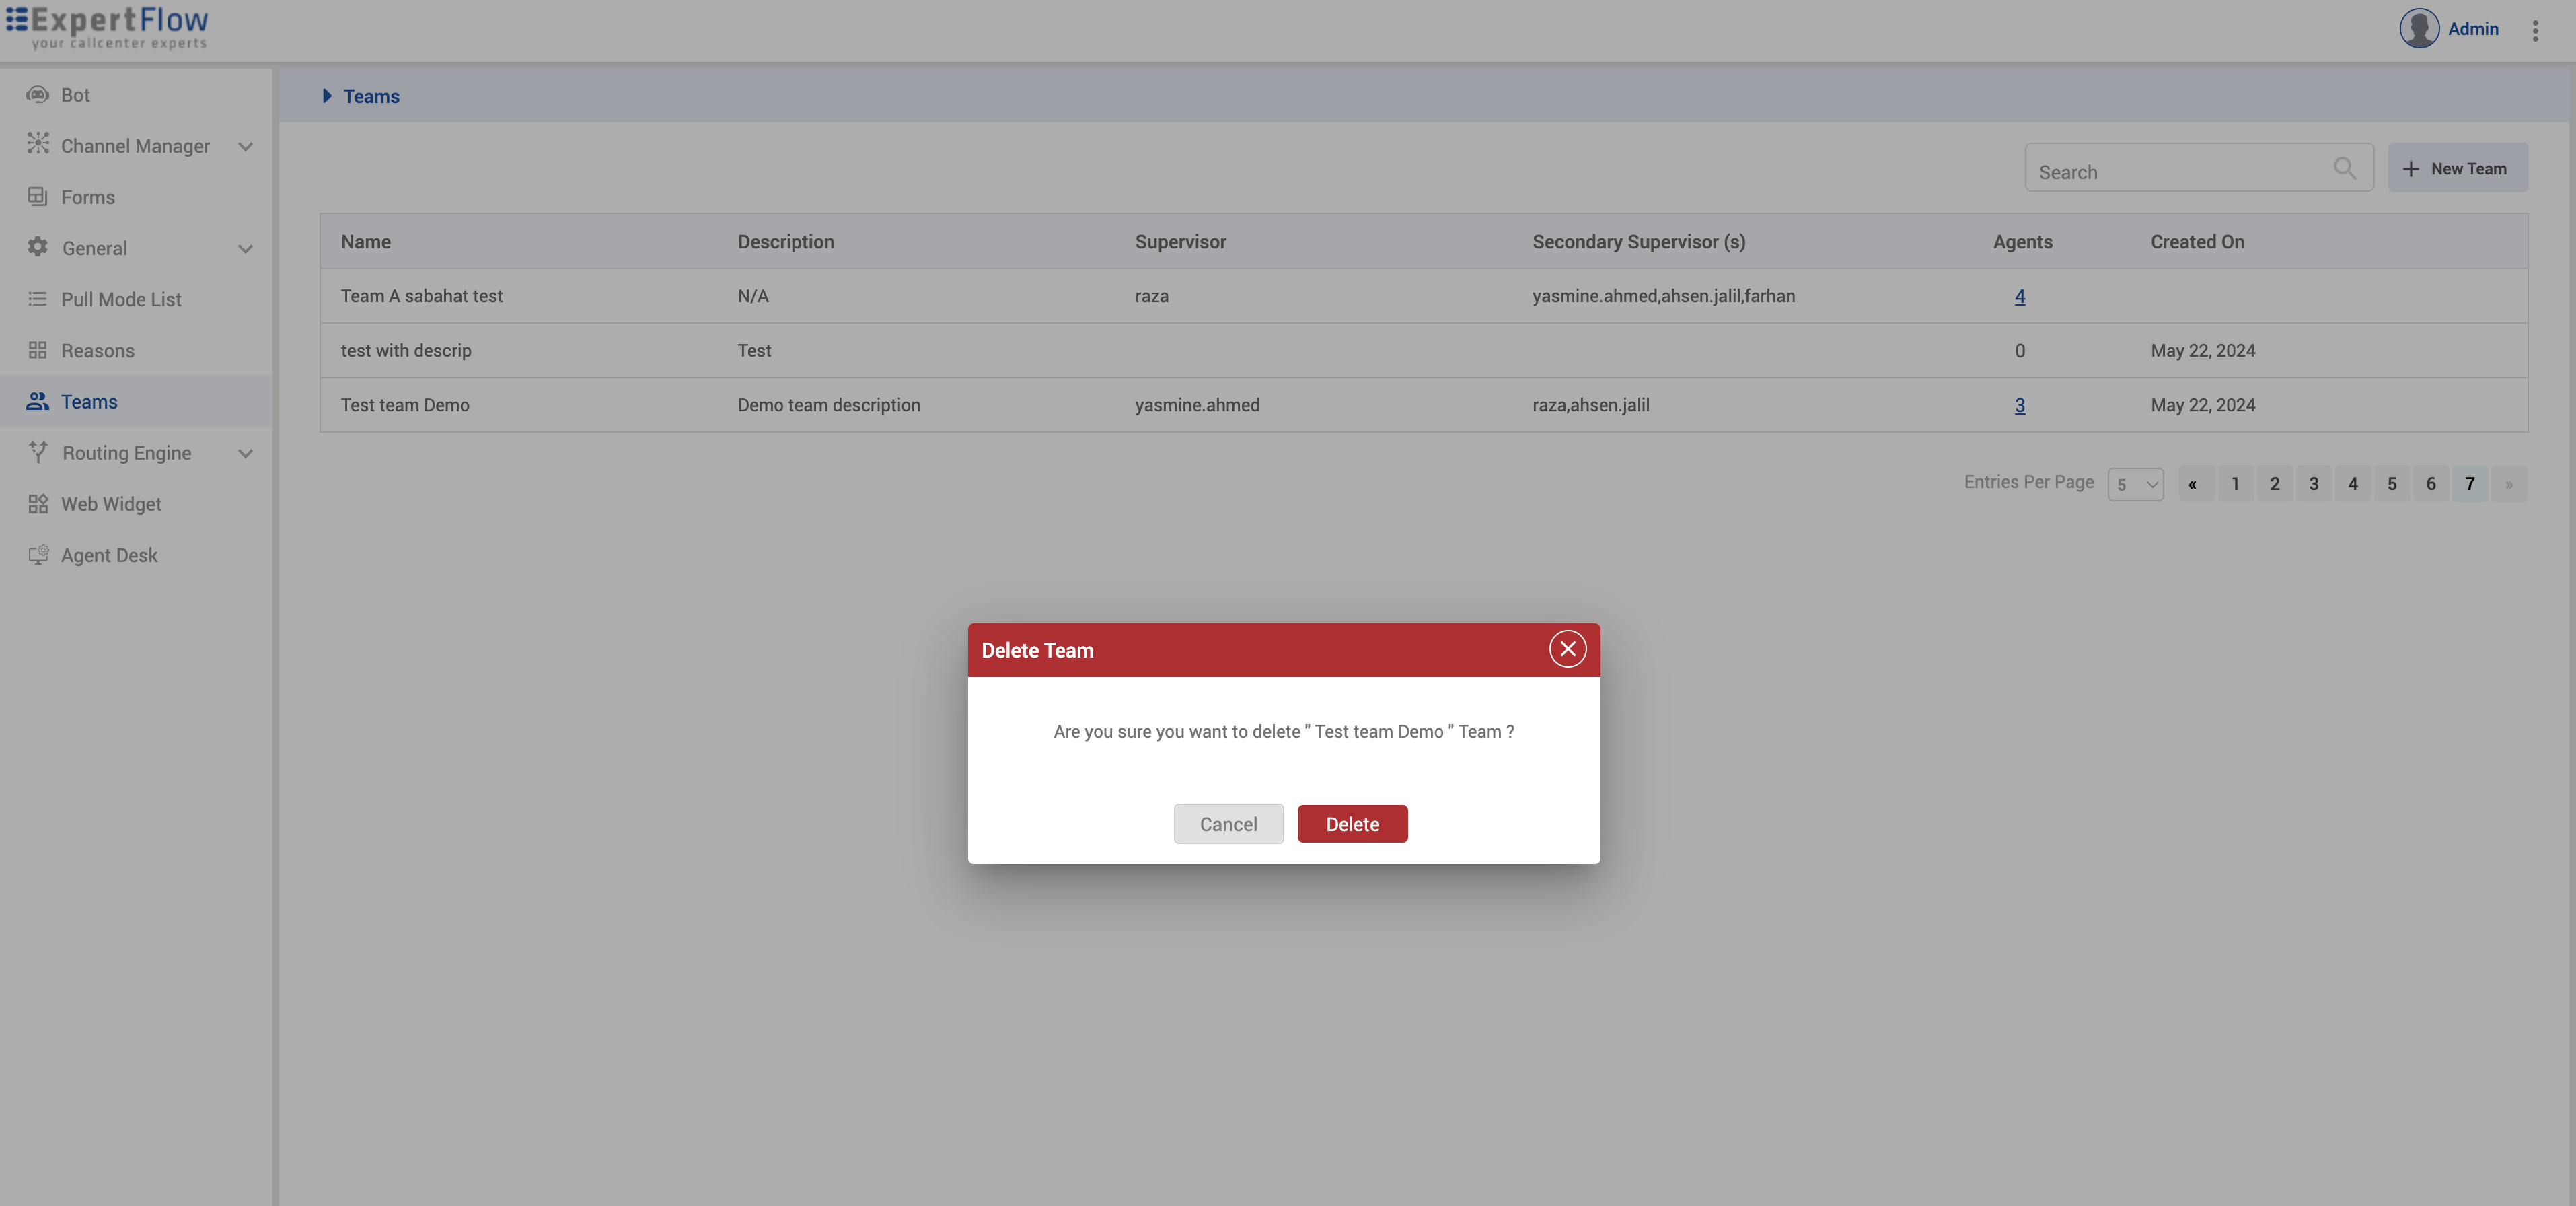
-
A confirmation box will appear. You can delete the team by clicking on the delete button.
Form Builder
Enables the business administrators to create, manage, and utilize multiple forms introducing new question types, sections, weightage, and form type categorization to enhance the user experience and data collection capabilities.
A default Wrap-up form is available on the Forms list. The business administrators can create other types of forms as per requirement:
For more detail click here.
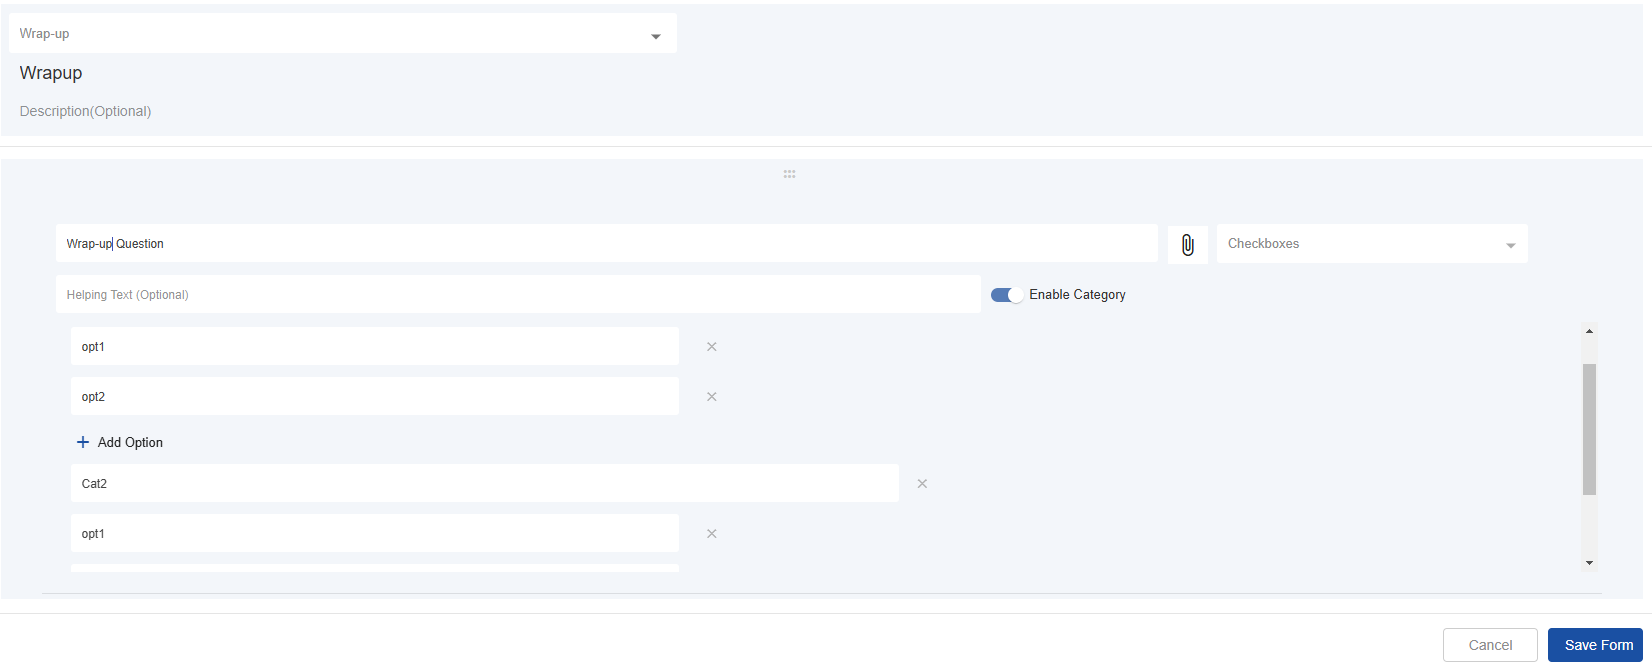
Default Wrap-Up Form
A default Wrap-up form is available on the Forms page.
Go to the form, Wrap-Up, and select edit action against the form to add wrap-up categories and reasons as per your business needs.
|
Field |
Description |
|---|---|
|
Form Title |
A default title to the Wrap-up form is provided on AgentDesk. The title changes to the form here won't take any effect on the AgentDesk. |
|
Description |
Specify an optional description of the form here. This won't be shown on AgentDesk. |
|
New Attribute |
Leave it as it is. In the default Wrap-up form, an attribute with the type Options is already added. You cannot change the type of this attribute in the default Wrap-up form. |
|
Multiple choice |
Turn this on if you want agents to be able to apply multiple reasons. |
|
Add Category |
A default category with the name, 'Category 1' is added. Change it according to your business requirements of wrap-up categories. |
|
Add Options |
Add options in each category. These are the actual wrap-up reasons per category defined above. |
You may add as many categories and options as needed in the Wrap-up form.
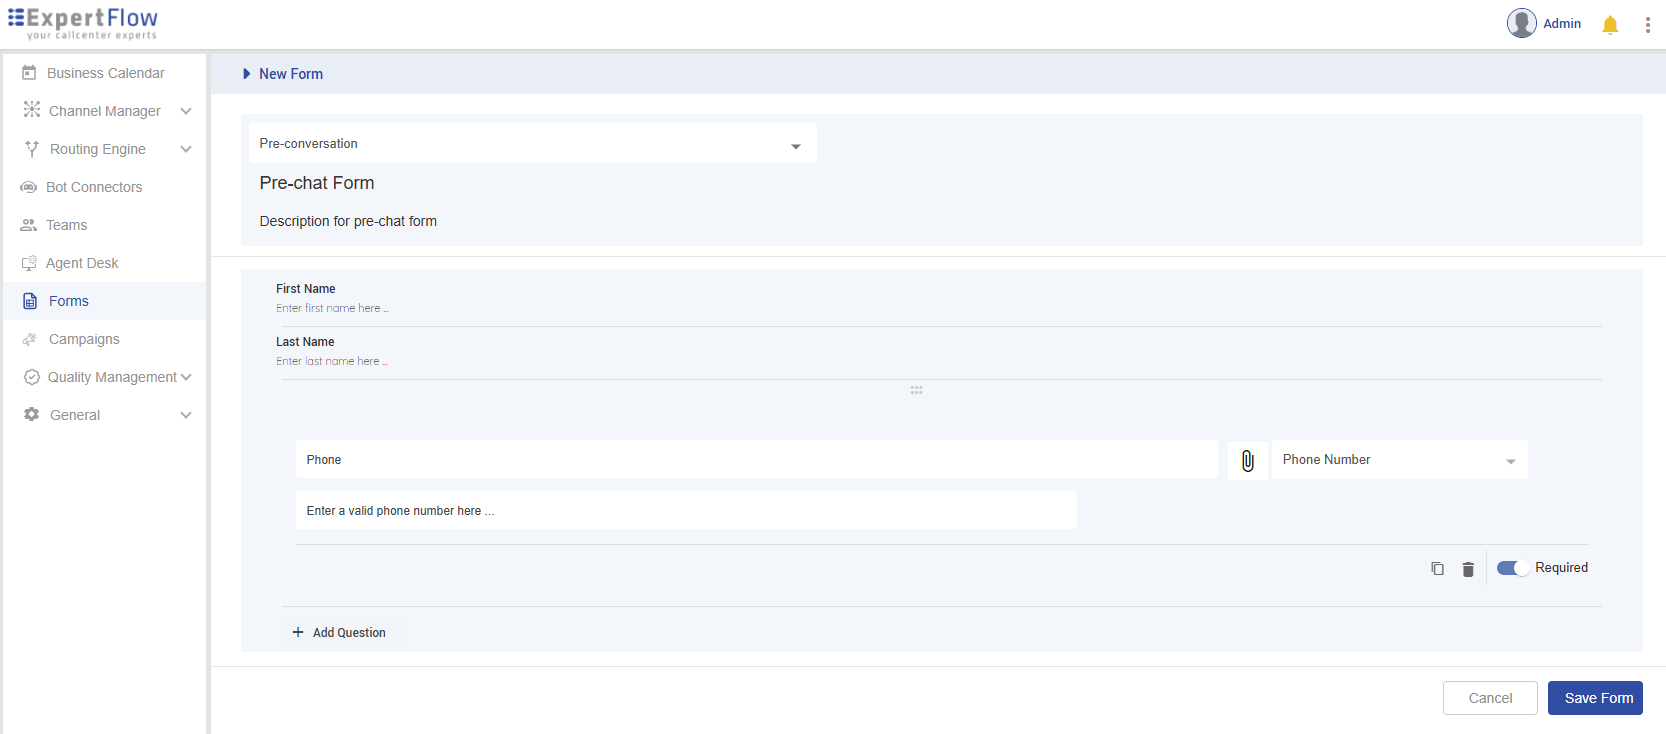
Pre-Conversation Form
Business Administrators can create a pre-conversation form to use in the customer widget.
-
Click on the Forms object.
-
Click on the New Form button.
-
Select form type Pre-conversation.
-
Add attributes (questions) as per your business needs.
-
Now click the Save Form button.
|
Field |
Description |
|---|---|
|
Form Title |
A default title to the Pre-conversation form is provided on the Customer Widget. The title changes to the form here do not have any effect on the Customer Widget. |
|
Description |
Specify an optional description of the form here. This will not be visible on the Customer Widget. |
|
First Name |
For instance, the
|
|
Last Name |
The
|
|
Phone |
To ensure personalized interactions in the conversation view of the Agent Desk, it is mandatory to create a
|
|
Helping Text (Optional) |
The optional helping text helps customers to understand the field. |
For a detailed understanding of the pre-conversation form, click here.
Campaign Configuration
CX Outbound Campaigns component empowers businesses to conduct bulk outbound campaigns directed at customers, including calls and messages. This component is integrated within the Unified Admin. Each campaign manages its contact list and utilizes a dedicated flow within the Conversation Studio.
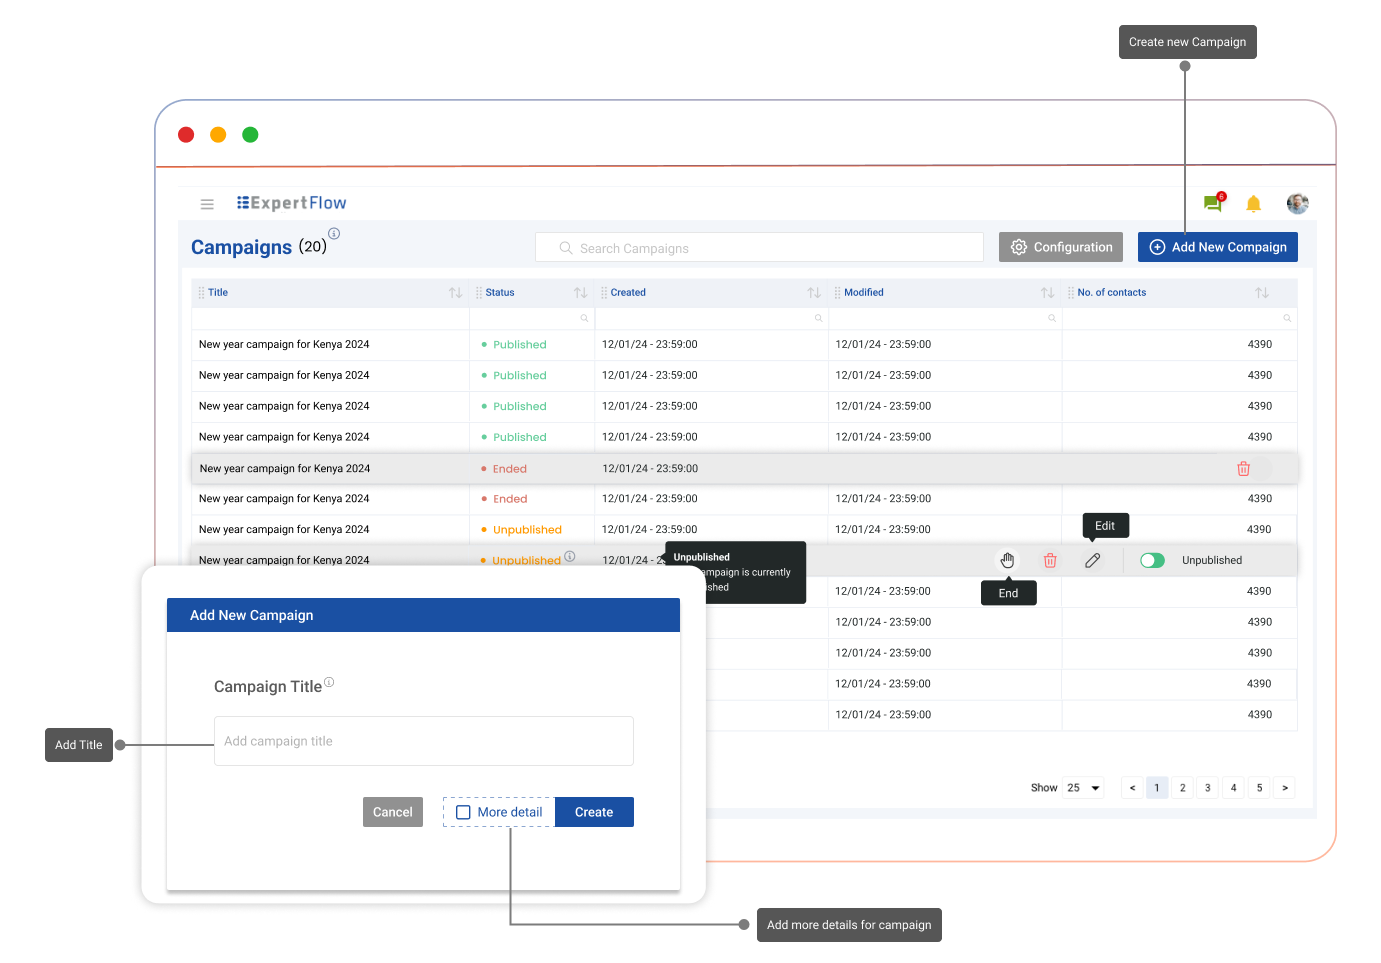
Create Campaign
To create a new campaign,
-
Click on the "Add New Campaign" button.
-
A popup will appear to add a title for the new campaign.
-
Click on Create to create a new campaign
-
If the "More detail" checkbox is selected, the campaign will open in editable mode immediately after creation, allowing one to attach contact sources via CSV and create control flows for the campaign.
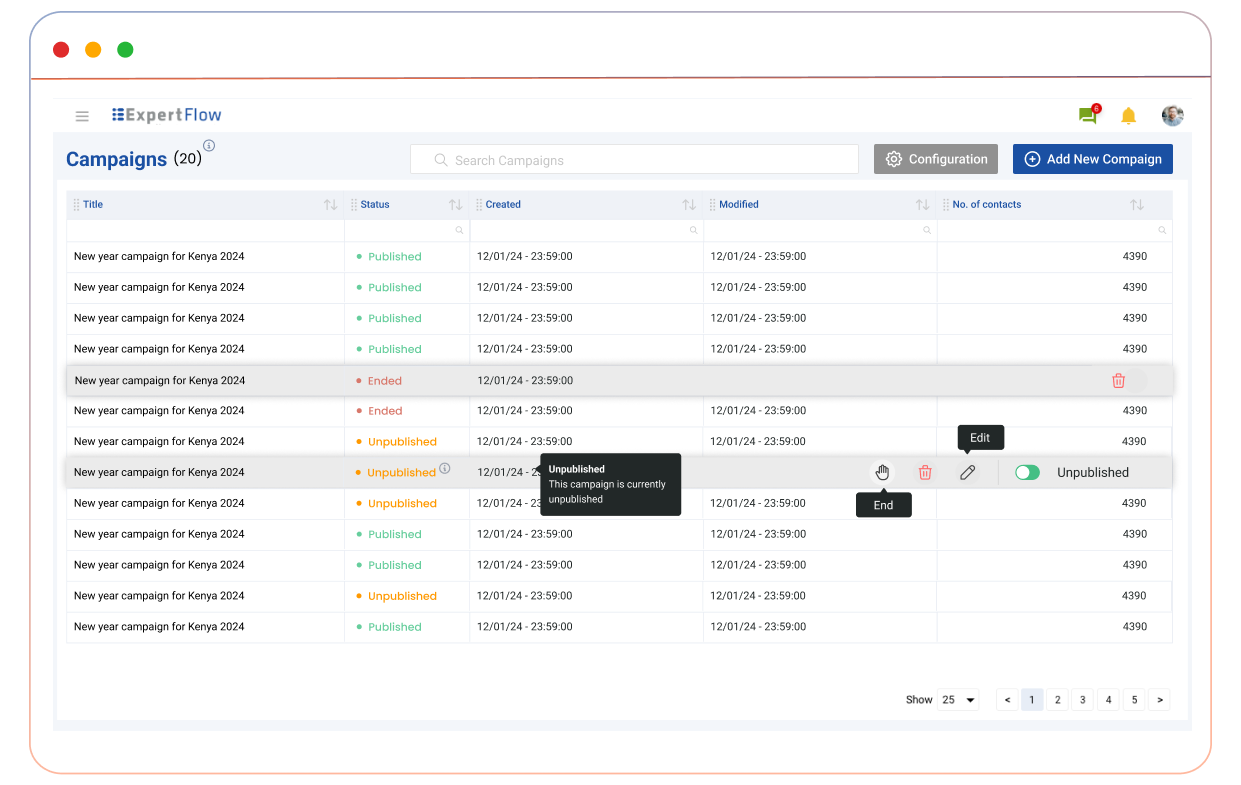
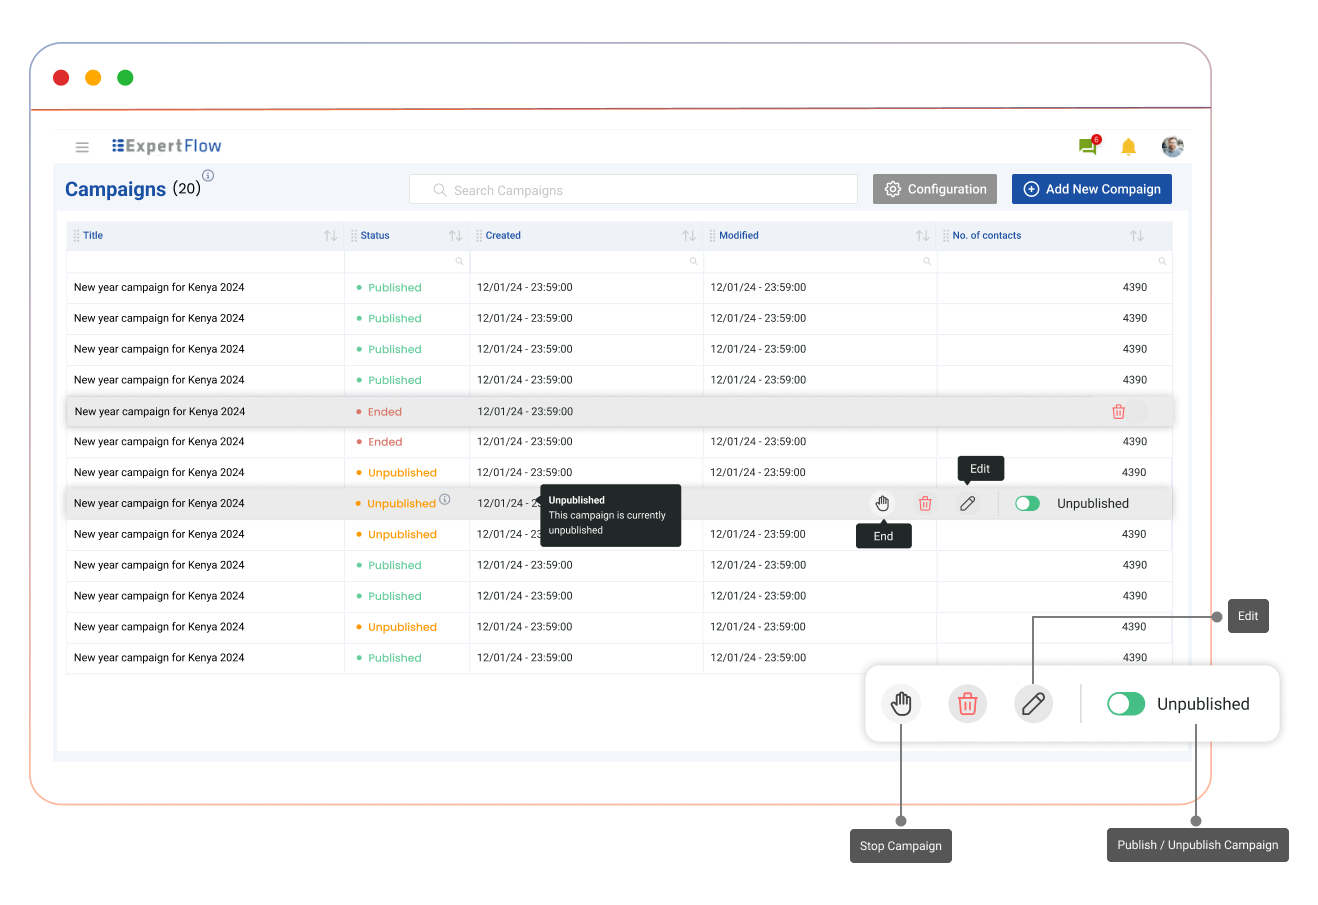
Campaign Controls
Following are the Campaign Controls to tailor campaign execution:
-
Unpublish: If the campaign is in a published state, it will be unpublished.
-
Publish: If the campaign is currently unpublished, it will be published.
-
Delete: Confirming this action will permanently delete the campaign.
-
End: This action will terminate the campaign regardless of its state (published or unpublished). Once ended, the campaign cannot be re-published.

Edit Campaign
To edit campaign:
-
Click on the "Edit" button of any specific campaign from the campaign table.
-
The campaign editing interface will be visible, which includes several key sections:
-
Edit: Make amendments to the campaign.
-
Title: Enter Campaign title.
-
Description: Provide a detailed description of the campaign.
-
Unpublish: If the campaign is in a published state, it will be unpublished.
-
Publish: If the campaign is currently unpublished, it will be published.
-
Delete: Confirming this action will permanently delete the campaign.
-
End/Stop: This action will terminate the campaign regardless of its state (published or unpublished). Once ended, the campaign cannot be re-published.
-
For a detailed user guide for campaigns click here.
Quality Management
The business admins/Quality Managers can create and assign evaluation jobs to Evaluators. The solution provides several different reports ranging from review volume, team comparison, individual team/ agent performance over time, and Evaluators' calibration.
Design an Evaluation Form
The Forms tab allows Quality Managers to create, edit, and manage evaluation forms (Questionnaires) used by evaluators to evaluate customer interactions with contact center agents.
Forms List View:
Displays existing forms with,
-
Name
-
Created On date and time.
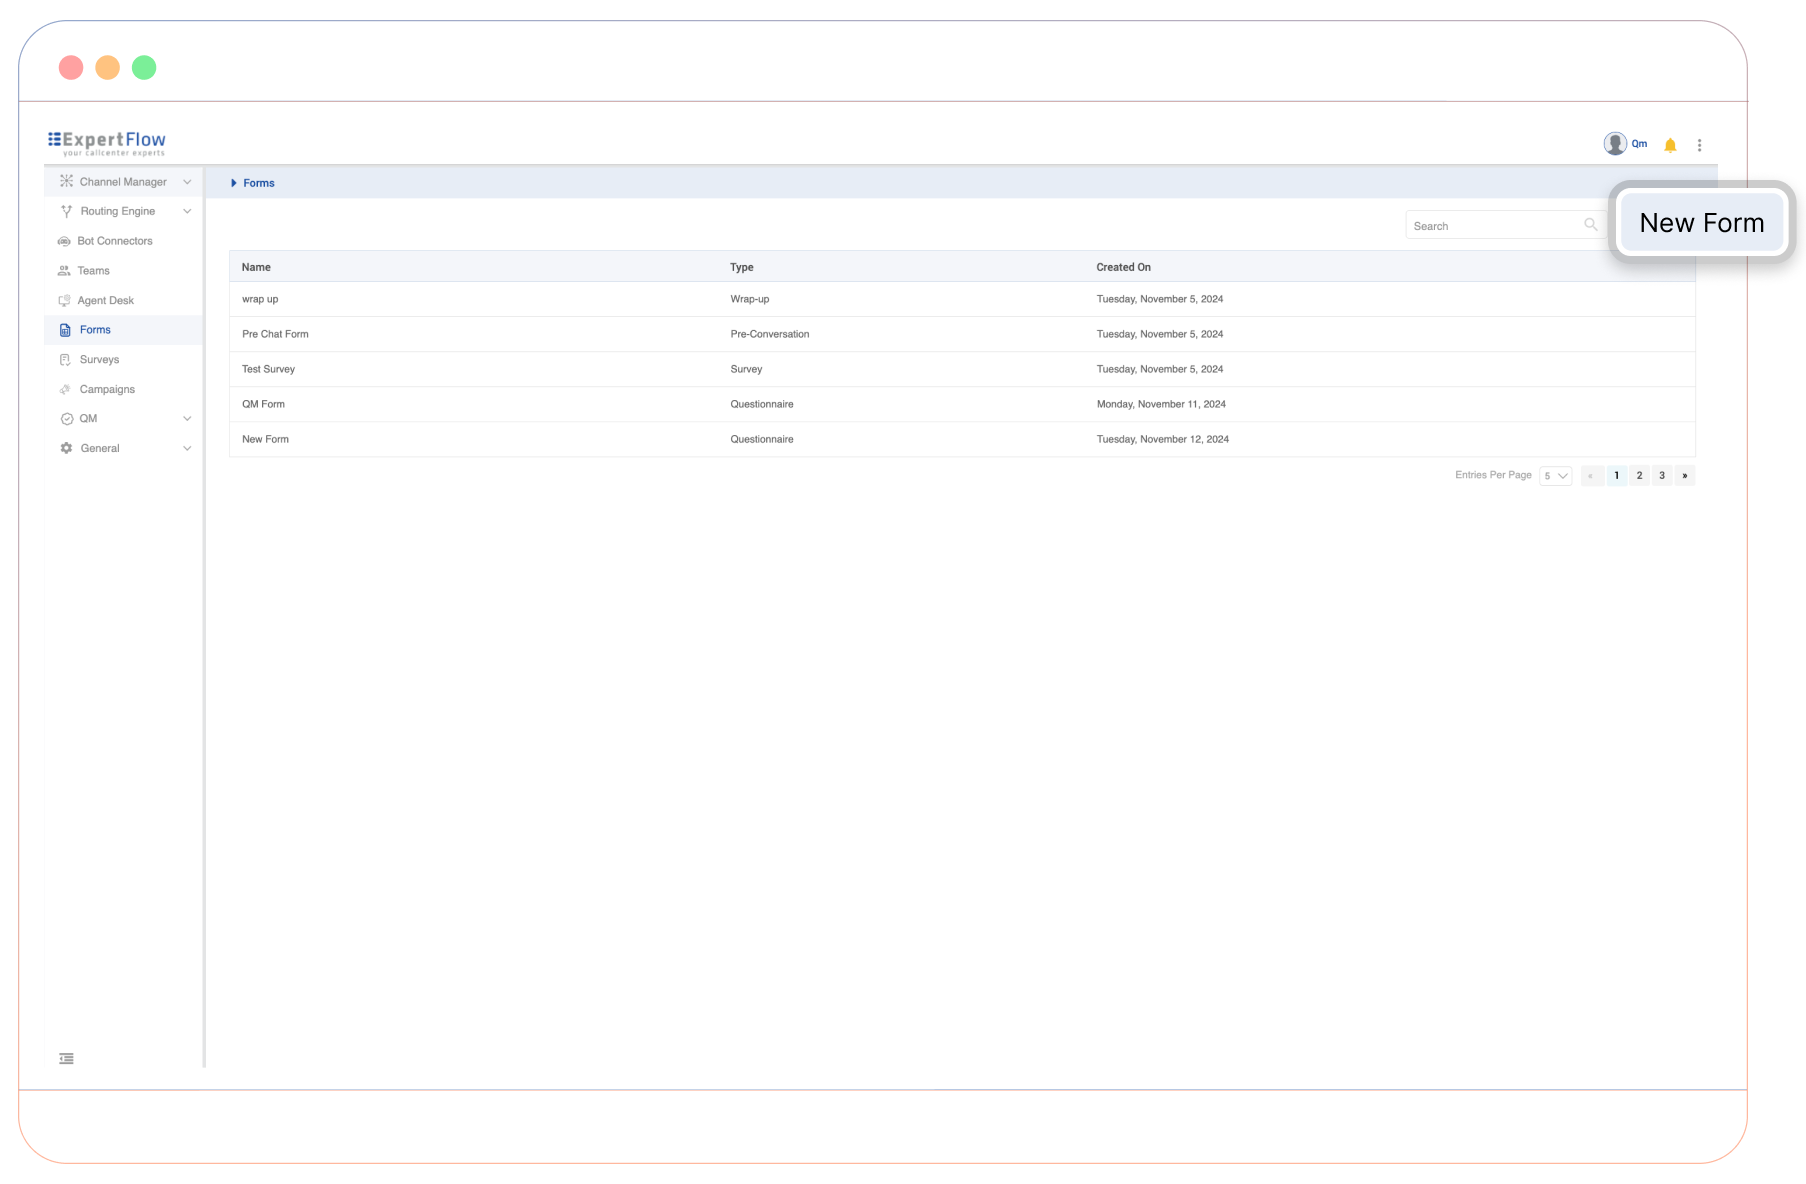
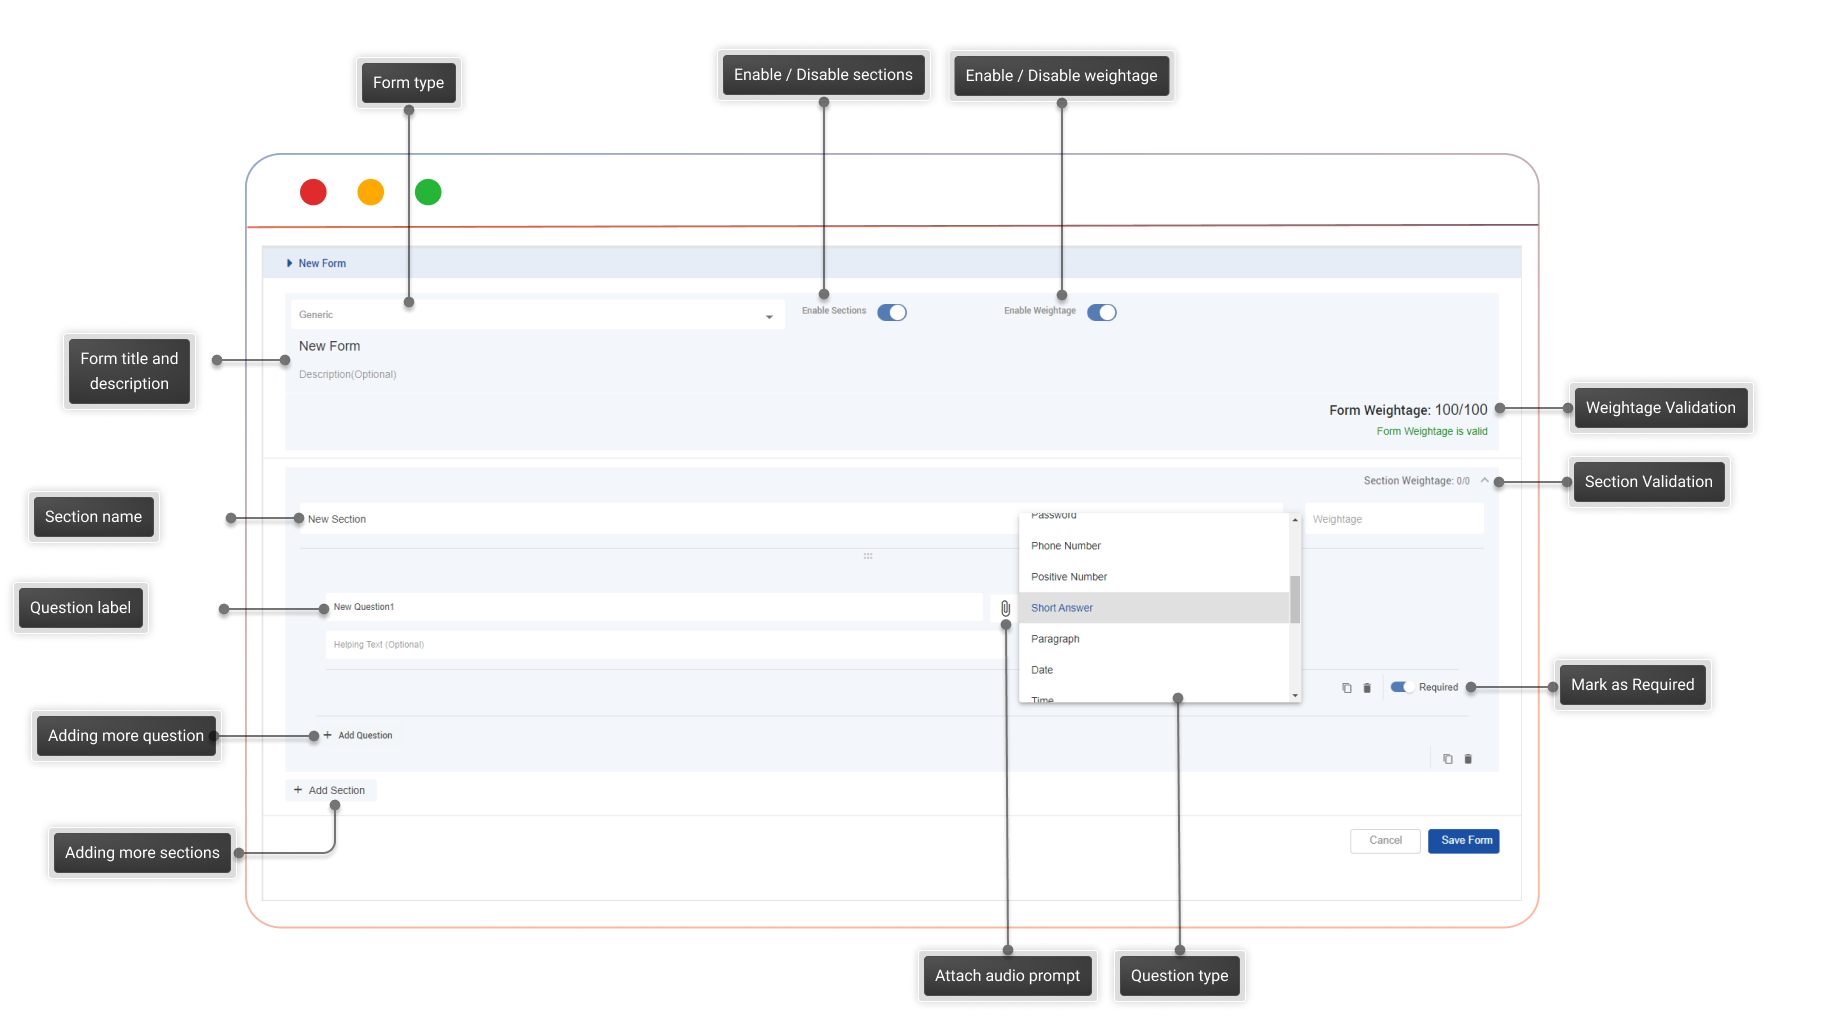
Creating a New Form
-
Steps to create a new form:
-
Click + New Form.
-
Provide a form title and description.
-
Select the questionnaire type form.
-
Enable Sections and Weightage (required for Questionnaire Type Forms).
-
Add sections and questions:
-
Add Section: Break down forms into logical categories.
-
Add Question: Insert multiple-choice, single-choice, or text-based questions.
-
-
Save the Form
.png?cb=81e2ef38792f5480c65cef8387628063)
Reviews
Viewing and Filtering Reviews
Accessing Reviews
-
Select the Reviews option under the QM menu.
-
The Review Screen opens and lists all tasks assigned to a Quality Manager or others (Evaluators/ Reviewers).
Filter Options
-
Use the dropdown menu to filter reviews by
-
All
-
Pending
-
In Progress
-
Completed
-
-
Toggle "Assigned to me" to view tasks specifically assigned to Quality Manager/Evaluator.
.png?cb=0557a1b48ab39b03b71cb1d55bd7cabc)
Starting a Review
-
Select a review from the list available on the review screen and click "Start Review". It will open Conversation View.
-
Use the form on the right-hand panel to evaluate agent interactions.
-
Assign scores or feedback to specific questions or sections.
.png?cb=7f0903a3f199d79f377a4dfb30105dab)
Schedules
The Schedules tab (Review Schedular) allows Quality Managers to assign reviews to evaluators systematically.
Manage Schedules:
-
Open the Schedules section in the left menu.
-
Select Manage Schedule
-
The list displays active schedules with details such as
-
Name: Schedule title.
-
Status: Current state (e.g., Active, Inactive).
-
Date: Scheduled end date.
-
Managing Schedules
-
Click the edit icon to modify a schedule.
-
Use the toggle switch to activate or deactivate schedules.
If toggled to deactivate, reviews created by the schedule will not be removed. Only future tasks assigned by the schedule are halted.
-
Delete schedules using the trash icon if no longer needed.
This will remove all pending/in-progress reviews.
.png?cb=8693f460289570032743c51f0837f40d)
Create a New Schedule
Scheduling Screen
After selecting the 'Schedule' tab at the top of the Schedules section, the screen displays two tabs:
-
One for viewing all available schedules.
-
Second for configuring a new schedule for quality management tasks.
Basic Information
-
Schedule Name:
-
Enter a name for the schedule to easily identify it (e.g., "Weekly Agent Review").
-
-
Questionnaire:
-
Select a pre-configured form from the dropdown ('QM Form', ‘Score’, ‘Quality Manager Form’). This form will be used during the evaluation process.
-
-
Reviewer(s):
-
Assign one or more reviewers from the dropdown. Use the ‘Search’ feature to find specific reviewers quickly.
-
-
Agents and Teams to be Reviewed:
-
Select agents or teams that are to be reviewed under this schedule. You can select individuals or entire teams from the dropdown.
-
Search Criteria
-
Start Date & Time / End Date & Time:
-
Set the date and time range for when the review schedule will be active. Use the calendar picker to select the desired dates and times.
-
-
Add Another Filter:
-
Use this feature to refine the criteria by additional parameters (e.g., "Wrapup", "Direction", "Duration").
-
Select filters to narrow down specific interactions or criteria for the schedule.
-
Additional Settings
-
Set Deadline:
-
Specify the number of days within which the schedule must be completed. Use the dropdown to select a value.
-
-
Set Reminder:
-
Enable reminders for assigned reviewers. You can choose the reminder interval (e.g., 1, 2, or 3 days). Reminders can only be scheduled up to one day before the deadline.
-
-
Repeat Schedule:
-
Enable repetition for recurring schedules. Options include:
-
Daily
-
Weekly
-
Fortnightly
-
Monthly
-
-
For a Repeat Schedule, only new conversations that meet the search criteria will be assigned. The "Start Date & Time / End Date & Time" must be configured to ensure repetitions occur within the specified date range.
End Repetition Options
-
Date:
-
Specify the exact date when the recurring schedule will end.
-
-
After Occurrences:
-
Specify the number of occurrences after which the schedule will end.
-
.png?cb=2b1c1b1394b33014169288e11e09a25d)
Conversation List
The Conversation List provides an overview of all agent interactions for evaluation and quality management. This screen is crucial for accessing, filtering, and managing conversations. Below are the key components and functionalities:
Conversation Overview
-
Columns:
-
Direction: Indicates whether the conversation is inbound or outbound.
-
Date: The date the conversation took place.
-
Time: The starting time of the conversation.
-
Duration: Total time of the interaction.
-
From: The origin of the conversation (e.g., a phone number or a client).
-
To: The recipient of the conversation.
-
Agent(s): The agent(s) involved in the conversation.
-
Reviews: Shows progress in percentages or whether the review is Assigned.
-
Wrap-up: Notes or summaries added by agents.
-
Filtering Options
-
Click the Filter Icon to open the filter panel.
-
Available filters:
-
Start Date & Time / End Date & Time: Specify a date and time range for filtering conversations.
-
Agents and Teams: Filter by specific agents or teams.
-
Direction: Select Inbound or Outbound Conversations.
-
Wrap-ups: Filter by wrap-up codes or notes.
-
Duration: Set a time range in minutes, seconds, or hours.
-
The default operator between different filters is AND, while the operator within the “Agents and Teams” and “Wrap-ups” filters is OR.
-
Actions:
-
Apply: Filter the list using the selected criteria.
-
Reset: Clear all applied filters.
-
.png?cb=3c1947c276f98c55f19a59c0d136c8cf)
Reviewing Conversations
-
Click on a conversation to open its detailed view.
-
The conversation view displays:
-
A chronological history of messages or call records.
-
Interaction details, such as client responses, agent replies, and system actions.
-
-
Actions:
-
Assign: Opens the Assign Panel where you can:
-
Select an evaluator.
-
Assign an agent for review.
-
Choose a questionnaire.
-
Set a due date and reminders.
-
Confirm by clicking Assign.
-
-
Review: Opens the Review Panel where you can:
-
Select an agent to review.
-
Choose a questionnaire for the evaluation.
-
Click Start Review to begin the process.
-
-
Viewing Conversation Types
-
Use the dropdown at the top-right to filter by:
-
All: Displays both chat and voice conversations.
-
Chat: Shows only chat-based interactions.
-
Voice: Displays voice calls.
-
-
-
.png?cb=32f8b5768f336d50a45c62c8f220d23a)
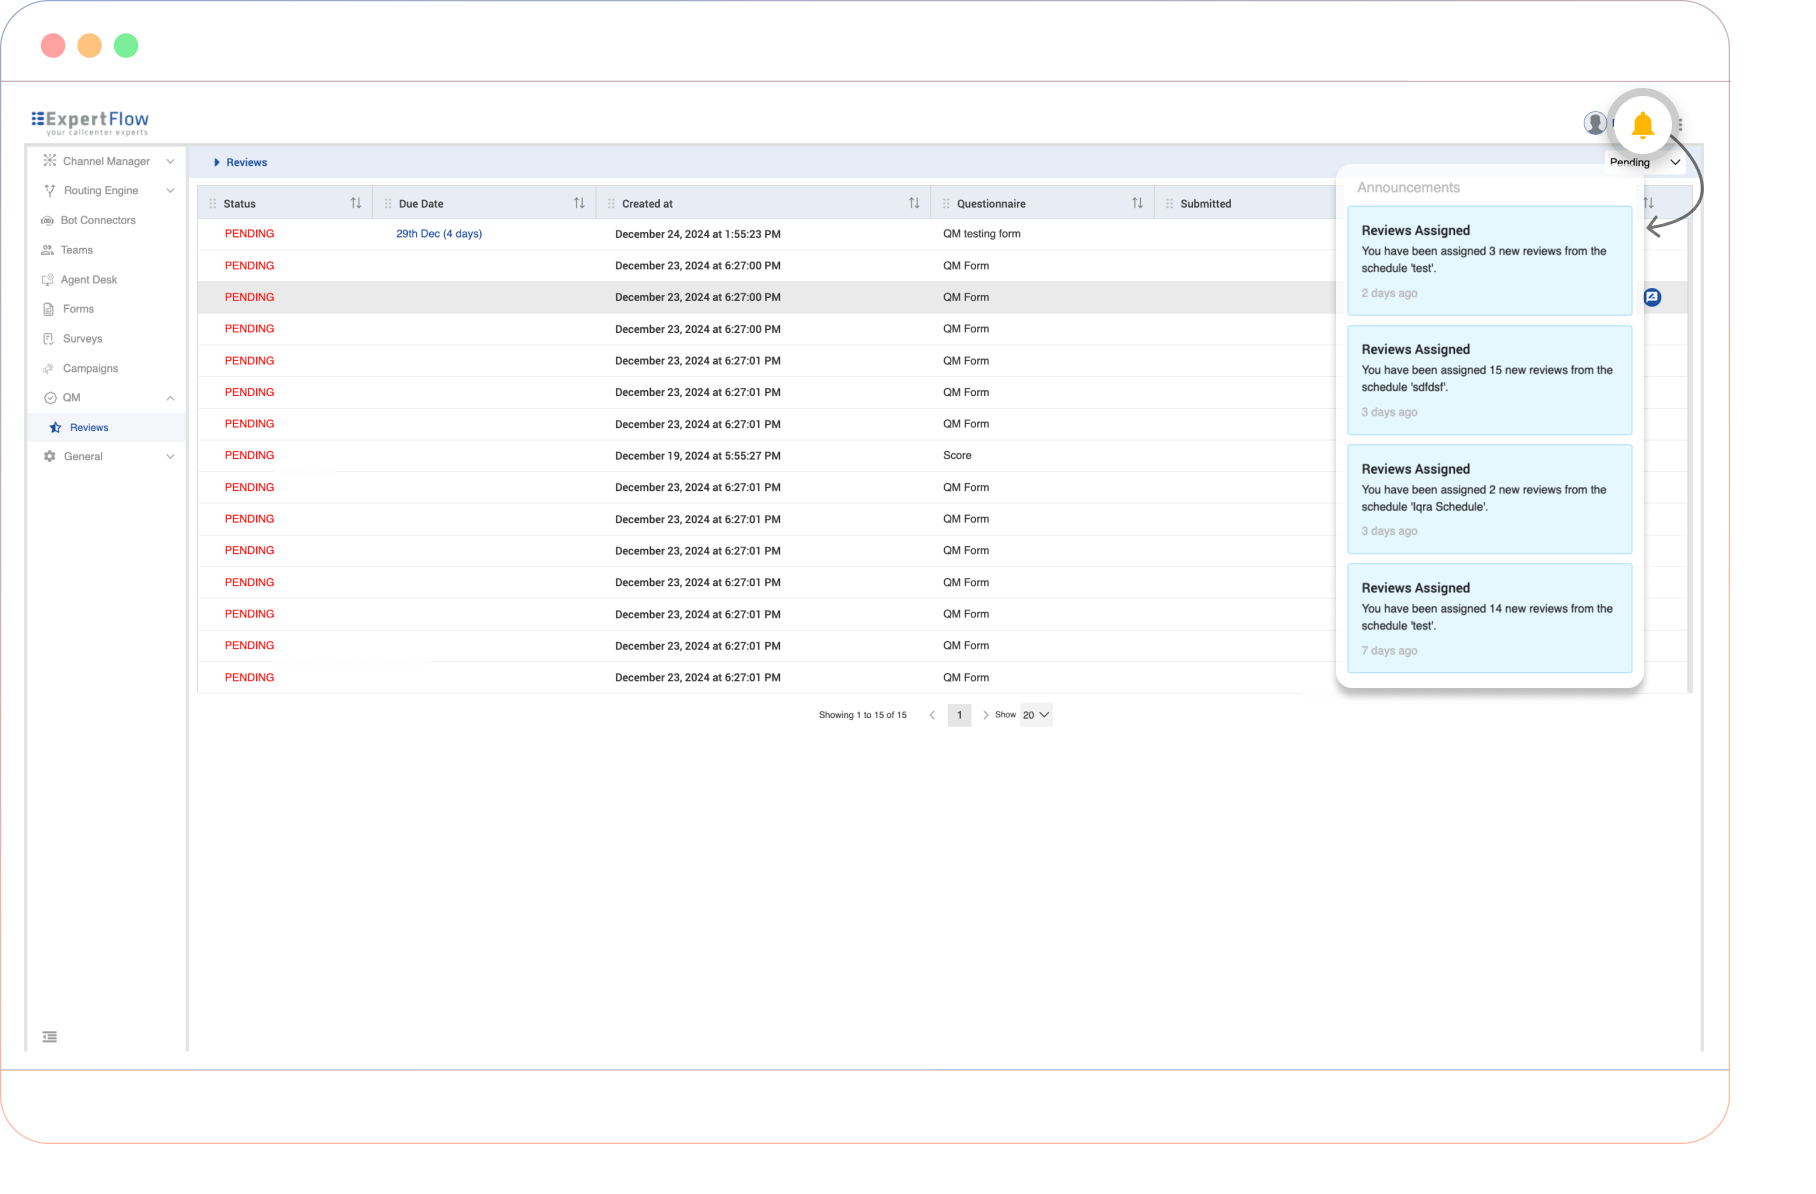
Review Notifications
Notifications alert evaluators about new reviews and deadlines.
-
New Assignments: Displays recently assigned reviews.
-
Reminders: Alerts for approaching deadlines.