Purpose
The deployment guide for the Webex Contact Center in ZOHO CRM provides instructions to install, configure, and use the connector within ZOHO environments.
Intended Audience
This document is intended for customers who want to deploy a Webex Contact Center connector within ZOHO CRM.
Prerequisites
The following are the prerequisites for the deployment of the Zoho Connector for Webex Cloud Contact Center.
-
You must have Zoho and Webex CC.
-
A Zoho CRM account is required.
You can choose “Access ZOHO CRM” from here.
-
The user must have administrative rights.
-
Webex Generic connector Library should be deployed. If not, see Webex Generic Connector Deployment Guide.
Pulling the Zoho Generic Connector from Git
-
Create a directory with name as
mkdir zoho-connectoror according to your ease. -
Navigate to newly created directory by
cd zoho-connector. -
Pull the the code from the:
git clone --branch 0.0.0_b-yaml-files https://gitlab.expertflow.com/cti/zoho-crm-generic-connector-deployment.git
-
Run
cd kubernetesto change directories. This is where all the YAML files are stored.
You must have access to above git repository. You must have git username and password. In case of 2FA you must have personal access token.
Setting Up Environment
Our server deployment is managed through Kubernetes, where the static files for the connector are hosted and the Zoho Connector runs.
Namespace
Create a namespace “expertflow” if it doesn’t exist.
kubectl create namespace expertflow
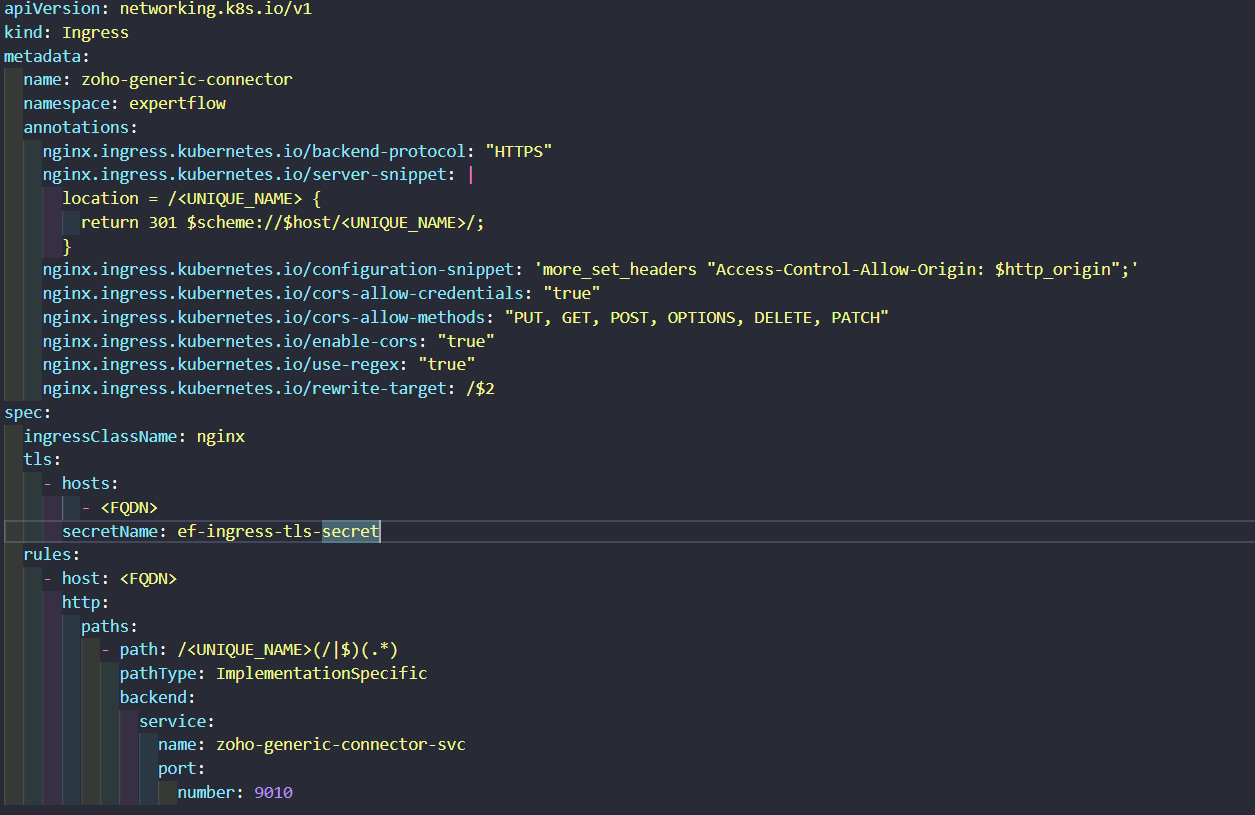
Configure Ingress.yaml
Zoho Generic Connector for Webex cloud should be accessible by a fully qualified domain name. Assign the FQDN.
Replace <FQDN> with your FQDN for Zoho Webex Connector (e.g. projectsdemo.expertflow.com) and run this command.
sed -i 's/devops[0-9]*.ef.com/<FQDN>/g' zoho-generic-connector-ingress.yaml
Create Self-Signed SSL/TLS Ingress Certificates (optional if already present)
Please modify the <FQDN> with your current FQDN before applying the following command.
-
Create IngressCerts directory (optional)
-
mkdir ingress-certs
-
cd ingress-certs
-
set the Variable name to your FQDN (e.g.
projectsdemo.expertflow.com).
The${FQDN}variable in following commands will be replaced with the value you provided in this step -
export FQDN=<enter FQDN here> -
Now generate a secret with the following commands.
-
openssl req -x509 \ -newkey rsa:4096 \ -sha256 \ -days 3650 \ -nodes \ -keyout ${FQDN}.key \ -out ${FQDN}.crt \ -subj "/CN=${FQDN}" \ -addext "subjectAltName=DNS:www.${FQDN},DNS:${FQDN}" -
Create a Kubernetes secret in your required namespace. In our case it’s
expertflow -
kubectl -n expertflow create secret tls hs-ef-ingress-tls-secret --key ${FQDN}.key --cert ${FQDN}.crt
Configure zoho-generic-ingress.yaml
-
Open the
zoho-generic-connector-ingress.yamlfile. -
Replace the hosts and host value with the FQDN on which you are deploying the application.
-
Set the path with a unique name for your sap connector.
-
You have to replace the value for UNIQUE_NAME with the path which you will use for your application.
Configure zoho-generic-deployment.yaml
-
Open the
zoho-generic-connector-deployment.yamlfile. -
Replace the image with the updated tag.
-
Updated tag is
1.0.0

Applying Kubernetes YAMLs
-
Apply the service with
kubectl apply -f zoho-generic-connector-service.yaml -
Apply the image-pull secret with
kubectl apply -f zoho-generic-connector-imagePullSecret-expertflow.yaml -
Apply the Ingress with
kubectl apply -f zoho-generic-connector-ingress.yaml. (For RKE2-based Ingresses using Ingress-Nginx Controller) -
Apply the deployment with
kubectl apply -f zoho-generic-connector-deployment.yaml
Install Expertflow Extension
Follow these steps to install the Webex Contact Center Connector in Zoho CRM:
Step 1: Access Zoho Marketplace
-
Log in to your Zoho CRM account.
-
Click on Extension URL to install the Zoho-Webex Extension.
Step 2: Install the Extension
-
Click the Install button.
-
A prompt will appear requesting permissions; click Accept All Permissions to proceed.
-
Choose the installation scope:
-
Install for Admins Only
-
Install for All Users (Recommended)
-
Choose Profiles (If you want to limit access to specific user roles)
-
-
Click Confirm to start the installation.
Step 3: Complete Installation
-
The extension will be installed automatically, and you will receive a confirmation once it is complete.
-
Navigate to Zoho CRM > Settings > Extensions to verify the installation.
Step 4: Change Base URL for an Installed Extension in Zoho CRM (if needed)
-
Click on the Marketplace > Installed Extensions.
-
Locate Zoho Generic Connector and click on it.
-
Look for the Widget Configuration.
-
Update Base URL of <Deployed Webex> with the new URL.
-
Click Save and refresh Zoho CRM to apply the changes.
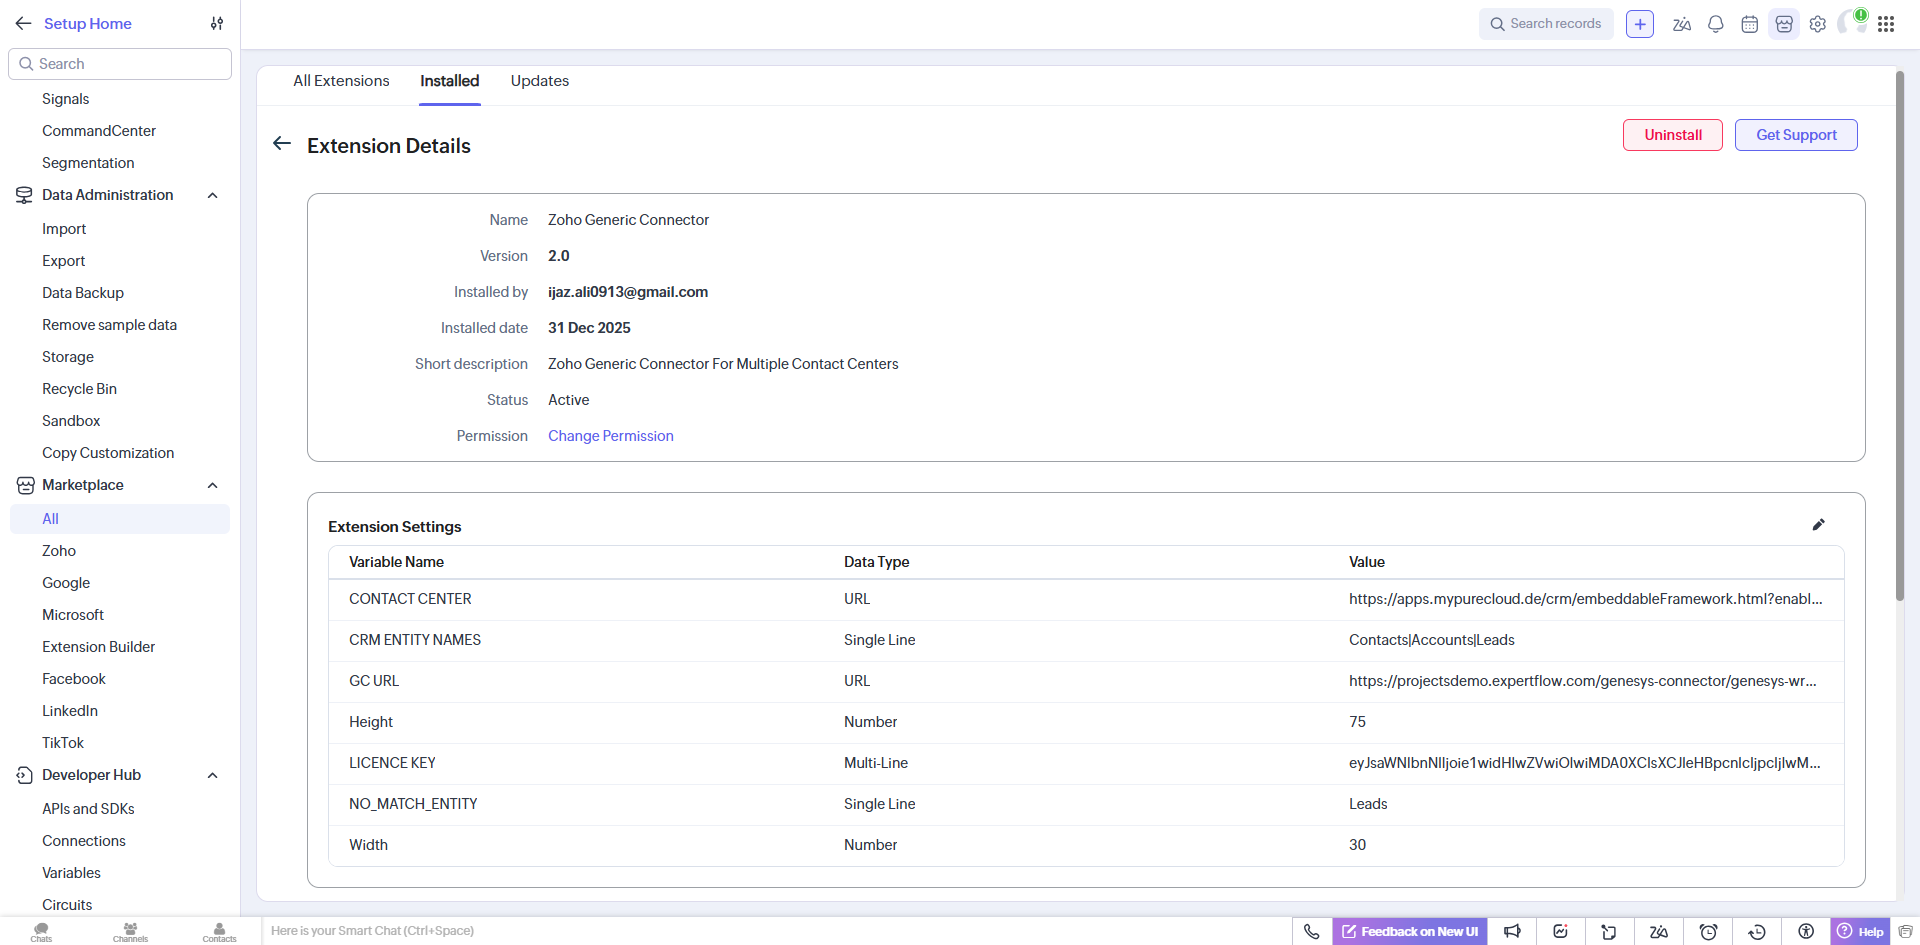
Set Variables in the Extension Settings
|
Field |
Values |
Description |
|---|---|---|
|
CONTACT CENTER |
|
Main URL for Contact Center |
|
CRM ENTITY NAMES |
Contacts|Accounts|Leads |
Entities (must be 3 values separated by “ | ”) |
|
GC URL |
|
The URL for Generic Library related to Contact center |
|
NO_MATCH_ENTITY |
Contacts |
Entity for new numbers (can be contact or account or lead) |
|
LICENCE KEY |
|
Contact the Expertflow team to get your license key. |
|
WIDTH |
45 |
Width of the widget (number between 1 and 99, representing the percentage of the screen size) |
|
HEIGHT |
75 |
Height of the widget (number between 1 and 99, representing the percentage of the screen size) |
|
EFCX Recording URL |
<FQDN> |
The Recording URL for EFCX Contact center. |
EFCX Recording URL will be only applicable for EFCX Contact Center.
After making any changes to the configuration settings, you must refresh the page.
Troubleshooting Tips
-
If the layout does not update, clear the browser cache and refresh the Webex Contact Center interface.
-
Verify that Webex Contact Center credentials are correct.
-
Ensure the layout JSON follows the Webex Contact Center Desktop Layout Schema.
After completing these steps, your Webex Contact Center Agent Desktop will be properly configured to work with Zoho CRM.