Purpose
This guide provides comprehensive instructions for the installation, configuration, and usage of the Genesys Cloud Embeddable Framework, enabling seamless integration with multiple CRM systems.
Intended Audience
This document is intended for customers who want to configure Genesys Embeddable Framework
Prerequisites
-
You must have Genesys Admin rights.
Configuring the Genesys Cloud Contact Center
There are two types of deployments in Genesys:
-
Private Deployment
-
Public Deployment
Private Deployment
The administrators can add the integration and upload the framework.js file to the company’s Genesys Cloud organization. A maximum of five different implementations of the integration in a single Genesys Cloud organization are allowed. We may want to use different implementations with various third-party products.
A maximum of five different implementations of the same integration can be configured within a single Genesys Cloud organization. This allows flexibility to connect multiple third-party applications or environments.
Following are the steps required to configure the private deployment.
Prerequisites for running the integration in Genesys
-
An Internet browser (the latest version of Chrome, Firefox, or Microsoft Edge).
-
To use WebRTC phones with the client, turn off the pop-up blocker in your browser.
-
Per-user licenses for Genesys Cloud (Communicate or higher).
Configure OAuth Client
In order to configure you need to log in as an administrator.
Required Permission
Ensure the following permission is assigned:
-
OAuth > Client > Add permission
Steps to configure OAuth client
-
Access your organization using an administrator account.
-
Navigate to OAuth Setting. Go to IT & Integrations and select OAuth.
-
Create a New OAuth Client
-
Click Add Client
-
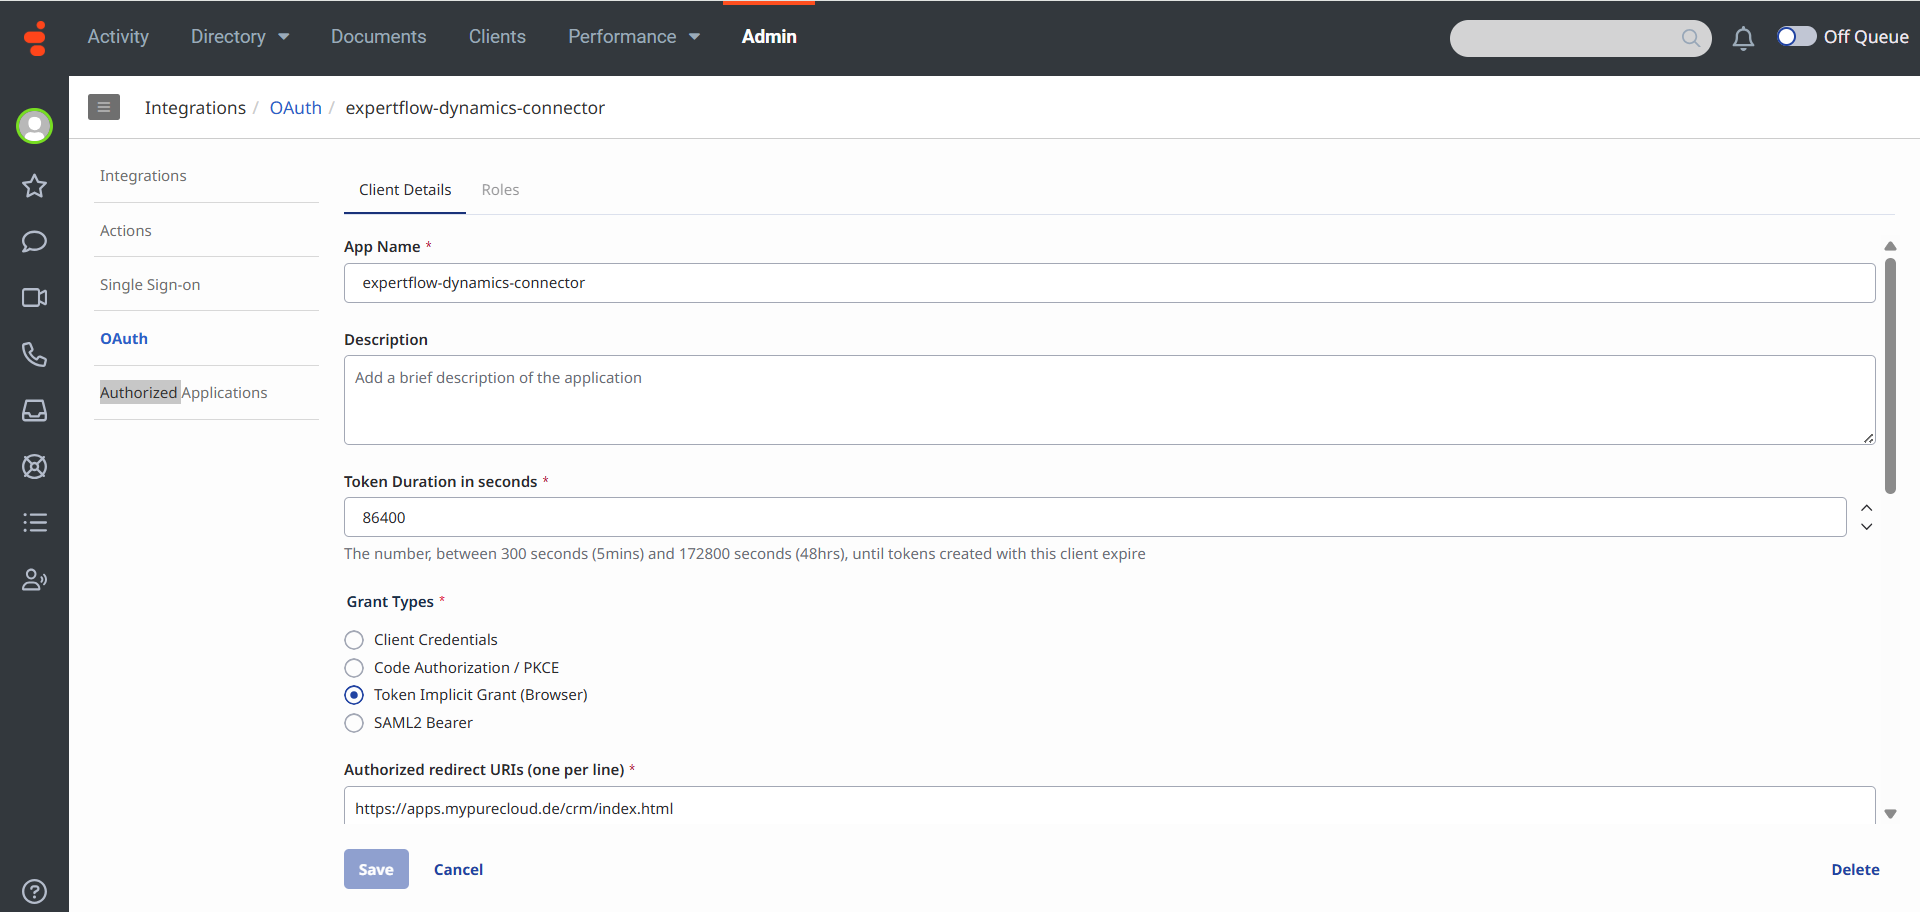
The Client Details tab will open
-
-
Set the App Name to expertflow-dynamics-connector or any meaningful name of the app.
-
Type a brief description of the app in the Description box. (Optional)
-
Under Grant Types, select Token Implicit Grant (Browser).
-
Set the duration of time until tokens created with this client expire.
Accept the default duration, or enter a value between 300 and 172800 seconds. This duration sets the lifetime of the token to a maximum of two days or less.
Tip: Genesys recommends setting the token duration to 18 hours (64800 seconds). This duration generally causes the token to expire outside an agent’s normal workday.
-
Under Authorized redirect URIs, add https://apps.mypurecloud.com/crm/index.html, Customize the URI according to the customer Genesys Cloud region.
-
Under Scope, add all required scopes.
An OAuth client added to your Genesys Cloud organization (optional for some private versions) with the required scopes.
-
Click Next.
-
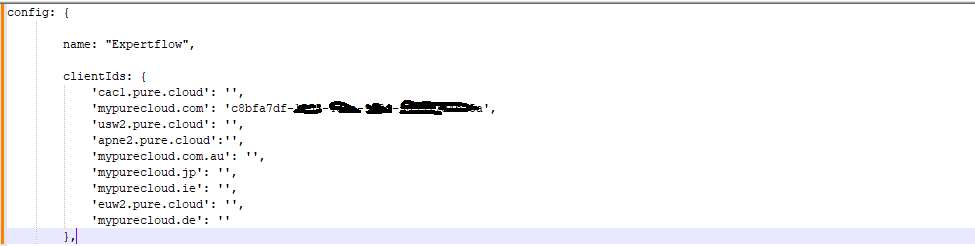
A Client ID will be generated. Copy and securely store this ID. We use in the Framework.js file.
Agent Permissions Required
The permission names appear in different formats. It all depends on where we access the permissions in Genesys Cloud, The integration looks for permissions, not roles, assigned to a user in Genesys Cloud.
|
Permission |
Required or optional |
Feature |
Description |
|---|---|---|---|
|
ACD Screen Share > Session > View |
Optional |
Screen share |
Allows an agent to screen share ACD interactions |
|
Analytics > Conversation Aggregate > View |
Optional |
Evaluations |
Allows an agent to view released evaluations in the User Inbox. |
|
Analytics > Conversation Aggregate > View |
Optional |
Statistics |
Allows an agent to see conversation statistics in the Agent Performance window. |
|
Analytics > Queue Observation > View |
Optional |
Statistics |
Allows an agent to see statistics for a queue before contacting the queue or transferring an interaction to the queue. |
|
Analytics > User Aggregate > View |
Optional |
Statistics |
Allows an agent to see user statistics in the Agent Performance window. |
|
Cobrowse > Chat > Escalate |
Optional |
Co-browse |
Allows an agent to use co-browse for chat interactions. |
|
Cobrowse > Session > View |
Optional |
Co-browse |
Allows an agent to use co-browse for voice or chat interactions. |
|
Cobrowse > Voice > Escalate |
Optional |
Co-browse |
Allows an agent to use co-browse for voice interactions. |
|
Conversation > Call > Record |
Optional |
Call controls |
Causes the Record icon to be clickable in the call controls in an agent’s client. |
|
Conversation > Call Forwarding > Edit |
Optional |
Call forwarding |
Allows an agent to use and edit call forwarding. |
|
Conversation > Callback > Create |
Optional |
Callbacks |
Allows an agent to schedule callbacks. |
|
Conversation > Cobrowse > Add |
Optional |
Co-browse |
Allows an agent to use co-browse for web messaging. |
|
Conversation > Email > Create |
Optional |
Emails |
Allows an agent to send emails on behalf of queues. |
|
Conversation > Message > Create |
Optional |
SMS messages |
Allows an agent to send SMS messages on behalf of queues. |
|
Integration > Custom Embeddable Framework > Agent
|
Required |
— |
This causes the client to appear in a private deployment of a Genesys Cloud Embeddable Framework integration. |
|
Outbound > Contact > View |
Optional |
Screen pop |
Allows an agent to see screen pops for outbound dialing. |
|
Quality > Evaluation > Edit Agent Sign-off |
Optional |
Evaluations |
Allows an agent to view released evaluation notifications in the User Inbox. |
|
Quality > Evaluation > Edit or Quality > Evaluation > Edit Score |
Optional |
Evaluations |
Allows a quality evaluator to view assigned evaluation notifications in the User Inbox. |
|
Quality > Evaluation > View |
Optional |
Evaluations |
Allows an agent to view released evaluation notifications in the User Inbox. |
|
Routing > Agent > On Queue |
Optional |
Statuses |
Causes On Queue to appear as a status and a status timer to appear in an agent’s client. |
|
Routing > Queue > Join |
Optional |
Queues |
Allows an agent to see which queues the agent is a member of and to select which queues to receive interactions from in the client. |
|
Scripter > Published Script > View |
Optional |
Scripts |
Allows an agent to see a script. |
|
Voicemail > Voicemail > Receive |
Optional |
Voicemails |
Allows an agent to receive personal voicemail notifications in the User Inbox. |
|
Workforce Management > Agent Schedule > View |
Optional |
Scheduling |
Allows an agent to view schedules in the client. |
|
Workforce Management > Agent Shift Trade Request > Participate |
Optional |
Scheduling |
Allows an agent to view shift trade request notifications in the User Inbox. |
|
Workforce Management > Agent Time Off Request > Submit |
Optional |
Scheduling |
Allows an agent to access time off notifications in the client. |
|
Workforce Management > Shift Trade Request > Edit |
Optional |
Scheduling |
Allows an administrator to view shift trade notifications in the User Inbox. |
-
The OAuth client is mandatory for most integrations, including CRM integrations like MS Dynamics.
-
Ensure all required scopes are correctly assigned to avoid permission issues during runtime.
-
Incorrect redirect URIs or scopes can cause authentication failures.
Steps to Configure Private Deployment
-
Access your Genesys Cloud organization using administrator credentials.
-
Go IT & Integration and then Integrations.
-
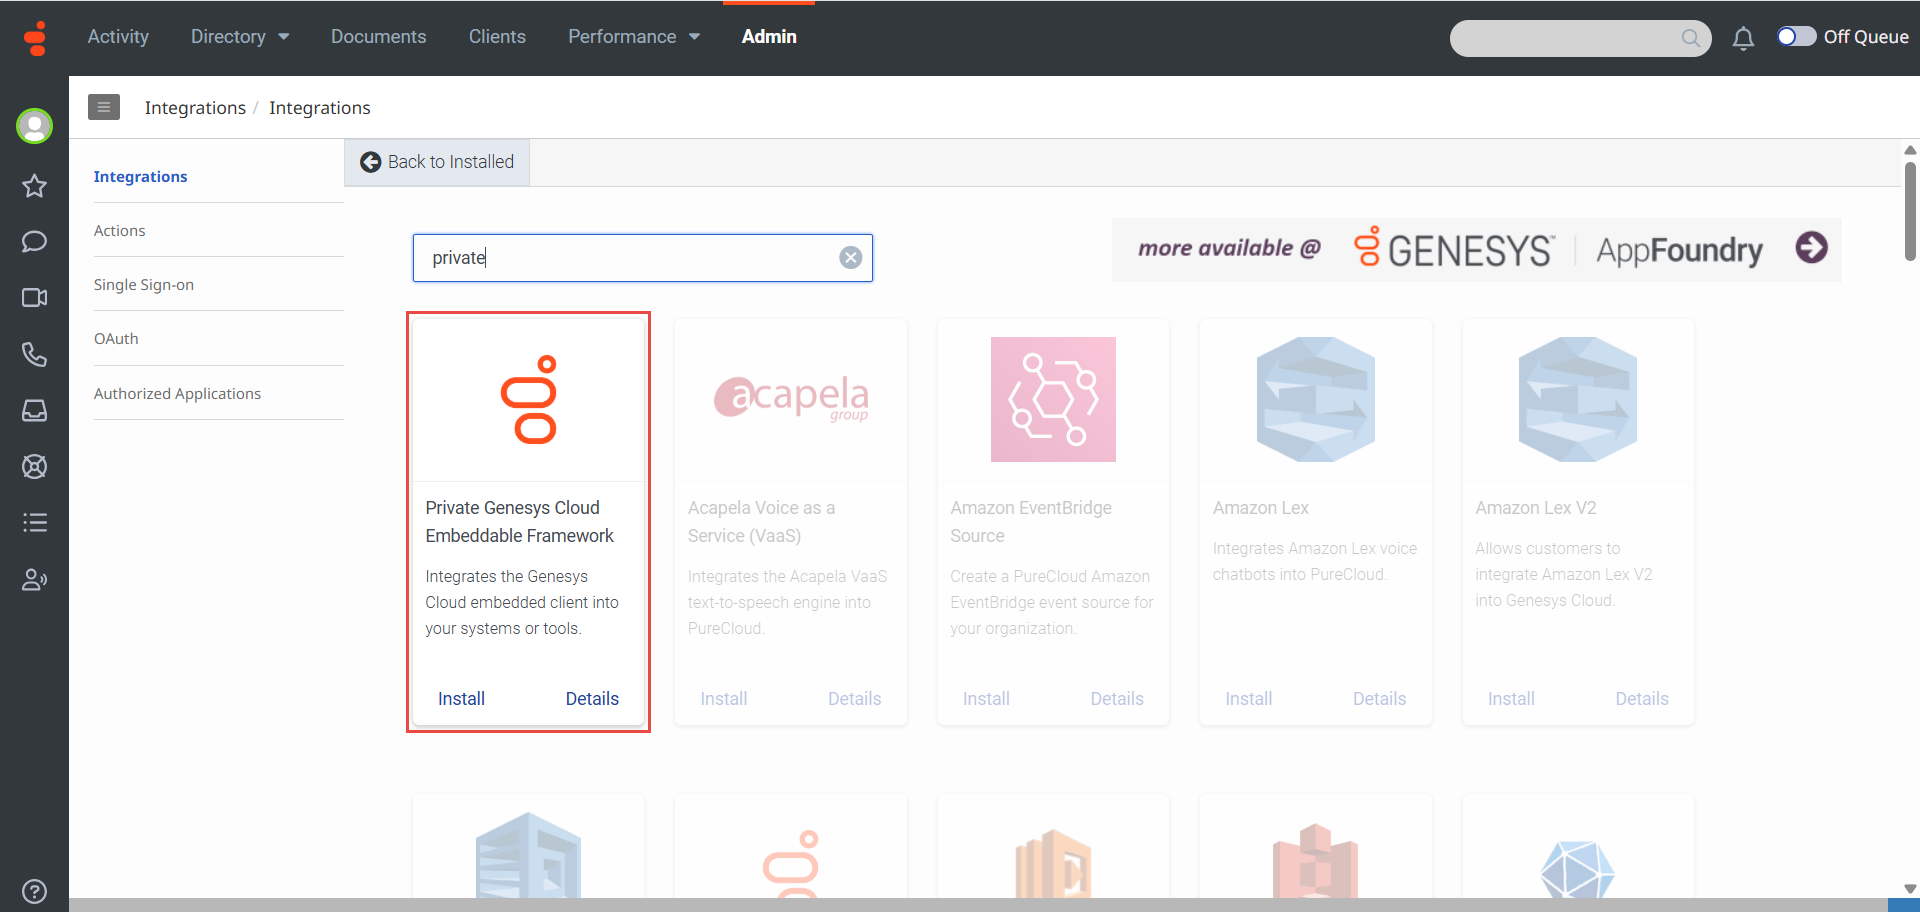
Click on “Add Integrations” on the top right and Search for the Private Genesys Cloud Embeddable Framework.
-
Select the integration and click Install.
-
Download the framework.js file (used to connect with third-party systems like MS Dynamics, CRM, etc.)
-
Open the framework.js file in some editor (e.g. Notepad++). Edit and update the App name & Client ID (Configured above in the document) in the file
-
Click on the installed Private Genesys Cloud Framework.
-
Click the Configuration tab.
-
Click on Click to Upload Button and upload your custom framework.js file.
Due to caching, users must refresh their client to see the effect of the new file. Any changes to the integration may take several minutes to appear.
-
Select groups whose members can use the Private Genesys Cloud Embeddable Framework integration. If no group is selected, then all users can use it.
-
Click Save.
-
Activate the integration. Under the integration that we just added, click the Status toggle to change it from Inactive to Active.
-
If we click on the three dots in last column, the following options appear We can edit, Activate\Deactivate or delete the integration. We can also edit and provide a unique name for the integration instance.

Adding the multiple Private Deployments.
The following steps need to be done to produce multiple private deployments.
-
Configure a separate OAuth Client for multiple deployments. (for creating the OAuth client described above)
-
Add a separate Private Genesys Cloud Embeddable Framework (for creating the Private Genesys Cloud Embeddable Framework described above)