Preface
This document provides deployment details of the product inside Microsoft Dynamics 365 CRM.
Prerequisites
The following are the prerequisites for the deployment of the Genesys Connector.
-
Microsoft Dynamics 365 should be installed.
-
The user must have administrative rights.
-
Genesys Cloud Embeddable Framework Configurations. For that please use this Guide.
Genesys Connector Deployment
Before you begin, verify that on the server, you have:
-
Installed Kubernetes. If not, see Deployment Planning
-
Setup storage. If not yet, see Storage Solution - Getting Started
Pulling The Genesys Genesys Connector from Git
-
Create a directory with name as
mkdir Microsoft-Dynamics-CIF-1.0or according to your ease. -
Navigate to newly created directory by
cd Microsoft-Dynamics-CIF-1.0. -
Pull the the code from the:
git clone --branch yaml-1.0.0 --depth 1 https://gitlab.expertflow.com/cti/ms-dynamics-crm-generic-connector
-
Run
cd ms-dynamics-crm-generic-connector/kubernetesto change directories. This is where all the YAML files are stored.
Setting Up Environment
If you have already deployed generic connector then skip these steps and directly move to Configure Ingress.
We use Kubernetes for our server deployment, on which the static files for the connector will be served, and where the Dynamics Connector will be running.
Namespace
Create a namespace “expertflow” if it doesn’t exist.
kubectl create namespace expertflow
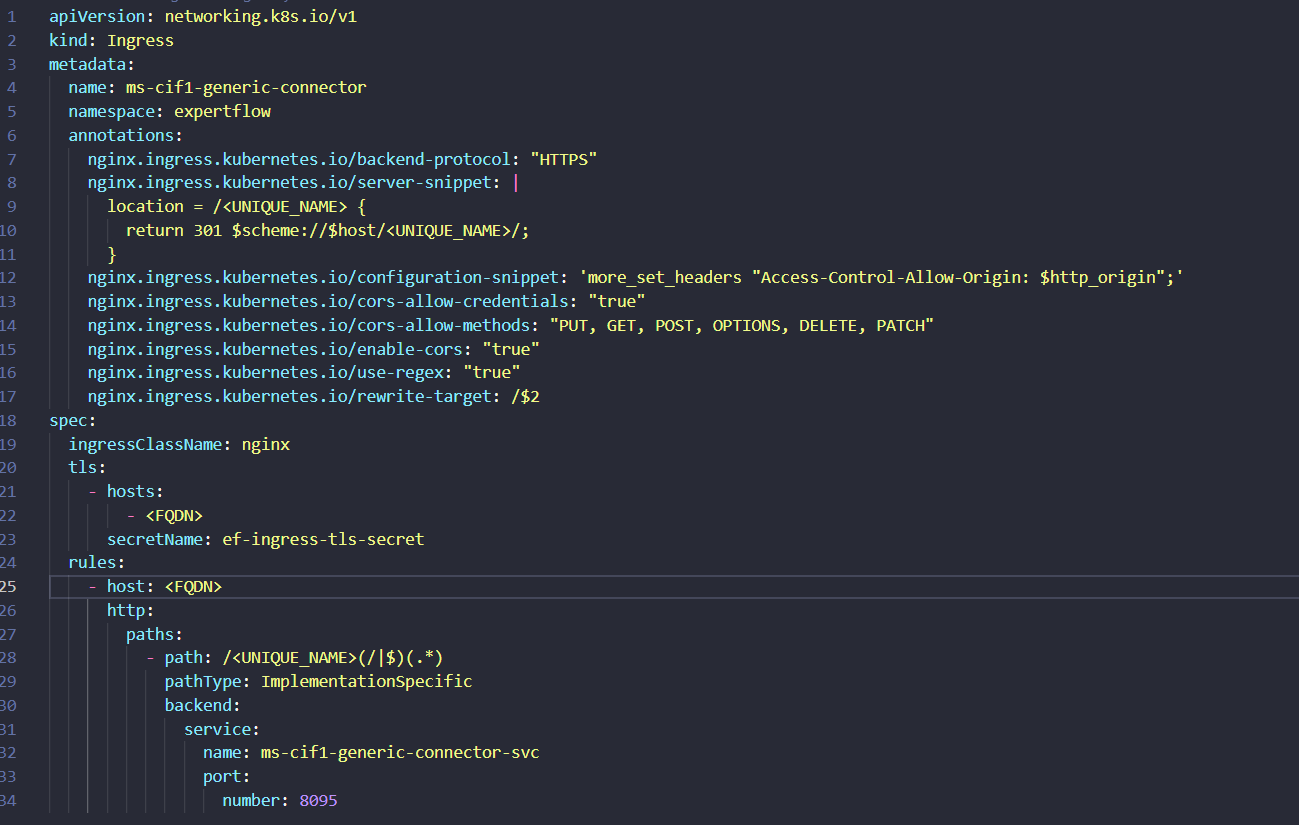
Configure Ingress.yaml
Genesys Connector should be accessible by a fully qualified domain name. Assign the FQDN.
Replace <FQDN> with your FQDN for Genesys Connector (e.g. projectsdemo.expertflow.com) and run this command.
sed -i 's/devops[0-9]*.ef.com/<FQDN>/g' ms-cif1-generic-ingress.yaml
Create Self-Signed SSL/TLS Ingress Certificates (optional if already present)
Please modify the <FQDN> with your current FQDN before applying the following command.
-
Create IngressCerts directory (optional)
mkdir ingress-certs
cd ingress-certs
-
Set the Variable name to your FQDN (e.g.
projectsdemo.expertflow.com). The${FQDN}variable in following commands will be replaced with the value you provided in this step.
export FQDN=<enter FQDN here>
-
Now generate a secret with the following commands.
openssl req -x509 \ -newkey rsa:4096 \ -sha256 \ -days 3650 \ -nodes \ -keyout ${FQDN}.key \ -out ${FQDN}.crt \ -subj "/CN=${FQDN}" \ -addext "subjectAltName=DNS:www.${FQDN},DNS:${FQDN}"
-
Create a Kubernetes secret in your required namespace. In our case it’s
expertflow
kubectl -n expertflow create secret tls hs-ef-ingress-tls-secret --key ${FQDN}.key --cert ${FQDN}.crt
Configure ms-cif1-generic-ingress.yaml
-
Open the
ms-cif1-generic-ingress.yamlfile. -
Replace the hosts and host value with the FQDN on which you are deploying the application.
-
Set the path with a unique name for your sap connector.
-
You have to replace the value for UNIQUE_NAME with the path which you will use for your application.
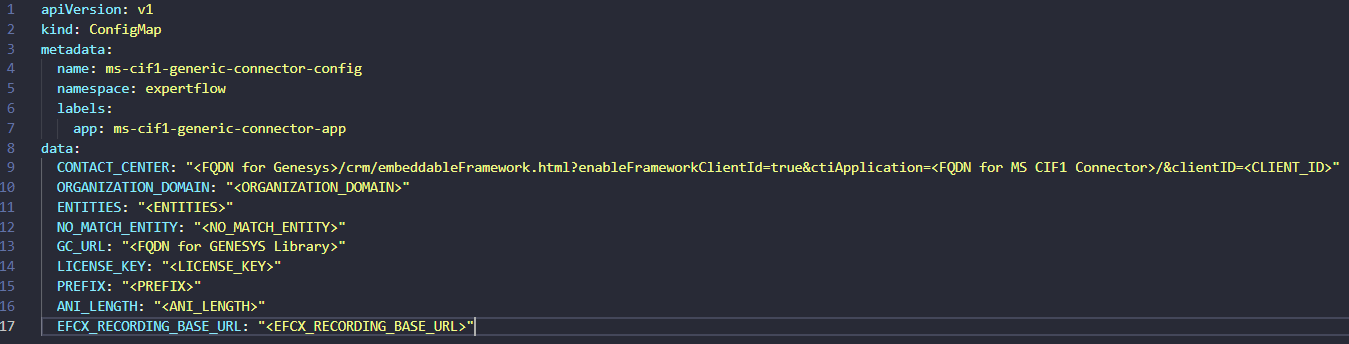
Configure ms-cif1-generic-configmap.yaml
-
Open the
ms-cif1-generic-configmap.yamlfile. -
Replace the configuration values with the actual values like
-
  CONTACT_CENTER: <It is combination of different parts in case of Genesys>
  ORGANIZATION_DOMAIN: "<ORGANIZATION_DOMAIN>"
  ENTITIES: "<ENTITIES>"
  NO_MATCH_ENTITY: "<NO_MATCH_ENTITY>"
  GC_URL: "<FQDN for GENESYS Library>"
  LICENSE_KEY: "<LICENSE_KEY>"
  PREFIX: "<PREFIX>"
  ANI_LENGTH: "<ANI_LENGTH>"
  EFCX_RECORDING_BASE_URL: "<EFCX_RECORDING_BASE_URL>"
CONTACT_CENTER In case of Genesys: <FQDN for Gensys>/crm/embeddableFramework.html?enableFrameworkClientId=true&ctiApplicatio=<FQDN for MS Connector>/&clientID=<CLIEND_ID>
If the client_id is already configured within framework.js for the cloud embeddable framework, then including it again in the CONTACT_CENTER URL for Genesys is unnecessary.
Configure ms-cif1-generic-deployment.yaml
-
Open the
ms-cif1-generic-deployment.yamlfile. -
Replace the image with the updated tag.
-
Updated tag is
0.0.1_b-CIF-1.0-011da6fd872945d1859e8f8595fe5d9421d8c914 -
Image will be
gitimages.expertflow.com/cti/ms-dynamics-crm-generic-connector/build:0.0.1_b-CIF-1.0-011da6fd872945d1859e8f8595fe5d9421d8c914
Applying Kubernetes YAMLs
-
Apply the service with
kubectl apply -f ms-cif1-generic-service.yaml -
Apply the image-pull secret with
kubectl apply -f ms-cif1-generic-imagePullSecret-expertflow.yaml -
Apply the Ingress with
kubectl apply -f ms-cif1-generic-ingress.yaml. (For RKE2-based Ingresses using Ingress-Nginx Controller) -
pply the service with
kubectl apply -f ms-cif1-generic-configmap.yaml -
Apply the deployment with
kubectl apply -f ms-cif1-generic-deployment.yaml
URL for Genesys Connector
-
<FQDN>/ms-cif1-connector/
Configure the CIF on Microsoft Dynamics 365 UCI for Genesys Connector
-
Login to the Microsoft Dynamics 365 and go to the published apps then select the ‘ channel integrated framework’.
If CIF is not installed on your CRM then you can follow this guide to install on your CRM.
-
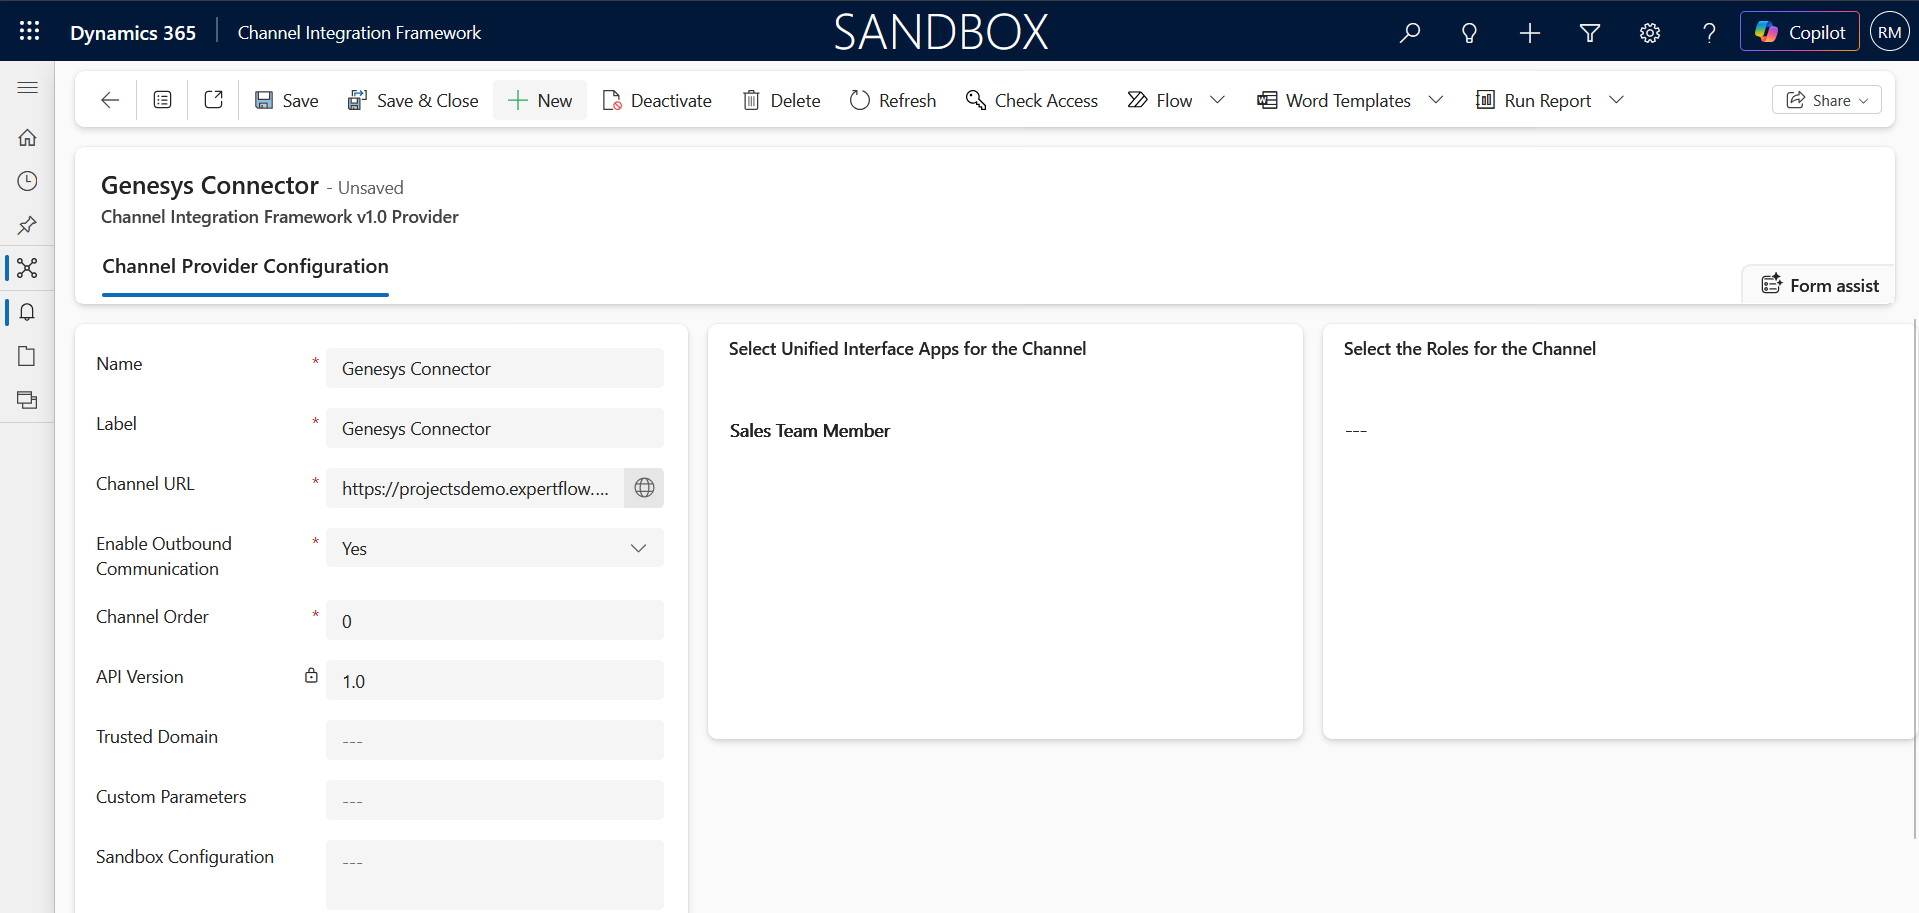
Click on the new button to create a new active channel provider and fill in the details as given in the screenshot below.
-
Name : Genesys Connector (Depends on your Choice)
-
Label: CTI
-
Channel Url : http://<Server-IP>/ms-cif1-connector/
-
Enabled outbound Communication: Yes
-
Channel Order : 0
-
API Version: 1.0
-
Select Unified Interface Apps for the Channel
-
Select the Unified app on where you want to embed the CTI.
-
Assign roles according to your requirements.
-
Click on Save Button.
-
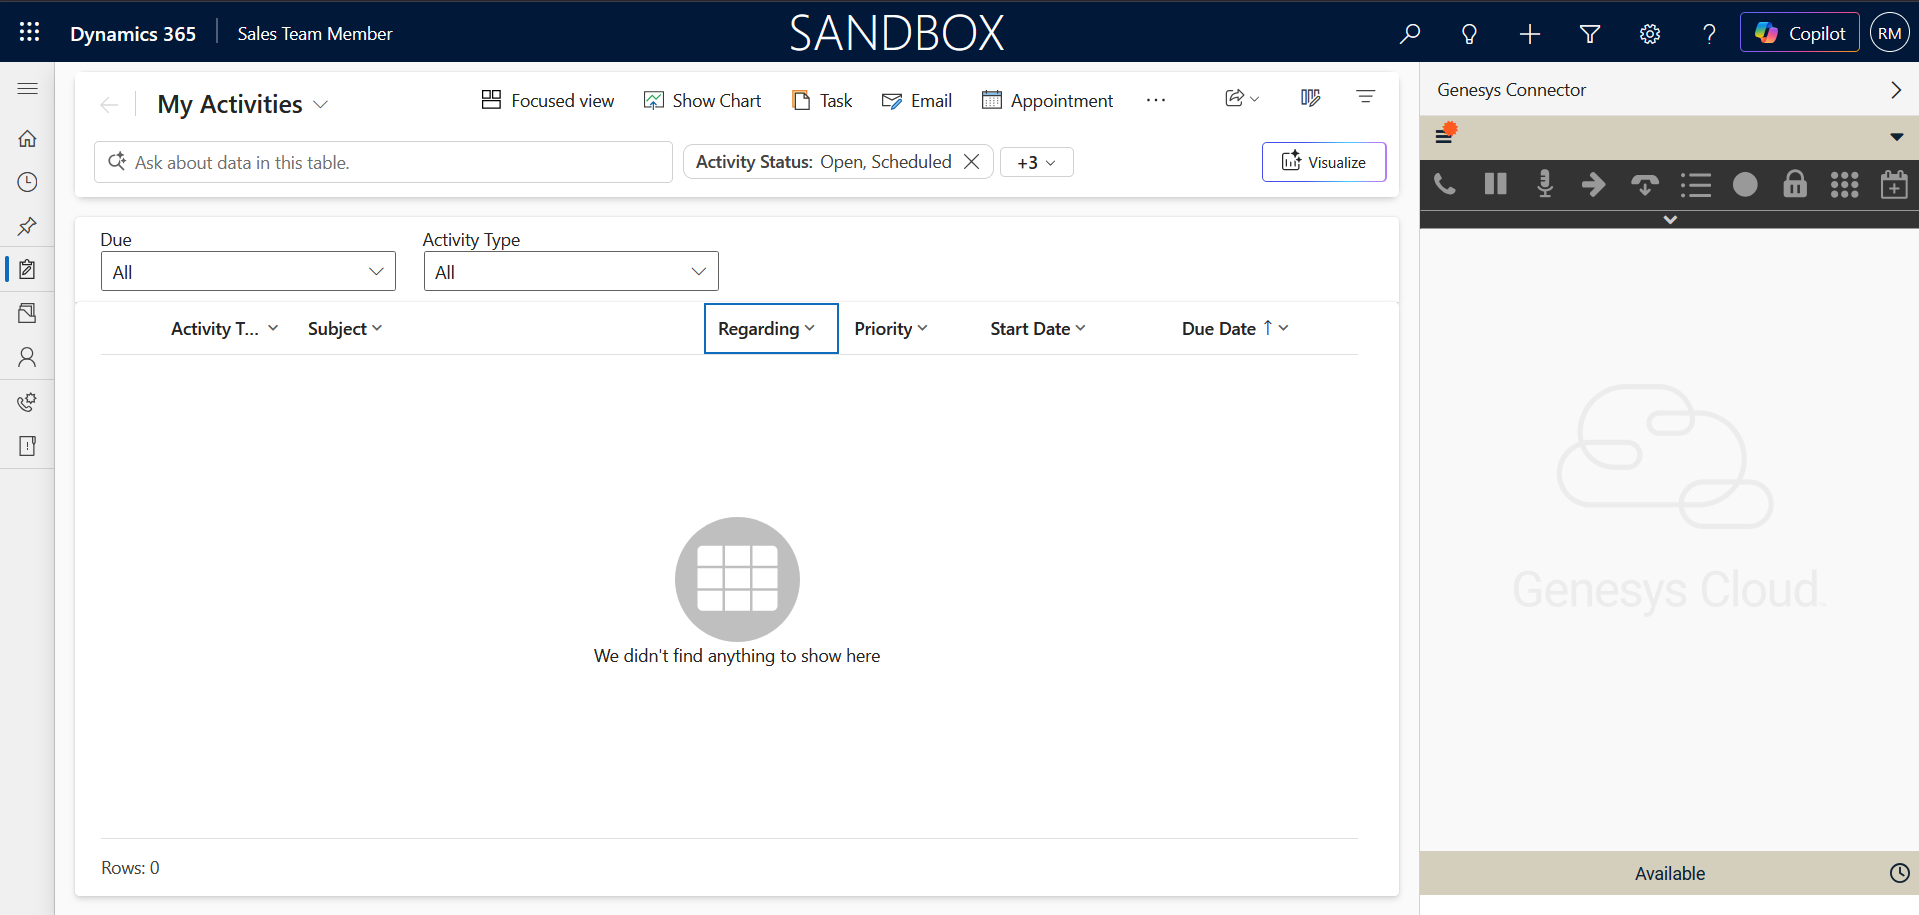
Go to the Unified app that you selected. For example for the Sales Team Member, it will look like the following screenshot.