Introduction
CX Campaigns empowers administrators to design and execute high-impact, multi-channel outbound flows. Whether you are launching a simple SMS blast or a sophisticated predictive dialing campaign, this platform provides the flexibility to automate customer outreach across Voice and digital channels such as SMS or WhatsApp.
The Role of the Campaign Manager
This guide is designed for the Outbound Campaign Manager. Your role is to transform business objectives—such as lead generation, debt collection, or customer retention—into automated logic. Using our visual Flow Builder, you will define exactly who to contact, when to contact them, and how the system should react based on real-time events.
How to Use This Guide
To make the configuration process as simple as possible, this manual is organized into four logical stages that follow your workflow from data preparation to live execution.
-
Preparation: Uploading your contact database and creating targeted CX Customer filters.
-
Campaign Management: Navigating the dashboard, searching for campaigns, and understanding the "Published" vs. "Stopped" lifecycle.
-
Designing the Flow: A comprehensive reference of all available nodes, their settings, and their logical outputs.
-
Common Use Cases: Step-by-step blueprints for combining these nodes into Agent-based, Digital, or Multi-channel campaigns.
-
Analytics and Reports
Some topics, such as PROMQL Formulas for predictive dialing, involve advanced logic. In these sections, we provide "Plug-and-Play" formulas that you can simply copy and paste into the system to get started immediately.
1. Preparing Your Audience
Before you can build a campaign flow, you must define who you are reaching out to. This process happens in the Customer and Filter modules.
Step 1: Uploading Contacts (CX Customers)
Your campaign relies on a database of "CX Customers."
-
The Process: You can import contacts via a CSV file. Each row represents a customer, while columns represent attributes like "Phone 1," "Name," or "Account ID."
-
Best Practice: Ensure your CSV headers match the customer attributes defined in your system for seamless mapping.
For specific details on CSV formatting and attribute definitions, please refer to CX Customer - Bulk Customer Upload - Feature Documentation (Draft Version) .
Step 2: Creating CX Customer Filters
Filters allow you to segment your master list into specific target groups.
-
Why use filters? Filters act as the "source" for your campaign. Instead of calling everyone, you can create a filter for "Overdue Accounts" or "Loyalty Members."
-
Dynamic Sourcing: These filters are live; as new customers are uploaded that match your criteria, they automatically become eligible for any campaign using that filter.
For help building complex logic (e.g., "And/Or" conditions), refer to Customer Advanced Filters .
2. Managing Your Campaigns
With your audience ready, you can now manage your outbound activities from the Campaign Dashboard.
The Campaign Dashboard
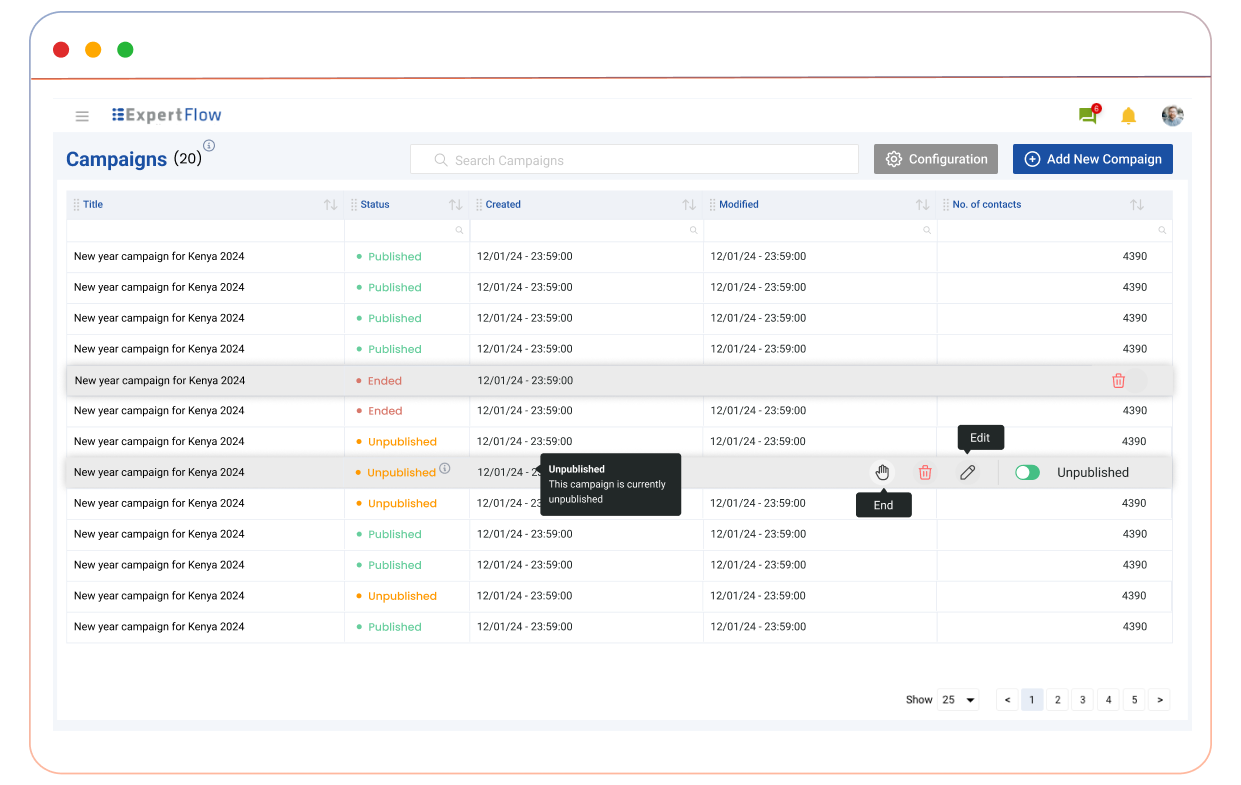
Navigate to the Campaigns tab on the left sidebar. This screen displays all current campaigns in a paginated table.
-
Search: Use the search bar to filter campaigns by title keywords.
-
Key Columns: View the campaign Title, Status, Creation/Modified dates, and the total number of Contacts.
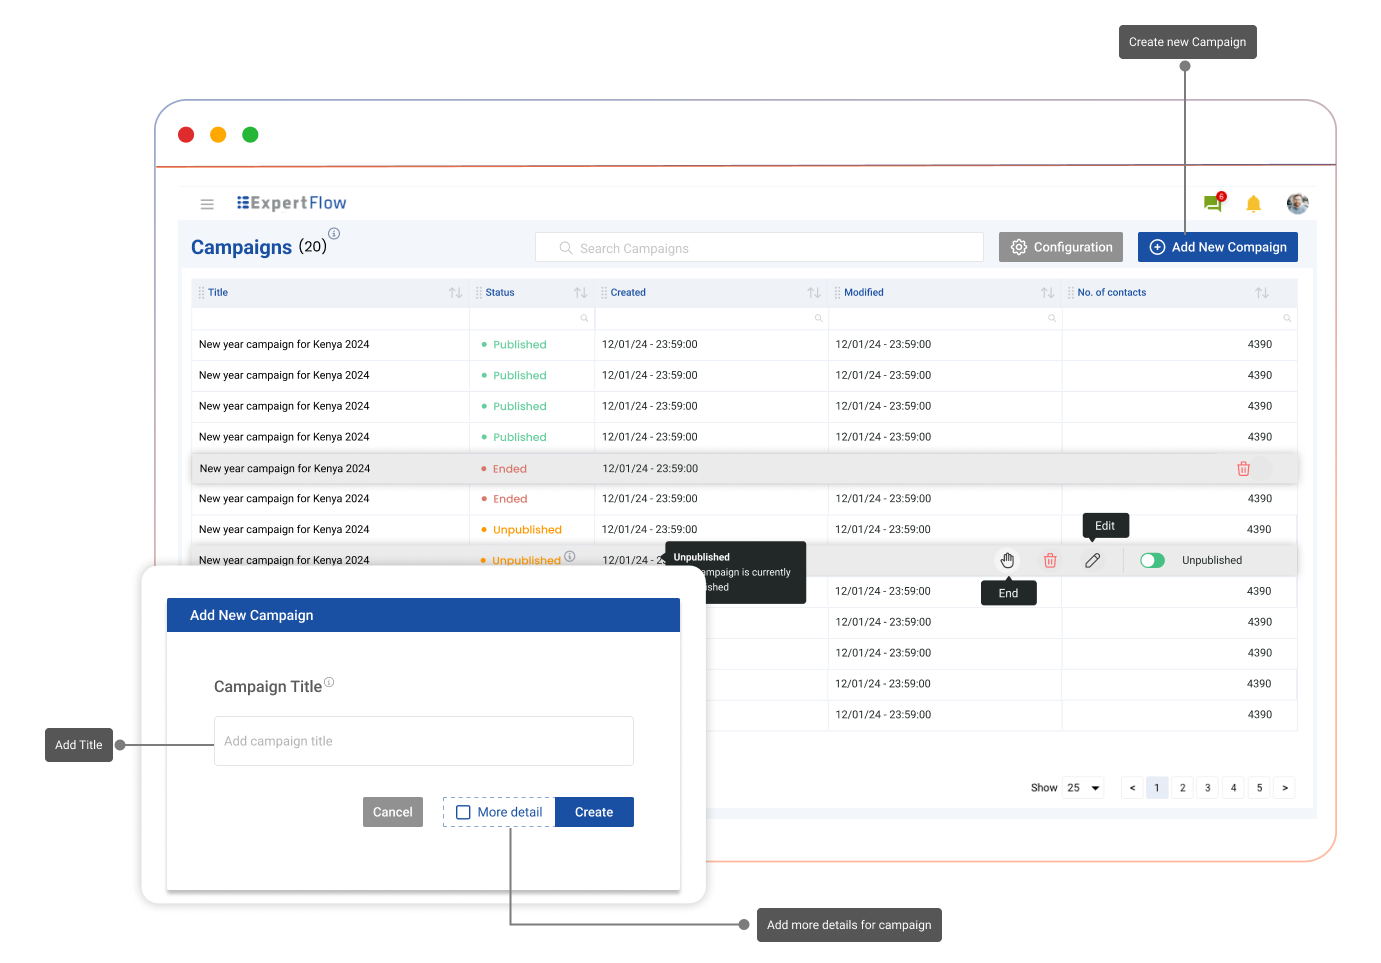
Creating and Editing Campaigns
Click the "Add New Campaign" button to start, or hover over an existing campaign to see the following options:
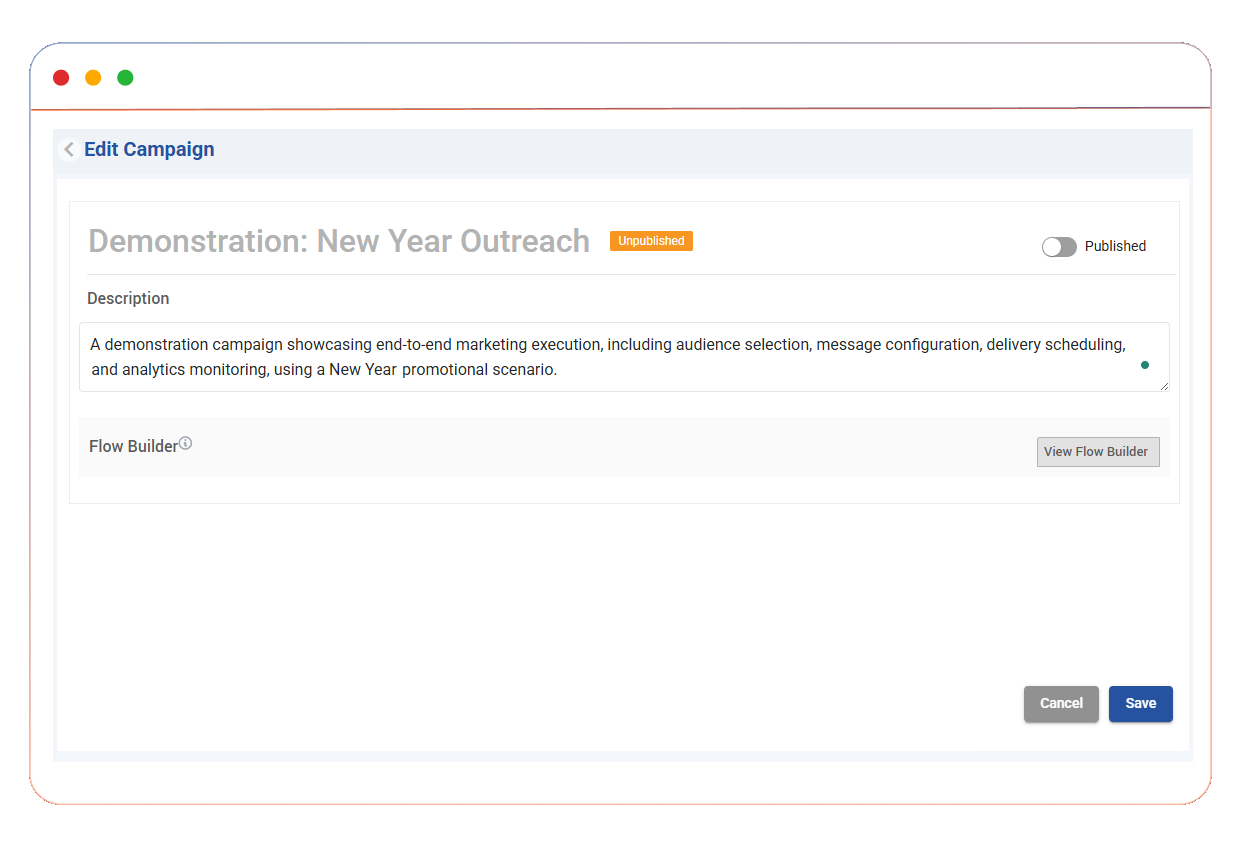
Edit (Pencil Icon): Opens the settings page where you can change the Title, Description, and access the Flow Builder.
-
Delete (Trash Icon): Permanently removes the campaign.
-
End (Stop Icon): Moves the campaign to a "Stopped" state.
Understanding Campaign Statuses
The status of a campaign determines if it is actively running.
-
Unpublished: The campaign is in "Draft" or "Pause" mode. No signals are sent.
-
Published: The campaign is active and pulsing.
-
Stopped: The campaign is permanently archived.
Once stopped, a campaign cannot be republished. (Cloning functionality is planned for a future update).
3. Configuring & Designing the Flow
-
Ensure the service identifier configured in the OB dialer (via tenant config) matches the one specified in the customer dialing flow.
Once you click "View Flow Builder" inside a campaign's settings, you are taken to the Flow Builder. This is where you connect "Nodes" to create your outbound logic. Below is a detailed breakdown of the tools available to you.
3.1 Control & Logic Nodes
These nodes manage the "pulse" and the data integrity of your flow.
The "Heartbeat": Start Node (Compulsory)
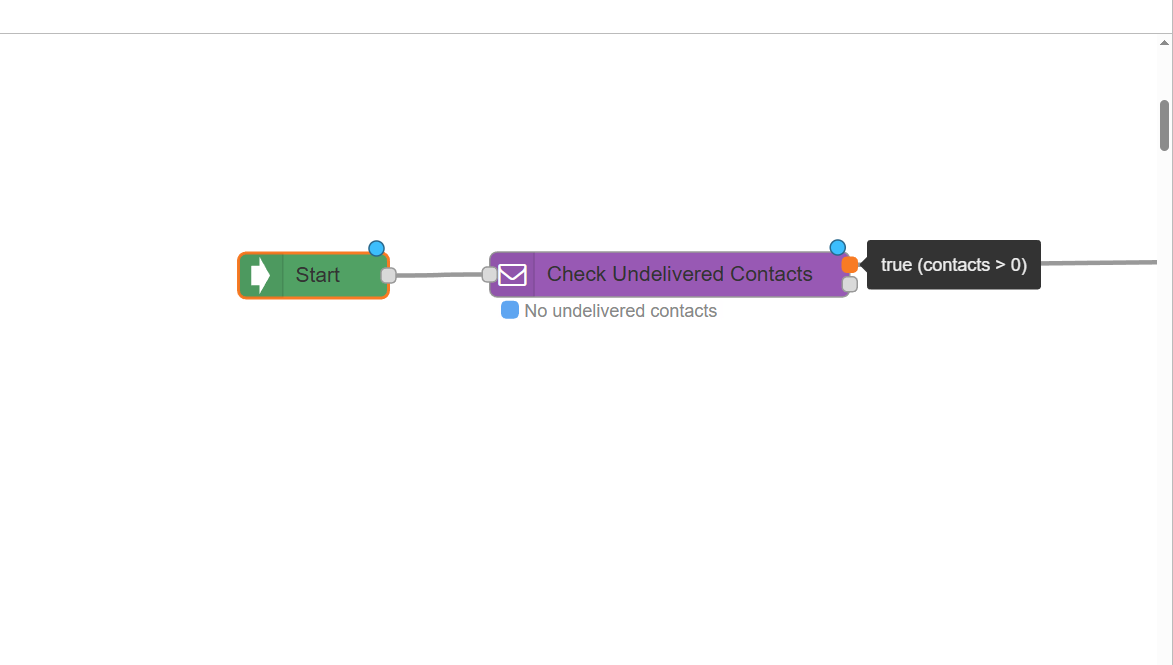
Every campaign must begin with a Start Node. It sends a signal through the flow at a regular interval to trigger actions.
-
Trigger Interval: Set in seconds (e.g.,
10). A pulse signal that engages the next linked node. This determines how often the flow re-evaluates formulas to see if it needs to seize agents or initiate more calls. -
Time & Day Windows: Check these boxes to restrict the campaign to certain hours (e.g., 9 AM - 5 PM) or specific days of the week.

Sourcing and Protecting Your Contacts
Once the "pulse" begins at the Start Node, the signal moves to the nodes that handle your customer data.
Best Practice: The "Check Undelivered Contacts" Node
While optional, we highly recommend placing this node immediately after the Start Node to prevent duplicate dialing.
-
How it works: It checks your database to see if a contact has already been processed by this campaign.
-
Logic Branches:
-
True: New contacts are available; the flow continues.
-
False: All contacts have been reached; the flow stops for this pulse.
-
-
Why use it? This prevents the same customer from receiving multiple calls or messages unless you manually reset the contact list for a repeat campaign.
3.2 Agent Management Nodes
These nodes are used specifically for Agent-Based Campaigns. They handle the logic of "finding" a human resource before the system attempts to contact a customer.
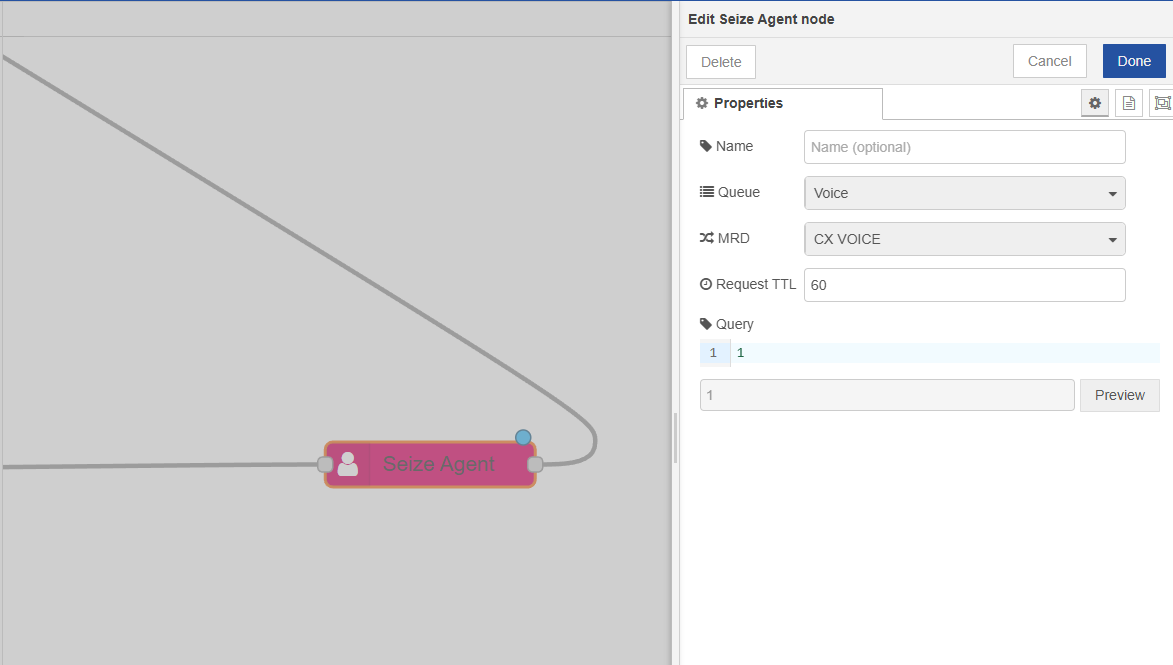
The "Seize Agent" Node
This node attempts to reserve an agent from a specific queue to ensure someone is ready to take the call.
-
Queue & MRD: Select the Voice queue and Media Routing Domain from the dropdown menus.
-
Request TTL: Enter the time (in seconds) the system should wait for an agent to become available before the request expires.
-
The Query Box: This determines your agent's "target."
-
Fixed Value: Enter a number (e.g.,
10) to always strive for 10 reserved agents. -
Dynamic Formula: Use a PROMQL query to adjust agent seizure based on live Outbound Metrics
-
Available formulae are listed here: SIEZE / INIT Formulas (Internal)
-
-
-
Preview: Click the Preview button to see the current result of your formula and verify that it is working as expected.
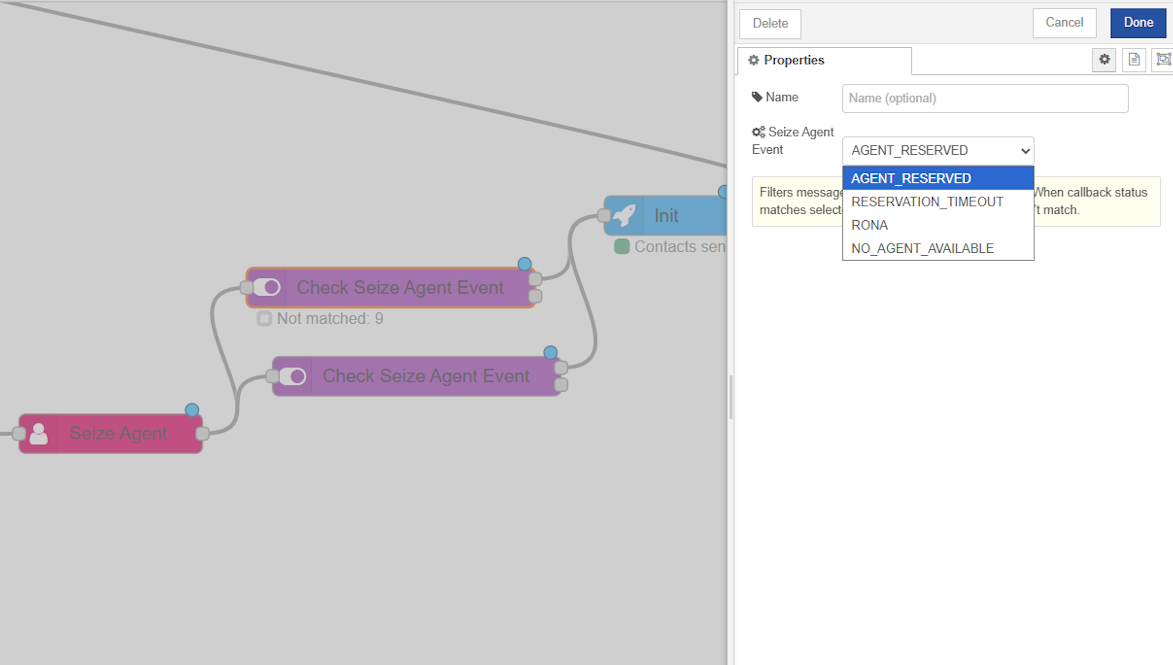
Catching Events: "Check Seize Agent Event"
Placed directly after the Seize Agent node, this node listens for the outcome of the reservation request.
-
AGENT_RESERVED: The "Success" path. Link this output to your Init node to start dialing.
-
Other Outcomes: You can also configure paths for
RESERVATION_TIMEOUT,RONA(Redirect on No Answer), orNO_AGENT_AVAILABLE.
3.3 Initiation Nodes
Initiation nodes are the "Gatekeepers." They are compulsory for every campaign type, whether Voice, SMS, or WhatsApp.
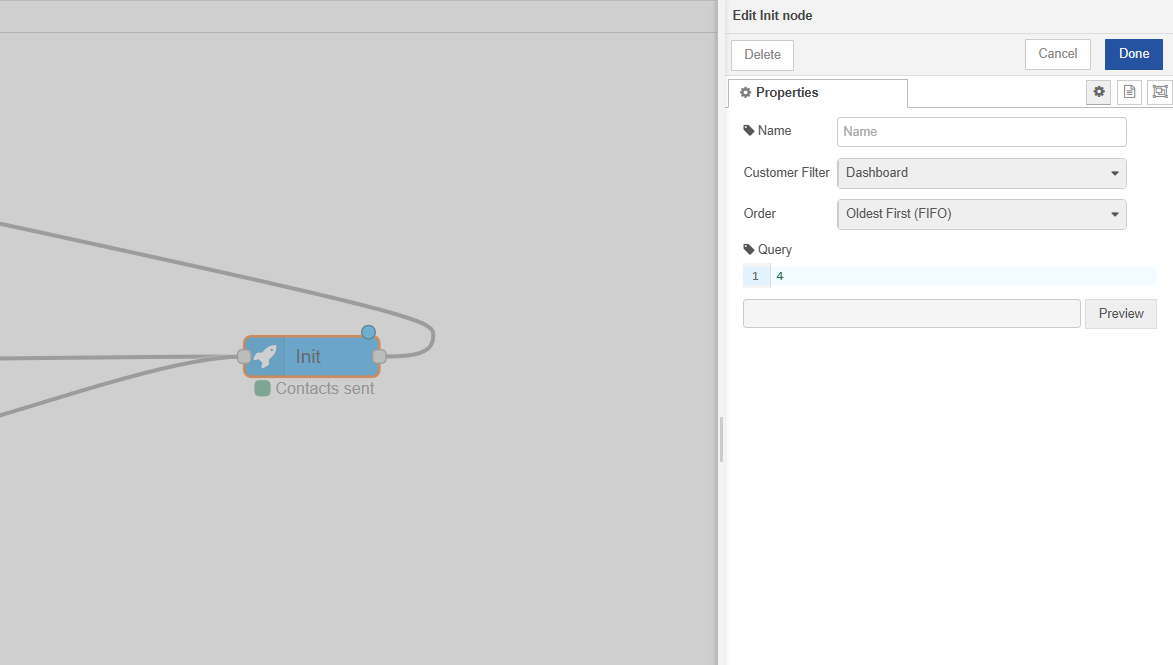
Initiating the Contact: Init Node
The Init Node is a compulsory component for all campaigns, i.e., Voice, SMS, or WhatsApp. It acts as the "Gatekeeper" that pushes a specific number of contacts into the execution stage.
-
CX Customer Filter: Select the audience source you prepared earlier.
-
Sorting: Choose FIFO (First-In, First-Out) for the oldest contacts first, or LEFO (Last-In, First-Out) for the newest.
-
Dialing Mode (Formula Box):
-
Progressive: Enter
1to dial one contact for every one agent reserved. -
Power: Enter a fixed number (e.g.,
3or5) to dial multiple contacts per agent. -
Predictive/ Dynamic Formula: Use a PROMQL query to automatically adjust dialing based on live Outbound Metrics
-
Available formulae are listed here: SIEZE / INIT Formulas | INIT Node Formulas
-
-
3.4 Channel & Decision Nodes
These nodes execute the actual communication and handle the results.
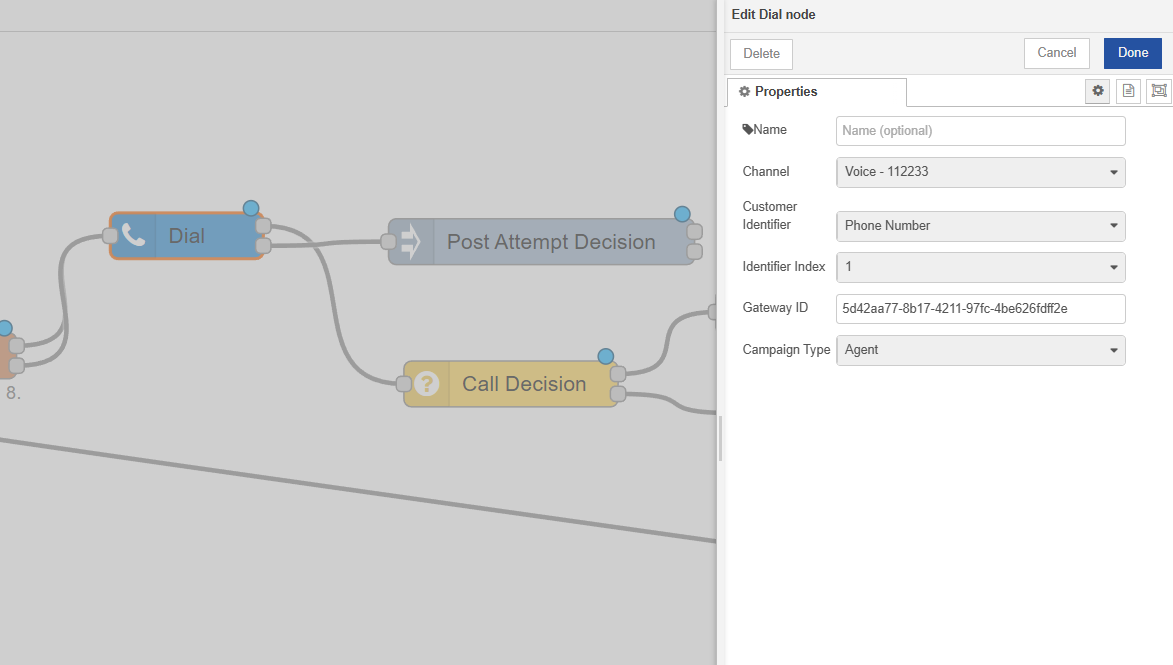
Executing the Call: The Dial Node
The Dial Node is where the system physically initiates the CX Voice call. It acts as the bridge between your contact list and the telephony gateway.
-
Channel Selection: Select the voice channel and its unique identifier from the dropdown.
-
Customer Identifier: Choose the specific attribute to dial, such as "Phone 1" or "Mobile".
-
Identifier Index: If a customer has multiple numbers under one attribute, specify which index to try first.
-
Campaign Type: Choose between Agent or IVR
IVR support is coming soon
Outputs of the Dial Node:
-
Live Call Event: Triggered when the call is active; typically connected to a Call Decision node.
-
Delivery Notification: Triggered once the call attempt is finished; typically connected to a Post Attempt Decision node.
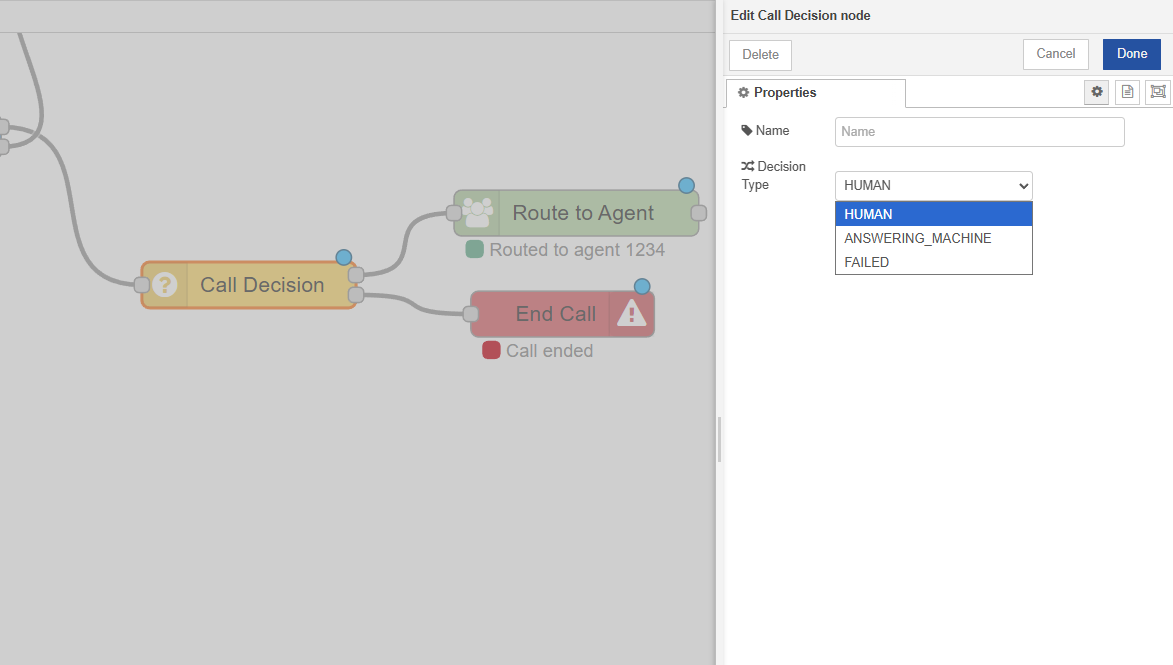
Smart Routing: Call Decision Node
To ensure agents only spend time talking to real people, the Call Decision Node uses Call Progress Analysis (CPA) to filter calls in real time.
-
Decision Type: You can configure the node to detect either a Human or an Answering Machine.
-
True Branch: If a Human is detected, this output is usually wired to the Route to Agent node to connect the seized agent.
-
False Branch: If the detection fails (e.g., it's a machine), you can wire this to the End Call node or a follow-up SMS.
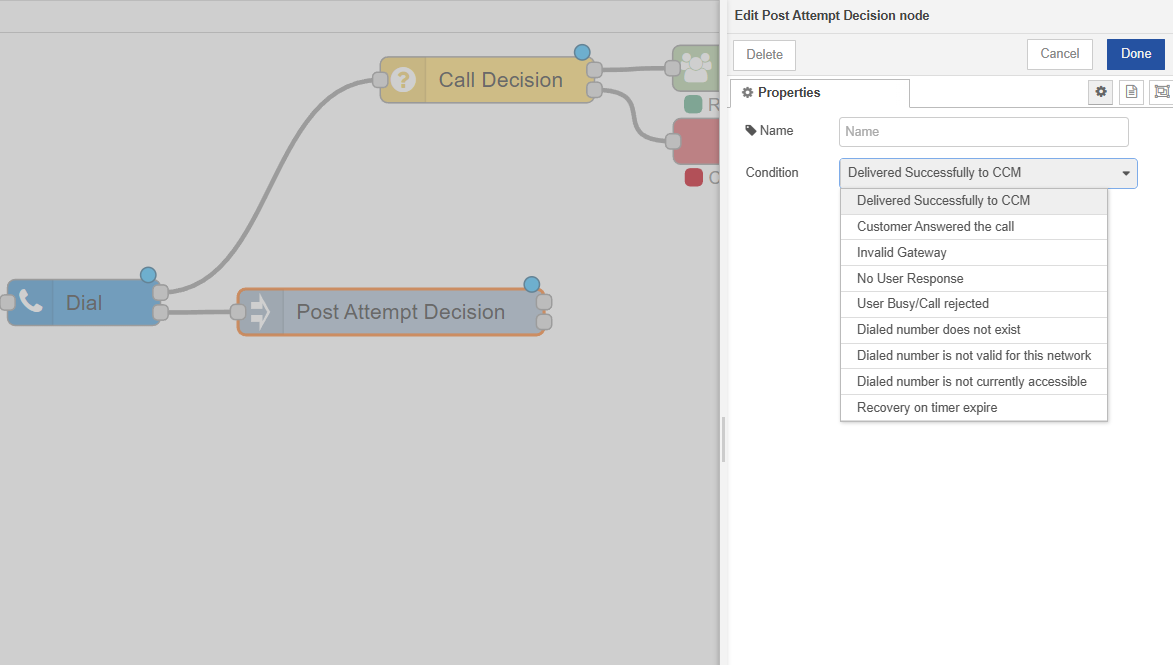
Post-Call Strategy: Post-Attempt Decision Node
After a call attempt ends, you need to decide what to do next based on the outcome.
-
Outcome Selection: The dropdown provides a list of results, such as Customer Answered, User Busy, No User Response, or Invalid Gateway.
-
The "Retry" Logic: You can use the True output for outcomes like "Busy" to loop the contact back into a Dial node for a retry, or use a Plain Message node to send an automated "Sorry we missed you" WhatsApp.
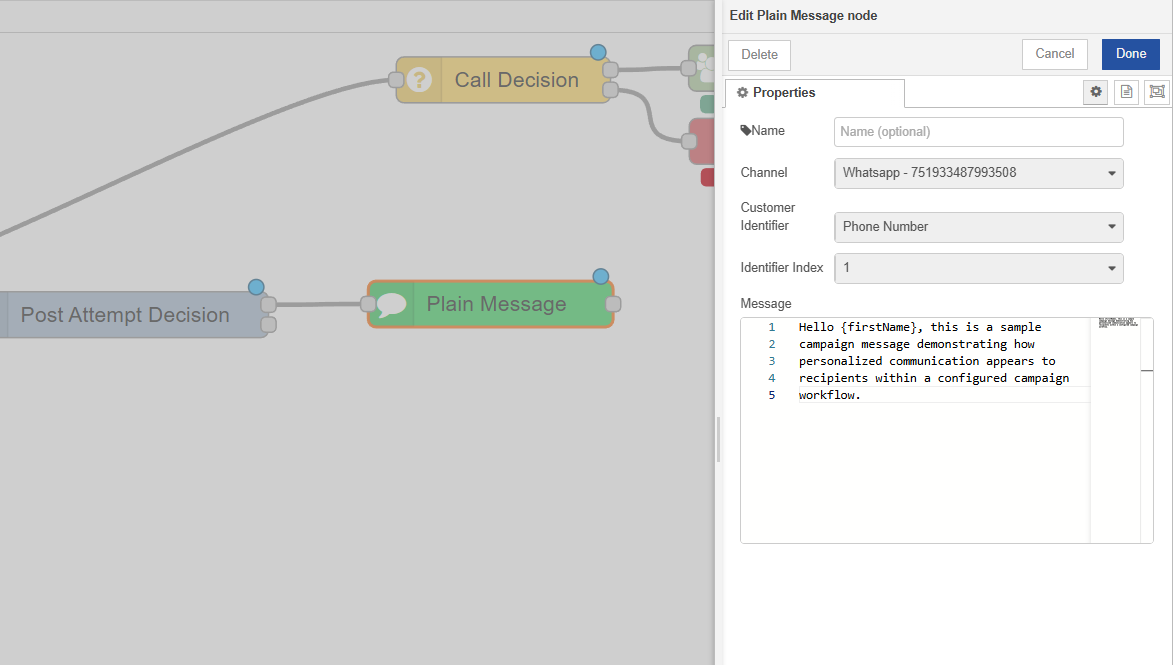
Sending Digital Messages: Plain Message Node
For SMS or WhatsApp campaigns, the Plain Message Node allows for direct outbound messaging.
-
Channel & Identifier: Similar to the Dial node, select your digital channel and the customer phone number attribute.
-
Dynamic Messaging: In the message box, you can type your text and insert customer attributes (like
{{FirstName}}) to personalize the message automatically.
4. Common Use Cases
While the Flow Builder is flexible, most outbound strategies usually follow one of the three patterns below. Use these as a starting point and customize them as needed.
4.1 Agent-Based - Fixed-Ratio Dialing (Progressive & Power)
Use this blueprint when you want a predictable, steady stream of calls based on a specific number of agents. This is the easiest mode to configure and monitor.
The Operational Flow
-
The Trigger (Start Node): The campaign "pulses" (e.g., every 10–20 seconds) to check for agent availability.
-
The Resource Check (Seize Agent): The system attempts to reserve an agent from the queue.
-
The Event Listener (Check Seize Agent Event): The flow waits for the AGENT_RESERVED status before moving forward.
-
The Initiation (Init Node): This is where you set your ratio.
-
Progressive Mode: Set the formula to 1. The system dials one contact for every one agent reserved. This is safest for maintaining low drop rates.
-
Power Mode: Set the formula to a fixed number, such as 3. The system dials three contacts for every one agent reserved, assuming some customers won't answer.
-
-
The Connection (Dial & Call Decision): The system dials the numbers and uses Call Decision (CPA) to filter out answering machines before routing the "Human" pick-up to the waiting agent.
4.2 Agent-Based - Predictive Dialing (Dynamic)
Predictive dialing is our most advanced mode. Instead of a fixed number, the system uses a formula to "predict" how many calls to place to keep agents busy without overwhelming them.
The Operational Flow
-
The Trigger (Start Node): Because the formula is dynamic, a shorter pulse (e.g., 5–10 seconds) is often used to keep the predictions fresh.
-
The Resource Check (Seize Agent): Unlike Power mode, the formula in the Seize Agent node is often dynamic, striving to keep a "buffer" of reserved agents based on live traffic.
-
The Initiation (Init Node): Instead of a number like 1 or 3, you will use a PROMQL Formula.
-
The Logic: The formula looks at live metrics (Total Agents, Busy Agents, Average Wrap-up Time) to calculate the exact number of contacts to dial right now.
-
Copy-Paste: Refer to the https://expertflow-docs.atlassian.net/wiki/x/EABBcg section to select the predictive formula that matches your business KPIs.
-
-
The Connection (Dial & Call Decision): As calls connect, the CPA ensures only live humans reach the agents. Because the system "over-dials" slightly based on math, agent idle time is minimized.
Predictive dialing requires a larger pool of agents to be effective. For teams of fewer than 10 agents, we recommend using Power Dialing (5.1) instead.
4.3 Simple Digital Messaging (SMS/WhatsApp)
This is a streamlined "Fire and Forget" flow used for notifications or marketing blasts where no agent intervention is required.
The Operational Flow
-
Start Node: Sets the schedule for when messages should be sent.
-
Check Undelivered Contacts: Ensures you don't spam the same customer twice.
-
Init Node: Connected directly after the contact check. Because there is no agent to "seize," the Start Node pulse triggers the contact fetch immediately.
-
Plain Message Node: The final destination. Select your SMS or WhatsApp channel and use dynamic tags like {{FirstName}} to personalize the content.
5. Dashboards & Reports
Once a campaign is published, the Campaign Manager’s role shifts from "Architect" to "Optimizer". The system provides two primary ways to track your outbound activity.
4.1 Real-Time Dashboards
The real-time dashboard is designed for immediate intervention. It allows you to see the "health" of your formulas and agent utilization as it happens.
4.2 Campaign Reports
Limitations:
Outbound flows system limitations document can be found here: https://expertflow-docs.atlassian.net/wiki/x/HoB6Rg