A Supervisor or Administrator can configure rules, create schedules, and monitor workforce performance across your contact center. This guide covers how to:
-
Configure contracts, shift categories, activities, and leave types to define scheduling and compliance rules.
-
Manage workforce records for teams, skills, agents, and scheduling eligibility.
-
Create and adjust schedules for teams and agents based on forecasts and contract rules.
-
Review and act on requests such as leave approvals, shift swaps, and trade posts.
-
Monitor adherence by mapping agent states, defining rules, and tracking real-time compliance.
-
Use calendars and visual boards to view team schedules, swap offers, and daily assignments.
-
Generate and export reports to track coverage, performance, and compliance over time.
Login
The Login Screen is the entry point for accessing the Workforce Management solution.
Login Screen
Users provisioned in IAM with the required permissions can authenticate using their credentials. The 'Remember Me' feature enables persistent login cookies for returning users
.png?cb=4210245701fbad534d3b853938cc85f2)
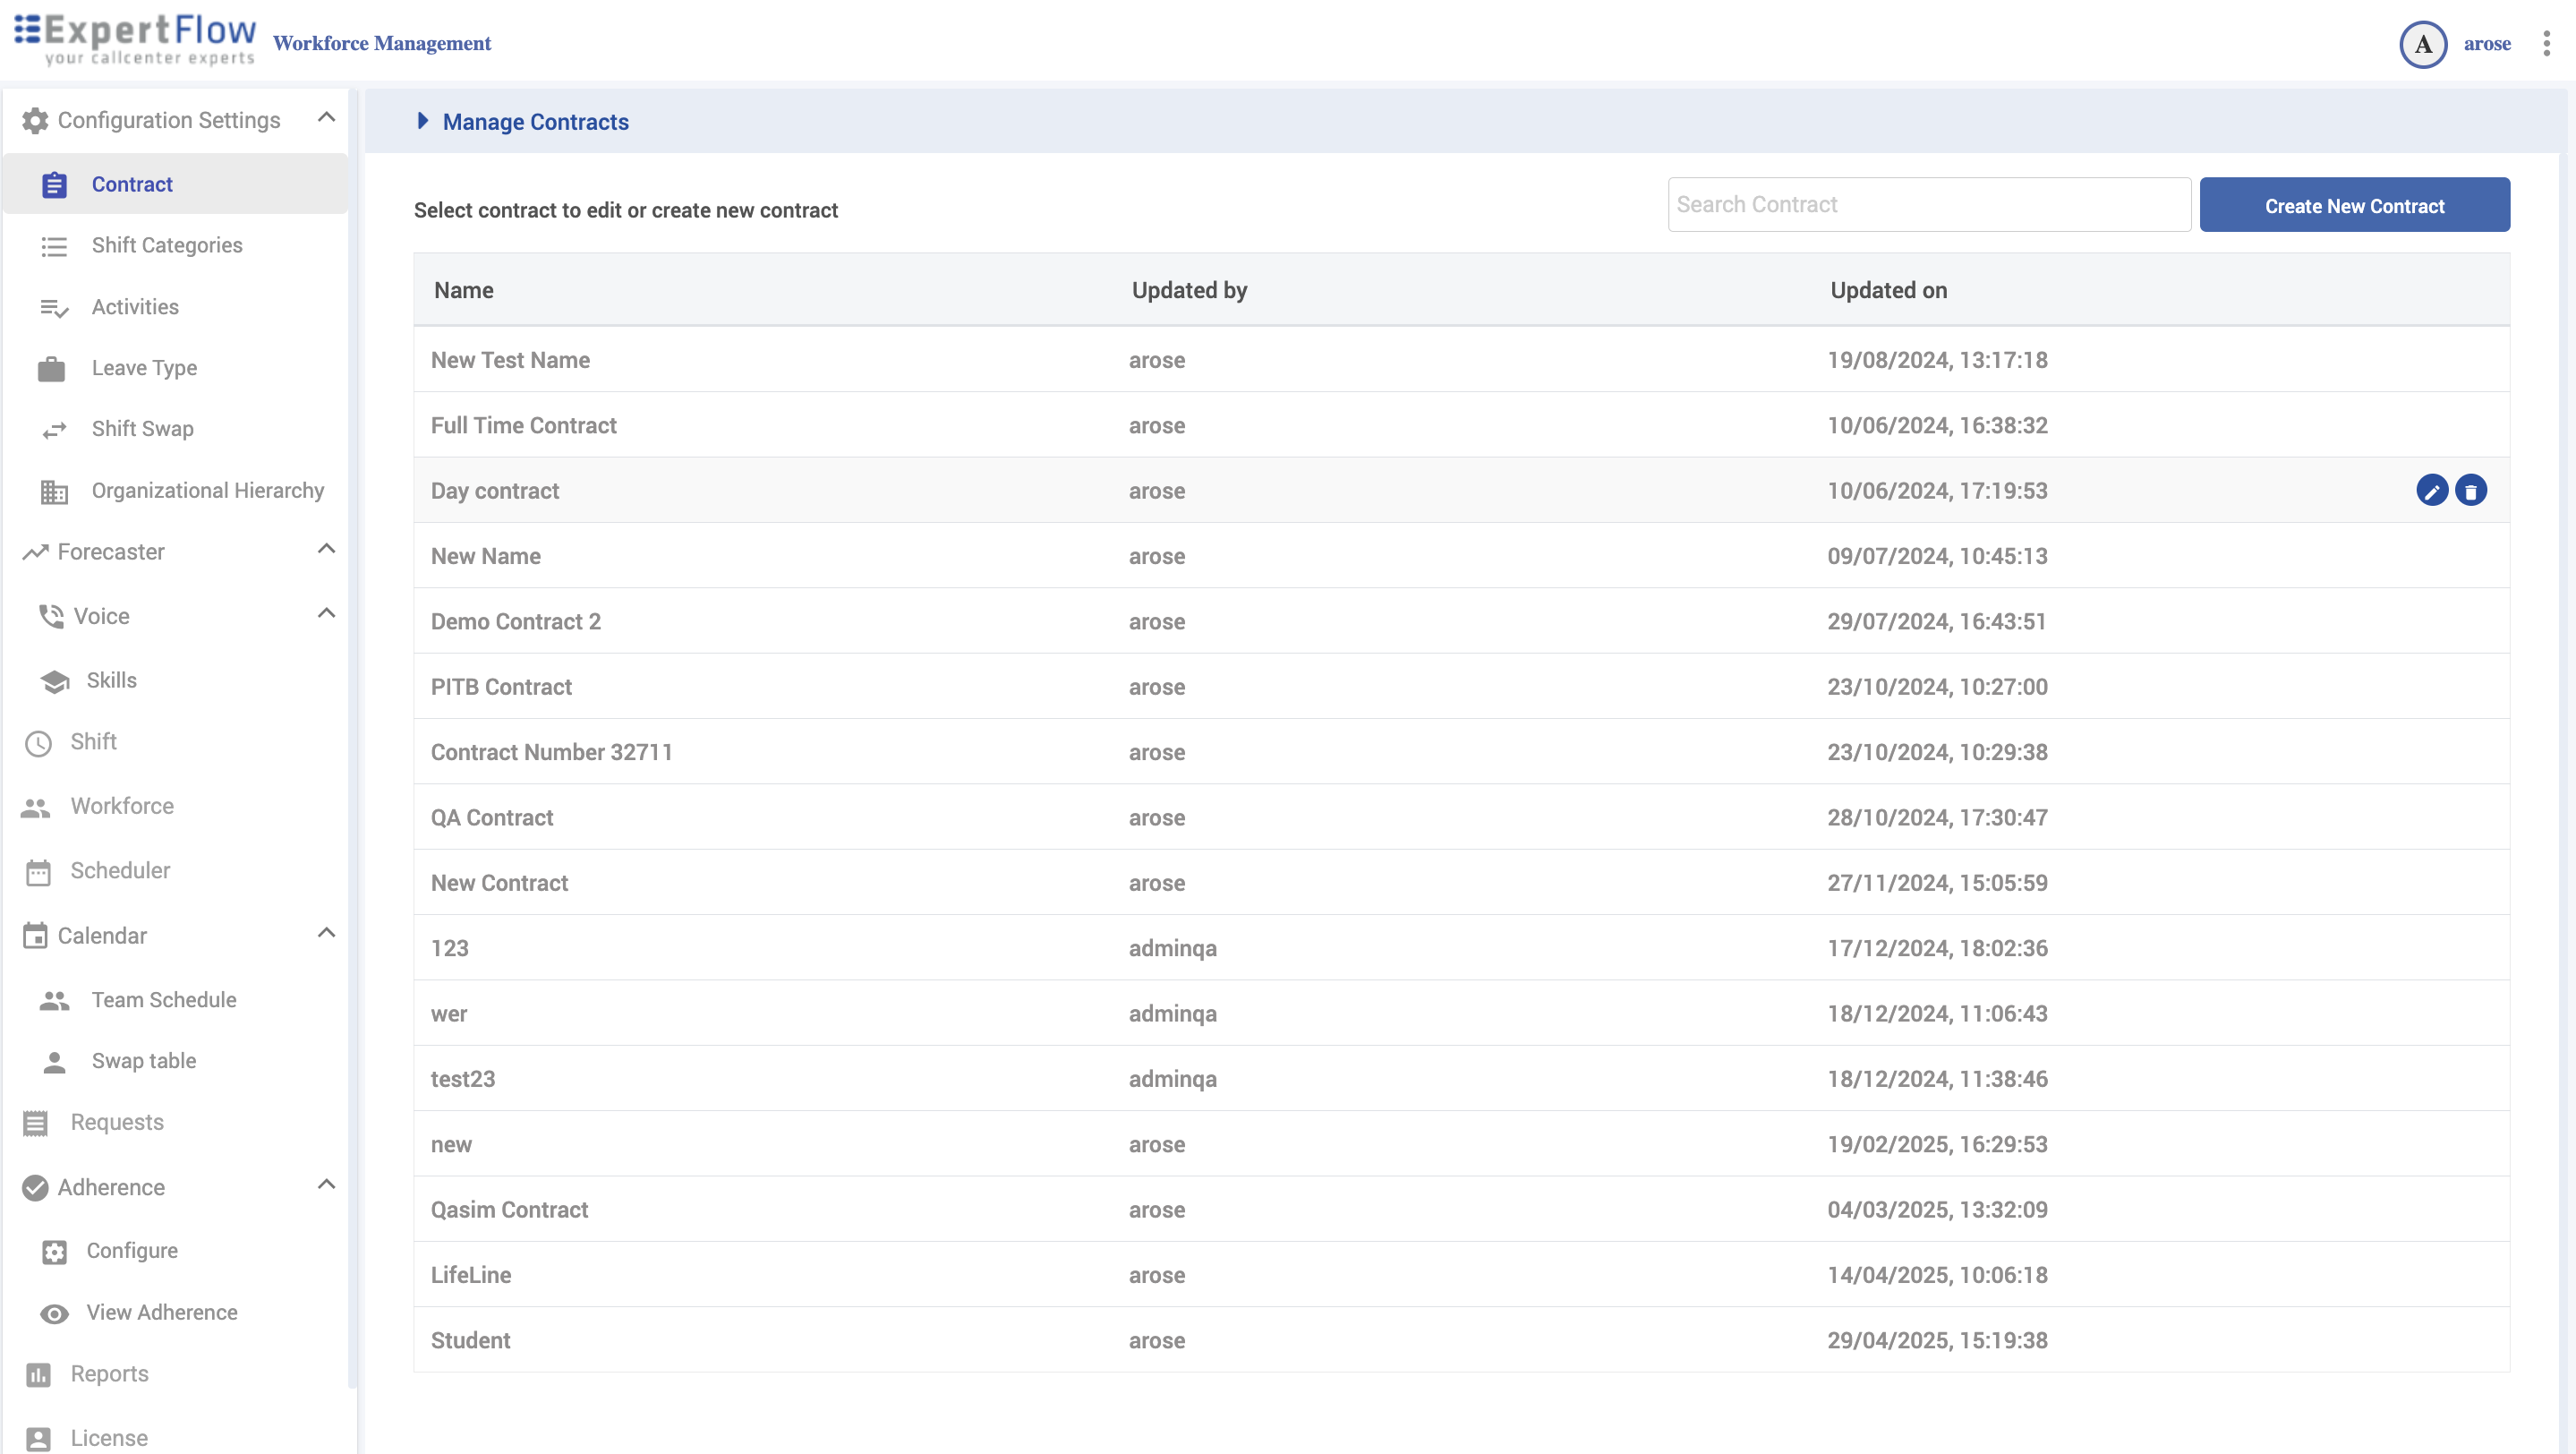
Contracts
Navigation
Left navigation → Configuration Settings → Contract
What you can do
-
Create full-time/part-time contract templates.
-
Set weekly/daily time limits and required rest periods.
-
Define tolerances and active working days.
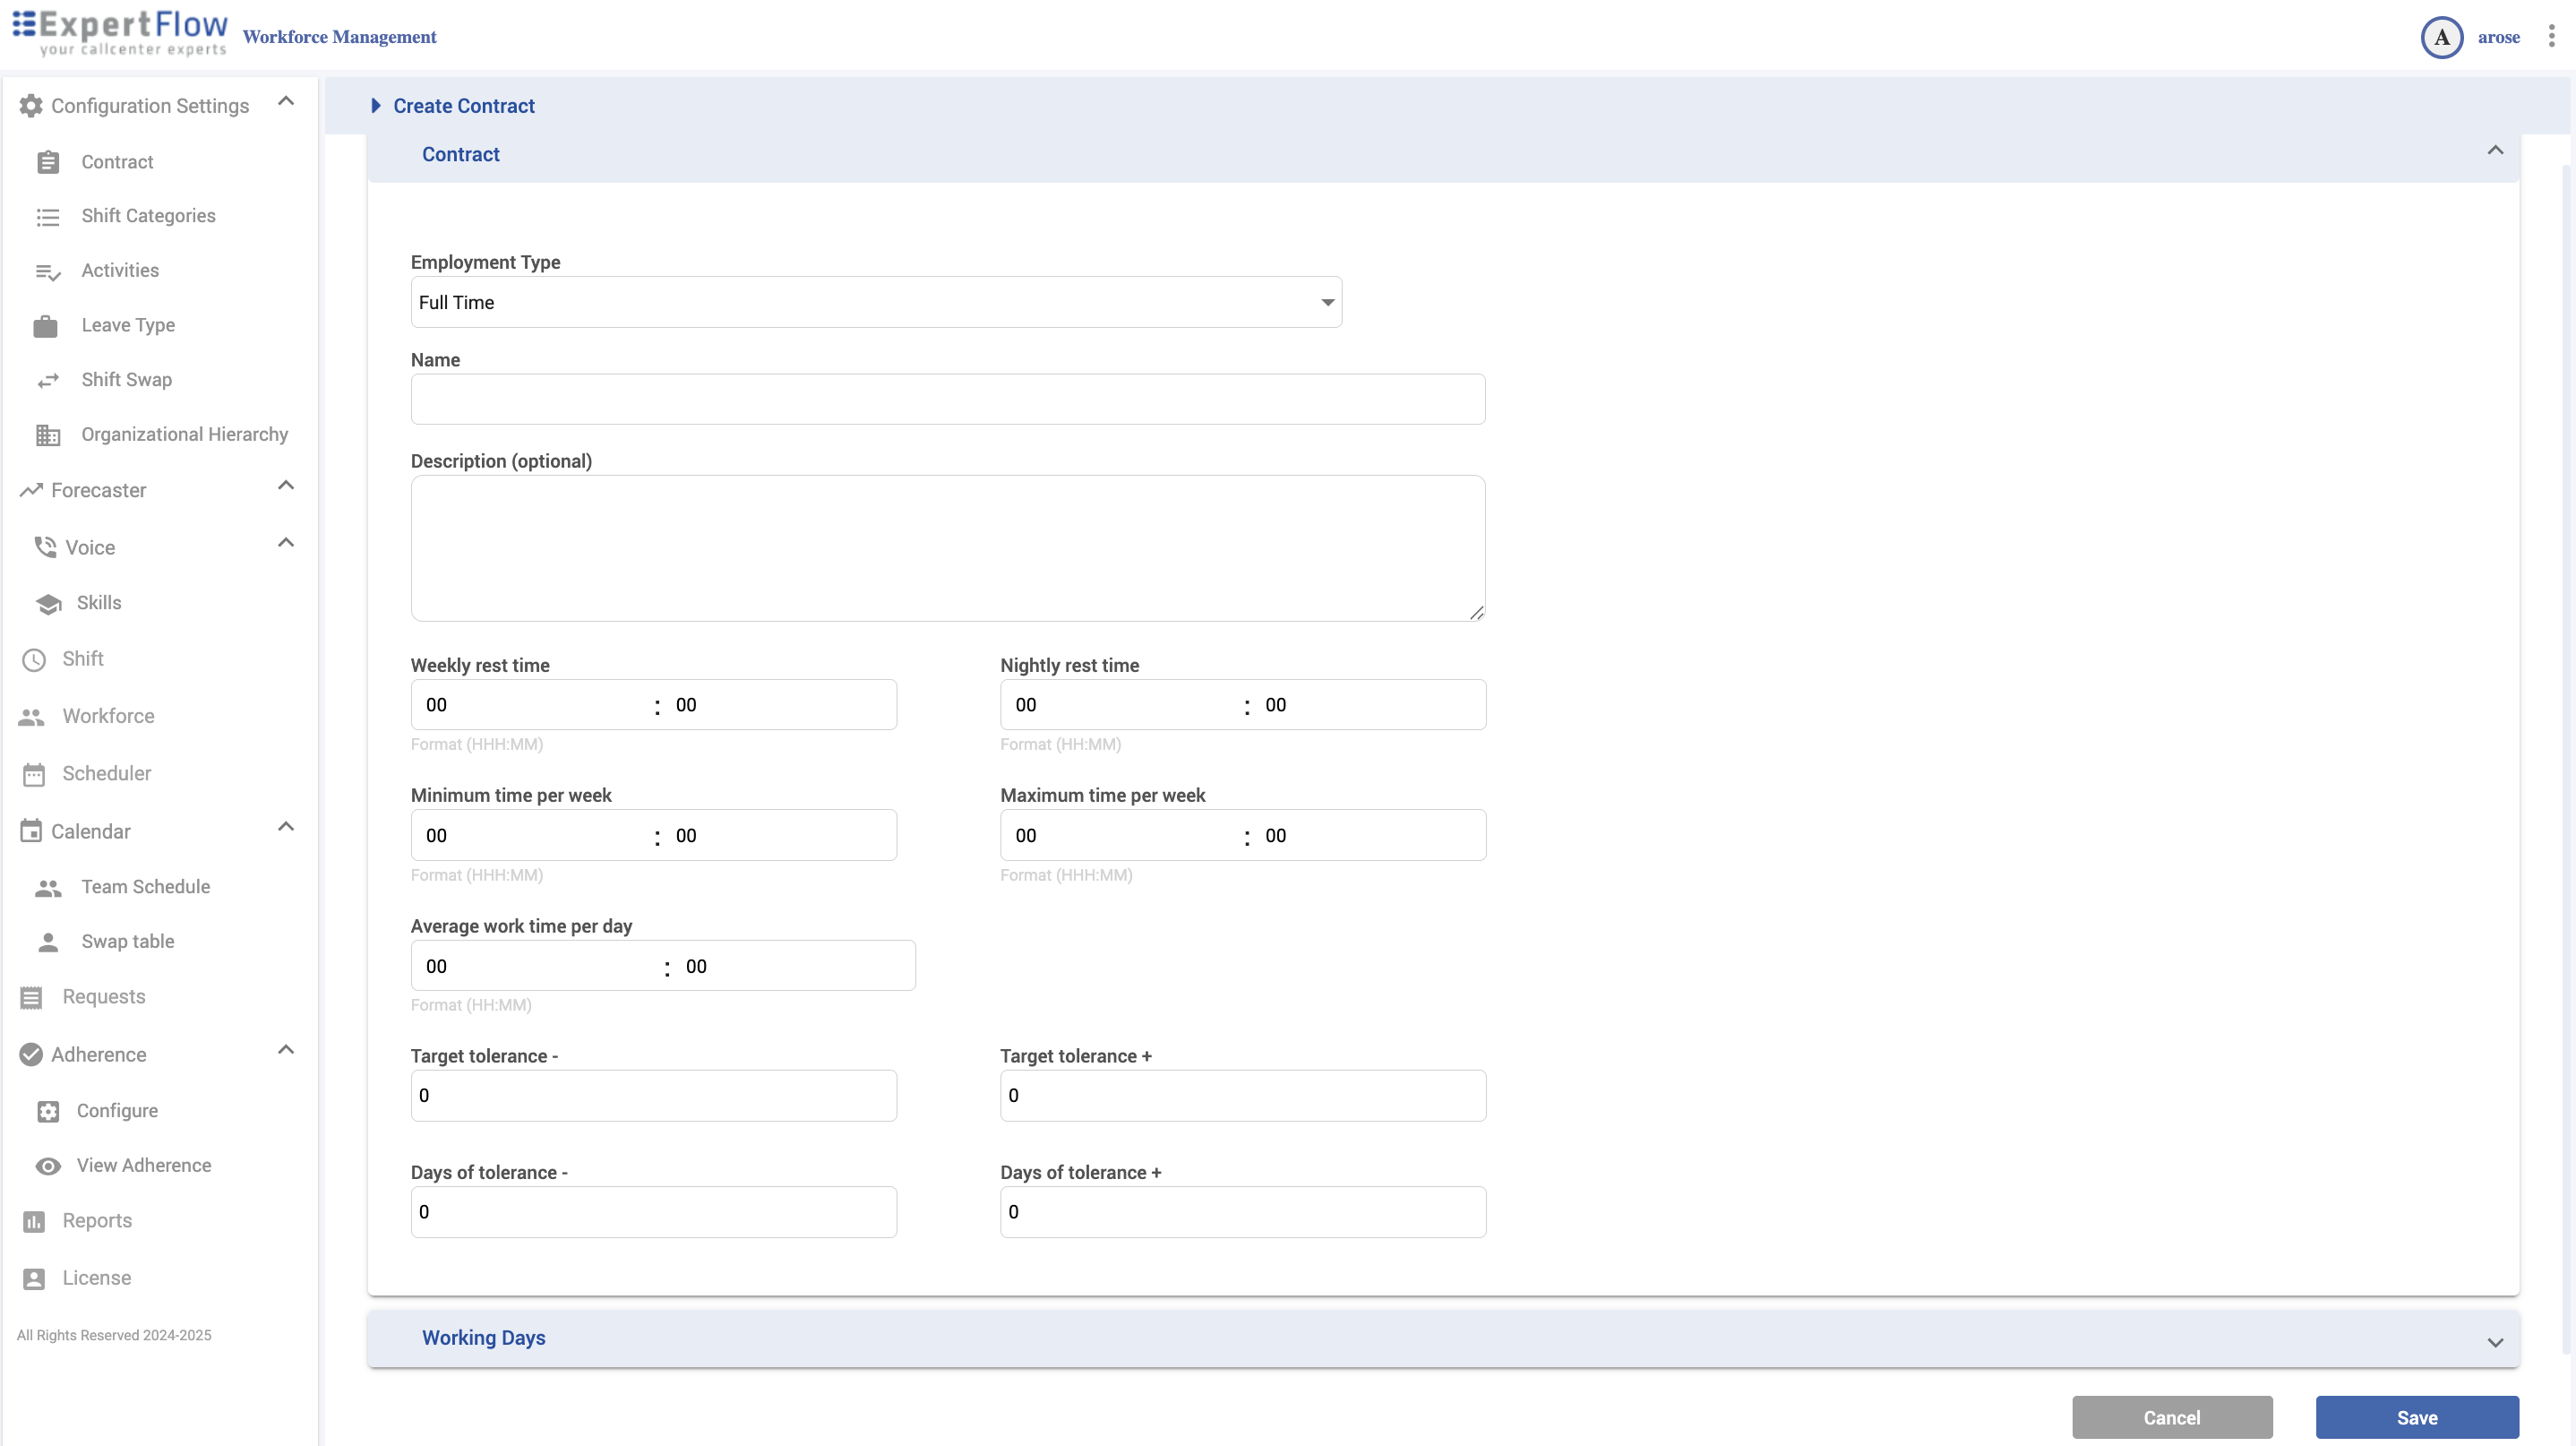
Create
-
Click Create New Contract.
-
Choose Employment Type: Full Time / Part Time.
-
Enter Name (required; 25 chars max) and optional Description (250 chars max).
-
Fill the time rules (see Field reference).
-
Expand Working Days and toggle allowed days.
-
Click Save.
Edit / Delete
-
Hover a row to reveal Edit or Delete.
-
If a contract is in use, Edit instead of deleting to avoid scheduling errors.
Field reference & validation
-
Weekly rest time — HHH:MM (0–167:59)
-
Nightly rest time — HH:MM (0–23:59)
-
Minimum time per week — HHH:MM (0–167:59)
-
Maximum time per week — HHH:MM (0–167:59)
-
Average work time per day — HH:MM (0–23:59)
-
Target tolerance − / + — allowed under/over target time (minutes)
-
Days of tolerance − / + — allowed under/over target days (days)
-
Working Days — Mon–Sun toggles
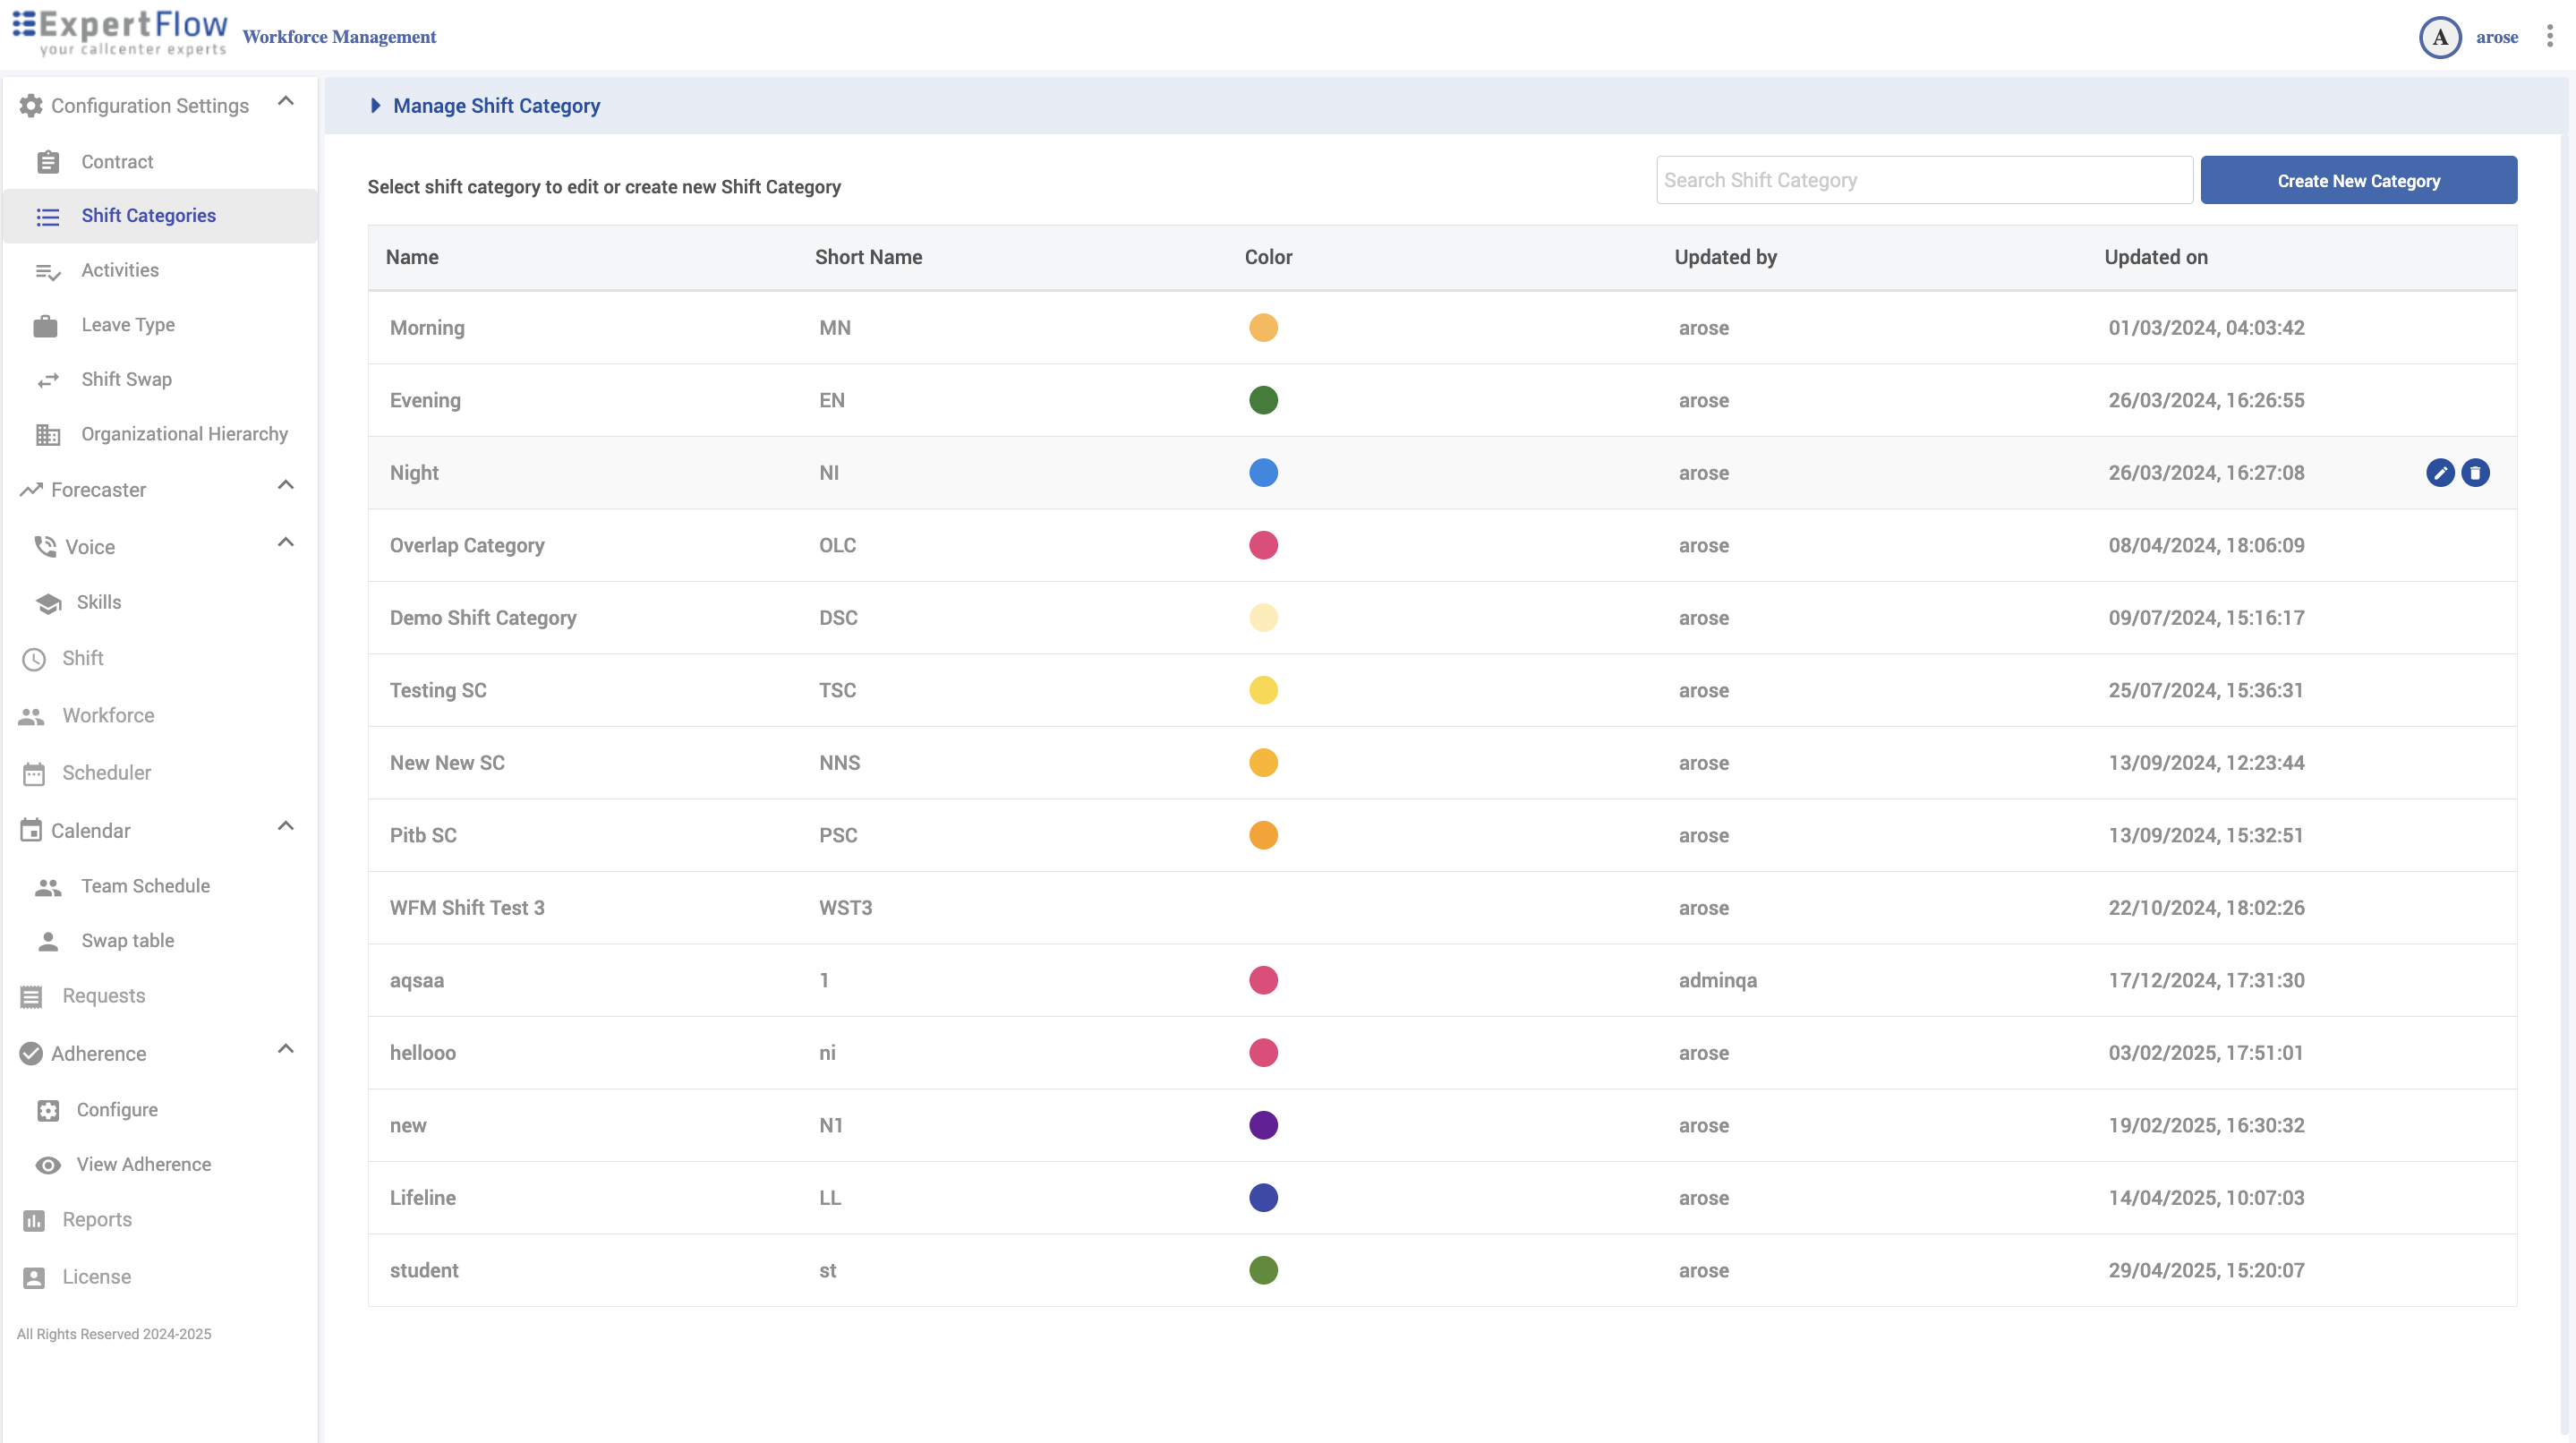
Shift Categories
Navigation
Configuration Settings → Shift Categories
What you can do
-
Create color-coded categories with a short code.
-
Search, edit, or delete categories.
Create
-
Click Create New Category.
-
Enter Name (25 chars max).
-
Enter Short Name (3 chars max) for compact grids.
-
Pick a Color.
-
Click Save.
Edit / Delete
-
Hover a row to Edit or Delete.
-
If referenced by shifts, reassign those shifts before deleting.

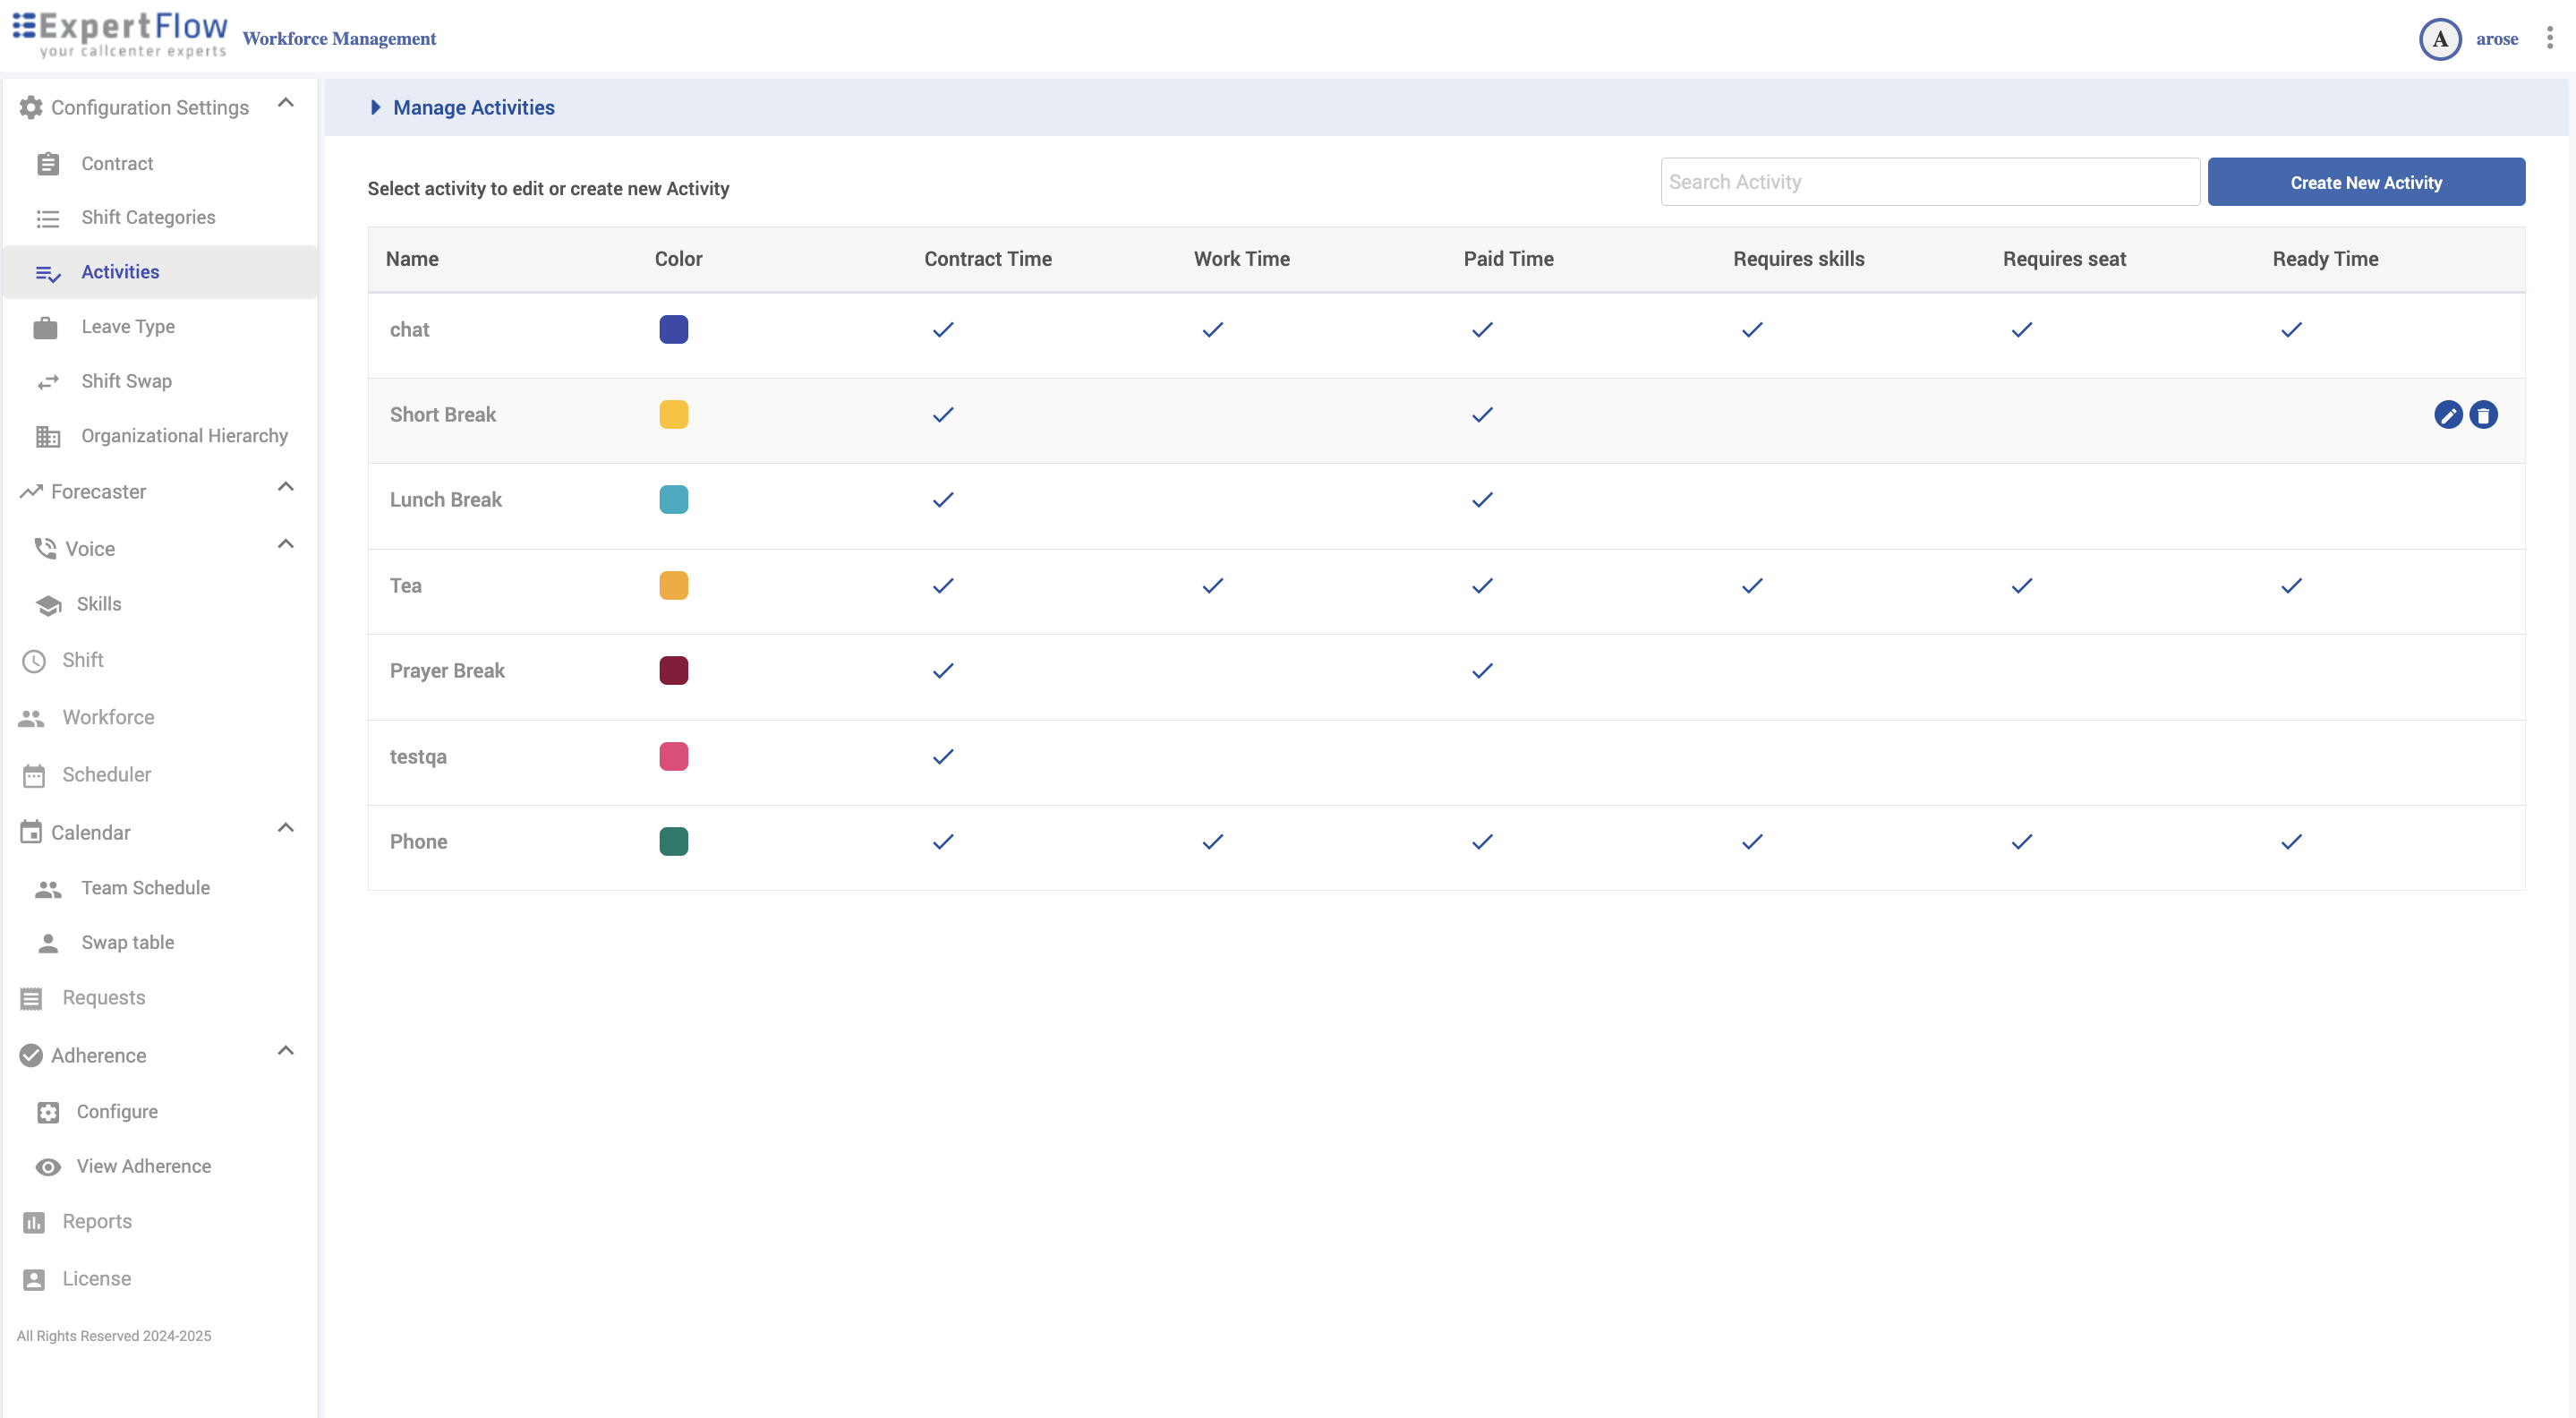
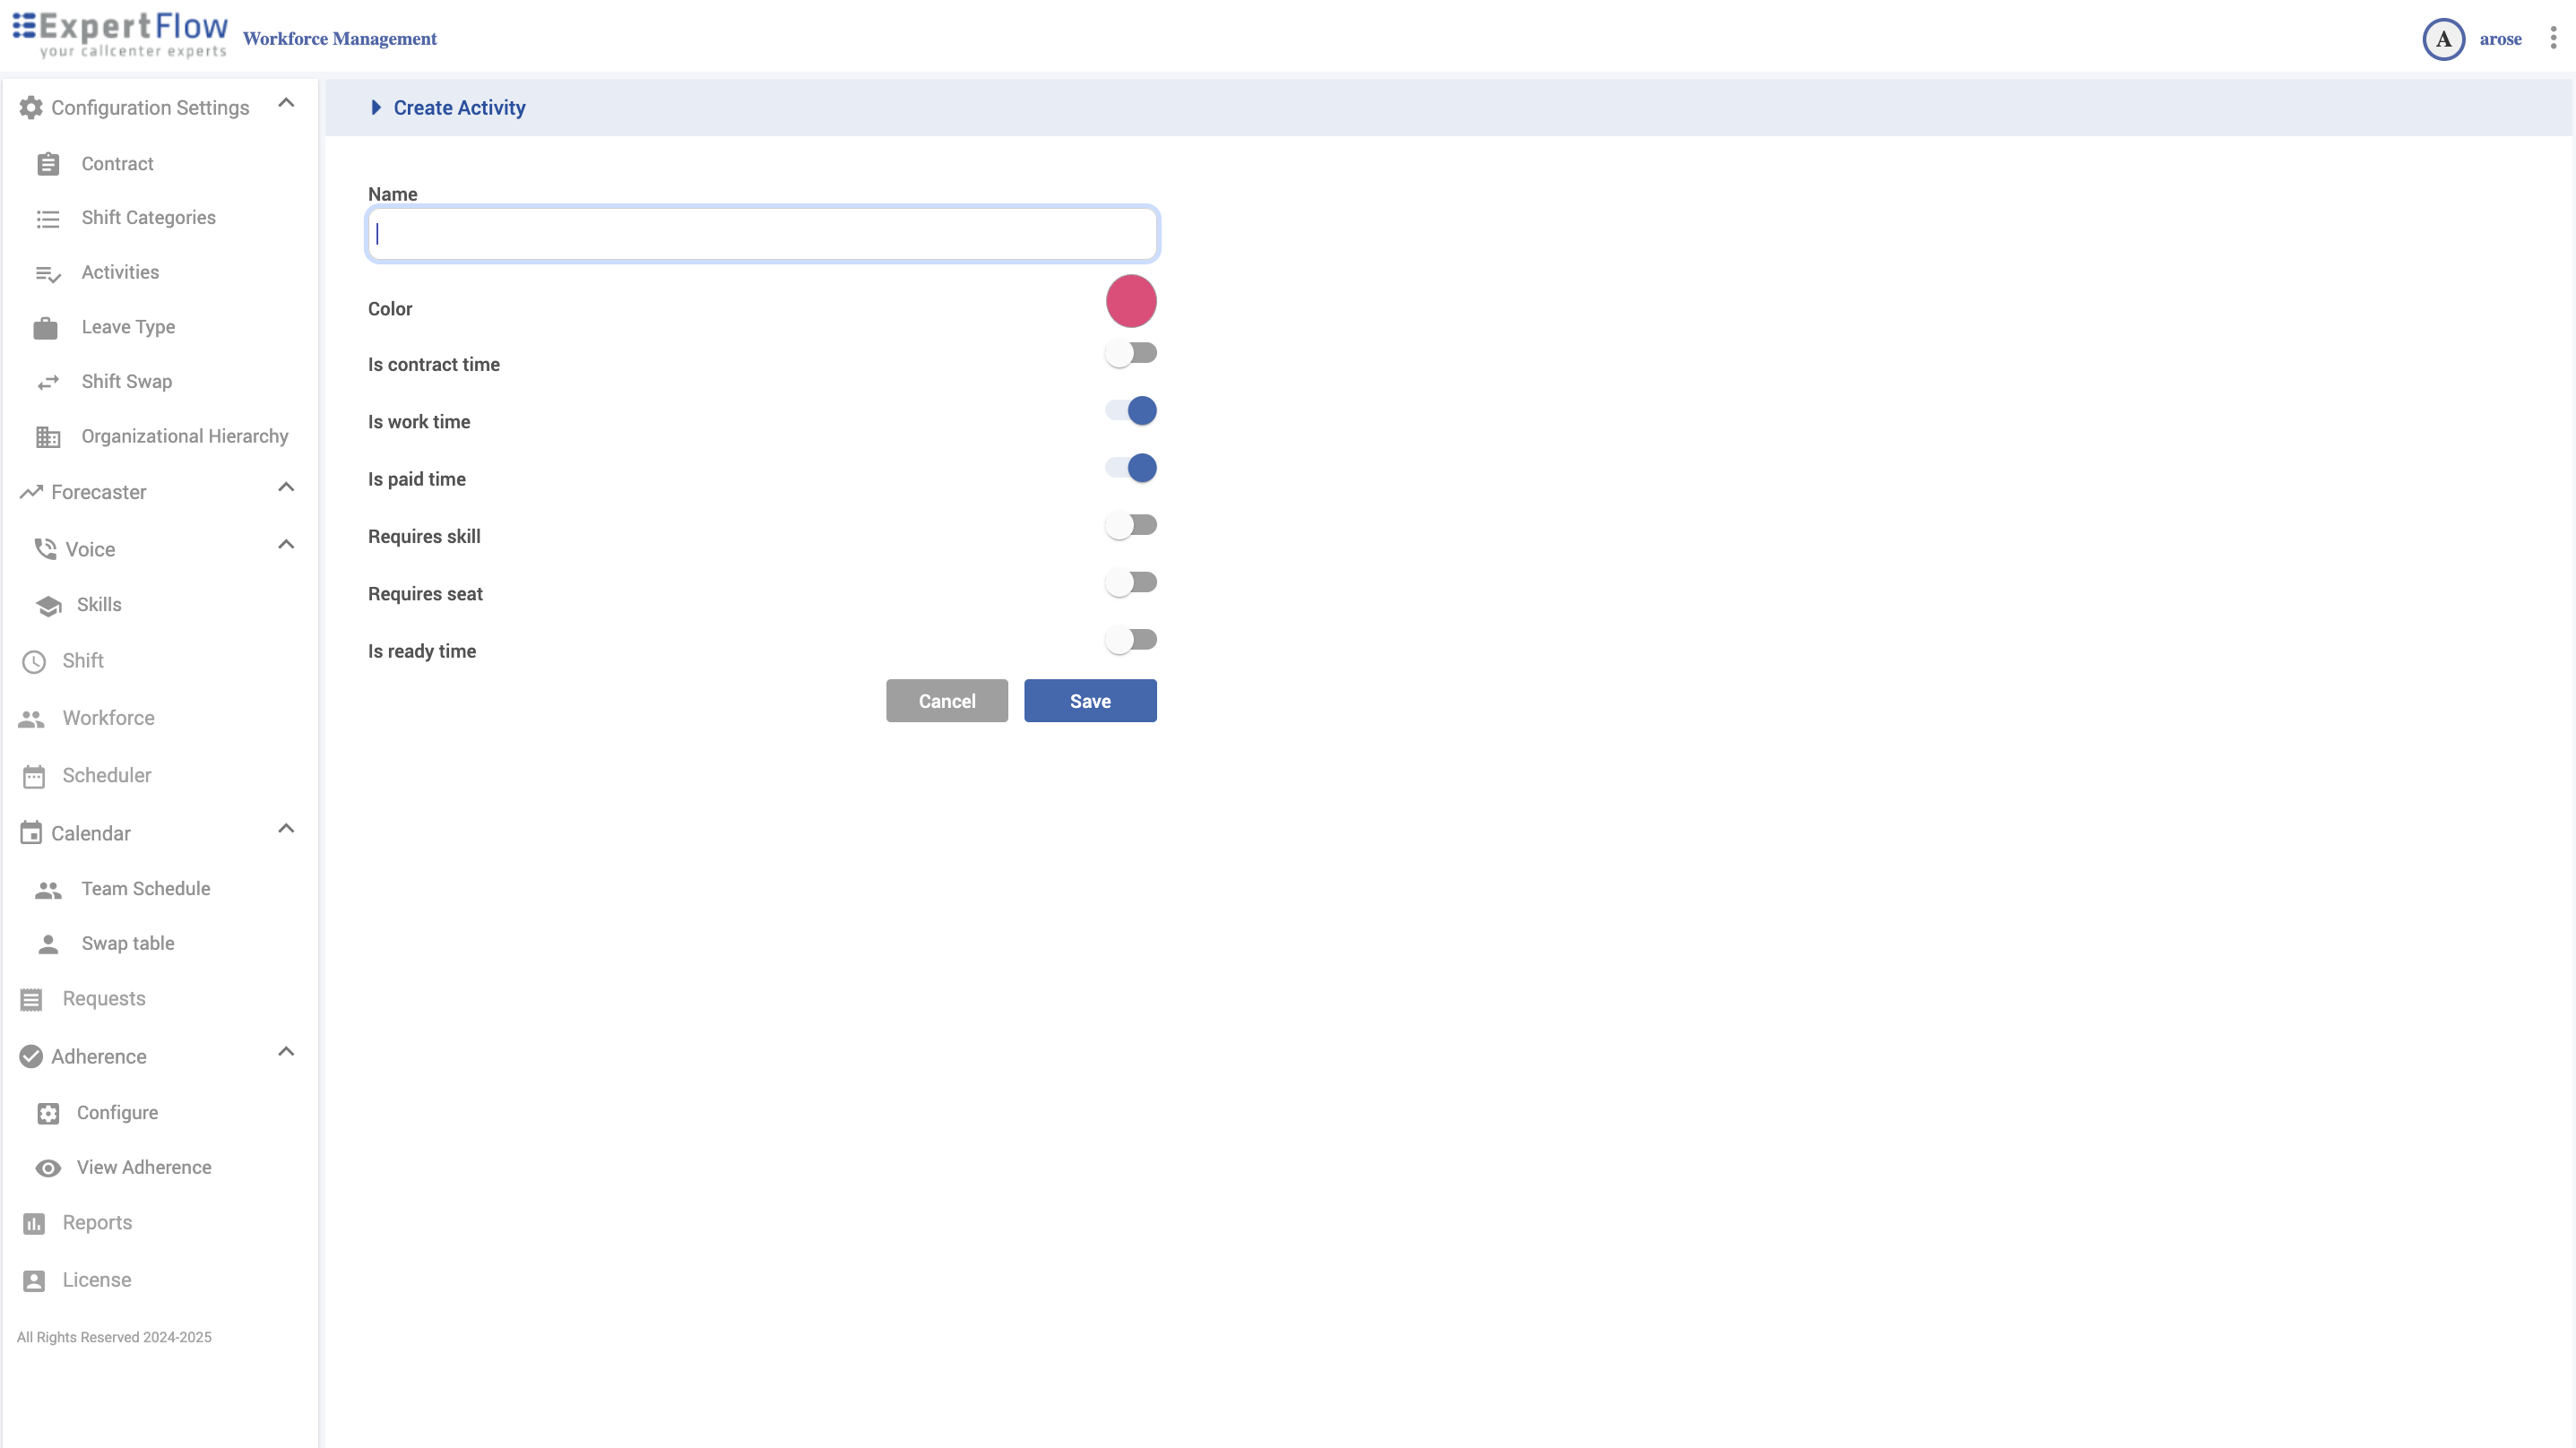
Activities
Navigation
Configuration Settings → Activities
What you can do
-
Create color-coded activities.
-
Set flags for contract/work/paid time, skill/seat needs, and “ready” time.
Create
-
Click Create New Activity.
-
Enter Name (25 chars max).
-
Choose a Color (used in calendars/adherence timelines).
-
Set flags as needed:
-
Is Contract Time — counts toward contract time
-
Is Work Time — productive time
-
Is Paid Time — payroll/costing
-
Requires Skill — only agents with matching skills
-
Requires Seat — consumes a seat/resource
-
Is Ready Time — contributes to “ready” capacity
-
-
Click Save.
Edit / Delete
-
Hover a row to Edit or Delete. Prefer editing if the activity is used in shifts.
Behavior/Impact
-
Scheduler & Adherence use these flags to place activities and evaluate “in Adherence.”
-
Reports use Paid/Work/Contract flags for time accounting.
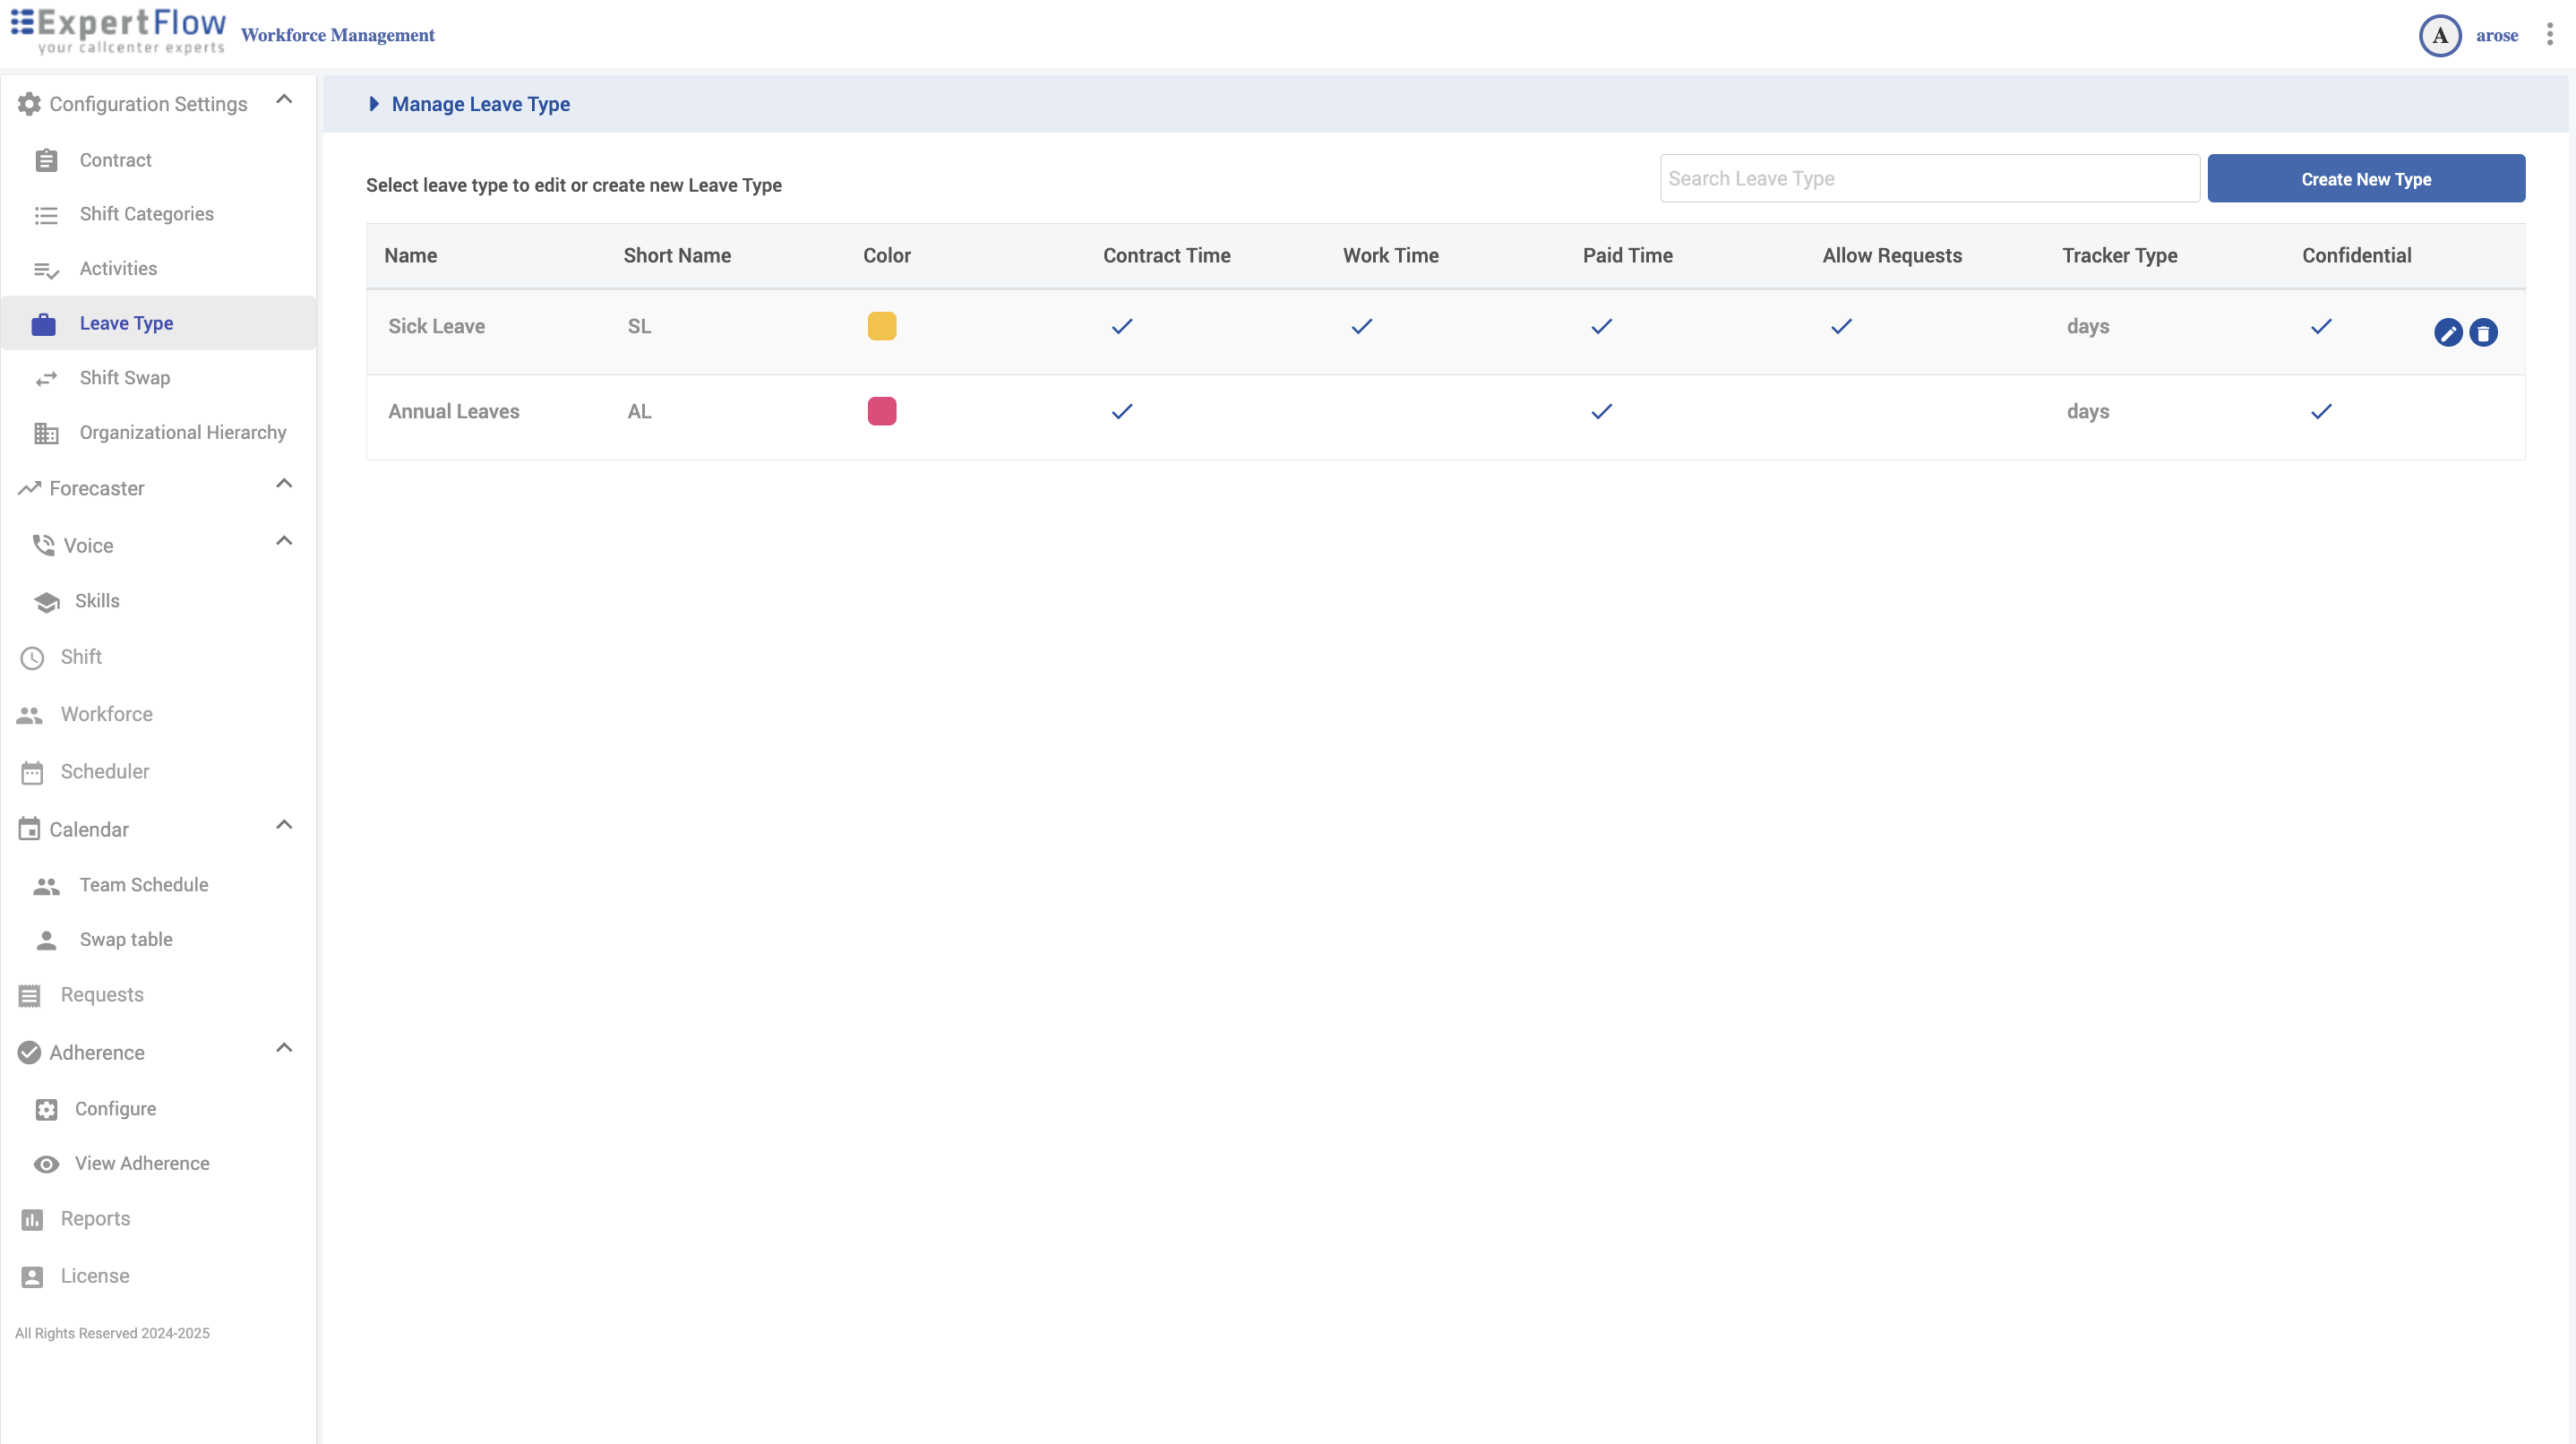
Leave Types
Navigation
Configuration Settings → Leave Type
What you can do
-
Create leave types with request/balance behavior.
-
Control self-service and confidentiality.
Create
-
Click Create New Type.
-
Enter Name and Short Name.
-
Pick a Color.
-
Set flags:
-
Contract Time (usually ✔ for paid leaves)
-
Work Time
-
Paid Time
-
Allow Requests (self-service)
-
Tracker Type — days or hours
-
Confidential — details hidden from peers
-
-
Click Save.
Edit / Delete
-
Hover a row to Edit or Delete.
-
If used historically, disable Allow Requests instead of deleting.
Behavior/Impact
-
Calendar/Requests enforce balances & visibility; Scheduler respects Contract Time.

Shift Swap (Configuration)
Navigation
Configuration Settings → Shift Swap
What you can configure
-
Open for Shift Trade Requests — From [X] to [Y] days (relative to today).
-
Maximum Consecutive Days Without Day Off — cap after swaps.
-
Tolerance for Matching Contract Time [min – max] — weekly contract match window.
-
Matching Skills — move required skills into Selected.
-
Auto grant — ON: auto-approve eligible swaps; OFF: supervisor approval.
-
Anonymous — ON: hide poster identity on the board.
-
First-come First-Serve bulletin board — ON: first eligible responder gets the shift.
Save to apply.
Behavior/Impact
-
All swaps/trades validate against these limits before approval.

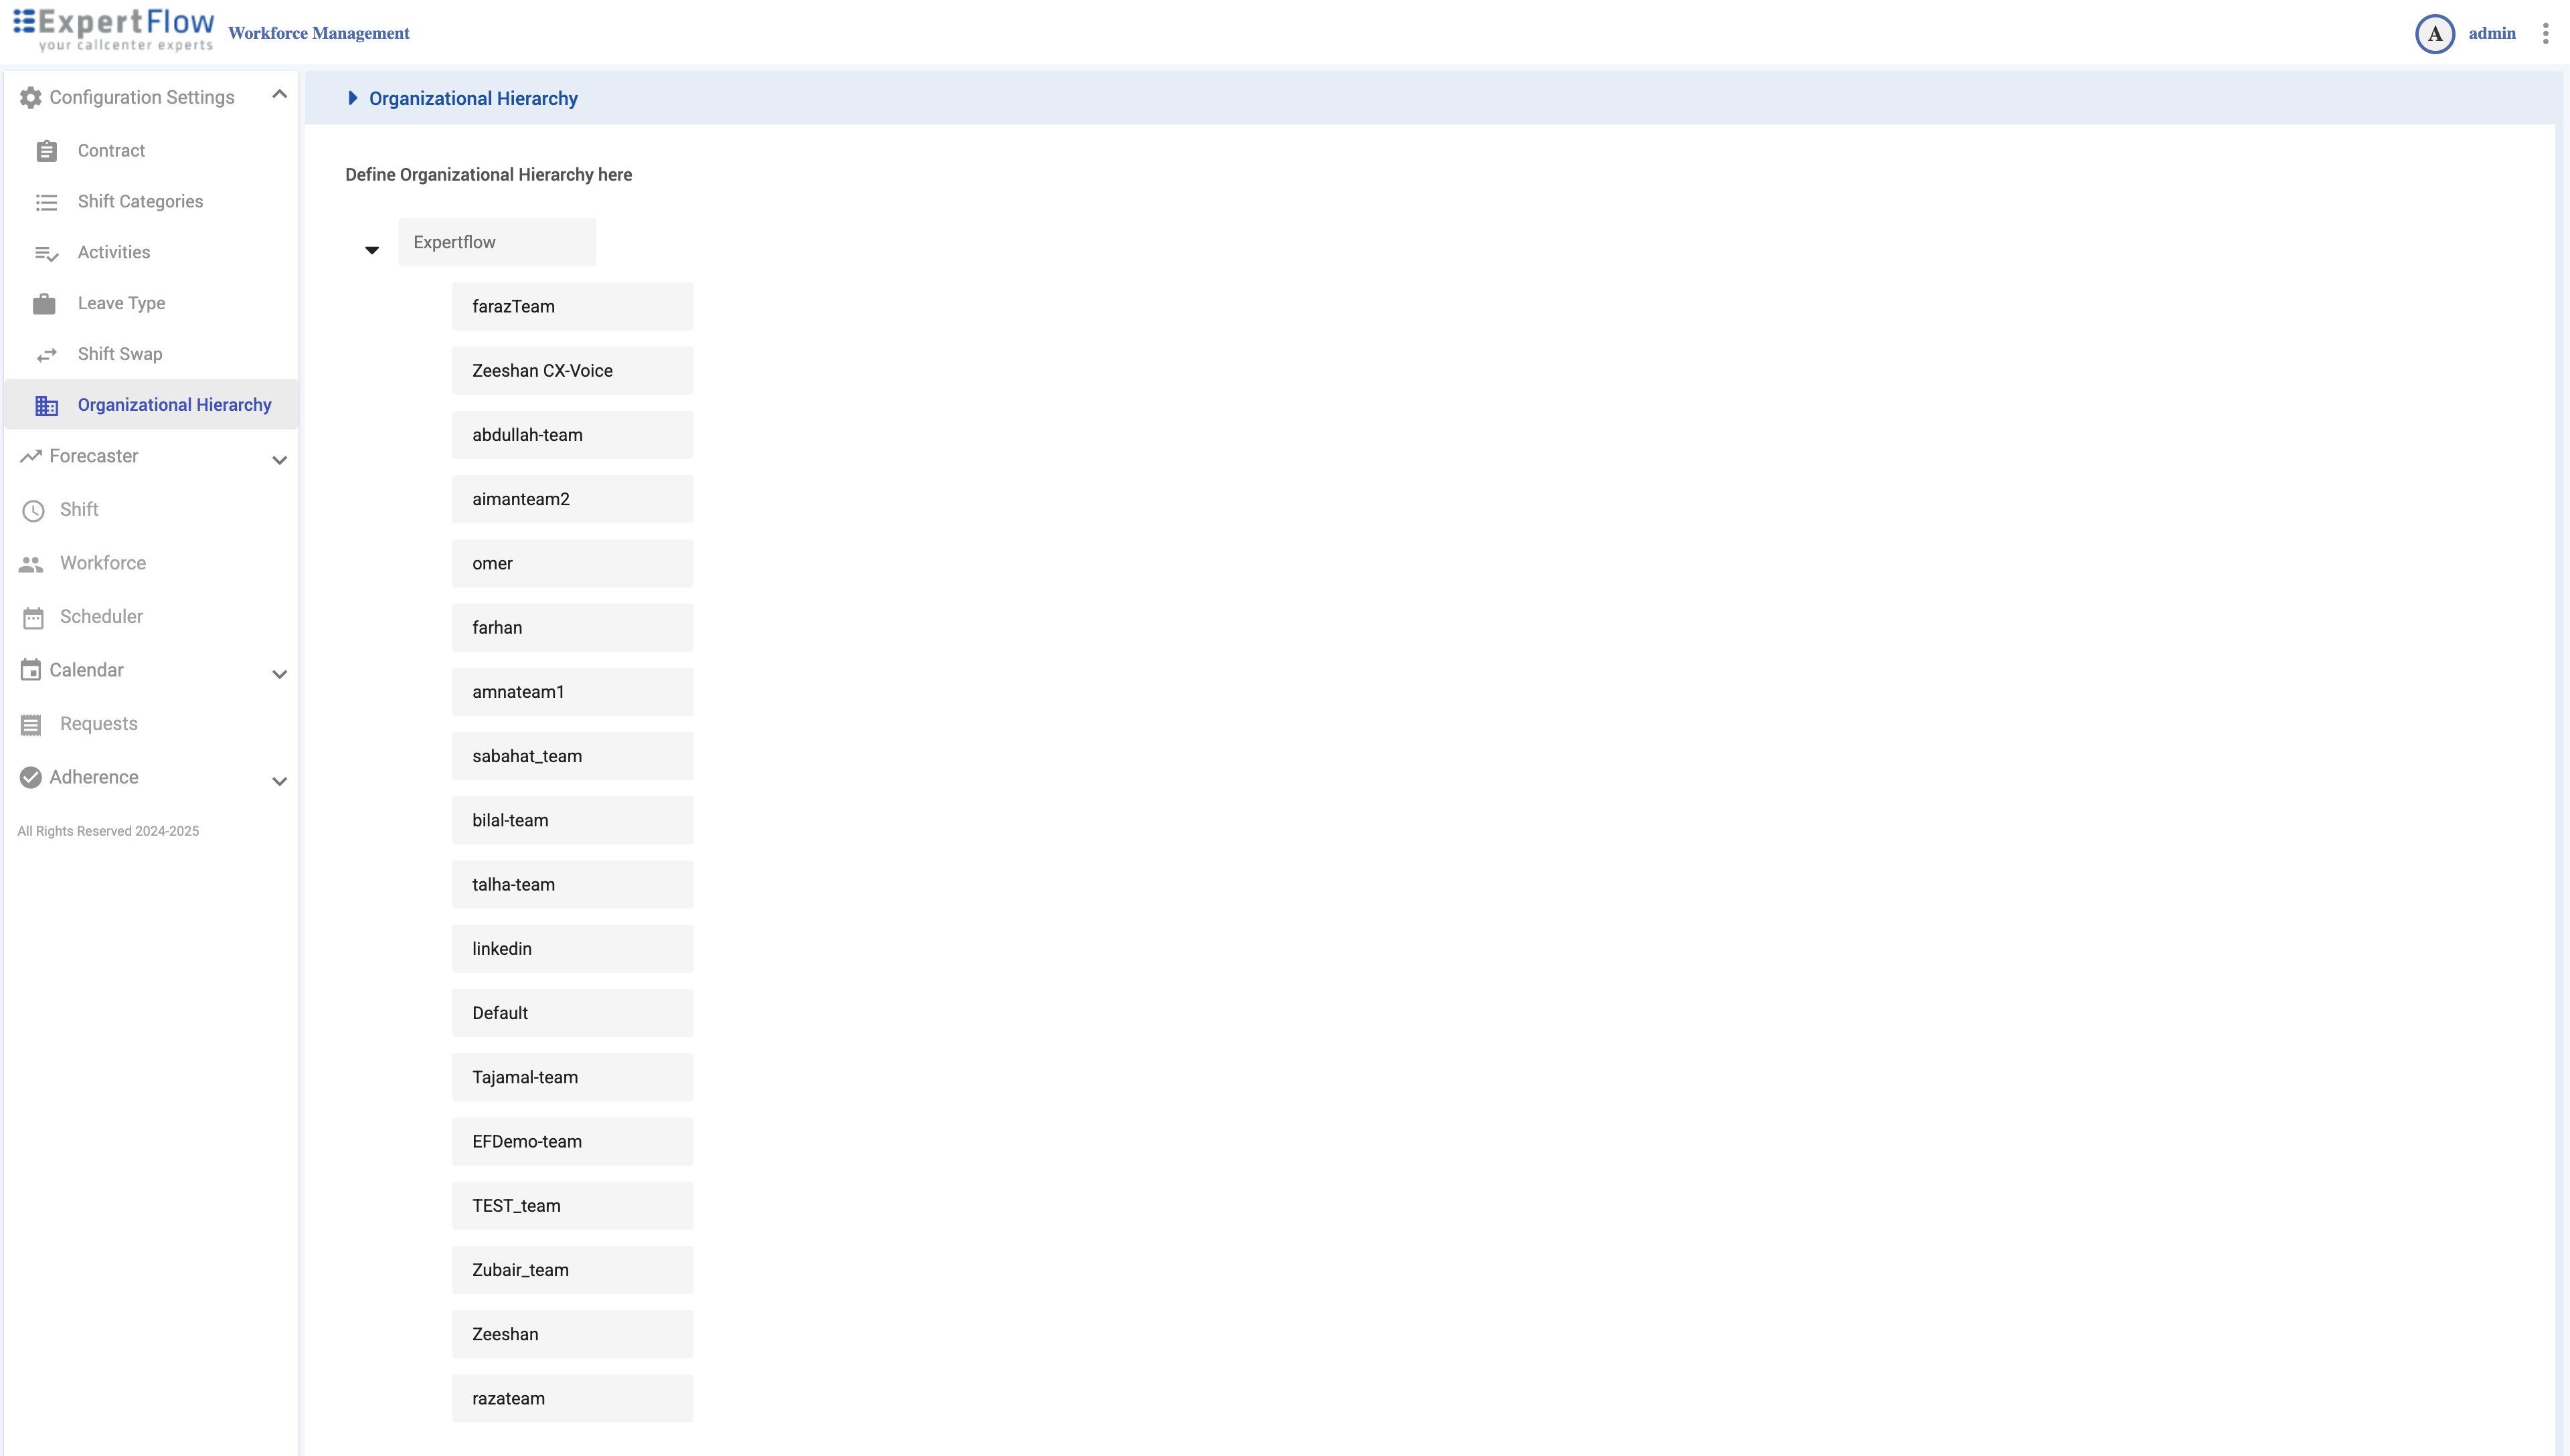
Organizational Hierarchy
Navigation
Configuration Settings → Organizational Hierarchy
Manage
-
Expand/collapse nodes with carets.
-
The nodes are the teams synced from unified admin.
-
You can create or update teams and their members in unified admin. It syncs automatically with WFM.
Behavior/Impact
-
Locations/Teams appear across Scheduler, Workforce, Calendars, Adherence filters, and Reports.
Forecaster — Skills, Queues, Queue Volumes, and Forecasts
Access
Left navigation → Forecaster → Voice → Skills
-
Top list: columns Name, SL(%), Min Occupancy(%), Max Occupancy(%), Shrinkage(%), plus Search Skills and Create New Skill.
-
Expand a skill (caret on the right) to see its Queues grid with columns Name, Offered, Overflow In, Overflow Out, row actions (icons), and a Create New Queue Volume button.
(Insert Screenshot: Expanded skill — queues and actions)
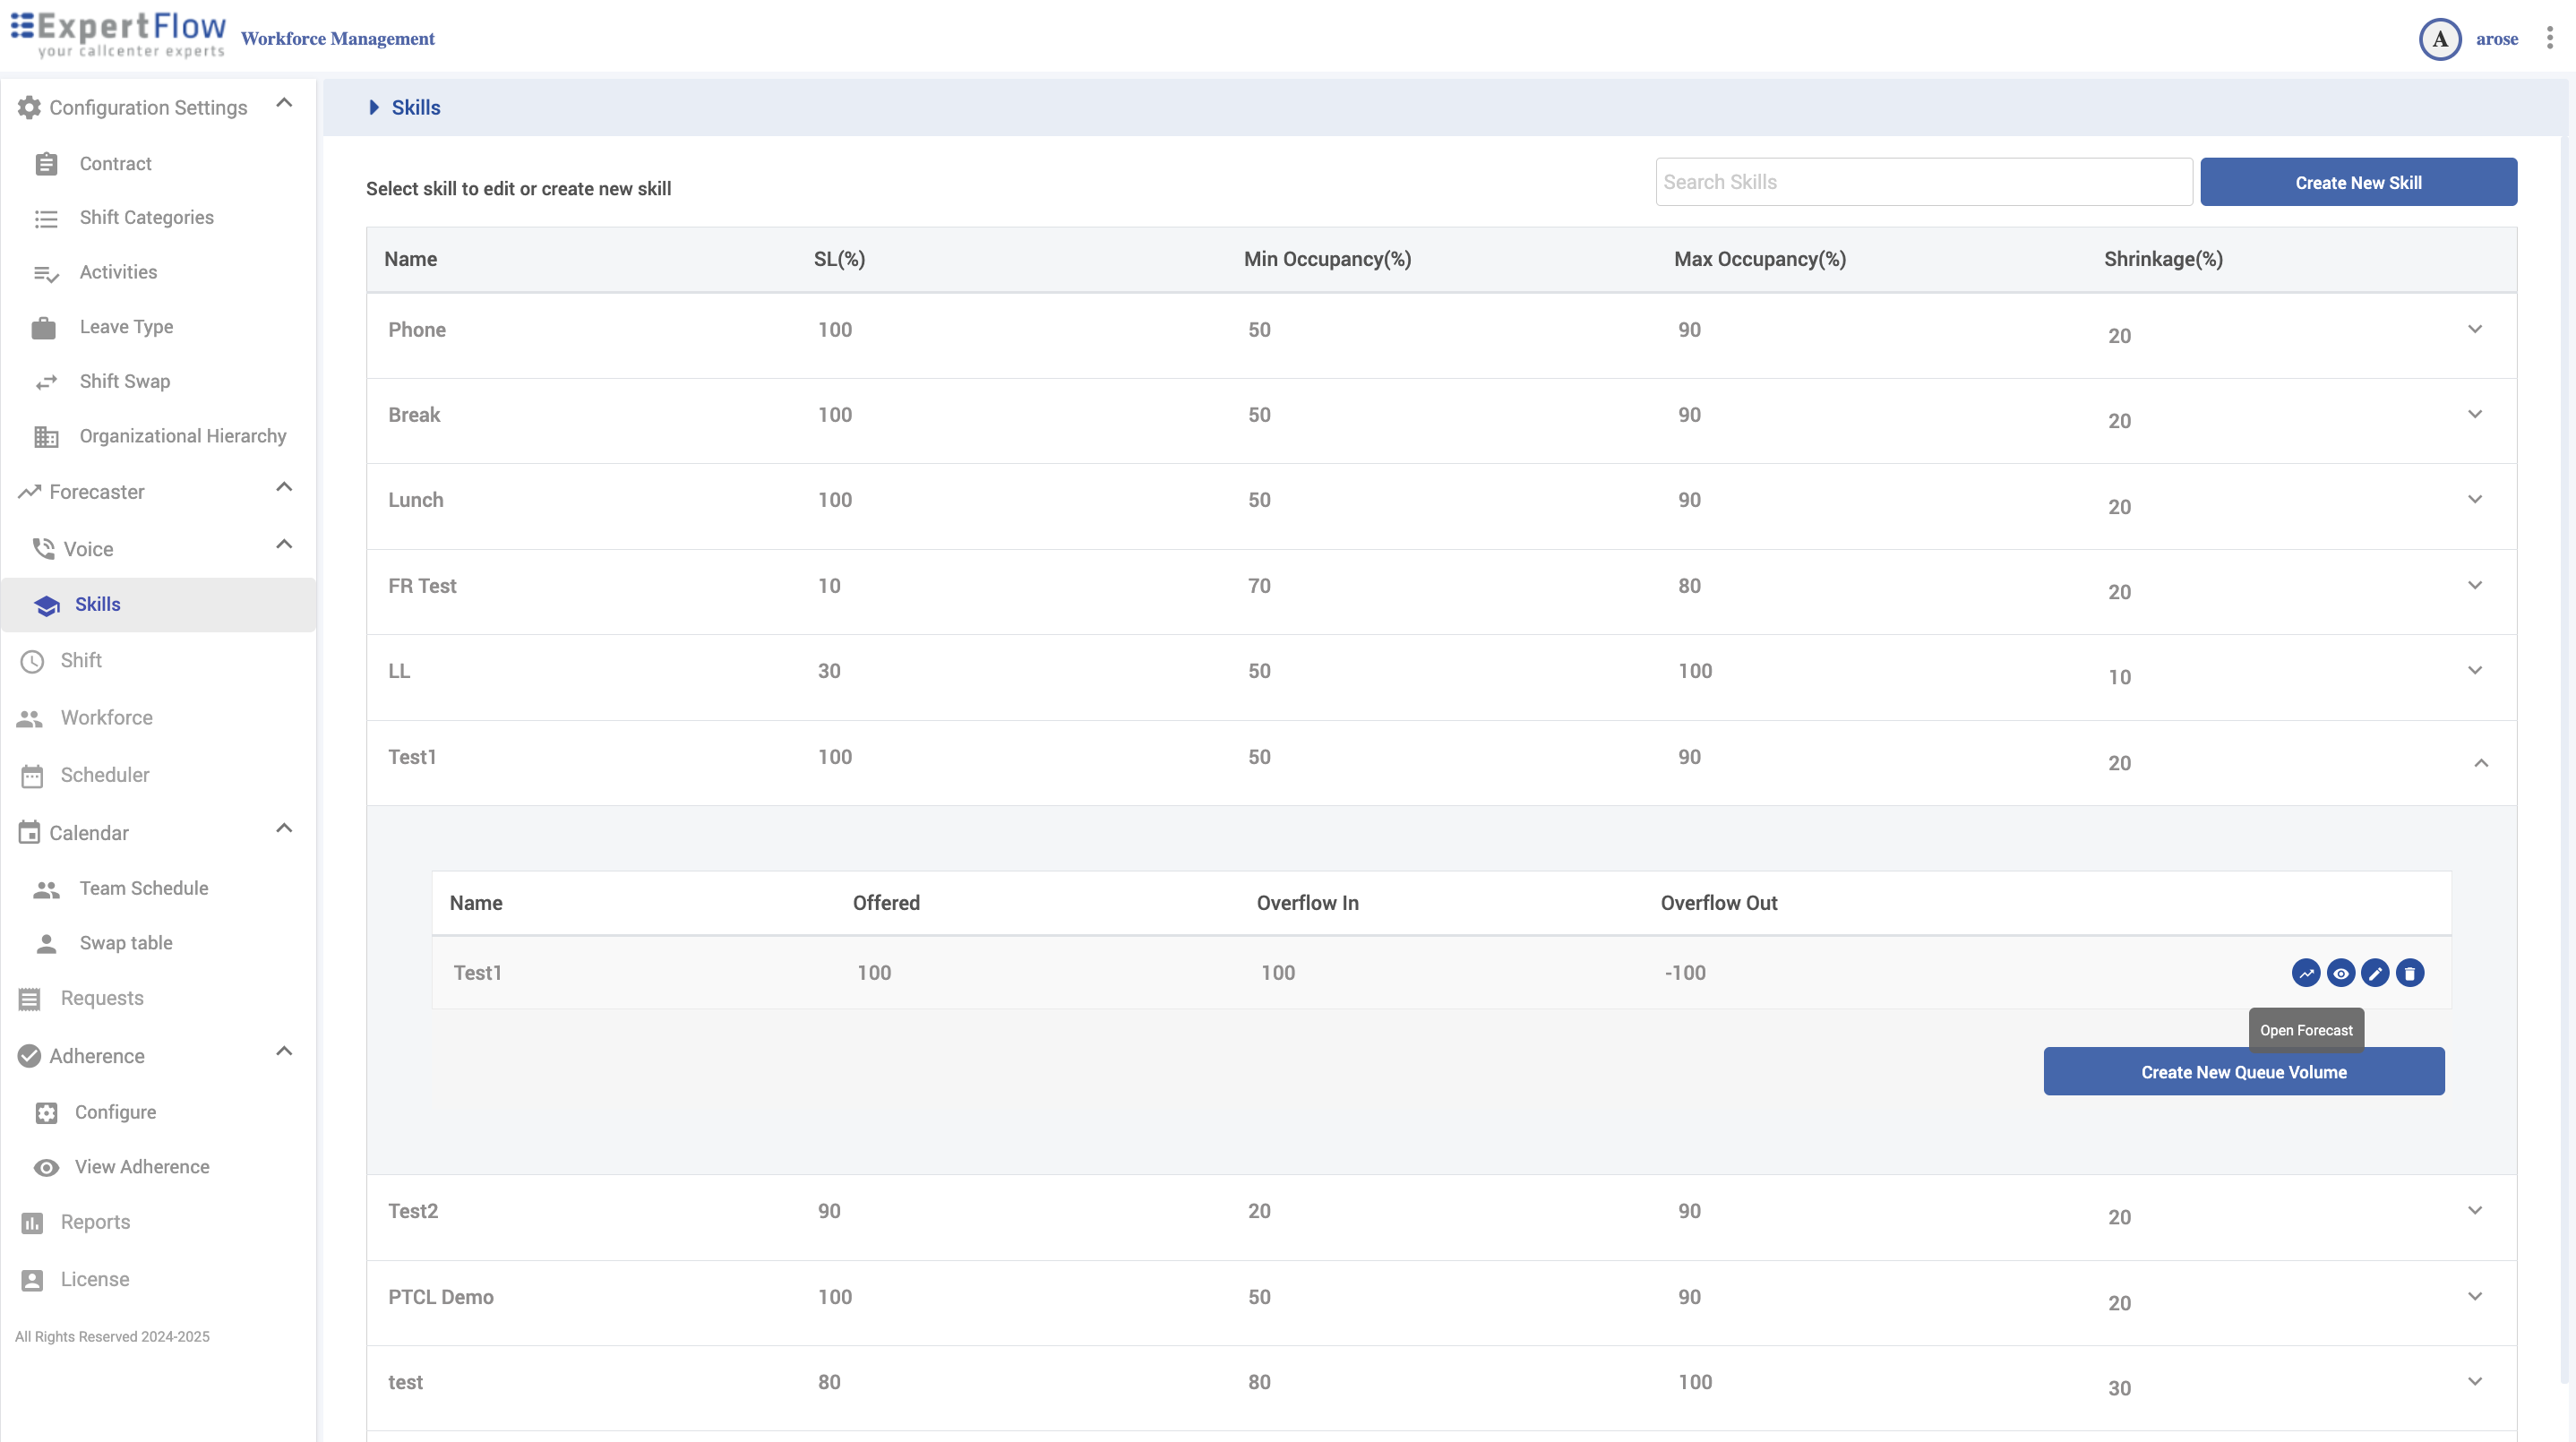
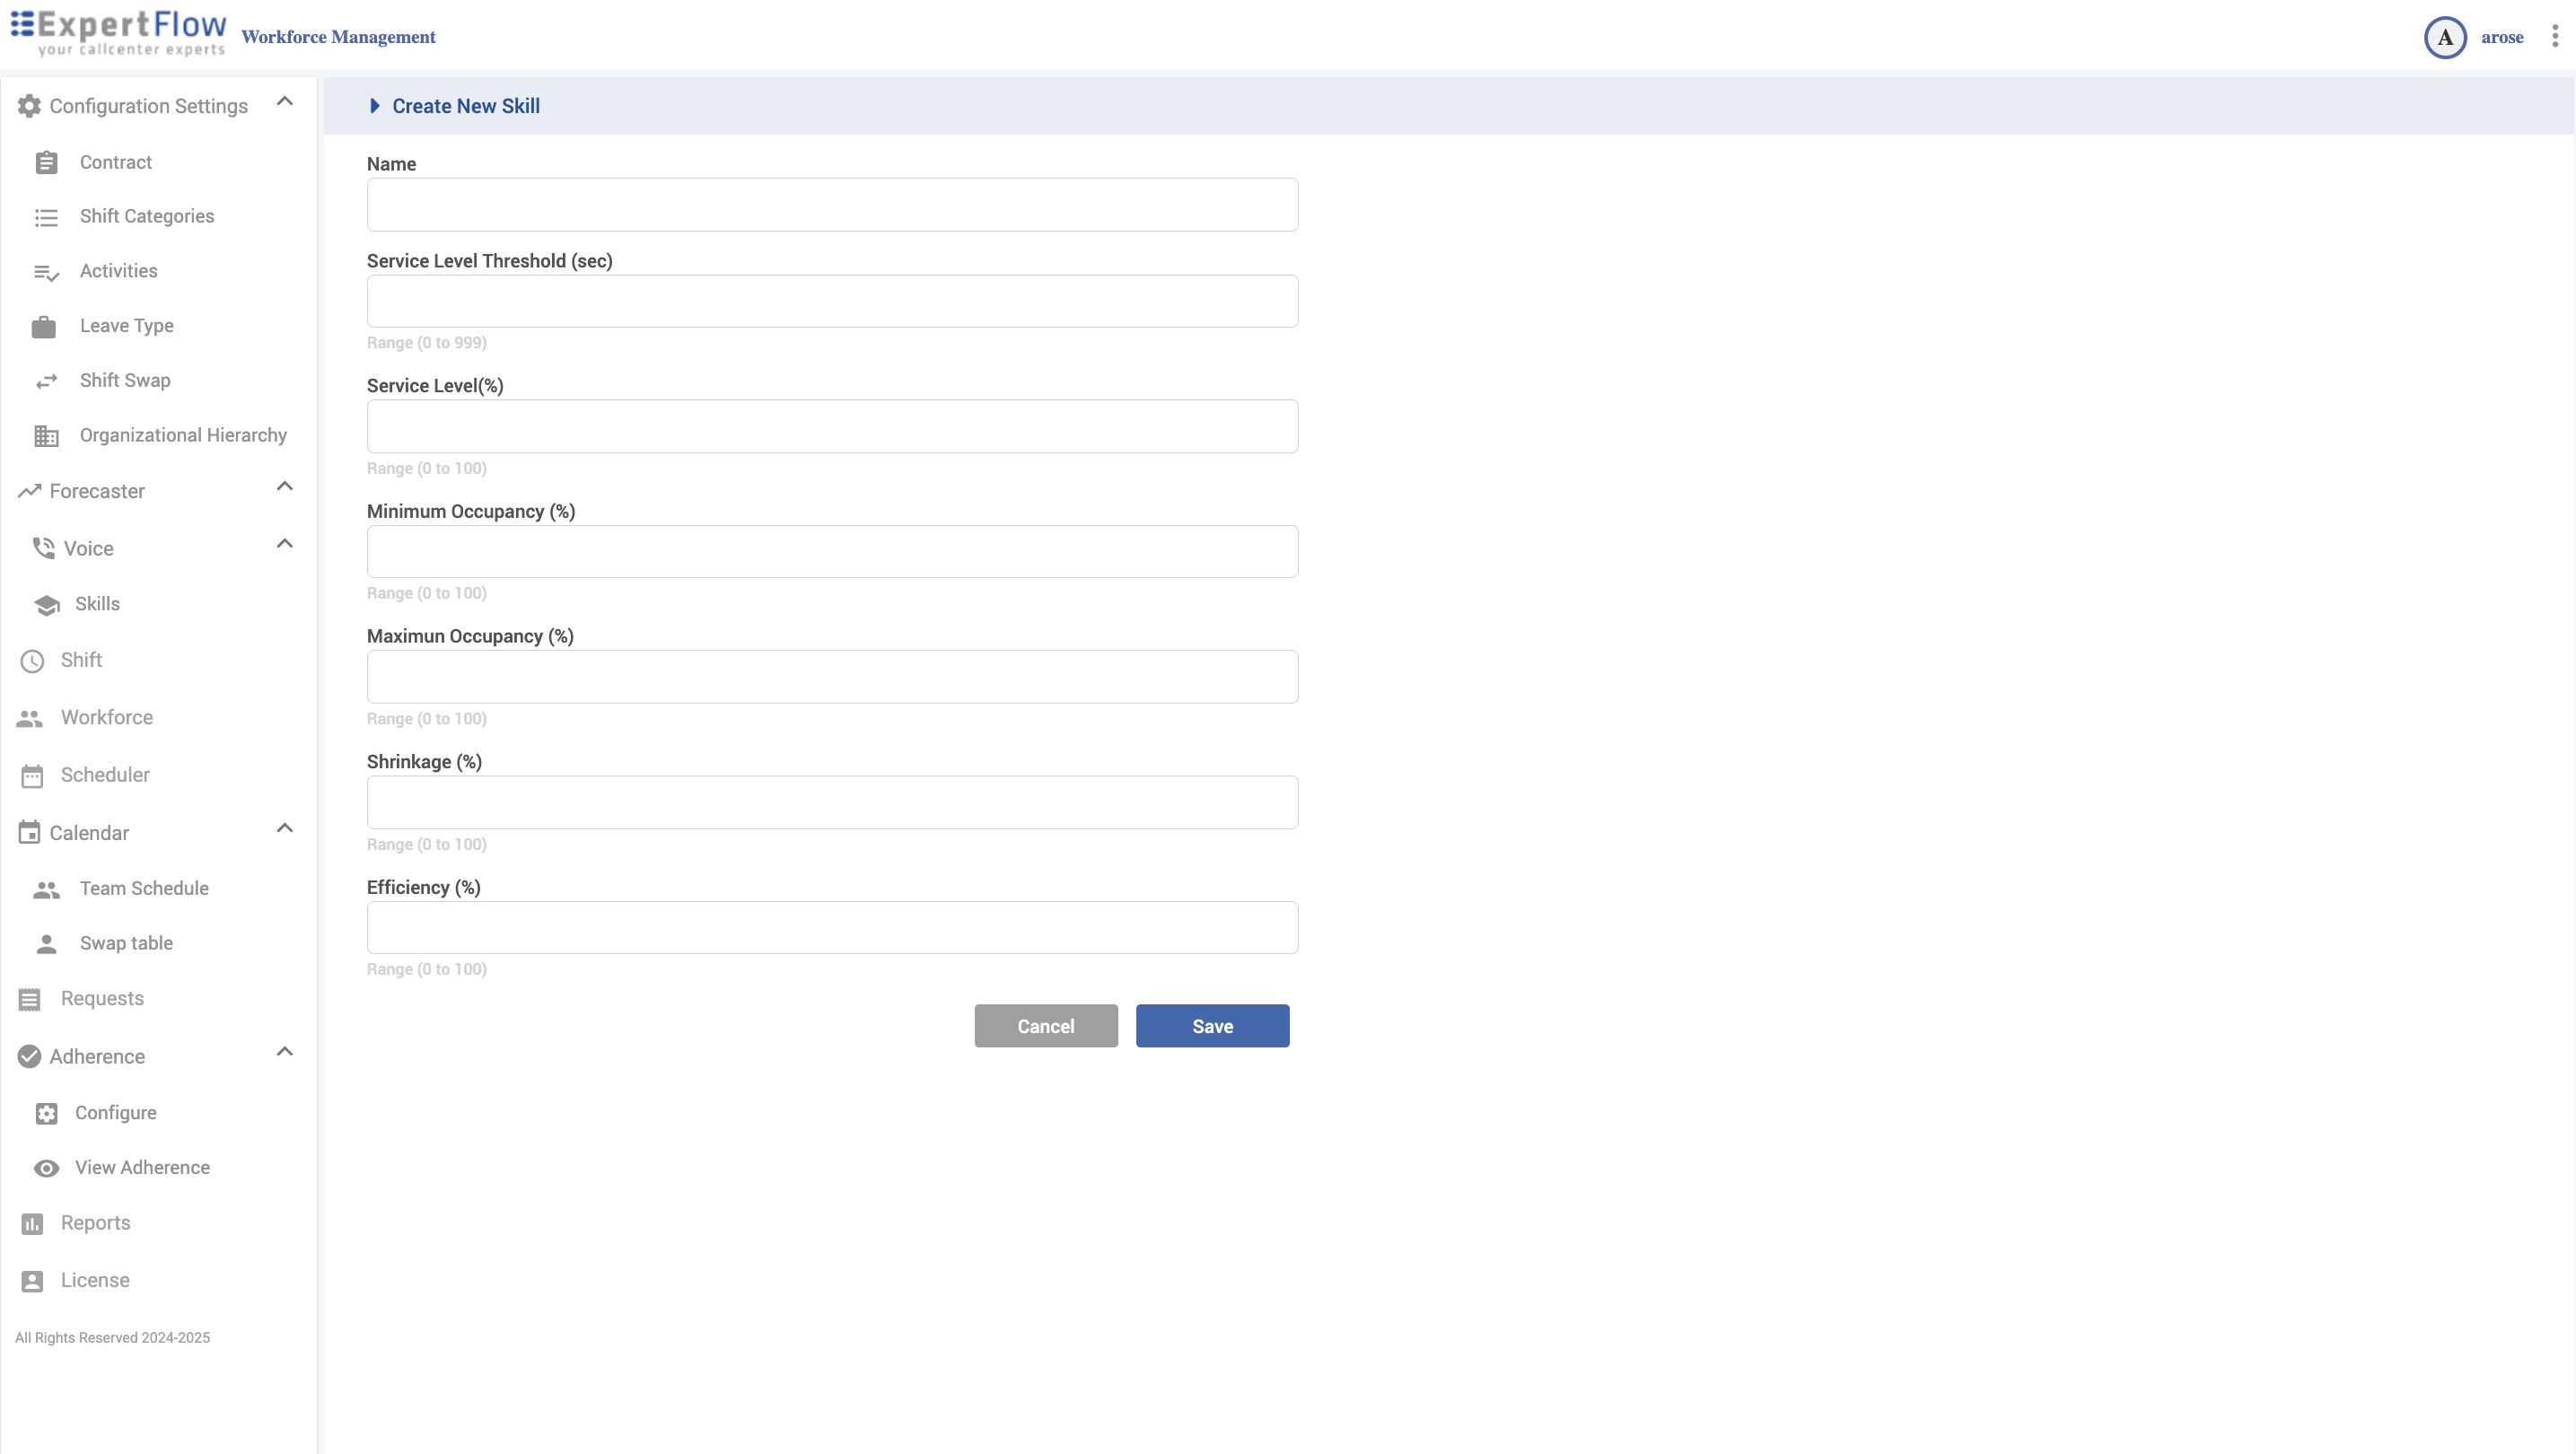
Create or edit a Skill (targets used for staffing in forecasts)
-
Click Create New Skill (or hover a skill → ✎ to edit).
-
Fill the fields:
-
Name
-
Service Level Threshold (sec) – seconds within which contacts should be answered (e.g., 20/30).
-
Service Level (%) – target (e.g., 80).
-
Minimum Occupancy (%) – lower bound used in staffing.
-
Maximum Occupancy (%) – upper bound used in staffing.
-
Shrinkage (%) – nonproductive time applied to staffing (appears as Avg Agents (Shrinkage) in forecasts).
-
Efficiency (%) – if visible in your build, leave at 100 if not used.
-
-
Click Save.
Manage Queues under a Skill
-
In Skills, expand a skill (caret).
-
Use the Queues sub-grid to model how load maps to this skill:
-
Name – queue identifier.
-
Offered – weighting for how much of this queue’s offered volume belongs to the skill (commonly 100 for 1:1 mappings).
-
Overflow In – positive adjustment for volume expected to flow into this skill from other queues.
-
Overflow Out – negative adjustment for volume expected to flow out to other skills/queues (accepts negative values).
-
-
Use the row action icons to open/edit/delete queue volumes or Open Forecast for that queue.
-
Click Create New Queue Volume to add or refresh the historical data set used for forecasting this queue.
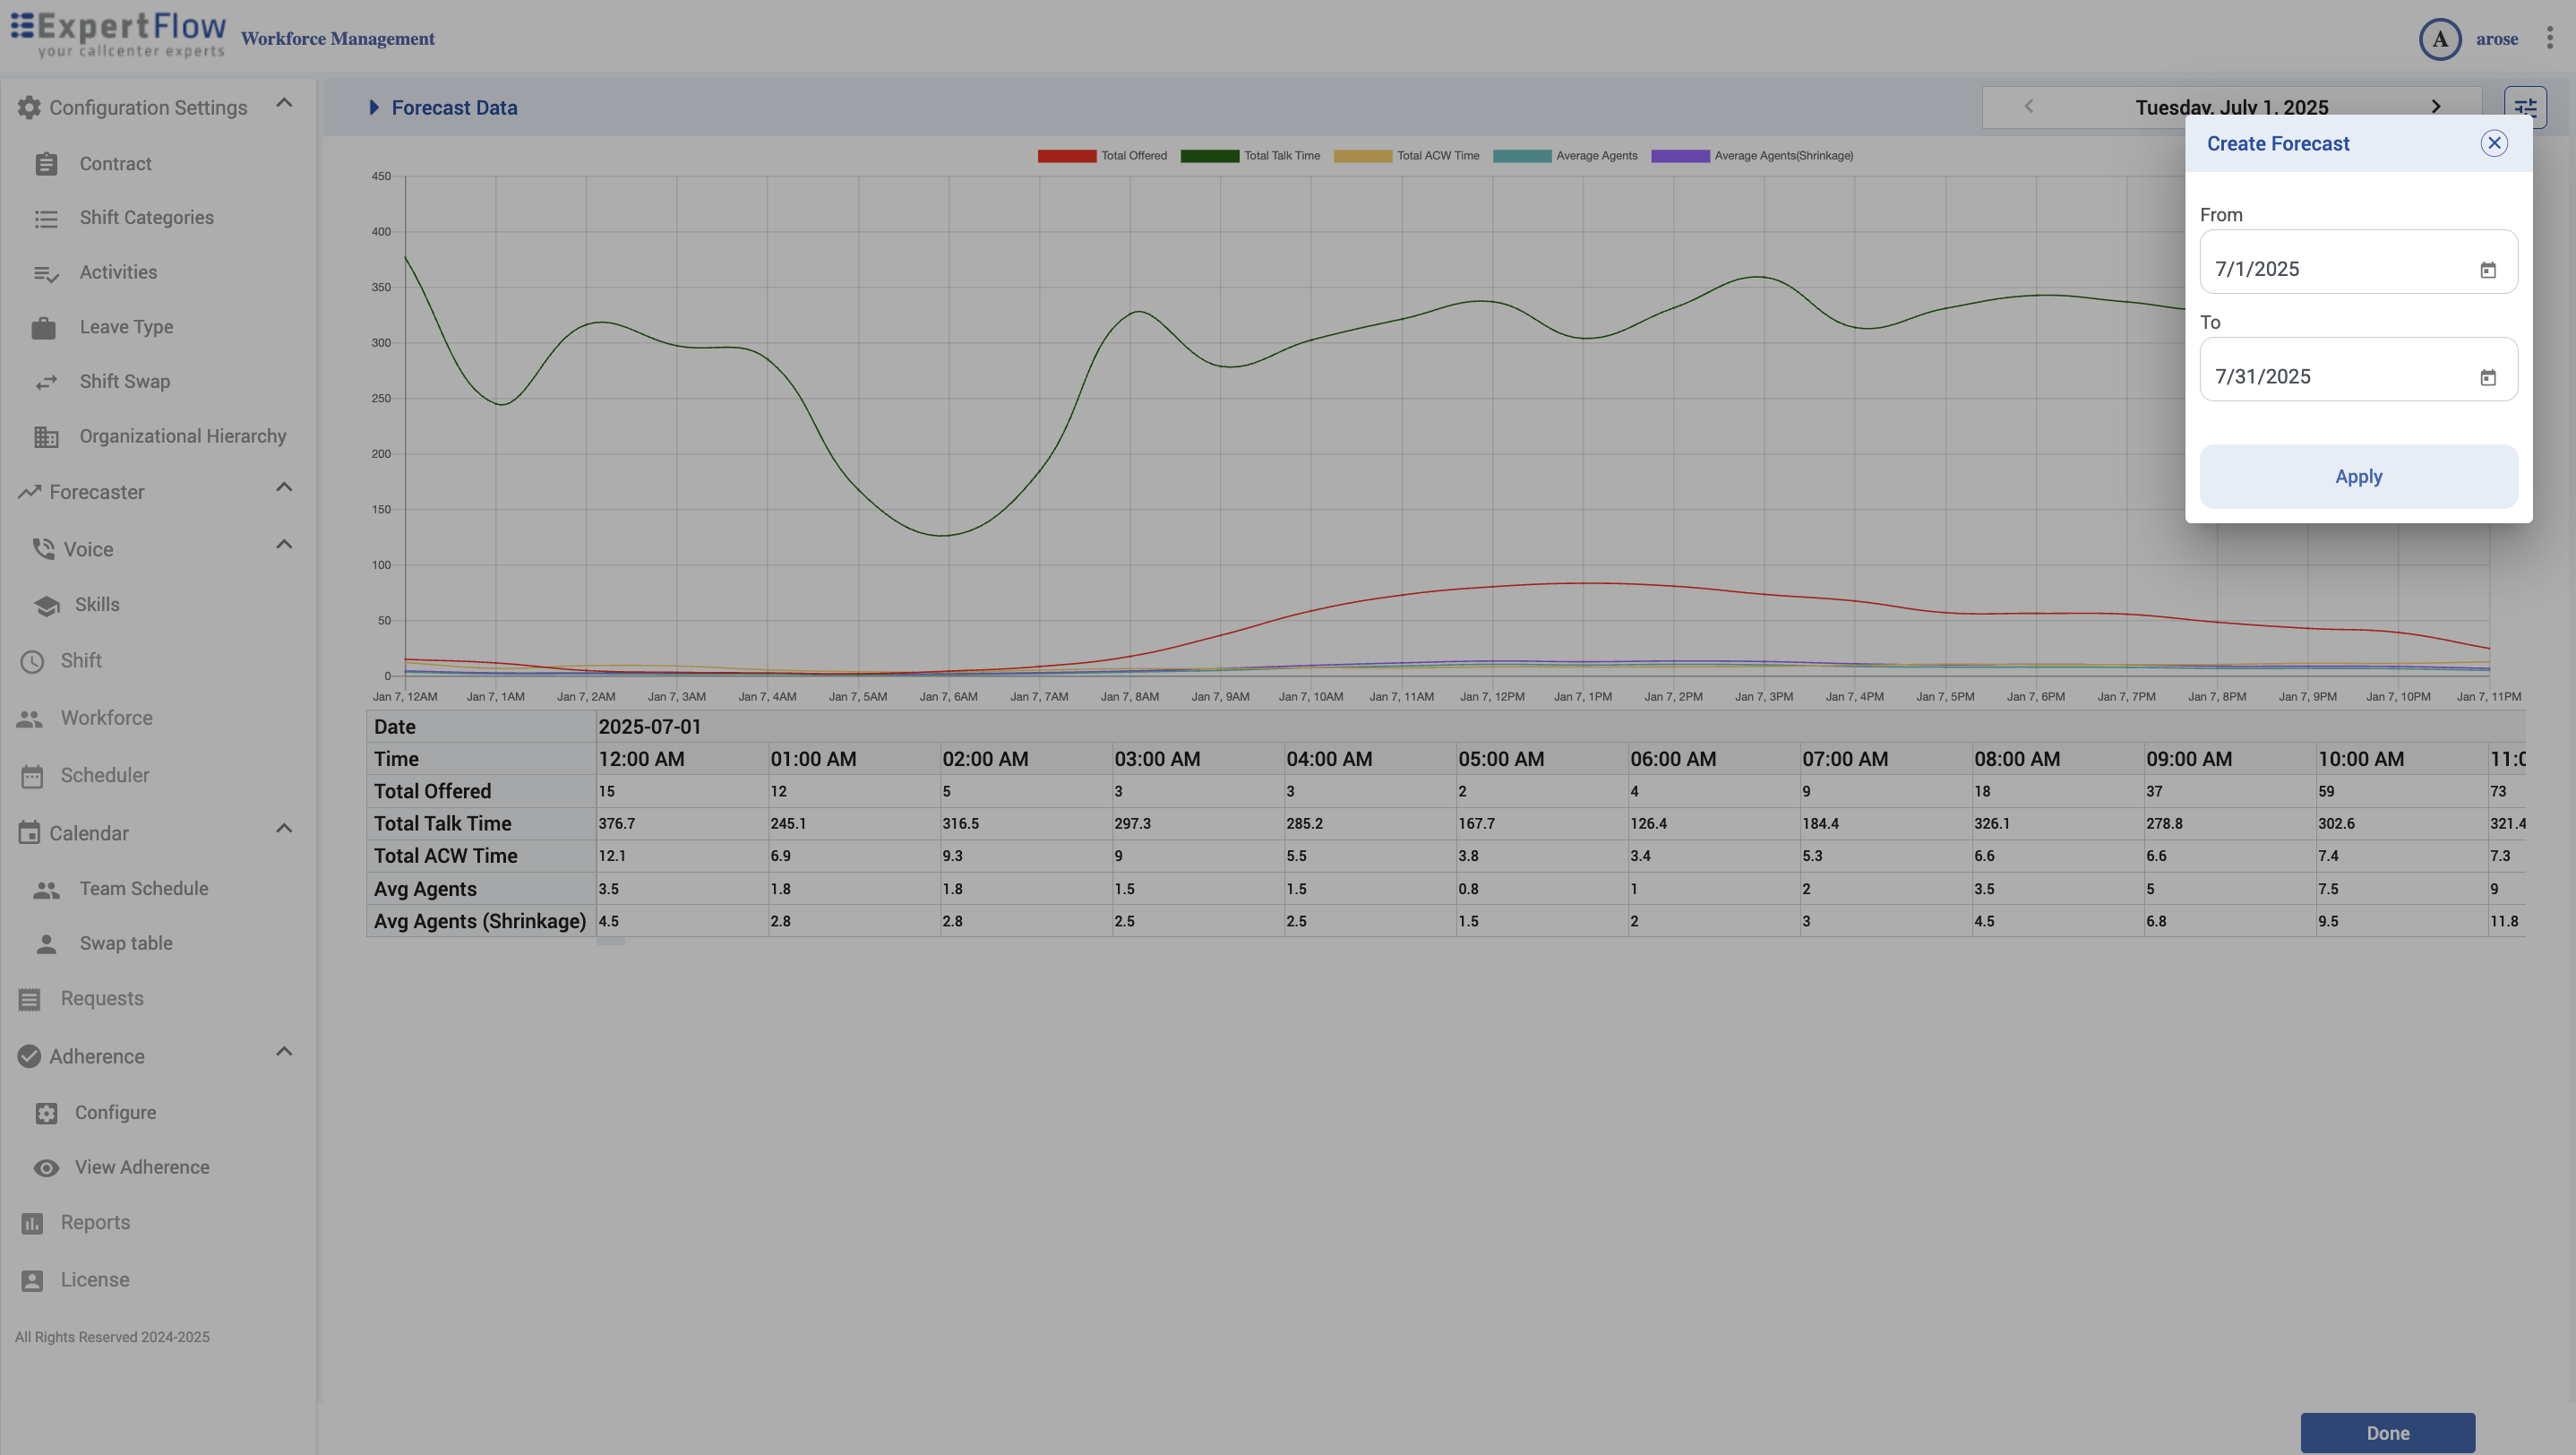
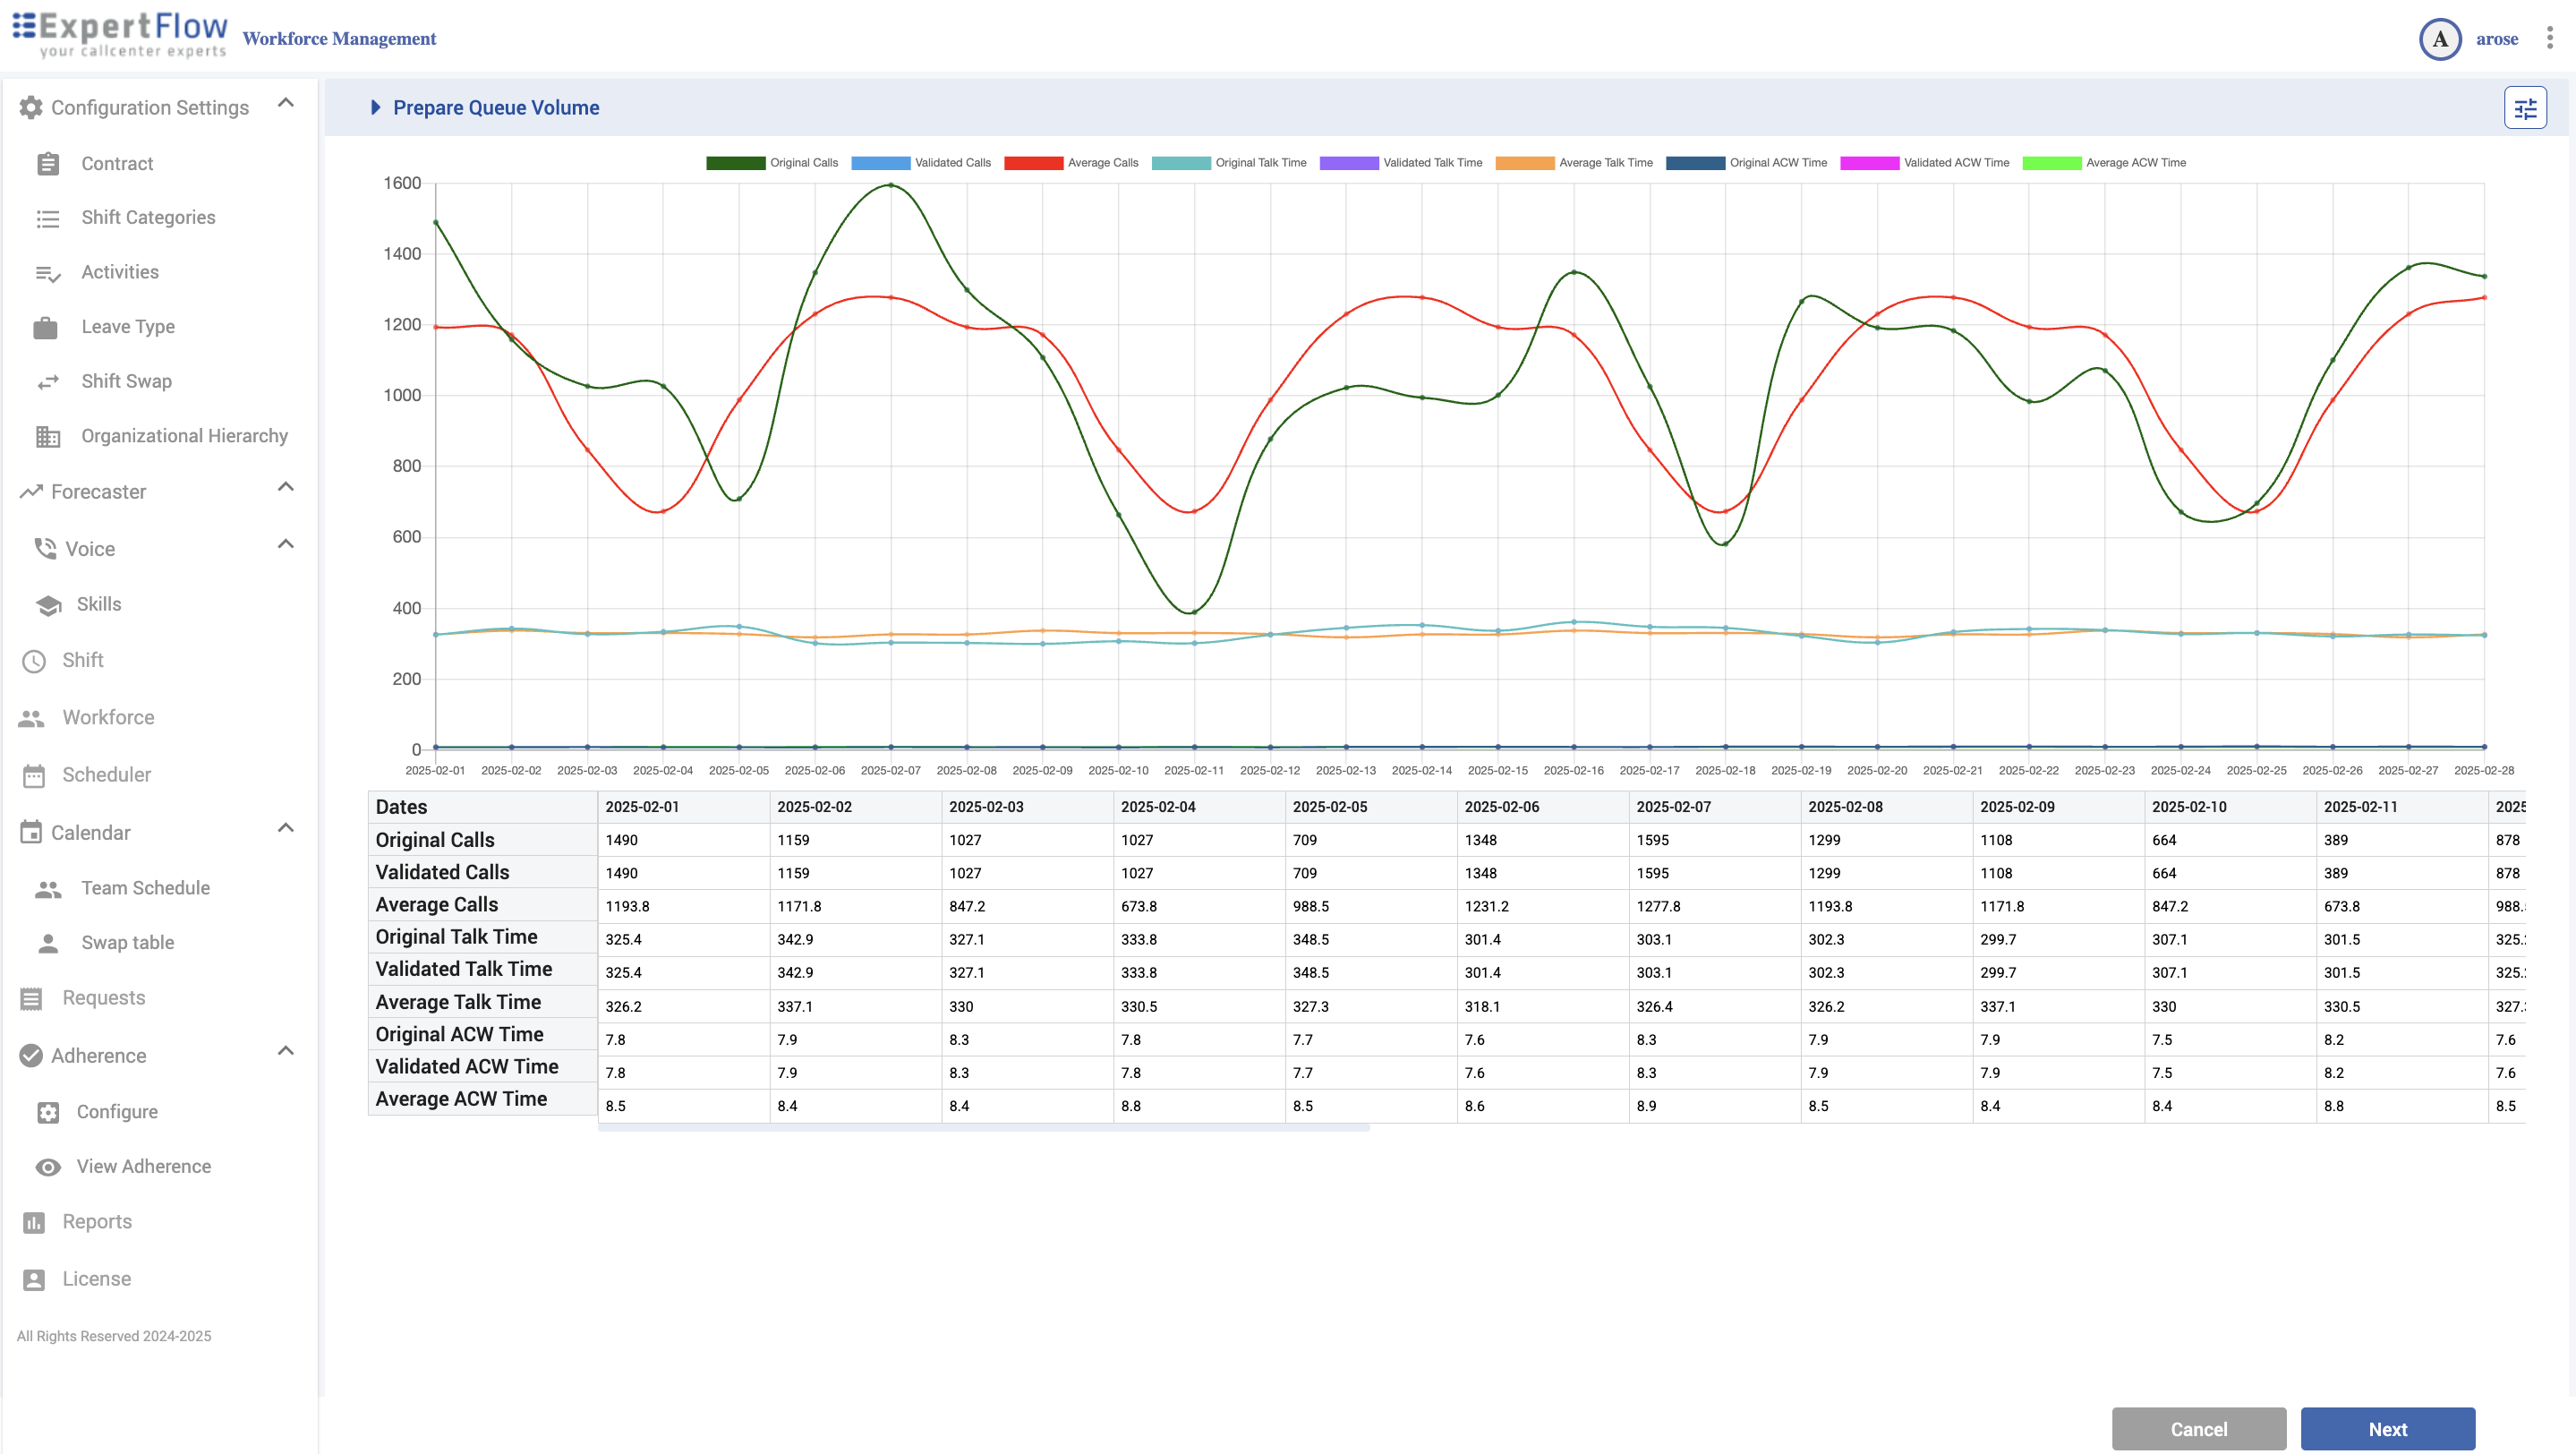
Prepare Queue Volume (historical data you’ll forecast on)
Click Create New Queue Volume (under the expanded skill) to launch a two-step wizard.
Step 1 — Date range view (multi-day)
-
Chart + table by date with series for:
-
Original Calls, Validated Calls, Average Calls
-
Original Talk Time, Validated Talk Time, Average Talk Time
-
Original ACW Time, Validated ACW Time, Average ACW Time
-
-
Validated is the series used for forecasting; adjust/tweak it where needed (e.g., outliers, corrections).
-
Click Next.
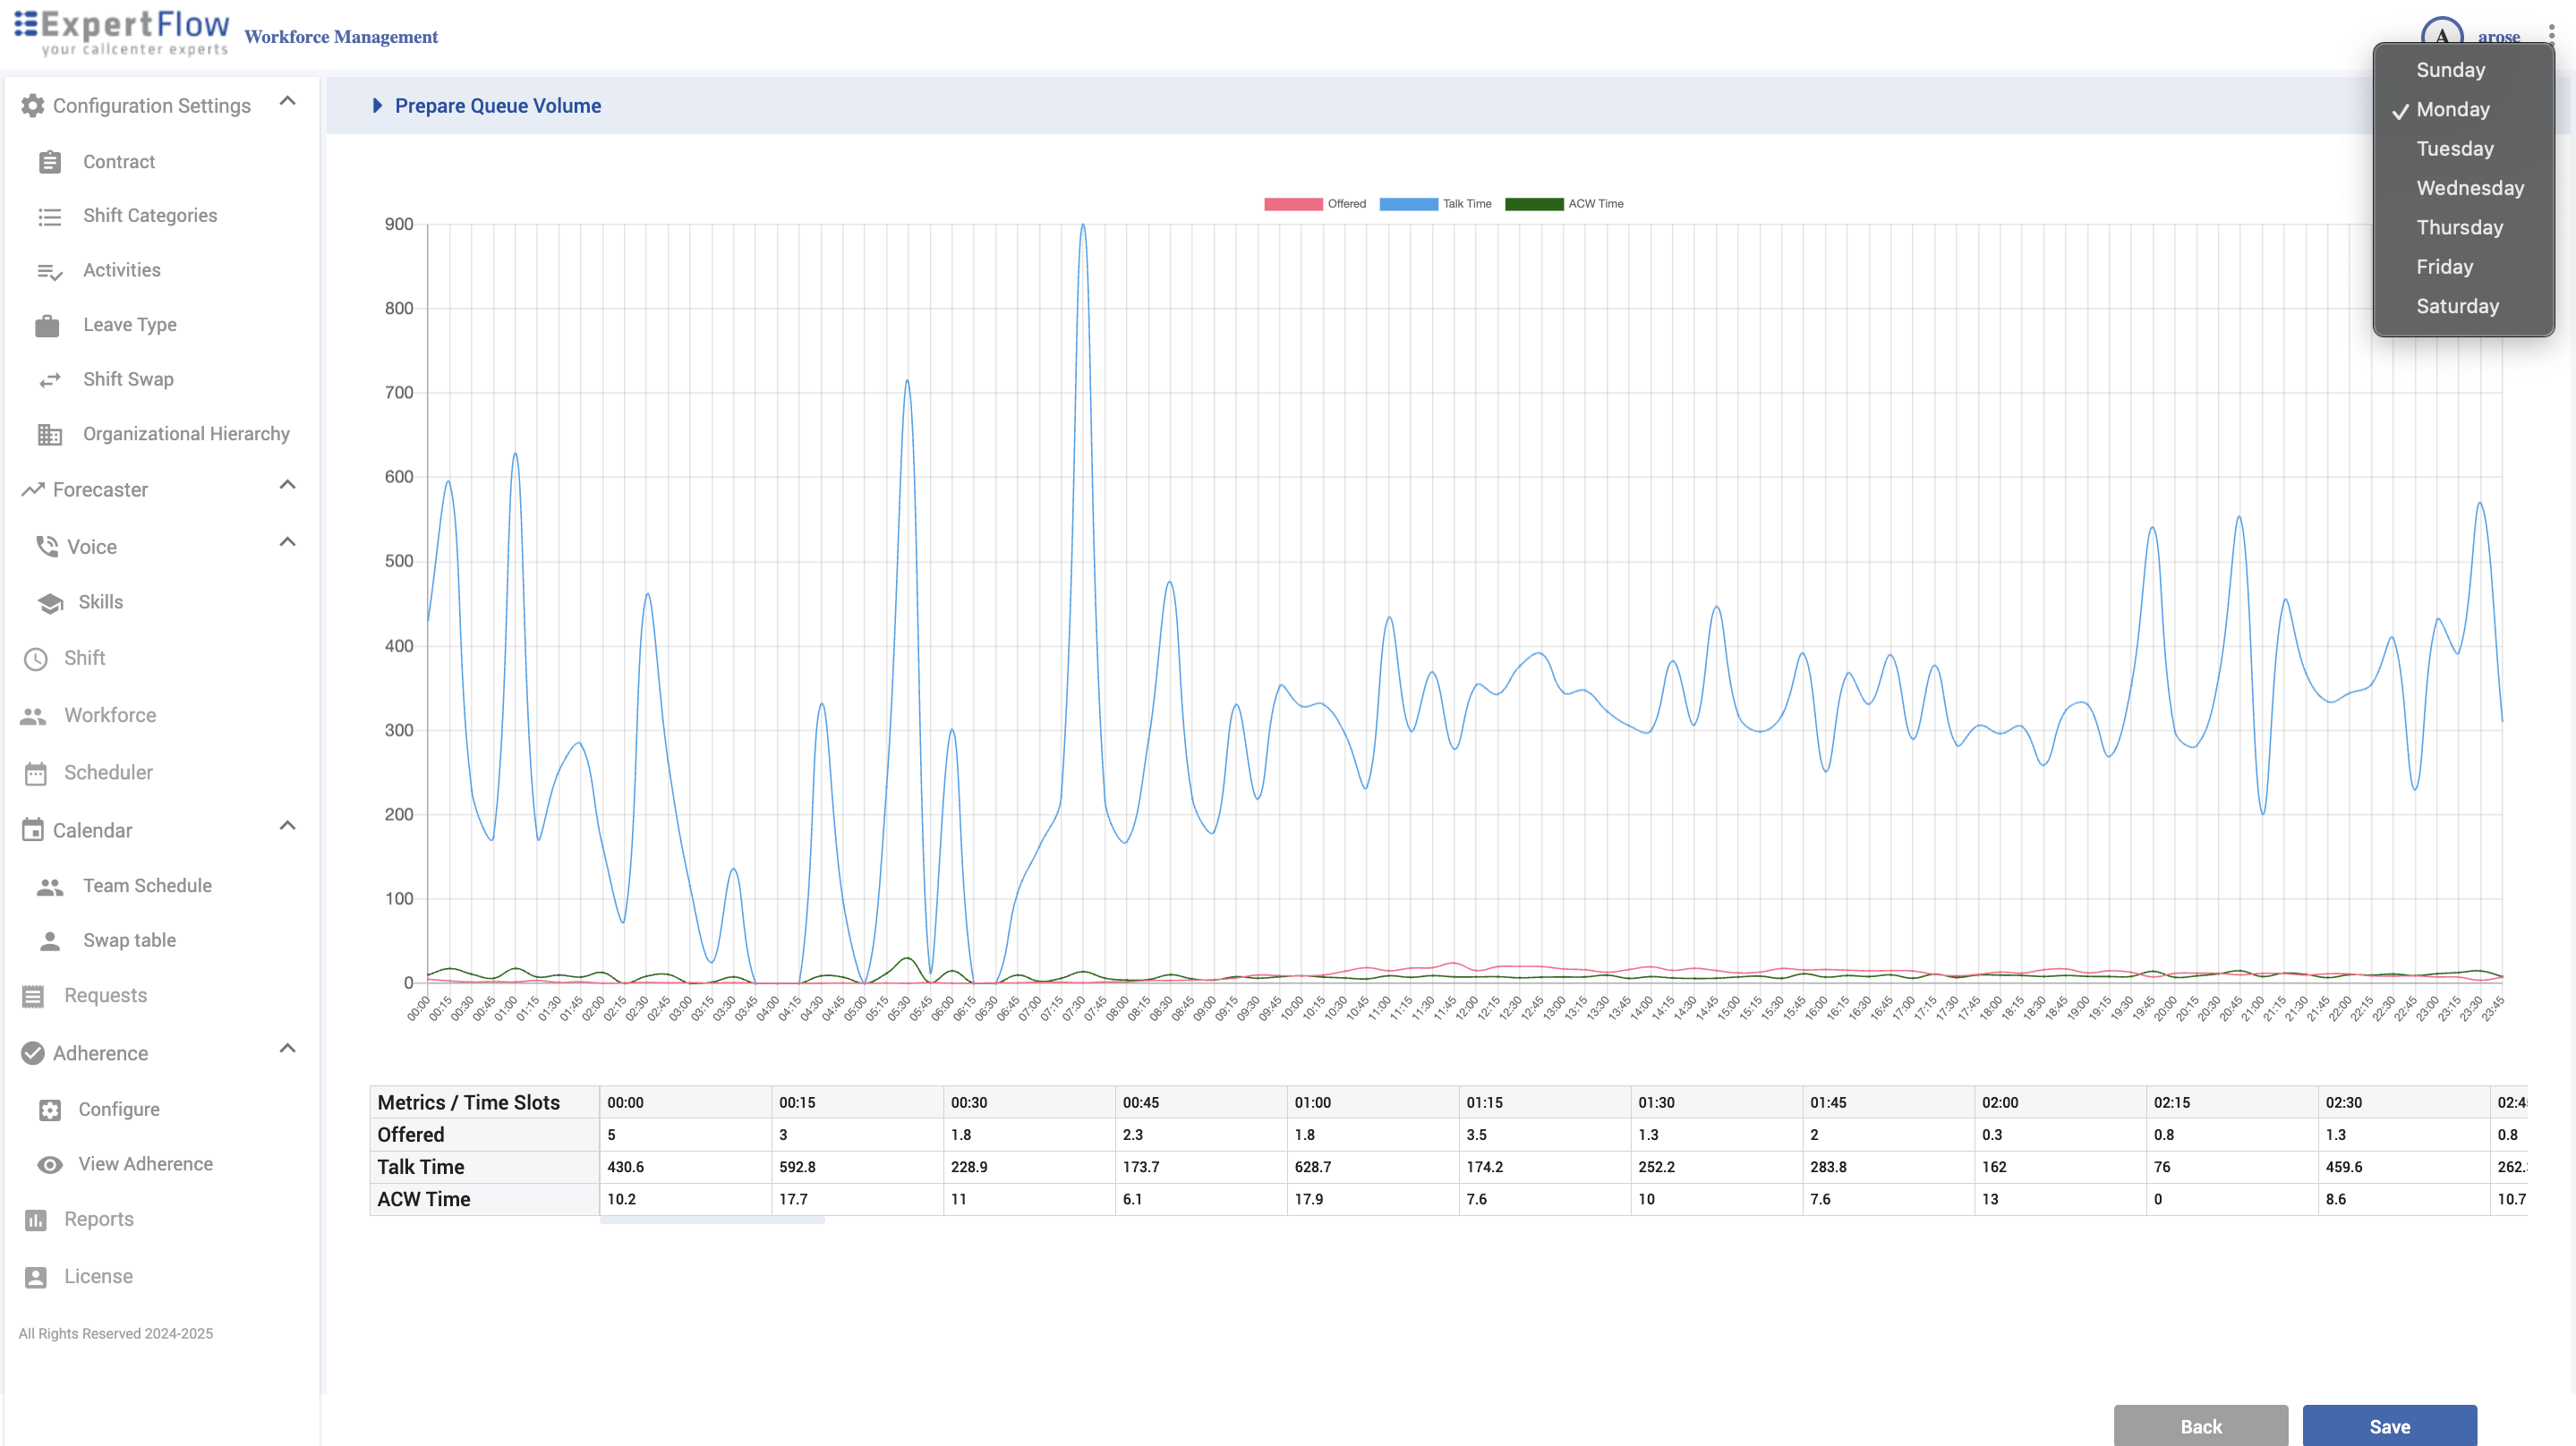
Step 2 — Day-of-week profile (intra-day)
-
Use the day selector (Sunday–Saturday) to view averaged hourly patterns.
-
Metrics per time slot: Offered, Talk Time, ACW Time (these reflect the validated dataset shaped into an hourly profile).
-
Click Save to store the queue volume.
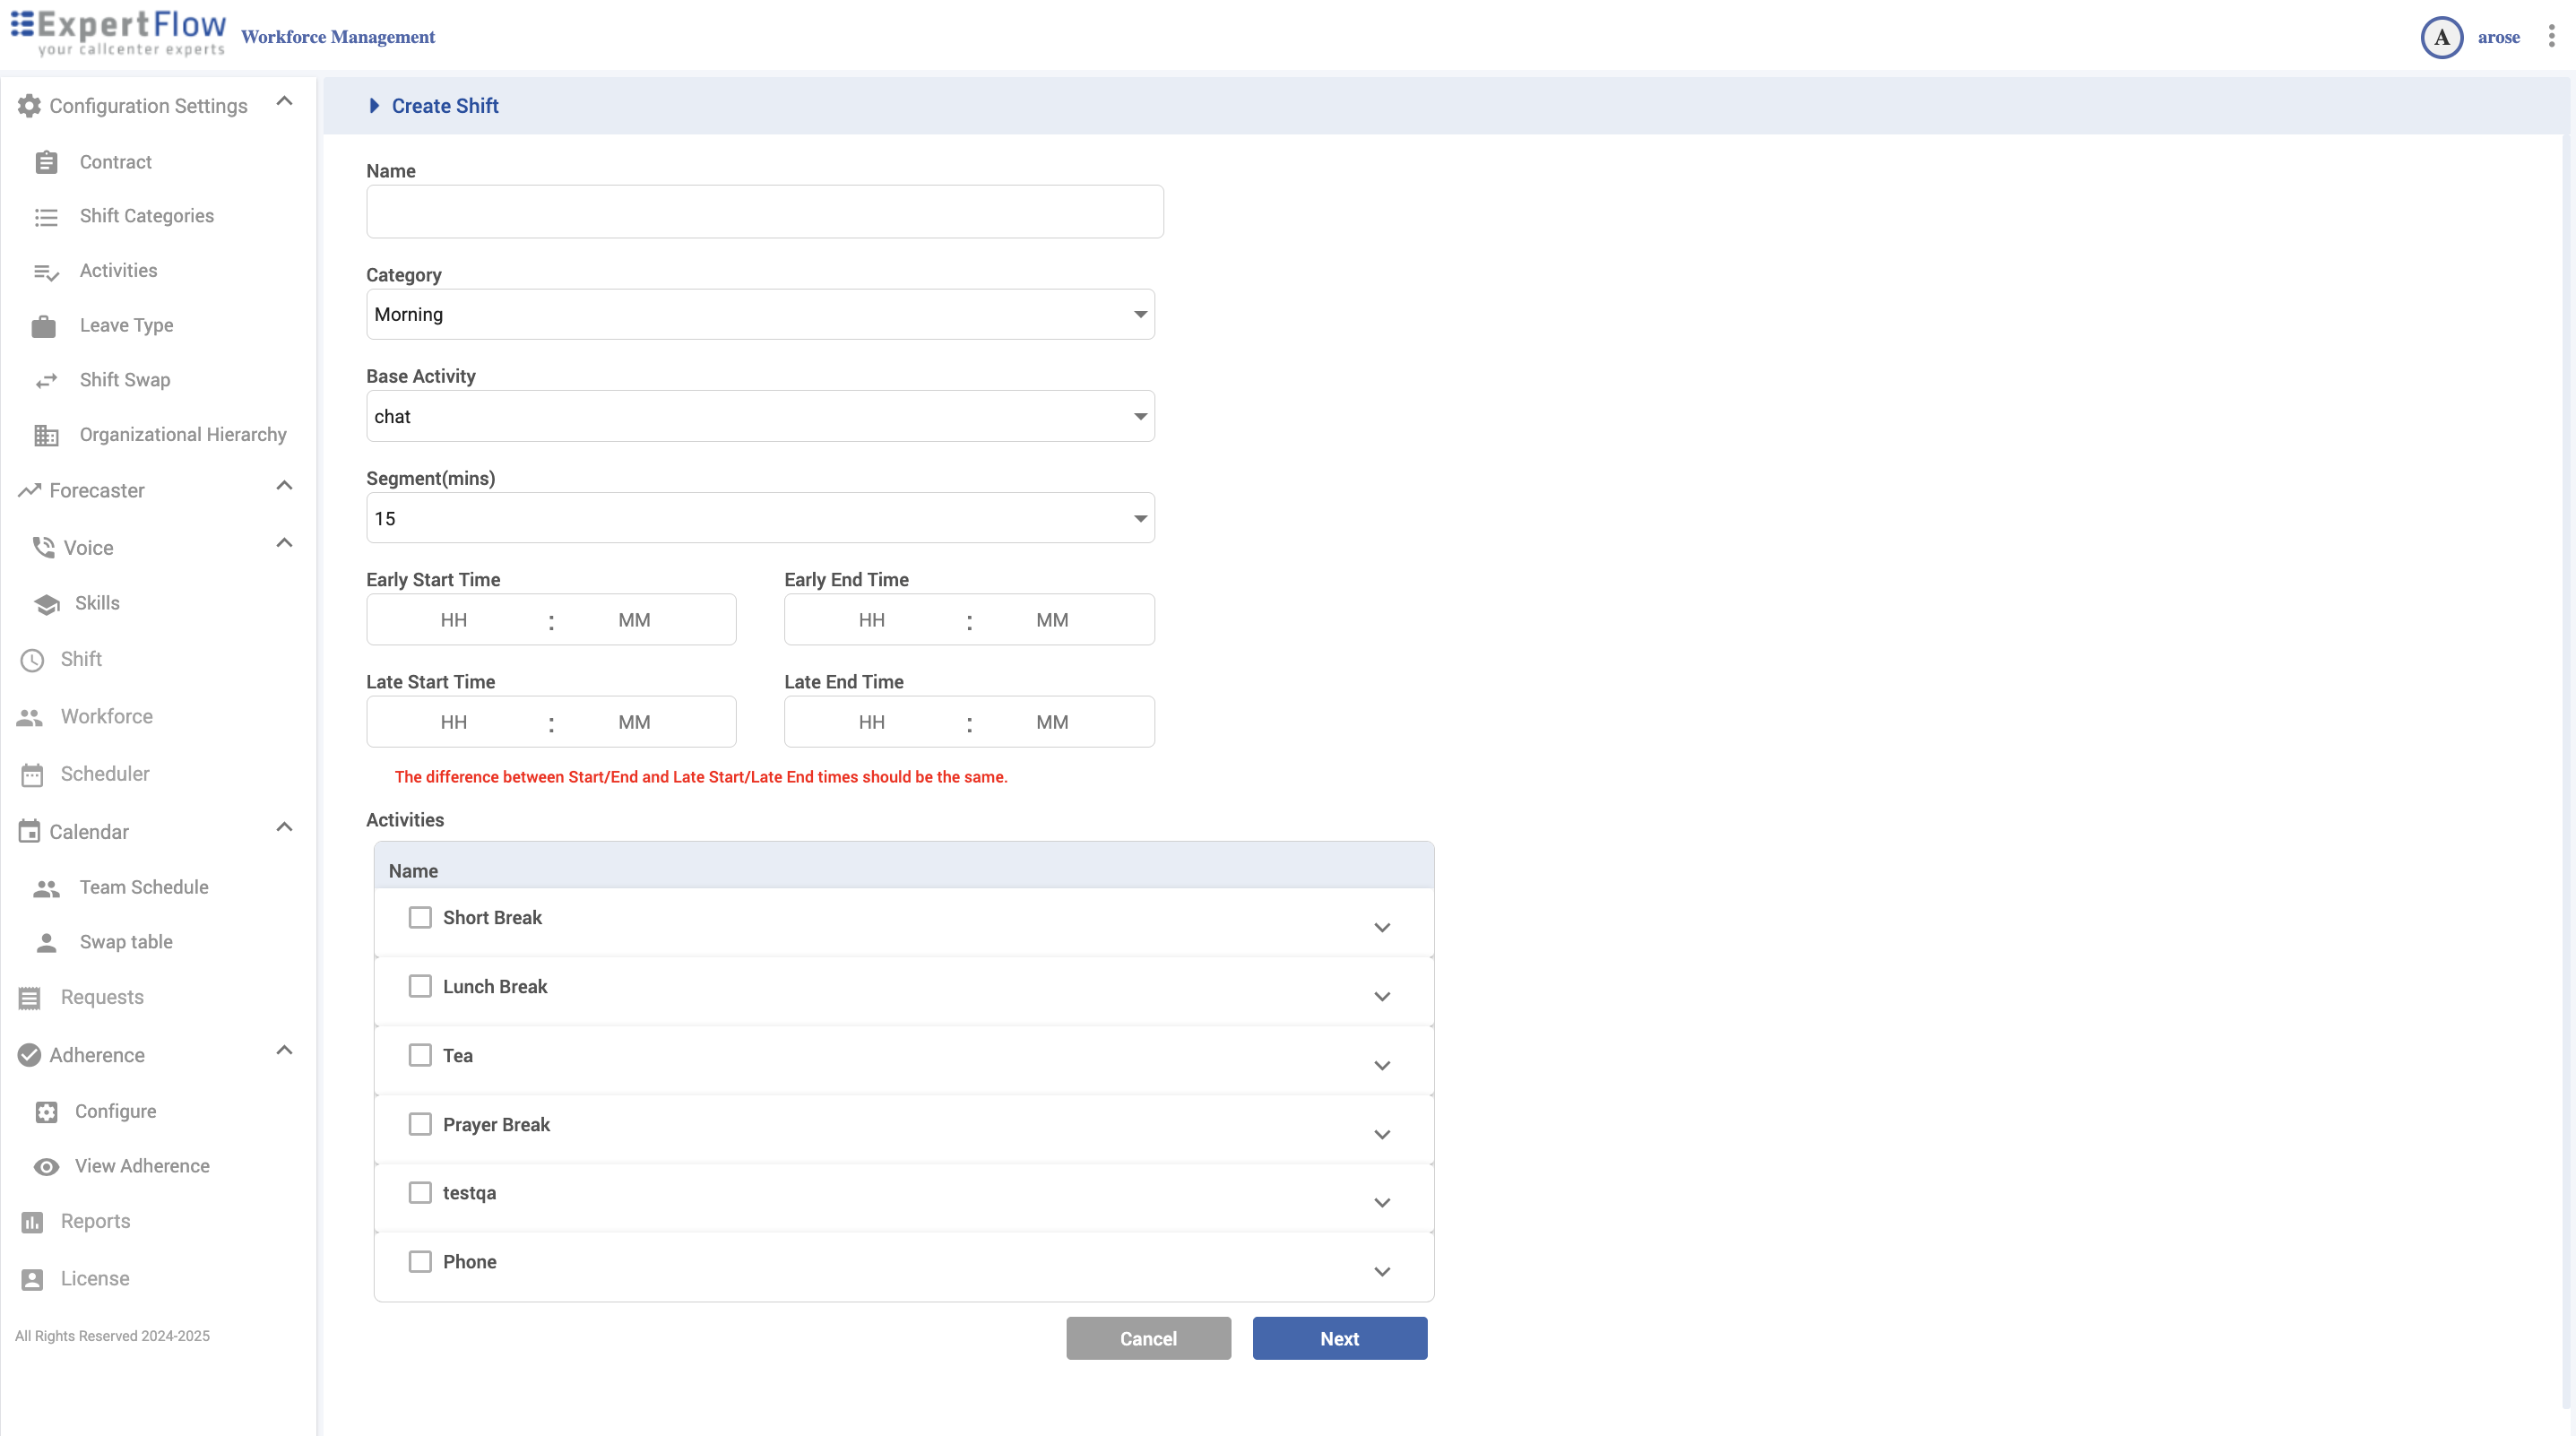
Shift
Navigation
Left navigation → Shift
What you can do
-
Create/search/edit/delete shifts.
-
Set Segment (granularity) and a movable start window.
-
Attach activities (breaks, coaching, etc.).
Create
-
Click Create New Shift.
-
Header: Name, Category, Base Activity, Segment (mins).
-
Start window for base activity:
-
Early Start/End and Late Start/End (durations must match).
-
This defines a window (e.g., 08:00–16:00 or 09:00–17:00).
-
-
Activities: tick the ones to include (Short Break, Lunch, etc.).
-
Click Next to review combinations graph; Save (or Done) when prompted.
Edit / Delete
-
Hover a shift row to Edit or Delete.
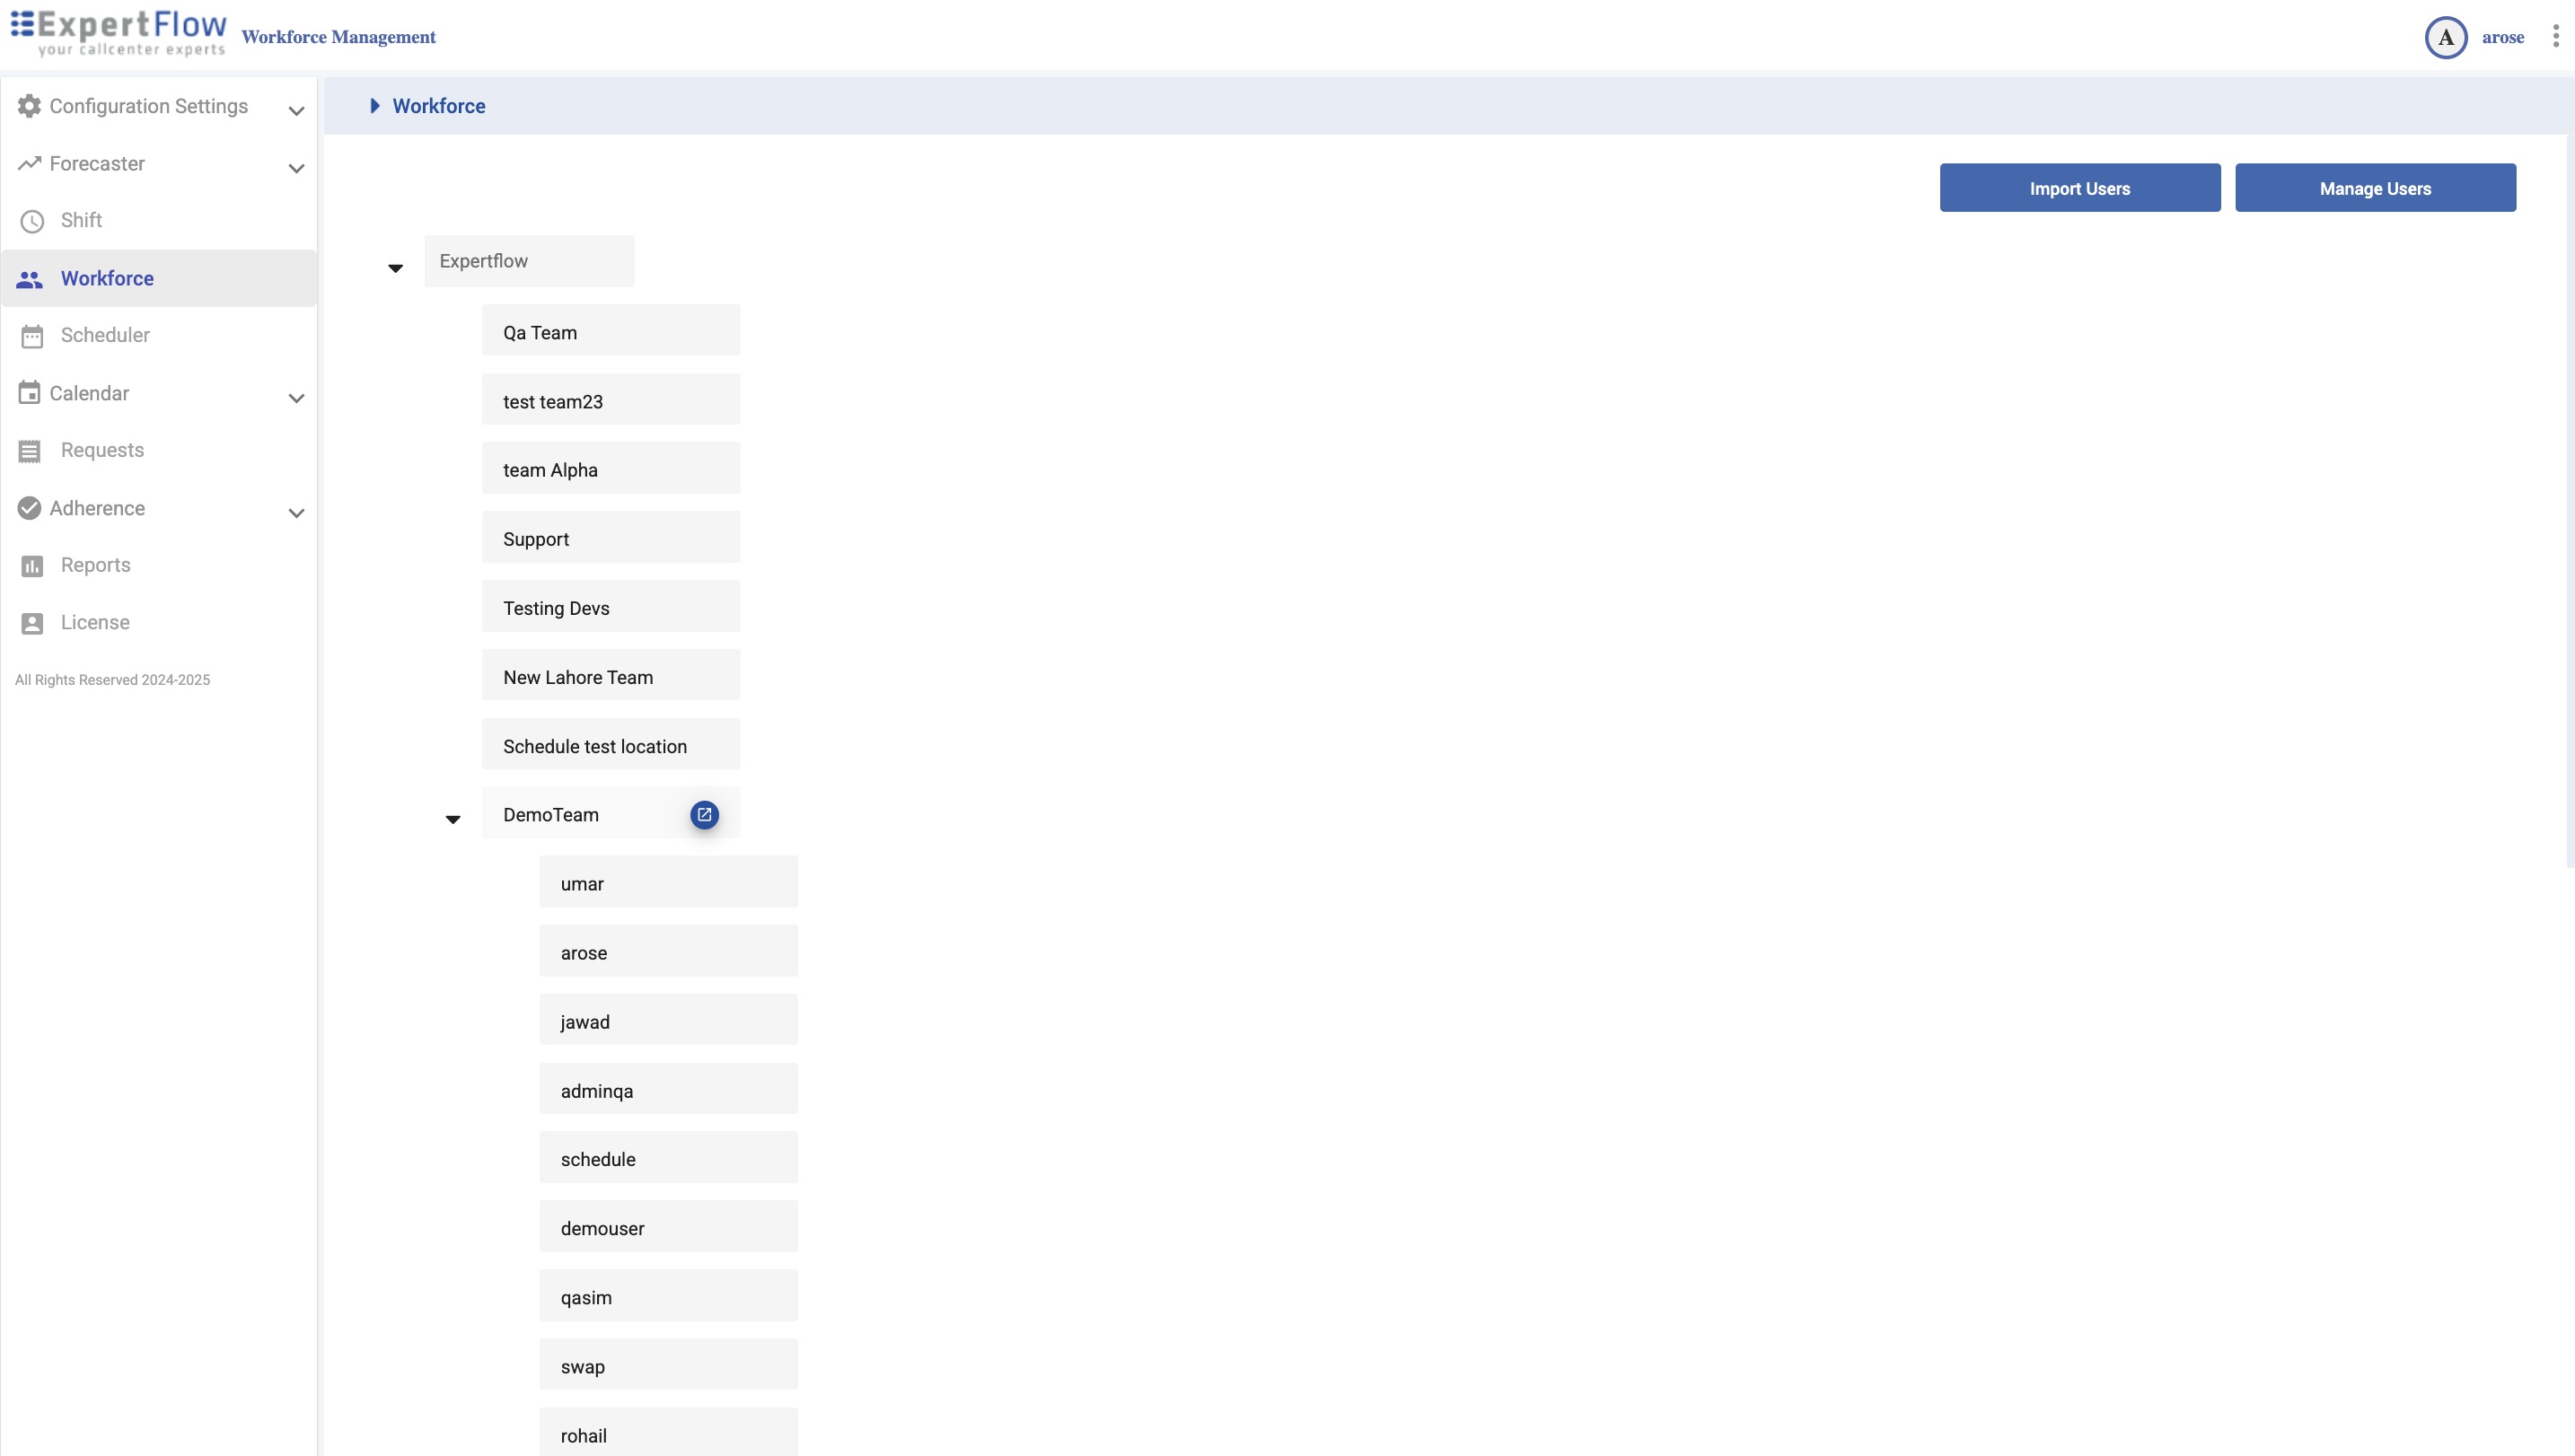
Workforce
Navigation
Left navigation → Workforce
What you can do
-
Browse org tree (locations → teams → users).
-
Import Users (Excel).
-
Manage Users with tabs: General, Person Period, Schedule Period, Leaves.
Org tree
-
Expand the organization to view Locations → Teams → Users.
-
Hover a Team to reveal the Open/Manage icon.
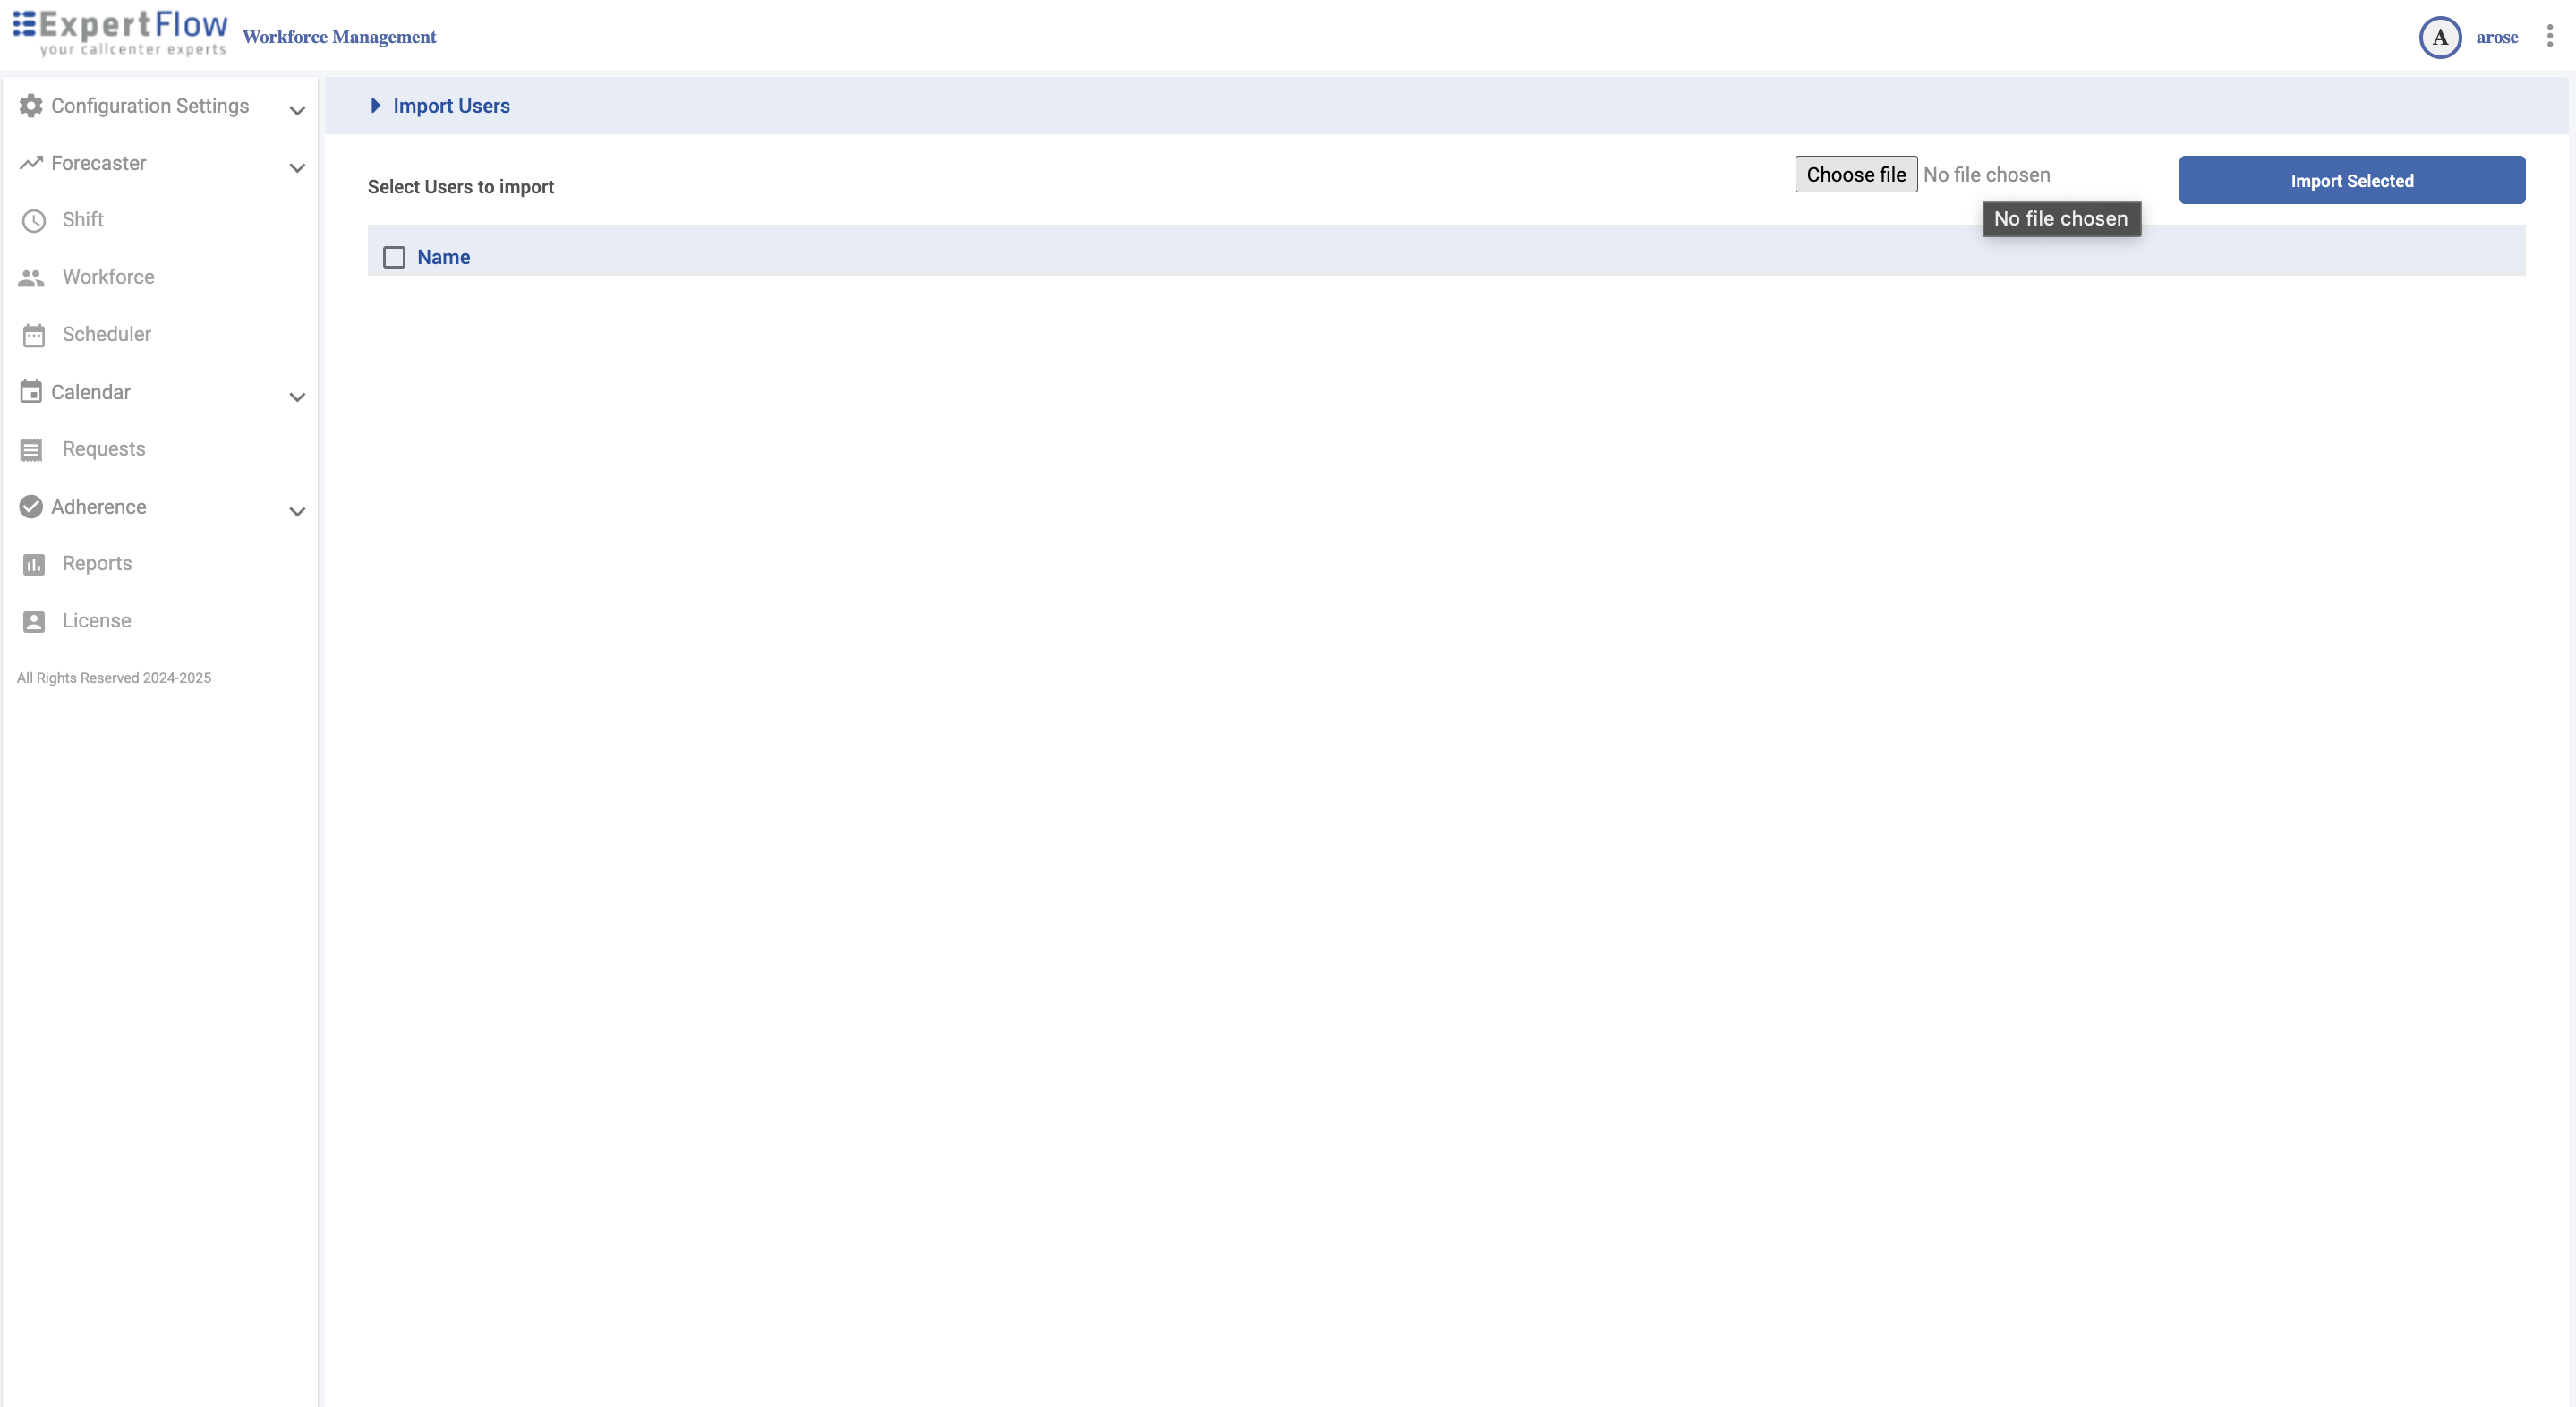
Import Users
-
Click Import Users (top-right).
-
Upload the prepared Excel file (your template).
-
Confirm mappings (if shown) and Save to create users.
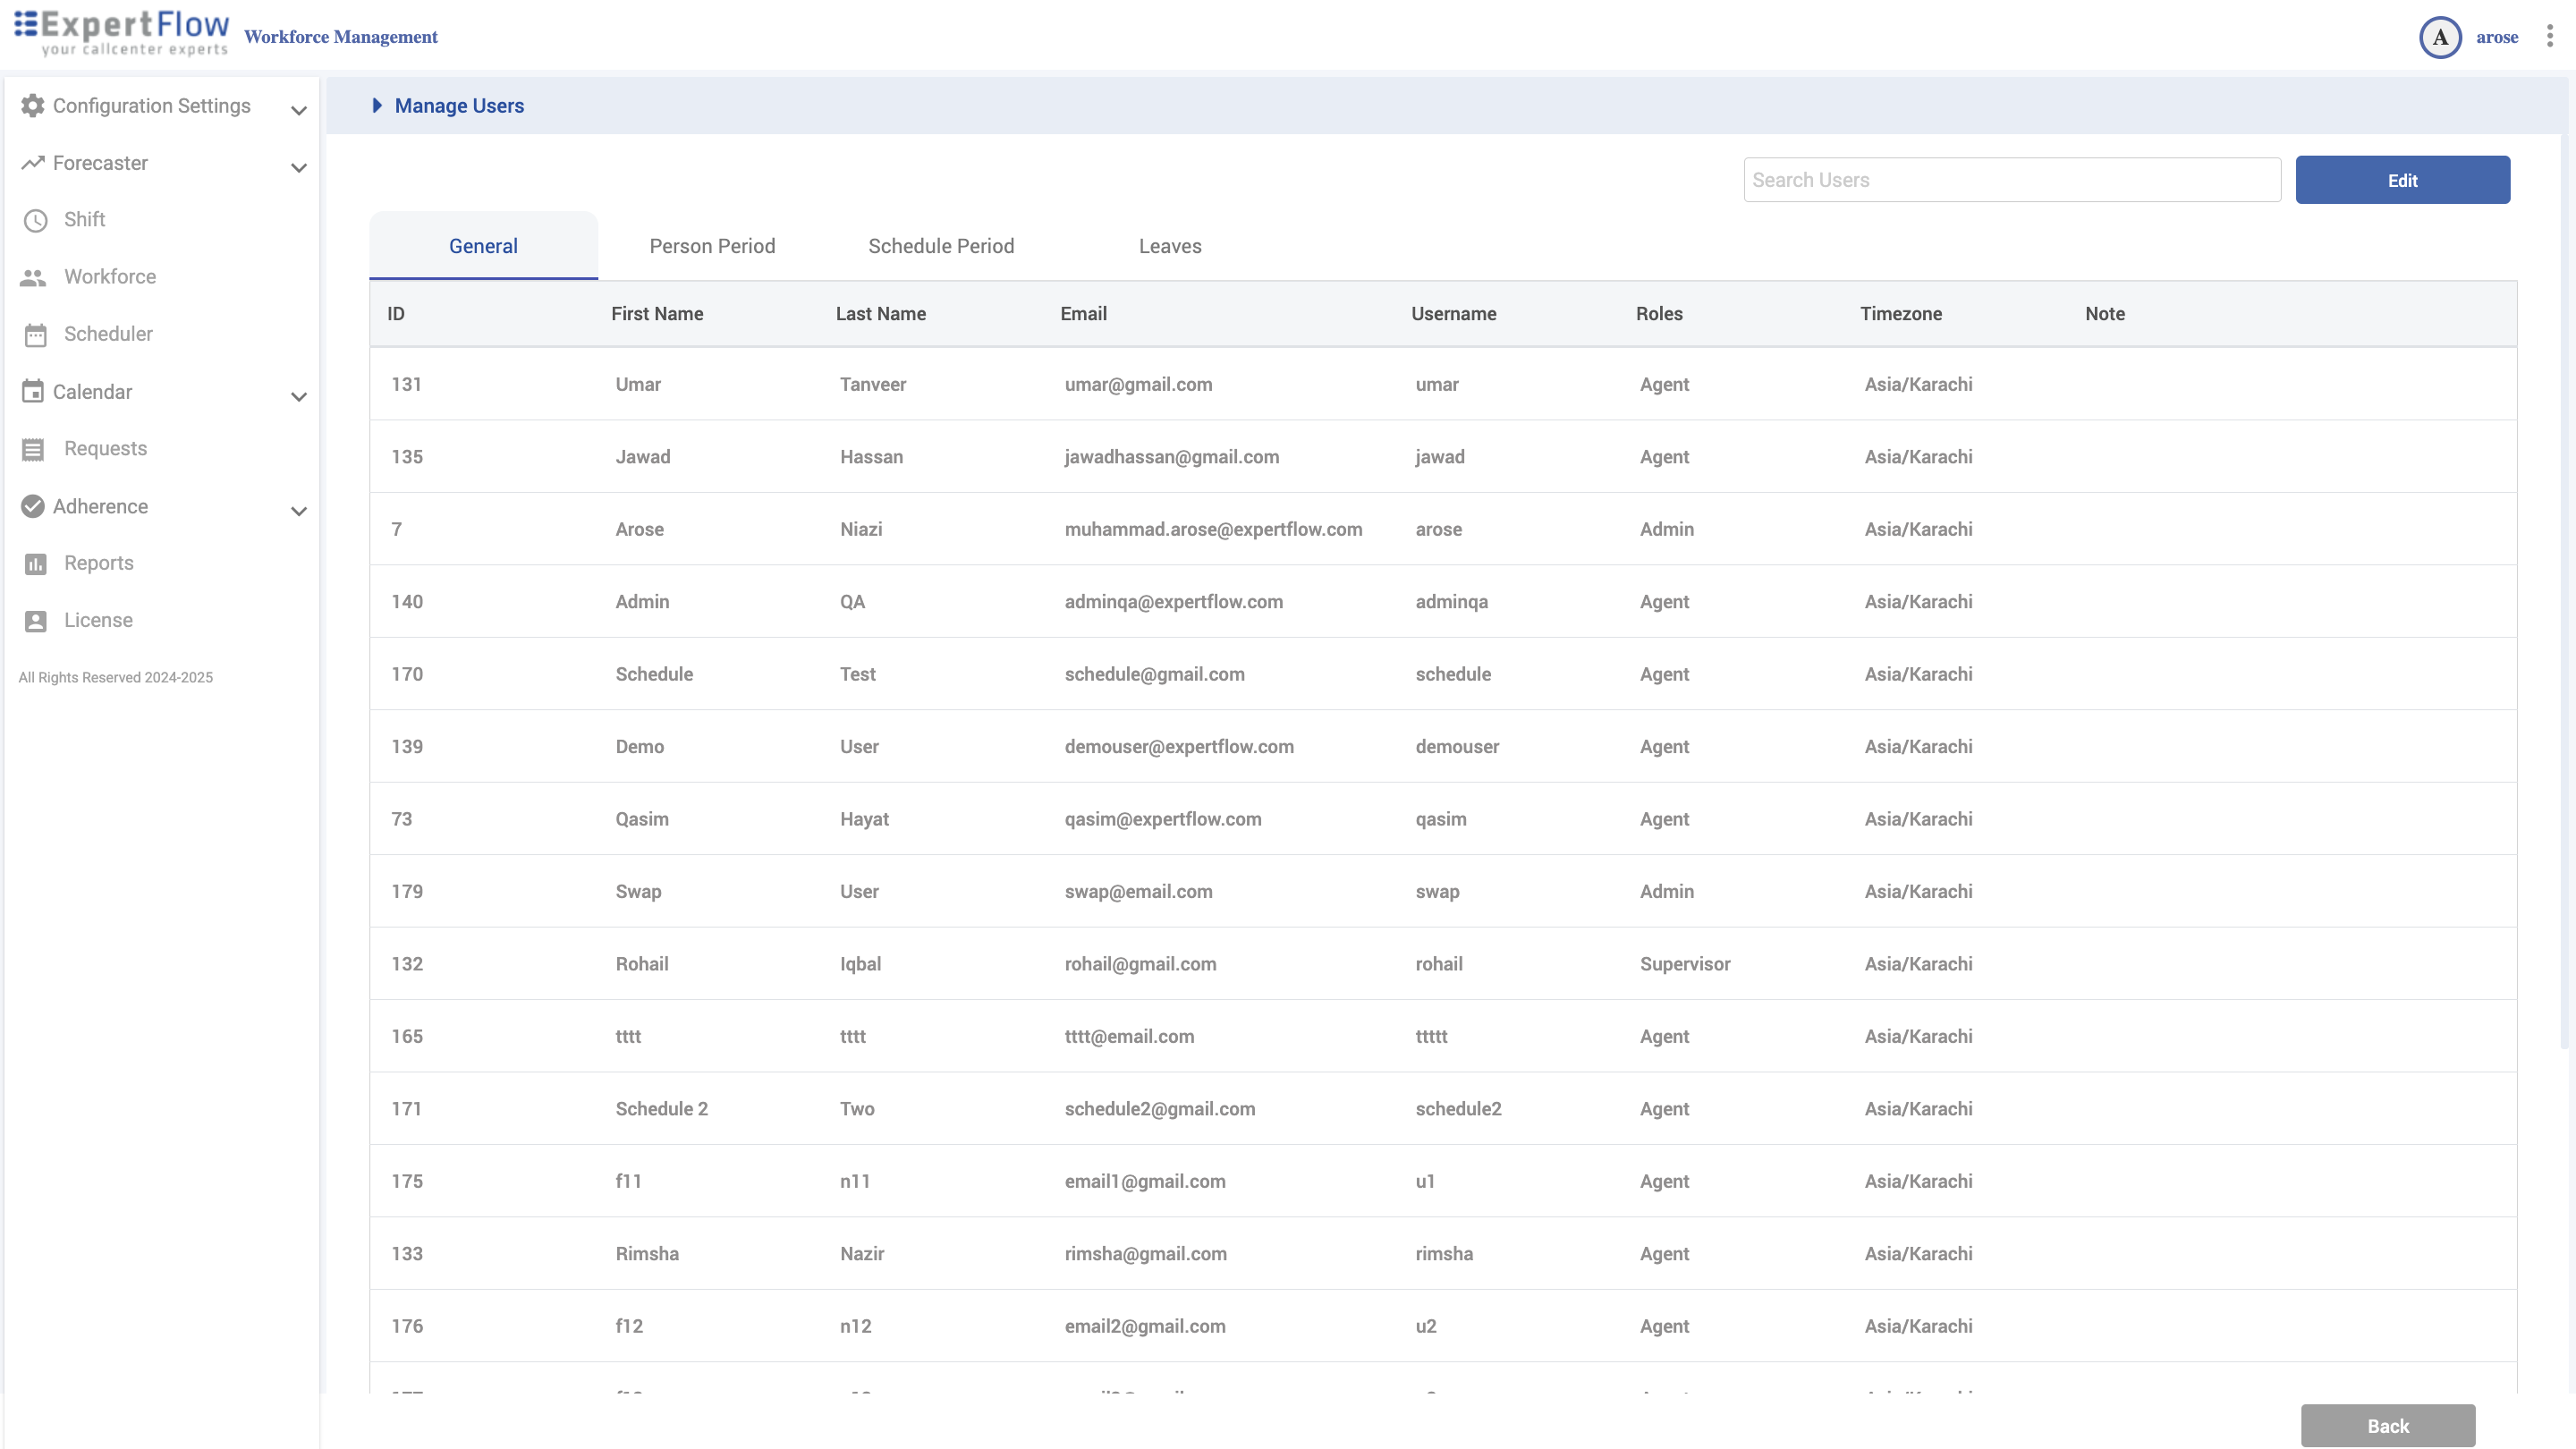
Manage Users (tabbed)
-
Click Manage Users. Use Search Users to filter.
-
Click Edit (top-right) to enable editing; Save (bottom-right) to persist.
Tabs
-
General — ID, First/Last Name, Email, Username, Roles, Timezone, Note.
-
Person Period — assign Team, Skill(s), Contract.
-
Schedule Period — Week Start, Shift, Schedule Date (earliest date to schedule),
Schedule Number (weeks to generate), Schedule Type (pattern semantics), Leaving Date (exclude after).
-
Leaves — view/manage absence records per leave type.
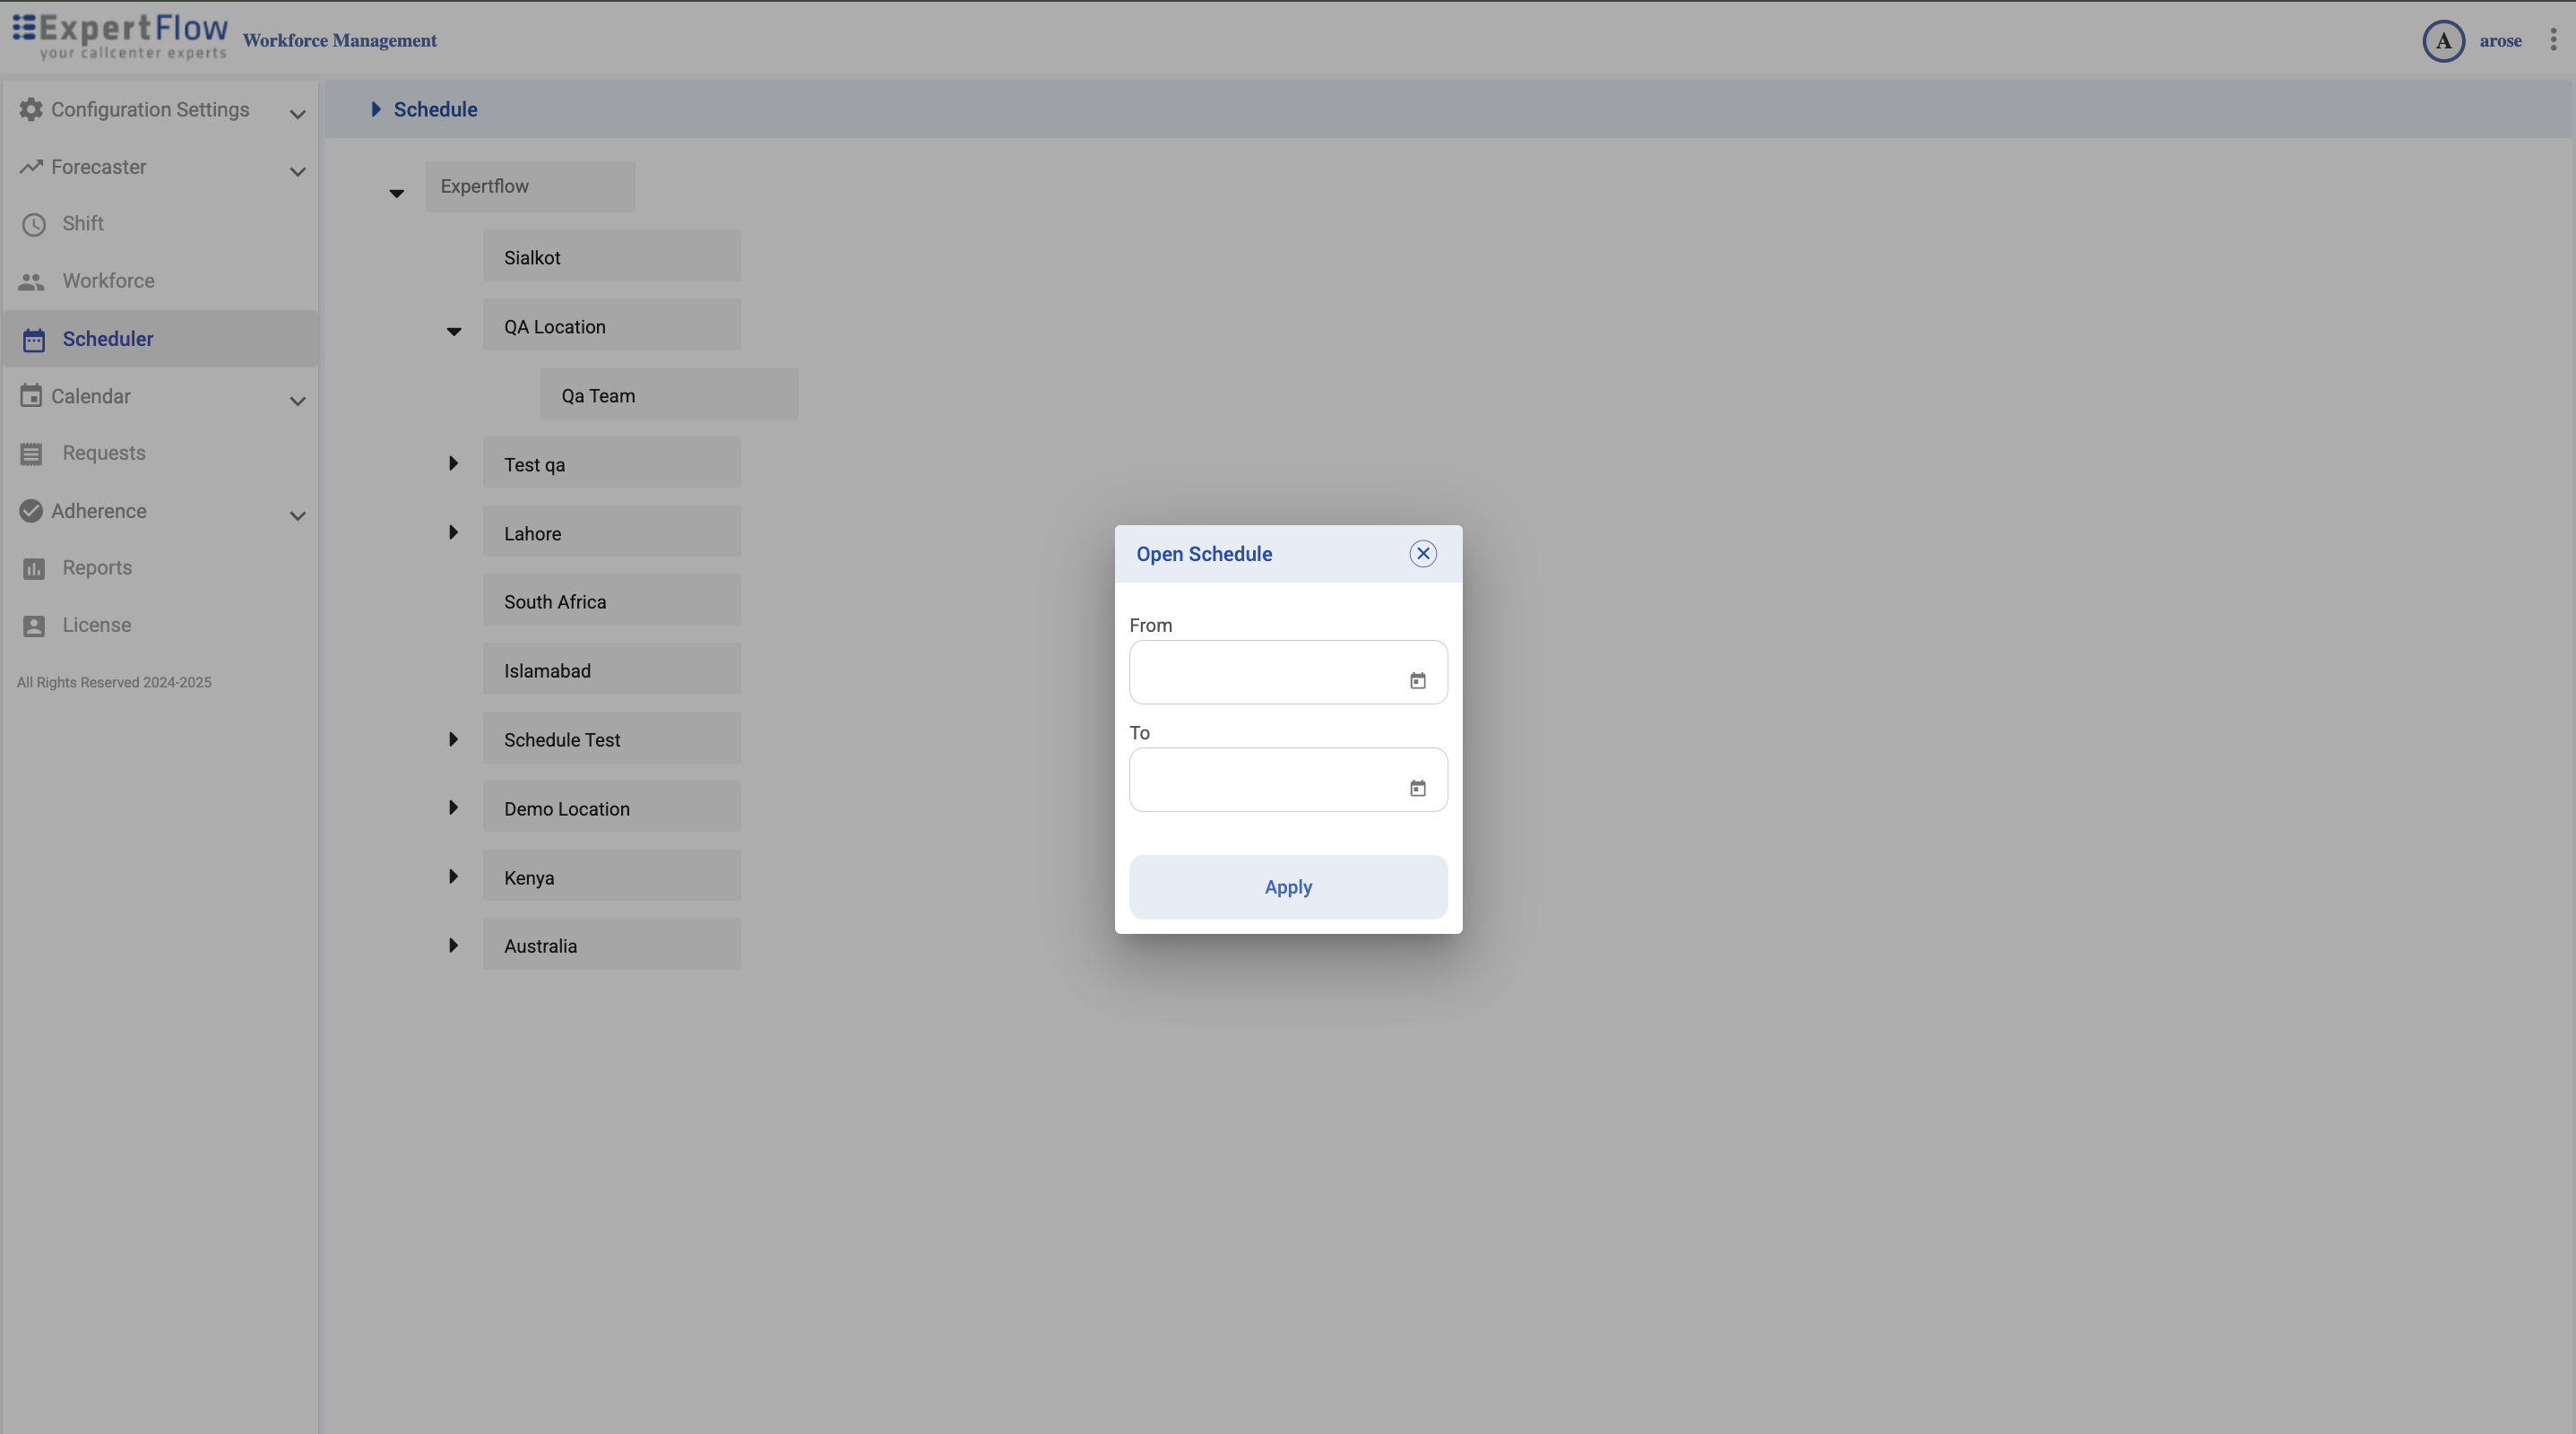
Scheduler
Navigation
Left navigation → Scheduler
Open a schedule
-
Expand the org tree and select a Team.
-
In Open Schedule, set From and To dates.
-
Click Apply.
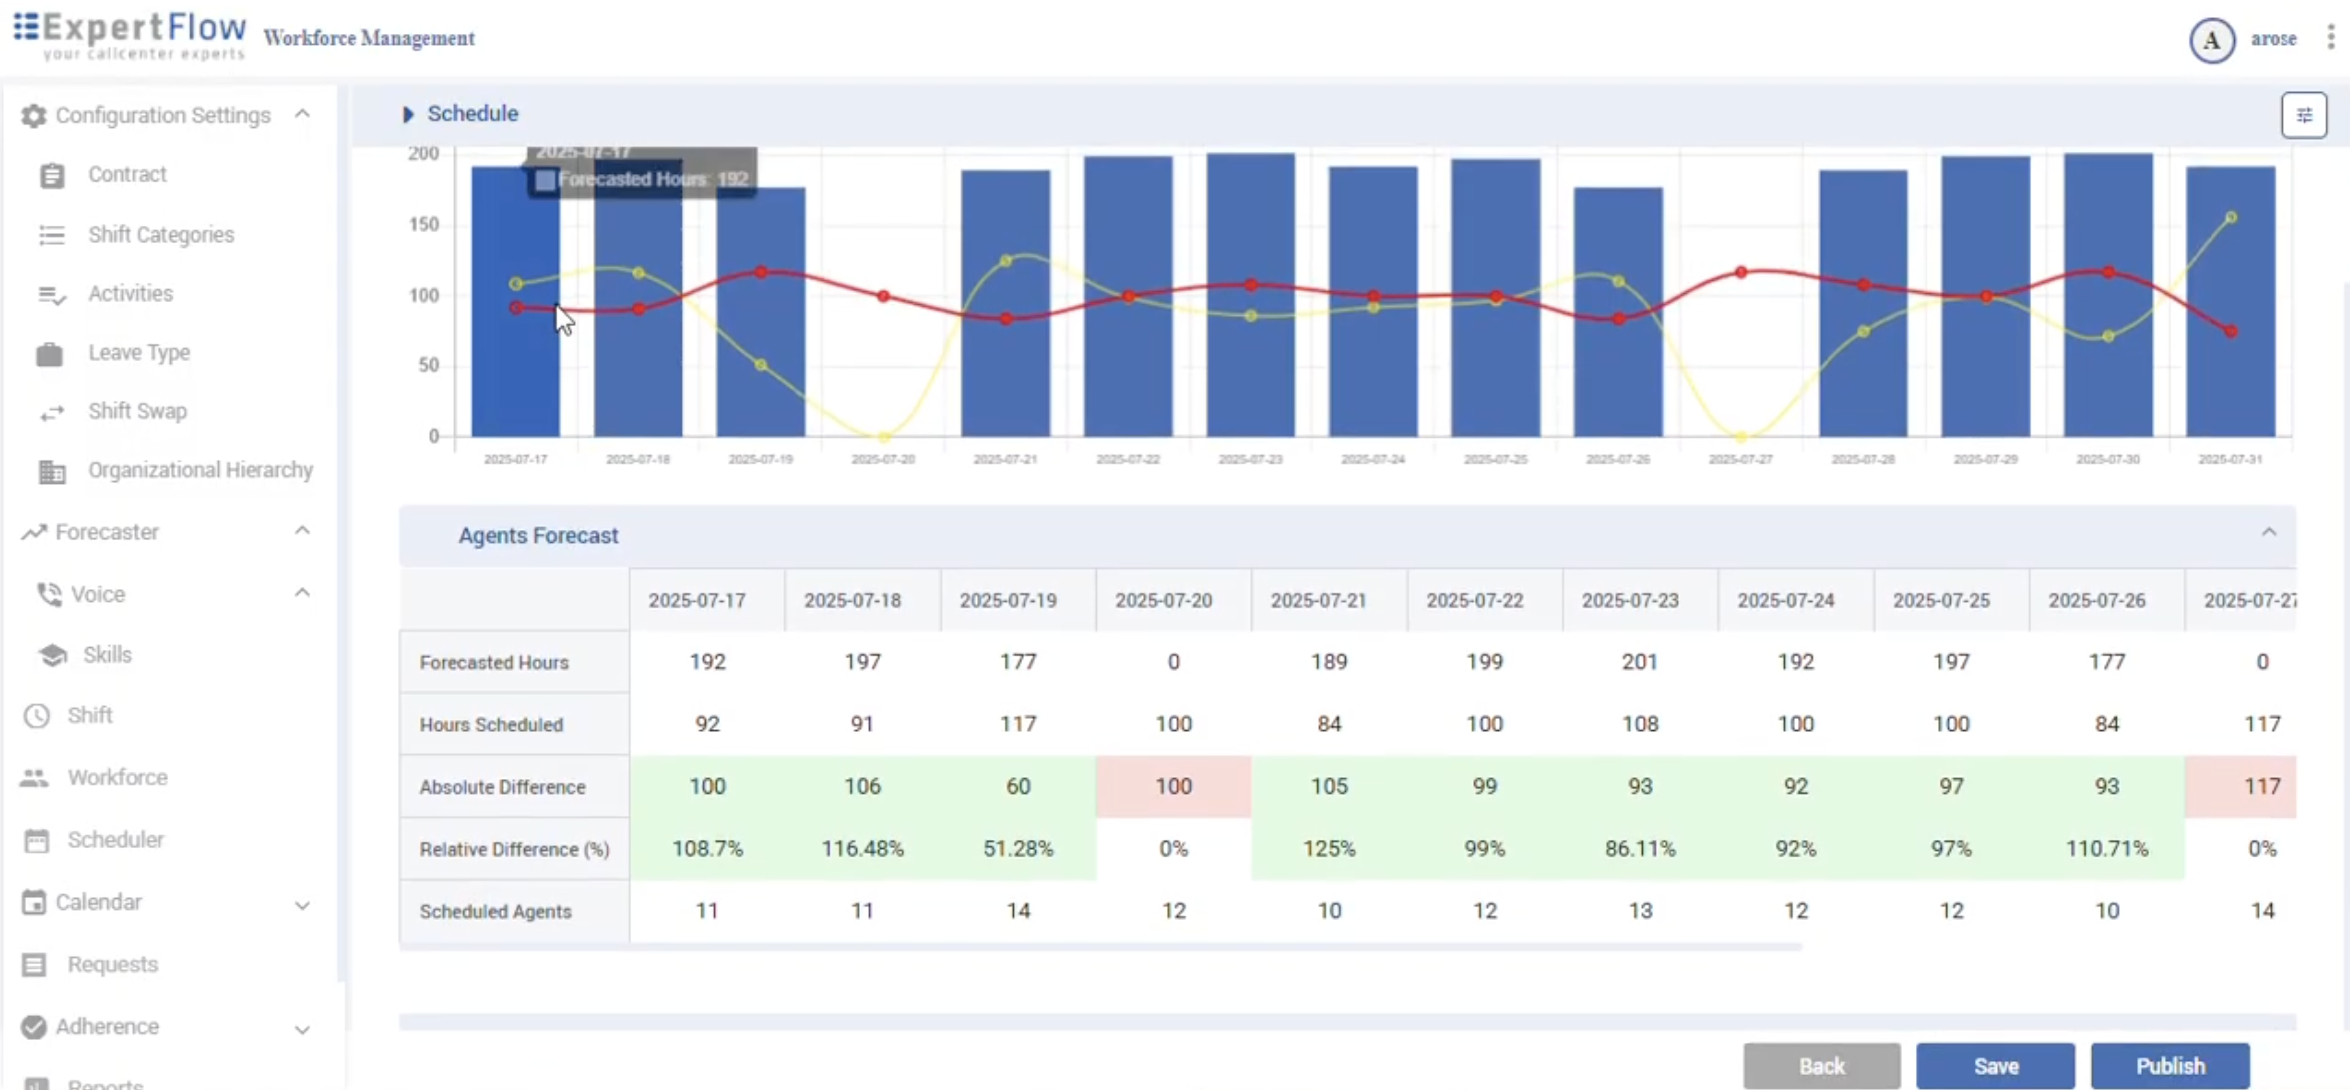
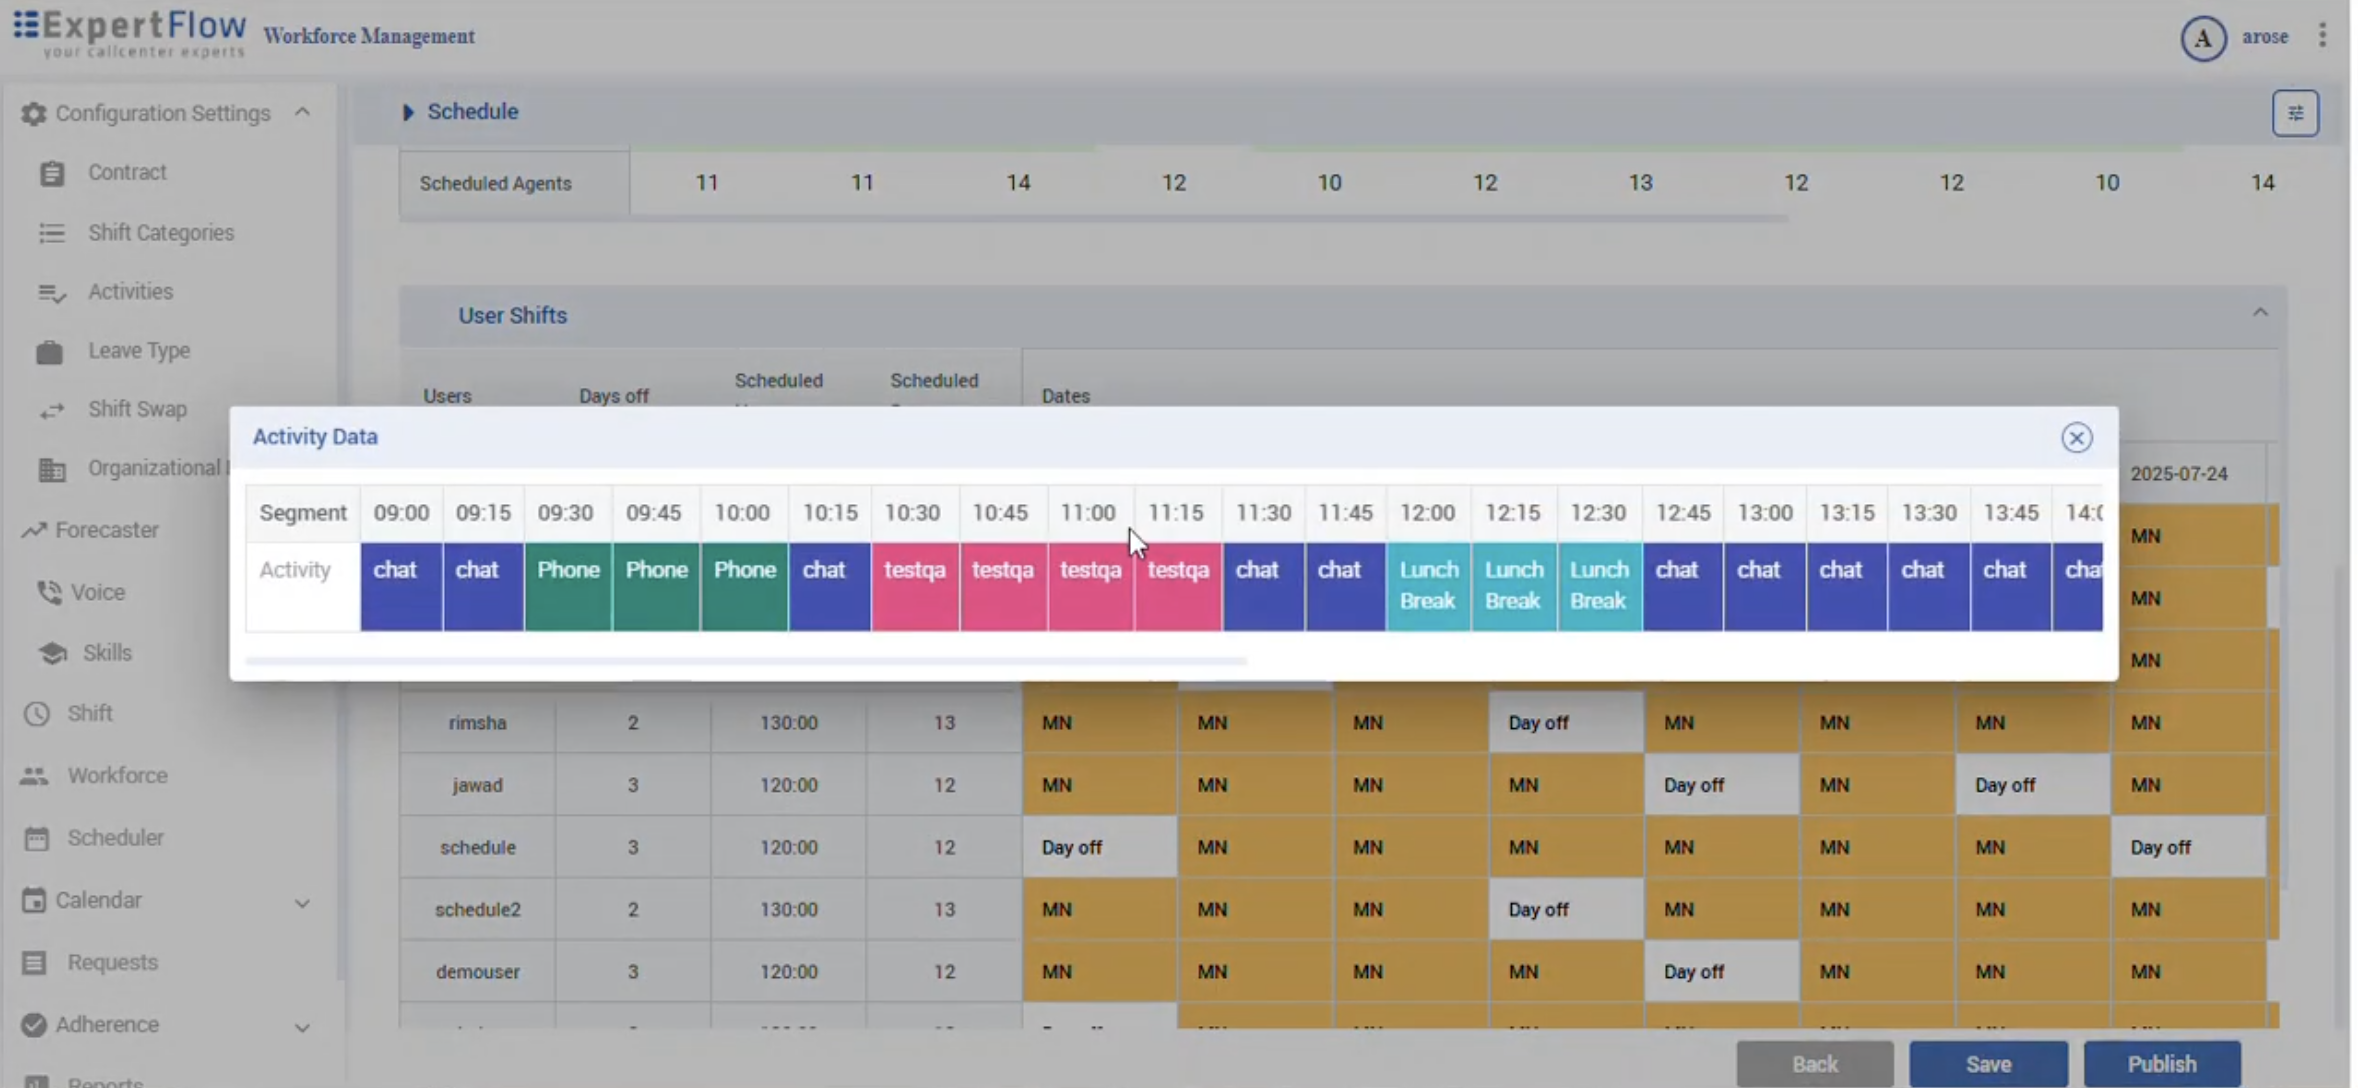
Next steps
-
Review Coverage vs Forecast, assignments, and shift details.
-
Modify assignments (contract/skills validation applies).
-
Save (draft) or Publish to push to calendars.
-
If no schedule exists for that range, you’ll be prompted to generate one.
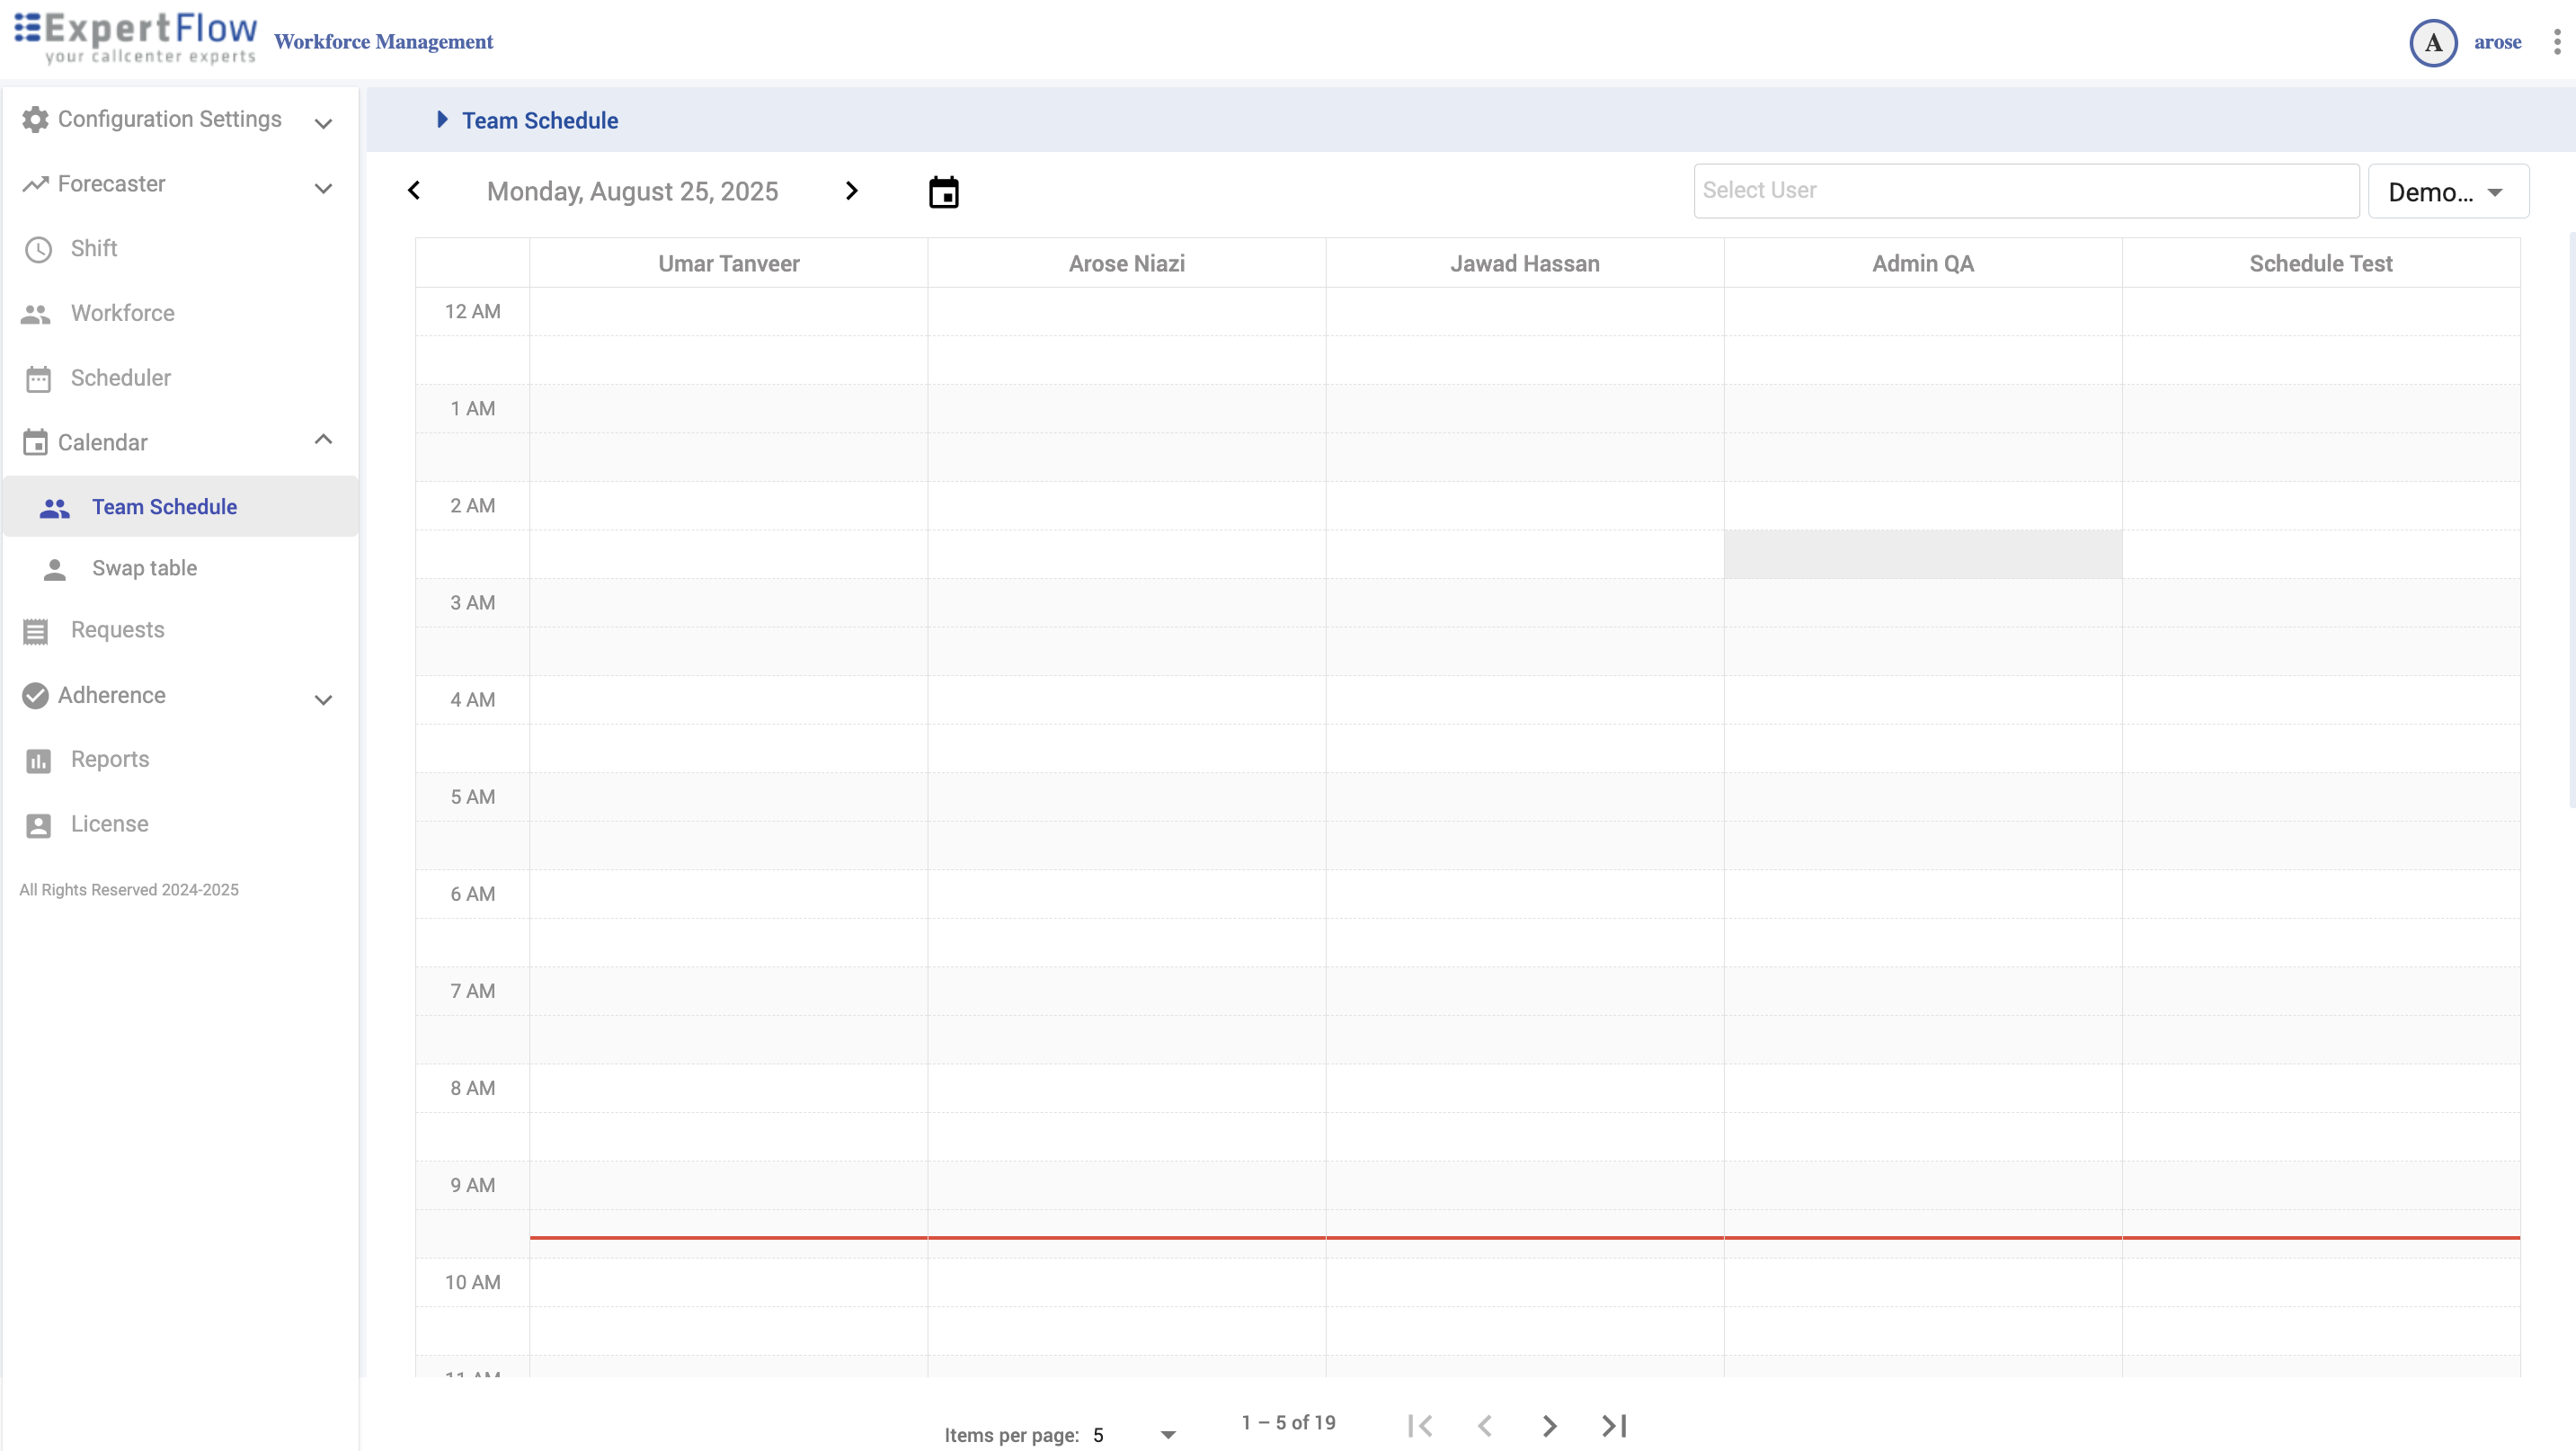
Calendar — Team Schedule
Navigation
Left navigation → Calendar → Team Schedule
Key elements
-
Date navigation (chevrons) and date picker.
-
Team selector (top-right).
-
Select User filter.
-
Time grid for the chosen date (24-hour).
Common actions
-
Pick the team and date.
-
(Optional) filter by Select User.
-
Click a shift block to view details or jump to the Scheduler for edits.
-
Validate that published shifts align with operations.
Calendar — Swap Table
Navigation
Left navigation → Calendar → Swap table
How it works
-
Each row is a trade post (shows Name and Date).
-
The blue bar is the shift span on a 24-hour axis.
-
Click a post to review; approvals are handled in Requests.

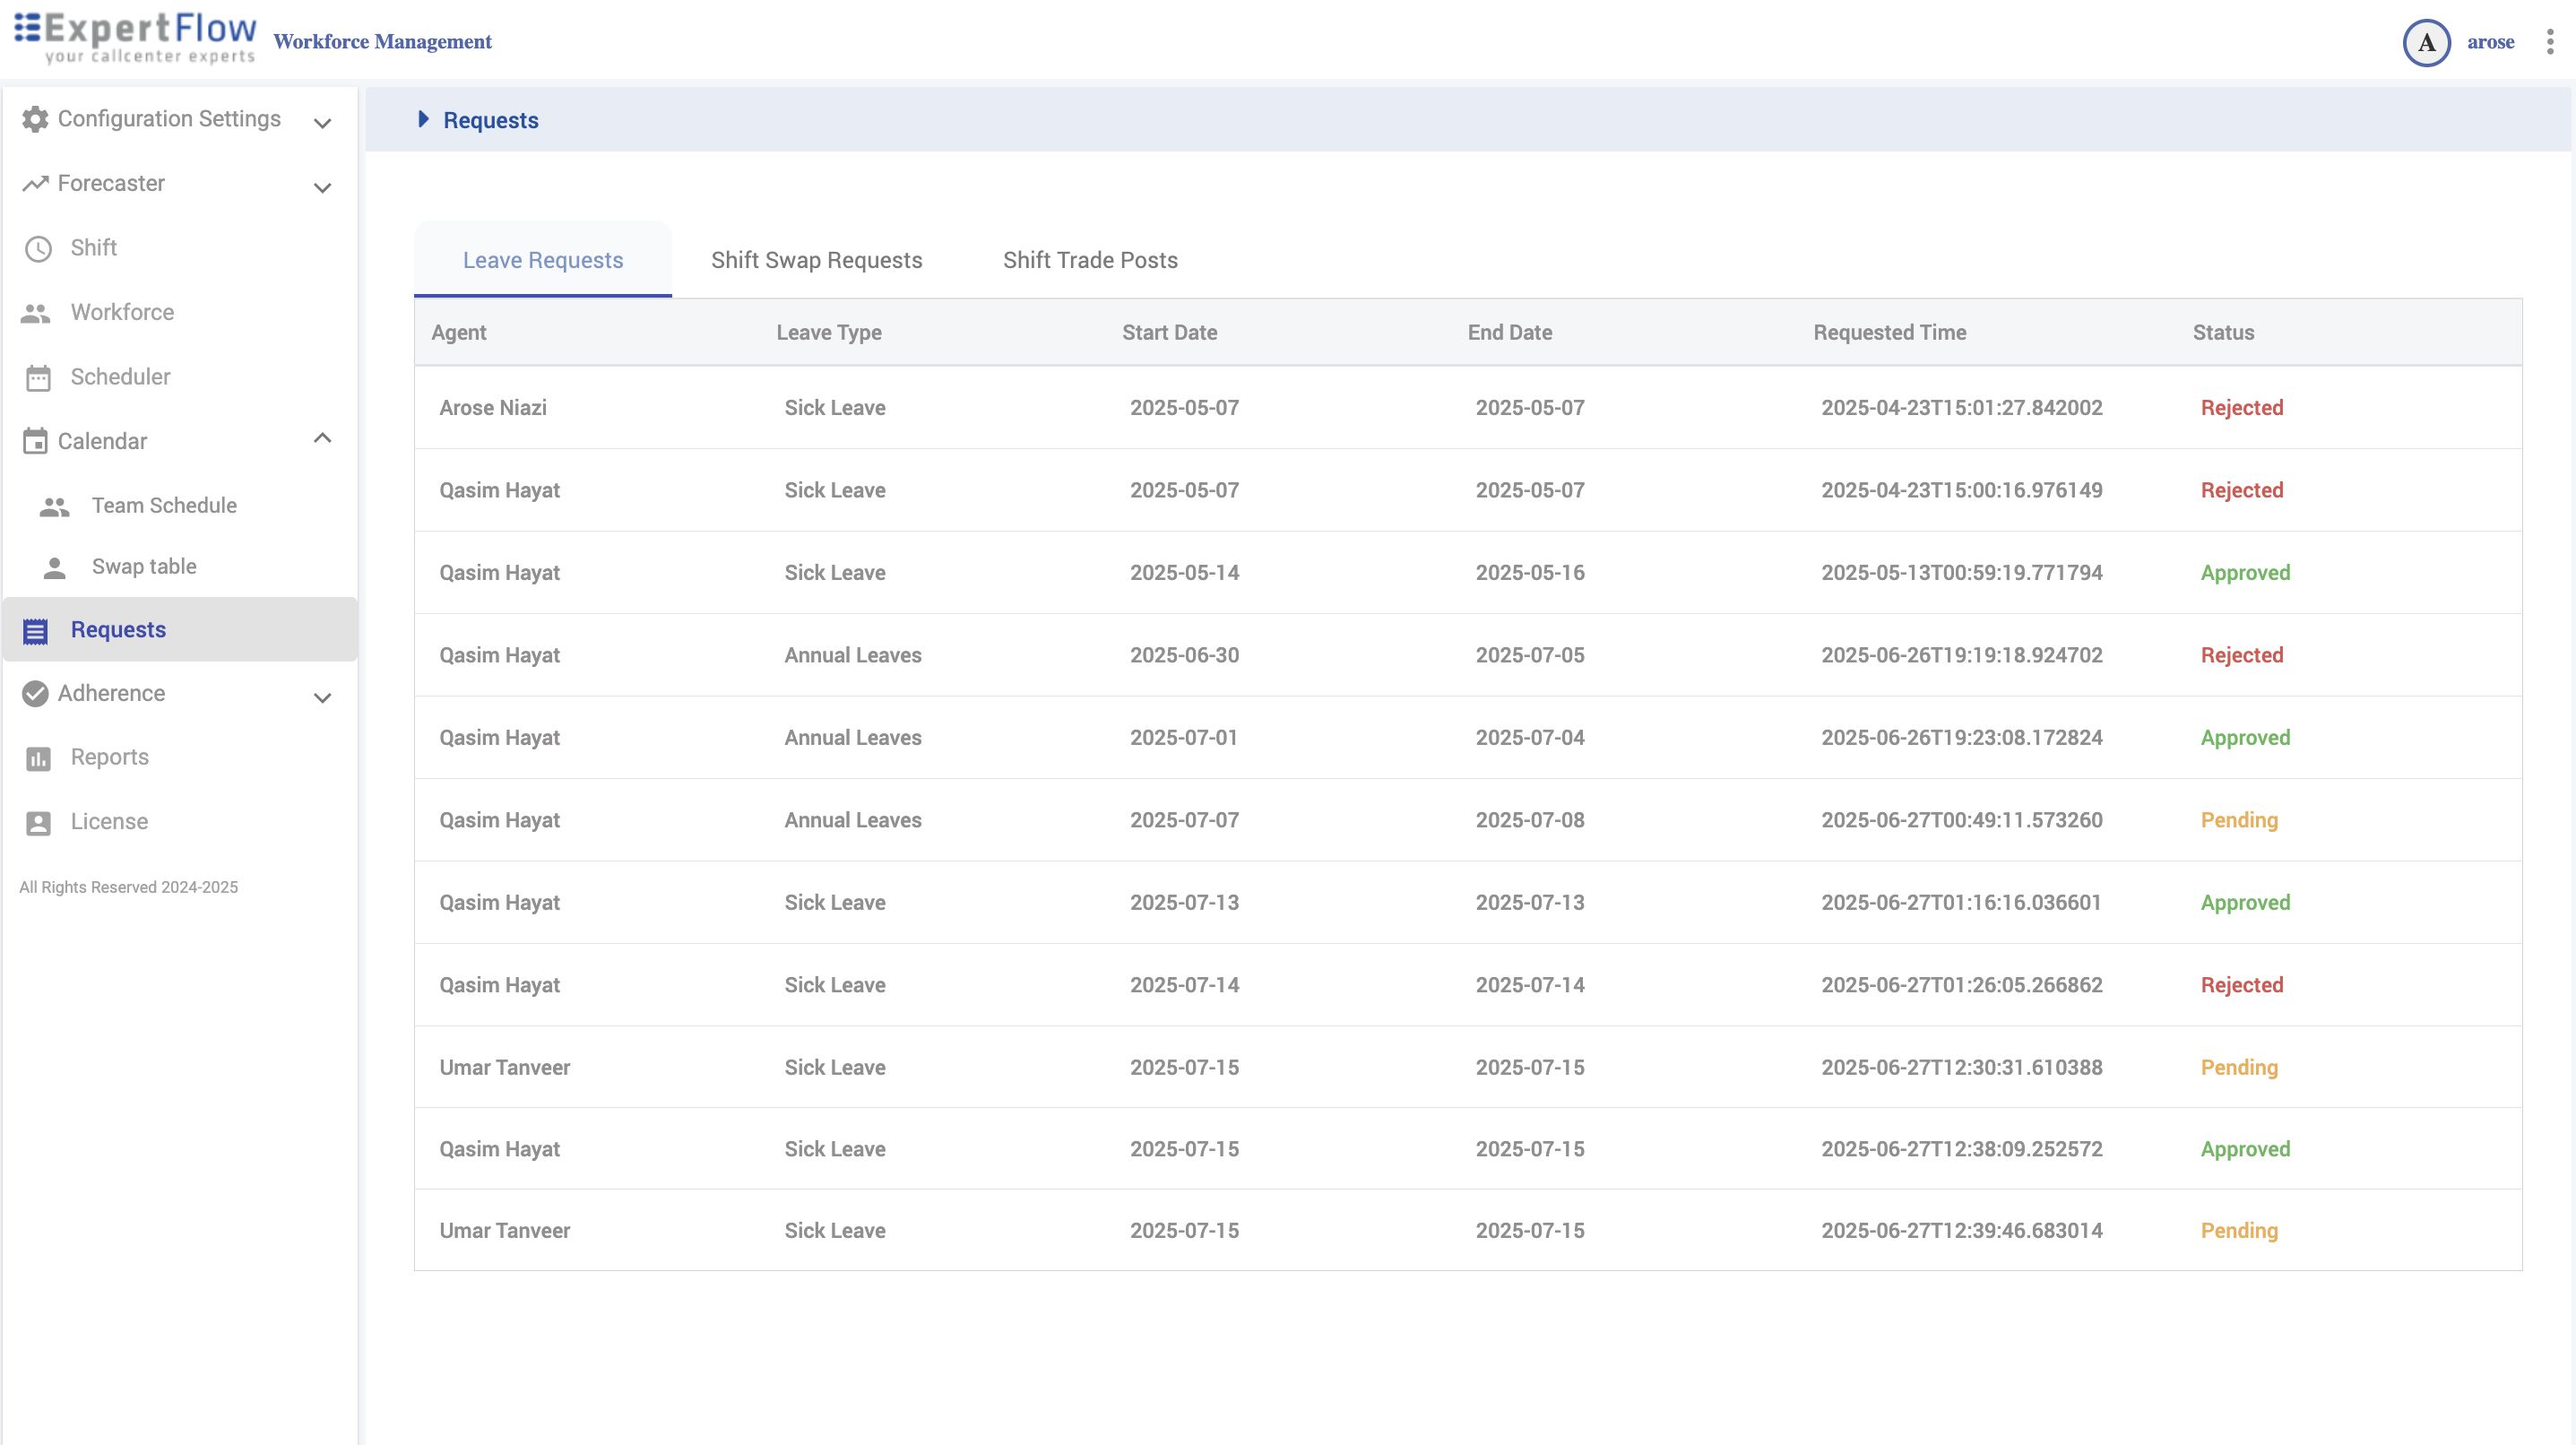
Requests
Navigation
Left navigation → Requests
Leave Requests
Process a request
-
Click a row.
-
Review dates/type/notes (system validates overlaps & contract).
-
Approve or Reject (add a note if needed).
-
Save (approved leaves appear on calendars).
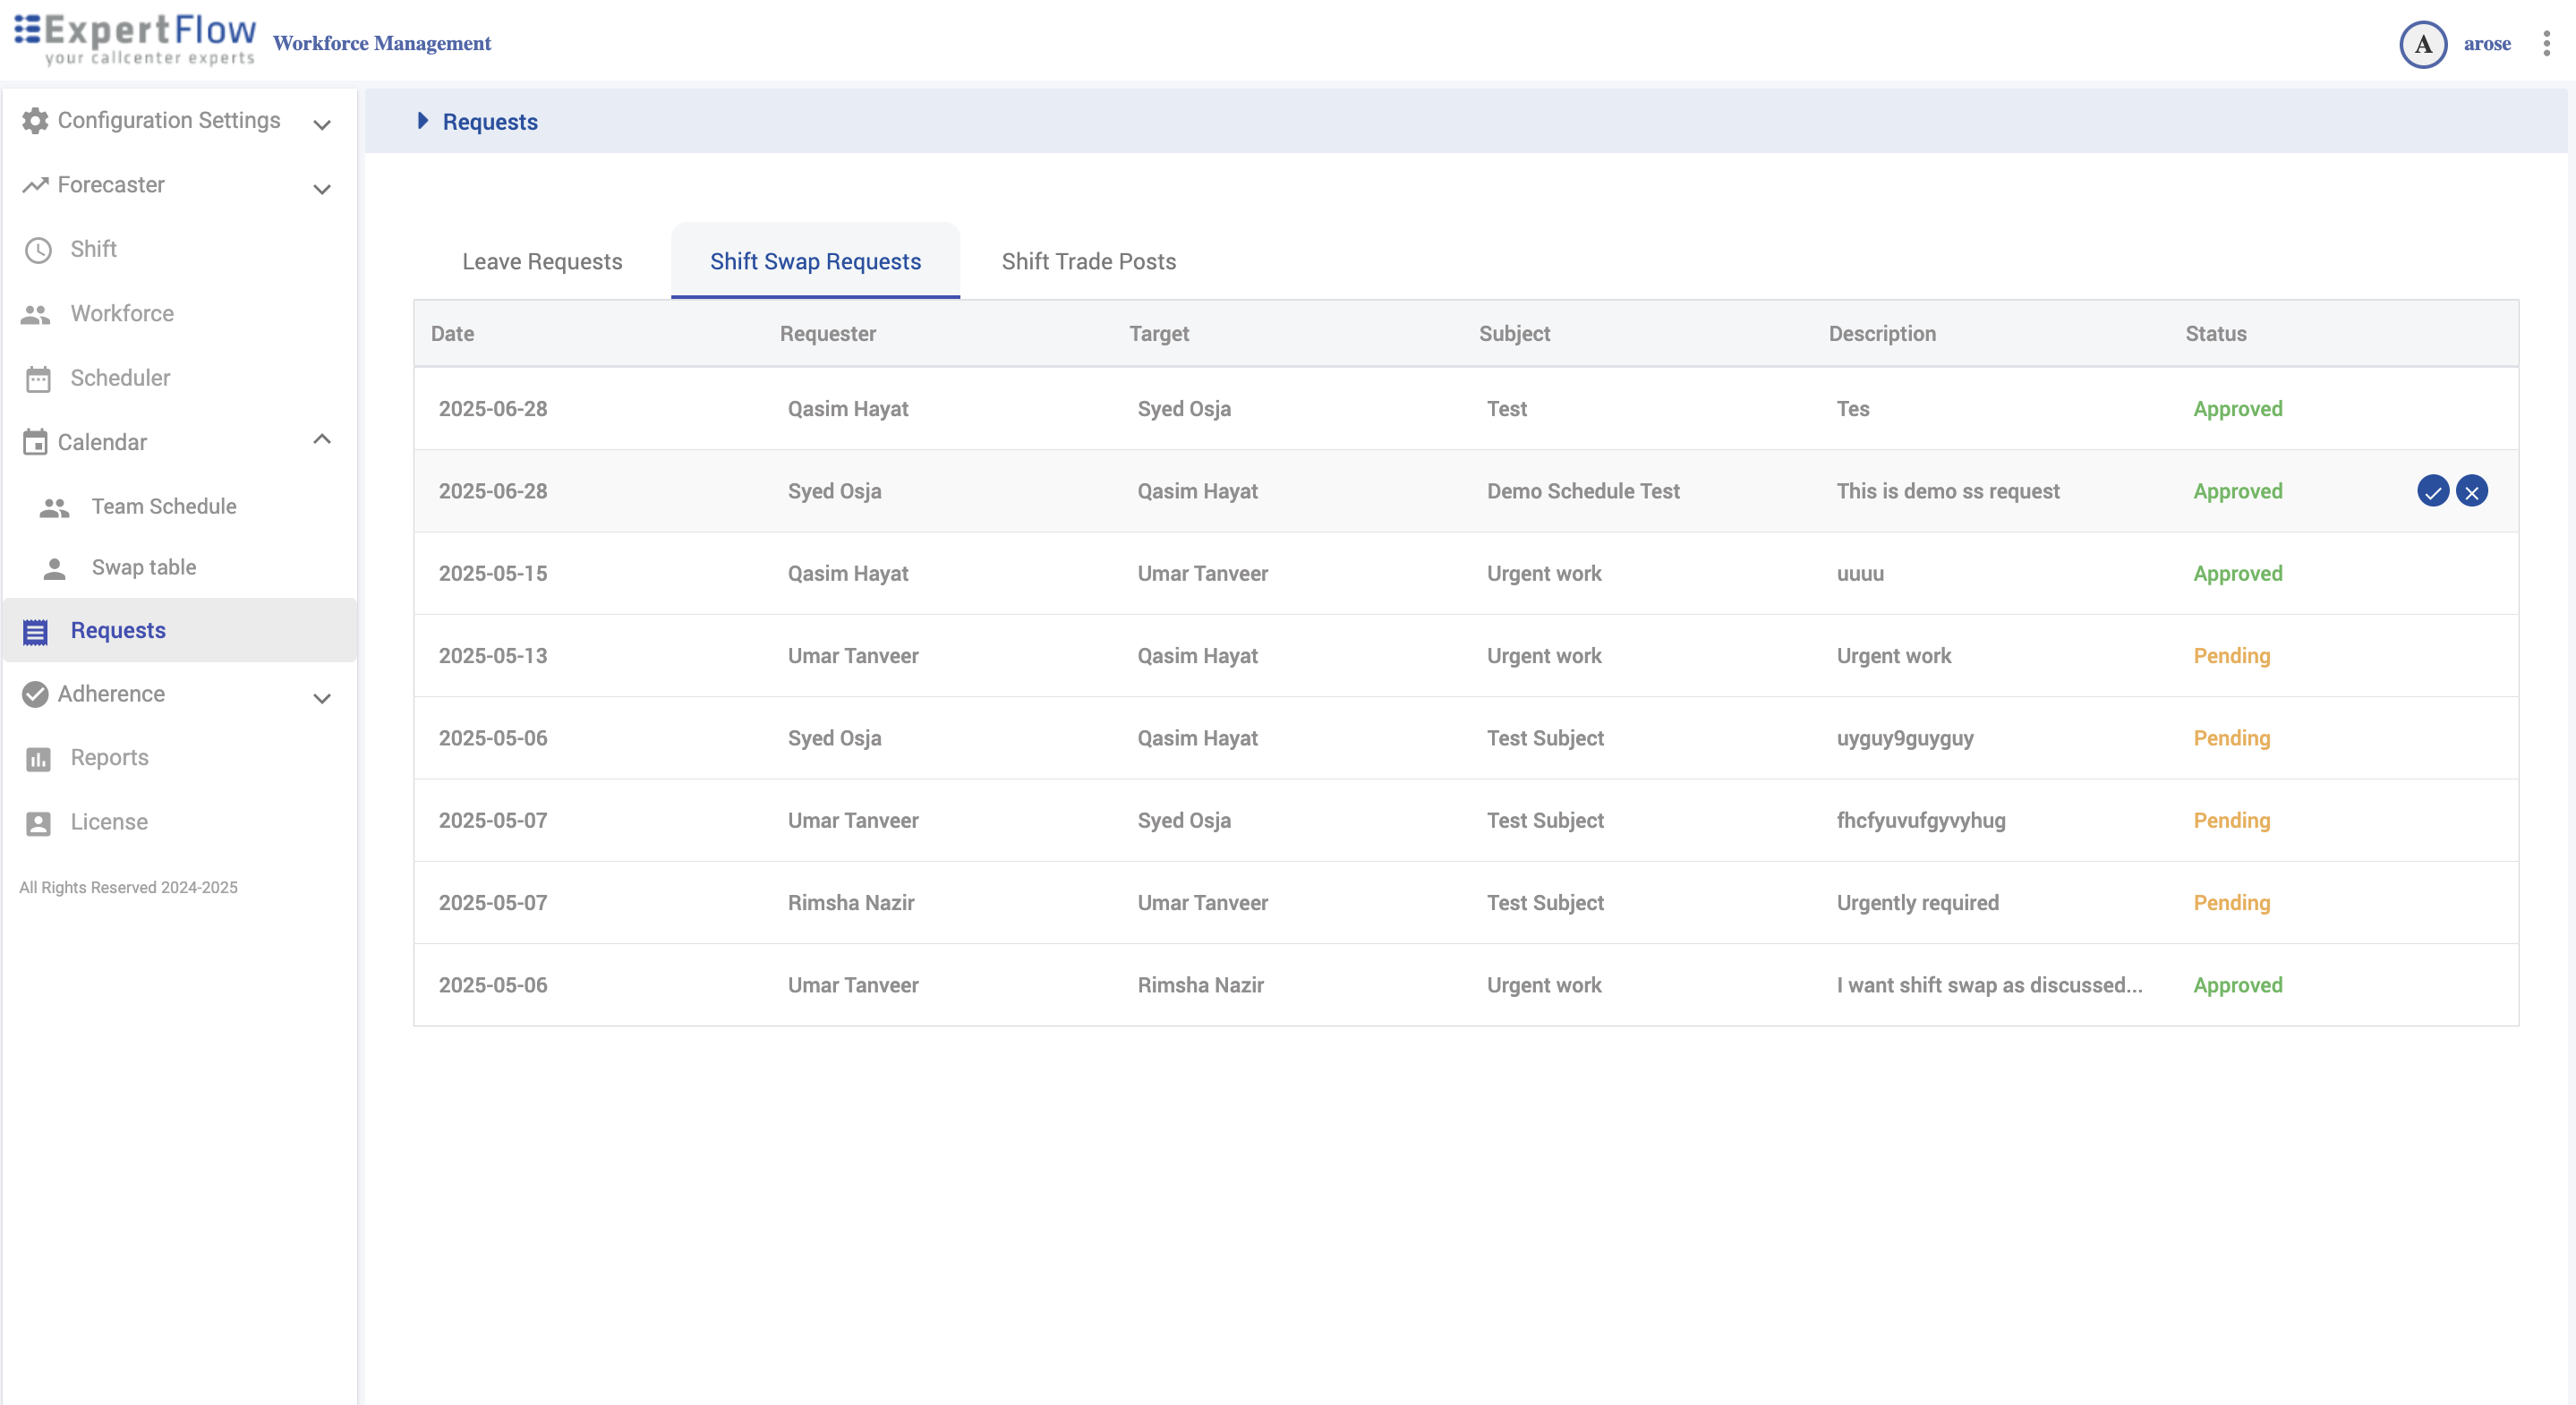
Shift Swap Requests (Targeted)
Process a swap
-
Open the request.
-
Verify both agents’ contracts, skills, and shift compatibility (conflicts are flagged).
-
Approve or Reject → Save (approved swaps update both schedules).
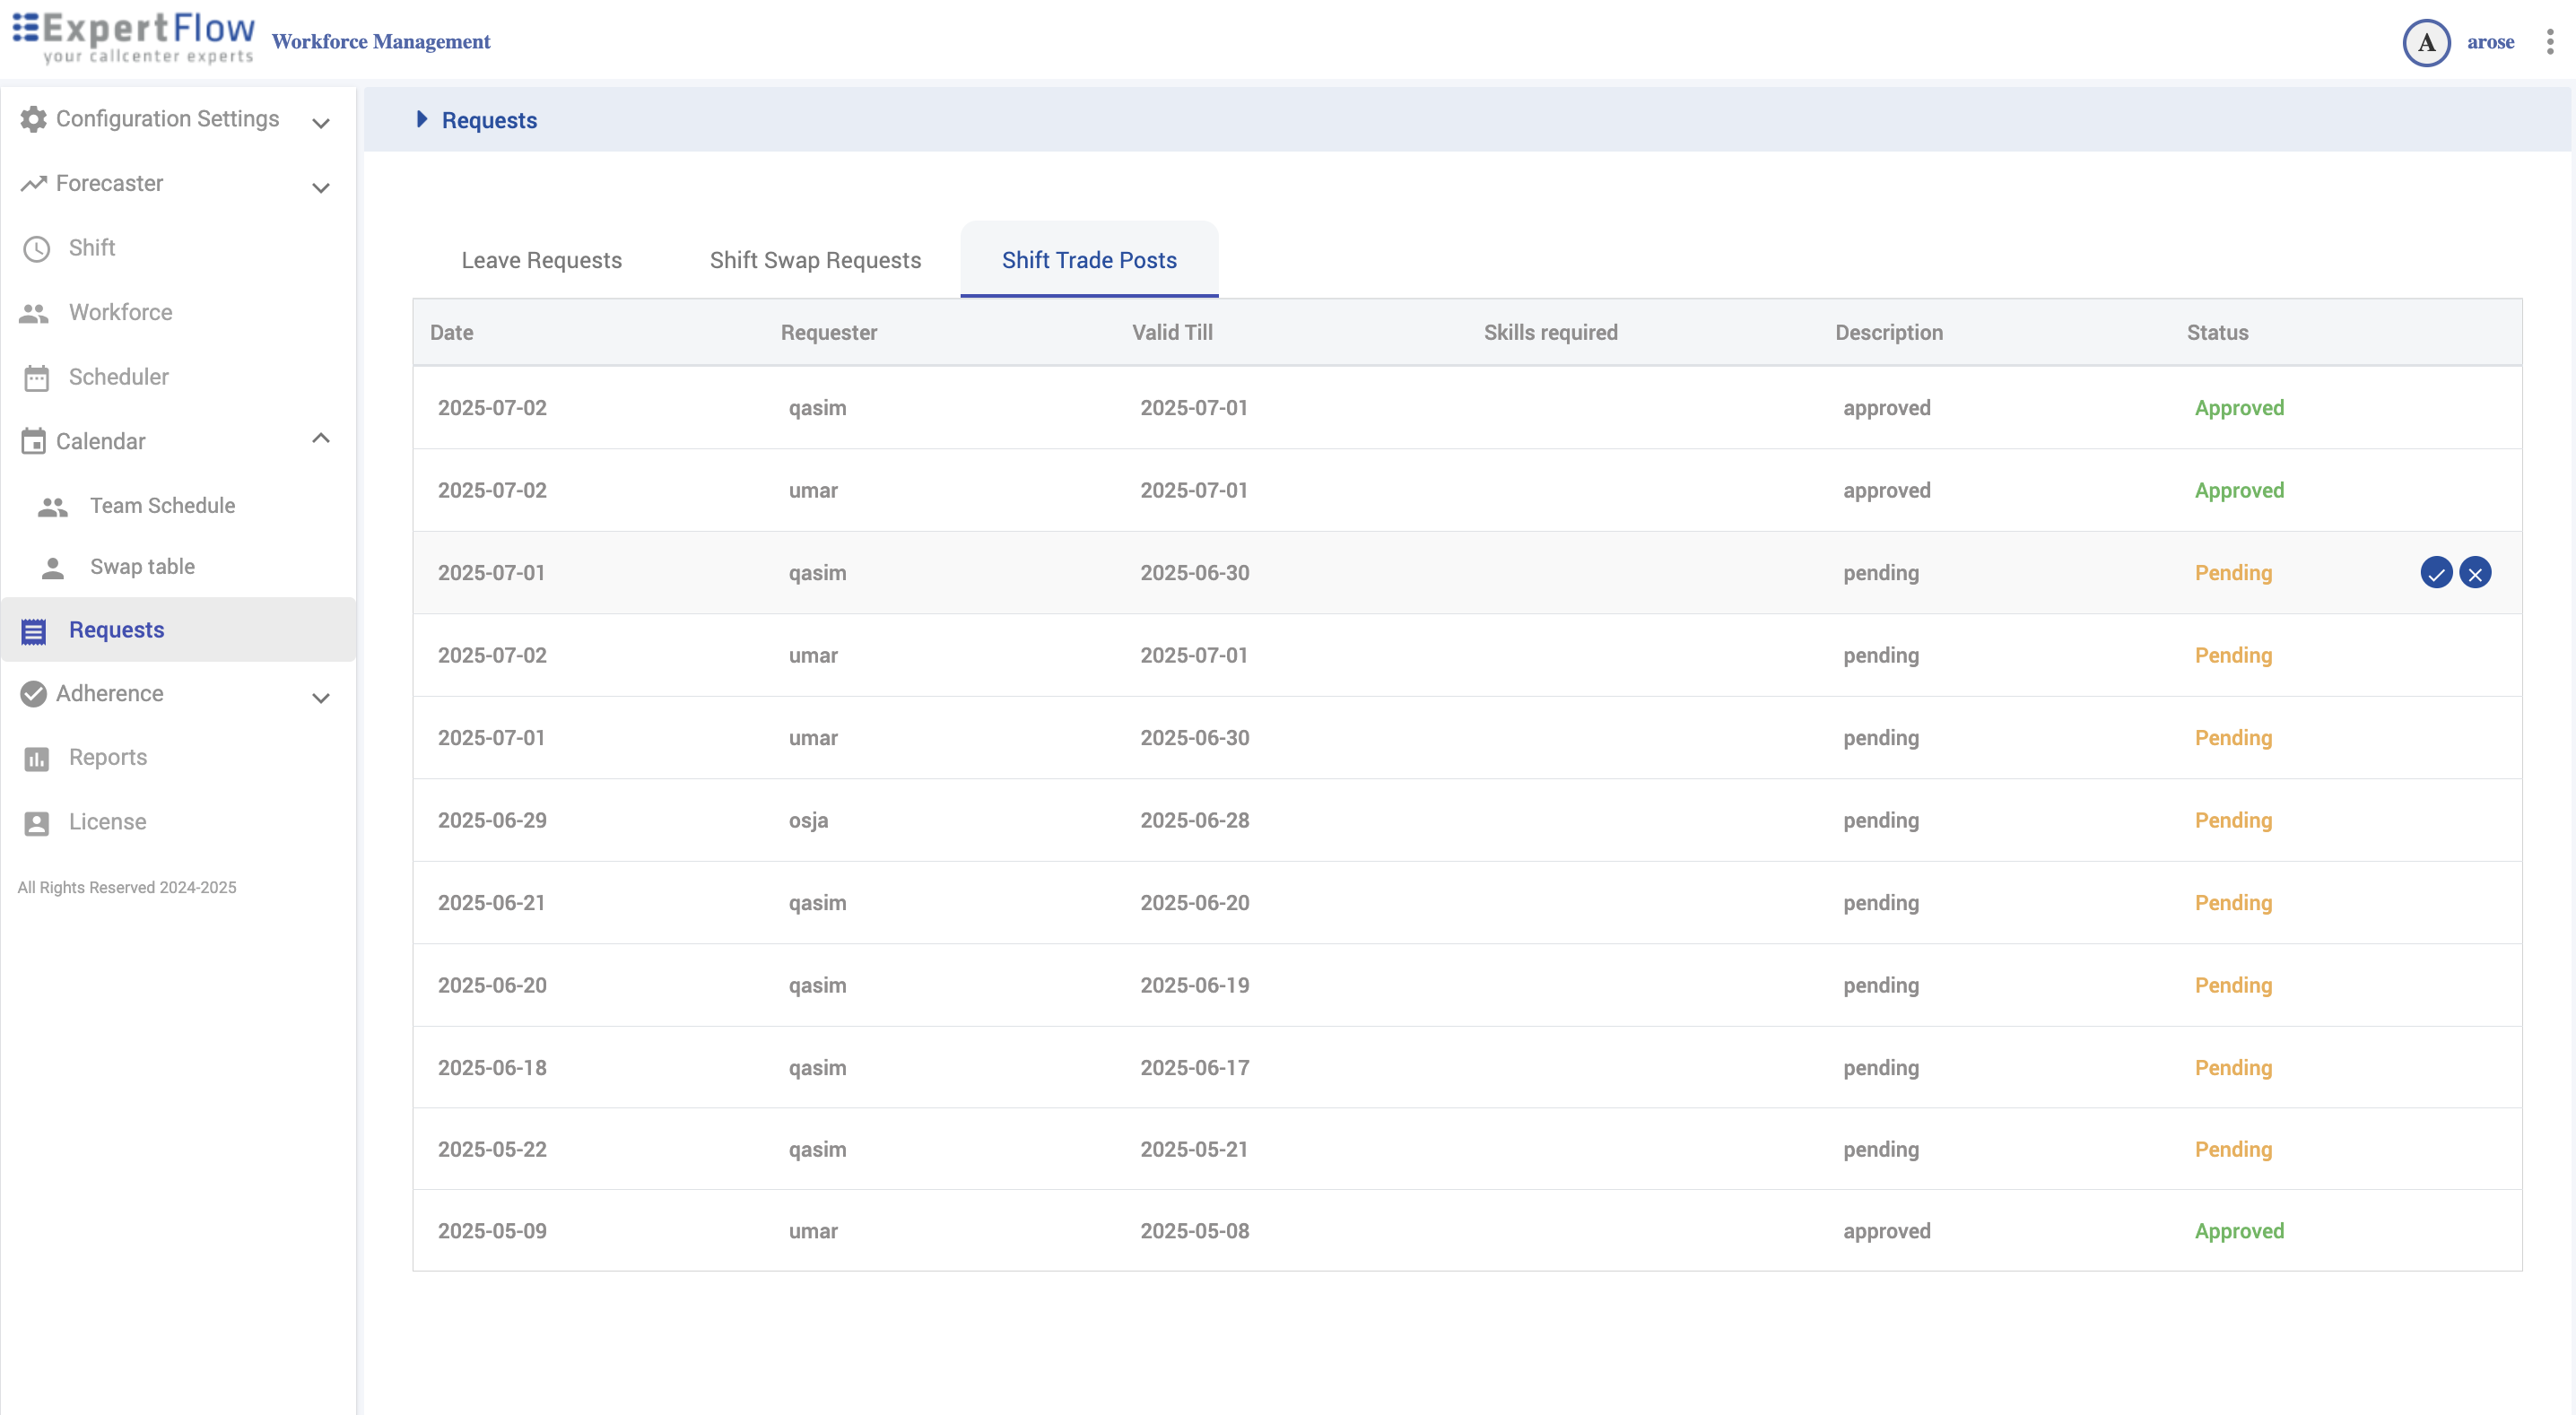
Shift Trade Posts (Open Market)
Process a trade
-
Open a post to see shift span, required skills, and takers (if any).
-
Confirm Taker meets skills/contract constraints.
-
Approve or Reject → Save (approved trades update schedules and remove the post).
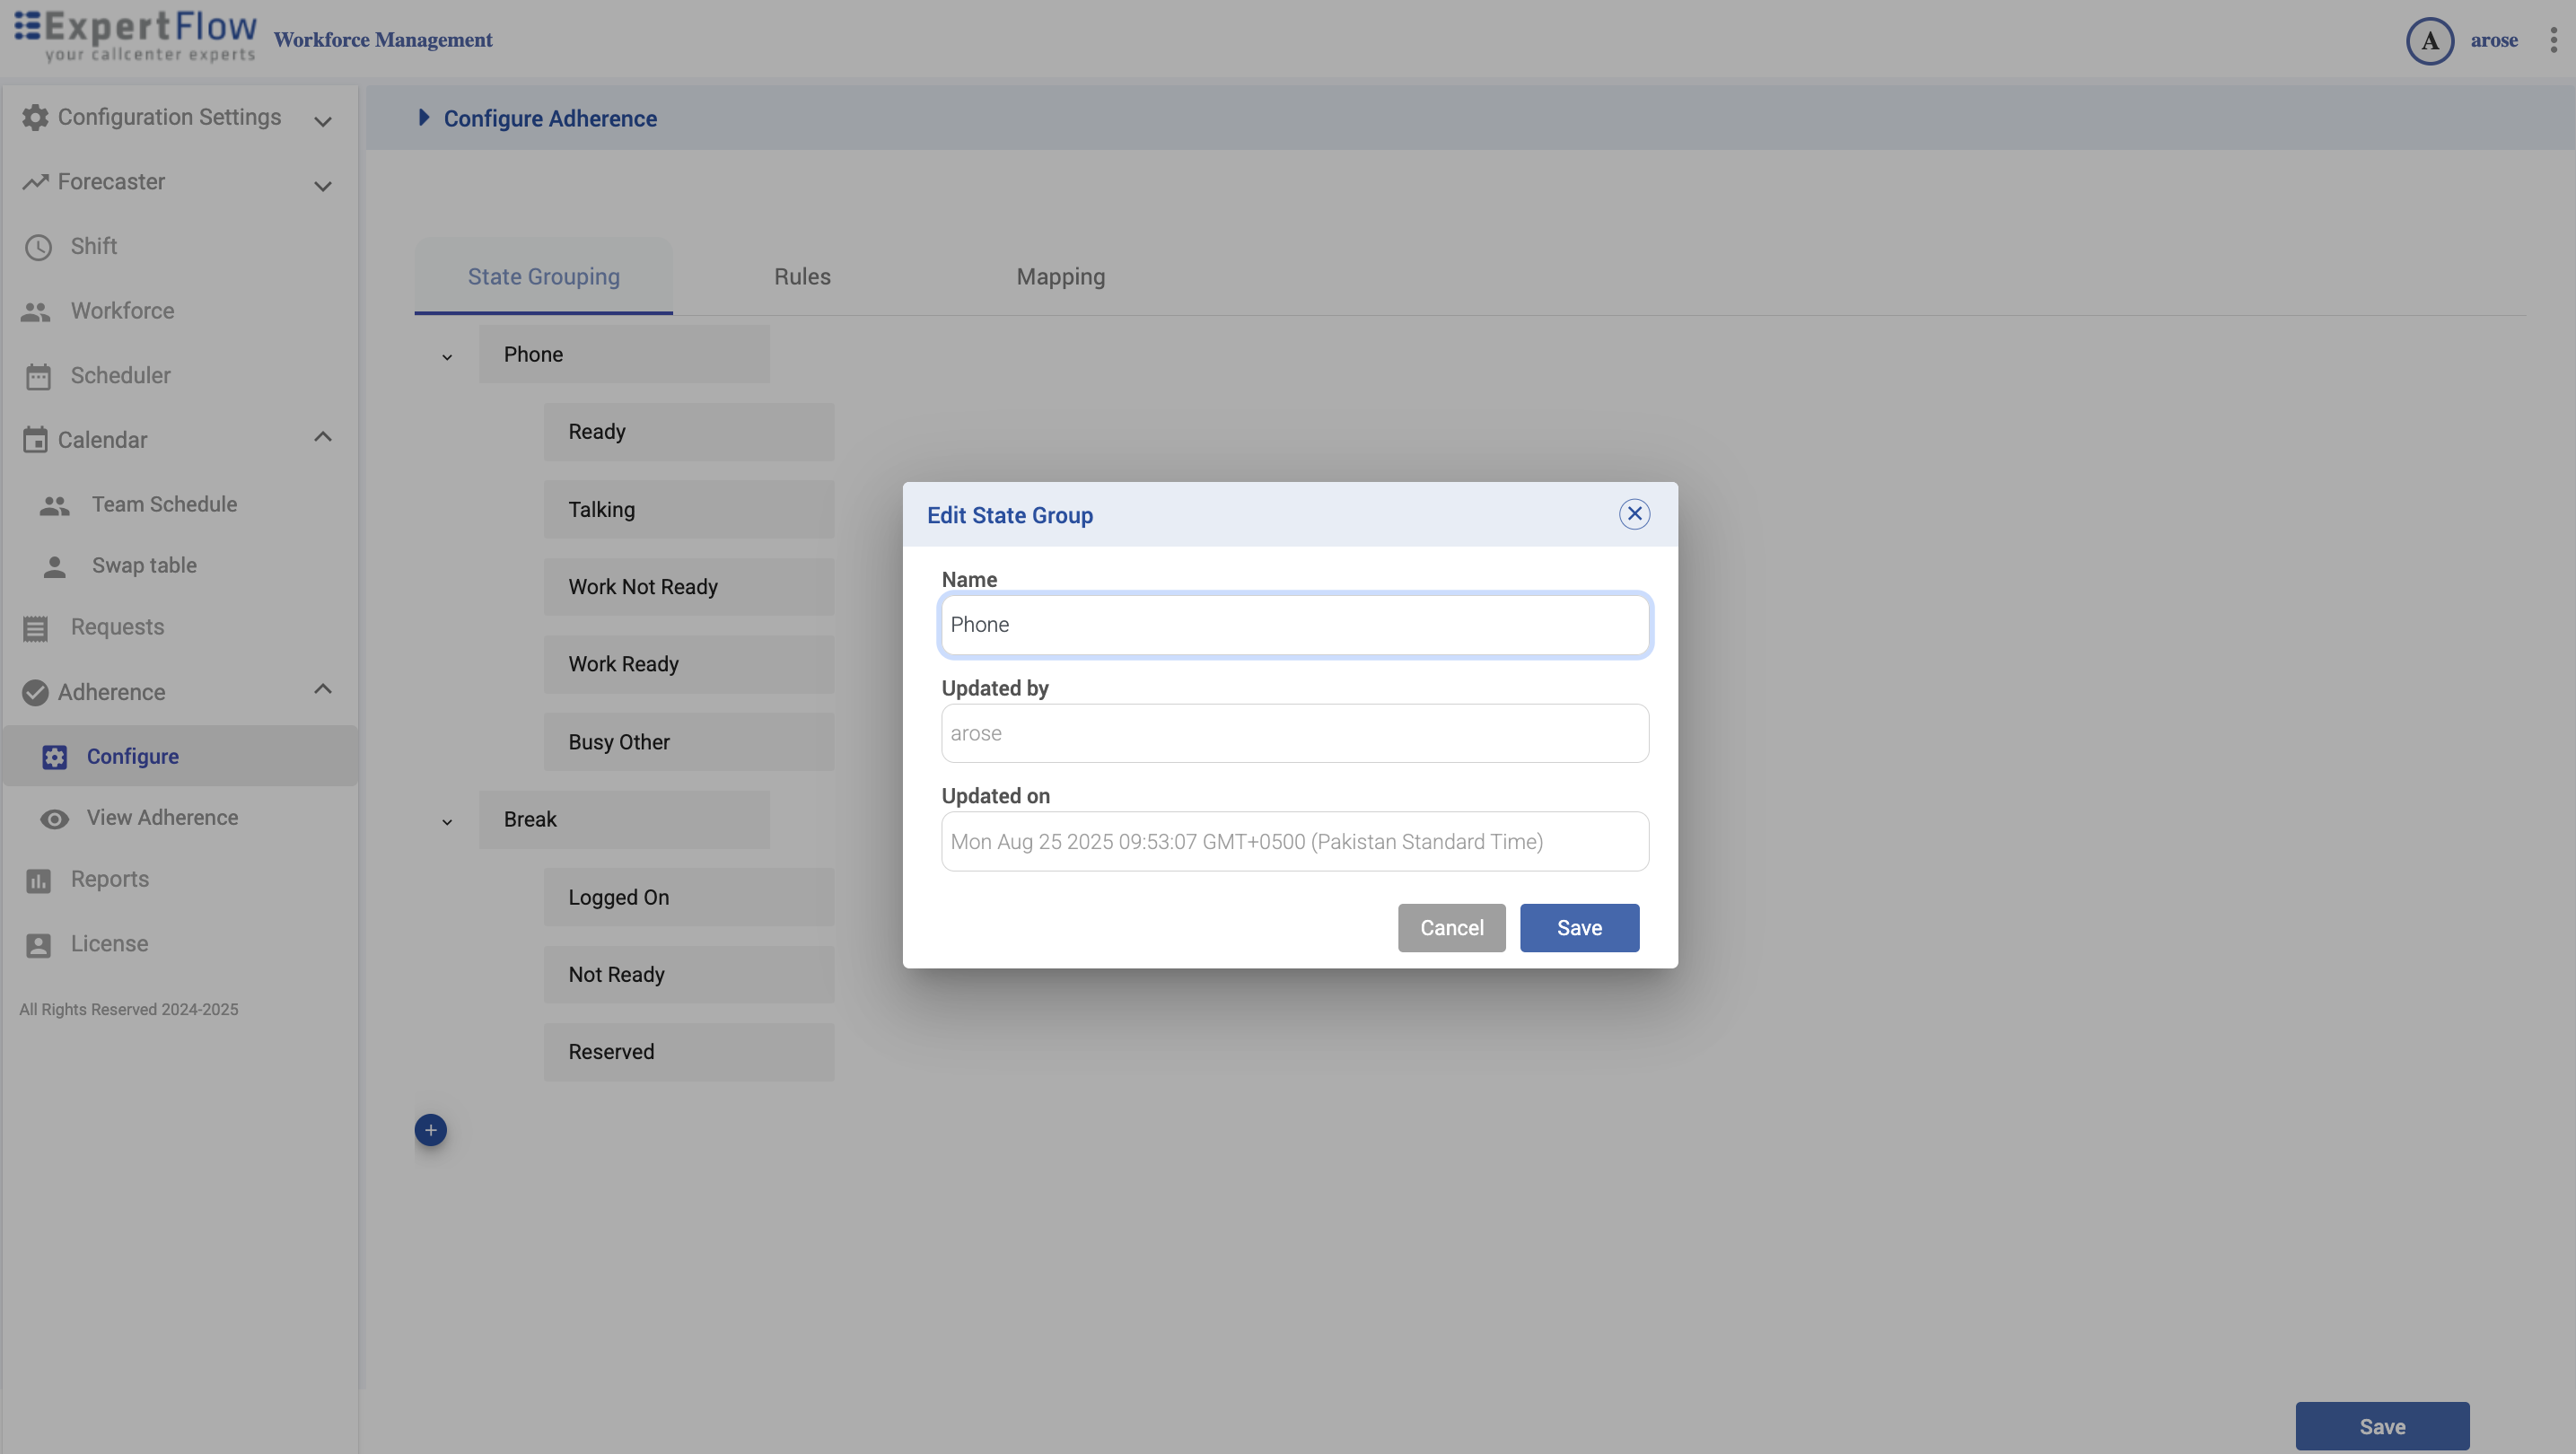
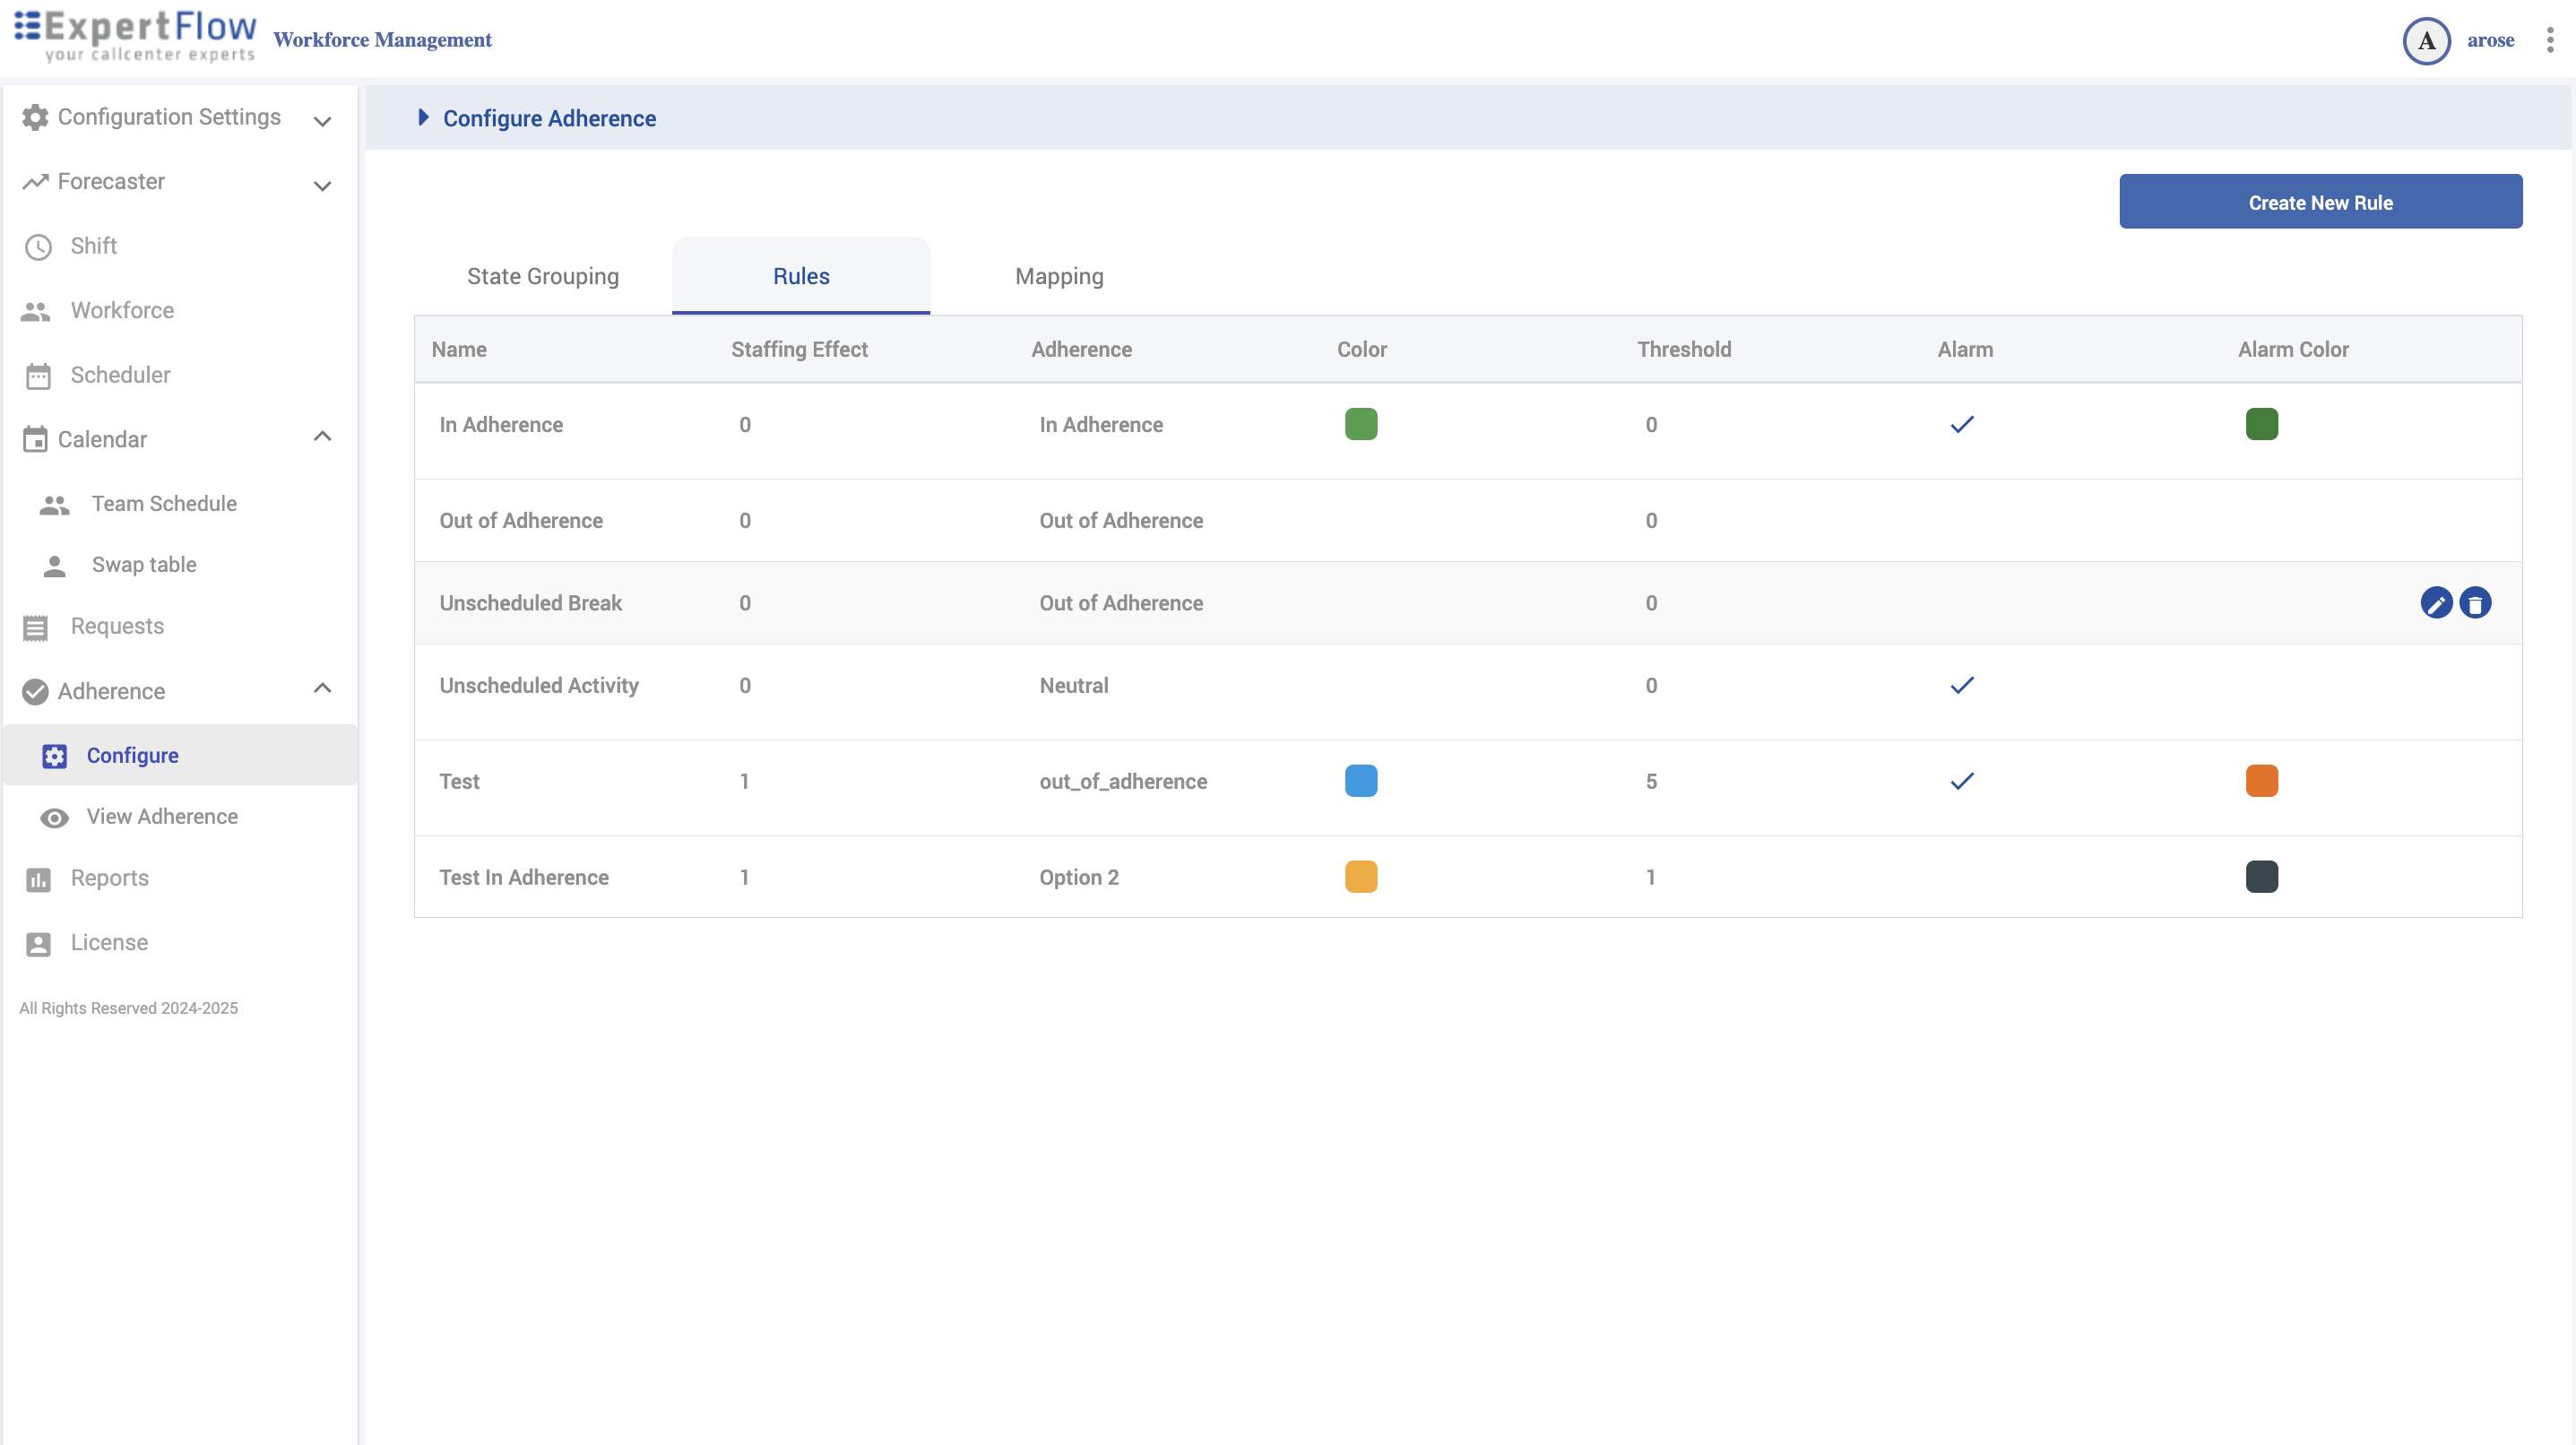
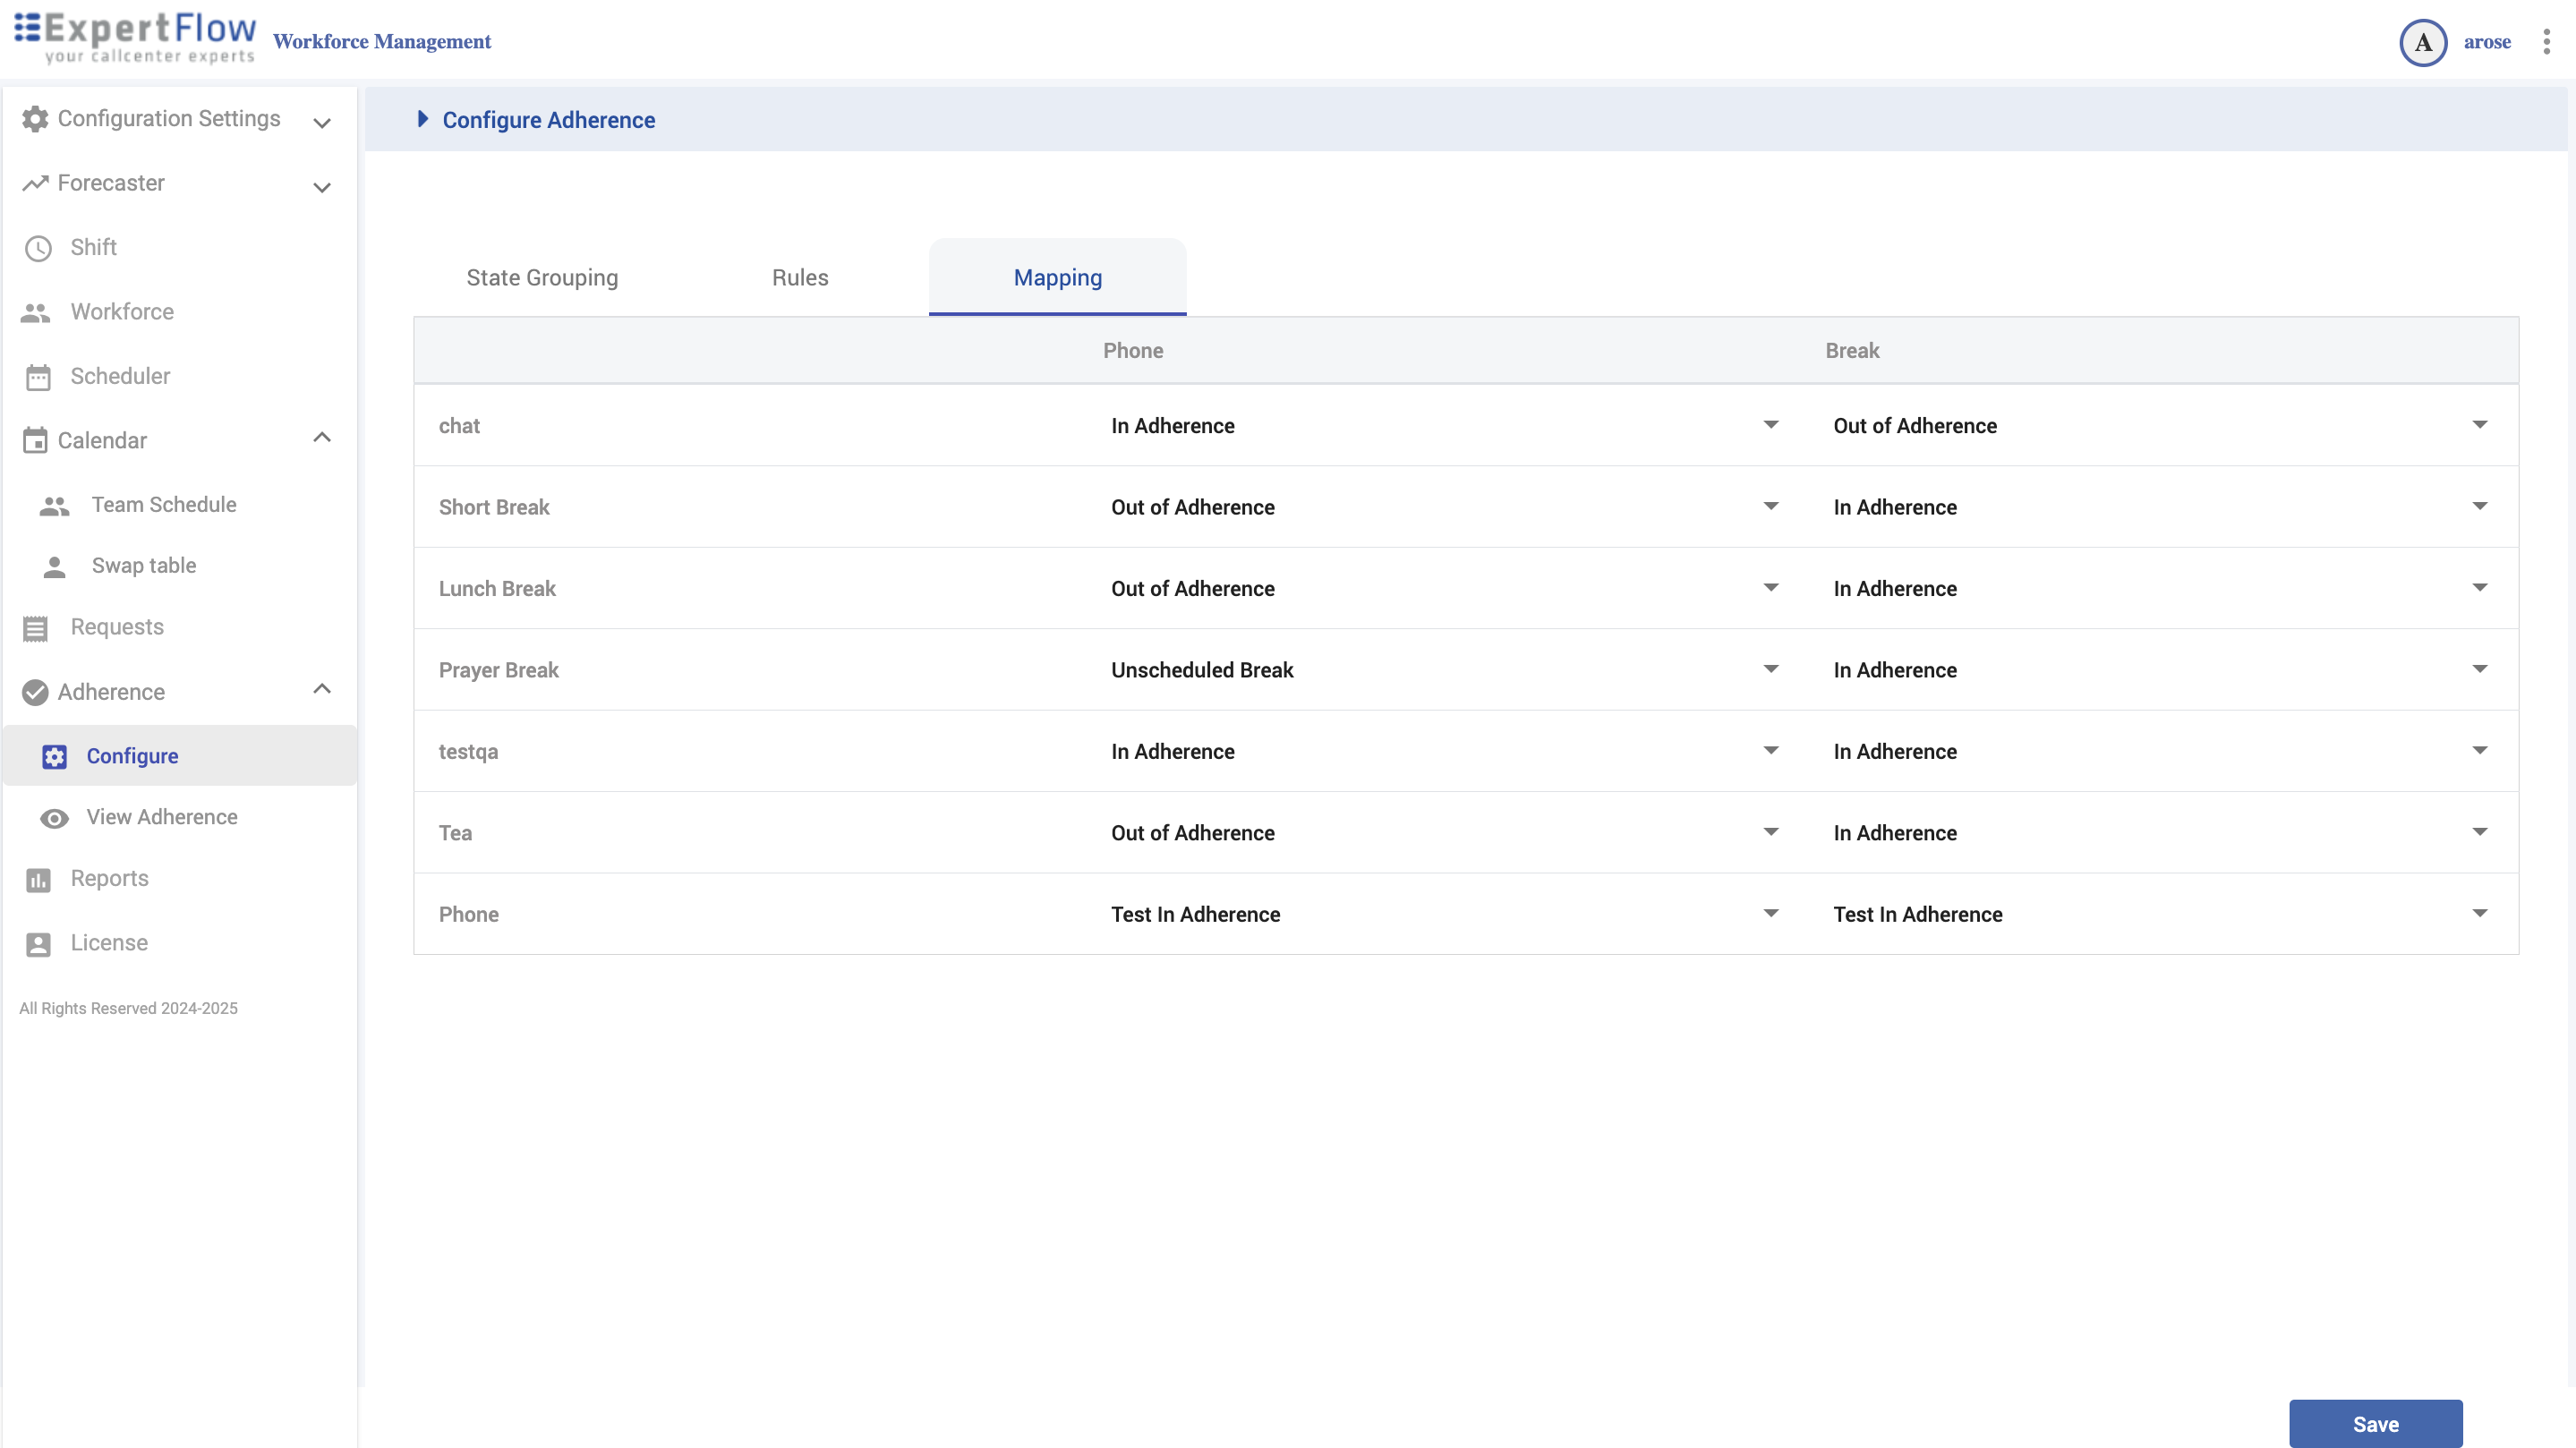
Adherence — Configure
Navigation
Left navigation → Adherence → Configure
State Grouping
-
Build logical groups (e.g., Phone, Break) and add member states (Ready, Talking, Work Ready, etc.).
-
Click + to add a state or subgroup.
Rules
-
Name, Staffing Effect, Adherence (In/Out/Neutral), Color, Threshold (mins), Alarm, Alarm Color.
-
Click Create New Rule, complete fields, Save.
Mapping
-
For each State Grouping, map WFM Activities (Phone, Lunch, Tea, etc.) to a Rule (In Adherence, Out of Adherence, Unscheduled Break…).
-
Save when done.
Result
If an agent is scheduled for Phone but their live platform state maps to Out of Adherence, the adherence view shows that outcome with your color/alarm after thresholds.
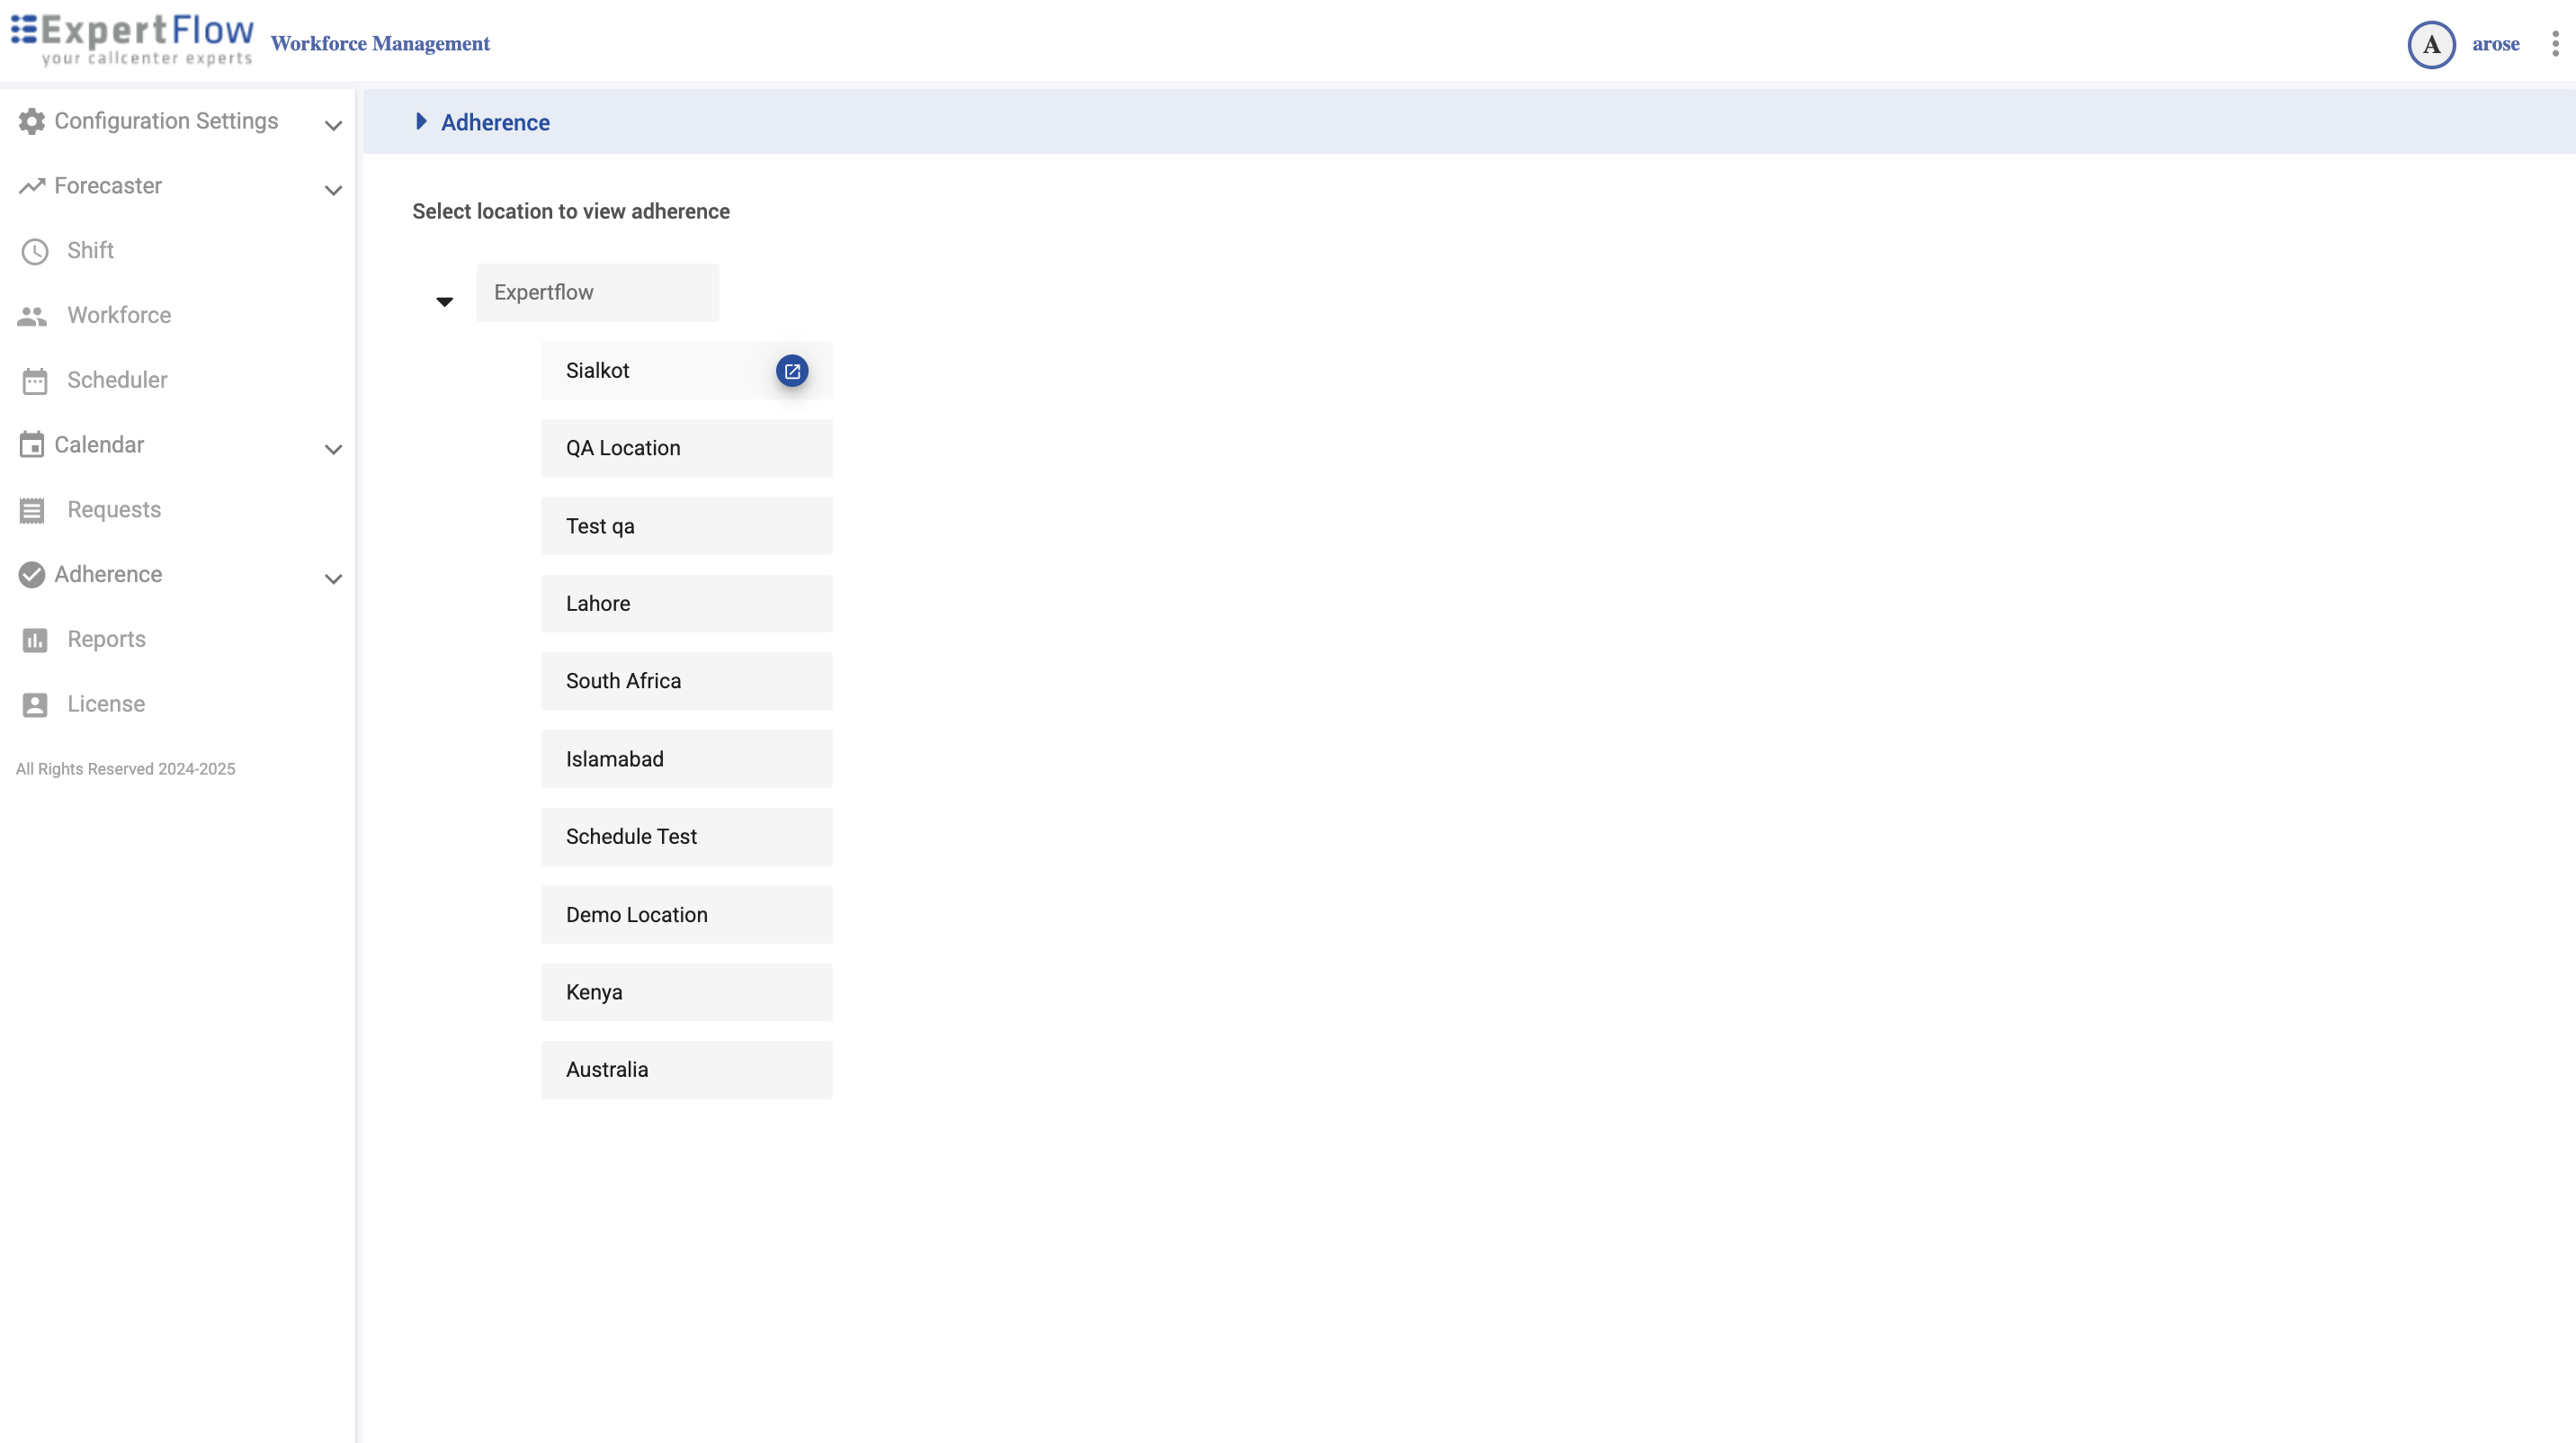
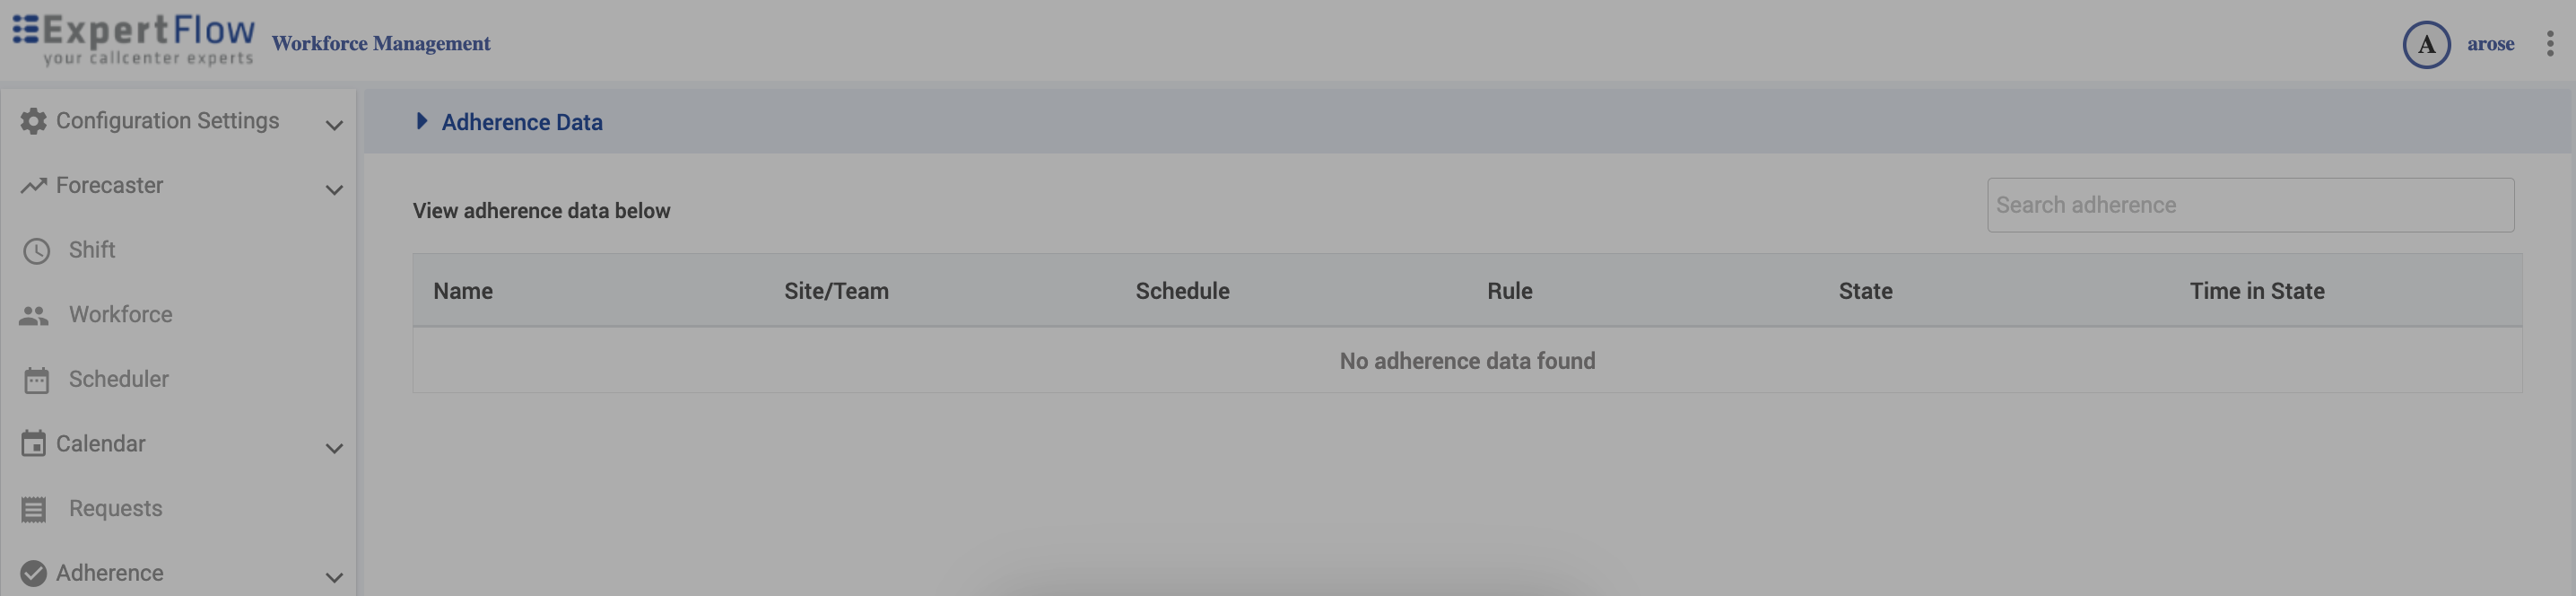
Adherence — View
Navigation
Left navigation → Adherence → View Adherence
Open a location
-
Expand the org tree.
-
Hover a Location and click the open icon.
-
The adherence board loads for that location showing:
-
Scheduled activity vs current state
-
Adherence result (your colors/rules)
-
Time in state and other indicators
-
Typical use
-
Spot Out of Adherence agents and drill in.
-
Validate that Rules and Mapping reflect policy.
-
Coordinate fixes with Scheduler and Requests.
Reports
The Reports feature allows users to view agent and queue statistics related to workforce management in the metabase.