
What this guide covers. How to get answers and reports about your contact center just by typing a question in plain English, and how administrators set this up. No SQL or technical knowledge is needed to use AI Reports or the AI Assistant.
Quick start: see it in 30 seconds
Short on time? These two clips show the whole idea. The rest of this guide explains each part in detail.
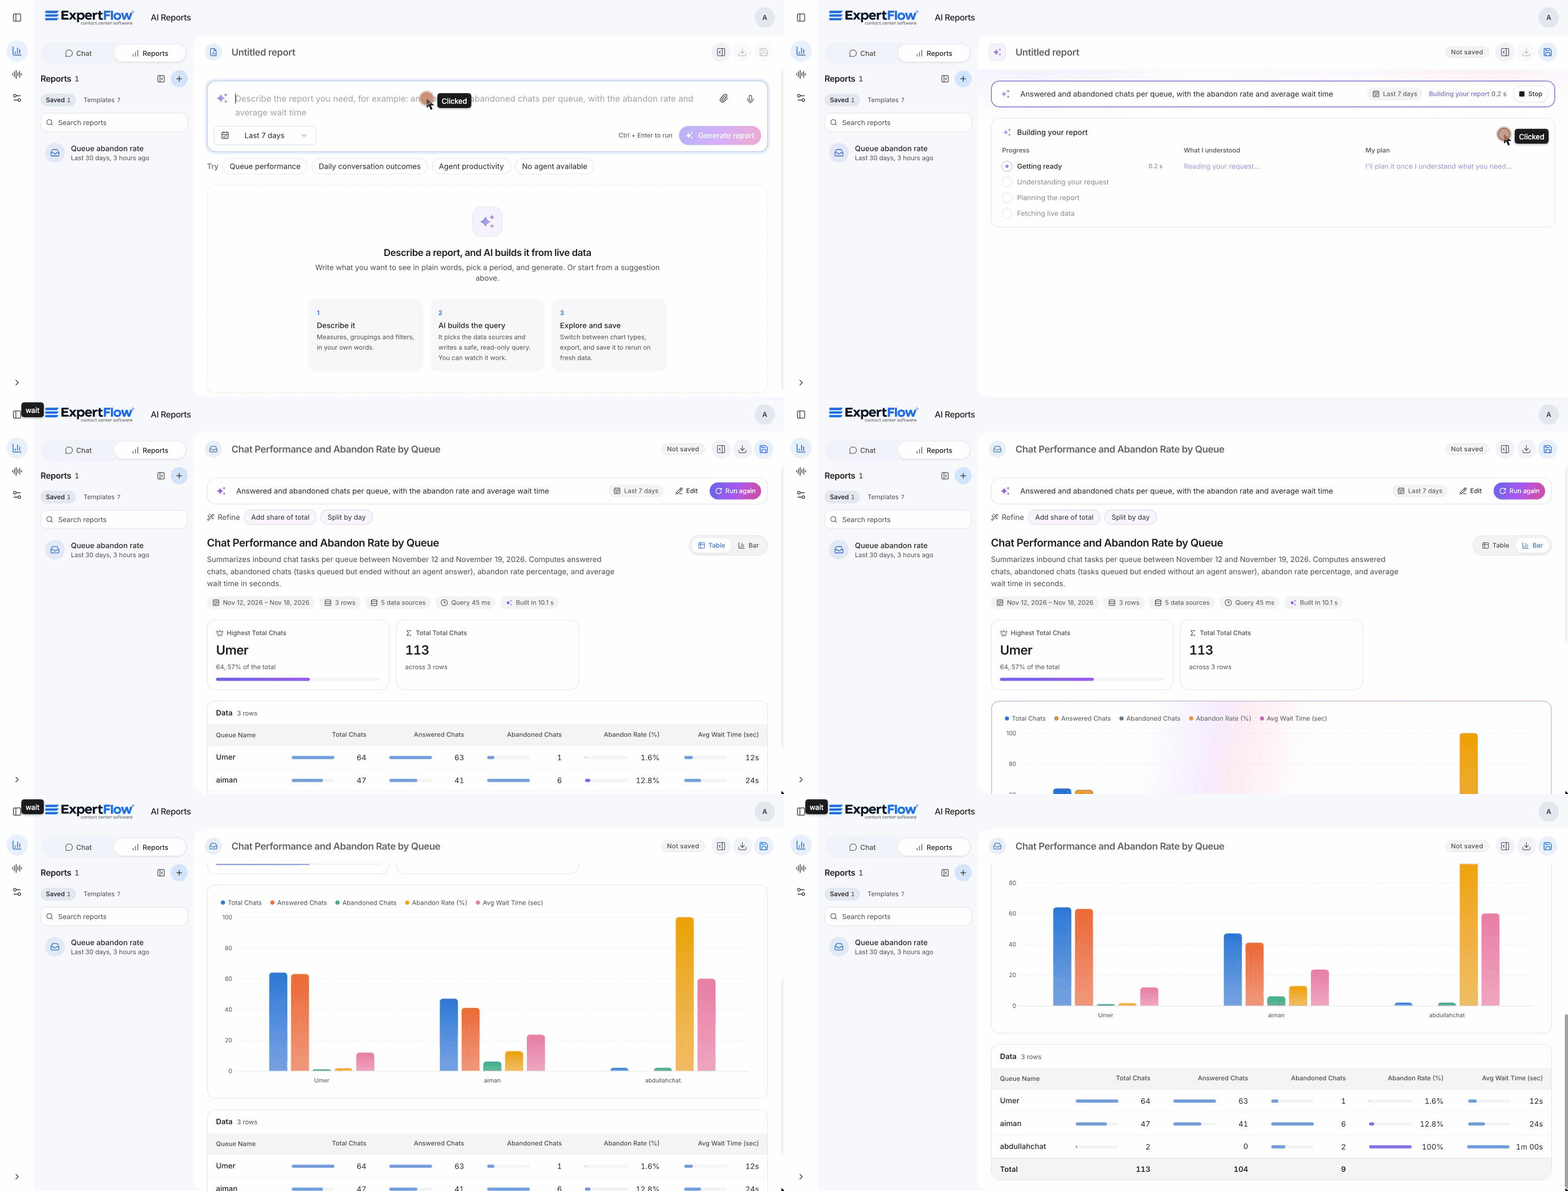
Build a report by typing what you want
In Insights → AI Reports, type the report in plain words, click Generate report, and the AI builds it from live data with highlights, a chart and a table.
Ask the AI Assistant a question
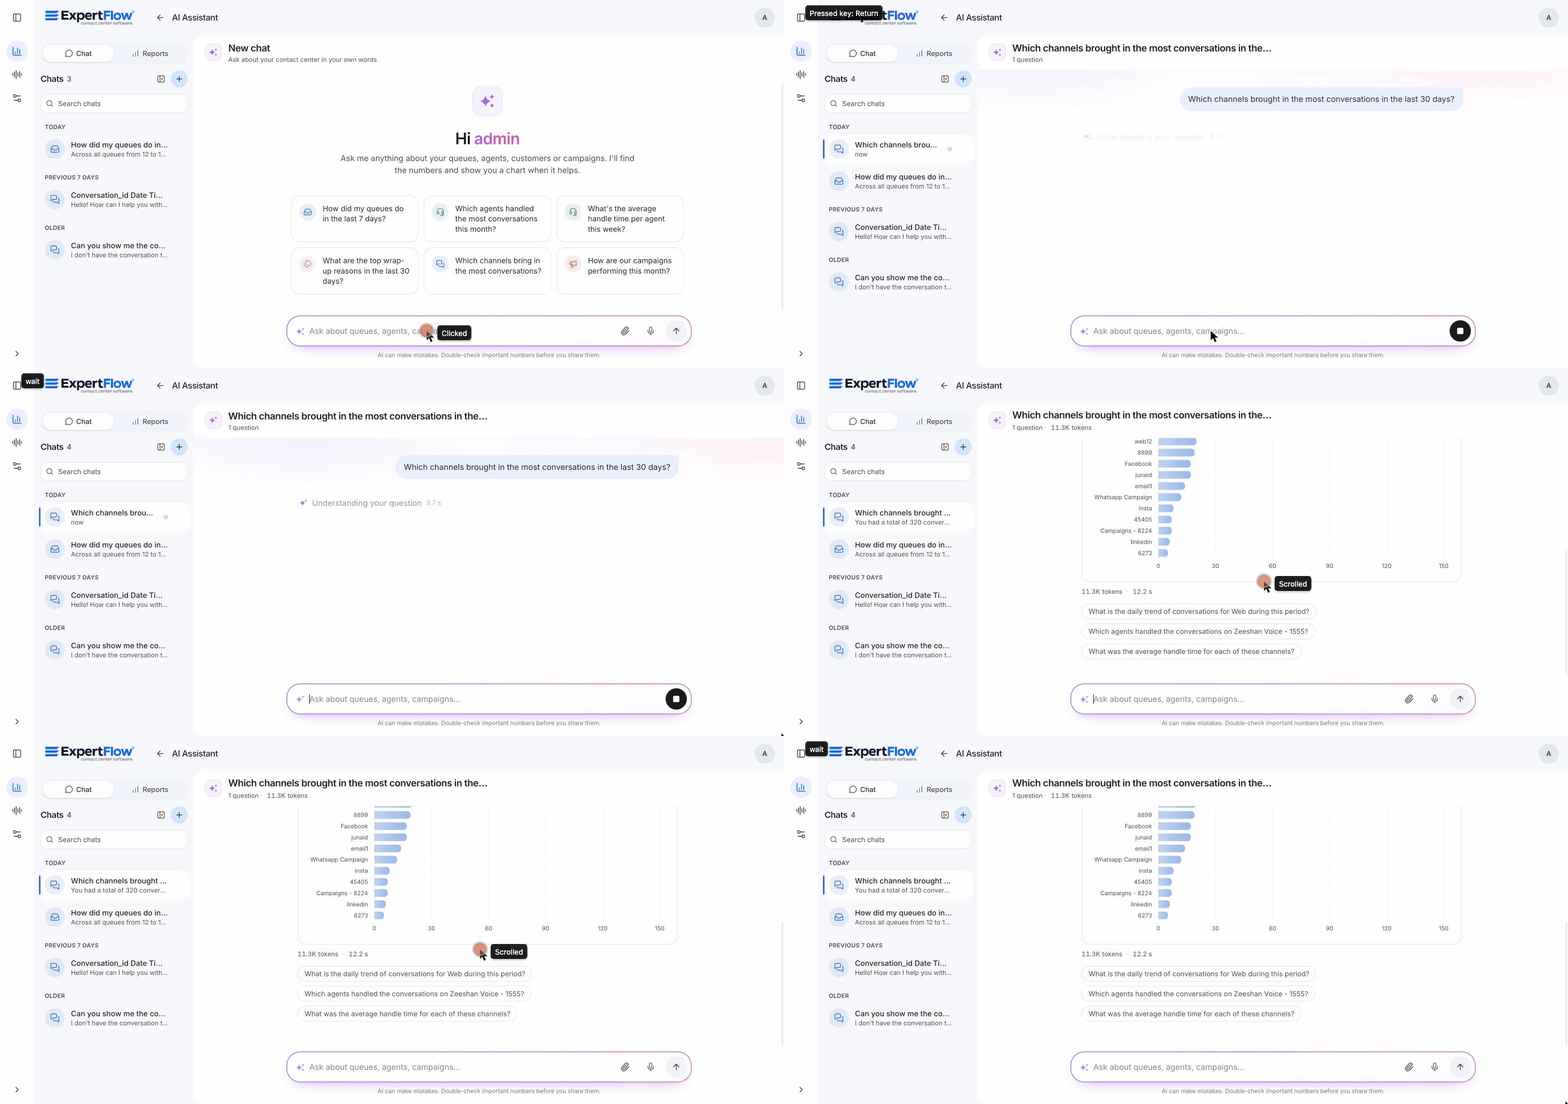
In Insights → AI Assistant, ask a question as you would ask a colleague. You get a short answer, a chart, and suggested follow-up questions.
1. What is it?
Agent Desk includes two AI tools that read your contact-center reporting data (queues, agents, conversations, wrap-ups, campaigns and so on) and turn a plain-language question into real numbers, tables and charts.
|
Tool |
What it is for |
Think of it as… |
|---|---|---|
|
AI Reports |
Building a report you can look at, export to Excel and save to rerun later on fresh data. |
A report builder where you describe the report instead of designing it. |
|
AI Assistant |
Asking quick questions in a chat and getting a short written answer with a chart, then asking follow-up questions. |
A colleague who knows the reporting database and answers in plain words. |
Behind the scenes, the AI reads your question, works out which data it needs, writes a database query, checks it and runs it on the live reporting database. It can only read data. It can never change or delete anything.
Who can use it
|
Who |
What they see |
|---|---|
|
Supervisors and administrators |
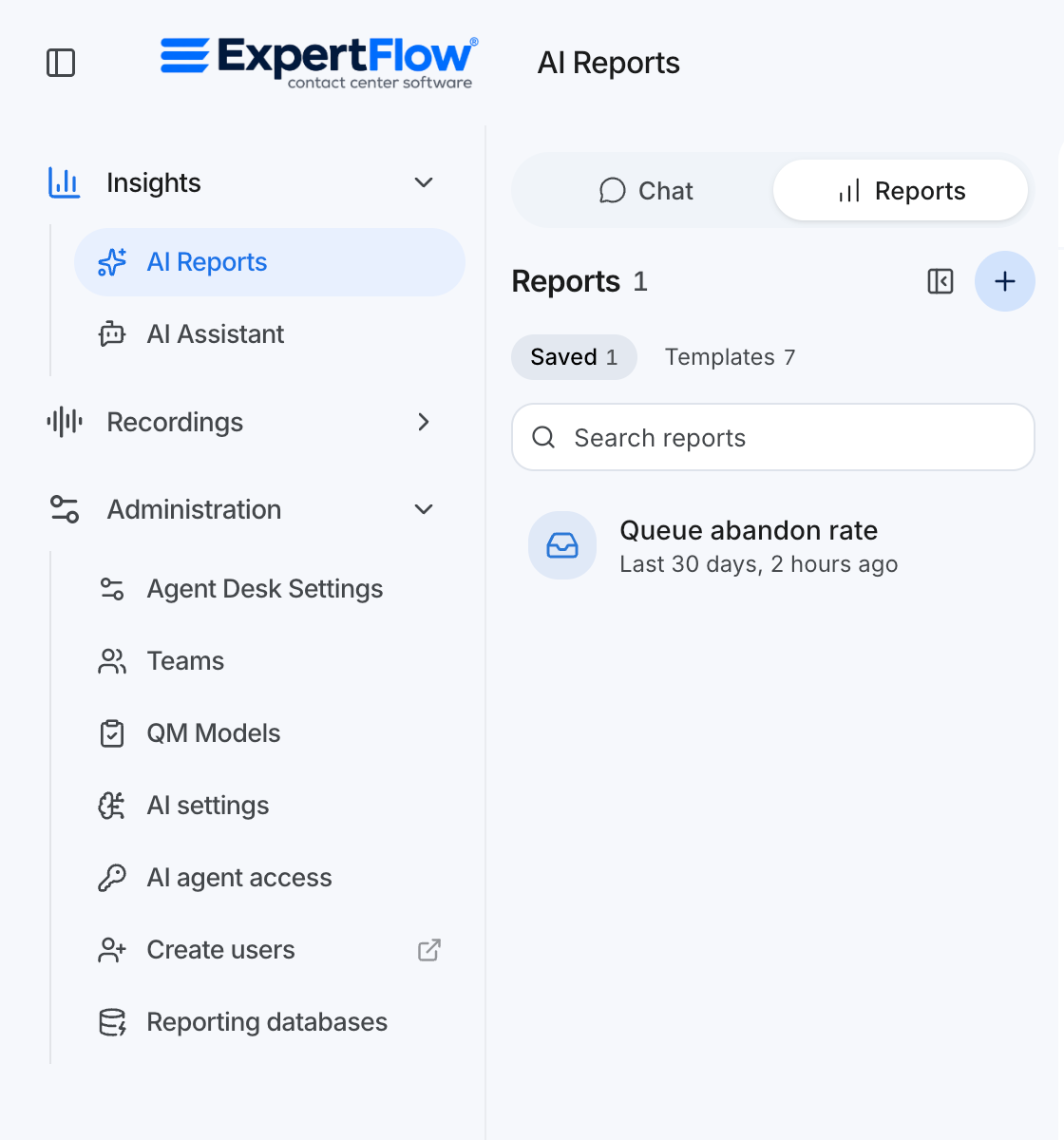
Insights → AI Reports and Insights → AI Assistant |
|
Administrators (users who can manage Agent Desk settings) |
Also Administration → AI settings, Reporting databases and AI agent access |
If you don't see these menu items, either your user doesn't have the right role, or the AI Reports service hasn't been connected to Agent Desk yet. Ask your administrator.
2. First-time setup (administrators)
Before anyone can use AI Reports, an administrator does these steps once, in this order:
-
Choose the AI model: Administration → AI settings. Pick the AI provider, model and key. See section 6.
-
Add the reporting databases: Administration → Reporting databases. Tell the AI where your reporting data lives. See section 7.
-
Try it: open Insights → AI Reports and run one of the templates.
-
Optional, give AI agents access: Administration → AI agent access. Create a token so a person can use AI Reports from tools like Claude Code, Codex or Cursor. See section 8.
3. AI Reports: build a report by describing it
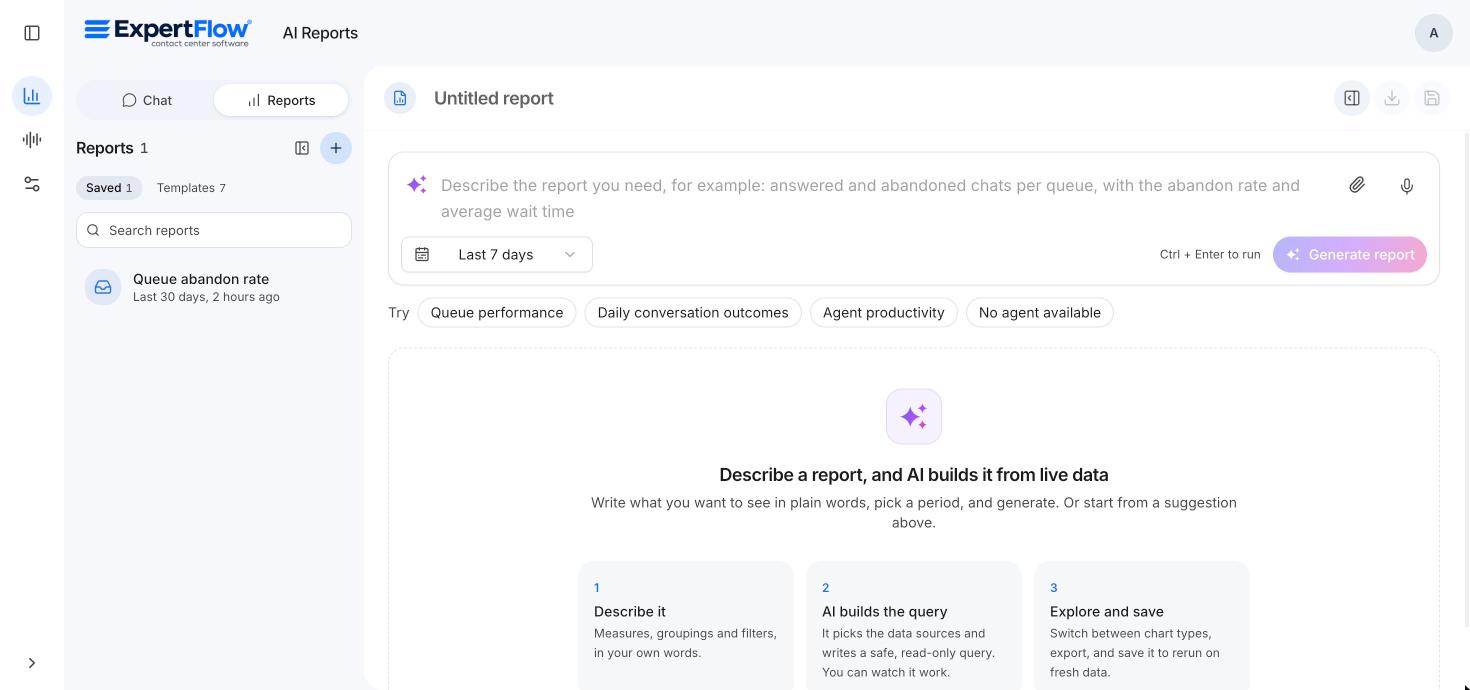
Open Insights → AI Reports. The screen has two parts:
-
Left: the report list. New report, a search box, your team's Saved reports and ready-made Templates. You can fold this list into a thin bar to give the report more room.
-
Right: the report. At the top is the box where you describe the report; below it the result appears.
Step 1: Describe the report
Type what you want to see in your own words. Say what to measure and what to group it by. For example:
-
Answered and abandoned chats per queue, with the abandon rate and average wait time
-
For each agent: completed tasks, average handle time in minutes, and transfers
-
Number of conversations per day split into agent-handled, bot-handled and abandoned
You can also click the microphone to dictate, or add files and images (for example a screenshot of an old report to rebuild, or an Excel list of agents to report on).
Step 2: Pick the period and the database
-
Report period: Today, Yesterday, Last 7 days, Last 30 days, This month, Last month, This year, All time, a Custom range, or As described (use whatever period you wrote in the description).
-
Databases: only shown when more than one database is connected. Leave it on All databases (AI decides), or tick the ones you want. If the AI can't tell which database you mean, it asks you instead of guessing.
Step 3: Generate
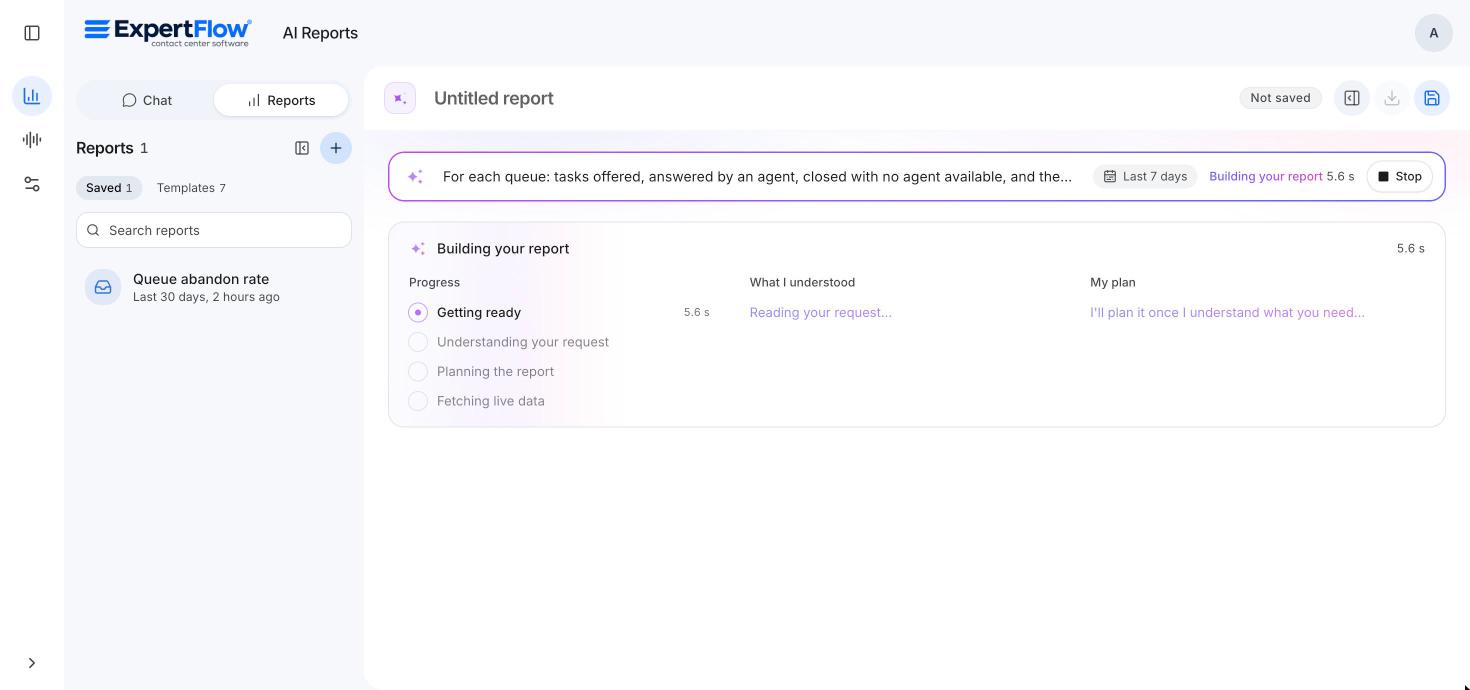
Click Generate report (or press Ctrl + Enter). While it works you can watch each step: getting ready, understanding your request, planning the report and fetching live data. A report usually takes between 5 and 60 seconds. Click Stop to cancel.
Step 4: Read and explore the result
-
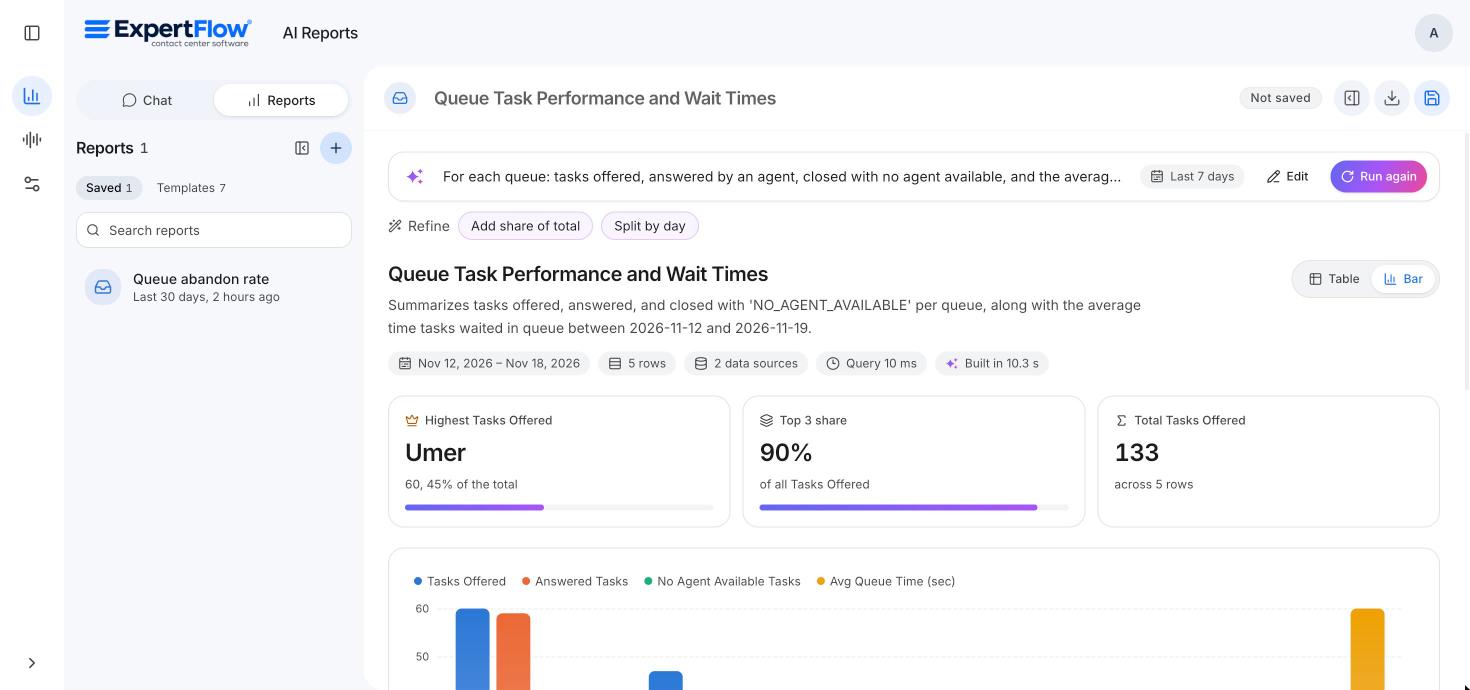
Highlights: short cards at the top pointing out the highest, lowest, total, peak or average values.
-
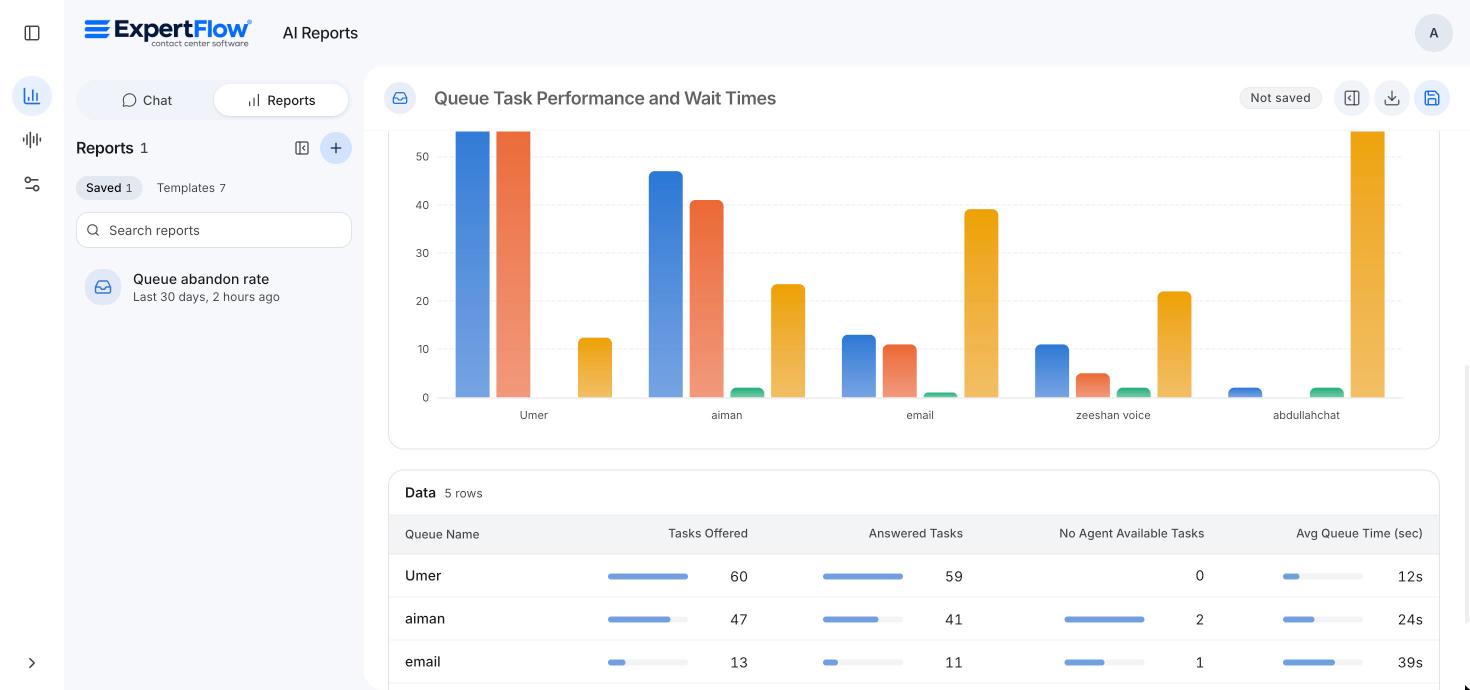
Show as: switch between Table, Bar, Line, Pie and Figures (big numbers). Only the views that suit the data are offered.
-
Data table: filter rows, page through them, and see totals.
-
Refine: one-click changes such as Top 5 only, Add share of total, Split by day, Group by week, Compare with previous period or Break down by queue. The AI rebuilds the report with that change.
Step 5: Export, save and check the details
|
Button (top right) |
What it does |
|---|---|
|
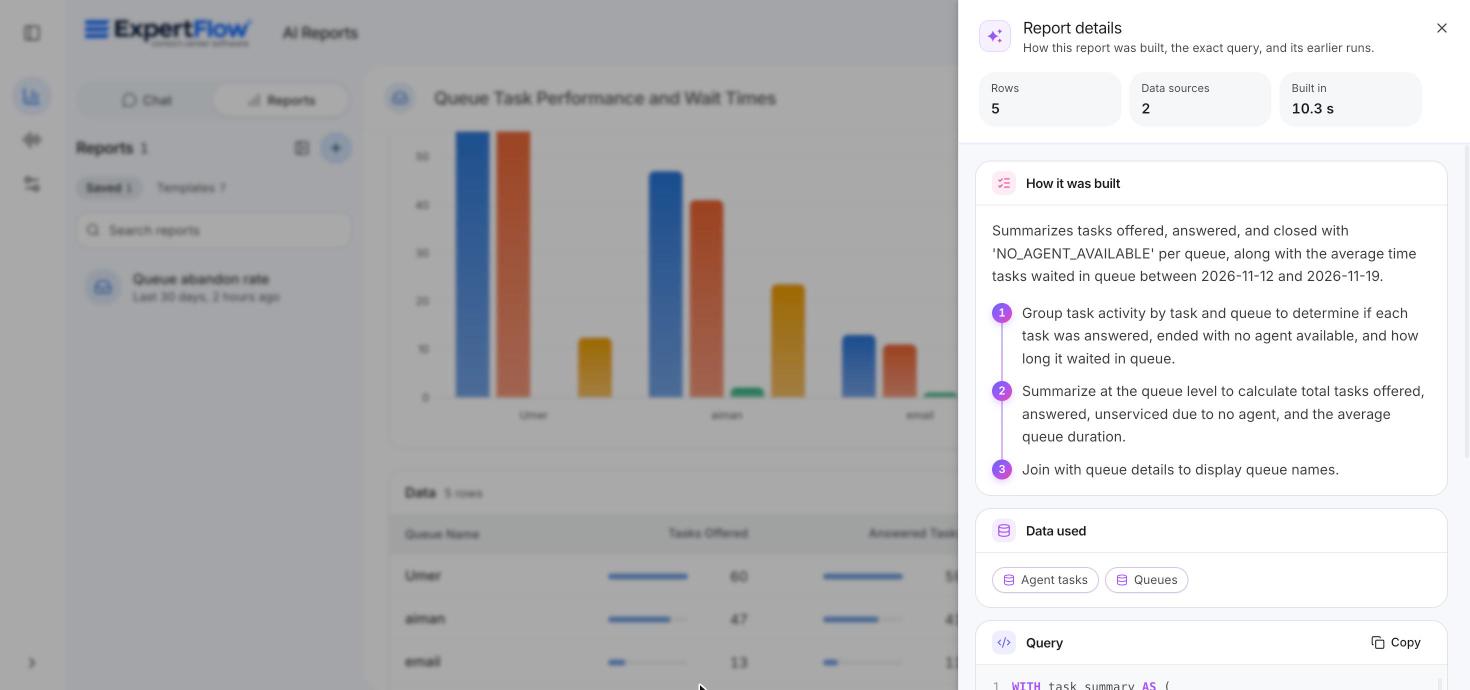
Report details (panel icon) |
Shows how the AI understood your request, which data it used, any corrections it made, the exact query, and the report's run history (who ran it, when, and how many rows). |
|
Export (download icon) |
Downloads the result as CSV or an Excel workbook. |
|
Save |
Saves the report to the shared list so you and your colleagues can rerun it. |
How saved reports work. A saved report keeps your description, period and chart type, not a fixed query. Each time you open it, the AI builds the query again and runs it on the latest data. Saved reports are shared: everyone with access sees them, and deleting one removes it (and its run history) for everyone.
The status next to the report name tells you where you are: Not saved (new draft), Saved, or Unsaved changes.
Templates: ready-made starting points
|
Template |
What it shows |
|---|---|
|
Queue performance |
Answered, abandoned and wait time per queue |
|
Daily conversation outcomes |
Agent-handled, bot-handled and abandoned per day |
|
Agent productivity |
Completed tasks and handle time per agent |
|
No agent available |
Tasks lost because no agent was free |
|
Not-ready time by reason |
Time agents spent not ready, per reason |
|
Wrap-up categories |
Share of each wrap-up category |
|
Campaign results |
Dialled, connected and success rate per campaign |
Tips for good results
-
Name what to count or measure (answered chats, abandoned calls, handle time, ready time) and what to group by (per queue, per agent, per day).
-
Put the date range in the period picker rather than in the text. That way a saved report can be rerun for any period.
-
If a report shows too many rows, ask for totals or a top 10 instead of every row, or choose a shorter period.
-
If the result isn't what you meant, edit the wording and generate again, or use a Refine button.
4. AI Assistant: ask questions in a chat
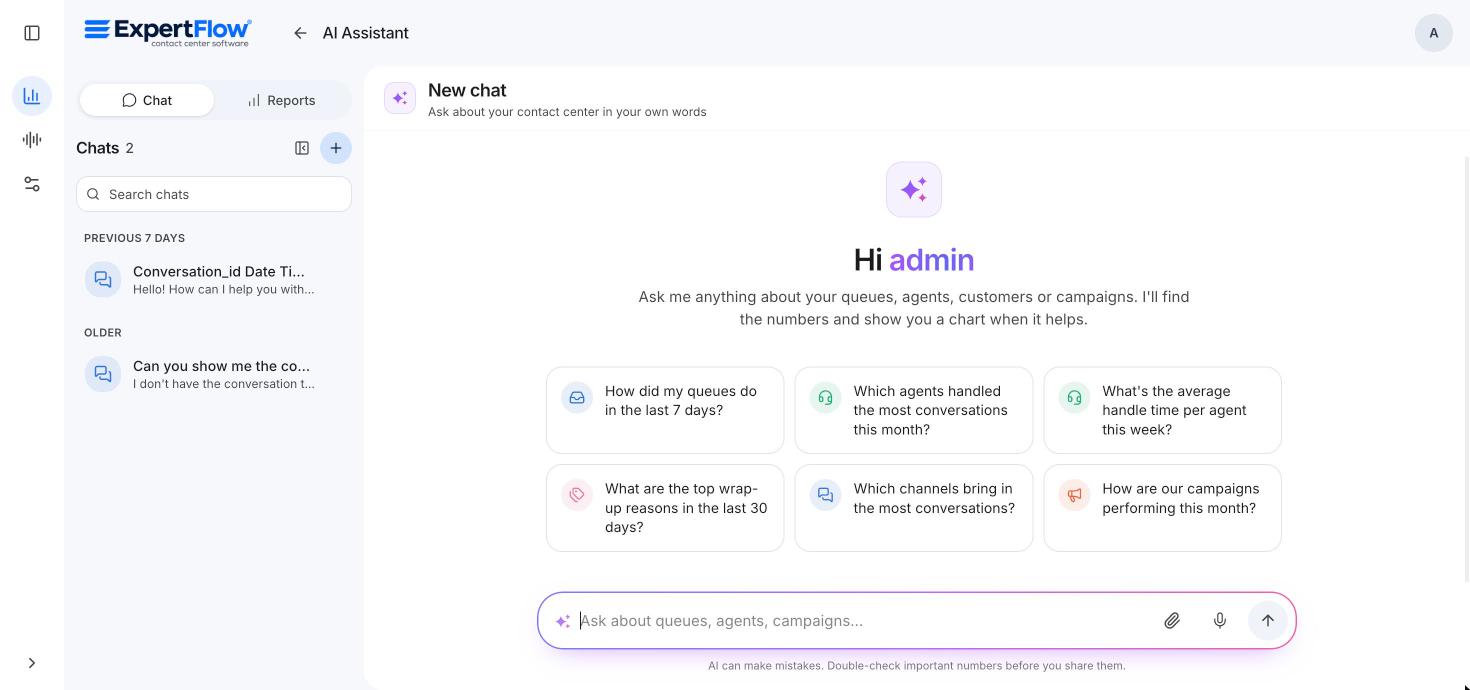
Open Insights → AI Assistant, or use the Chat / Reports switch at the top of AI Reports. Type a question as you would ask a colleague, or click one of the suggested questions, such as:
-
How did my queues do in the last 7 days?
-
Which agents handled the most conversations this month?
-
What are the top wrap-up reasons in the last 30 days?
What the assistant can do
-
Answer in plain words, with a chart or table when it helps.
-
Handle follow-up questions: after an answer, just ask and per agent? or what about last month?. It remembers the conversation.
-
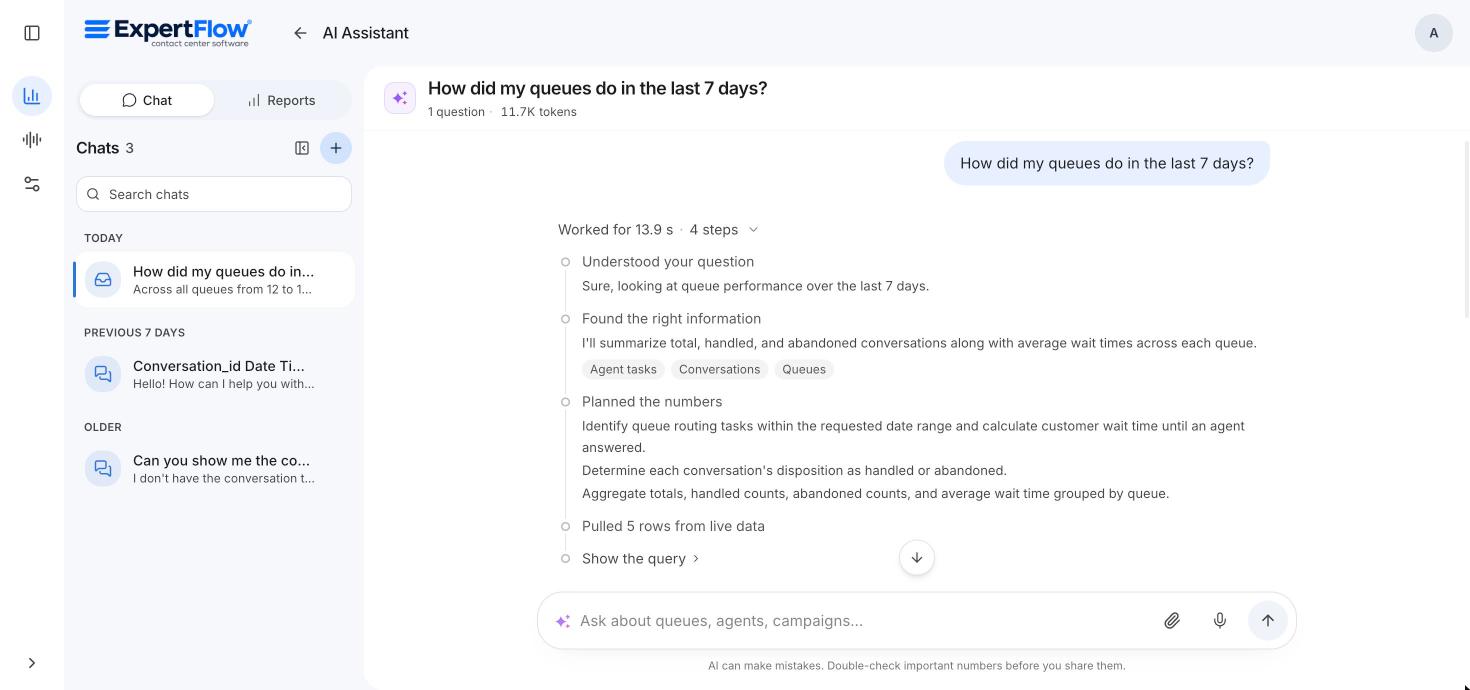
Show its work: click the Worked for … s line above an answer to see each step (understanding the question, finding the data, planning the numbers, pulling the results). Click Show the query there to see the exact query behind the answer.
-
Read files and images: add Excel, CSV, PDF, Word, text files or screenshots with the paper-clip button, or drag and drop or paste them. Up to 5 files per message (4 of them images); files up to 10 MB, images up to 20 MB.
-
Take dictation: click the microphone and speak your question.
-
Suggest next questions under each answer.
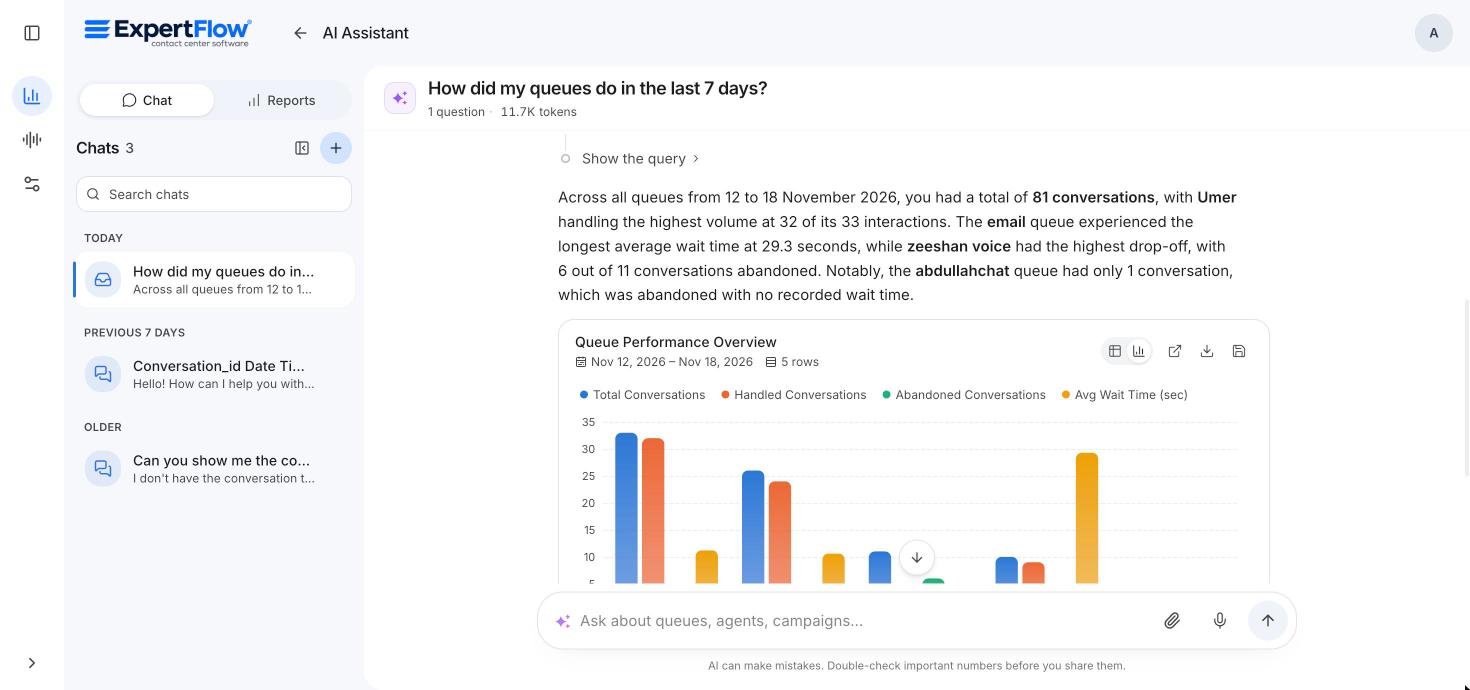
Buttons on each answer
|
Button |
What it does |
|---|---|
|
Open in Reports |
Opens the same question in AI Reports, where you can change the chart, refine and export it. |
|
Download |
Downloads the numbers behind the answer. |
|
Save as report |
Adds it to the shared saved-reports list. |
|
Copy answer |
Copies the written answer. |
|
Tokens badge |
Shows how much AI work the answer used (text read and written by the AI, number of AI steps) and, where known, the cost. |
Chat history
Your chats are listed on the left, grouped by Today, Yesterday, Previous 7 days and Older. Use New chat to start fresh, search old chats, or delete them.
Chat history is kept in your browser only. It is not shared with colleagues and won't appear on another computer. Saved reports are shared and are not affected when you delete a chat.
AI can make mistakes. Double-check important numbers before you share them. Open the answer in Reports or look at the query if something looks off.
5. When something goes wrong
|
Message you see |
What it means |
What to do |
|---|---|---|
|
No AI model is set up for reports yet |
AI settings haven't been filled in. |
Administrator: complete AI settings (section 6). |
|
Which database? |
Several databases are connected and the AI can't tell which one you mean. |
Choose the database next to the period and run again. |
|
The reporting data can't answer this |
The data needed for this question doesn't exist in the reporting database. The AI explains why. |
Rephrase, or ask about something the data holds. |
|
No data for this period |
The query worked but found nothing. |
Try a longer period or a broader description. |
|
Showing the first … rows |
The result was too big to show completely. |
Narrow the period or ask for totals instead of every row. |
|
The AI service isn't available right now |
The AI account ran out of credit, reached its usage limit, or its key was rejected. |
Administrator: top up the account or check the key in AI settings. |
|
The AI Reports service didn't respond |
The reporting service can't be reached. |
Check your connection and try again in a moment. If it continues, contact support. |
|
The report couldn't be built |
Something went wrong while building it. |
Click Run again; if it still fails, word it a little differently. |
6. AI settings: choosing the AI model
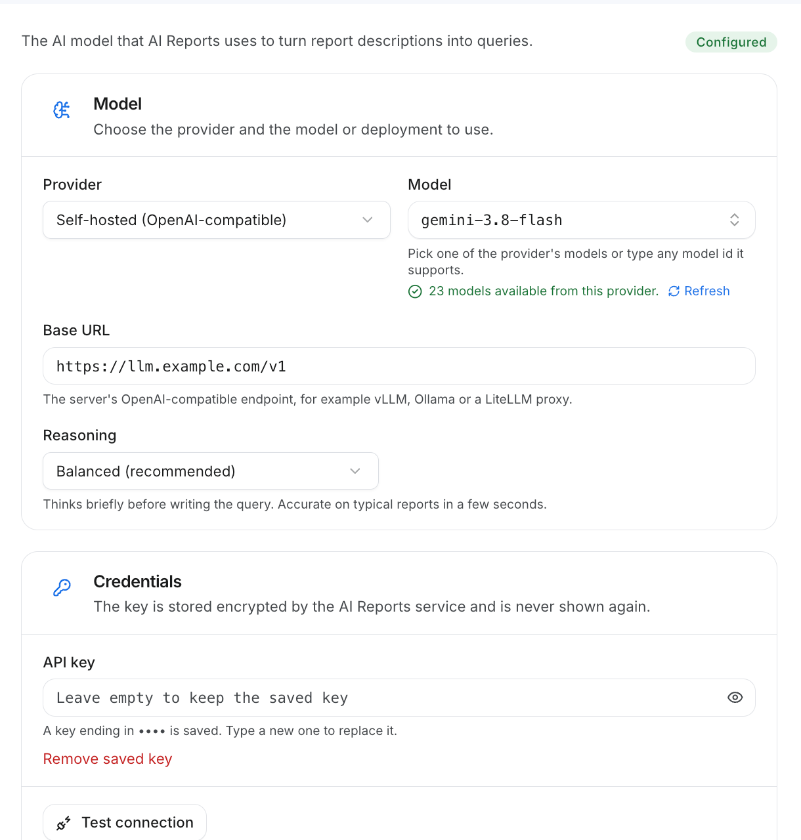
Administrators only. Open Administration → AI settings. This decides which AI model turns questions into reports.
-
Provider: OpenAI, Azure OpenAI, Anthropic, Google Gemini, Moonshot AI (Kimi), or a self-hosted OpenAI-compatible server (for example vLLM, Ollama or a LiteLLM proxy).
-
Model: pick from the provider's own list (it loads once the key is entered) or type any model name the provider supports. Azure uses a Deployment name instead.
-
Base URL / API version: only for Azure, self-hosted servers and Moonshot.
-
API key: paste the key from the provider's console. It is stored encrypted and never shown again; only its last characters are displayed so you can recognise it. Leave the box empty to keep the saved key.
-
Reasoning: Fast (quickest, may miscount on complex reports), Balanced (recommended) or Thorough (most careful, often several times slower).
-
Click Test connection. When the model answers, save.
What is sent to the AI provider? For AI Reports: the report description, table and column names, and a few sample rows, so the AI can write the right query. Report results are not sent. For AI Assistant answers, a small summary of the results is also sent so the AI can write the answer and understand follow-up questions.
7. Reporting databases: connecting your data
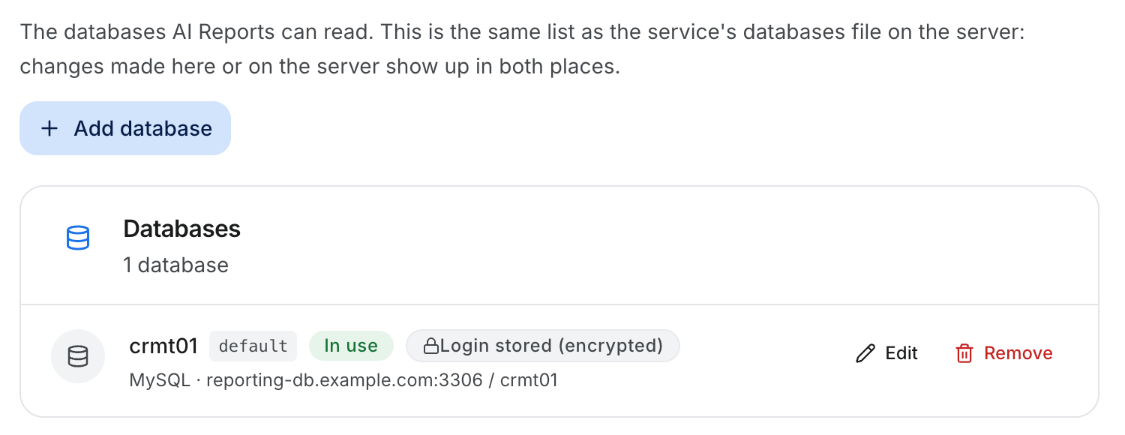
Administrators only. Open Administration → Reporting databases. This is the list of databases AI Reports is allowed to read. Most sites have one; larger setups may have several (for example one per site or server).
Add a database
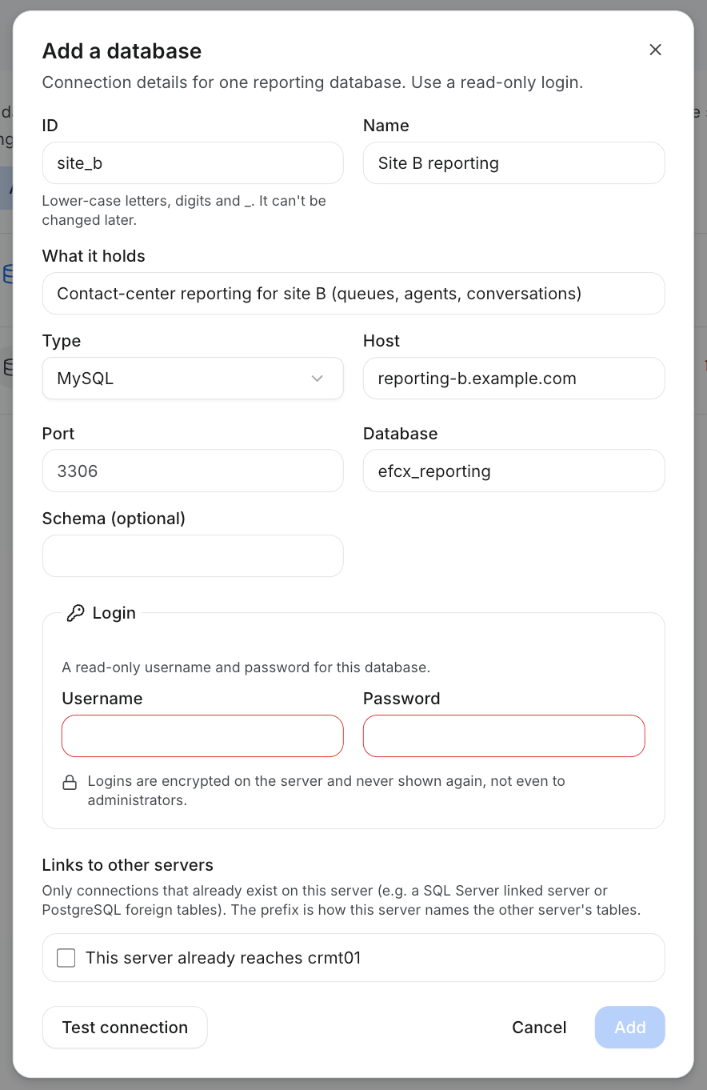
Click Add database and fill in:
|
Field |
What to enter |
|---|---|
|
ID |
A short code such as |
|
Name |
A friendly name people will see, for example Karachi reporting. |
|
What it holds |
One line describing the data. This helps the AI pick the right database, so be specific. |
|
Type |
MySQL, SQL Server, PostgreSQL or Informix. |
|
Host / Port |
The database server address and port. The usual port is filled in for you. For Informix, use the server's DRDA port. |
|
Database / Schema |
The database name, and optionally the schema (for example |
|
Username / Password |
A read-only database login. It is encrypted on the server and never shown again, not even to administrators. |
|
Links to other servers (optional) |
Only if this server already reaches another database through an existing link (for example a SQL Server linked server or PostgreSQL foreign tables). Tick it and enter how this server names the other server's tables. |
Click Test connection. A green message such as Connected: 120 tables in 35 ms means it works. Then click Add.
Always use a read-only login. AI Reports only ever runs read-only queries, but a read-only account adds a second layer of safety.
Reading the list
|
Label |
Meaning |
|---|---|
|
In use |
The database is loaded and AI Reports can read it. |
|
Not loaded |
Saved, but not in use yet (often a login or connection problem). |
|
Login stored (encrypted) |
The username and password were entered here. |
|
Login from the server |
The login comes from the server's own settings. |
|
No login |
No working login. Edit the database and enter one. |
Use Edit to change details (leave the login empty to keep the stored one) or Remove to stop reading a database. Removing deletes its stored login, and saved reports that used it will ask for another database.
If the page says the list is read-only, the database list is managed directly on the server and can only be changed there. Contact whoever runs the AI Reports service.
8. AI agent access: MCP tokens
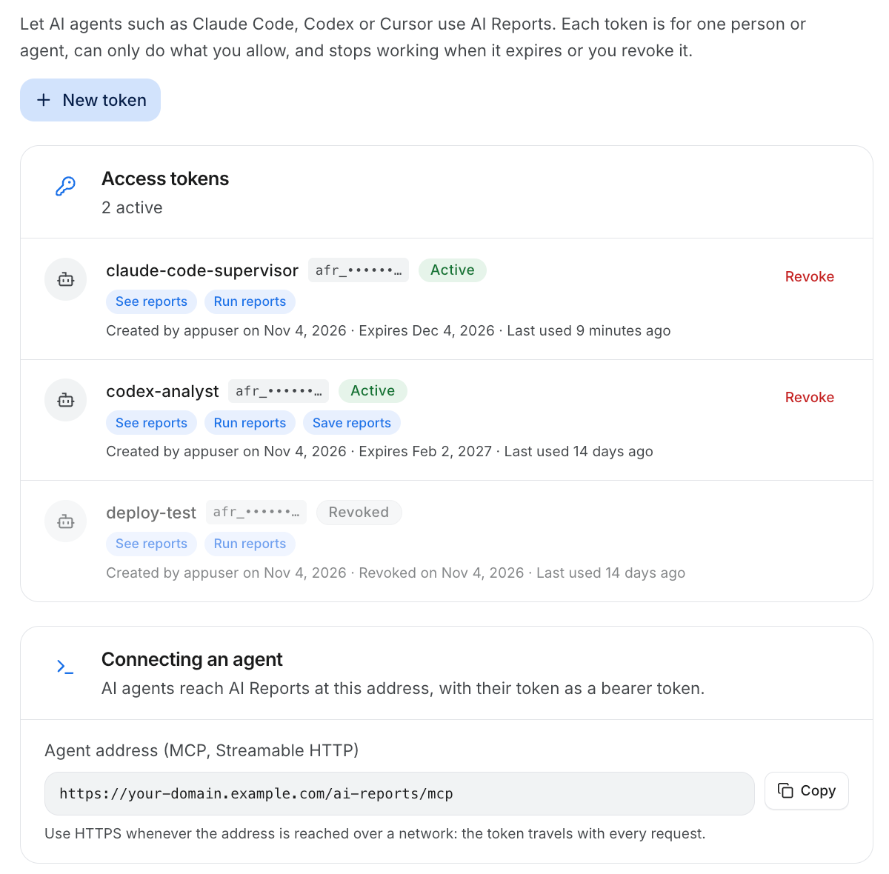
Administrators only. Open Administration → AI agent access.
What is this, in simple terms?
Many people now use AI assistants on their own computer, such as Claude Code, Codex or Cursor. These assistants can connect to outside tools through a standard called MCP (Model Context Protocol). AI Reports offers such a connection, so a person can ask their own AI assistant show me abandoned chats per queue last week and get the answer straight from your reporting data.
An access token is like a personal key for that connection. You create one key per person or agent, decide what it may do and for how long, and can switch it off at any time.
Create a token
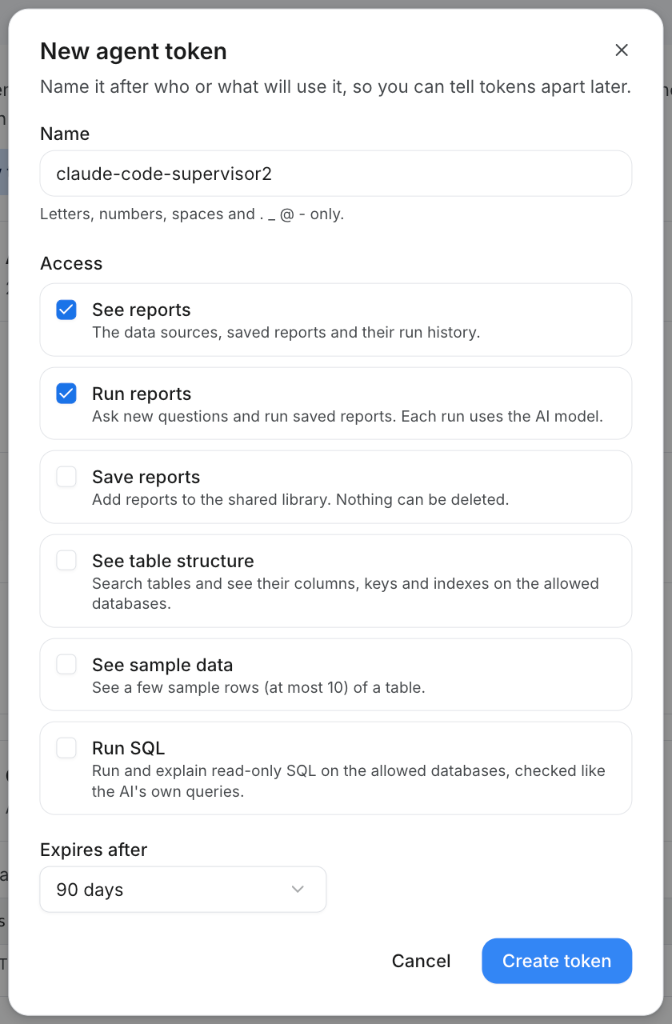
-
Click New token.
-
Name: name it after who or what will use it, for example
claude-code-ayesha, so you can tell tokens apart later. -
Access: tick what the token may do (see the table below). See reports and Run reports are ticked by default and are enough for most people.
-
Databases: shown when more than one database is connected. Leave all unticked to allow every database (including ones added later), or tick only the ones this person should see.
-
Expires after: 7, 30, 90, 180 or 365 days.
-
Click Create token.
|
Access option |
What it allows |
Who needs it |
|---|---|---|
|
See reports |
See the data sources, saved reports and their run history. |
Everyone |
|
Run reports |
Ask new questions and run saved reports. Each run uses the AI model. |
Everyone |
|
Save reports |
Add reports to the shared library. Nothing can be deleted. |
People who build reports for others |
|
See table structure |
Search tables and see their columns, keys and indexes. |
Report developers |
|
See sample data |
See a few sample rows (at most 10) of a table. |
Report developers |
|
Run SQL |
Run and explain read-only SQL, checked like the AI's own queries. |
Report developers |
Copy the token and connect
After you click Create token, the token is shown once only. Click Copy token straight away: it is not stored anywhere and can't be shown again. The same window also shows ready-to-copy commands for connecting:
-
Claude Code: a single
claude mcp add …command that already contains the address and the token. The person pastes it into their terminal. -
Codex: a
codex mcp add …command. The person first puts the token in an environment variable calledAI_REPORTS_TOKEN. -
Other tools (Cursor and others): use the Agent address shown under Connecting an agent on the page, and send the token as a Bearer token.
# Claude Code (one line; the window fills in your address and token)
claude mcp add --scope user --transport http ai-reports https://your-domain.example.com/ai-reports/mcp --header "Authorization: Bearer YOUR_TOKEN"

# Codex (put the token in AI_REPORTS_TOKEN first)
codex mcp add ai-reports --url https://your-domain.example.com/ai-reports/mcp --bearer-token-env-var AI_REPORTS_TOKEN
Treat a token like a password. Send it privately (a direct message or a password manager), never in a group chat, email thread or ticket. Anyone who has it can use these reports.
Once connected, the person can ask their AI assistant things like list the saved reports, run the Queue performance report for last month or average handle time per agent this week.
Managing tokens
-
Each token shows its status ( Active , Expired or Revoked ), what it can do, which databases it can use, who created it, when it expires and when it was last used.
-
Revoke switches a token off. The agent loses access on its next request. This can't be undone; create a new token if access is needed again.
-
When a token expires, create a new one and send it to the person.