Upload multiple customer records at once using a CSV file. The system automatically maps your CSV columns to customer schema fields, checks for duplicates, and lets you control how duplicate records are handled.
What It Does
The Bulk Customer Upload feature allows you to:
-
Import hundreds or thousands of customers in one go using a CSV file
-
Download a sample CSV template with all customer schema fields to ensure your file is valid
-
Automatically map CSV columns to customer schema fields (email, phone, name, etc.)
-
Prevent duplicate records by checking against existing customers
-
Control duplicate handling - ignore, replace, update, or append data
-
Track upload progress and download detailed results
This is useful for:
-
Migrating customer data from other systems
-
Importing customer lists from marketing campaigns
-
Updating customer information in bulk
-
Adding new customers from external databases
Before You Start
Download Sample CSV Template
To ensure your CSV file is formatted correctly, download the sample CSV template from the import interface. The template contains all customer schema attribute headers, making it easy to prepare your data.
CSV File Requirements
-
Must be a valid CSV file with properly formatted data
-
Mandatory fields required - Your CSV must include all mandatory customer schema attributes (such as firstName). If any mandatory field is missing, the entire CSV will be rejected.
-
Use standard headers - Column names should match customer schema fields (email, phoneNumber, firstName, etc.)
-
Phone numbers - Include country code (e.g., +1234567890)
-
Email addresses - Must be valid email format
Example CSV:
firstName,lastName,email,phoneNumber,city
John,Doe,john@example.com,+1234567890,New York
Jane,Smith,jane@example.com,+0987654321,Boston
How to Import Customers
Open the Import Dialog
-
Go to Unified Admin → Import Records
-
Click Bulk Customer Upload
-
The import configuration dialog opens
All import configuration happens on this single screen. You will:
-
Select record type
-
Upload your CSV file
-
Choose channel identifier for duplicate checking
-
Select action for duplicate records
-
Map CSV columns to customer schema fields
-
Click Import
1. Choose Record Type
Select Customers from the dropdown.
2. Upload CSV File
Click Upload a CSV file and select your prepared CSV.
Tip: Use the sample CSV template to ensure your file has the correct format and all mandatory fields.
3. Select Channel Identifier to Search for Existing Records
Choose which customer schema field the system should use to search for duplicate records.
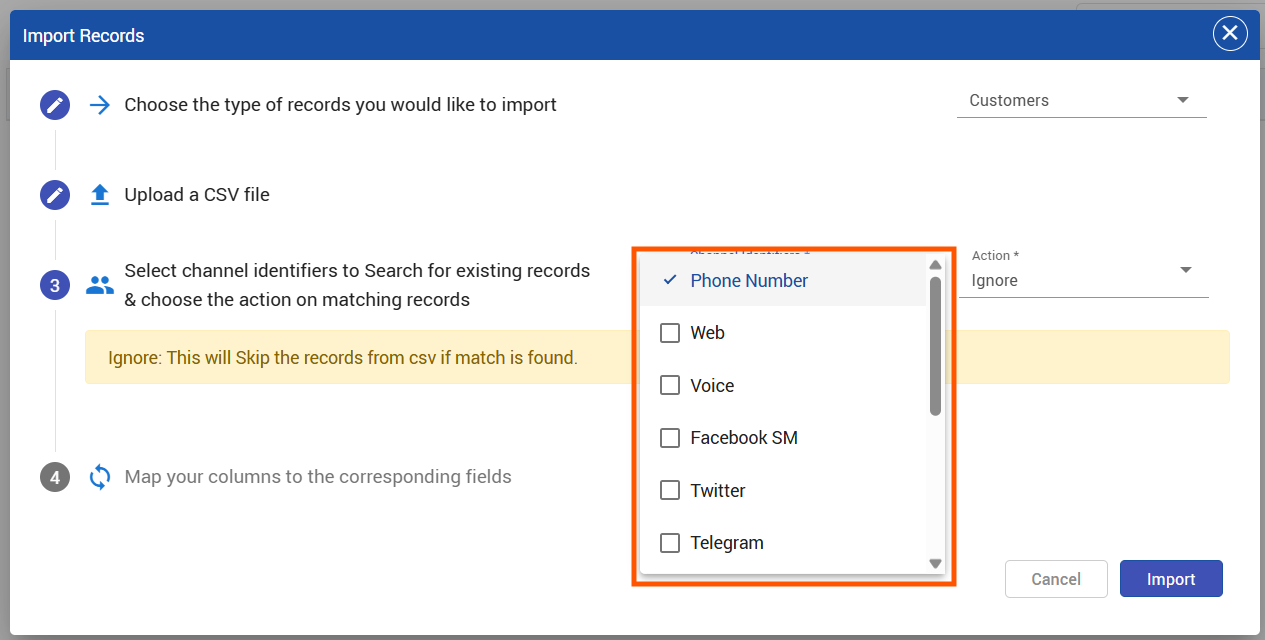
The system displays all available channel identifiers. Examples include:
-
Phone Number
-
Email
-
Facebook
-
WhatsApp
-
Instagram
-
Web
-
Voice
-
Viber
-
YouTube
-
LinkedIn
-
Twitter
-
Telegram
-
And all other supported channel identifiers in your system
How it works: If you select "Phone Number" and upload a CSV with "+1234567890", the system searches existing customer profiles for that phone number. If found, that CSV record is considered a duplicate.
4. Choose an Action on Matching Records
Select what happens when a duplicate record is found:
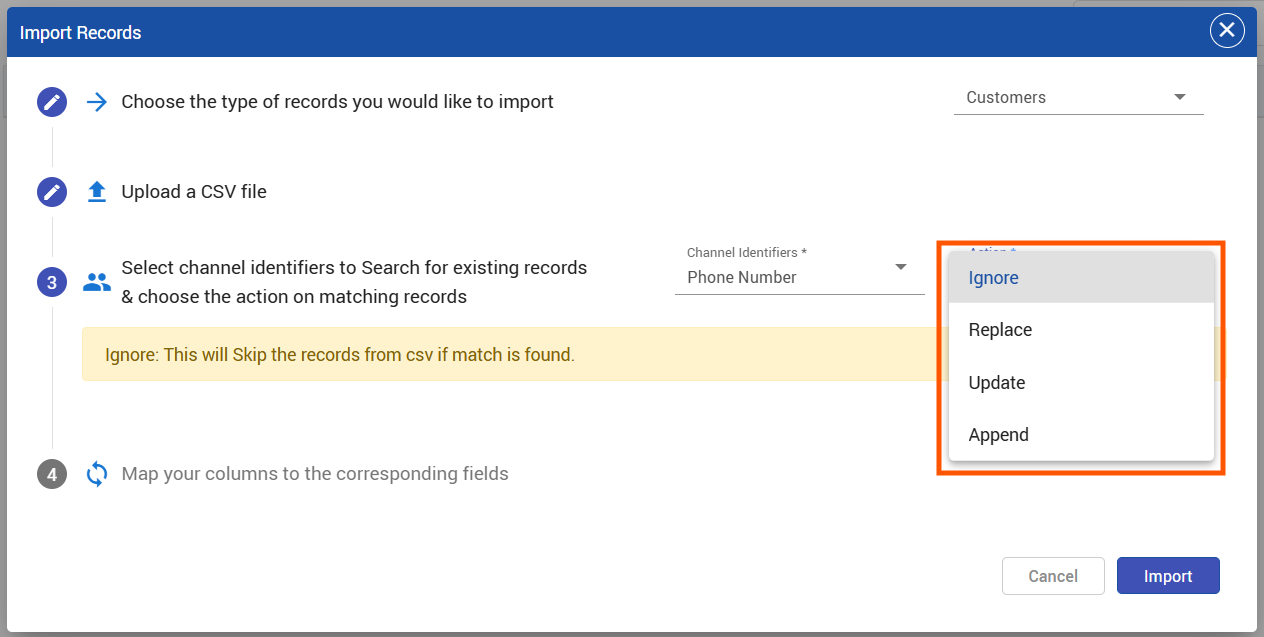
Ignore
Skip the CSV record entirely. The existing customer profile remains unchanged.
When to use: When you want to upload only new customers and avoid changing existing data.
Result: Ignored records appear in the results report with the reason "Ignored - duplicate found."
Replace
Completely replace the existing customer profile with data from the CSV.
When to use: When your CSV has the most up-to-date information and you want to overwrite old data.
Example:
Existing Customer Profile:
|
Name |
|
Phone |
City |
|---|---|---|---|
|
John Doe |
+1234567890 |
New York |
CSV Record:
|
Name |
|
Phone |
City |
|---|---|---|---|
|
John Doe |
+1234567890 |
Boston |
Result After Replace:
|
Name |
|
Phone |
City |
|---|---|---|---|
|
John Doe |
+1234567890 |
Boston |
All fields are replaced with CSV values
Update (Merge)
Update only the empty fields in the existing profile. Fields that already have values are not changed.
When to use: When you want to fill in missing information without overwriting existing data.
Example:
Existing Customer Profile:
|
Name |
|
Phone |
City |
|---|---|---|---|
|
John Doe |
(empty) |
+1234567890 |
New York |
CSV Record:
|
Name |
|
Phone |
City |
|---|---|---|---|
|
John Doe |
+1234567890 |
Boston |
Result After Update:
|
Name |
|
Phone |
City |
|---|---|---|---|
|
John Doe |
+1234567890 |
New York |
Email was added (was empty), but City stayed "New York" (already had a value)
Append
Add new values from CSV to the existing profile.
Rules:
-
Multi-value fields (like phone numbers, emails) → New value is added to the list
-
Single-value fields (like firstName, city) → CSV value replaces existing value
When to use: When a customer has multiple contact methods and you want to add new ones.
Example with Multi-Value Field (Phone Numbers):
Existing Customer Profile:
phoneNumber = [+1234567890]
CSV Record:
phoneNumber = [+0987654321]
Result After Append:
phoneNumber = [+1234567890, +0987654321]
Example with Single-Value Field (City):
Existing Customer Profile:
city = "New York"
CSV Record:
city = "Boston"
Result After Append:
city = "Boston"
(Single-value fields are replaced, not appended)
5. Map CSV Columns to Customer Schema Fields
The system automatically maps CSV column headers to customer schema fields.
Auto-Mapping:
-
emailin CSV →emailin customer schema -
phoneNumberin CSV →phoneNumberin customer schema -
firstNamein CSV →firstNamein customer schema
Manual Mapping:
If the system cannot automatically map a column (e.g., your CSV has "mobile" instead of "phoneNumber"), those columns will be highlighted. You can manually select the correct customer schema field from the dropdown.
Example:
-
CSV column:
mobile→ You map it to → Customer schema field:phoneNumber -
CSV column:
company→ You map it to → Customer schema field:labelsor custom attribute
6. Import
After configuring all options, click the Import button.
The file is submitted for processing and the dialog closes.
Track Upload Status
After submitting your import:
-
Navigate to the Upload Status page
-
Find your upload in the list
-
Refresh the page to see updated status
Upload Status:
-
Pending - Upload queued for processing
-
In Progress - Currently processing records
-
Completed - Processing finished
Note: Status does not update automatically in real-time. You need to refresh the page to see progress manually. This will be improved in future releases.
Download Results Report
Once the upload status shows "Completed", click the download button to get a detailed Excel report.
Report contains:
-
Total records in CSV
-
Successfully imported - New customer profiles created
-
Updated records - Existing profiles modified (if using Update/Replace/Append)
-
Ignored records - Duplicates that were skipped (if using Ignore action)
-
Failed records - Records that couldn't be imported with error reasons
Example Summary:
|
Summary |
Count |
|---|---|
|
Total Records |
1000 |
|
Imported |
850 |
|
Updated |
100 |
|
Ignored |
30 |
|
Failed |
20 |
Failed/Ignored Records Details:
|
Customer Email |
Phone |
Reason |
|---|---|---|
|
invalid-email |
+1234567890 |
Invalid email format |
|
+1234567890 |
Ignored - duplicate found |
|
|
(empty) |
Missing mandatory field: firstName |
Common Use Cases
Use Case 1: Import New Customer List from Marketing Campaign
Scenario: You ran a marketing campaign and collected 5,000 new leads.
Configuration:
-
Channel Identifier: Email
-
Action: Ignore
Why: You want to add only new customers and skip anyone who's already in the system.
Use Case 2: Update Missing Customer Information
Scenario: You have partial customer data in the system and want to fill in missing details.
Configuration:
-
Channel Identifier: Phone Number
-
Action: Update
Why: This fills in empty fields without overwriting existing information.
Use Case 3: Refresh Customer Database from CRM
Scenario: Your CRM has the latest customer information and you want to sync it.
Configuration:
-
Channel Identifier: Email
-
Action: Replace
Why: CRM is your source of truth, so you want to completely overwrite old data.
Use Case 4: Add Multiple Contact Methods for Customers
Scenario: Customers signed up on different channels, and you want to link all their contact methods.
Configuration:
-
Channel Identifier: Email
-
Action: Append
Why: This adds new phone numbers, social media handles, etc., without removing existing ones.
Tips for Successful Uploads
CSV Preparation
-
Download the sample template - Use it to ensure your CSV has all required fields
-
Include all mandatory fields - Missing mandatory customer schema attributes will cause rejection
-
Use standard column names - Match customer schema field names (email, phoneNumber, firstName, etc.)
-
Validate phone numbers - Include country code (e.g., +1234567890)
-
Validate email formats - Ensure all emails are properly formatted
-
Remove duplicate rows - Clean your CSV before uploading
Choosing the Right Channel Identifier
-
Phone Number - Best for SMS/WhatsApp campaigns
-
Email - Best for email marketing lists
-
Social Media IDs - Best when importing from social platforms
-
Web - Best for website visitor tracking
Choosing the Right Action
-
Ignore - Safest option, won't change existing data
-
Update - Safe way to enrich profiles gradually
-
Replace - Use with caution, will overwrite everything
-
Append - Good for adding new contact methods
Testing
-
Start small - Test with 10-20 records first to verify mapping and actions
-
Review results - Check the results report before uploading larger files
-
Keep backups - Always back up customer data before doing bulk replacements
-
Refresh status page - Remember to manually refresh to see upload progress
Current Limitations
Manual Status Refresh Required:
The upload status page does not update automatically in real-time. You must manually refresh the page to see progress updates. This will be improved in future releases.
CSV Rejection on Missing Mandatory Fields:
If your CSV is missing any mandatory customer schema attributes, the entire file will be rejected. Use the sample CSV template to ensure all required fields are included.
Technical Reference
API Endpoint
Bulk Upload API:
POST /customers/bulkCustomers
Request Payload:
{
  "action": "append",
  "deduplicationKeys": [
    "email",
    "phoneNumber"
  ],
  "customers": [
    {
      "firstName": "John",
      "phoneNumber": ["+1234567890"],
      "email": ["john@example.com"],
      "labels": "premium"
    },
    {
      "firstName": "Jane",
      "phoneNumber": ["+0987654321"],
      "email": ["jane@example.com"]
    }
  ]
}
Response:
{
  "insertedCount": 150,
  "appendedCount": 50,
  "rejectedCount": 5,
  "rejectedCustomers": [
    {
      "customer": {"email": "invalid@"},
      "reason": "Invalid email format"
    }
  ]
}
System Processing Flow
Backend Architecture:
-
Data Platform receives CSV file and configuration
-
CSV is validated for mandatory fields (rejected if missing)
-
CSV is parsed and converted to JSON format
-
Records are split into batches (for performance)
-
Each batch is sent to CIM Customer Microservice
-
Microservice processes each batch:
-
Searches for duplicates using selected channel identifier
-
Categorizes records into:
uniqueCustomers[]andduplicateCustomers[] -
Executes selected action on duplicates
-
Bulk inserts unique customers
-
-
Results are aggregated and saved
-
Upload status updated to "Completed"
-
Results report generated
Database Operations:
-
Unique customers:
bulkInsert()operation -
Duplicate actions executed using
bulkUpdate()operations -
All operations are batched for performance