1. Prerequisites
1.1 System Requirements
|
Requirement |
Specification |
|---|---|
|
Operating System |
Debian 12 (Bookworm) |
|
CPU |
Minimum 4 cores (8 cores recommended) |
|
RAM |
Minimum 8GB (16GB recommended) |
|
Storage |
Minimum 50GB free space |
1.2 Required Software
-
Docker (Version 24.0+)
-
Docker Compose (Version 2.20+)
-
Git (For Cloning Repo)
1.3 External Dependencies
-
FusionPBX Server (can be on separate VM)
-
OpenAI API Key with Realtime API access
-
CCM Endpoint (Expertflow Unified Agent tenant)
1.4 Required Ports
|
Services |
Ports |
Protocol |
Description |
|---|---|---|---|
|
LiveKit Server |
7880, 7881 |
TCP |
WebSocket/HTTP API |
|
LiveKit RTC |
50000-50200 |
UDP |
WebRTC media streams |
|
SIP Service |
5060 |
TCP/UDP |
SIP signalling |
|
RTP Media |
10000-10200 |
UDP |
Voice/media streams |
|
Redis |
6379 |
TCP |
State management (internal) |
|
Dashboard |
8000 |
TCP |
Web interface |
|
SSH |
22 |
TCP |
Remote access (If needed) |
2. Installation Steps
Step 1: Install Docker
Check if Docker is already installed:
docker --version
If Docker is installed, you'll see version information. Skip to Step 2.
If not installed, run the following:
# Update system packages
sudo apt update && sudo apt upgrade -y

# Install required packages
sudo apt install -y ca-certificates curl

# Add Docker's official GPG key
sudo install -m 0755 -d /etc/apt/keyrings
sudo curl -fsSL https://download.docker.com/linux/debian/gpg -o /etc/apt/keyrings/docker.asc
sudo chmod a+r /etc/apt/keyrings/docker.asc

# Add Docker repository
echo "deb [arch=$(dpkg --print-architecture) signed-by=/etc/apt/keyrings/docker.asc] https://download.docker.com/linux/debian $(. /etc/os-release && echo "$VERSION_CODENAME") stable" | sudo tee /etc/apt/sources.list.d/docker.list > /dev/null

# Update package index
sudo apt update

# Install Docker
sudo apt install -y docker-ce docker-ce-cli containerd.io docker-buildx-plugin docker-compose-plugin

# Add current user to docker group
sudo usermod -aG docker $USER

# Apply group changes
newgrp docker

# Verify installation
docker --version
docker compose version
```

**Expected output:**
```
Docker version 24.x.x
Docker Compose version 2.x.x
Step 2: Configure Firewall (Iptables)
# Allow SSH (IMPORTANT: Don't lock yourself out!)
sudo iptables -A INPUT -p tcp --dport 22 -j ACCEPT

# Allow LiveKit Server (WebSocket/HTTP)
sudo iptables -A INPUT -p tcp --dport 7880 -j ACCEPT
sudo iptables -A INPUT -p tcp --dport 7881 -j ACCEPT

# Allow LiveKit RTC (WebRTC media)
sudo iptables -A INPUT -p udp --dport 50000:50200 -j ACCEPT

# Allow SIP Service
sudo iptables -A INPUT -p tcp --dport 5060 -j ACCEPT
sudo iptables -A INPUT -p udp --dport 5060 -j ACCEPT

# Allow RTP Media
sudo iptables -A INPUT -p udp --dport 10000:10200 -j ACCEPT

# Allow Dashboard
sudo iptables -A INPUT -p tcp --dport 8000 -j ACCEPT

# Allow established connections
sudo iptables -A INPUT -m state --state ESTABLISHED,RELATED -j ACCEPT

# Allow loopback
sudo iptables -A INPUT -i lo -j ACCEPT

# Save iptables rules
sudo apt install -y iptables-persistent
sudo netfilter-persistent save

# Verify rules
sudo iptables -L -n -v
Step 3: Clone Repository
# Navigate to home directory
cd ~

# Install git if not already installed
sudo apt update
sudo apt install -y git

# Clone repository
git clone -b develop https://efcx:RecRpsuH34yqp56YRFUb@gitlab.expertflow.com/rtc/livekit.git livekit-project

# Navigate to project
cd livekit-project

# Verify directory structure
ls -la
```

**Expected output:**
```
agent/
dashboard/
infrastructure/
dispatch-rule.json
README.md
requirements-linux.txt
requirements-window.txt
Step 4: Configure Infrastructure
4.1 Update SIP Service External IP and Port (If needed)
cd ~/livekit-project/infrastructure
nano docker-compose.yaml
Find this line:
external_ip: "192.168.1.161"
Change to your VM actual IP address:
external_ip: "YOUR_VM_IP_ADDRESS"
If Media server is already on same vm (5060), then you should also edit these two ports in docker-compose.yaml so sip service use 5070 port.
sip_port: 5070


 ports:
      - "5070:5070/udp"
      - "5070:5070/tcp"
Save and exit (Ctrl+X, Y, Enter)
The livekit-config.yaml file does NOT require any changes. The infrastructure docker-compose.yaml creates the network automatically, so no manual network creation is needed.
4.2 Start Infrastructure Containers
-
If already media server is running on VM then it already using 5060 port so we need to map port for using sip service in docker compose file that we did above otherwise sip service container will through error.
cd ~/livekit-project/infrastructure

# Start all infrastructure services
docker compose up -d --build

# Verify containers are running
docker ps
Step 5: Configure Dashboard
5.1 Update Dashboard Environment
-
Change vm healthcheck ip in docker-compose.yml file.
cd ~/livekit-project/dashboard

#change ip in health check line
nano docker-compose.yml

#save and exit ctrl+x,y,Enter
#create file using below command
nano .env
-
Paste this below by making relevant changes
-
Change LiveKit server URL with your vm ip on which LiveKit is running, API KEY and API SECRET (api credentials from sip server docker-compose.yml in infrastructure directory).
# LiveKit Server Configuration
LIVEKIT_URL=http://192.168.1.161:7880
LIVEKIT_API_KEY=devkey
LIVEKIT_API_SECRET=h1J2kL3mN4pQ5rS6tU7vW8xY9zA0bC1d

# Admin Authentication
ADMIN_USERNAME=admin
ADMIN_PASSWORD=shahzaib123

# Application Settings - USE ANY APP_SECRET_KEY THIS IS RANDOM KEY
APP_SECRET_KEY=A3F7D9E2C1B8F4E6D5A9C7F3E2D1B4C8F6E5D9A7C3F1E4D8B2C6F5E9D7A1C3F8
DEBUG=false
HOST=0.0.0.0
PORT=8000

# Feature Flags
ENABLE_SIP=true
All other settings are pre-configured and do not need changes.
-
Save and exit if you made changes (Ctrl+X, Y, Enter)
5.2 Start Dashboard Container
cd ~/livekit-project/dashboard

# Start dashboard
docker compose up -d

# Verify container is running
docker ps | grep dashboard

# Check logs
docker logs livekit-dashboard --tail 50
You can access dashboard on <your vm ip> :8000
Step 6: Configure AI Agent
6.1 Update Agent Environment Variables
cd ~/livekit-project/agent/src
#Create .env file
nano .env
-
Paste this below by making relevant changes
-
Change LiveKit server URL with your vm ip on which LiveKit is running, API KEY and API SECRET (api credentials from sip server docker-compose.yml in infrastructure directory)
-
For now we are using OpenAI Realtime API so we don’t need any other vendor to add.
#--------------------------------- LIVEKIT AGENT env CONFIGURATION ------------------------

LIVEKIT_URL=" http://192.168.1.161:7880"
LIVEKIT_API_KEY=devkey
LIVEKIT_API_SECRET=h1J2kL3mN4pQ5rS6tU7vW8xY9zA0bC1d

#DEEPGRAM_API_KEY=2032fb4af64455ed37f58822e59f489f53fe6eb1
#ELEVENLABS_API_KEY=sk_4b397d08a5c52179b94766c4f3ba6c98fbe2d30d37584468
#OPENAI_API_KEY=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

OPENAI_API_KEY=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
#DEEPGRAM_API_KEY=65d9a15e1b1f9f43329d1342d2071043a60d372a
LIVEKIT_ENABLE_TRANSCRIPTION=true

#This api used for Elevenlabs agent integration with LiveKit as LiveKit directly does not support Speach to Speach for elevenlabs.

#ELEVEN_API_KEY=sk_147c1d306073aea0ca26683a2aca97b355a0185d9dd53826
#ELEVENLABS_AGENT_ID=agent_7401kh37vjbsepjrfgq0q06y8wxg
Without valid API keys, the agent will fail silently. Ensure you have valid keys before proceeding.
(Ctrl+X ,y,Enter) Save and exit.
6.2 Update Agent Configuration
cd ~/livekit-project/agent/src
nano complete_flow_agent.py
Find these lines (around line 360-390) and update:
# ⚠️ UPDATE THESE VALUES FOR TRANSFER TO AGENT:
fusionpbx_ip = "192.168.1.17"          # Your FusionPBX Server IP
agent_extension = "99900"              # Extension that routes to human agent Inbound route on FusionPBX.
service_identifier = "1122"            # Your service identifier should be same as you channel in Unified Admin

# ⚠️ UPDATE CCM ENDPOINT:
CCM_URL = "https://YOUR-TENANT.expertflow.com/ccm/message/receive"
# Example: "https://efcx-dev2.expertflow.com/ccm/message/receive"
Update:
-
fusionpbx_ip: Your FusionPBX server IP address -
CCM_URL: Your CCM tenant URL
We'll update the outbound_trunk_id after creating the trunk in Step 7.
Save and exit.
Configuration
Step 7: Configure SIP Trunks and Dispatch Rules
7.1 Install LiveKit CLI
sudo apt update
sudo apt install -y jq

curl -sSL https://get.livekit.io/cli | bash
# Verify installation
lk --version
Connect LiveKit CLI to server so we can manage trunks,dispatch rules etc form lk cli as well.
# Configure CLI environment
export LIVEKIT_URL=http://localhost:7880
export LIVEKIT_API_KEY=devkey
export LIVEKIT_API_SECRET=h1J2kL3mN4pQ5rS6tU7vW8xY9zA0bC1d
These LIVEKIT_API_KEY and LIVEKIT_API_SECRET are set in docker-compose.yml. When you run these export commands, you're setting environment variables in your current terminal session. These tell the LiveKit CLI (lk command) where to connect and how to authenticate.
7.2 Create Inbound Trunk (FusionPBX → LiveKit)
Now we need to create inbound,outbound trunks and dispatch rules for our LiveKit agent. We will create inbound trunk using lk cli but for dispatch rules and outbound trunks we will use dashboard for ease.
Why lk cli for inbound trunk? The dashboard doesn't support custom header mapping, which is required for passing caller information to the agent.
Create trunk configuration file:
cd ~/livekit-project
nano inbound-trunk.json
Add this content:
   {
  "trunk": {
    "name": "Testing Trunk",
    "numbers": ["10005"],
    "headers_to_attributes": {
      "P-Asserted-Identity": "caller_id",
      "From": "from_header",
      "X-Caller-Extension": "caller_extension"
    },
    "include_headers": 1,
    "allowed_addresses": ["192.168.1.17"]
  }
}
Update:
-
allowed_addresses: Your FusionPBX server IP (e.g.,"192.168.1.17"). -
numbers: Extension that customers dial to reach the AI (e.g.,["10005"])
Save and exit.
Create the trunk:
lk sip inbound create inbound-trunk.json

**Expected output:**
Created trunk: ST_<GENERATED_TRUNK_ID>

**SAVE THIS TRUNK ID** - you'll need it for the dispatch rule.

#### 7.3 Access Dashboard and Create Outbound Trunk

**Open your browser and navigate to:**
```
http://YOUR_VM_IP:8000
Example: http://192.168.1.161:8000
Login credentials:
-
Username:
admin(or what you set in.envof dashboard) -
Password: (what you set in dashboard
.env)
7.3 Create Outbound Trunk
Now we create outbound trunk easily from dashboard, go to Outbound calls form left side bar and then click create new trunk you and add details manually. Then copy trunk id.
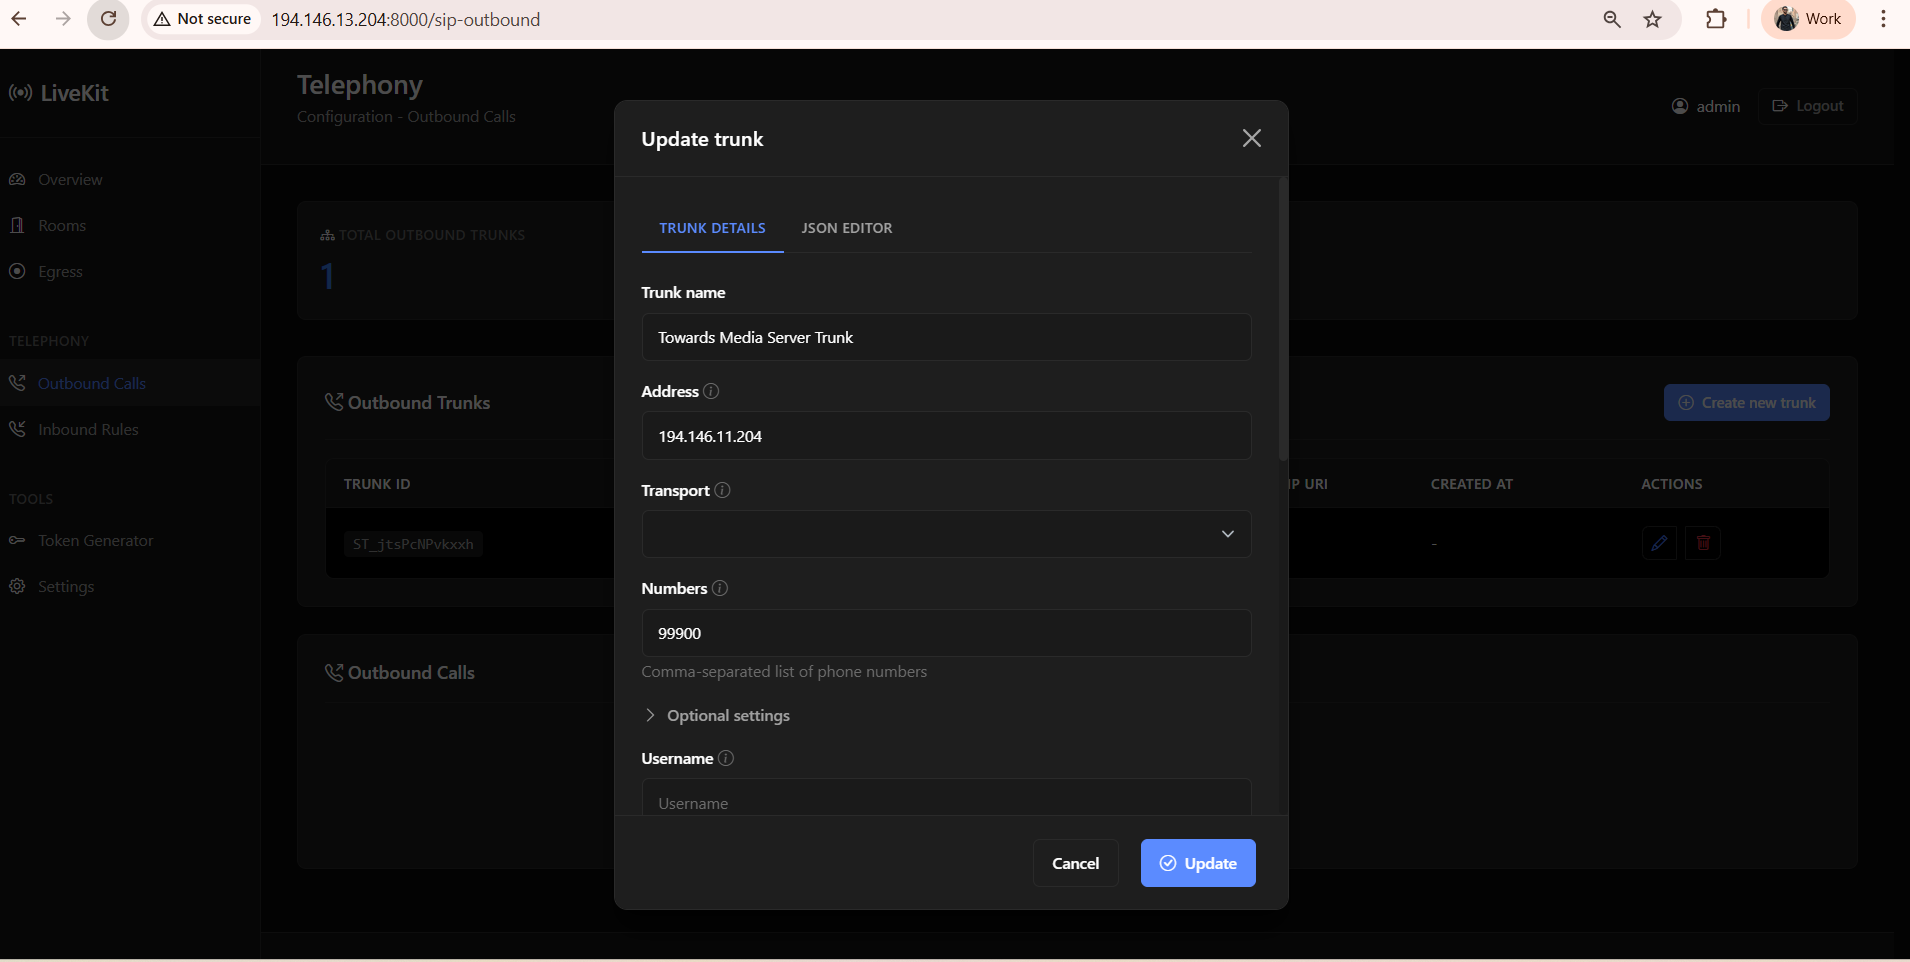
Copy the Trunk ID (starts with ST_...)
SAVE THIS OUTBOUND TRUNK ID - you need to update the agent code with it.
7.4 Update Agent with Outbound Trunk ID
cd ~/livekit-project/agent/src
nano complete_flow_agent.py
Find this line (around line 380-385):
outbound_trunk_id = "ST_W7jqvDFA2VgG"
Replace with your new outbound trunk ID:
outbound_trunk_id = "ST_YOUR_NEW_TRUNK_ID"
Save and exit.
7.5 Build and Start Agent Container
Be patience initially it will take time to build.
cd ~/livekit-project/agent

# Build the agent Docker image
docker compose build

# Start the agent
docker compose up -d --build

# Verify agent is running
docker ps | grep agent
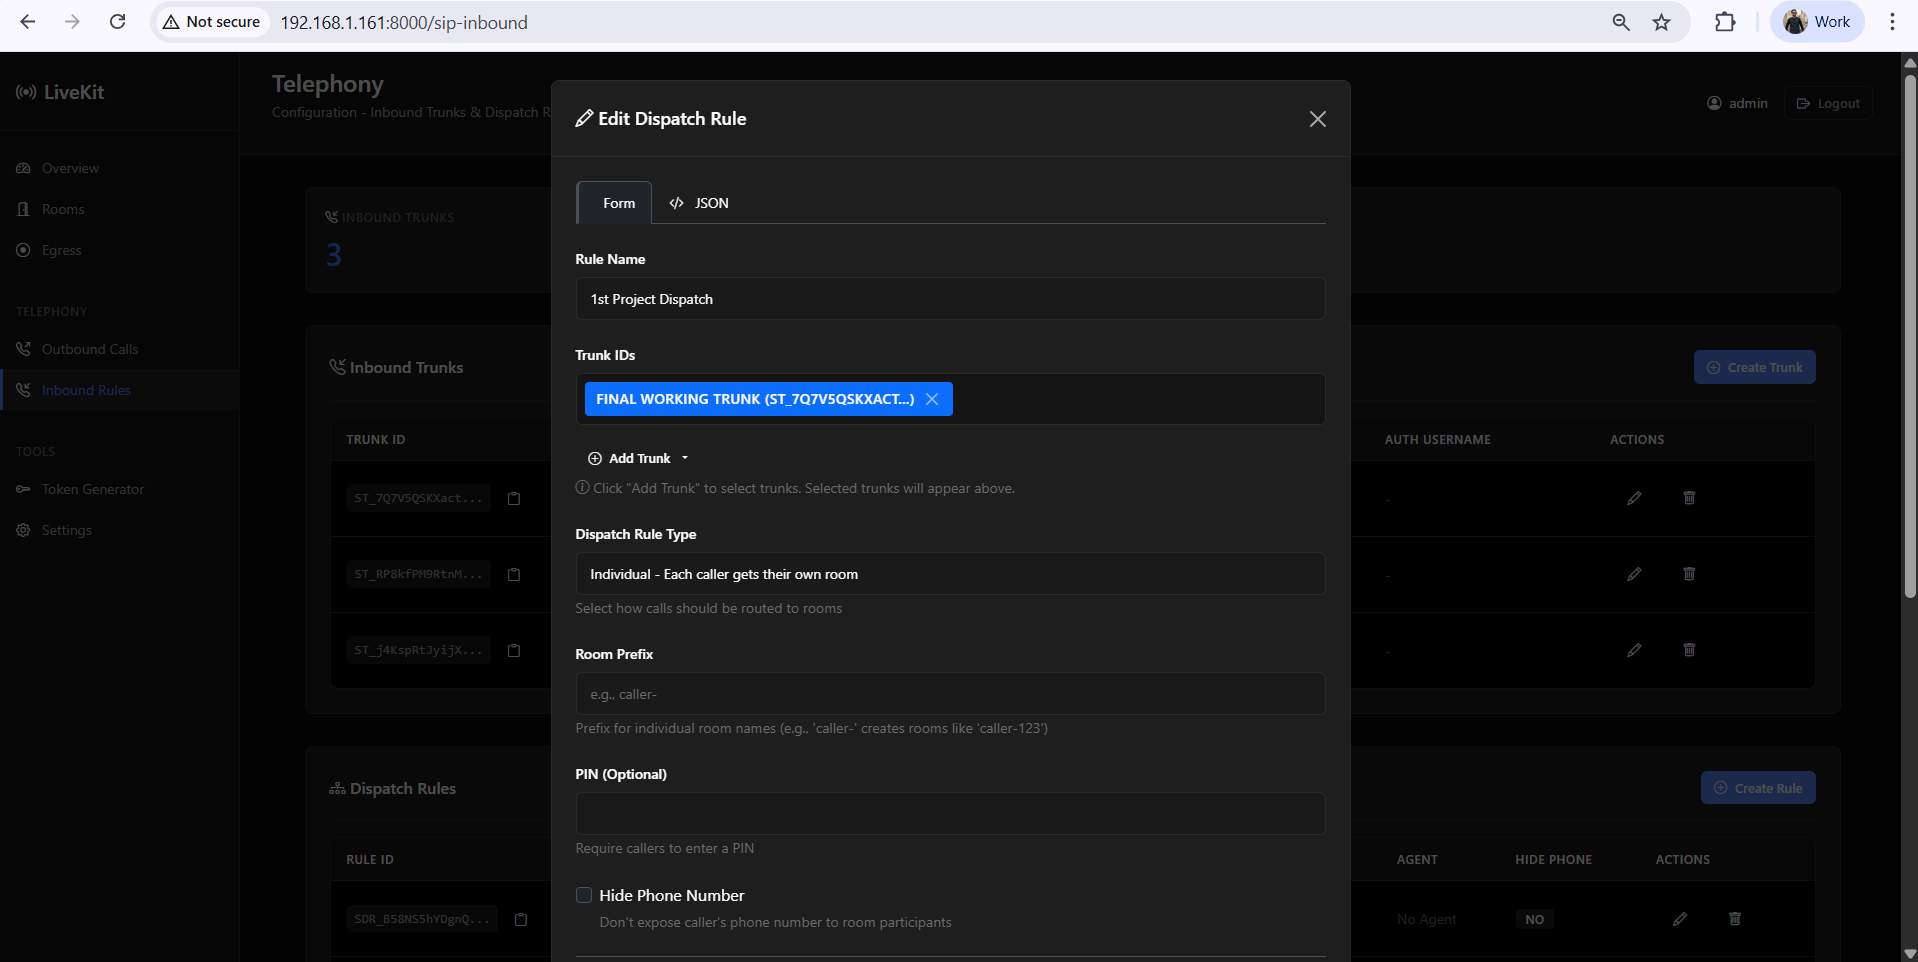
7.5 Create Dispatch Rule (via Dashboard)
In the Dashboard:
-
Navigate to left sidebar Inbound Rules → Dispatch Rules
-
Click "Create Rule"
-
Fill in the form or you can switch to json and write json as well.
-
Name:
Main Dispatch Rule -
Trunk: Select your inbound trunk (FusionPBX Inbound Trunk)
-
Room Prefix:
_FreeSWITCH_(Optional) -
Agent Name: Leave blank (for automatic dispatch)
-
-
Click "Create"
FusionPBX Setup
1. Create extension in FusionPBX
-
Should select relevant tenant domain from right side of media server.
-
Hover on accounts and then go to extensions click Add.
2. Outbound Route (FusionPBX → LiveKit)
Configuration:
-
Go to: Dialplan → Outbound Routes → Add
-
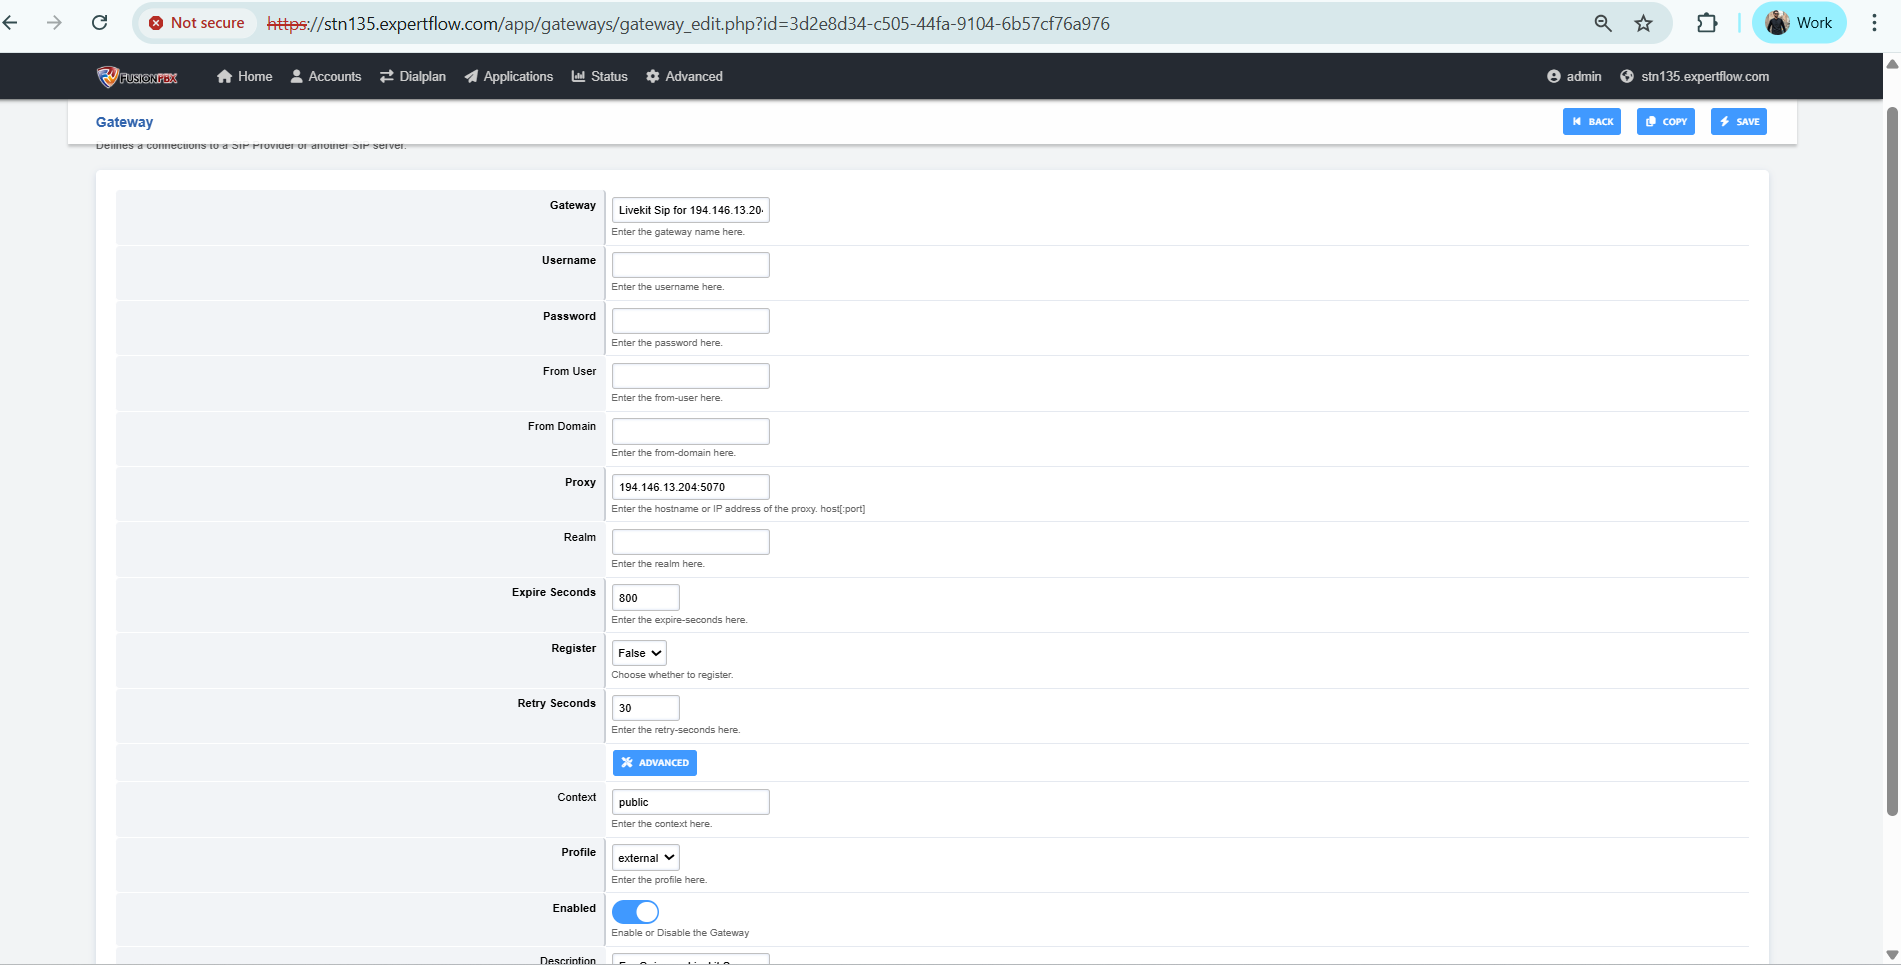
Gateway Setup:
-
When creating the gateway in FusionPBX:
Gateway Address:
194.146.13.204:5070Because:
-
FreeSWITCH's default SIP port is 5060 (already in use by FreeSWITCH itself)
-
LiveKit SIP service is mapped to host port 5070 (which internally is 5060 in the container)
-
So FusionPBX must send calls to 5070 to reach LiveKit
-
-
Create a new gateway pointing to:
YOUR_LIVEKIT_VM_IP:5070 -
Example:
192.168.1.161:5070 -
Route Configuration:
-
Create any Destination Number:
99900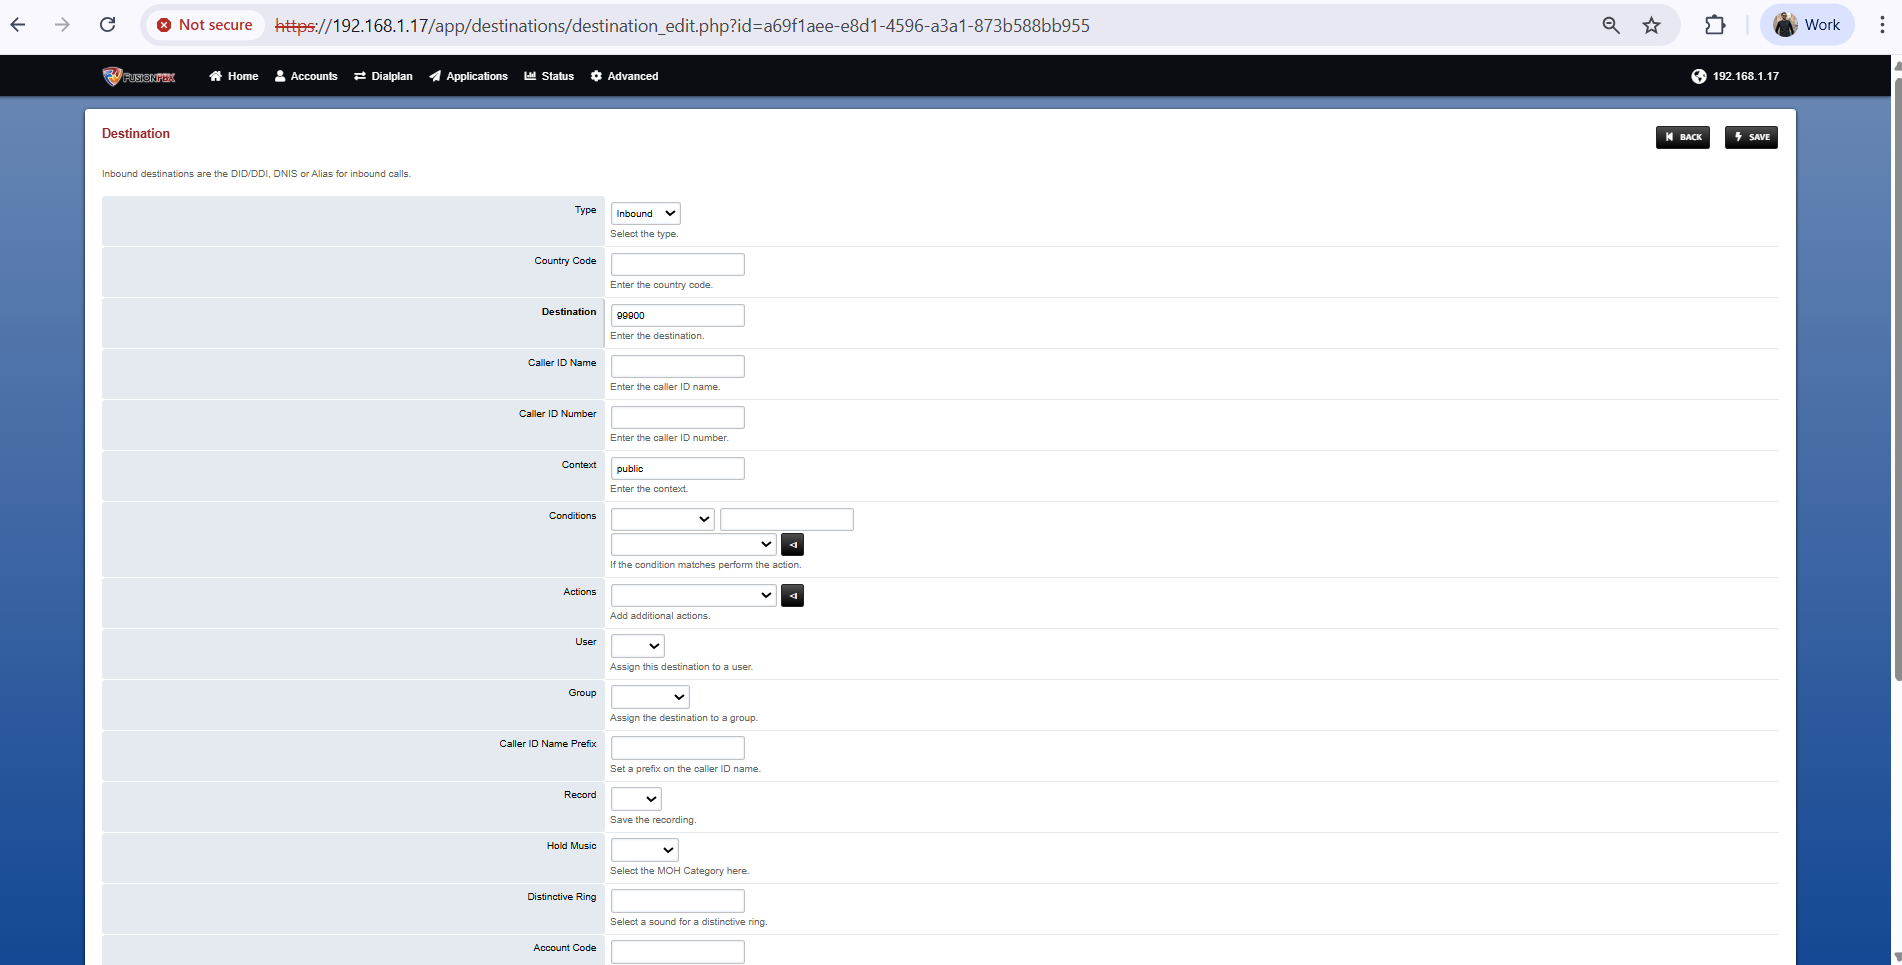
-
Outbound Route: Select the LiveKit gateway created above and create outbound route
-
XML
<extension name="Livekit_Sip_for_1.161.1234" continue="false" uuid="ea8f0d57-6ed8-429b-b932-6b5f2077b707">
	<condition field="${user_exists}" expression="false"/>
	<condition field="destination_number" expression="^(10005)$">
		<action application="log" data="--------------------------------------Shahzaib LiveKit---------------------------------------------------------"/>
		<action application="export" data="call_direction=outbound" inline="true"/>
		<action application="unset" data="call_timeout"/>
		<action application="set" data="hangup_after_bridge=true"/>
		<action application="set" data="effective_caller_id_name=${caller_id_name}"/>
		<action application="set" data="effective_caller_id_number=${caller_id_number}"/>
		<action application="set" data="inherit_codec=true"/>
		<action application="set" data="ignore_display_updates=true"/>
		<action application="set" data="callee_id_number=$1"/>
		<action application="set" data="continue_on_fail=1,2,3,6,18,21,27,28,31,34,38,41,42,44,58,88,111,403,501,602,607,809"/>
		<action application="set" data="sip_h_P-Asserted-Identity=sip:${caller_id_number}@${domain_name}"/>
		<action application="bridge" data="sofia/gateway/a77c367f-b043-4407-9187-d5b1850bad08/$1"/>
	</condition>
</extension>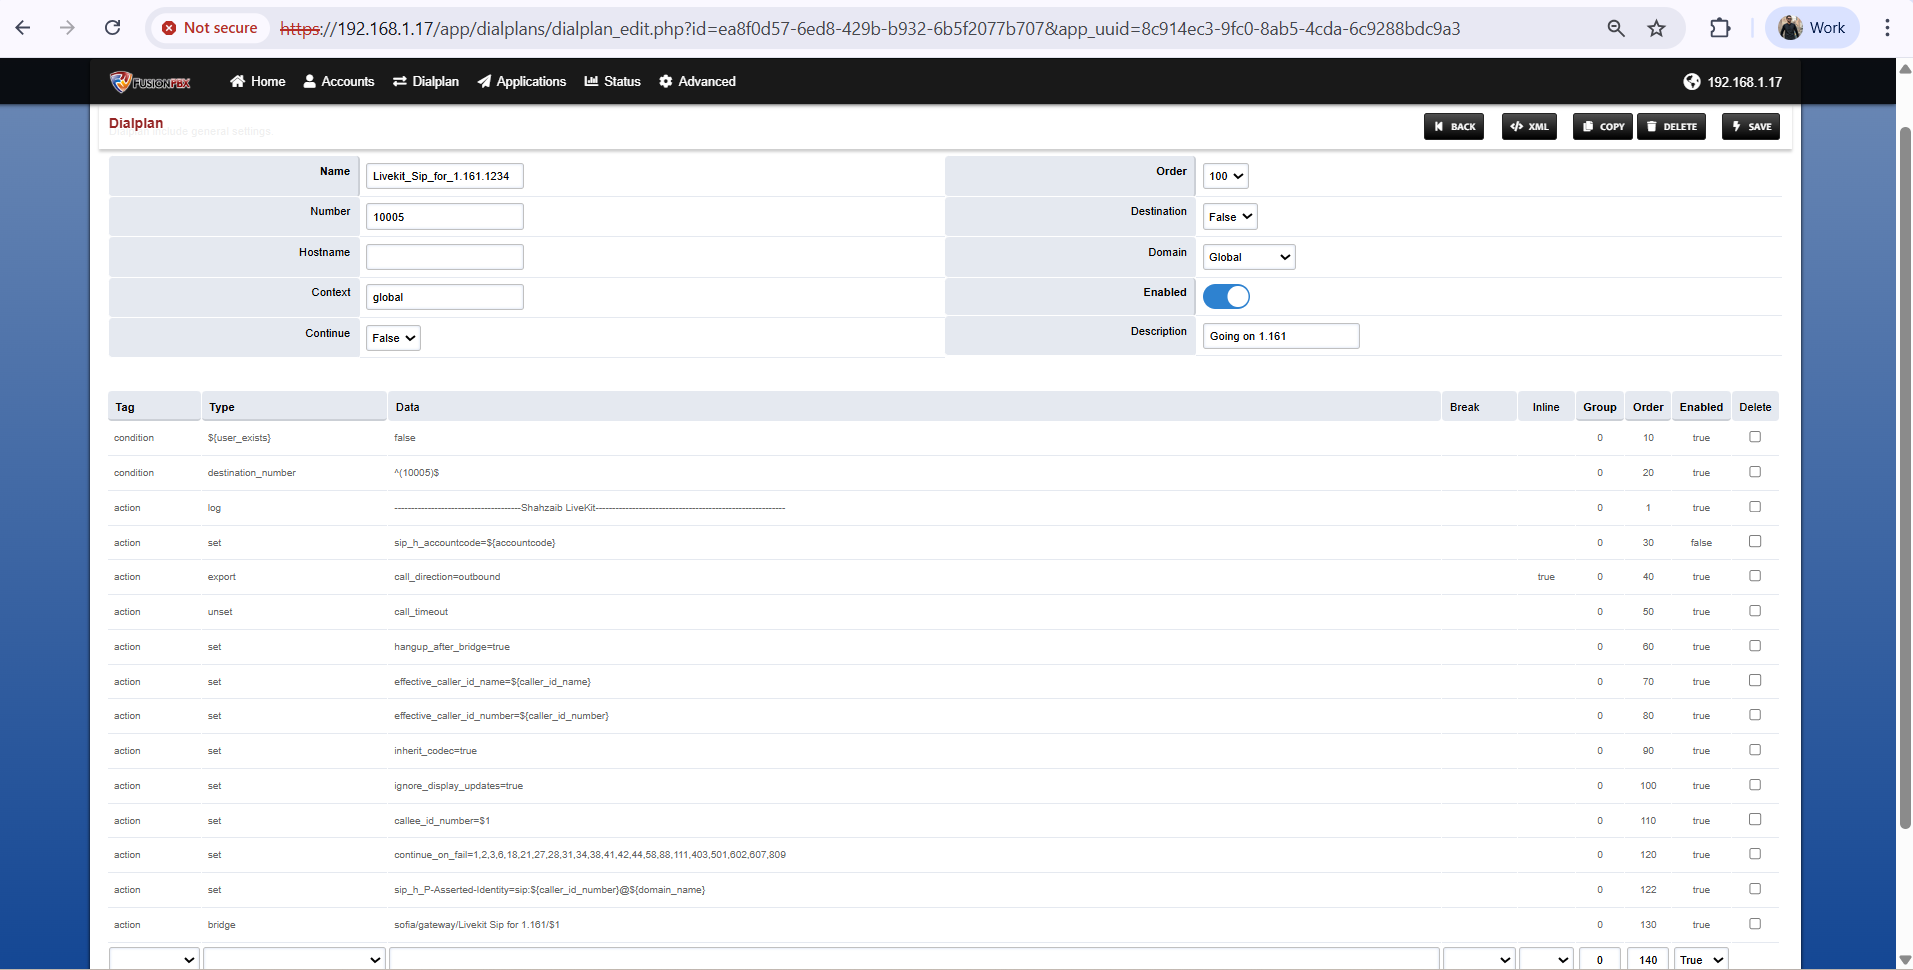
-
All headers Variables in Outbound route should be same as it is just change your gateway in last line.
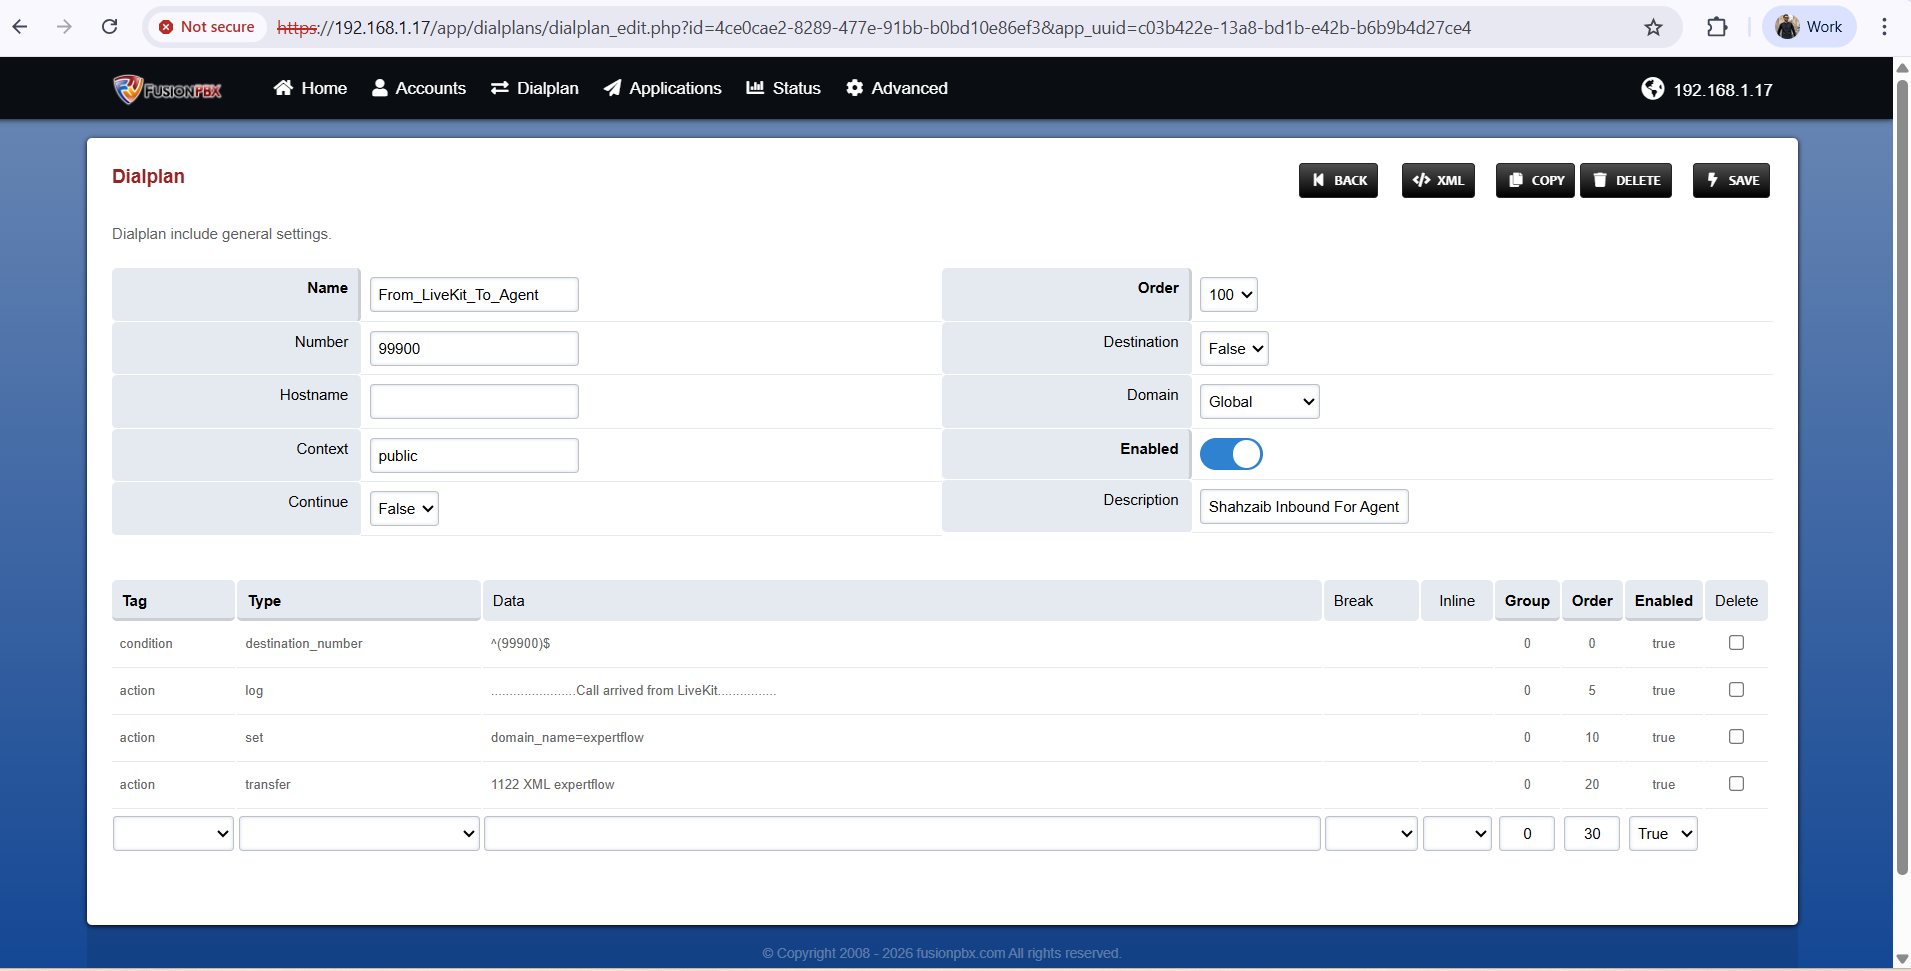
Inbound Route (LiveKit → FusionPBX)
Purpose: When LiveKit transfers a call to extension 99900, route it to a human agent.
Configuration:
-
Go to: Dialplan → Public → Add
1122 is internal DN there which is our channel id in Unified Admin.
-
Go to Dialplan:
Add a dialplan for connecting to Voice Connector. Number should be same as you service identifier is in unified admin side.
<extension name="cxIvr-1122" continue="false" uuid="0024d96f-ab8e-4fd1-822b-38f5f2bcf97d">
	<condition field="destination_number" expression="^1122$">
		<action application="set" data="caller_id_number=${sip_h_X-Customer-Number}"/>
		<action application="log" data="...........call land on ${caller_id_number}"/>
		<action application="set" data="effective_caller_id_number=${sip_h_X-Customer-Number}"/>
		<action application="set" data="effective_caller_id_name=${sip_h_X-Customer-Number}"/>
		<action application="lua" data="vcApi.lua"/>
	</condition>
</extension>
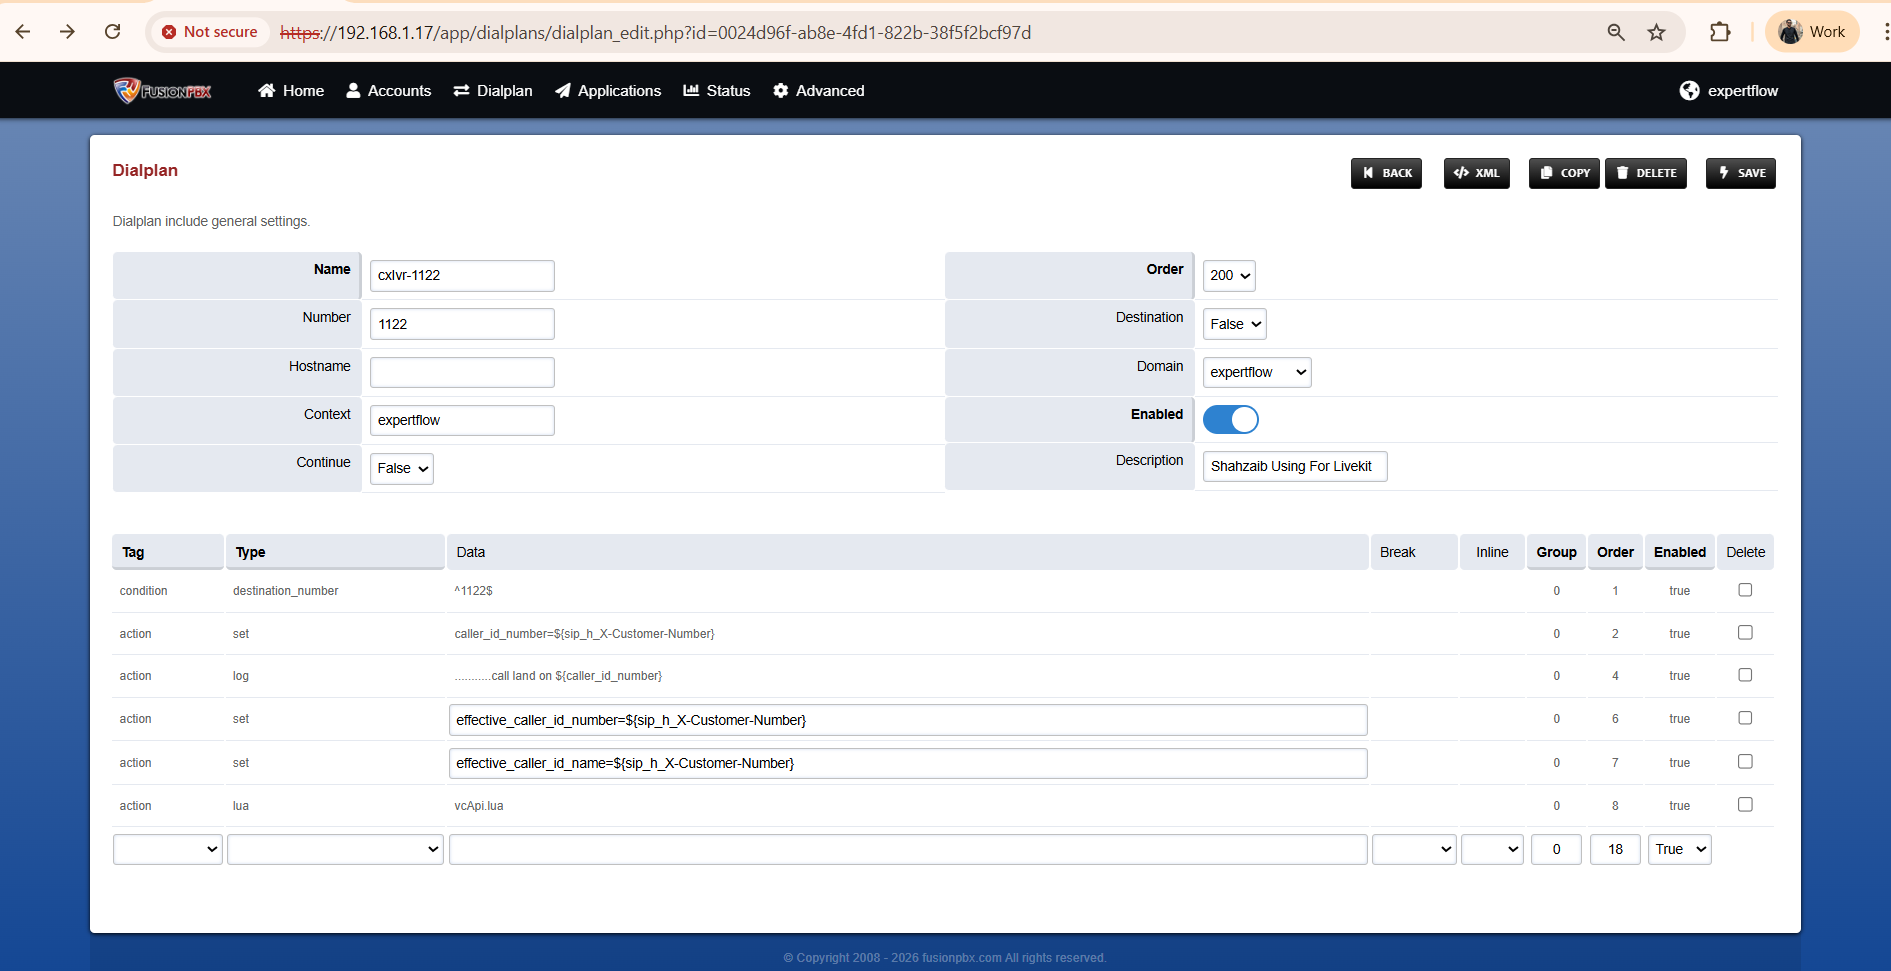
After making changes, reload the dialplan from FusionPBX interface or run reloadxml in FreeSwitch CLI.
Testing
Verify All Containers
docker ps
Expected output - 5 running containers:
|
Container Name |
Image |
Status |
|---|---|---|
|
livekit-agent |
agent-livekit-agent |
Up |
|
livekit-dashboard |
dashboard-dashboard |
Up |
|
infrastructure-sip-1 |
livekit/sip:latest |
Up |
|
infrastructure-livekit-1 |
livekit/livekit-server:latest |
Up |
|
infrastructure-redis-1 |
redis:7-alpine |
Up |