
This guide explains how to create a simple flow in Conversation Studio so the system can handle the CAMPAIGN_UNSUBSCRIBED event. The flow uses two nodes only: an Init node and a Plain Message node.
Use this flow when you want Conversation Studio to react to campaign unsubscribe events published by the platform and send a message without requiring an existing conversation context.
What this flow does
When a supported unsubscribe event is detected by the platform, the system publishes CAMPAIGN_UNSUBSCRIBED. This flow listens for that event and sends a plain message even if there is no active conversation ID.
Key configuration: set the Init node intent to
CAMPAIGN_UNSUBSCRIBEDand enable Allow null conversation ID in the Plain Message node.
Before you start
-
Make sure you can log in to Conversation Studio.
-
Make sure you have permission to edit and deploy configured or default flows.
-
Confirm that campaign unsubscribe handling is enabled in your environment.
-
Know which message you want to send to the customer after unsubscribe is detected.
The unsubscribe feature is additive. It does not require changing the normal inbound routing behavior. This flow is meant to handle the published unsubscribe event cleanly inside Conversation Studio.
Flow design
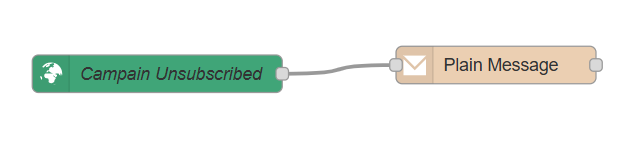
The flow is intentionally minimal:
-
Node 1: Init
-
Node 2: Plain Message
Connection:
Init → Plain Message
Step-by-step configuration
Create or open the target flow
-
Open Conversation Studio.
-
Go to the area where your default flows or configured flows are managed.
-
Create a new flow or open an existing flow that should handle unsubscribe events.
-
Give the flow a clear name such as Campaign Unsubscribed Handler.
Add and configure the Init node
-
Drag an Init node onto the canvas.
-
Open the node configuration.
-
Set the event or intent trigger to
CAMPAIGN_UNSUBSCRIBED. -
Save the node.
Best practice: keep the Init node label descriptive so other admins can quickly understand the purpose of the flow.
Add and configure the Plain Message node
-
Drag a Plain Message node onto the canvas.
-
Connect the Init node output to the Plain Message node input.
-
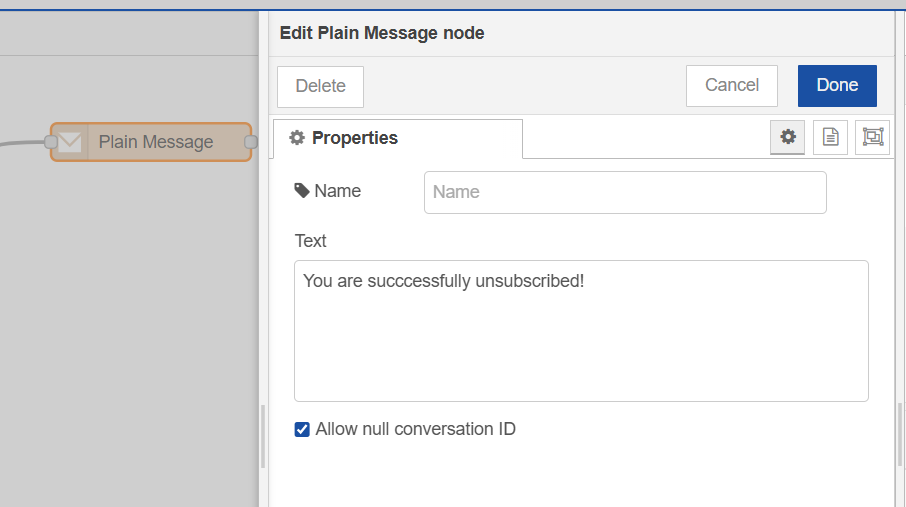
Open the Plain Message node configuration.
-
Enter the message text you want to send for unsubscribe handling.
-
Enable or check Allow null conversation ID.
-
Save the node.
This setting is important. Without Allow null conversation ID, the message may fail when the unsubscribe event does not carry an active conversation context.
Deploy the flow
-
Review the connection between the two nodes.
-
Validate the node settings.
-
Click Deploy.
Recommended message content
Your Plain Message should be short and clear. Example:
You have been unsubscribed successfully and will no longer receive campaign messages from us.
You may adjust the wording to match your channel, brand tone, and compliance requirements.
How it works with the platform
The broader unsubscribe flow works like this:
-
A supported channel detects an unsubscribe signal.
-
The platform updates the customer subscription state in CIM to
isSubscribed=false. -
After a successful opt-out, the system publishes
CAMPAIGN_UNSUBSCRIBED. -
Your Conversation Studio flow starts from the Init node.
-
The Plain Message node sends the configured response.
Validation checklist
- Init node is present in the flow
- Init node trigger is set to
CAMPAIGN_UNSUBSCRIBED - Plain Message node is connected to Init
- Plain Message content is configured
- Allow null conversation ID is enabled
- Flow is deployed successfully
Troubleshooting
|
Issue |
Likely cause |
What to check |
|---|---|---|
|
Flow does not trigger |
Init node is not configured with the correct event |
Verify the Init node is set to |
|
Message is not sent |
Plain Message node is missing required configuration |
Check message text, connection from Init, and deployment status |
|
Execution fails because of conversation context |
Null conversation ID is not allowed |
Enable Allow null conversation ID in the Plain Message node |