
Summary
Voicemail in Expertflow CX allows a customer to leave a recorded message when their private advisor is unavailable — on another call, in Not Ready state, logged out, or after ring-no-answer (RONA). The recording is stored on the media server and a VOICE_MAIL_ACTIVITY is posted to CX so the advisor can play it back from the Agent Desk voicemail mailbox.
Configuration overview:
-
Conversation Studio — add the Condition Checker and Set Voicemail nodes; set the Voicemail DN.
-
FusionPBX Dialplan — create the voicemail capture dialplan (e.g.
54544). -
Voicemail Internal DN — create the customer entry dialplan (e.g.
1122) and setisDidVoicemail. -
Enable Voicemail Application — make sure the FusionPBX Voicemail app is enabled and running.
-
Enable Voicemail on Extensions — turn on voicemail for each advisor extension in FusionPBX.
-
Keycloak — map each advisor to
agentExtensionorDID_number. -
Nginx Voicemail Route — expose the voicemail recording path over HTTPS.
-
voicemail_end.lua — update the media server recording URL and CX connection details.
Configuration
1. Conversation Studio
Configure the voice flow so that when voicemail is enabled, the call is routed to the Voicemail DN. This DN must match the FusionPBX voicemail dialplan destination_number (e.g. 54544).
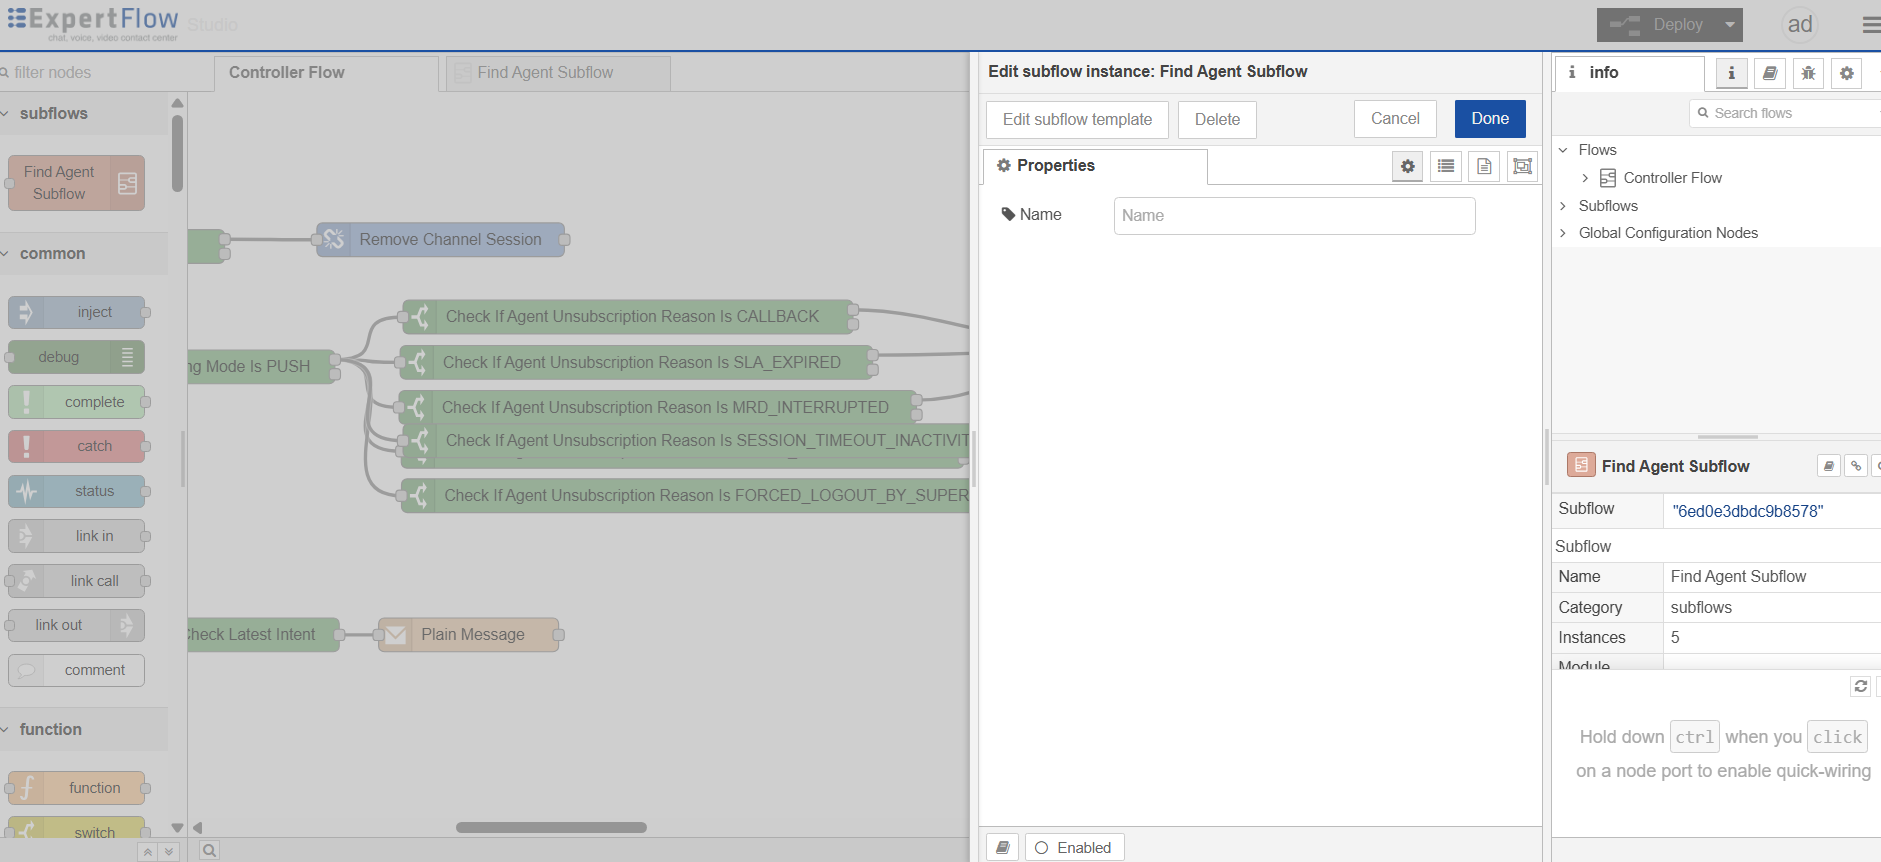
Open the Find Agent Subflow
-
Open Conversation Studio at
CX-FQDN/conversation-studio/and log in. -
Double-click the Find Agent Subflow node (top left of the canvas).
-
In the popup, click Edit Properties.
Configure the Condition Checker node
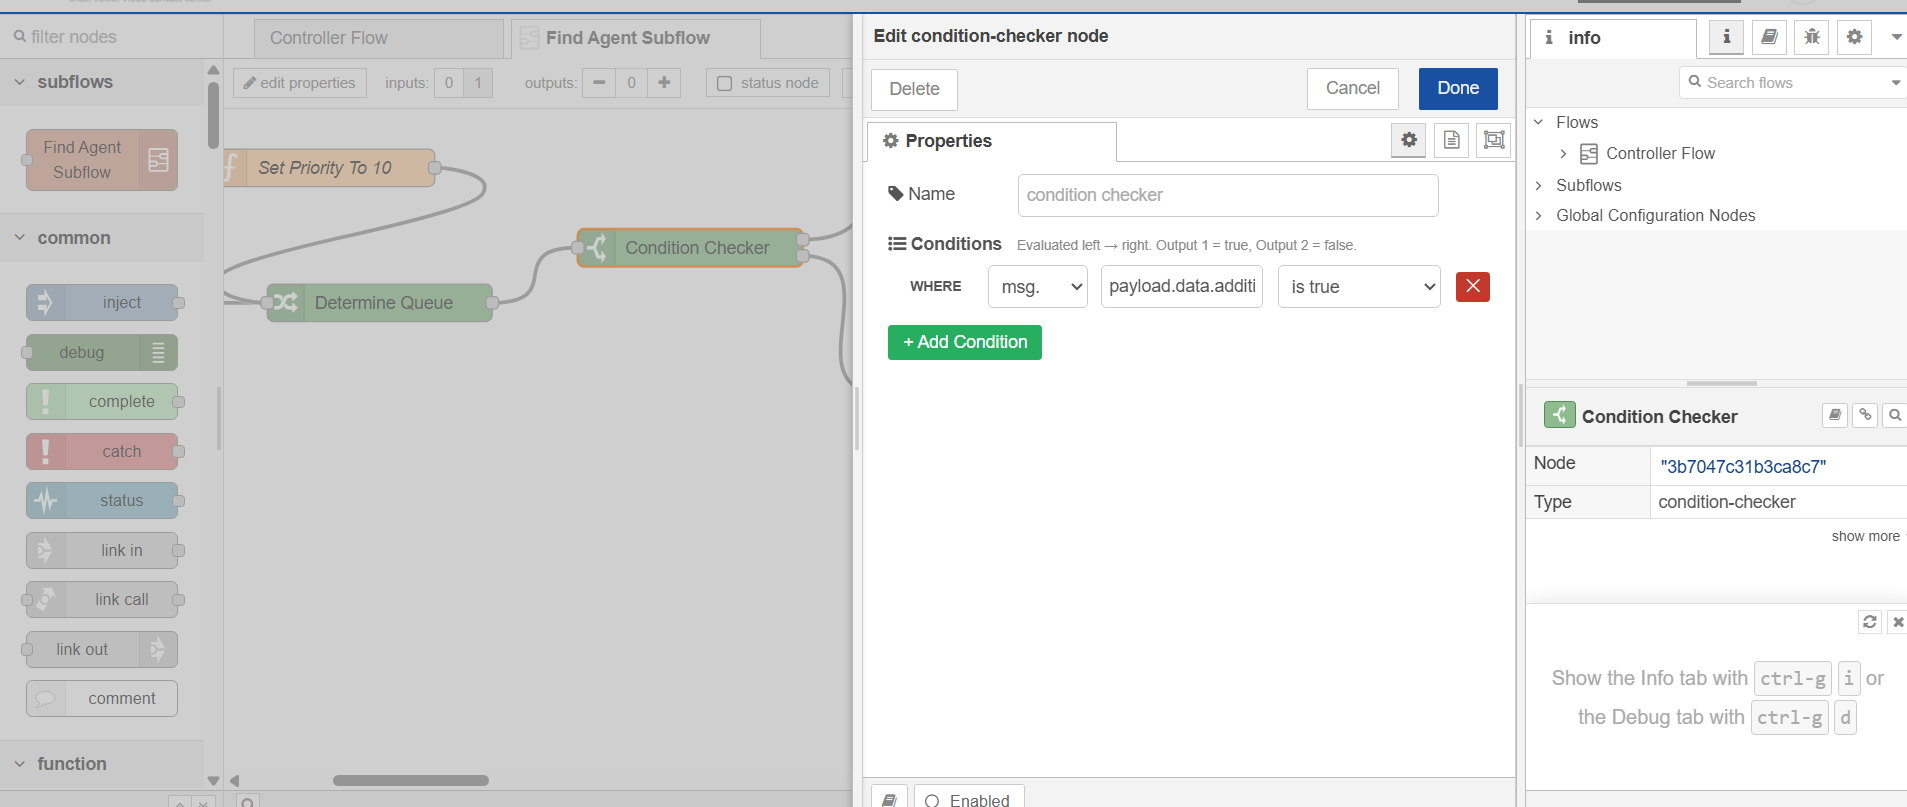
The Condition Checker decides whether the call should take the voicemail path.
-
In the left panel, open the Condition section.
-
Drag the Condition Checker node from the Condition section onto the flow canvas.
-
Double-click the Condition Checker node to open its properties.
-
Configure the condition as follows:
-
Message / Field: select
msg. -
Value:
payload.data.additionalDetails.isVoiceMailEnable -
Condition: select is true from the dropdown.
-
-
Save the Condition Checker node.
Configure the Set Voicemail node
After the Condition Checker is configured, add and configure the Set Voicemail node.
-
In the left panel, open the Actions section.
-
Drag the Set Voicemail node from the Actions section onto the flow canvas.
-
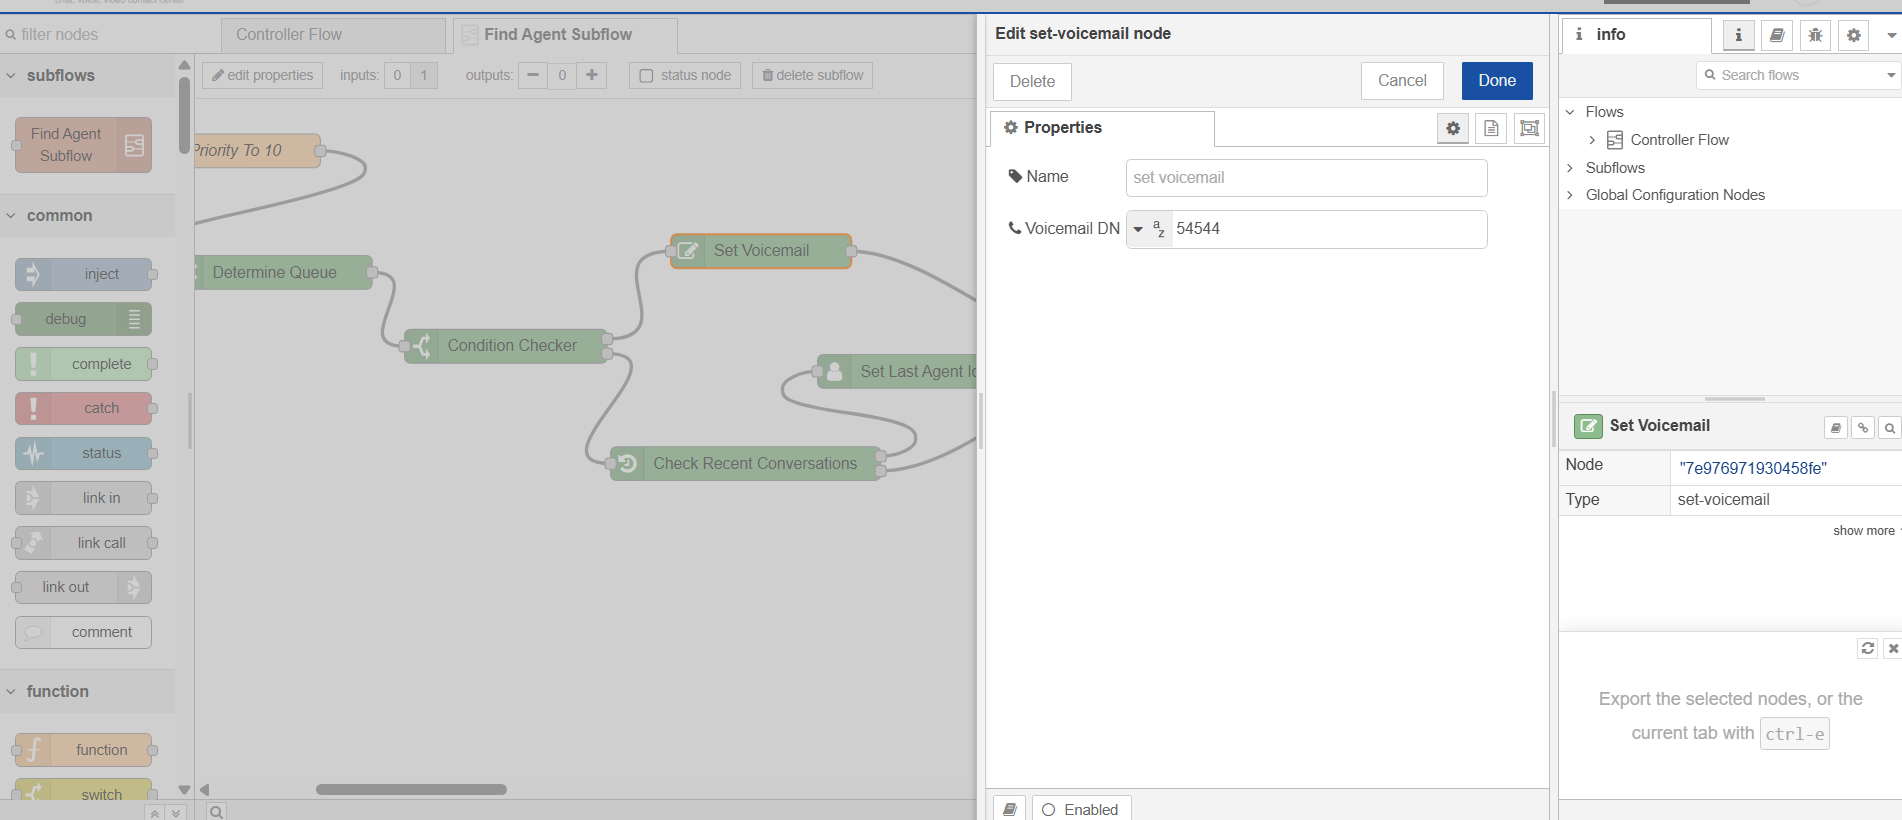
Double-click the Set Voicemail node to open its properties.
-
Enter the Voicemail DN in the Voicemail DN input box (e.g.
54544). This value must match the FusionPBX dialplan in section 2. -
Save the Set Voicemail node.
Connect the nodes and save
-
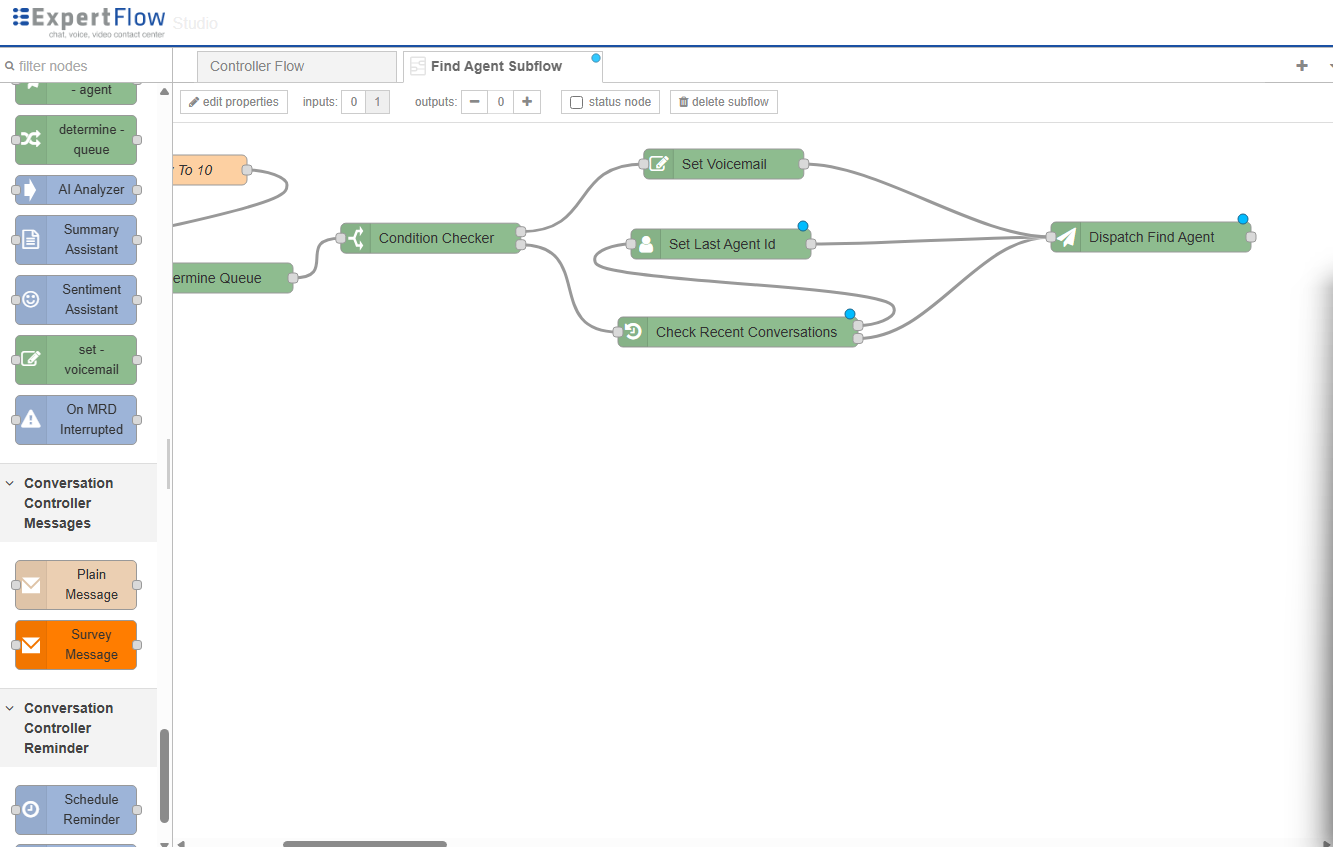
Connect the nodes so that the true path of the Condition Checker leads to the Set Voicemail node. Use the completed flow diagram below as the reference.
-
Save the subflow configuration.
The completed flow should look like this:
2. FusionPBX Dialplan
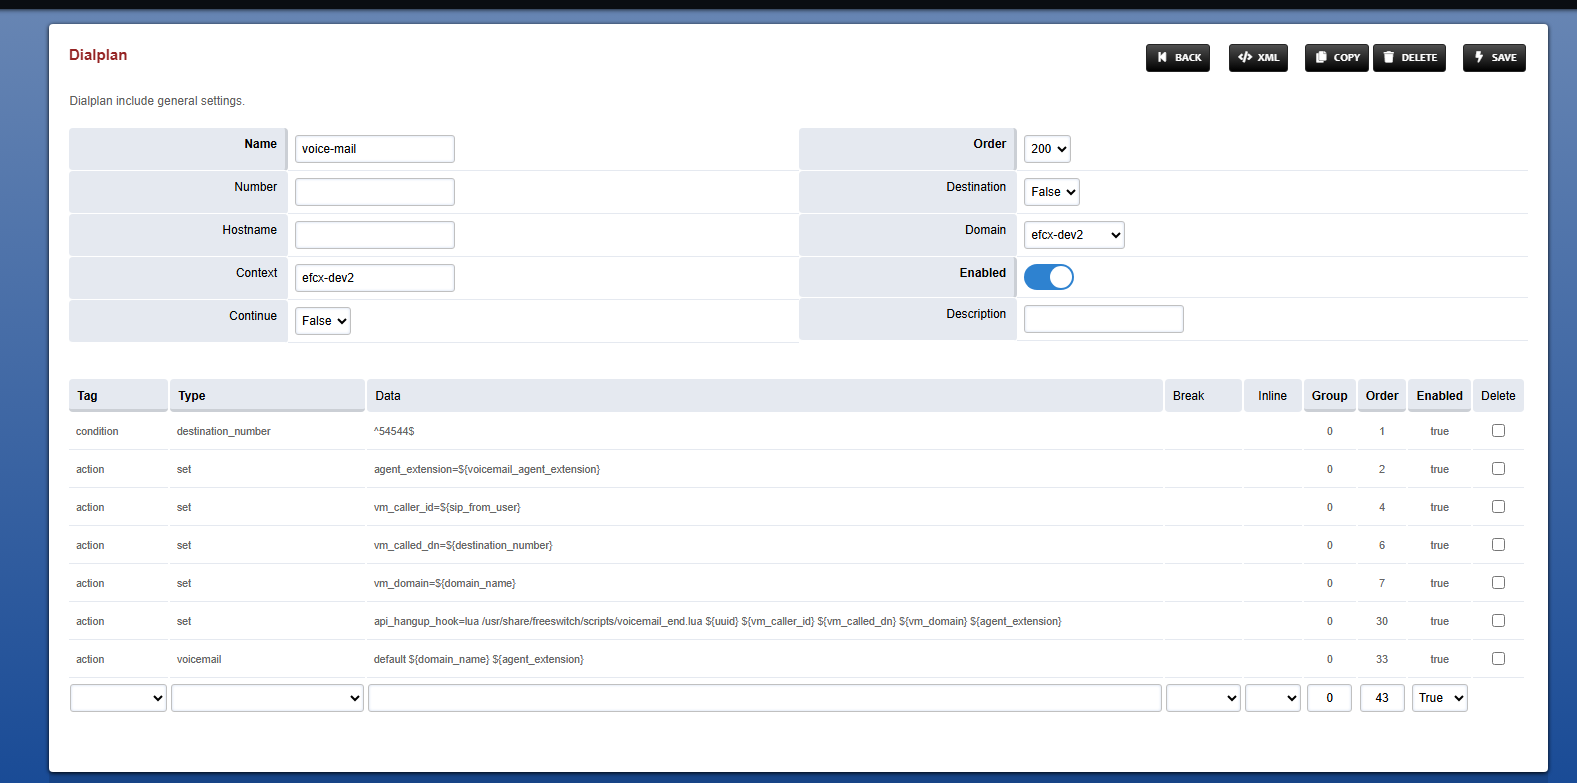
Create a dialplan entry for voicemail capture. Voice Connector transfers calls to this DN when the advisor is unavailable.
-
Open the FusionPBX web interface and log in.
-
Go to Domain → Dialplan → Dialplan Manager.
-
Click Add to create a new dialplan entry.
-
Configure the dialplan using the table below and save.
|
Order |
Tag |
Type |
Data |
Enabled |
|---|---|---|---|---|
|
1 |
condition |
|
|
true |
|
2 |
action |
|
|
true |
|
4 |
action |
|
|
true |
|
6 |
action |
|
|
true |
|
7 |
action |
|
|
true |
|
30 |
action |
|
|
true |
|
33 |
action |
|
|
true |
3. Voicemail Internal DN
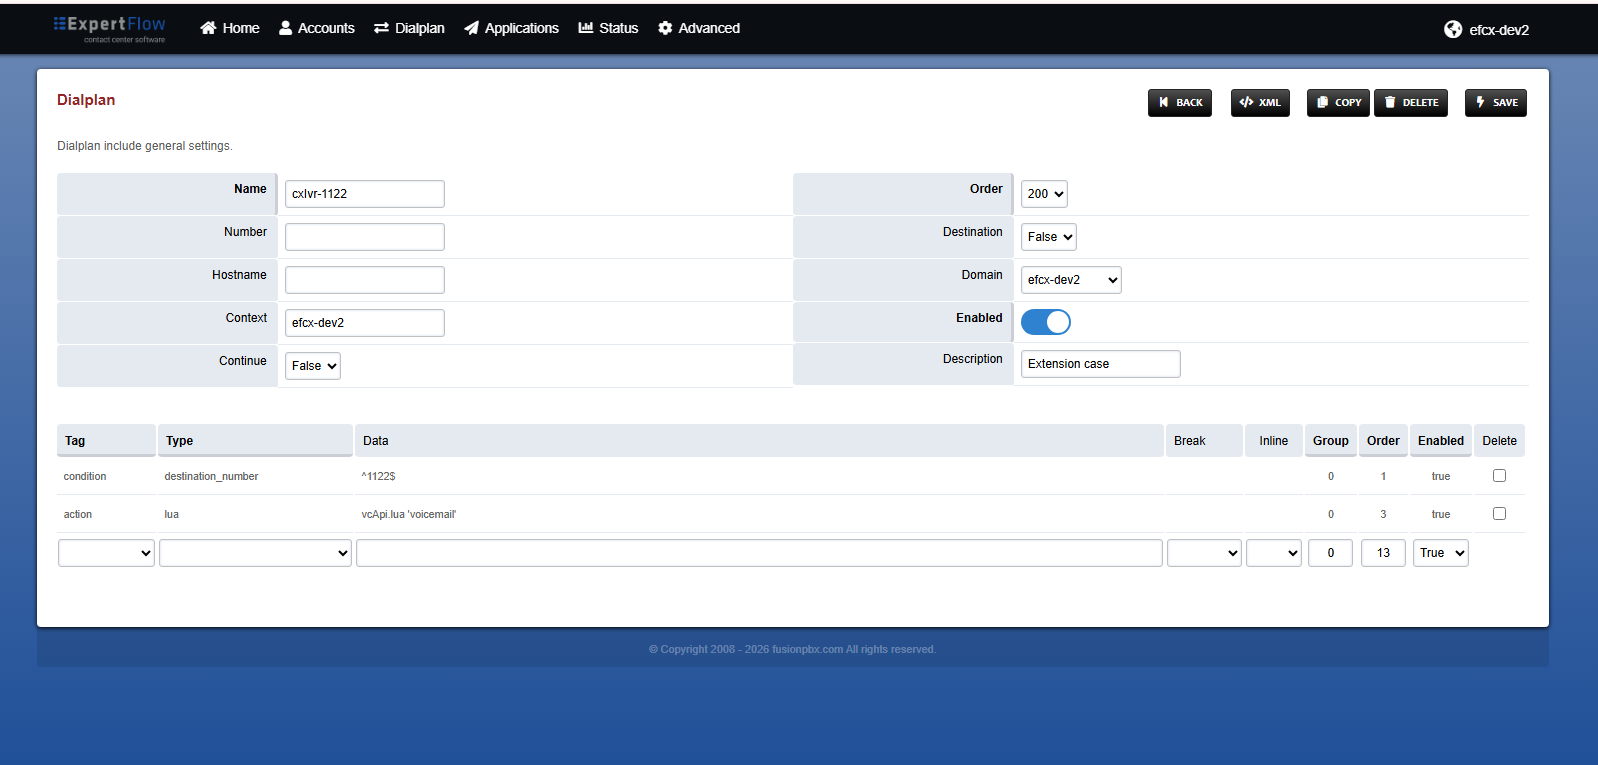
Create a dialplan entry for the customer entry point into the voicemail flow. Calls to this DN execute vcApi.lua 'voicemail'.
The isDidVoicemail session variable controls which routing path runs:
-
isDidVoicemail=false— agent extension flow: customer is prompted to enter their advisor's extension. -
isDidVoicemail=true— DID flow: call is routed using the advisor's dedicated DID number.
-
Open the FusionPBX web interface and log in.
-
Go to Domain → Dialplan → Dialplan Manager.
-
Click Add to create a new dialplan entry.
-
Configure the dialplan using the table below and save.
|
Order |
Tag |
Type |
Data |
Enabled |
|---|---|---|---|---|
|
1 |
condition |
|
|
true |
|
2 |
action |
|
|
true |
|
3 |
action |
|
|
true |
4. Enable Voicemail Application
On some FusionPBX installs the Voicemail application is disabled. If it is not running, mailboxes will not work even when dialplans and extensions are configured.
-
Open the FusionPBX web interface and log in.
-
Go to Advanced → App Manager.
-
Search for Voicemail.
-
Confirm the Voicemail application status is Enabled. If it is disabled, enable it and save.
-
Verify that Apps → Voicemail is now visible in the FusionPBX menu.
If the Voicemail app was just enabled and settings look incomplete, run App Defaults:
-
Go to Advanced → Upgrade.
-
Select the App Defaults checkbox and execute.
5. Enable Voicemail on FusionPBX Extensions
Each advisor extension that can receive voicemail must have voicemail enabled in FusionPBX. Without this, the dialplan action voicemail default ${domain_name} ${agent_extension} cannot store a message for that extension.
-
Open the FusionPBX web interface and log in.
-
Select the target Domain (e.g.
expertflow). -
Go to Accounts → Extensions.
-
Open the advisor extension (for example,
1001). -
Set Voicemail Enabled to True.
-
Optionally set a Voicemail Password if local mailbox access is required.
-
Click Save.
-
Repeat steps 4–7 for every advisor extension that should receive voicemail.
You can confirm the mailbox exists under Apps → Voicemail.
6. Keycloak
Map each advisor in Keycloak so the system knows which agent handles which customer call. The attribute required depends on the voicemail routing path configured in section 3.
-
Open the Keycloak admin console and log in.
-
Select the target realm (e.g.
efcx-dev2). -
Go to Users and open the advisor user.
-
Open the Attributes tab.
-
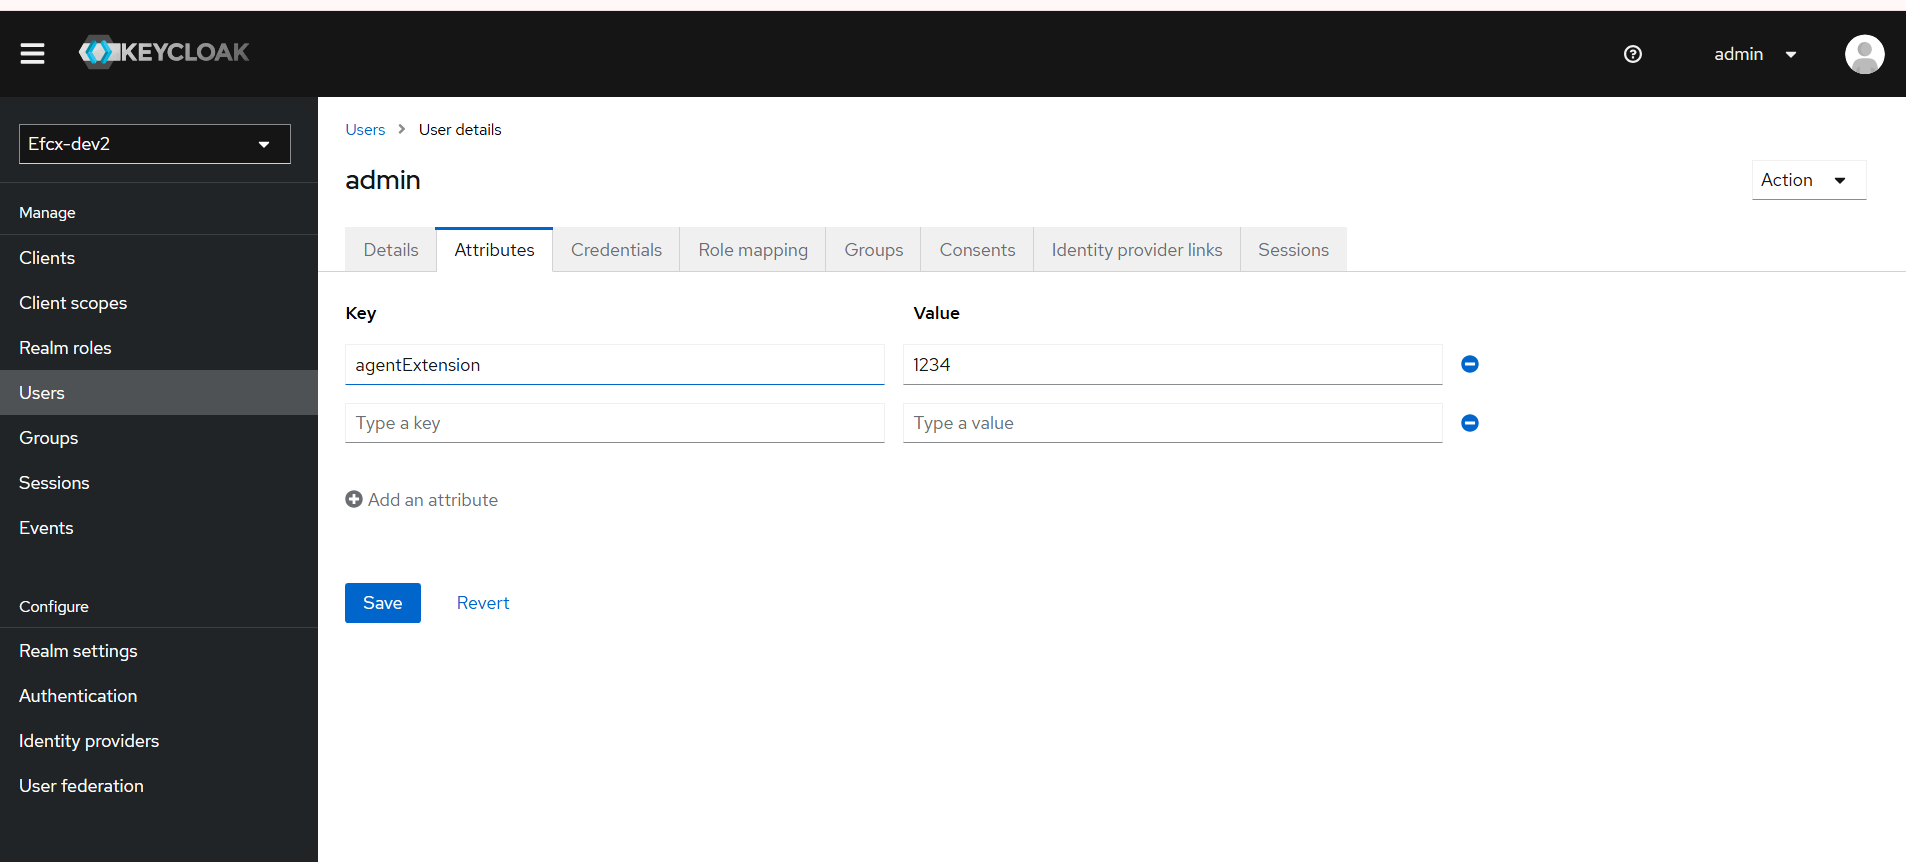
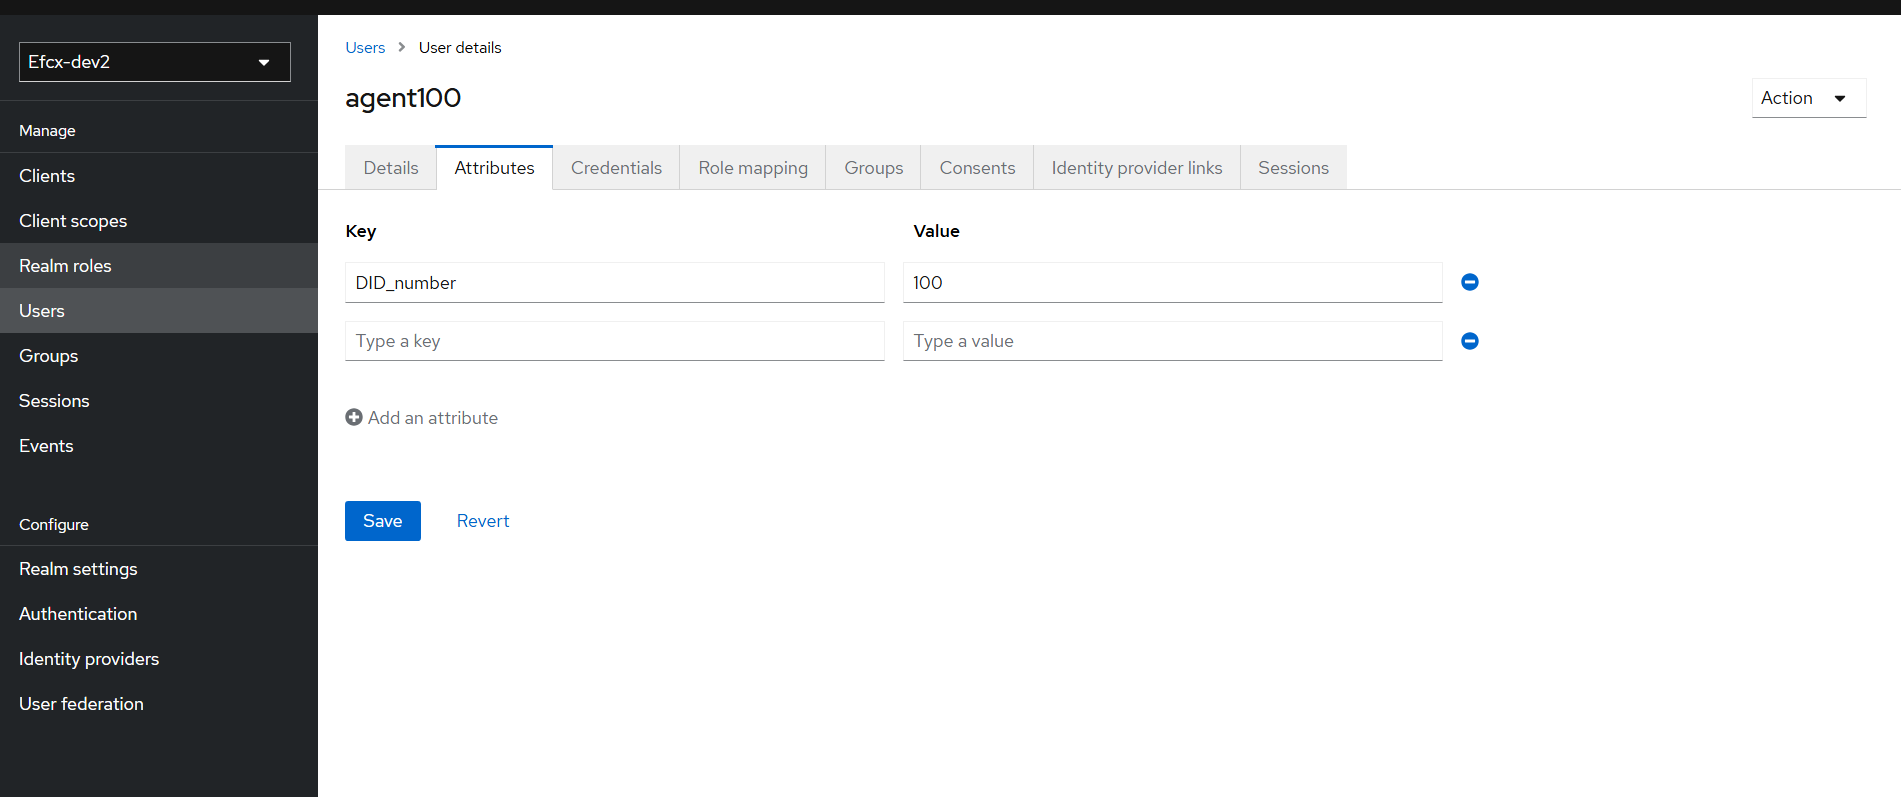
Add the attribute for the routing path:
|
Flow |
Key |
Value |
Example |
|---|---|---|---|
|
Agent extension |
|
Advisor extension |
|
|
DID |
|
Advisor DID number |
|
-
Click Save.
Agent extension flow — assign agentExtension to the advisor:
DID flow — assign DID_number to the advisor:
7. Nginx Voicemail Route
Nginx must expose the FreeSWITCH voicemail storage path so Agent Desk can play recordings from the URL built by voicemail_end.lua (for example, https://<MEDIA-SERVER-IP>/voicemail/...).
-
On the media server, open the FusionPBX Nginx site config:
nano /etc/nginx/sites-available/fusionpbx -
Go to the HTTPS section (around line 198):
listen [::]:443 ssl; listen 443 ssl; server_name fusionpbx; -
Inside that
server { ... }block, findlocation / {and add the following block above it:location /voicemail/ { alias /var/lib/freeswitch/storage/voicemail/default/; add_header Content-Type audio/wav; add_header Accept-Ranges bytes; } -
(Optional but recommended) Add the same
location /voicemail/block in thelisten 80server (around line 66), also above itslocation /. -
Save the file and exit the editor.
-
Test the Nginx configuration and reload:
nginx -t
systemctl reload nginx
After this change, a recording path such as /var/lib/freeswitch/storage/voicemail/default/expertflow/1001/msg_....wav is reachable at https://<MEDIA-SERVER-IP>/voicemail/expertflow/1001/msg_....wav.
8. voicemail_end.lua Script
The script is already deployed on the media server at /usr/share/freeswitch/scripts/voicemail_end.lua. It runs on call hangup (via the api_hangup_hook in section 2), looks up the recording, and posts a VOICE_MAIL_ACTIVITY to CX. For each deployment, update the media server URL and CX connection details as follows.
Update the media server recording URL
-
Open
/usr/share/freeswitch/scripts/voicemail_end.luaon the media server. -
Locate the
VOICEMAIL_RECORDING_BASE_URLsetting near the top of the script. -
Change it to your media server voicemail endpoint:
local VOICEMAIL_RECORDING_BASE_URL = "https://<MEDIA-SERVER-IP>/voicemail"Example:
https://192.168.1.17/voicemail -
Save the file.
Update the CX connection details
The script loads CX settings from an env file named:
cx_env-<domain>-<service_id>.lua
Here, service_id is the Voicemail DN (the voicemail triggering DN configured in Conversation Studio and matched by the FusionPBX dialplan in section 2 — e.g. 54544).
The dialplan hangup hook passes ${destination_number} as this value, so if your Voicemail DN is 54544 and the domain is expertflow, the env file name is:
cx_env-expertflow-54544.lua
-
Open or create the env file on the media server under
/usr/share/freeswitch/scripts/using the Voicemail DN as the service identifier. -
Set the CX FQDN and authentication values for your environment. Example:
local config = { cxFqdn = "https://<CX-FQDN>", auth_enabled = false, auth_realm = "expertflow", client_id = "cim", client_secret = "<CLIENT_SECRET>", username = "voice_auth", password = "<PASSWORD>" } return config -
Confirm the file ends with
return config. Without this return, the script cannot load CX settings. -
Save the file. No FreeSWITCH restart is required; the next hangup hook picks up the changes.