
LiveKit Configuration Guide
This guide is for anyone who has a LiveKit infrastructure already deployed and running (LiveKit Server, SIP Service, Redis, Dashboard) and needs to configure a voice bot or transcription bot with their own Media Server (FusionPBX/FreeSWITCH) and Expertflow CX (EFCX).
Prerequisite: LiveKit infrastructure must already be deployed. If not, follow the LiveKit - Deployment Guide first, then come back here.
This guide covers two scenarios:
-
Scenario A: Setting up a full AI Voice Bot (bot answers the call, talks to the customer, can transfer to a human agent)
-
Scenario B: Setting up a Transcription-Only Bot (no AI conversation — call is silently transferred to a human agent, and both sides are transcribed to CCM)
1. Call Flow Overview
Before configuring anything, understand how a call flows through the system:
Inbound Call (Customer → AI Bot)
-
Customer calls a DID number that lands on the Media Server (FusionPBX) inbound route
-
FusionPBX outbound route forwards the call to the LiveKit SIP Service (via gateway pointing to LiveKit VM IP and SIP port)
-
The call hits the Inbound Trunk on LiveKit (configured via Dashboard)
-
A Dispatch Rule (configured via Dashboard) matches the inbound trunk and dispatches the appropriate AI agent into the room
-
The AI agent joins the room and starts conversing with the customer
For Testing: Instead of a DID, you can dial the bot DN (e.g., 10005) directly from a registered extension on the Media Server. The call goes from the extension → outbound route of Media Server → LiveKit SIP Service → Inbound Trunk → Dispatch Rule → AI Agent.
Human Transfer (AI Bot → Human Agent)
-
When the customer says "transfer me to a human agent" (or the bot decides to transfer), the AI agent uses the LiveKit Outbound Trunk to dial out
-
The call goes from LiveKit outbound trunk → hits the Media Server (FusionPBX) on an inbound route (e.g.,
99900) -
The inbound route on FusionPBX then routes the call to an internal DN dialplan (e.g.,
1122or682200) — this is the Service Identifier configured in EFCX Unified Admin (channel configuration) -
On this internal DN, a Lua script runs (e.g.,
vcApi.luaorcxIvr.lua) that connects the call to EFCX and routes it to an available human agent -
Once the human agent answers, the AI session closes and transcription continues via standalone STT streams
Important: 99900 is not an extension — it is an inbound route on the Media Server that receives the call coming back from LiveKit. The inbound route then forwards the call to the internal DN (service identifier) where the Lua script handles EFCX routing.
2. Available Agent Types
Choose the agent that matches your use case. All three are pre-built in the repository under agent/src/.
|
Agent |
File |
Architecture |
Use Case |
|---|---|---|---|
|
Complete Flow Agent |
|
OpenAI Realtime API (speech-to-speech) |
Full AI conversation with lowest latency. Single model handles STT + LLM + TTS. |
|
Pipeline Flow Agent |
|
3-stage: STT → LLM → TTS |
Full AI conversation with separate providers (ElevenLabs STT/TTS + OpenAI LLM). More control over each stage. |
|
NCRI Flow Agent |
|
No bot — silent transfer + transcription only |
Scenario B. Immediately transfers call to human agent. Provides dual-leg transcription (customer + agent) to CCM. |
For Scenario A (full voice bot): Use complete_flow_agent.py or pipeline_flow_agent.py.
For Scenario B (transcription only): Use NCRI_flow_agent.py.
Important — Do NOT edit the template bot files directly. The three agent files (complete_flow_agent.py, pipeline_flow_agent.py, NCRI_flow_agent.py) are templates. For each customer deployment, copy the desired bot file and rename it (e.g., customer_name_agent.py), then make all configuration changes in the copied file. This keeps the original templates clean for future deployments and updates.
3. Step-by-Step Configuration
Step 1: Create Your Agent File (Copy from Template)
Navigate to the agent source directory and copy the template bot you want to use:
cd ~/livekit-project/agent/src

# For Scenario A (full voice bot with OpenAI Realtime):
cp complete_flow_agent.py customer_name_agent.py

# For Scenario A (full voice bot with pipeline):
# cp pipeline_flow_agent.py customer_name_agent.py

# For Scenario B (transcription only):
# cp NCRI_flow_agent.py customer_name_agent.py
Replace customer_name_agent.py with a meaningful name for your deployment (e.g., acme_voice_agent.py, ncri_transcription_agent.py).
All subsequent configuration changes will be made in this copied file, not in the original template files.
Step 2: Configure Agent Environment Variables
Create the environment file for the agent:
cd ~/livekit-project/agent/src
nano .env
Add the following, adjusting values for your deployment:
# ===== LiveKit Connection (REQUIRED for all agents) =====
# Use your LiveKit VM IP and the API credentials from infrastructure/docker-compose.yaml
LIVEKIT_URL="http://YOUR_LIVEKIT_VM_IP:7880"
LIVEKIT_API_KEY=devkey
LIVEKIT_API_SECRET=h1J2kL3mN4pQ5rS6tU7vW8xY9zA0bC1d

# ===== AI Provider Keys (depends on which agent you are using) =====

# For complete_flow_agent (OpenAI Realtime — Scenario A):
OPENAI_API_KEY=sk-proj-YOUR_OPENAI_KEY

# For pipeline_flow_agent (STT + LLM + TTS — Scenario A):
# OPENAI_API_KEY=sk-proj-YOUR_OPENAI_KEY
# ELEVEN_API_KEY=sk_YOUR_ELEVENLABS_KEY

# For NCRI_flow_agent (Transcription only — Scenario B):
# ELEVEN_API_KEY=sk_YOUR_ELEVENLABS_KEY

# ===== Optional Model Overrides (defaults work fine) =====
# OPENAI_REALTIME_MODEL=gpt-realtime-1.5        # complete_flow_agent
# OPENAI_LLM_MODEL=gpt-4o                        # pipeline_flow_agent
# ELEVENLABS_VOICE_ID=JBFqnCBsd6RMkjVDRZzb      # pipeline_flow_agent
# ELEVENLABS_TTS_MODEL=eleven_turbo_v2_5         # pipeline_flow_agent
# NCRI_STT_LANGUAGE=en                           # NCRI_flow_agent
# NCRI_STT_SAMPLE_RATE=16000                     # NCRI_flow_agent
Important: Without valid API keys, the agent will fail silently. The LIVEKIT_API_KEY and LIVEKIT_API_SECRET must match what is configured in your infrastructure docker-compose.yaml.
Step 3: Configure Agent-Specific Settings
Open your copied agent file and update the hardcoded values for your environment:
cd ~/livekit-project/agent/src
nano customer_name_agent.py    # your copied agent file
Find and update these values:
|
Setting |
What to Change |
Example |
|---|---|---|
|
|
IP address of your Media Server (FusionPBX) |
|
|
|
Inbound route DN on FusionPBX that receives the transfer call from LiveKit and routes to EFCX |
|
|
|
Service Identifier / Channel ID from EFCX Unified Admin |
|
|
|
Your EFCX CCM tenant endpoint |
|
|
|
LiveKit outbound trunk ID — you will get this in Step 5 after creating the trunk |
|
Notes:
-
agent_extensionis the inbound route on your Media Server (e.g.,99900) — not a physical extension. When LiveKit transfers the call, it dials this number, which hits the FusionPBX inbound route, and from there the call is routed to the internal DN (service identifier) where the Lua script handles EFCX integration. -
NCRI_flow_agent.pydoes not have afusionpbx_ipsetting since it does not construct SIP URIs directly. -
You can leave
outbound_trunk_idas-is for now and update it after creating the trunk in Step 5.
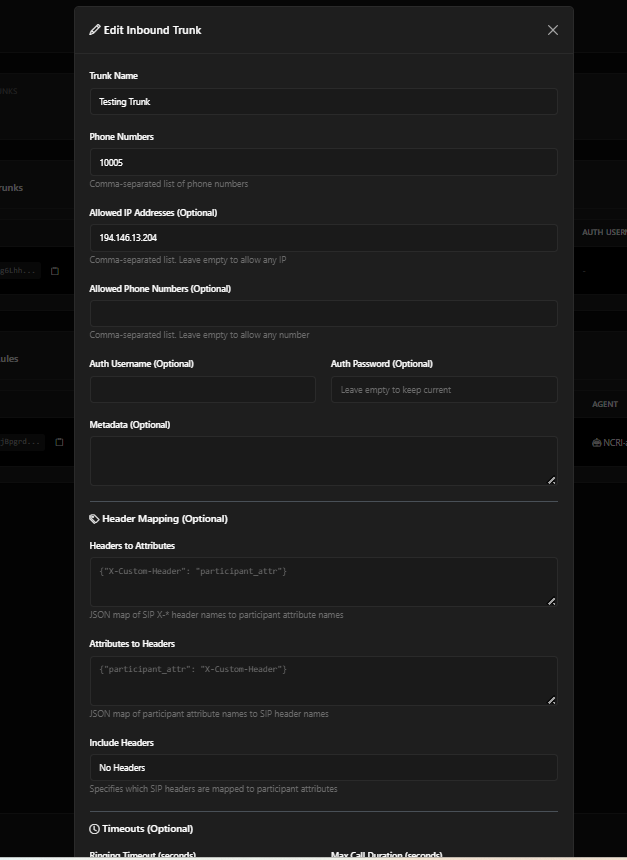
Step 4: Create Inbound Trunk (via Dashboard)
The inbound trunk allows calls from your Media Server (FusionPBX) to enter LiveKit.
-
Open the LiveKit Dashboard in your browser:
http://YOUR_LIVEKIT_VM_IP:8000 -
Log in with your admin credentials (configured in dashboard
.env) -
Go to Inbound from the left sidebar
-
Click "Create Trunk"
-
Fill in the details:
-
Name:
FusionPBX Inbound(or any descriptive name) -
Numbers: Add the DN that FusionPBX will send to LiveKit (e.g.,
10005) -
Allowed Addresses: Add your FusionPBX/Media Server IP address (e.g.,
192.168.1.17)
-
-
Click "Create"
-
Save the generated Trunk ID (starts with
ST_...) — you will need it for the dispatch rule
Step 5: Create Outbound Trunk (via Dashboard)
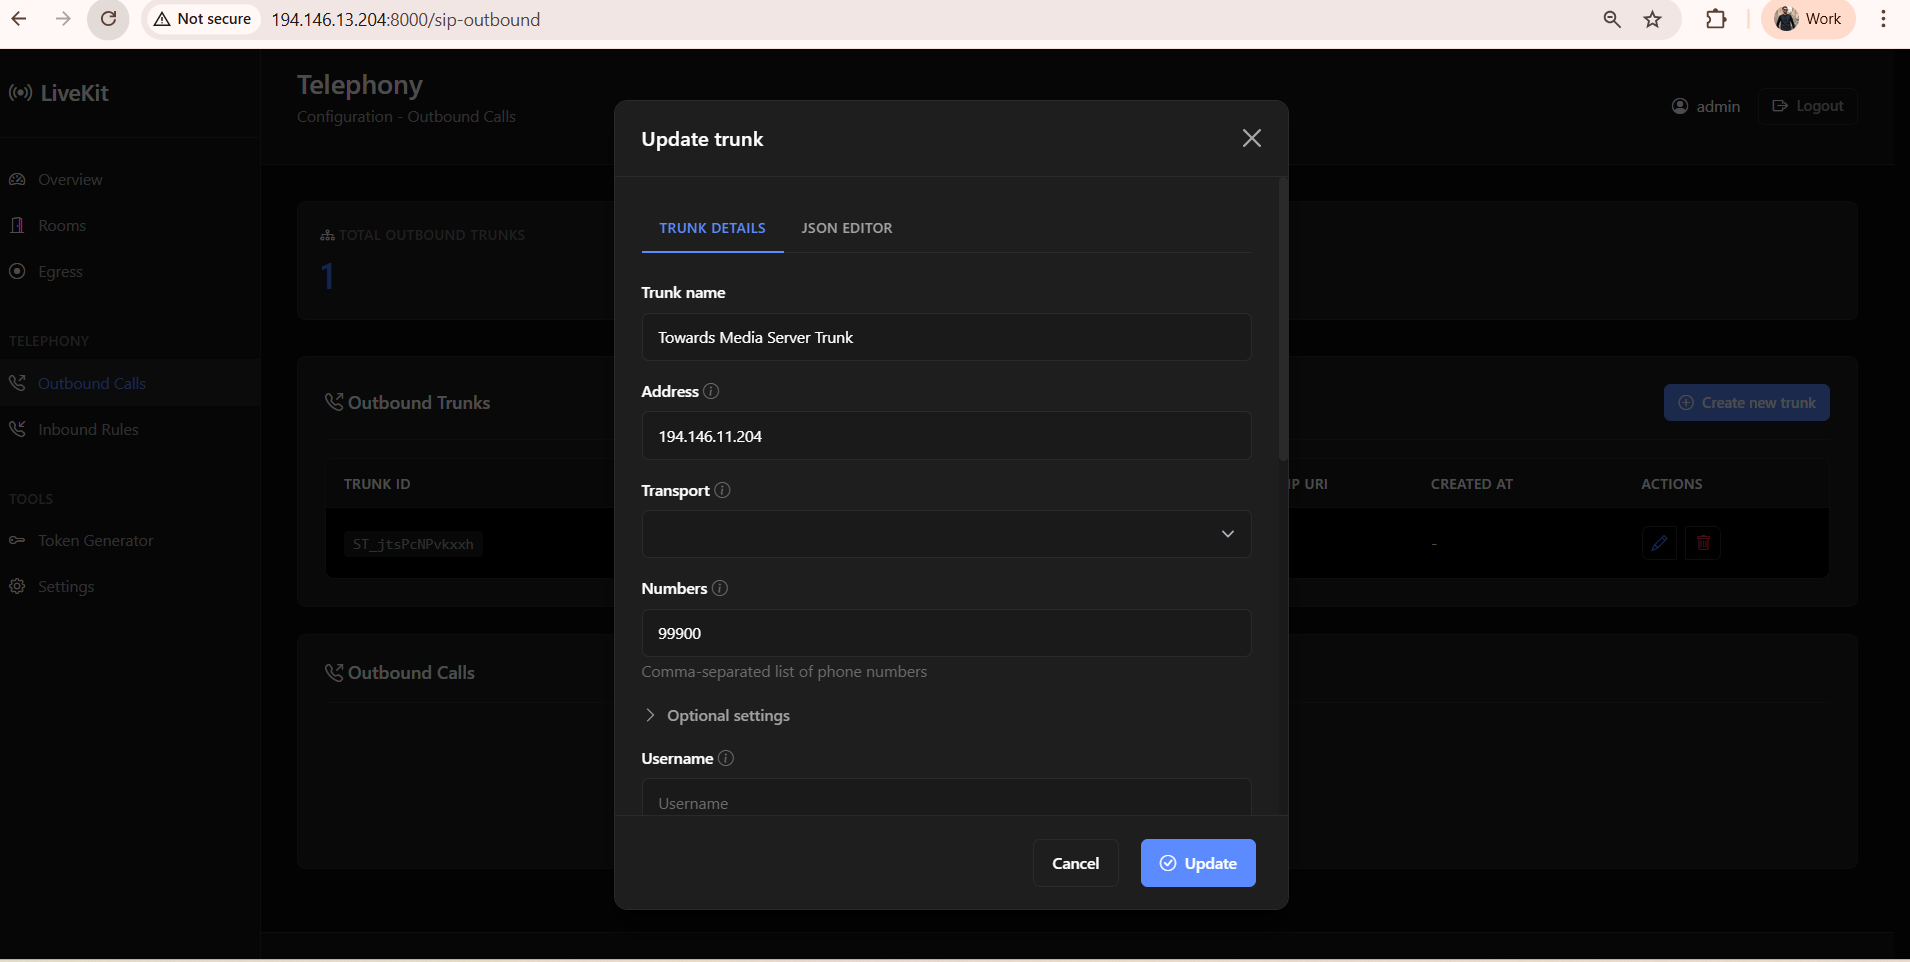
The outbound trunk allows LiveKit to send calls back to your Media Server (for human agent transfers).
-
In the Dashboard, go to Outbound Calls from the left sidebar
-
Click "Create New Trunk"
-
Fill in the details:
-
Name:
FusionPBX Outbound(or any descriptive name) -
Address: Your FusionPBX/Media Server IP address
-
Numbers: The inbound route DN on FusionPBX that handles transfer calls (e.g.,
99900)
-
-
Click "Create"
-
Copy the generated Trunk ID (starts with
ST_...)
Now update your agent file with this outbound trunk ID:
cd ~/livekit-project/agent/src
nano customer_name_agent.py    # your copied agent file
Find the outbound_trunk_id line and replace it with your new trunk ID:
outbound_trunk_id = "ST_YOUR_NEW_TRUNK_ID"
Save and exit.
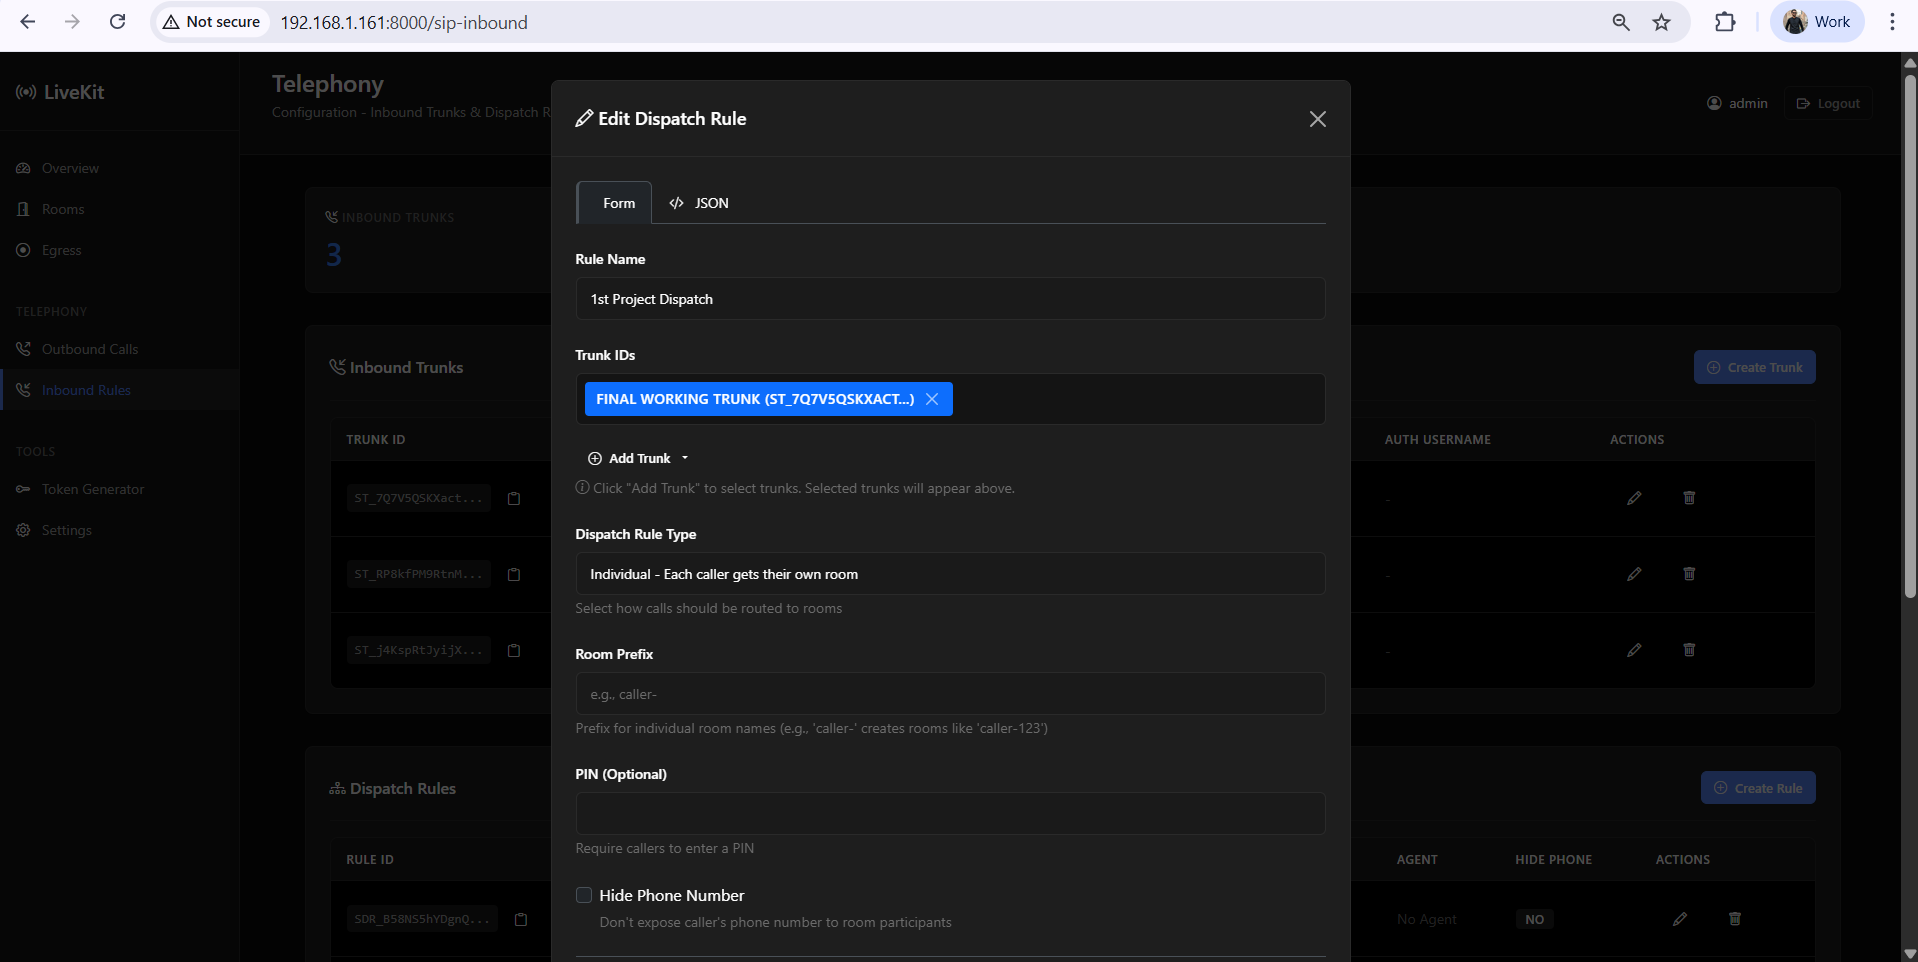
Step 6: Create Dispatch Rule (via Dashboard)
The dispatch rule tells LiveKit which agent to launch when a call arrives on a specific inbound trunk.
-
In the Dashboard, go to Inbound Rules → Dispatch Rules
-
Click "Create Rule"
-
Fill in:
-
Name:
Main Dispatch Rule(or any descriptive name) -
Trunk: Select the inbound trunk you created in Step 4
-
Room Prefix:
_FreeSWITCH_(optional, helps identify rooms) -
Agent Name: Leave blank for automatic dispatch
-
-
Click "Create"
Step 7: Select and Start the Agent
Update the Dockerfile to point to your copied agent file:
cd ~/livekit-project/agent
nano Dockerfile
Change the CMD line to point to your agent file:
# Point to your copied agent file:
CMD ["python", "src/customer_name_agent.py", "dev"]
Build and start the agent:
cd ~/livekit-project/agent
docker compose up -d --build

# Verify agent is running
docker ps | grep agent

# Check logs for successful startup
docker logs livekit-agent --tail 50 -f
Step 8: Configure Media Server (FusionPBX)
Now configure your FusionPBX/Media Server to route calls to and from LiveKit.
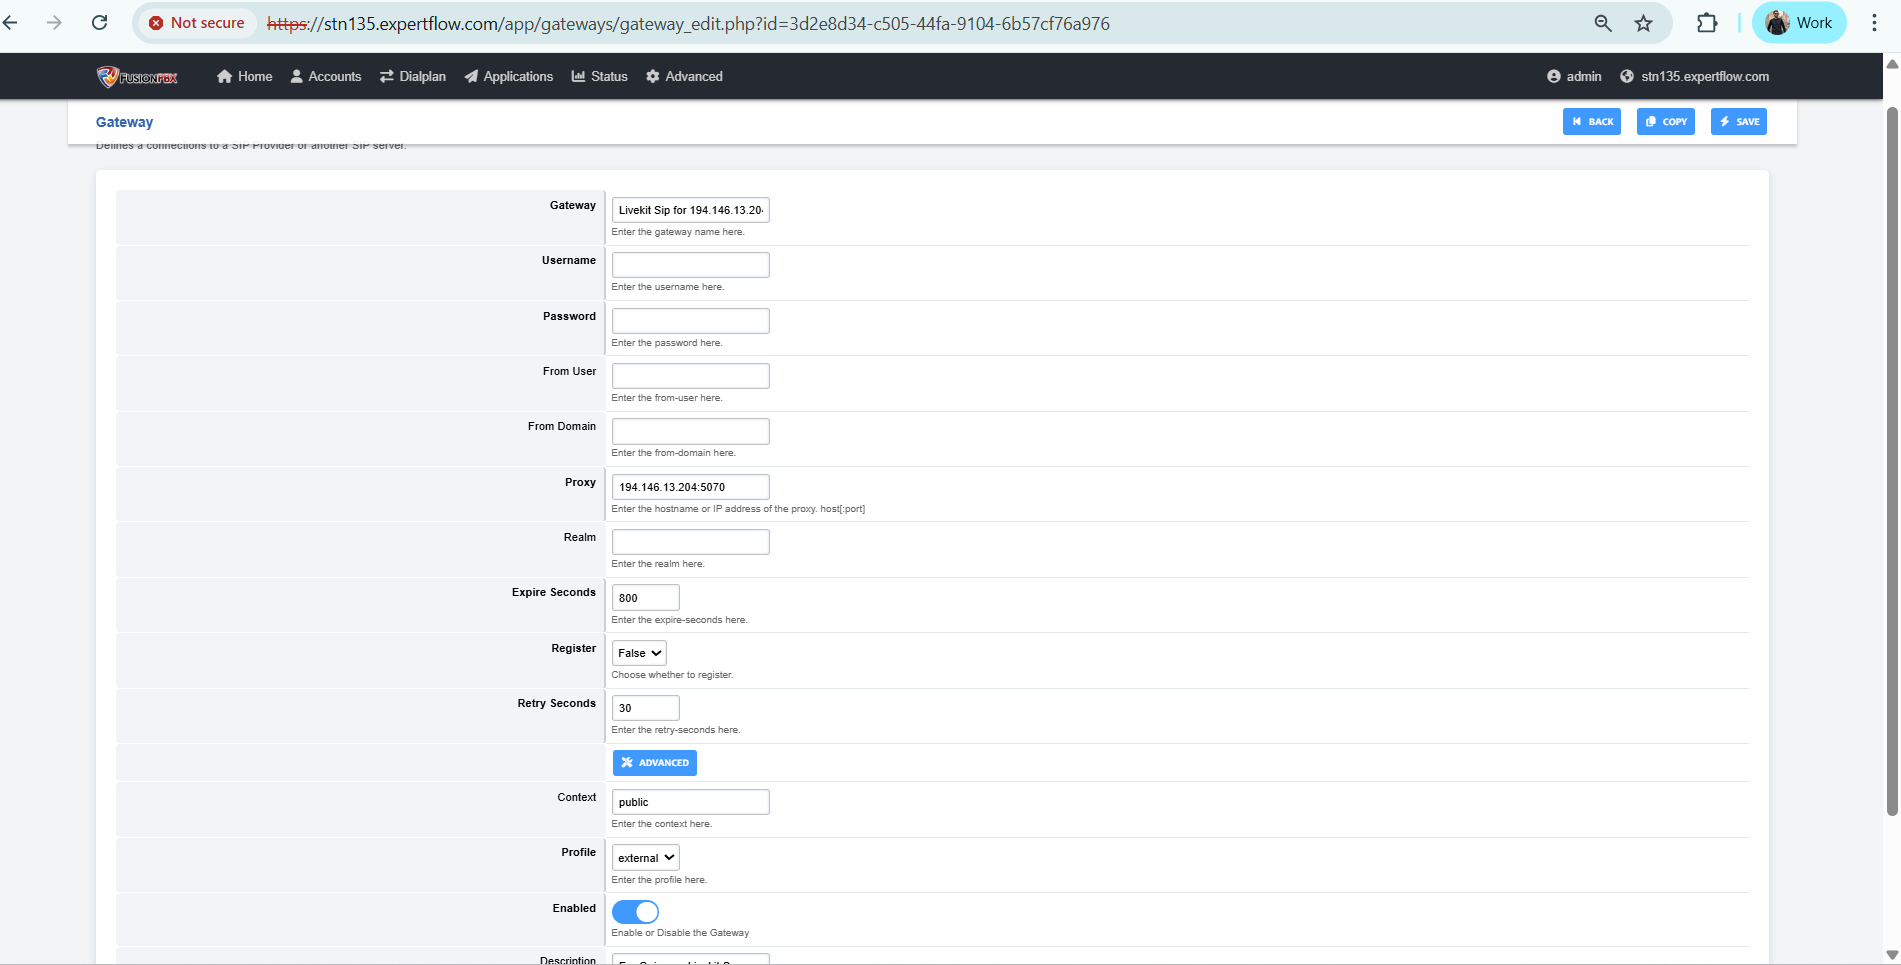
8a. Create Gateway (FusionPBX → LiveKit)
Create a new gateway in FusionPBX that points to your LiveKit SIP service:
-
Gateway Address:
YOUR_LIVEKIT_VM_IP:5070 -
Port 5070 is used because FreeSWITCH typically uses 5060 on the same VM. If LiveKit SIP is on a different VM or a different port, adjust accordingly.
8b. Create Outbound Route (FusionPBX → LiveKit)
This route sends calls from FusionPBX to LiveKit when a customer dials the bot DN (or when testing from a registered extension).
Go to Dialplan → Outbound Routes → Add and create a route. The dialplan XML should look like this (change only the gateway UUID in the last bridge line to match your gateway):
.png?cb=dc3c423a4c506361f4731831d9687594)
Critical: The sip_h_P-Asserted-Identity and sip_invite_from_uri actions must use export, not set. Using set will cause the caller ID to be lost on the outbound leg, and the agent will not be able to identify the customer's phone number. All other variables should remain exactly as shown — only change the gateway UUID.
<extension name="Livekit_Sip" continue="false">
    <condition field="${user_exists}" expression="false"/>
    <condition field="destination_number" expression="^(10005)$">
        <action application="export" data="call_direction=outbound" inline="true"/>
        <action application="unset" data="call_timeout"/>
        <action application="set" data="hangup_after_bridge=true"/>
        <action application="set" data="effective_caller_id_name=${caller_id_name}"/>
        <action application="set" data="effective_caller_id_number=${caller_id_number}"/>
        <action application="set" data="inherit_codec=true"/>
        <action application="set" data="ignore_display_updates=true"/>
        <action application="set" data="callee_id_number=$1"/>
        <action application="export" data="sip_h_P-Asserted-Identity=sip:${caller_id_number}@${domain_name}"/>
        <action application="export" data="sip_invite_from_uri=sip:${caller_id_number}@${domain_name}"/>
        <action application="bridge" data="sofia/gateway/YOUR_GATEWAY_UUID/$1"/>
    </condition>
</extension>
8c. Create Inbound Route for Human Transfer (LiveKit → FusionPBX)
When the AI bot transfers a call to a human agent, LiveKit sends the call to your FusionPBX. This hits an inbound route on the Media Server (e.g., 99900).
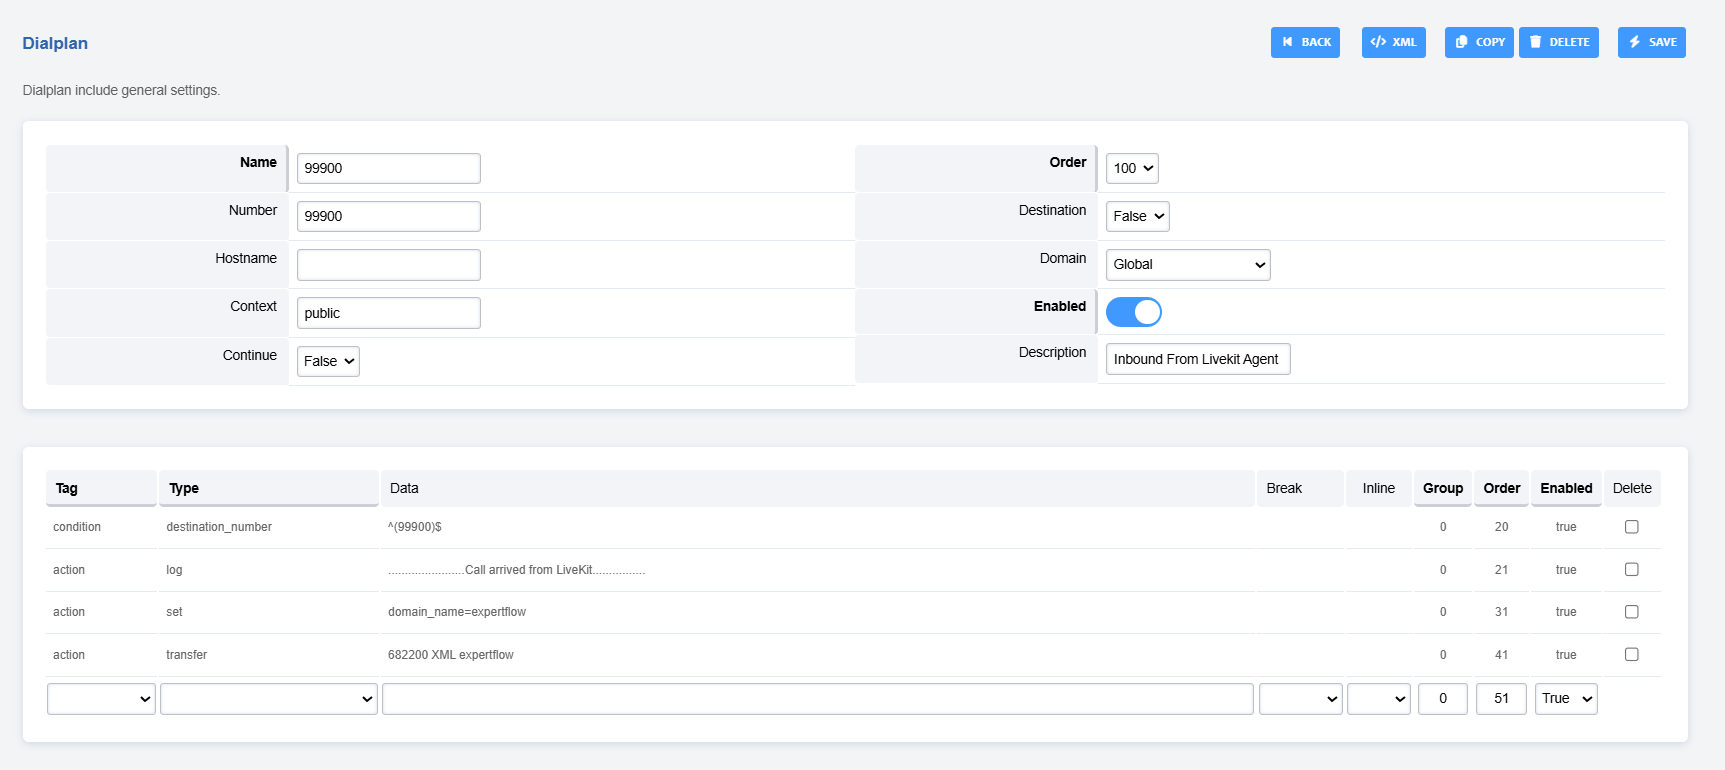
The inbound route then forwards the call to an internal DN dialplan (e.g., 1122 or 682200). This internal DN is your Service Identifier in EFCX Unified Admin.
Create a dialplan entry for this internal DN:
<extension name="cxIvr-682200" continue="false">
    <condition field="destination_number" expression="^682200$">
        <action application="set" data="caller_id_number=${sip_h_X-Customer-Number}"/>
        <action application="set" data="effective_caller_id_number=${sip_h_X-Customer-Number}"/>
        <action application="set" data="effective_caller_id_name=${sip_h_X-Customer-Number}"/>
        <action application="lua" data="vcApi.lua"/>
    </condition>
</extension>
Replace 682200 with your actual service identifier. The vcApi.lua (or cxIvr.lua) script connects the call to EFCX for agent routing.
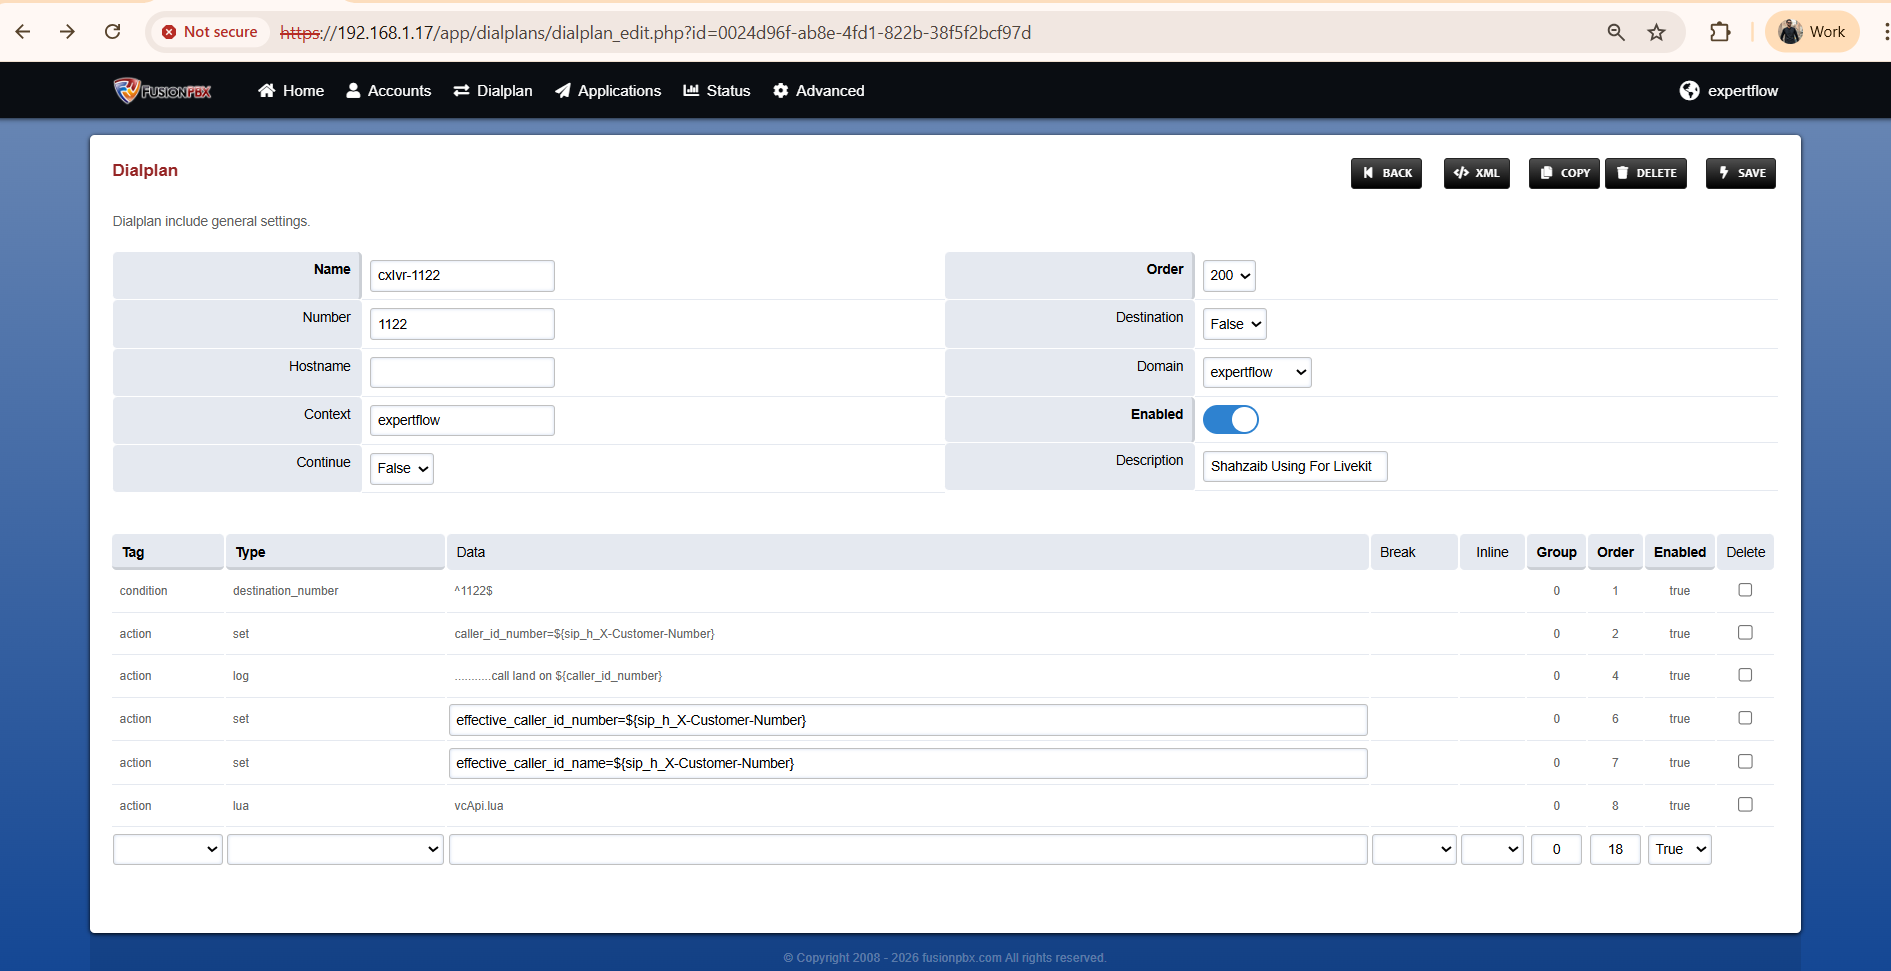
After making changes, reload the dialplan from the FusionPBX interface or run reloadxml in FreeSWITCH CLI.
Step 9: Verify the Setup
# Check all containers are running
docker ps

# Expected containers:
# livekit-agent            - AI agent worker
# livekit-dashboard        - Web dashboard
# infrastructure-sip-1     - LiveKit SIP service
# infrastructure-livekit-1 - LiveKit server
# infrastructure-redis-1   - Redis

# Check agent logs for successful connection to LiveKit
docker logs livekit-agent --tail 20
To test:
-
From a registered extension on the Media Server, dial the bot DN (e.g.,
10005) -
The call should go: extension → outbound route → LiveKit SIP → inbound trunk → dispatch rule → AI agent answers
-
For Scenario A: The AI agent should greet you. Say "transfer me to a human agent" to test the transfer flow
-
For Scenario B: The call should be silently transferred to a human agent
-
Verify transcripts appear in EFCX/CCM
4. Transcription Configuration
4.1 How Transcription Works
Transcription operates in two phases depending on the call state:
Phase 1: Pre-Transfer (AI Bot Active)
While the AI bot is handling the call, transcription happens automatically as part of the conversation:
|
Agent Type |
Pre-Transfer STT |
How It Works |
|---|---|---|
|
complete_flow_agent |
OpenAI Realtime API (built-in) |
The Realtime model processes speech-to-speech internally. Customer speech is transcribed and sent to CCM. |
|
pipeline_flow_agent |
ElevenLabs Scribe v2 Realtime (streaming) |
Dedicated STT stream converts customer audio to text, sent to LLM and logged to CCM. |
|
NCRI_flow_agent |
N/A (no bot phase) |
No AI bot — goes directly to transfer. |
Phase 2: Post-Transfer (Human Agent Active)
After the call is transferred to a human agent, the AI session closes but transcription continues via standalone STT streams:
|
Agent Type |
Post-Transfer STT |
Streams |
|---|---|---|
|
complete_flow_agent |
Silero VAD + OpenAI Whisper ( |
2 streams: customer leg → CCM as CONNECTOR, agent leg → CCM as AGENT |
|
pipeline_flow_agent |
Silero VAD + OpenAI Whisper ( |
2 streams: customer leg → CCM as CONNECTOR, agent leg → CCM as AGENT |
|
NCRI_flow_agent |
ElevenLabs Scribe v2 Realtime |
2 streams: customer leg → CCM as CONNECTOR, agent leg → CCM as AGENT |
Key Point: Post-transfer transcription only starts after the human agent answers. The system checks sip.callStatus == "active" on the human agent participant before starting STT streams. This prevents transcribing hold music or ringback tones.
4.2 Enabling Transcription
Transcription is always enabled by default in all three agents. There is no separate on/off toggle. The transcription behavior depends on which agent template you copy and deploy:
|
Scenario |
Agent Template to Copy |
What Gets Transcribed |
|---|---|---|
|
Full AI bot with transcription |
|
AI conversation + post-transfer human conversation |
|
Transcription only (no AI bot) |
|
Customer + human agent conversation (dual-leg) |
For Scenario A (Voice Bot with Transcription):
-
Copy
complete_flow_agent.pyorpipeline_flow_agent.pyas your agent file -
Ensure the required API keys are set in
.env(see Step 2) -
Ensure
CCM_URLis set to your EFCX CCM tenant endpoint -
Deploy and start the agent — transcription is automatic
For Scenario B (Transcription-Only Bot):
-
Copy
NCRI_flow_agent.pyas your agent file -
Set
ELEVEN_API_KEYin.env -
Optionally configure
NCRI_STT_LANGUAGEandNCRI_STT_SAMPLE_RATEin.env -
Ensure
CCM_URLandservice_identifierare correctly set -
Deploy and start the agent
4.3 Changing Transcription Language
For complete_flow_agent and pipeline_flow_agent (Post-Transfer Whisper):
Edit your copied agent file and update the language parameter:
# Located in your agent file (around line 263-270)
whisper = openai.STT(
    language="en",           # Change to your language: "ar", "es", "fr", etc.
    model="whisper-1",
    prompt=(
        "Expertflow CX voice support call. Speakers say Expertflow, agent, "
        "representative, transfer. Prefer 'Expertflow' over similar words."
    ),
)
For NCRI_flow_agent (ElevenLabs STT):
Set the language via environment variable in .env:
NCRI_STT_LANGUAGE=en          # Change to your language code
NCRI_STT_SAMPLE_RATE=16000    # Audio sample rate
4.4 Disabling Transcription
Since transcription is deeply integrated into the call flow, there is no single configuration flag to disable it. However, you can effectively disable it in your copied agent file:
Option 1: Remove CCM Integration (Recommended)
Comment out the HTTP POST to CCM_URL in the agent's send_to_ccm() function. Transcripts will still be generated locally but won't be sent to CCM.
Option 2: Disable Post-Transfer STT Only
To keep AI bot transcription but disable post-transfer transcription, comment out the standalone STT stream creation in the transfer completion handler.
Option 3: NCRI Agent Without STT Key
Deploy the NCRI agent but remove the ELEVEN_API_KEY from .env. The transfer will still work, but STT streams will fail to initialize.
Note: Disabling transcription does not affect the call flow or transfer functionality. The AI bot conversation and human transfer work normally. Only the CCM transcript logging is affected.
4.5 CCM Message Flow
All transcripts are sent to CCM (Expertflow) in real time:
-
CALL_RINGING — Sent when a customer joins the room
-
CALL_CONNECTED — Sent when the human agent answers (5-second delay to ensure CCM session is ready)
-
Customer transcripts — Sent as
CONNECTORsender type -
AI bot transcripts — Sent as
BOTsender type -
Human agent transcripts — Sent as
AGENTsender type -
CALL_ENDED — Sent when the call ends
During human transfer, messages are briefly queued to ensure correct ordering in CCM before being flushed.
5. Quick Reference: Environment Variables per Agent
|
Variable |
complete_flow_agent |
pipeline_flow_agent |
NCRI_flow_agent |
|---|---|---|---|
|
|
✅ Required |
✅ Required |
✅ Required |
|
|
✅ Required |
✅ Required |
✅ Required |
|
|
✅ Required |
✅ Required |
✅ Required |
|
|
✅ Required |
✅ Required |
❌ Not needed |
|
|
❌ Not needed |
✅ Required |
✅ Required |
|
|
Optional (default: gpt-realtime-1.5) |
❌ |
❌ |
|
|
❌ |
Optional (default: gpt-4o) |
❌ |
|
|
❌ |
Optional (default: JBFqnCBsd6RMkjVDRZzb) |
❌ |
|
|
❌ |
Optional (default: eleven_turbo_v2_5) |
❌ |
|
|
❌ |
❌ |
Optional (default: en) |
|
|
❌ |
❌ |
Optional (default: 16000) |
Related Documentation
-
LiveKit - Deployment Guide — Initial infrastructure setup (Docker, firewall, installation)
-
AI Voice Agent System (LiveKit) — Architecture and design overview