
Outbound Campaign Configuration Guide
This guide explains how to configure and run outbound campaigns across different channels and dialing modes.
Supported Campaign Types
|
Type |
Modes / Channels |
|---|---|
|
CX Voice Campaigns |
Predictive Dialing · Power Dialing · Progressive Dialing |
|
Cisco Campaigns |
UCCX · UCCE |
|
Multi-Step SMS Surveys |
— |
|
Digital Channel Campaigns |
WhatsApp · SMS · Email |
1. Customer Data Preparation
Before creating any outbound campaign, you must prepare the customer dataset (CX Customers) that will be used as the campaign source. Customers can be added either by importing a CSV file or by creating them one at a time.
Option A: Import Customers via CSV
-
Log in to Unified Admin.
-
Click Import Record.
-
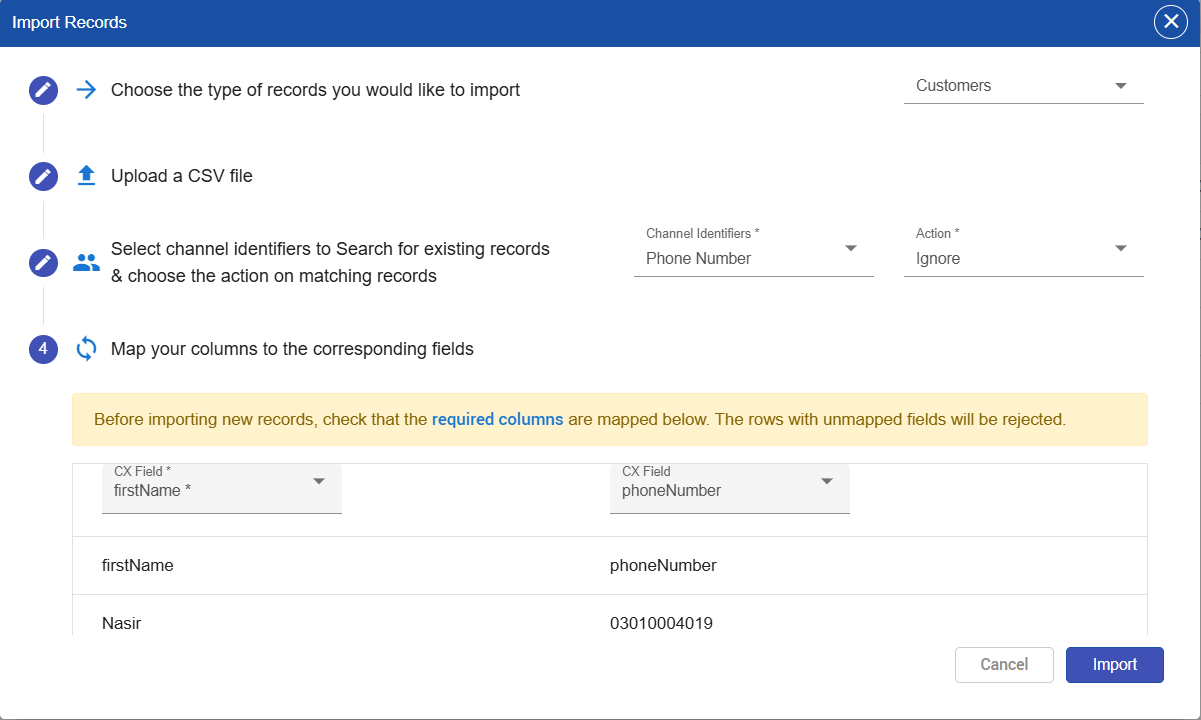
Choose the type of records you want to import (e.g., Customers).
-
Upload your CSV file.
-
Select the Channel Identifier(s) used to search for existing records — for example, Phone Number — and choose the Action to take on matching records (e.g., Ignore).
-
Map your CSV columns to the corresponding CX Customer attributes.
Prequisite: CX Load hub must be running to upload the contact in CX Customer.
⚠️ Important: CSV column headers should match the system-defined customer attributes so columns map correctly. Before completing the import, double-check the column mapping shown on screen — any required field left unmapped will cause that row to be rejected.
Option B: Create a Customer Manually
-
Log in to Unified Agent using a Supervisor role.
-
Click Customer in the menu.
-
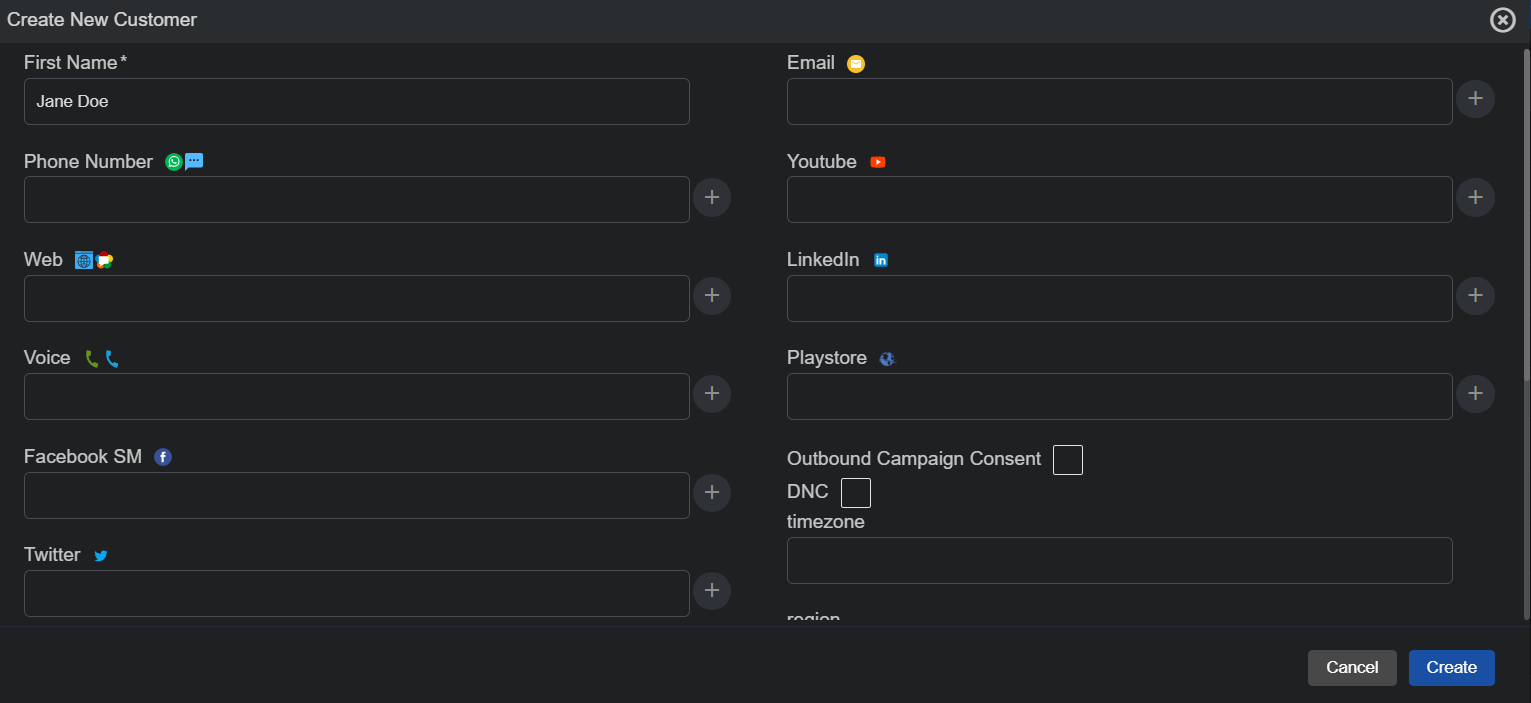
Create a new customer and enter their details.
2. Customer Filters (Audience Segmentation)
Filters define the target audience for your campaign.
Creating a Filter
-
Log in to Unified Agent.
-
Click Customer, then click Advance Filter.
-
Select Advance Filter to create a new one.
-
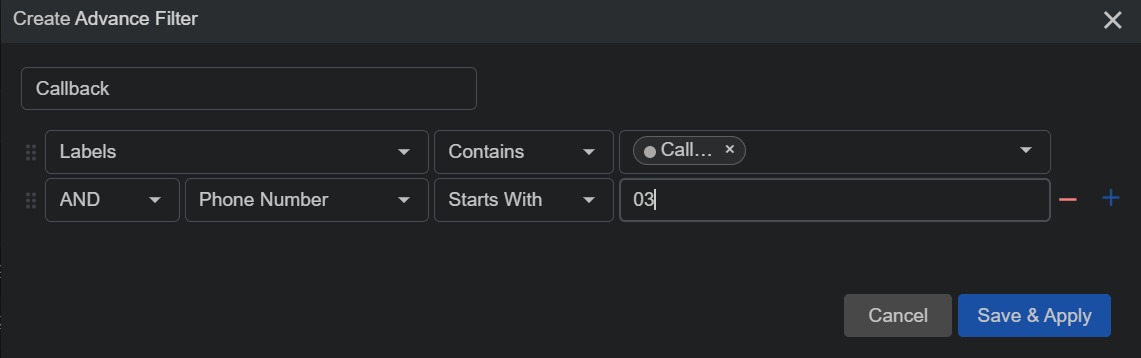
Give the filter a Title.
-
Build the filter by selecting a Customer Attribute, an Operation, and a Value.
-
To add more conditions to the same filter, add additional rules and combine them using AND / OR.
Purpose
Instead of targeting all customers, filters allow you to create focused segments such as:
-
Overdue customers
-
Premium customers
-
Region-based customers
-
Newly registered customers
Dynamic Behavior
-
Filters are continuously active
-
Newly added customers matching filter conditions are automatically included
-
Campaigns using filters always stay up to date
3. Channel Management
You can follow the below guide to setup channel which will be use to interact with the customer.
For CX Voice: CX Voice Channel Configuration Guide
For Cisco: Cisco Voice Channel Configuration Guide
General Guide: Manage Channels and Channel Categories
4. Campaign Management
All outbound campaigns are managed from the Campaign Dashboard.
Dashboard Overview
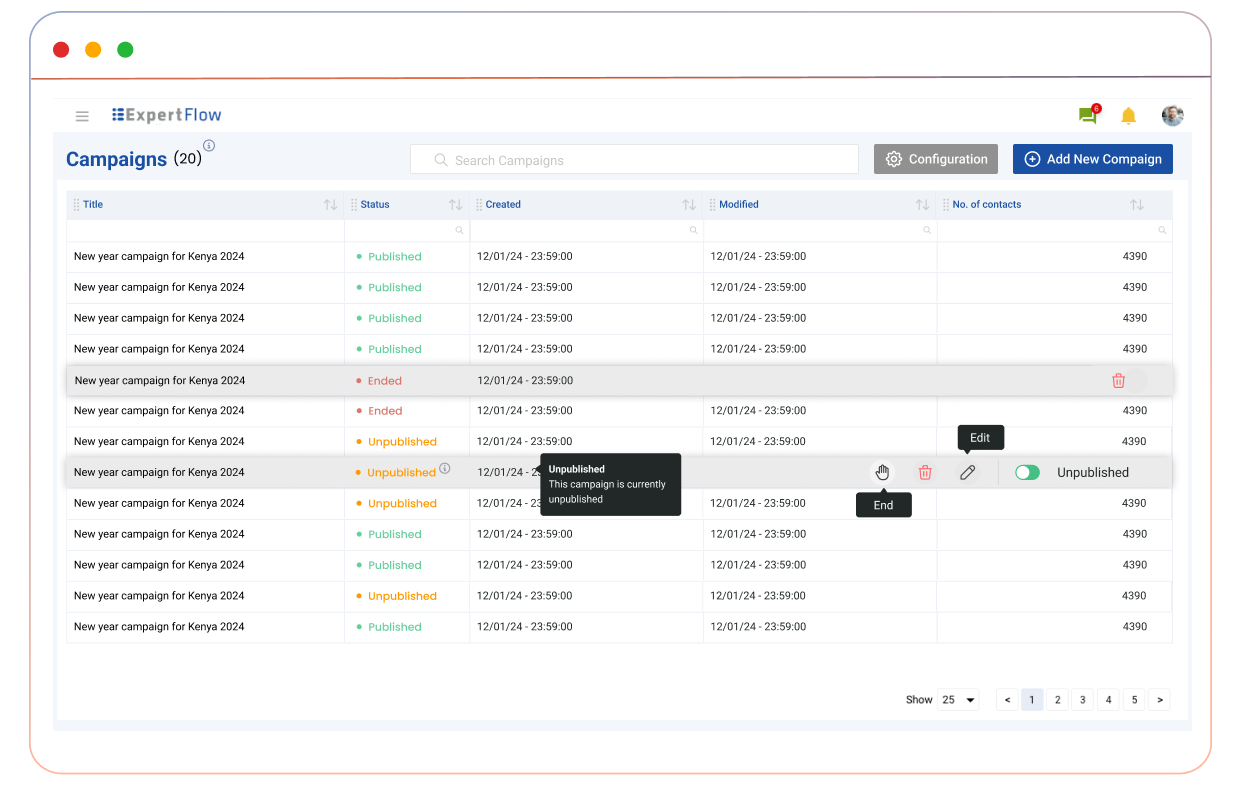
The dashboard provides a centralized view of all campaigns, where you can:
-
Search campaigns by name
-
View campaign status and details
-
Monitor execution progress
Key Campaign Attributes
|
Attribute |
Description |
|---|---|
|
Campaign Title |
Name of the campaign |
|
Status |
Current state — see Campaign Status Definitions below |
|
Creation Date |
When the campaign was first created |
|
Last Modified Date |
When the campaign was last updated |
Creating a Campaign
-
Click Add New Campaign
-
Enter campaign details
-
Configure the outbound flow
-
Save and publish the campaign
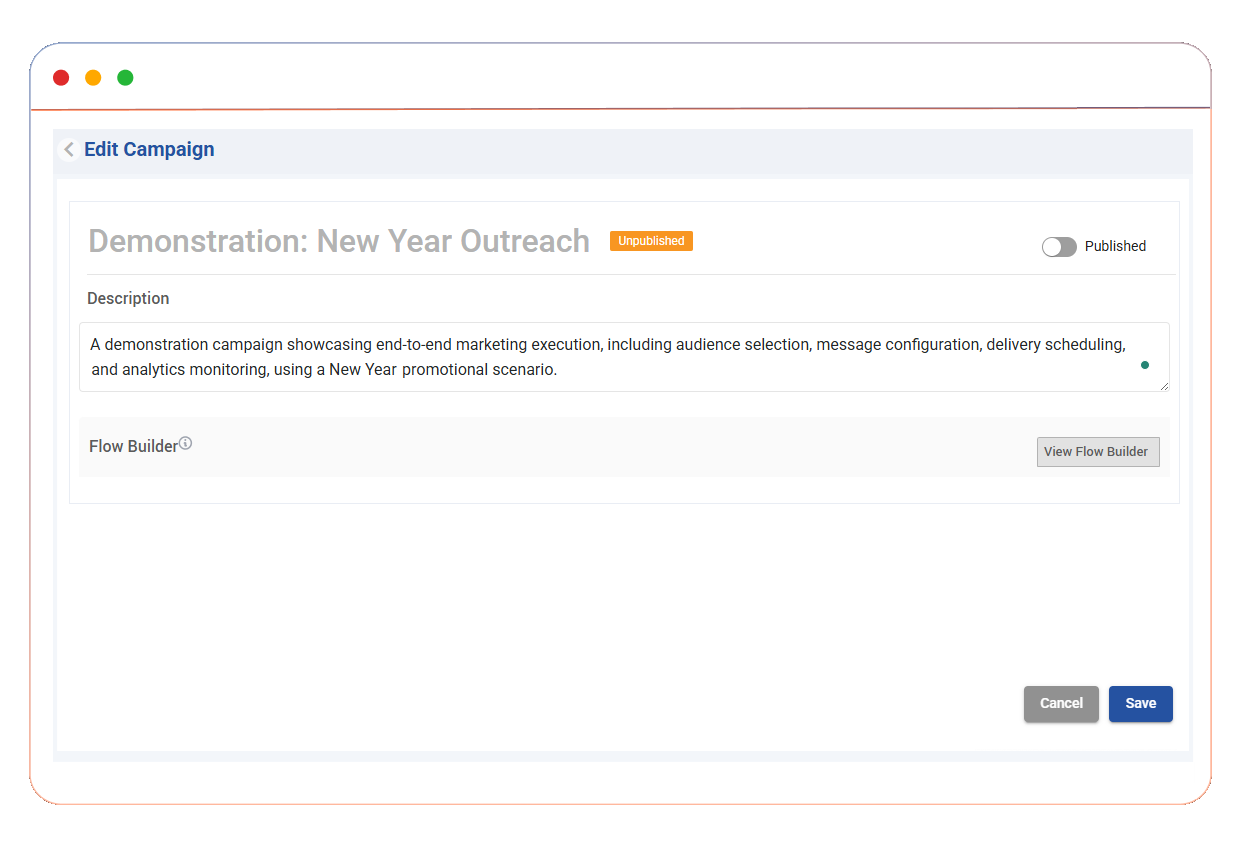
Edit (Pencil Icon): Opens the settings page where you can change the Title, Description, and access the Flow Builder.
Managing Existing Campaigns
|
Action |
Description |
|---|---|
|
Edit |
Modify campaign details or flow configuration |
|
Delete |
Permanently remove the campaign |
|
Stop |
Immediately terminate campaign execution |
Campaign Status Definitions
|
Status |
Meaning |
|---|---|
|
Unpublished |
Campaign is in draft or paused state — no outbound activity is triggered |
|
Published |
Campaign is active — outbound flow execution is in progress |
|
Stopped |
Campaign has been terminated — no further processing occurs |
5. Outbound Flow Design
Once customer data, filters, and campaign setup are complete, you can design the outbound flow. The flow defines how the campaign interacts with customers across different channels.
Supported Flow Types
-
CX Voice Campaigns (Predictive, Power, Progressive Dialing)
-
Cisco Campaigns (UCCX, UCCE)
-
Multi-Step SMS Surveys
-
Digital Channel Campaign
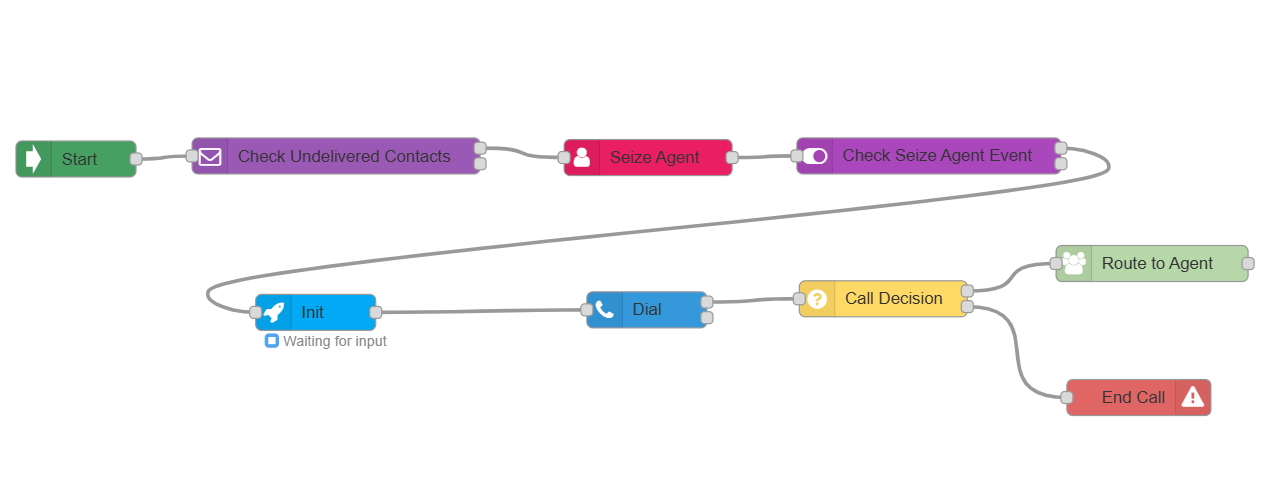
Upon clicking Flow Builder in campaign panel, it will open node-red flow for that campaign. Here we can design our flow base on our requirement.
5.1. CX Voice Campaign
Components Involved in CX Voice Campaign
The following components are required and must be operational for a CX Voice Campaign:
|
Component |
Role |
|---|---|
|
Campaign Backend |
Manages campaign configuration and sends scheduled contacts for processing. |
|
Scheduler |
Triggers campaign contacts at their configured schedule. |
|
Customer Channel Manager (CCM) |
Coordinates communication between campaign services and voice resources. |
|
CX Voice Connector (VC) |
Acts as the integration layer between CCM and the Dialer. |
|
EFCX Dialer |
Processes campaign contacts, manages dialing operations, and handles call outcomes. |
|
CPA Module |
Optional Dialer component used to identify whether an answered call was picked up by a human or an answering machine/voicemail. Call Progress Analysis |
|
Routing Engine |
Provides routing capabilities and agent selection logic required during campaign execution. |
|
Conversation Manager |
Manages conversation and interaction workflows within the CX platform. |
Components Required for Analytics and Reporting
|
Component |
Role |
|---|---|
|
Campaign Reporting |
Provides campaign execution reports and historical data. |
|
Campaign Dashboard (Grafana) |
Provides real-time campaign monitoring, analytics, and visualization of campaign metrics. Accessing Campaign Studio Dashboard in Grafana
|
5.1.1. Control & Logic Nodes
|
Node |
Role in the Flow |
Required? |
Docs |
|---|---|---|---|
|
Start Node |
Pulses the flow at a set interval; gates execution by time window, days, and/or date range. |
Compulsory — every campaign |
|
|
Check Undelivered Contacts |
Confirms contacts are still left to process before continuing, so the campaign doesn't re-dial the same customers. |
Recommended |
5.1.2. Agent Management Nodes
|
Node |
Role in the Flow |
Required? |
Docs |
|---|---|---|---|
|
Seize Agent |
Reserves an agent from a Voice queue/MRD before dialing, using either a fixed count or a PROMQL formula. |
Compulsory for agent-based campaigns |
|
|
Check Seize Agent Event |
Listens for the reservation outcome and branches the flow: |
Compulsory for agent-based campaigns |
5.1.3. Init Node
|
Node |
Role in the Flow |
Required? |
Docs |
|---|---|---|---|
|
Init Node |
The gatekeeper — pulls a batch of contacts into the flow, sized according to your dialing mode (Progressive, Power, or Predictive). |
Compulsory — every campaign type |
5.1.4. Channel & Decision Nodes
|
Node |
Role in the Flow |
Docs |
|---|---|---|
|
Dial Node |
Places the outbound call through the configured voice channel. |
|
|
Call Decision |
Uses Call Progress Analysis (CPA) to detect Human vs. Answering Machine and branches accordingly. |
|
|
Route to Agent |
Connects a detected human caller to the agent reserved earlier in the flow. |
|
|
End Call |
Ends the call — typically wired from a failed Call Decision branch, or when no agent is available. |
5.1.5. How the Nodes Connect
For a standard agent-based CX Voice flow, the nodes are wired together as follows:
Start Node
   │  (pulse, only if within configured time/day/date window)
   ▼
Check Undelivered Contacts
   │  True — contacts remain
   ▼
Seize Agent
   ▼
Check Seize Agent Event
   │  AGENT_RESERVED
   ▼
Init Node
   │  (pulls in contacts, sized by dialing mode)
   ▼
Dial Node
   ├── Live Call Event ────────▶ Call Decision ──┬── True (Human) ───▶ Route to Agent
   │                                              └── False (Machine) ▶ End Call / follow-up message
   │
   └── (Optional) Delivery Notiication ──▶ Post-Attempt Decision ──▶ Retry (loop back to Dial) or follow-up message
Reading the flow: the Start Node's pulse only makes it past Check Undelivered Contacts if there's someone left to call. Once an agent is reserved and confirmed, the Init Node releases a batch of contacts sized to match your dialing mode, and the Dial Node places the calls. From there, the flow splits in two directions at once — the Live Call Event path filters out answering machines before connecting a real person to the waiting agent, while optionally the Delivery Notification path independently handles what to do once each call attempt is finished (retry, follow-up, or drop).
5.1.6. Dialing Modes
|
Mode |
Description |
|---|---|
|
Progressive |
Dials one contact per reserved agent — the safest setting for keeping abandonment low. |
|
Power |
Dials a fixed number of contacts per reserved agent (e.g., 3–5) to keep agents continuously busy. |
|
Predictive |
Uses a live PROMQL formula instead of a fixed ratio, dialing just enough contacts to keep agents busy without over-dialing. |
In the flow, additional nodes can also be used to extend functionality.
-
Condition Node: Condition
Used to filter contacts before dialing. It is typically placed after the Init node and before the Dialing node. -
Post Decision Attempt Node: Post Attempt Decision
Used to take actions based on the final call result. It branches the flow according to outcomes such as Busy, No Answer, Invalid Gateway, etc., and can be used for retries or follow-up actions.