
This guide explains how to configure and run outbound campaigns across different channels and dialing modes.
Supported Campaign Types
|
Type |
Modes / Channels |
|---|---|
|
CX Voice Campaigns |
Predictive Dialing · Power Dialing · Progressive Dialing · Preview Dialing |
|
Cisco Campaigns |
UCCX · UCCE |
|
Multi-Step SMS Surveys |
— |
|
Digital Channel Campaigns |
WhatsApp · SMS · Email |
|
IVR |
CX |
1. Customer Data Preparation
Before creating an outbound campaign, prepare the customer dataset (CX Customers) that the campaign will use, unless you plan to upload contacts directly to the campaign (see Contact Source for the selected Campaign). Customers can be added either by importing a CSV file or by creating them one at a time.
Option A: Import Customers via CSV
-
Log in to Unified Admin.
-
Click Import Record.
-
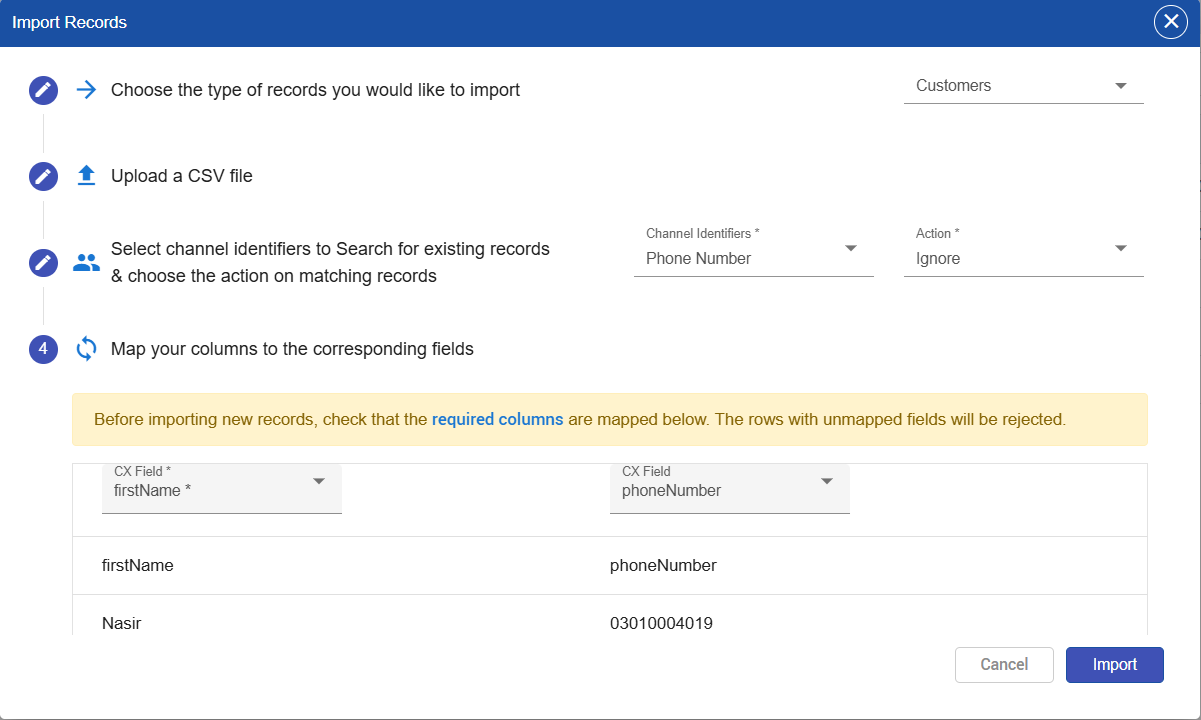
Choose the type of records you want to import (e.g., Customers).
-
Upload your CSV file.
-
Select the Channel Identifier(s) used to search for existing records — for example, Phone Number — and choose the Action to take on matching records (e.g., Ignore).
-
Map your CSV columns to the corresponding CX Customer attributes.
Prerequisite: CX Load hub must be running to upload the contact in CX Customer.
⚠️ Important: CSV column headers should match the system-defined customer attributes so columns map correctly. Before completing the import, double-check the column mapping shown on screen — any required field left unmapped will cause that row to be rejected.
Option B: Create a Customer Manually
-
Log in to Unified Agent using a Supervisor role.
-
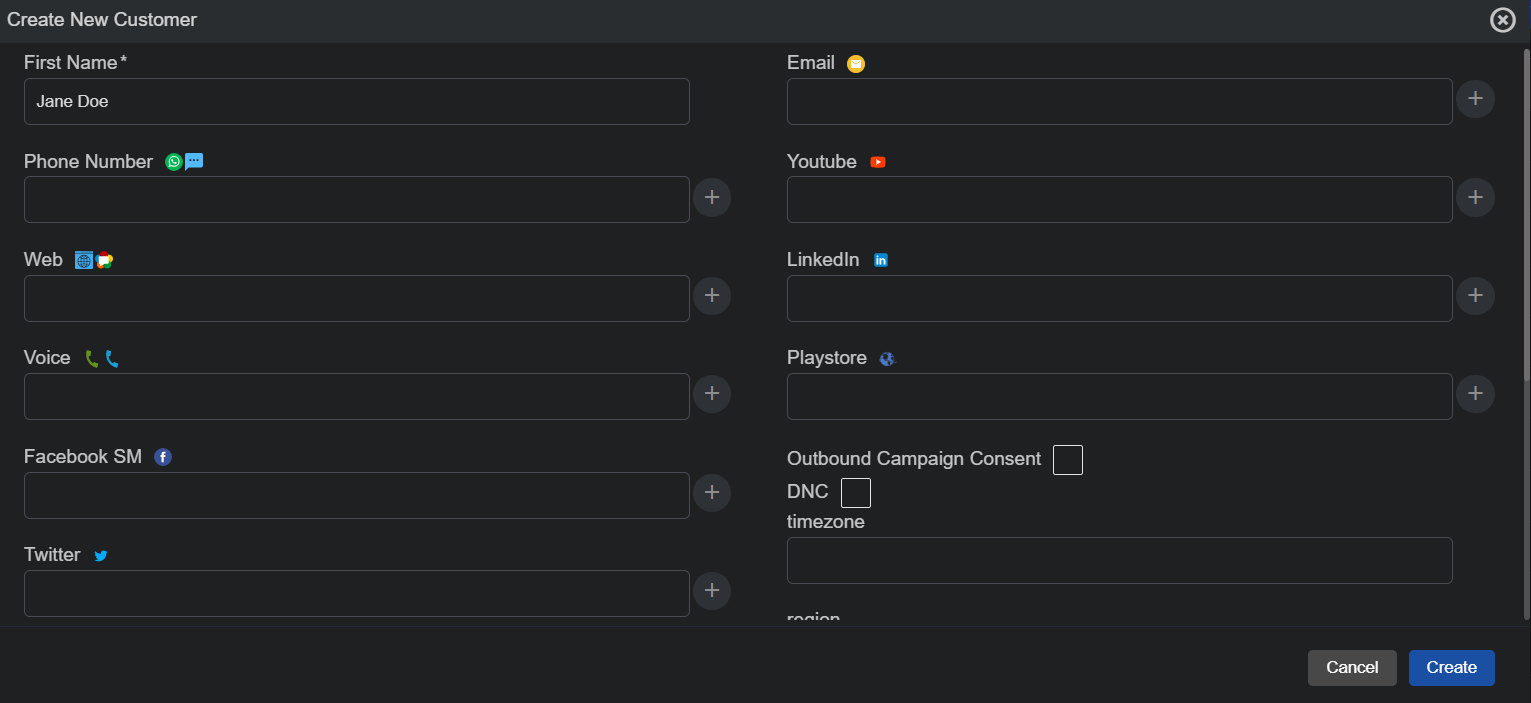
Click Customer in the menu.
-
Create a new customer and enter their details.
2. Customer Filters (Audience Segmentation)
Filters define the target audience for your campaign.
Creating a Filter
-
Log in to Unified Agent.
-
Click Customer, then click Advance Filter.
-
Select Advance Filter to create a new one.
-
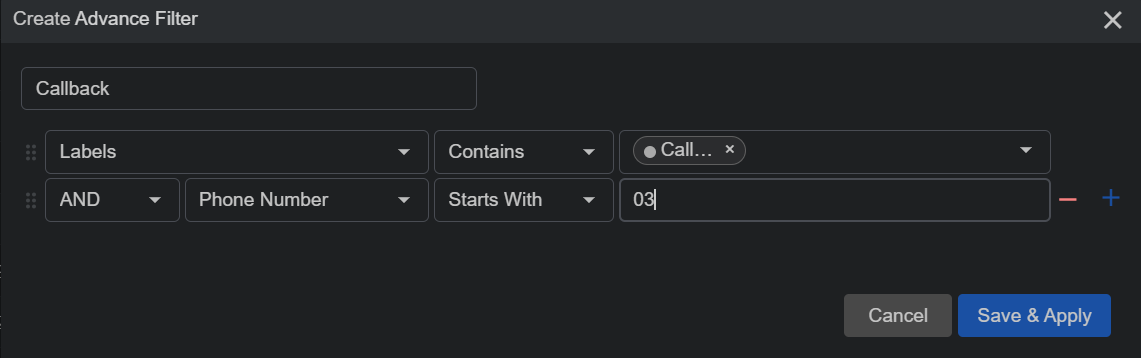
Give the filter a Title.
-
Build the filter by selecting a Customer Attribute, an Operation, and a Value.
-
To add more conditions to the same filter, add additional rules and combine them using AND / OR.
Purpose
Instead of targeting all customers, filters allow you to create focused segments such as:
-
Overdue customers
-
Premium customers
-
Region-based customers
-
Newly registered customers
Dynamic Behavior
-
Filters are continuously active
-
Newly added customers matching filter conditions are automatically included
-
Campaigns using filters always stay up to date
3. Channel Management
You can follow the below guide to setup channel which will be use to interact with the customer.
For CX Voice: CX Voice Channel Configuration Guide
For Cisco: Cisco Voice Channel Configuration Guide
General Guide: Manage Channels and Channel Categories
4. Campaign Management
All outbound campaigns are managed from the Campaign Dashboard.
Dashboard Overview
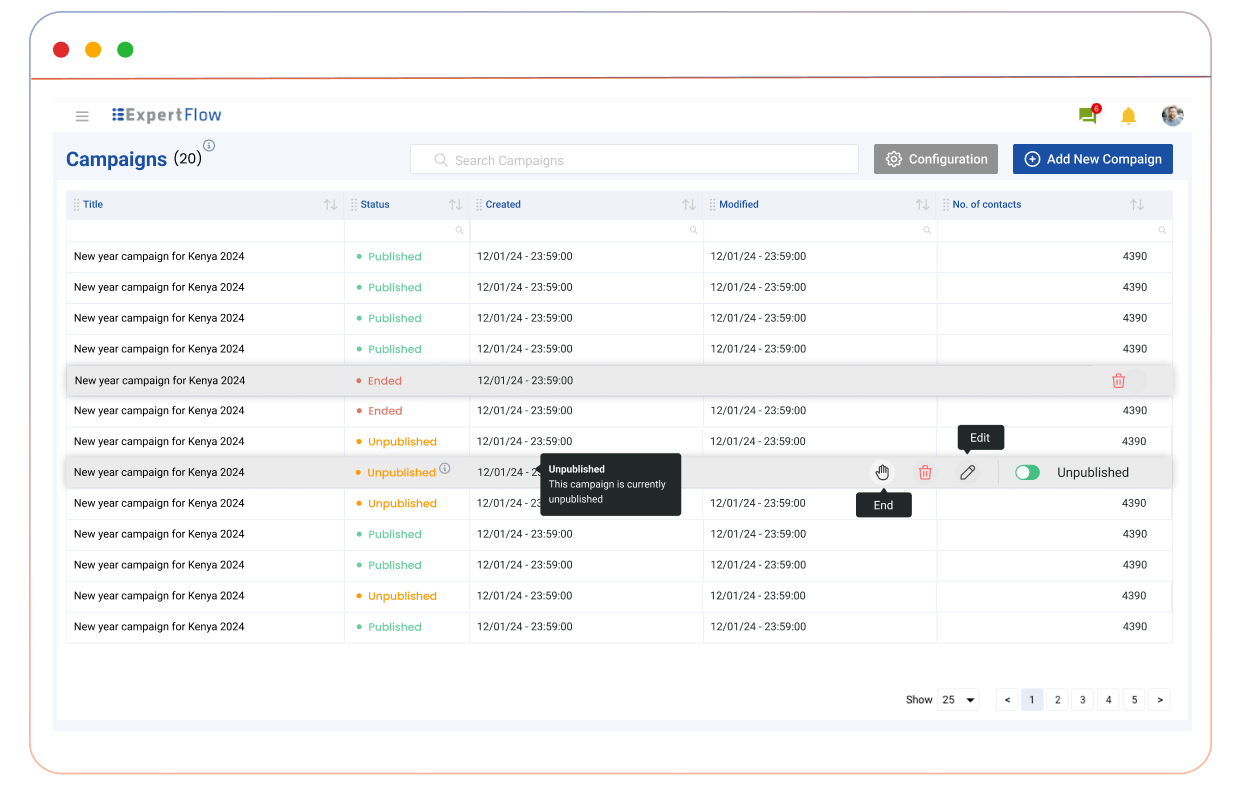
The dashboard provides a centralized view of all campaigns, where you can:
-
Search campaigns by name
-
View campaign status and details
-
Monitor execution progress
Key Campaign Attributes
|
Attribute |
Description |
|---|---|
|
Campaign Title |
Name of the campaign |
|
Status |
Current state — see Campaign Status Definitions below |
|
Creation Date |
When the campaign was first created |
|
Last Modified Date |
When the campaign was last updated |
Creating a Campaign
-
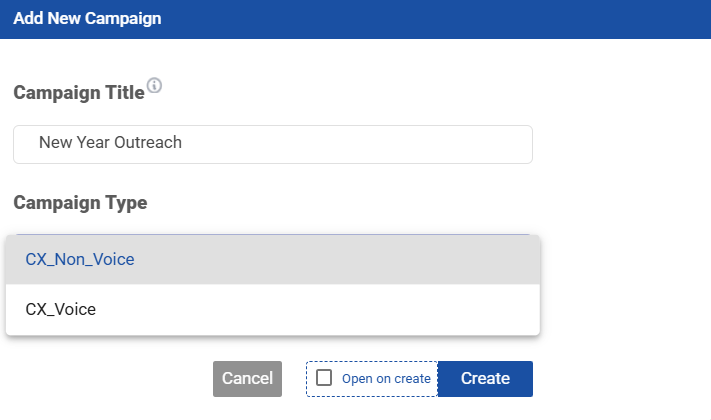
Click Add New Campaign
-
Enter campaign details
-
Select the contact source (File or Filter)
-
Configure the outbound flow
-
Save and publish the campaign
Edit (Pencil Icon): Opens the settings page where you can change the Title, Description, scheduling time, select the contact source and access the Flow Builder.
Contact Source for the selected Campaign
This feature is available starting with CX5.13.0.
A campaign manager selects the contact source for each campaign. Each campaign uses one contact source, either File or Filter. Once the campaign is saved, the contact source can't be changed.
Select the contact source (file or filter)
-
Option File is selected:
-
Browse the CSV file that contains the contacts for the campaign. The file follows the same format and rules as a bulk customer upload; see Bulk Customer Upload.
-
Select the channelIdentifier(s) for duplicate detection.
-
Select the operation for duplicate contacts
-
Click upload button. The contacts will be added to the campaign and also the respective cx customers will also be created/updated.
-
-
Option Filter is selected:
-
Campaign manager selects one of the available filters for the campaign (see section 2, Customer Filters).
-
Clicks the save button.
-
The contacts fetched against the selected filter are synced with the selected campaign.
-
When Synchronization Starts:
When the contact source is Filter, the Campaign Backend starts a synchronization job as soon as the campaign is saved.
This happens without waiting for the Start node or any other trigger.
When the contact source is File, contacts are added to the campaign when the file is uploaded.
Uploading more files: You can upload more files to a campaign that uses File as its contact source. If a contact in the file is already in the campaign with status Undelivered, it is skipped, and the existing contact is contacted on its schedule. If the contact was already Delivered, it is added again and contacted again.
Filter changes: If the conditions of the selected filter are edited later, contacts already synchronized to the campaign keep their current campaign status (for example, Delivered or Undelivered). Contacts that no longer match the filter are not sent into the flow again.
Campaigns created before CX5.13.0: these keep running for contacts already synced from their customer filter, but new customers who match the filter are no longer added. After upgrading, open each existing campaign in Unified Admin and set its contact source (File or Filter). Once saved, the contact source can't be changed.
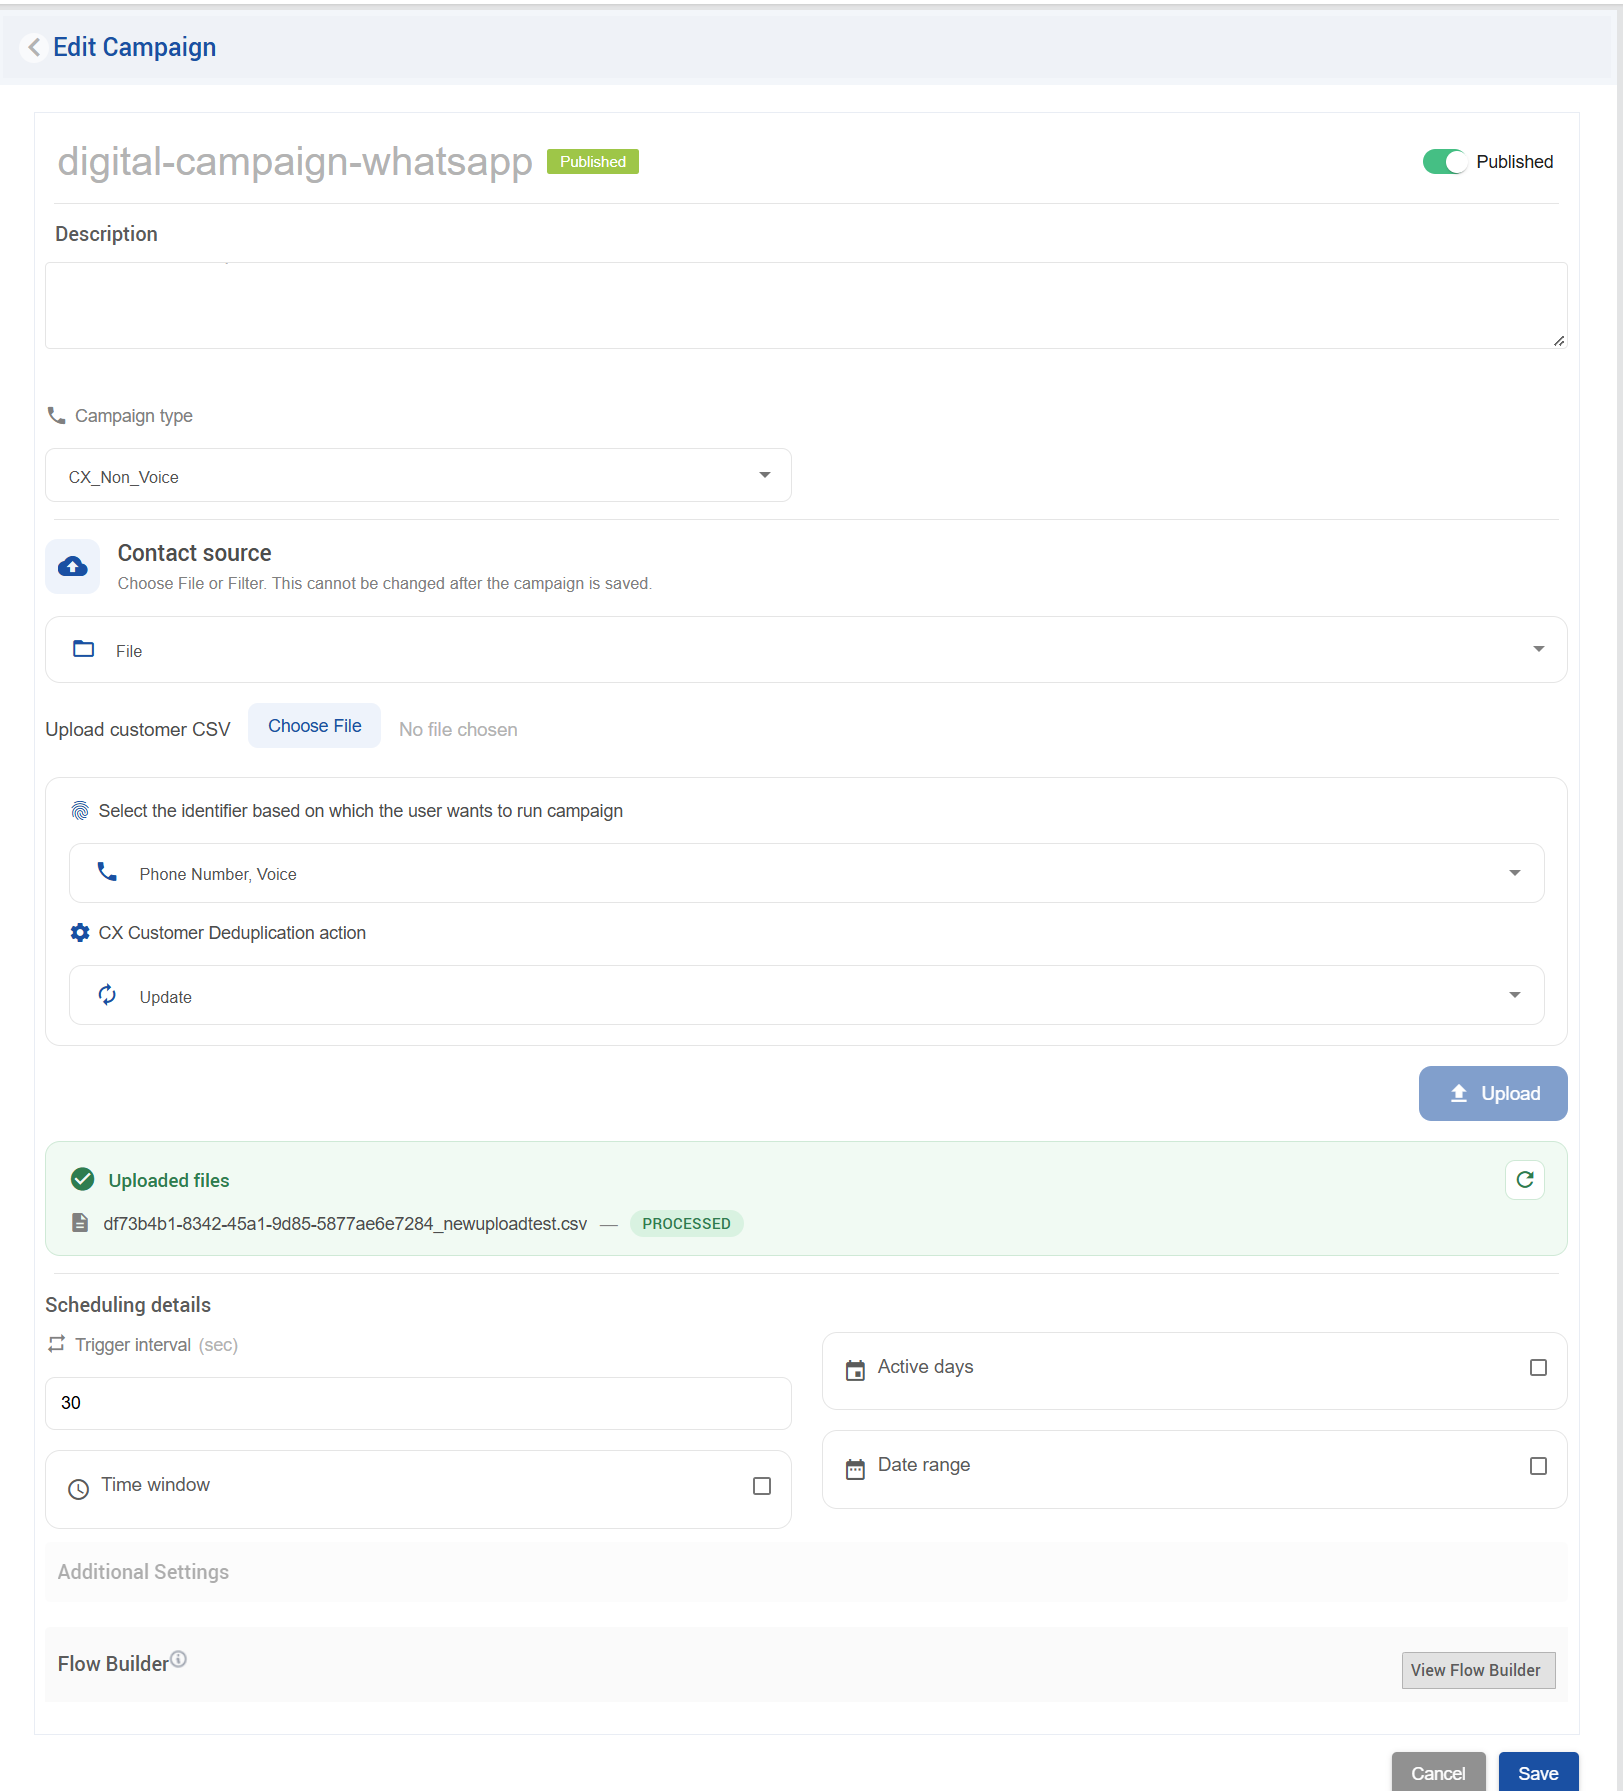
Type of the campaign can’t be updated and for CX_Voice type campaign the trigger interval is handled by governor (campaign backend configurable variable).
Managing Existing Campaigns
|
Action |
Description |
|---|---|
|
Edit |
Modify campaign details or flow configuration |
|
Delete |
Permanently remove the campaign |
|
Stop |
Immediately terminate campaign execution |
Campaign Status Definitions
|
Status |
Meaning |
|---|---|
|
Unpublished |
Campaign is in draft or paused state — no outbound activity is triggered |
|
Published |
Campaign is active — outbound flow execution is in progress |
|
Stopped |
Campaign has been terminated — no further processing occurs |
Components Required for Analytics and Reporting
|
Component |
Role |
|---|---|
|
Campaign Reporting |
Provides campaign execution reports and historical data. |
|
Campaign Dashboard |
Provides real-time campaign monitoring, analytics, and visualization of campaign metrics. Accessing Campaign Studio Dashboard
|
5. Outbound Flow Design
Once customer data, filters, and campaign setup are complete, you can design the outbound flow. The flow defines how the campaign interacts with customers across different channels.
Supported Flow Types
-
CX Voice Campaigns (Predictive, Power, Progressive and Preview Dialing)
-
CX IVR Campaign
-
Cisco Campaigns (UCCX, UCCE)
-
Multi-Step SMS Surveys
-
Digital Channel Campaign
Upon clicking Flow Builder in the campaign panel, it will open the Node-RED flow for that campaign. Here we can design our flow based on our requirements.
5.1. CX Voice Campaign
Components Involved in CX Voice Campaign
The following components are required and must be operational for a CX Voice Campaign:
|
Component |
Role |
|---|---|
|
Campaign Backend |
Manages campaign configuration and sends scheduled contacts for processing. |
|
Scheduler |
Triggers campaign contacts at their configured schedule. |
|
Customer Channel Manager (CCM) |
Coordinates communication between campaign services and voice resources. |
|
CX Voice Connector (VC) |
Acts as the integration layer between CCM and the Dialer. |
|
EFCX Dialer |
Processes campaign contacts, manages dialing operations, and handles call outcomes. |
|
CPA Module |
Optional Dialer component used to identify whether an answered call was picked up by a human or an answering machine/voicemail. Call Progress Analysis |
|
Routing Engine |
Provides routing capabilities and agent selection logic required during campaign execution. |
|
Conversation Manager |
Manages conversation and interaction workflows within the CX platform. |
Campaign Priority & Shared Line Allocation
User guide for setting campaign priority (1–10) on CX_Voice campaigns in Unified Admin, and how the Leveraged Share model splits the tenant dial-line pool when multiple campaigns run together. Covers where to configure priority, valid values, pending-contact caps, and expected behavior under line scarcity. Campaign Priority — User Guide
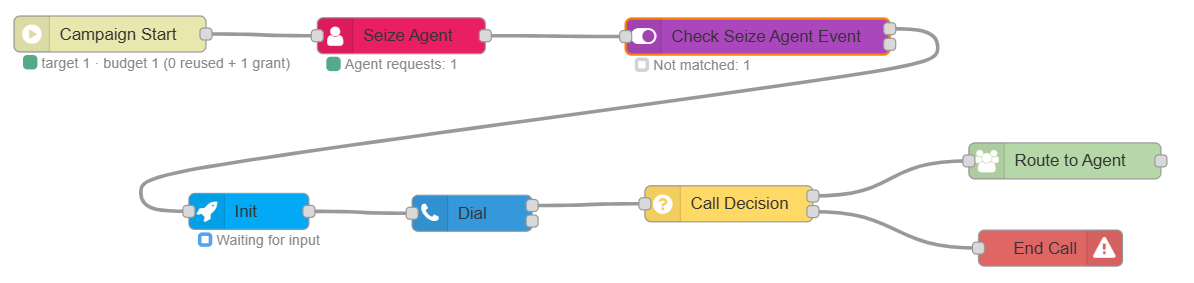
Every node in the flow must be opened, its settings reviewed and updated if needed, and Done clicked so configuration is saved. Skipping this step can leave nodes with incomplete or default settings, which may cause unexpected behavior at runtime. Go through each node in the flow once before deploying the flow.
5.1.1. Campaign Start
|
Node |
Role in the Flow |
Required? |
Docs |
|---|---|---|---|
|
Campaign Start |
Entry point for every campaign flow created in Unified Admin. Governor triggers it when dial capacity is available and eligible contacts remain; it gates execution by publish status and campaign schedule (time window, days, date range). It also receives |
Compulsory — every campaign |
5.1.2. Agent Management Nodes
|
Node |
Role in the Flow |
Required? |
Docs |
|---|---|---|---|
|
Seize Agent |
Reserves an agent from a Voice queue/MRD before dialing, using either a fixed count or a PROMQL formula. For CX Voice, the number of agents requested is capped by |
Compulsory for agent-based campaigns |
|
|
Check Seize Agent Event |
Listens for the reservation outcome and branches the flow: |
Compulsory for agent-based campaigns |
5.1.3. Init Node
|
Node |
Role in the Flow |
Required? |
Docs |
|---|---|---|---|
|
Init Node |
The gatekeeper — pulls a batch of contacts into the flow, sized according to your dialing mode (Progressive, Power, or Predictive). For CX Voice, contact count is also limited by |
Compulsory — every campaign type |
5.1.4. Channel & Decision Nodes
|
Node |
Role in the Flow |
Docs |
|---|---|---|
|
Dial Node |
Places the outbound call through the configured voice channel and connects it on the live-agent path. Set Campaign Type to Agent. Optionally enable Preview Campaign when the dial should be treated as a preview campaign. For Preview Campaign dials, Call Decision, Route to Agent, and End Call are not required in the happy path. Keep them in the flow anyway: Preview can be toggled on or off on the Dial node, so the same Agent path should still work when Preview is disabled. |
|
|
Call Decision |
Uses Call Progress Analysis (CPA) to detect Human vs. Answering Machine and branches accordingly. |
|
|
Route to Agent |
Connects a detected human caller to the agent reserved earlier in the flow. |
|
|
End Call |
Ends the call — typically wired from a failed Call Decision branch, or when no agent is available. |
5.1.5. How the Nodes Connect
Standard agent-based CX Voice flow
For CX Voice campaigns, Campaign Start replaces both Start Node and Check Undelivered Contacts. Governor handles scheduling eligibility, contact availability, and dial-capacity allocation before the flow is pulsed.
Governor (campaigns backend)
   │  Checks: Published · CX Voice · within schedule · pendingContacts > 0 · dial capacity
   │  Sends: allocatedSlots, pendingContacts
   ▼
Campaign Start
   │  Syncs dial budget; sends pulse only if dialBudget > 0
   │  Sets outboundMetadata.fqdn = https://{FQDN} (from env)
   ▼
Seize Agent
   ▼
Check Seize Agent Event
   │  AGENT_RESERVED
   ▼
Init Node
   │  (pulls contacts, capped by slotsRemaining)
   ▼
Dial Node [Campaign Type: Agent]
   │  Optional: Preview Campaign (persisted on Dial; sets outboundMetadata.previewCampaign)
   │
   ├── Live Call Event
   │      Required for normal Agent dials (Preview off).
   │      Not required when Preview Campaign is on — keep wired so the same flow still works when Preview is toggled off.
   │      ────────▶ Call Decision ──┬── True (Human) ───▶ Route to Agent
   │                                └── False (Machine) ▶ End Call / follow-up message
   │
   └── (Optional) Delivery Notification ──▶ Post-Attempt Decision ──▶ Retry (loop back to Dial) or follow-up message
Reading the flow: Governor only triggers Campaign Start when the campaign is eligible and contacts remain to dial. Campaign Start assigns the dial budget (allocatedSlots / slotsRemaining) and kicks off the flow. Once an agent is reserved and confirmed, Init releases contacts sized to the dialing mode and remaining slot budget. Dial places the calls; Live Call Event filters answering machines before connecting a human to the waiting agent. Delivery Notification optionally handles post-attempt outcomes independently.
5.1.6. Dialing Modes
|
Mode |
Description |
|---|---|
|
Progressive |
Dials one contact per reserved agent — the safest setting for keeping abandonment low. |
|
Power |
Dials a fixed number of contacts per reserved agent (e.g., 3–5) to keep agents continuously busy. |
|
Predictive |
Uses a live PROMQL formula instead of a fixed ratio, dialing just enough contacts to keep agents busy without over-dialing. |
|
Preview |
In Dial node, upon selecting Agent type a check box will appear for preview campaign. Check this to make the campaign as Preview Campaign. For detail configuration guide, please follow this guide: CX Voice Campaign Preview Mode |
5.2. CX IVR Campaign
Configuration guide for IVR Campaign: IVR Campaign Configuration Guide (Voice)
|
Component |
Role |
|---|---|
|
Campaign Backend |
Manages campaign configuration and sends scheduled contacts for processing. |
|
Scheduler |
Triggers campaign contacts at their configured schedule. |
|
Customer Channel Manager (CCM) |
Coordinates communication between campaign services and voice resources. |
|
CX Voice Connector (VC) |
Acts as the integration layer between CCM and the Dialer. |
|
EFCX Dialer |
Processes campaign contacts, manages dialing operations, and handles call outcomes. |
|
Routing Engine |
Provides routing capabilities and agent selection logic required during campaign execution. |
|
Conversation Manager |
Manages conversation and interaction workflows within the CX platform. |

5.2.1. Campaign Start
|
Node |
Role in the Flow |
Required? |
Docs |
|---|---|---|---|
|
Campaign Start |
Entry point for every campaign flow created in Unified Admin. Governor triggers it when dial capacity is available and eligible contacts remain; it gates execution by publish status and campaign schedule (time window, days, date range). It also receives |
Compulsory — every campaign |
5.2.2. Init Node
|
Node |
Role in the Flow |
Required? |
Docs |
|---|---|---|---|
|
Init Node |
The gatekeeper — pulls a batch of contacts into the flow according to the value evaluated by PromQL. For IVR (CX), contact count is also limited by |
Compulsory — every campaign type |
5.2.3. Dial Node
|
Node |
Role in the Flow |
Docs |
|---|---|---|
|
Dial Node |
Places the outbound call through the configured voice channel and routes it to an IVR menu. Set Campaign Type to IVR and enter the IVR DN (extension) the call should connect to. |
5.2.4. How the Nodes Connect
Standard IVR-based CX Campaign flow
For IVR base campaigns, Campaign Start replaces both Start Node and Check Undelivered Contacts. Governor handles scheduling eligibility, contact availability, and dial-capacity allocation before the flow is pulsed.
Governor (campaigns backend)
   │  Checks: Published · CX Voice · within schedule · pendingContacts > 0 · dial capacity
   │  Sends: allocatedSlots, pendingContacts
   ▼
Campaign Start
   │  Syncs dial budget; sends pulse only if dialBudget > 0
   ▼
Init Node
   │  (pulls contacts, capped by slotsRemaining)
   ▼
Dial Node [IVR Campaign type with IVR DN]
   │
   └── (Optional) Delivery Notification ──▶ Post-Attempt Decision ──▶ Retry (loop back to Dial) or follow-up message
Reading the flow: Governor only triggers Campaign Start when the campaign is eligible and contacts remain to dial. Campaign Start assigns the dial budget (allocatedSlots / slotsRemaining) and kicks off the flow. Once Campaign Start node trigger; Init node releases contacts sized to the remaining slot budget. Dial node forward the contact for dialing.
5.3. Non Voice Campaign (Digital Campaign)
Components Involved in Digital Campaign
The following components are required and must be operational for a Digital Channel Campaign:
|
Component |
Role |
|---|---|
|
Campaign Backend |
Manages campaign configuration and sends scheduled contacts for processing. |
|
Scheduler |
Triggers campaign contacts at their configured schedule and handles delivery notifications. |
|
Customer Channel Manager (CCM) |
Coordinates communication between campaign services and configured digital channels connector. |
|
Relevant Channel Connector (e.g. SMPP, WhatsApp, Email) |
Acts as the integration layer between CCM and the configured digital channel provider. Receives outbound message requests from CCM and delivers them through the respective channel (WhatsApp, SMPP, Email, etc.). |
|
Conversation Manager |
Manages conversation and interaction workflows within the CX platform. |

5.3.1. Control & Logic Nodes
|
Node |
Role in the Flow |
Required? |
Docs |
|---|---|---|---|
|
Campaign Start |
Entry point for every campaign flow. Governor triggers it when eligible contacts remain and the campaign is within its configured schedule. |
Compulsory — every campaign |
|
|
Check Undelivered Contacts |
Checks whether there are pending/undelivered contacts remaining before proceeding to the Init node. Branches the flow to continue or stop accordingly. |
Compulsory |
5.3.2. Init Node
|
Node |
Role in the Flow |
Required? |
Docs |
|---|---|---|---|
|
Init Node |
Pulls a batch of contacts into the flow for processing. Sized according to the campaign configuration. |
Compulsory — every campaign type |
5.3.3. Channel
|
Node |
Role in the Flow |
Docs |
|---|---|---|
|
Plain Message |
Sends a text-based outbound message to a contact over a configured digital channel (WhatsApp, SMPP/SMS, Email, or any other CCM digital channel). |
— |
5.3.4. How the Nodes Connect
Standard Digital Channel Campaign flow
Governor (campaign backend)
   │  Checks: Published · Digital · within schedule · pendingContacts > 0
   ▼
Campaign Start
   │  Triggers flow if campaign is eligible
   ▼
Check Undelivered Contacts
   │  Contacts remaining → continues; none remaining → flow stops
   ▼
Init Node
   │  (pulls a batch of contacts for processing)
   ▼
[Optional] Condition Node
   │  (filters contacts based on attributes before sending)
   ▼
Plain Message Node
   │  Resolves customer identifier · personalizes message · schedules delivery via Scheduler
   │
   └── (Optional) Delivery Notification ──▶ Post Attempt Decision ──▶ Retry or follow-up action
Reading the flow: Governor triggers Campaign Start when the campaign is published, within its schedule, and contacts remain. Check Undelivered Contacts gates the flow to ensure there is work to do before Init pulls a contact batch. The Plain Message node resolves each contact's channel identifier (phone number, email address, etc.), personalizes the message body using {placeholder} syntax, and dispatches the message through the Scheduler to the configured digital channel. A Delivery Notification path can optionally be wired downstream into a Post Attempt Decision node to handle outcomes such as retries or follow-up messages.
5.3.5. Supported Digital Channels
The Plain Message node supports any non-voice channel configured in CCM:
|
Channel |
Customer Identifier |
Notes |
|---|---|---|
|
|
Mobile number / phone field |
Sent as plain text |
|
SMPP (SMS) |
Mobile number / phone field |
Sent via SMPP gateway as plain text |
|
|
Email address field |
Subject line required; supports HTML body |
|
Other CCM channels |
Depends on contact schema |
Any additional digital channel configured in your tenant |
Prerequisite: The channel must be configured in CCM before it appears in the Plain Message node. If no digital channels are configured, the node editor will show an error.
In the flow, additional nodes can also be used to extend functionality.
-
Condition Node: Condition
Used to filter contacts before dialing. It is typically placed after the Init node and before the Dialing node. -
Post Decision Attempt Node: Post Attempt Decision
Used to take actions based on the final call result. It branches the flow according to outcomes such as Busy, No Answer, Invalid Gateway, etc., and can be used for retries or follow-up actions. -
Check Timezone Window: Check Timezone Window
Optional compliance check after Init. Enforces regional calling/messaging windows and holidays per contact timezone. Contacts outside the window are rescheduled or marked unresolved; the flow continues only for contacts that are currently allowed.