This guide provides step-by-step instructions for deploying the Expertflow Live Chat widget via Google Tag Manager (GTM). It is intended for both customers and admins. Administrators typically handle deployments of the standard widget, while customers may be responsible when custom widgets are involved. Multiple installation options are available:
Deploy via Tag Template
Use a custom tag template to set up Expertflow live chat on your website, connecting customers to the business for inbound, outbound, and self-service interactions.
Expertflow Live Chat Template Installation
Prerequisite
Make sure you have already created the Google Tag Manager account and container. For details on how to create a Google Tag Manager account and container, follow the steps listed in This guide.
Installation
-
Log in to your Google Manager account.
-
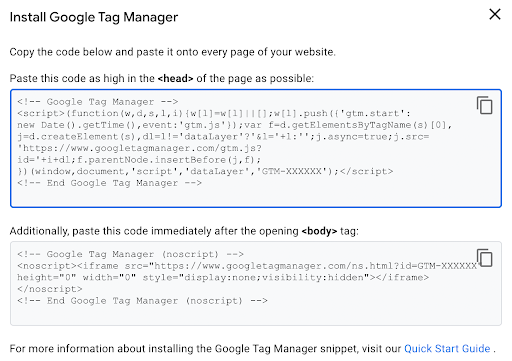
In Google Tag Manager, click Workspace. Near the top of the window, find your container ID, formatted as GTM-XXXXXX. Click your container ID to launch the Install Tag Manager window.

-
Copy the code and add it to the target website based on the instructions provided. The first code block should be placed in the <head> tag of the target website. This helps ensure your Tag Manager configuration is available and ready when the website loads.
-
Publish Your container. For more information, click here.
Search Tag Template:
Once the GTM account and container are created and configured on your site.
-
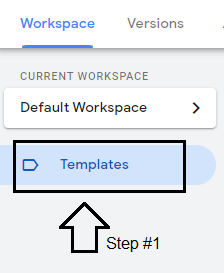
Click Templates in the left navigation of the Current Workspace.
-
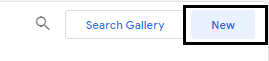
Click the Search Gallery button under the Tag Templates section.

-
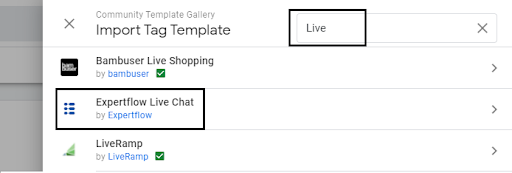
Search “Expertflow” in the search bar, and this will filter the template from the Gallery.
-
Click on theThe Expertflow Live Chat template and it will navigate to the Template Details Section.
-
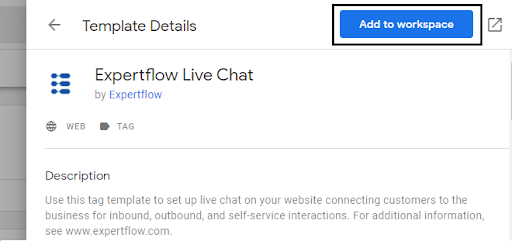
Click on the Add to Workspace button to install it on the Current Workspace.
-
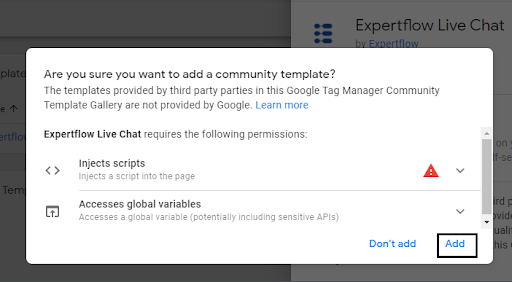
Read the third-party policies and click on the Add button.
-
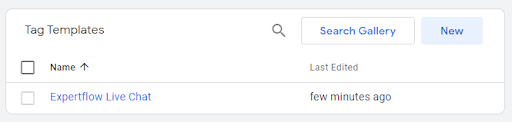
After adding to the workspace, the Tag Template will be visible in the templates section.
-
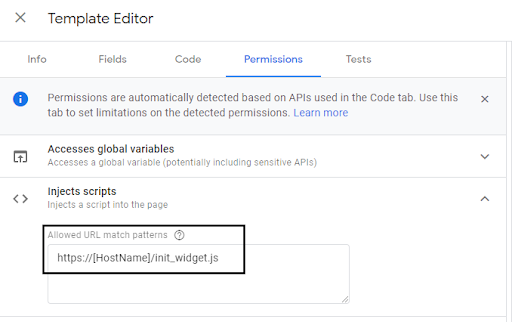
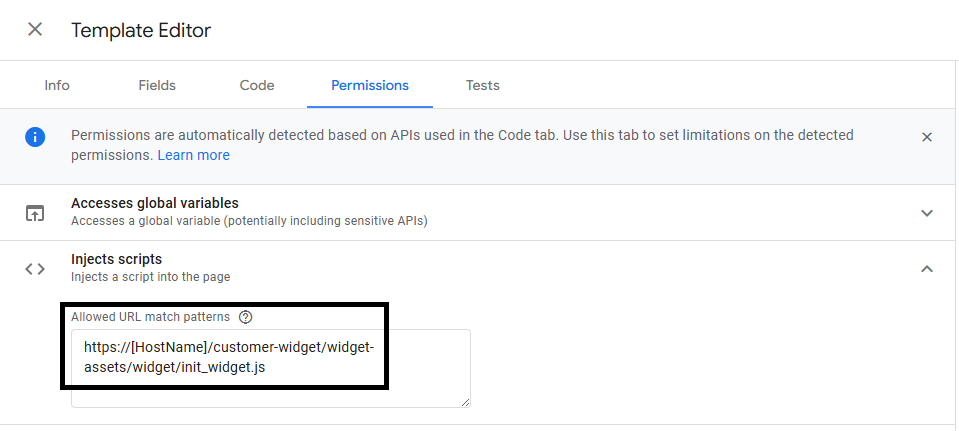
Click on the template to open it in Template Editor. Navigate to the Permissions section and replace the [Hostname] with the Init-Widget Url (FQDN).
-
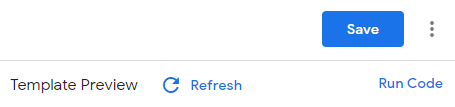
Click on the Refresh and then the Save button to save the Template.
Make sure the Template Editor's Console is error-free before saving the Template.
The Expertflow Live Chat template is added to your current workspace.
Tag Template from Github
You can also import the Expertflow Live Chat template from the Github Repository, in case you don’t find it in the Community Gallery of Tag Manager.
Import from GitHub Repository
-
Download the Tag template source code from here.
-
Extract files in a folder and make sure the folder contains the template.tpl file.
-
Open Google Tag Manager, navigate to the templates section from the sidebar, and click on the New button as shown in the figure below.
-
Template Editor will open up, click on the three-dot icon at the top right corner to select the import Option from the dropdown as shown in the figure below.

-
Select the template.tpl file from the source code folder to open it in the Template Editor.
-
Click on the template to open it in Template Editor. Navigate to the Permissions section and replace the [Hostname] with the Init-Widget Url (FQDN).
-
Click on the Refresh and then the Save button to save the Template.
Make sure the Template Editor's Console is error-free before saving the Template.
The Expertflow Live Chat The template is added to your current workspace.
Create a Tag and a Trigger for the Template
-
Navigate to the Tag section and click on the New button to add a new Tag.
-
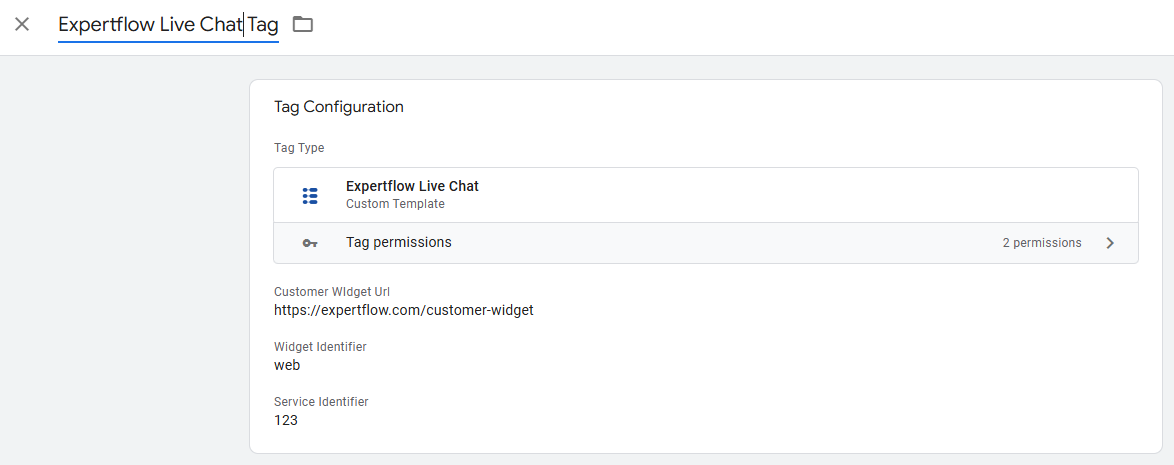
Name the tag and add Tag Configuration.
-
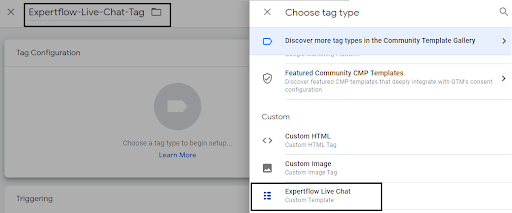
Choose the Tag Type => Expertflow Live Chat template under the Custom headings.
-
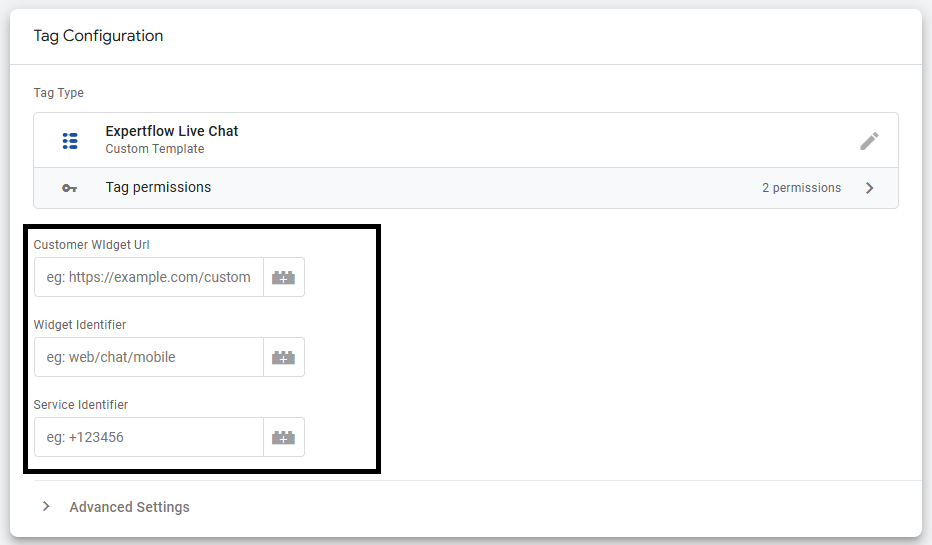
Fill in the required fields with valid configurations.
-
Once configurations are filled, the final step is to add the trigger to fire the tag on the page view.

-
Finally, the Tag will look like this:
-
Click on the Save button.
Preview Before Publish
To enable preview and debug mode for the current workspace:
-
Click Preview in the top right of your workspace.
-
Enter your site's URL.
-
Click Connect. Your site opens in a new window and displays as Connected in the bottom right.
-
Click back on the Tag Assistant tab and click Continue to access the debug interface.
-
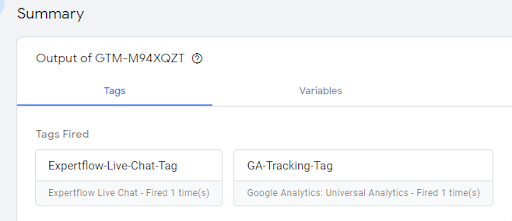
You can monitor fired tags in Tag Assistant.
For more information regarding Preview and Debug Mode: Click Here
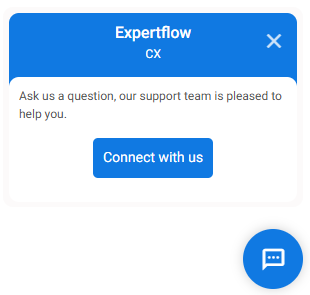
Click Submit button to Publish the Container online. Refresh the target website to see the Expertflow Live Chat widget.
Embed Widget & Pushing Browser Information as CX Activity via GTM
Prerequisite
Make sure you have already created the Google Tag Manager account and container. For details on how to create a Google Tag Manager account and container, follow the steps listed in this guide.
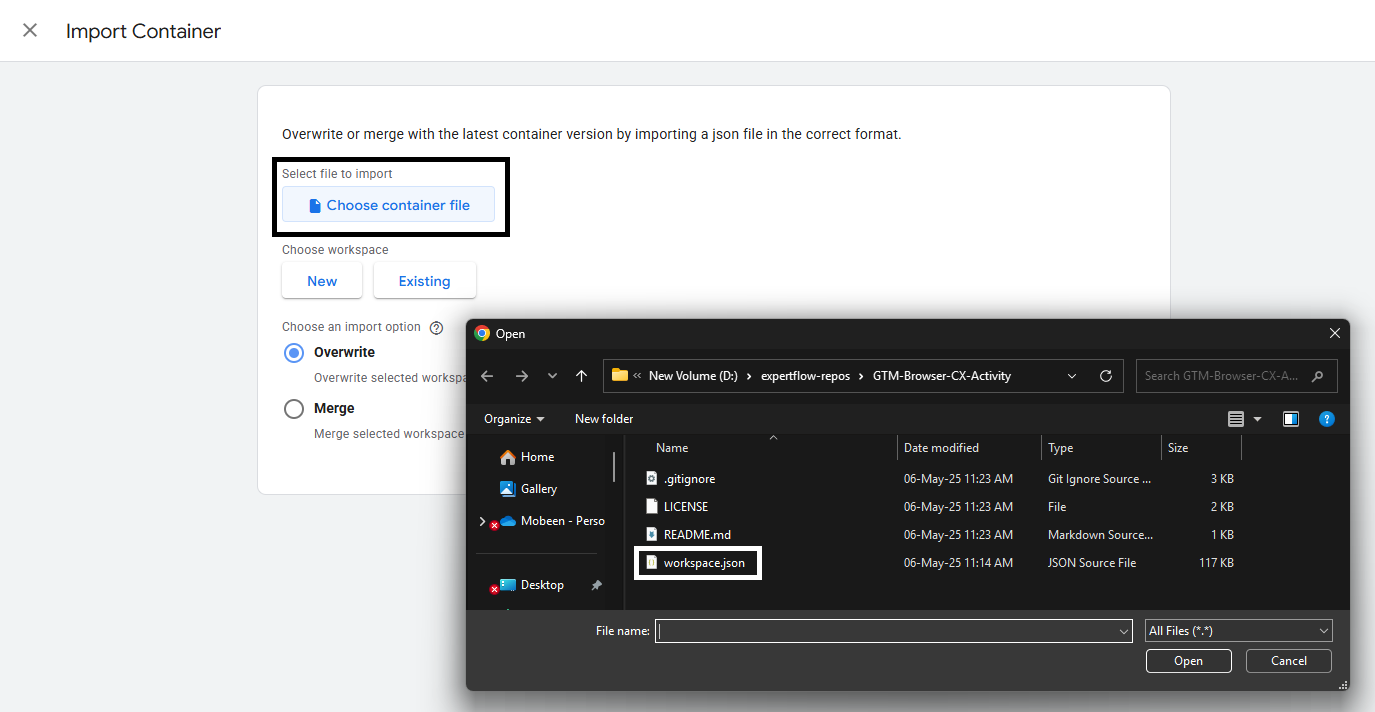
Clone/Download this repository expertflow/GTM-Browser-CX-Activity
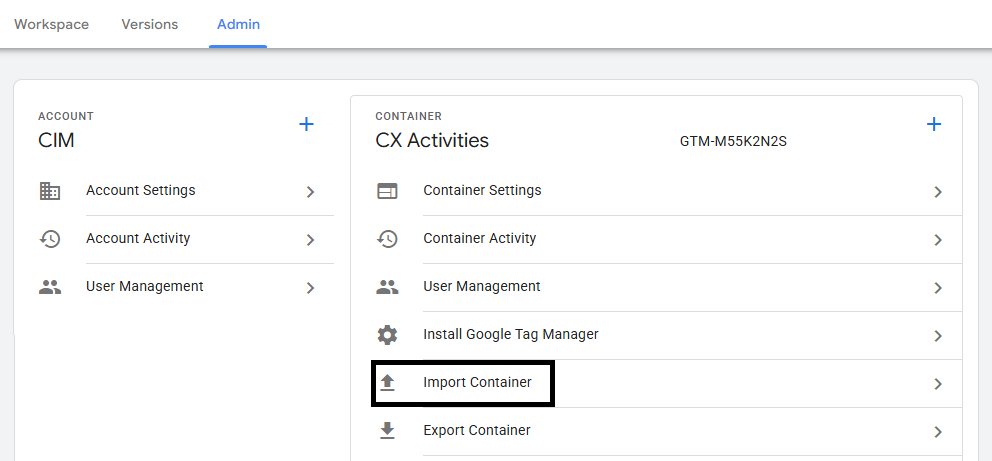
On Google Tag Manager's home page, click on the admin tab.

Click on the Import Container to import the workspace.json file downloaded from the above repository.
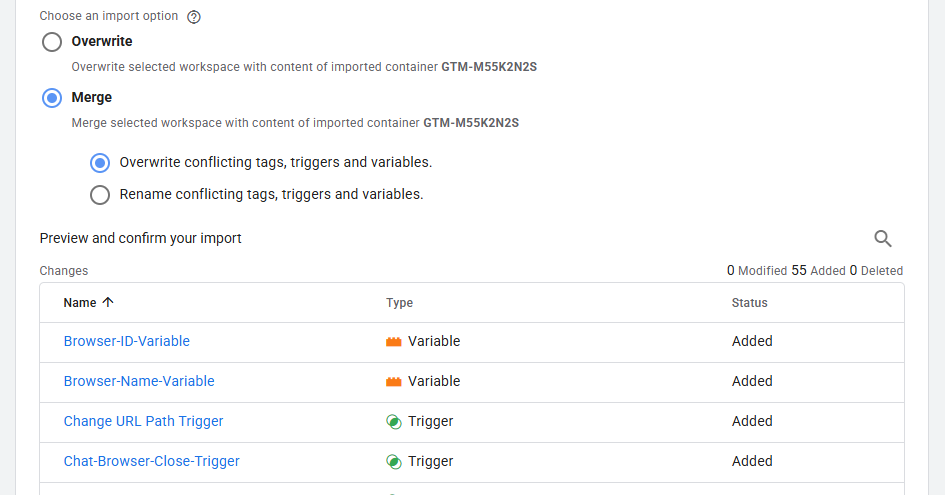
Select the workspace.json file from the locally cloned repository, Also, one can decide whether to override or merge the importing container. Recommended to use the merge option to avoid any existing tag lost.
Once selected, it will list all the imported tags and triggers in the preview mode.
Once the import is complete, navigate to the tag section and click on the cx-activity tag, and update the FQDN as per the preferred EFCX Server Deployment.
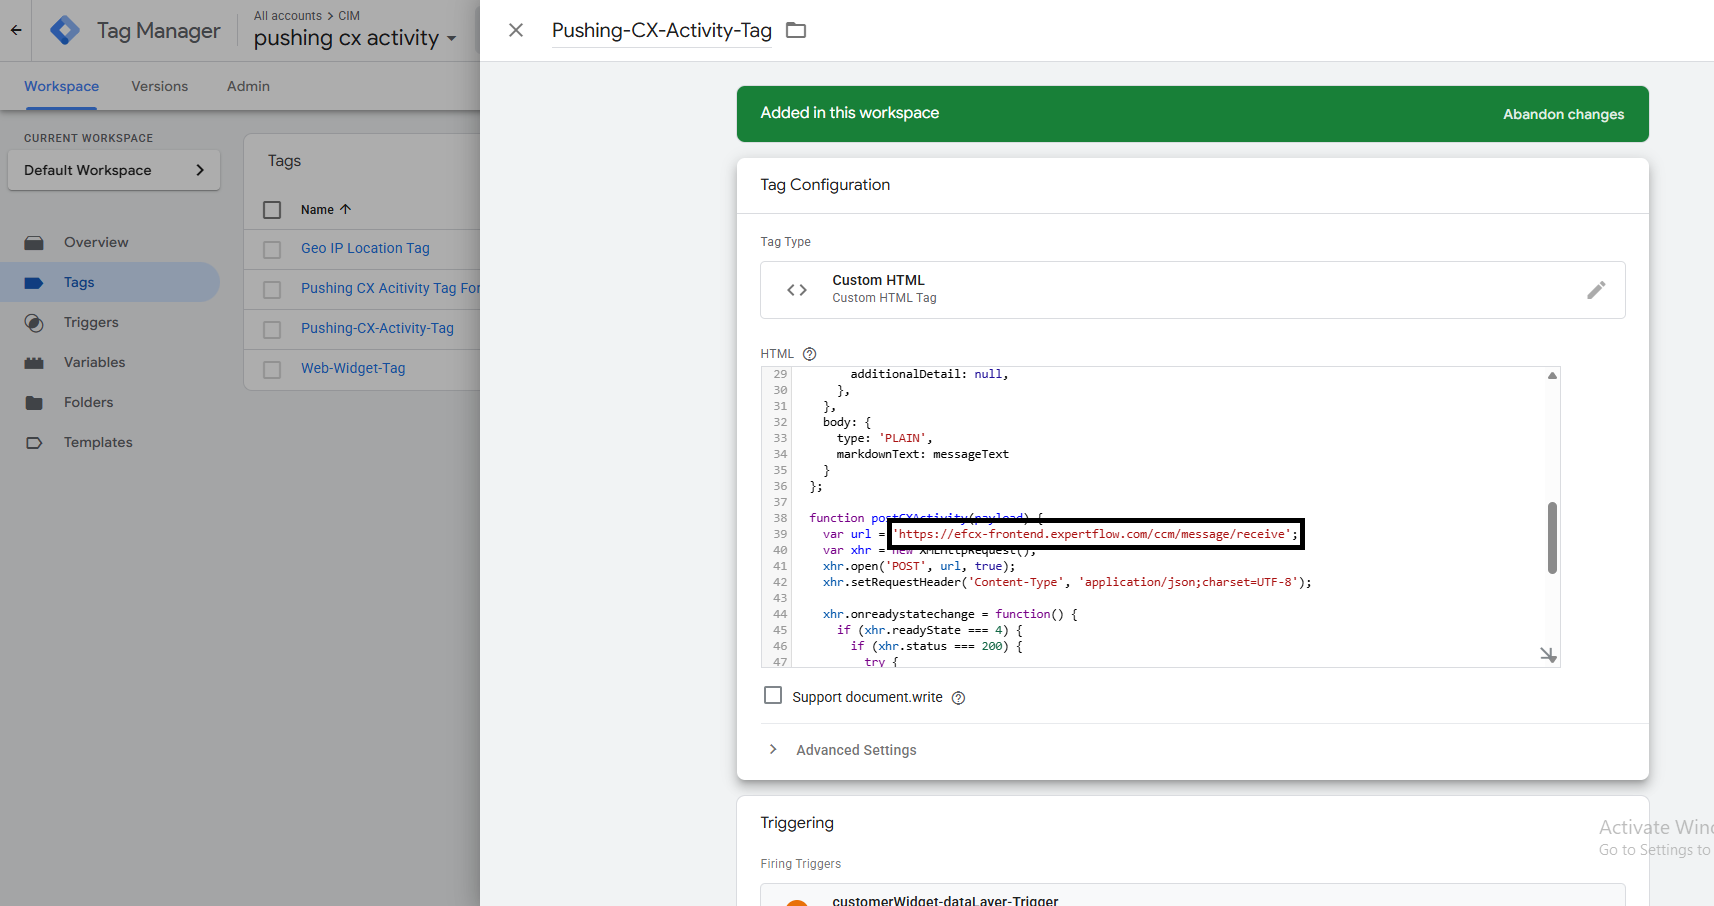
Once all FQDNs are updated in all tags, save the changes.
Preview Before Publish
To enable preview and debug mode for the current workspace:
-
Click Preview in the top right of your workspace.
-
Enter your site's URL.
-
Click Connect. Your site opens in a new window and displays as Connected in the bottom right.
-
Click back on the Tag Assistant tab and click Continue to access the debug interface.
-
You can monitor fired tags in Tag Assistant.
For more information regarding Preview and Debug Mode: Click Here
Click Submit button to Publish the Container online. Refresh the target website to see the Expertflow Live Chat widget.
Note: If using the above-provided repository to embed and push the cx activity, then the web widget deployment tag is also part of this container, so no need to import it separately.
Embed via Script in Google Tag Manager
Prerequisite
Make sure you have already created the Google Tag Manager account and container. For details on how to create a Google Tag Manager account and container, follow the steps listed in this guide.
Create a Tag in GTM
Web-init widget Deployment via custom HTML Tag:
-
Navigate to the Tag section and create a New tag.
-
Name the tag and choose the tag type Custom HTML under the Custom heading.
-
Add a script with the required configurations.
JavaScript<!-- CIM Script Tags --> <script type="text/javascript"> var __cim = __cim || {}; __cim.customerWidgetUrl = "<Public FQDN>/customer-widget"; //Url where Customer Widget is Deployed __cim.widgetIdentifier = "web"; //Widget Identifier (Case Sensitive) __cim.serviceIdentifier = "+921218"; //Service Identifier (function () { var __cimScript = document.createElement("script"), __cimScriptTag = document.getElementsByTagName("script")[0]; __cimScript.src = __cim.customerWidgetUrl + "/widget-assets/widget/init_widget.js"; __cimScript.charset = "UTF-8"; __cimScriptTag.parentNode.insertBefore(__cimScript, __cimScriptTag); })(); </script> <!-- End CIM Script Tags -->
Change the configurations in the script before adding the tag.
-
Customer Widget URL is the IP or FQDN of the server where the Customer Widget is hosted.
-
The widget Identifier is the web identifier for CIM chat. Make sure the widget identifier is the same as used in Unified Admin and it's case-sensitive.
-
Service Identifier is the service identifier for CIM chat.
You can also embed this script directly into the head tags of your origin site html file.
-
Add a trigger to fire it on Page View.
-
Click on the Save and then Submit button to publish the container online.
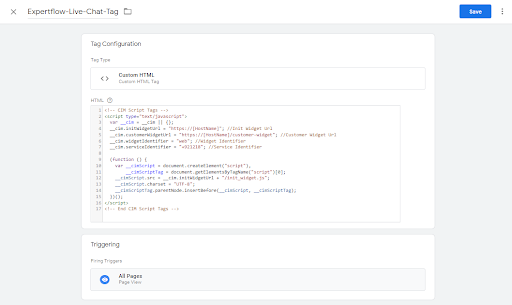
The final view of the tag looks like this:
Once the custom HTML tag is created and saved, follow the same installation The steps given above shows the widget on the target website.
Customer Identification via Google Analytics
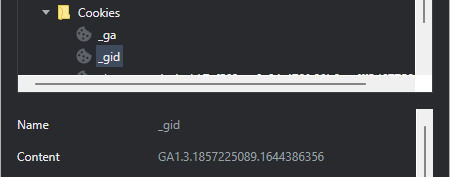
A unique customer identifier ID is fetched from the browser cookie. The customer channel identifier will help to identify and maintain returning chats.
In our case, we are fetching the GA Unique ID as a customer channel identifier from browser cookies. GA Unique ID can only be available in customer browser cookies if the Google Analytics account is integrated.
Similarly, we can use other Analytics Tools for fetching Unique IDs as customer channel Identifiers like Mautic Automation Tool (mtc_id), Facebook Pixel (fa_id), etc.
Ways to Integrate Google Analytics
-
Directly embed the GA Tracking Script between the <head> tags of the website code.
-
Embedding GA Tracking Script via Google Tag Manager (GTM) Tag.
Direct Embedding GA Tracking Script
-
Universal Analytics
-
Assuming that you already have a Google Analytics Account, Property and View Created, if not Click Here.
-
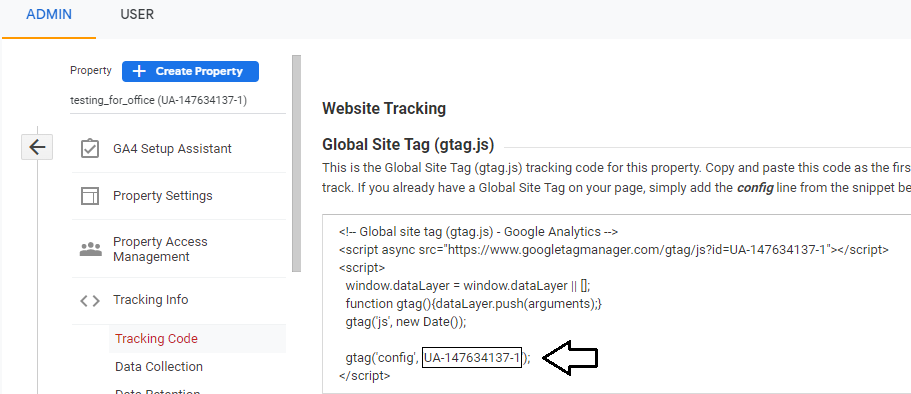
Navigate to Admin > Account > Property Section and click on the Tracking Code Option to get the Tracking Script to embed into the website
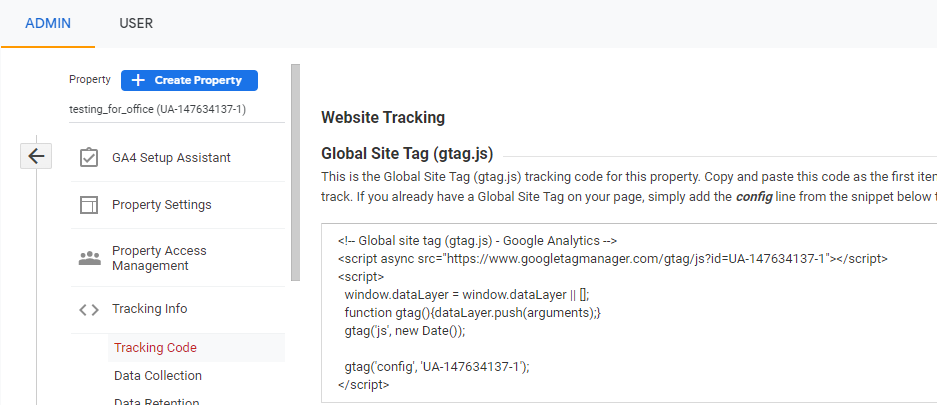
-
Once Tracking Code is embedded into your site, GA Unique ID is now available on that browser's cookies.
-
Now customer widget can automatically fetch the _gid as a Customer Channel Identifier.
-
-
Google Analytics 4 (GA4)
-
Assuming that you already have a Google Analytics account Account, Property and Data Streams Created, if not Click Here.
-
Navigate to Admin > Account > Property Section > Data Streams and click on the Data Stream Option to get the Measurement ID to embed into the website or GTM Tag.
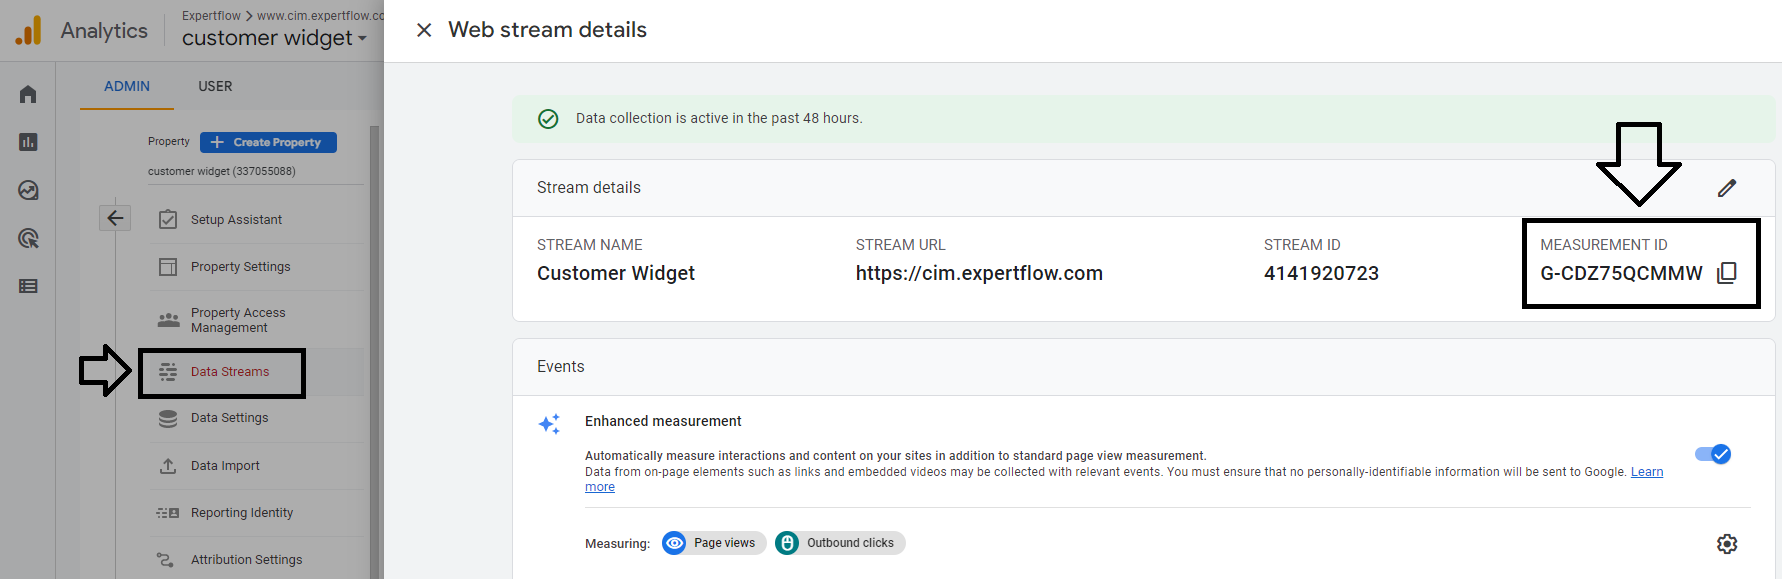
-
Once Tracking Code is embedded into your site, GA Unique ID is now available on that browser's cookies.
-
Now customer widget can automatically fetch the _gid as a Customer Channel Identifier.
-
Embed GA Tracking via GTM:
-
Universal Analytics
-
Assuming that you already have a Google Analytics account Account, Property, View, and GTM account created, if not Click Here.
-
Navigate to Admin > Account > Property Section and click on the Tracking Code Option to get the Tracking ID from the script to use in GTM.
-
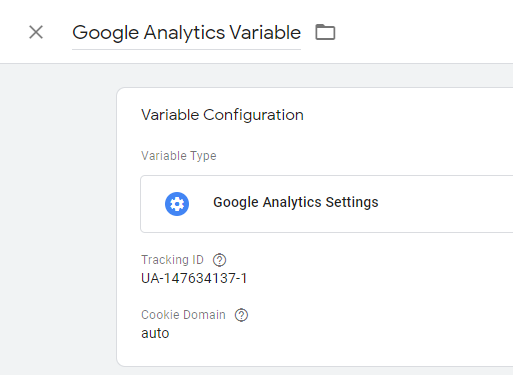
Now open the GTM account and create a new variable, name it, add variable type as Google Analytics settings and add that Tracking ID Copy from the GA tracking script, then click the Save button to save the variable.
-
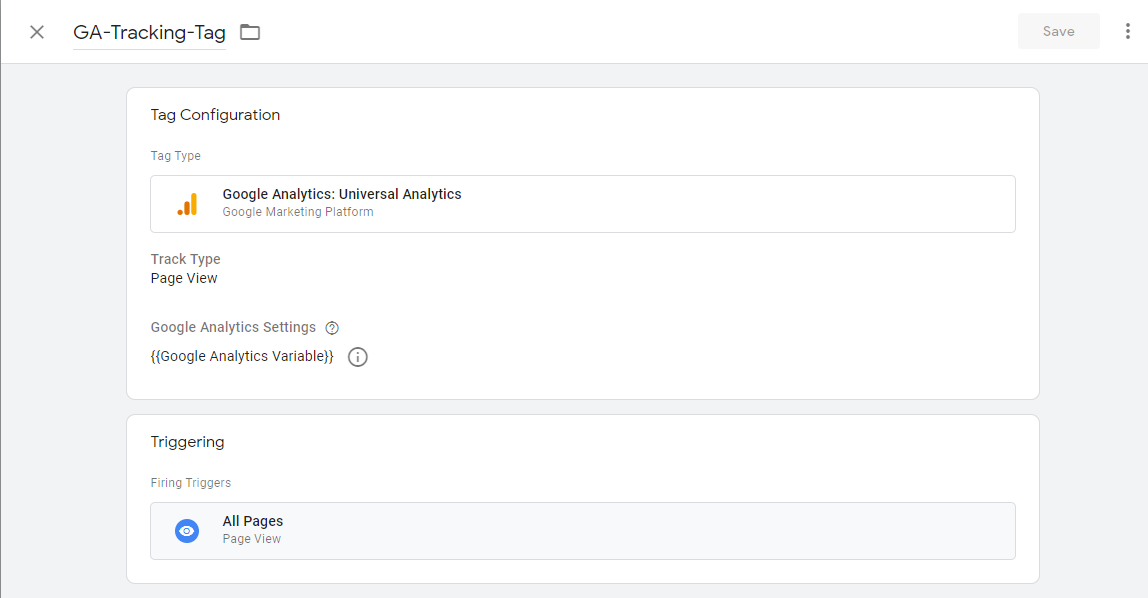
Create New Tag, Name The tag, select Tag Type "Google Analytics: Universal Analytics", select Track Type as Page View, select the GA variable previously created in Google Analytics Settings and fire the tag on Page View Trigger.
-
Click the Save button and publish the Container of GTM to sync GTM with your website.
-
Once the container is synced into your site, the GA Unique ID is now available on that browser's cookies.
-
Now customer widget can automatically fetch the _gid as a Customer Channel Identifier.
-
-
Google Analytics (GA4)
-
Assuming that you already have a Google Analytics Account, Property, Data Streams, and GTM account created, if not Click Here.
-
Navigate to Admin > Account > Property Section and click on the Data Streams Option to get the Measurement ID from the script to use in GTM.

-
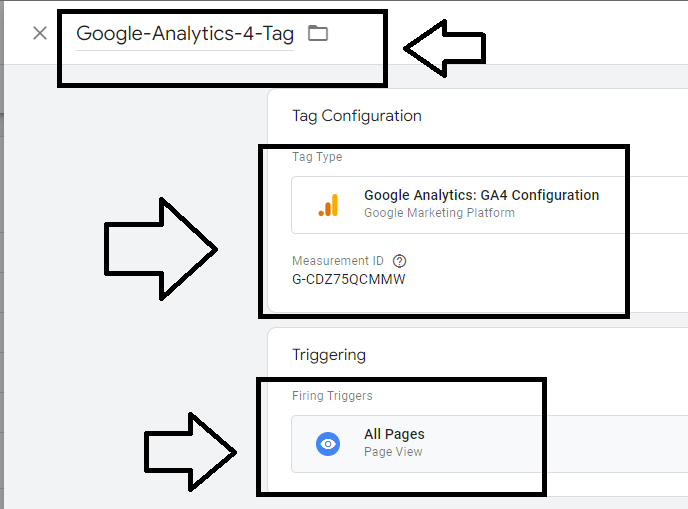
Create New Tag, Name the tag, select Tag Type "Google Analytics: GA4 Configuration", add Measurement Id from the GA4 account and also check the check box of page view event and fire the tag on Page View Trigger.

-
Final view of the tag would look like this:
-
Click the Save button and publish the Container of GTM to sync GTM with your website.
-
Once the container is synced into your site, the GA Unique ID is now available on that browser's cookies.
-
Now customer widget can automatically fetch the _gid as a Customer Channel Identifier.
-
Widget Custom Iogo Configuration
One can display the web widget in Icon as well as with a custom logo by changing the custom Values file of customer widget configs.
To change the web widget from Chat Icon to Custom logo, just change the boolean check from false to true.
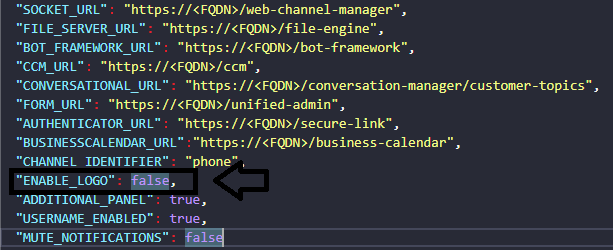
For example, if we enable custom logo. Custom Logo will be visible instead of Chat Icon.
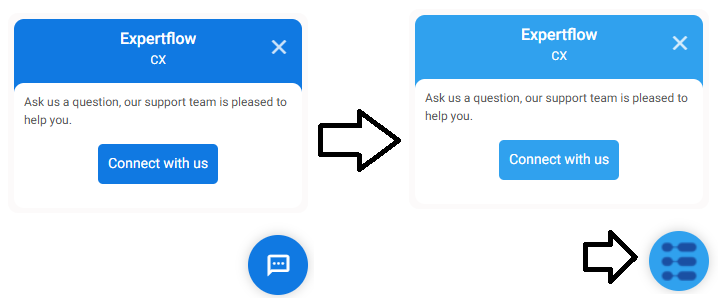
Similarly, one can change Custom logo to Chat Icon by changing the boolean check to false.
Additional Panel on the Web Widget
The Additional Panel on the web widget can be enabled/disabled from the configs of the Customer widget's custom values file.
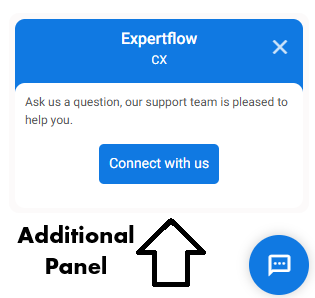
one can use the Additional Panel by uncommenting the HTML code from the index.html file.
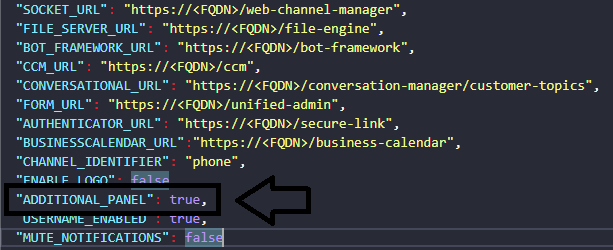
If an Additional Panel is not required, then change the check to false.