This document is a configuration guide for integrating Expertflow CX with Google Play Store app reviews. This guide is for developers and system administrators who will install, configure, and maintain this integration in your environment.
By following this guide, you will configure Google Play Store as a channel in Expertflow CX and connect it to your Android application so that you can manage and reply to reviews from within CX.
Prerequisites
-
Ensure you have successfully completed Helm-Based EFCX Deployment (add link of deployment guide)
-
After your system administrator completed Google Play Store onboarding, and set up your service account and linked it to Google Play Console you should have the following details:
-
Google Service Account access to Google Play Store Application and JSON file containing all authentication credentials
-
Google Play Package Name (e.g., com.yourcompany.yourapp)
-
Google Play App Name (your application's display name)
-
Confirmation that the Service Account has "Manage reviews and reply to reviews" permission in Google Play Console
-
Service Account JSON File Contents containing:
-
type(usually "service_account") -
project_id -
private_key_id -
private_key -
client_email -
client_id -
auth_uri -
token_uri -
auth_provider_x509_cert_url -
client_x509_cert_url -
universe_domain
-
-
Unified Admin Configuration
This section outlines the procedure for setting up the Google Play Store Channel.
-
Open Unified Admin
-
Click on Channel Manager dropdown to setup the further configurations:
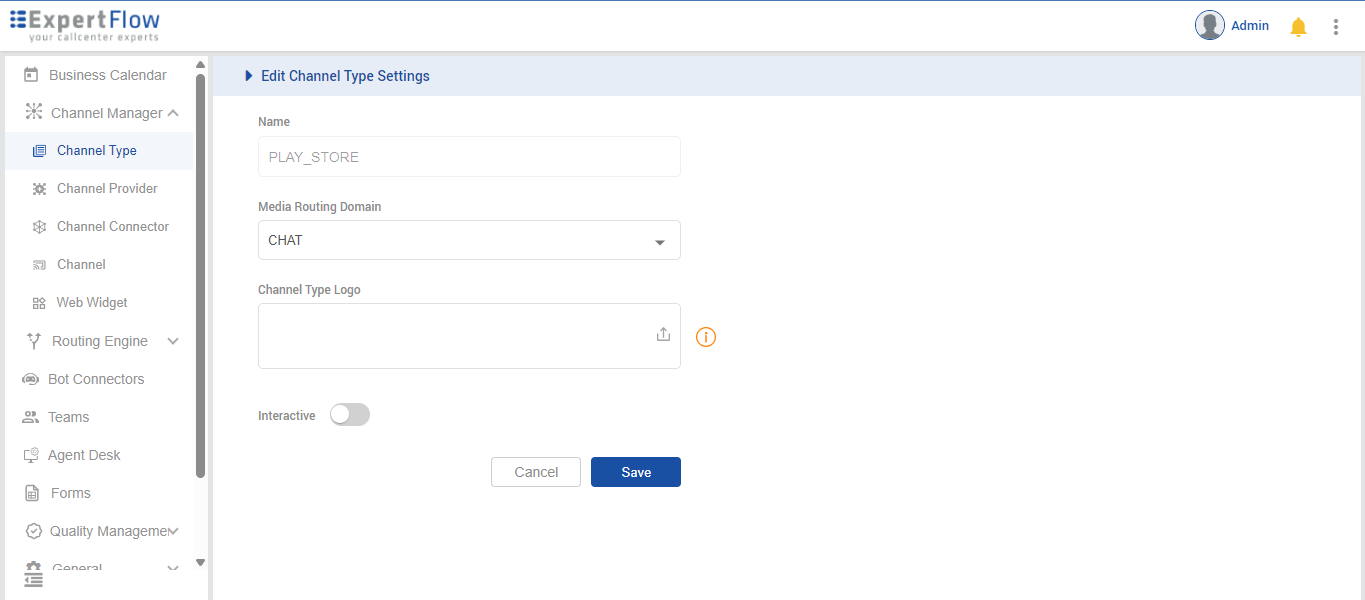
Setup Channel Type
-
Google Play Store channel type should already be shown in the list here as out-of-the-box Channels as "PLAY_STORE". If not please add one.
-
Select the MRD as CHAT.
-
Upload the icon (if not already uploaded).
-
Save.
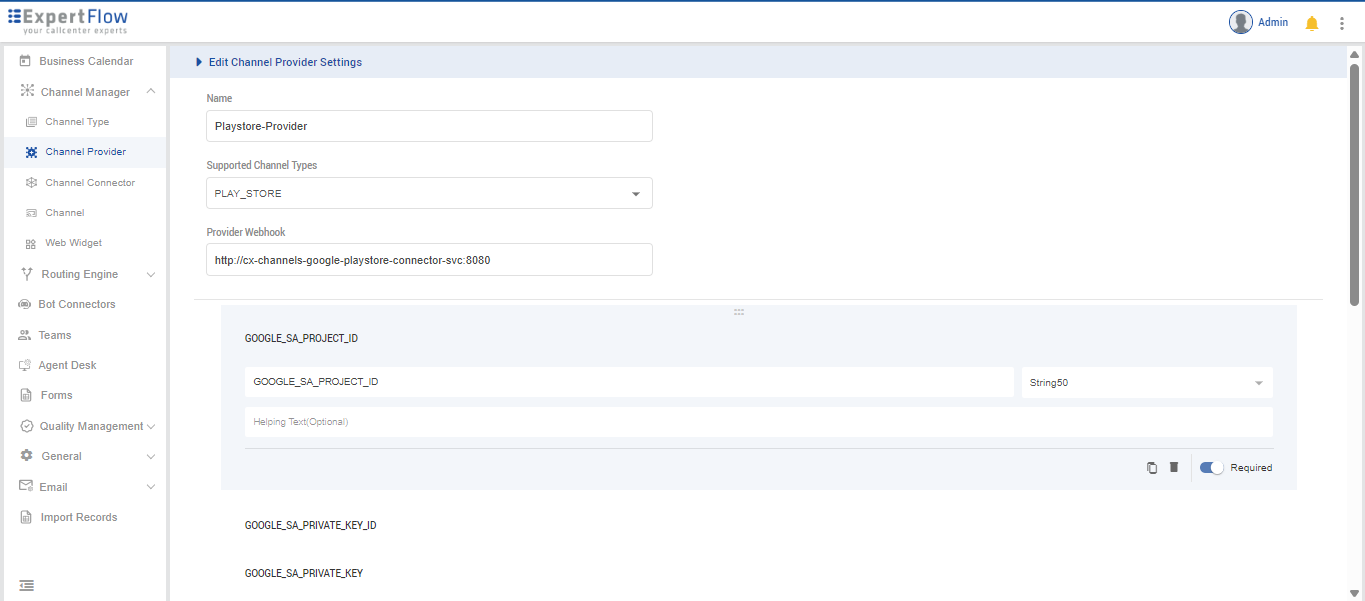
Setup Channel Provider
It's recommended to use the service name of the component in the "Channel Provider -> Provider's Webhook" field. However, FQDN can also be used with some additional custom configurations.
-
Set a name i.e. Google Play Store Provider.
-
Select Channel Type as
PLAY_STORE. -
In Provider Webhook, enter the service name of the Google Play Store Connector as:
http://{SERVICE-NAME}:{SERVICE-PORT}. Replace the{SERVICE-NAME}and {SERVICE-PORT} in the URL with the component's k3s-based service name and port (It can be fetched usingkubectl get svc -n expertflow)Example: Set the "Provider Webhook" field as
http://cx-channels-google-playstore-connector-svc:8080 -
Add the following 13 attributes as Custom Attributes, by cl Add Custom Attribute button, and replace the dummy value "New attribute1.." in the attribute field with
-
GOOGLE_SA_TYPE and select data-type as String(50)
-
GOOGLE_SA_PROJECT_ID and select data-type as “String 50”
-
GOOGLE_SA_PRIVATE_KEY_ID and select data-type as “String 100”
-
GOOGLE_SA_PRIVATE_KEY and select data-type as “String 2000”
-
GOOGLE_SA_CLIENT_EMAIL and select data-type as “String 100”
-
GOOGLE_SA_CLIENT_ID and select data-type as “String 50”
-
GOOGLE_SA_AUTH_URI and select data-type as “String 100”
-
GOOGLE_SA_TOKEN_URI and select data-type as “String 100”
-
GOOGLE_SA_AUTH_PROVIDER_CERT_URL and select data-type as “String 100”
-
GOOGLE_SA_CLIENT_CERT_URL and select data-type as “String 100”
-
GOOGLE_SA_UNIVERSE_DOMAIN and select data-type as “String 50”
-
GOOGLE_PLAY_PACKAGE_NAME and select data-type as “String 50”
-
GOOGLE_PLAY_APP_NAME and select data-type as “String 50”
-
-
Add the following permissions related attributes as Custom Attributes
-
LIKE_SUPPORT_SM and select data-type as “Boolean”
-
HIDE_SUPPORT_SM and select data-type as “Boolean”
-
DELETE_SUPPORT_SM and select data-type as “Boolean”
-
ALLOW_VIEW_FULL_POST_SM and select data-type as “Boolean”
-
PRIVATE_REPLY_SUPPORT_SM and select data-type as “Boolean”
-
COMMENT_REPLY_SUPPORT_SM and select data-type as “Boolean”
-
EDIT_MESSAGE_SUPPORT_SM and select data-type as “Boolean”
-
-
Save.
Setup Channel Connector
-
Set any name i.e. My App Play Store Connector.
-
Select Channel Provider as "Google Play Store Provider".
-
In GOOGLE_SA_TYPE field, insert
service_account -
In GOOGLE_SA_PROJECT_ID field, insert the
project_idfrom your Service Account JSON file -
In GOOGLE_SA_PRIVATE_KEY_ID field, insert the
private_key_idfrom your Service Account JSON file -
In GOOGLE_SA_PRIVATE_KEY field, insert the complete
private_keyfrom your Service Account JSON file (including-----BEGIN PRIVATE KEY-----and-----END PRIVATE KEY-----) -
In GOOGLE_SA_CLIENT_EMAIL field, insert the
client_emailfrom your Service Account JSON file -
In GOOGLE_SA_CLIENT_ID field, insert the
client_idfrom your Service Account JSON file -
In GOOGLE_SA_AUTH_URI field, insert the
auth_urifrom your Service Account JSON file (usuallyhttps://accounts.google.com/o/oauth2/auth) -
In GOOGLE_SA_TOKEN_URI field, insert the
token_urifrom your Service Account JSON file (usuallyhttps://oauth2.googleapis.com/token) -
In GOOGLE_SA_AUTH_PROVIDER_CERT_URL field, insert the
auth_provider_x509_cert_urlfrom your Service Account JSON file -
In GOOGLE_SA_CLIENT_CERT_URL field, insert the
client_x509_cert_urlfrom your Service Account JSON file -
In GOOGLE_SA_UNIVERSE_DOMAIN field, insert the
universe_domainfrom your Service Account JSON file (usually googleapis.com) -
In GOOGLE_PLAY_PACKAGE_NAME field, insert your Google Play app's package name (e.g., com.yourcompany.yourapp, and make sure it is exactly same as on google play store)
-
In GOOGLE_PLAY_APP_NAME field, insert your Google Play app's display name
Set the values of Permissions related custom attributes to
-
LIKE_SUPPORT_SM :
false -
HIDE_SUPPORT_SM :
false -
DELETE_SUPPORT_SM:
false -
ALLOW_VIEW_FULL_POST_SM
true -
PRIVATE_REPLY_SUPPORT_SM :
false -
COMMENT_REPLY_SUPPORT_SM:
true -
EDIT_MESSAGE_SUPPORT_SM:
false
Save
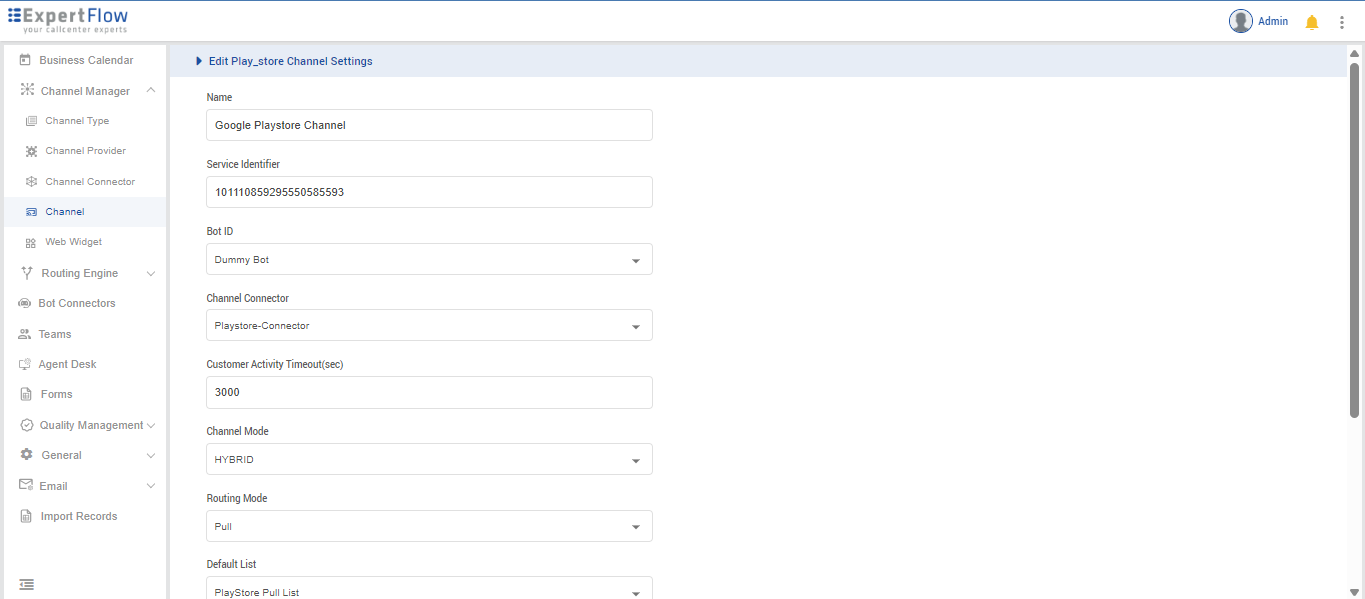
Setup Channel
-
Click on Google Play Store to expand the panel and click on "Add new Channel".
-
Set a name i.e. My App Reviews Channel.
-
Set Service Identifier as your app's package name that you have used in GOOGLE_SA_CLIENT_ID while setting up Channel Connector.
-
Select the Bot from the drop down list.
-
Select the connector name you have created i.e. "My App Play Store Connector" from Channel Connector drop down list.
-
Set any value in seconds as Customer Activity Timeout(sec). (You can change it as per your need. Normally it would be 0sec (1 hour) for reviews)
-
Set Channel Mode as HYBRID.
-
Set Routing Mode as PULL. (As it works best in PULL mode)
-
Set Queue or List (As required based on PUSH or PULL mode).
-
Set Agent Selection Policy as LONGEST AVAILABLE.
-
Set any value as Agent Request TTL (sec). (You can change it as per your need. Normally it would be 300sec (5mins))
-
Save.
The connector uses an automatic discovery mechanism. Once the channel is configured in Unified Admin, the connector will automatically detect it during the next polling cycle by querying CCM for channels with channel type "PLAY_STORE". No additional webhook setup is required as the connector proactively fetches its configuration from CCM.