Once the Customer Widget is successfully deployed and embedded on your website (either via Google Tag Manager or direct script embedding), you can perform various post-deployment customizations — such as updating pre-chat forms, translations, modifying appearance, and controlling behavior via environment variables.
This guide explains how to manage these customizations and apply configuration updates smoothly.
Tip: If you have not added web channel yet, you can start by referring to this guide.
Once deployed and provisioned, the Customer Widget can be directly accessed via the following URLs:
https://{FQDN}/customer-widget/#/widget?widgetIdentifier=<widget-identifier>&serviceIdentifier=<service-identifier>
Replace {FQDN}, widgetIdentifier, and serviceIdentifier with your instance-specific values.
For the chat history, use the following URL
https://{FQDN}/customer-widget/widget-assets/chat-transcript/
Dynamic Custom Fields in Web Widget configuration
Admins can now add and manage dynamic custom fields in each web widget, using an “add” button to define multiple field types that are stored in the widget’s object model and remain editable whenever that specific widget is updated.
Updating the Translation File in Customer Widget
Steps to Update the Translation File
1. Navigate to the Kubernetes Directory
cd {your-cx-solution}/kubernetes
2. Modify the Translation File
Make the necessary changes in the desired file located at:
pre-deployment/app-translations/customer-widget/i18n/
3. Delete the Existing ConfigMap
kubectl delete cm ef-widget-translations-cm -n expertflow
4. Apply the Updated ConfigMap
Ensure you are in the {your-cx-solution}/kubernetes directory before running the command:
kubectl -n expertflow create configmap ef-widget-translations-cm --from-file=pre-deployment/app-translations/customer-widget/i18n
5. Restart the Customer Widget Component
Run the following command to apply changes:
helm upgrade --install --namespace expertflow --create-namespace ef-cx --debug --values helm-values/ef-cx-custom-values.yaml expertflow/cx
This process ensures the updated translations are applied successfully to the customer widget.
Environment Variables Manipulation
The Customer Widget offers various environment variables to control its appearance, behavior, and interaction options.
These can be configured in your values.yaml file or within the environment section of your Kubernetes deployment.
Widget Custom Logo Configuration
You can display either:
-
The default chat icon, or
-
A custom company logo in the widget interface.
To change the web widget from Chat Icon to Custom logo, just change the boolean check from false to true.
For example, if we enable custom logo. Custom Logo will be visible instead of Chat Icon.
Similarly, one can change Custom logo to Chat Icon by changing the boolean check to false.
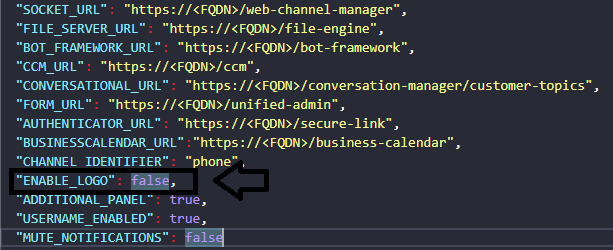
Additional Panel on the Web Widget
The Additional Panel on the web widget can be enabled/disabled from the configs of the Customer widget's custom values file.
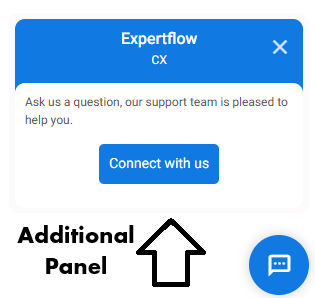
one can use the Additional Panel by uncommenting the HTML code from the index.html file.
If an Additional Panel is not required, then change the check to false.
Additional Environment Variables
The following environment variables control the appearance, behavior, and features of the web widget when embedded on a website.
These can be configured in the deployment file (e.g., values.yaml) or environment section of your widget’s deployment.
|
Variable Name |
Description |
Example / Default Value |
|---|---|---|
|
CHANNEL_IDENTIFIER |
Specifies the field through which the customer will be identified, such as phone, email, or any other field. |
|
|
ENABLE_LOGO |
Enables or disables the display of the company or product logo inside the widget interface. |
|
|
ADDITIONAL_PANEL |
Toggles the visibility of welcome form |
|
|
USERNAME_ENABLED |
Allows customers to see the usernames of the agents in the notifications area |
|
|
MUTE_NOTIFICATIONS |
Controls whether sound notifications (like incoming messages or alerts) are muted. |
|
|
VIDEO |
Enables or disables video call functionality in the widget. When |
|
|
IS_DIRECT_WEBRTC_CALL_ENABLED |
Determines whether direct peer-to-peer (WebRTC) voice calls are allowed through freeswitch to the agent desk. |
|
|
ENABLE_TRANSCRIPT_NOTIFICATIONS |
If enabled, customers will see the notifications in the transcripts. |
|
|
AUTO_RESUME |
Automatically resumes the last conversation session when the customer reopens the widget (value defined based on feature availability). |
|
|
WIDGET_END_VIEW_TIMEOUT_SECONDS |
When the chat ends at the customer widget and the thank you screen appears, a configurable timer starts. Once the timer expires, the widget closes automatically. The value is in seconds. |
|
Example YAML Configuration
env:
  - name: CHANNEL_IDENTIFIER
    value: "phone"
  - name: ENABLE_LOGO
    value: "false"
  - name: ADDITIONAL_PANEL
    value: "true"
  - name: USERNAME_ENABLED
    value: "true"
  - name: MUTE_NOTIFICATIONS
    value: "false"
  - name: VIDEO
    value: "false"
  - name: IS_DIRECT_WEBRTC_CALL_ENABLED
    value: "true"
  - name: ENABLE_TRANSCRIPT_NOTIFICATIONS
    value: "true"
  - name: AUTO_RESUME
    value: "true"
  - name: WIDGET_END_VIEW_TIMEOUT_SECONDS
    value: "60"
The below feature with configuration will be available in the release 4.10.x.
Disable composer once the bot sends the custom surveys link
The bot automatically disables the message composer upon sending a custom survey link to the customer. This prevents further input and ensures a focused transition to the survey experience. A 30-second timer is applied, after which the conversation ends and transitions to the End Screen. The survey link is configurable in the Customer Widget Configuration, allowing easy updates without code changes.
-
name: SURVEY_FORM_LINK
        value: "https://solution.domain.com/Base_URL/"